Luce Plan titania D17 User manual

Luceplan Spa
Via E.T. Moneta 40
20161 Milano
Italia
T +39 02662421
F +39 0266203400
info@luceplan.com
www.luceplan.com
D17NI0001
D17 D17t.
( titania )
design
alberto meda - paolo rizzatto

INDICE
INDEX
INHALT
INDEX
02
03
04
05
06
07
Descrizione / Description / Description / Beschreibung
Dimensioni / Dimensions / Abmessungen / Dimensions
D17
sospensione / suspension / zugleuchte / va-et-vient
D17t.
terra / floor / boden / lampadaire
Accessori / Accessories / Accessoires / Accesorios
Cablaggio per sospensione
Wiring for suspension
Hängeverkabelung
Câblage de suspension
Rosone supplementare di decentramento
Optional ceiling rose for special uses
Zusätzlicher Baldachin zur Versetzung
Rosace en option pour des applications spéciales
Applicazioni standard / Standard applications
Standard Anwendungen / Applications standard
Applicazioni speciali / Special applications
Sonder-Anwendungen / Applications speciales
D17
Fissaggio nylon / Fixing nylon cable
Befestigung des nylon / Fixation du nylon
08
10
11
12
14
15
16
17
Montaggio con rosone centrato
Mounting with centered ceiling rose
Montage mit zentralem baldachin
Montage de la rosace centréè
Montaggio con rosone decentrato
Mounting with off-center ceiling rose
Montage mit versetztem baldachin
Montage avec rosace decentree
Montaggio rosone / Mounting ceiling rose
Montage des baldachins / Montage de la rosace
D17t.
Montaggio stelo / Mounting the stem
Montage der stützstruktur / Montage du corps
Montaggio lampadina / Mounting the bulb
Montage des Leuchtmittels / Montage de l’ampoule
Montaggio filtri / Mounting the filters
Montage der Filter / Montage des filters
Aggancio corpo / Hooking the body
Anhaken des Körpes / Accrochage du corps
ATTENZIONE / WARNING
ACHTUNG / ATTENTION

m
c
0
5
3
/
0
01
Descrizione
Description
Beschreibung
Description
Serie di lampade per illuminazione diretta e riflessa,
da installare con lampadine alogene HSGST/F E27
massimo 250W; disponibile in versione a sospensione
o da terra.
Regolatorediintensitàincluso nella versioneda terra.
Filtri colorati intercambiabili in policarbonato
serigrafato.
Series of lamps for direct and reflected lighting
to be equipped with max 250W HSGST/F E27
halogen bulb; available in the suspension
or floor versions.
Dimmer included in the version for floor.
Interchangeable coloured filters of silk-screened
polycarbonate.
Serie von Lampen mit direkter und reflektierter
Beleuchtung, geeignet für max. 250W HSGST/F E27
Halogenbirnen; in zwei Versionen verfügbar:
Hänge- oder Stehleuchte.
Dimmer wird bei Stehversion mitgeliefert.
Auswechselbare farbige Filter aus siebgedruktem
Polykarbonat.
Série de lampes pour éclairage direct et réfléchi,
à utiliser avec des ampoules halogènes max. 250 W
HSGST/F E27; disponibles dans les versions
suspendues et lampadaire.
Intégrant un gradateur de lumière dans la version
lampadaire.
Filtres colorés interchangeables en polycarbonate
sérigraphié.
Dimensioni
Dimensions
Abmessungen
Dimensions
m
c
72
70 cm
mc8
m
c
8
27 cm
D17
sospensione / suspension
zugleuchte / va-et-vient

mc
7
51
90 cm
D17t.
terra / floor
boden / lampadaire
Accessori
Accessories
Zubehör
Accessoires
Cablaggio per sospensione
Wiring for suspension
Hängeverkabelung
Câblage de suspension
D17/4 15m D17/9 6m
Cablaggio completo di portalampadina e cavo di
mt. 15, oppure di mt. 6 con spina bipolare EU.
Wiring with bulb-holder and 15 m cable or 6 m cable
with EU bipolar plug.
Verkabelung mit Birnenträger und 15 Mt. langes
Kabel, oder 6 Mt. langes Kabel mit zweipoliger
EU-Stecker ausgestattet.
Câblage avec douille et cordon de 15 m ou de 6 m
avec fiche bipolaire EU.

D17
Rosone supplementare di decentramento
Optional ceiling rose for special uses
ZusätzlicherBaldachinzurVersetzung
Rosaceenoptionpourdes applicationsspéciales
Rosone supplementare di decentramento con cavo
di mt. 3.
Additional ceiling rose with 3 mt cable for
off-center ceiling mounting.
Zusätzlicher Baldachin zur Versetzung, mit 3 mt.
langem Stromkabel.
Rosace supplementaire pour le deplacement de la
lampe par un câble de 3 mt.
Applicazioni standard
Standard applications
Standard Anwendungen
Applications standard
Applicazioni speciali
Special applications
Sonder-Anwendungen
Applications speciales
Fissaggio nylon
Fixing nylon cable
Befestigung des nylon
Fixation du nylon
1
2
3
Regolare la lunghezza del cavo di sospensione in nylon
(1), annodarlo (2) e avvitare i nottolini agli snodi (3).
Adjust the nylon cable length (1), knot the end (2)
and screw the bushes to the joints (3).
Die Länge des Hängekabels aus Nylon verstellen (1),
verknoten (2) und die Klinken and en Gelenken
festschrauben (3).
Régler la longeur du câble de suspension en nylon (1),
le nouer (2) et visser les loqueteaux aux rotules (3).
D13/25
D13/25 D17/4 D17/9

Montaggio con rosone centrato
Mounting with centered ceiling rose
Montage mit zentralem baldachin
Montage de la rosace centréè
Fissare la piastra (a) a soffitto mediante i due
tasselli in dotazione attraverso i fori (b).
Dopo aver stabilito la lunghezza del cavo elettrico
farlo passare nel foro del rosone (c) e nel
bloccacavo (d); collegarlo al morsetto (e) e serrare
il bloccacavo.
Eseguire i collegamenti elettrici della rete al
morsetto di alimentazione (e) rispettando le
polarità indicate.
Dopo aver creato con la mano due asole far passare
il filo di nylon nelle fessure del rosone (c) ed
agganciarle ai ganci (f) della piastra (a).
Appendere il contappeso (g).
Fix the plate (a) to the ceiling by inserting the
supplied expansion plugs through the holes (b).
Set the exact cord length and let it go through the
ceiling rose hole (c) and through the cable fastener (d);
connect the cable fastener to clamp (e) and tighten it.
Perform electric network wiring to the power supply
terminal (e), respecting the polarities shown.
After creating two slots with the hands, insert the
nylon cable into the slots of the ceiling rose (c),then
fix them to the hooks (f) of the plate (a).
Hang the counterweight (g).
a
b
f
g
c
d
e
Die Grundplatte (a) mittels der beiden in der
Verpackung enthaltenen Dübel durch die Öffnungen (b)
an der Decke befestigen.
Das elektrische Kabel auf die gewünschte Länge
zuschneiden und es dann erst durch das dafür
vorgesehene Loch des Baldachins (c) und dann
durch die Kabelschelle (d) ziehen; das Kabel an die
Klemme (e) schließen und die Schrauben der
Kabelschelle festziehen.
Stromnetzanschluss an der Speiseklemme (e)
durchführen, dabei angegebene Polarität
berücksichtigen.
Mit der Hand zwei Ösen bilden, die Nylonschnur
durch die Löcher in des Baldachins (c) und an die
Haken (f) der Platte (a) befestigen.
Das Gegengewicht (g) aufhängen.
Fixer la base (a) au plafond en faisant passer les 2
chevilles fournies dans les trous (b).
Après avoir déterminé la longueur du câble électrique,
faites le passer dans le trou de la rosace (c) et du
serre-câble(d); puis le connecter à la borne (e) et
bloquer le serre-câble.
Effectuer les connexions électriques du réseau
à la borne d’alimentation (e) en respectant les
polarités indiquées.
Après avoir fait manuellement deux fentes, faire
passer le fil de nylon par les fentes de la rosace (c)
et y accrocher les crochets (f) de la plaque (a).
Suspendre le contre-poids (g).

Montaggio con rosone decentrato
Mounting with off-center ceiling rose
Montage mit versetztem baldachin
Montage avec rosace decentree
a
b
c
d
e
h
i
g
Fissare il gancio (h) nella posizione desiderata
mediante il tassello e la rondella in plastica (i).
Fissare la base (a) a soffitto mediante i 2 tasselli in
dotazione attraverso i fori (b).
Dopo aver stabilito la lunghezza del cavo elettrico
farlo passare nel foro del rosone (c)
e nel bloccacavo (d); collegarlo al morsetto (e) e
serrare il bloccacavo.
Eseguire i collegamenti elettrici della rete al
morsetto di alimentazione (e) rispettando le
polarità indicate.
Far passare il nylon nel gancio (h).
Appendere il contappeso (g).
Mount the hook (h) in desired position by means of
the block and the plastic washer (i).
Fix the plate (a) to the ceiling by inserting the
supplied expansion plugs through the holes (b).
Set the exact cord length and let it go through the
ceiling rose hole (c) and through the cable fastener (d);
connect the cable fastener to clamp (e) and tighten it.
Perform electric network wiring to the power
supply terminal (e), respecting the polarities
shown.
Insert the nylon cable into the hook (h).
Hang the counterweight (g).
Den Haken (h) in gewünschter Stellung mittels
Dübel und Plastikscheibe (i) festmachen.
Die Grundplatte (a) mittels der beiden in der
Verpackung enthaltenen Dübel durch die Öffnungen (b)
an der Decke befestigen.
Das elektrische Kabel auf die gewünschte Länge
zuschneiden und es dann erst durch das dafür
vorgesehene Loch des Baldachins (c) und dann
durch die Kabelschelle (d) ziehen; das Kabel an die
Klemme (e) schließen und die Schrauben der
Kabelschelle festziehen.
Stromnetzanschluss an der Speiseklemme (e)
durchführen, dabei angegebene Polarität
berücksichtigen.
Nylonfaden durch den Haken ziehen (h).
Das Gegengewicht (g) aufhängen.
Fixer le crochet (h) dans la position souhaitée avec
la cheville et la rondelle en plastique (i).
Fixer la base (a) au plafond en faisant passer les 2
chevilles fournies dans les trous (b).
Après avoir déterminé la longueur du câble électrique,
faites le passer dans le trou de la rosace (c) et du
serre-câble(d); puis le connecter à la borne (e) et
bloquer le serre-câble.
Effectuer les connexions électriques du réseau
à la borne d’alimentation (e) en respectant
les polarités indiquées.
Faire passer le nylon par le crochet (h).
Suspendre le contre-poids (g).
Montaggio rosone
Mounting ceiling rose
Montage des baldachins
Montage de la rosace
c
c
a
a
Dopo aver collegato la linea di alimentazione al
morsetto, fissare il rosone (c) alla piastra (a) con la
relativa chiusura a scatto.
Connect the cord to the terminal, fix the click-on
ceiling rose (c) to the plate (a).
Die Speiseleitung an die Klemme schließen und
dann den Baldachin (c) auf die Grundplatte (a)
drücken und mittels dem Schnappverschluß
schließen.
Après avoir connecté l'alimentation au domino,
fixer le cache (c) à la patère (a) par légère pression
avec déclic.

D17t.
D17 t.
s
t
uw
x
Montaggio stelo
Mounting the stem
Montage der stützstruktur
Montage du corps
Separare il fermo (s) dal supporto stelo (u) svitando
la vite mediante la chiave a brugola in dotazione.
Infilare lo stelo (t) nel supporto (u) riposizionando il
fermo (s) in corrispondenza della fresatura ricavata
nello stelo (t).
Serrare la vite con la chiave a brugola.
Introdurre il contrappeso (w) nell'estremità dello
stelo avvitando il grano (x) con la chiave a brugola
piu' piccola.
Unscrew the screw by means of the enclosed Allen
wrench and separate the stop (s) from the stem
support (u).
Insert the stem (t) into its support (u) and position
again the stop (s) matching it with the milling in the
stem (t).
Tighten the screw by wrench.
Insert the counterweight (w) into the stem end and
screw the dowel (x) by means of the smaller
wrench.
Die Schraube des Blöckchens (s) mittels dem
Imbusschlüssel, der im Montageset enthalten ist,
lockern und das Blöckchen aus der Öse der Stütze (u)
herausnehmen.
Den Stab (t) in die Öse der Stütze (u) einführen und
das Blöckchen (s) wieder so einsetzen, daß es in
der kleinen Ausbuchtung des Stabes (t) liegt.
Die Schraube mit dem Imbusschlüssel zuziehen.
Das Gegengewicht (w) an das Ende des Stabes
anbringen, indem der kleine Gewindestift (x) mit
Hilfe des kleineren Imbusschlüssels eingeschraubt
wird.
Separer la fermeture (s) de la structure (u) en
dévissant la visse par les clefs dont la lampe est
equipée.
Enfiler la tige (t) dans le support (u) et mettre la
fermeture (s) en correspondence du fraisage de la
tige (t).
Serrer la vis. Placer le contrepoids (w) dans le bout
de la tige en vissant la vis (x) avec la petite clé pour
vis à six pans creux.

m
p
q
o
n
Montaggio lampadina
Mounting the bulb
Montage des Leuchtmittels
Montage de l’ampoule
Dopo aver avvitato la lampadina inserire in
sequenza il portalampada (m), i traversini (n-o-p)
ed infine la centina (q) facendo attenzione a non
danneggiare il cavo di alimentazione.
Agire all'inverso per la sostituzione della
lampadina.
Screw the halogen bulb and insert in sequence the
lampholder (m), the metal strips (n-o-p) and then
the rib (q) paying attention not to damage the
power supply cable.
Operate in opposite way to remove the bulb.
Das Leuchtmittel einschrauben und dann in der
angegebenen Reihenfolge die Lampenfassung (m),
die Querrippen (n-o-p) und schließlich die
Längsrippe (q) einsetzen , dabei darauf achten,
dass das Speisekabel nicht beschädigt wird.
Zum Austausch des Leuchtmittels die
angegebenen Teile in umgekehrter Reihenfolge
herausnehmen.
Après avoir vissé l'ampoule, installer la douille (m),
les traverses (n-o-p) et le cintre (q), dans cet ordre,
en faisant attention à ne pas endommager le
cordon d’alimentation.
Pour remplacer l'ampoule suivre les instructions
dans l'ordre contraire. r
Montaggio filtri
Mounting the filters
Montage der Filter
Montage des filters
Infilare i due filtri colorati prescelti nelle apposite sedi,
a fianco della zona portalampada.
Curare il corretto inserimento delle due tacche (r).
Insert bothcolouredfilters intotheir properseatscloseto
thelampholder. Position thenotches (r) in thecorrect way.
Zwei Farbfilter aussuchen und sie in ihren jeweiligen Sitz
rechts und links von den Querrippen einsetzen. Dabei
darauf achten, daß die Filter mit ihren Einkerbungen (r)
genau in die Schlitze des Metallgehäuses einrasten.
Enfiler les deux filtres dans les logements fait exprès,
à côté de la douille. Pour la correcte introduction
mettre les filtres dans les emboîtures (r).
Aggancio corpo
Hooking the body
Anhaken des Körpes
Accrochage du corps
Agganciare il corpo lampada alla struttura (in
corrispondenza
del traversino centrale).
Hook the body to the structure (in correspondence
of the central metal strip).
Den Leuchtenkörper an die Struktur haken
(in Übereinstimmung mit der mittleren Querrippe).
Accrocher le corps de la lampe à la structure
(en correspondence du traverse central).

!ATTENZIONE
WARNING
!ACHTUNG
ATTENTION
F
FF
F
LA SICUREZZA DELL'APPARECCHIO E' GARANTITA SOLO
RISPETTANDO QUESTE ISTRUZIONI, SIA IN FASE DI
INSTALLAZIONE CHE DI IMPIEGO; E' NECESSARIO
CONSERVARLE. IL PRODUTTORE NON RISPONDE DI DANNI
DERIVANTI DA UN USO SCORRETTO DELL'APPARECCHIO.
Dopo aver tolto l'imballaggio, assicurarsi dell'integrità
dell'apparecchio. Gli elementi dell'imballaggio (sacchetti in plastica,
polistirolo espanso, graffette) non devono essere lasciati
alla portata dei bambini, in quanto potenziali fonti di pericolo.
Non utilizzare l'apparecchio se danneggiato.
Questo apparecchio dovrà essere destinato solo all'uso
per il quale è stato espressamente concepito.
Il costruttore non può essere considerato responsabile di
eventuali danni derivati da usi impropri, erronei e irragionevoli.
Prima di collegare l'apparecchio accertarsi che i dati di targa
siano rispondenti a quelli della rete di distribuzione.
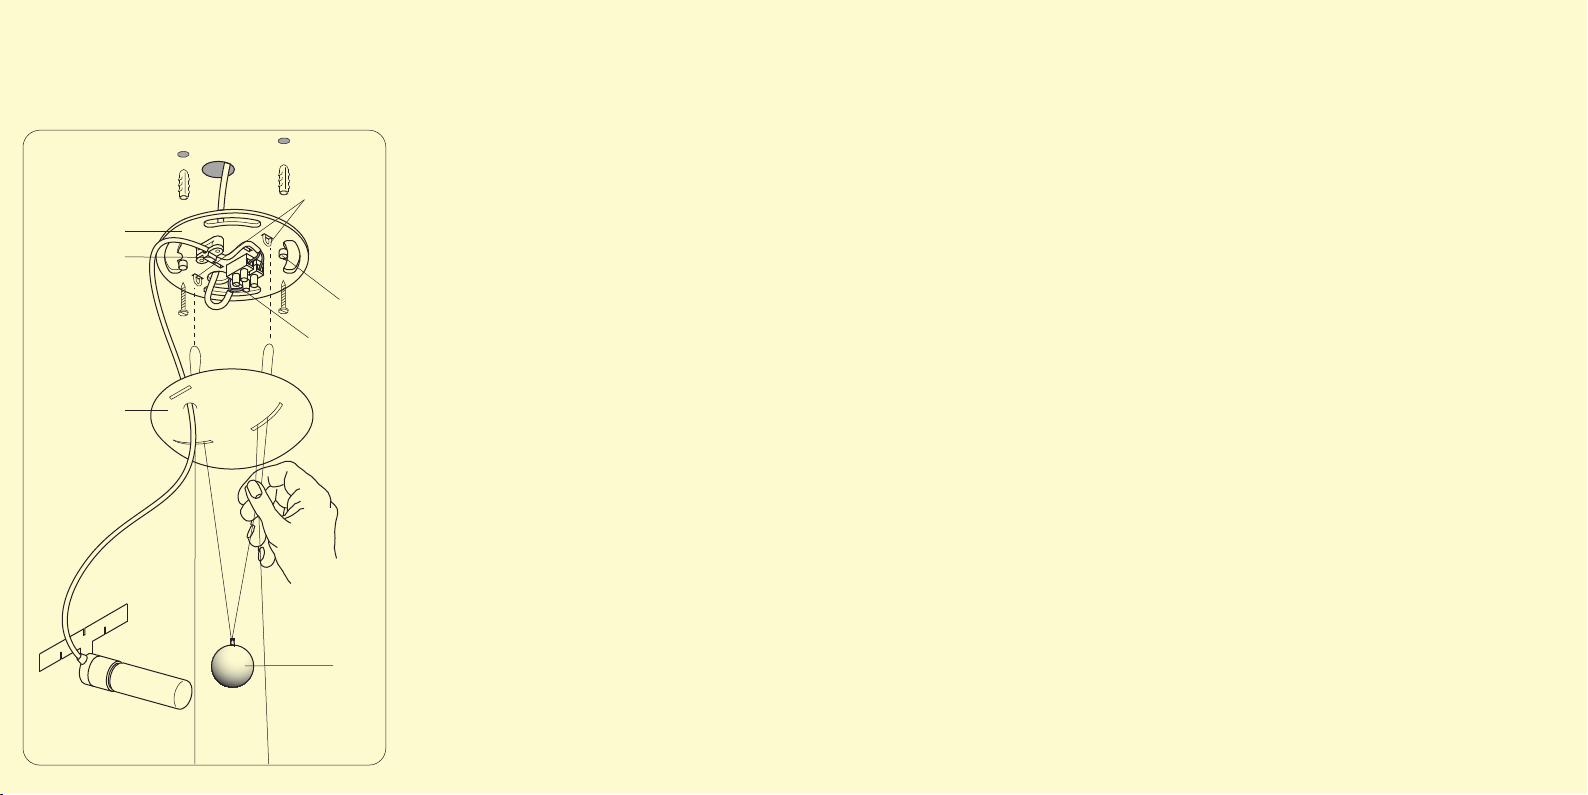
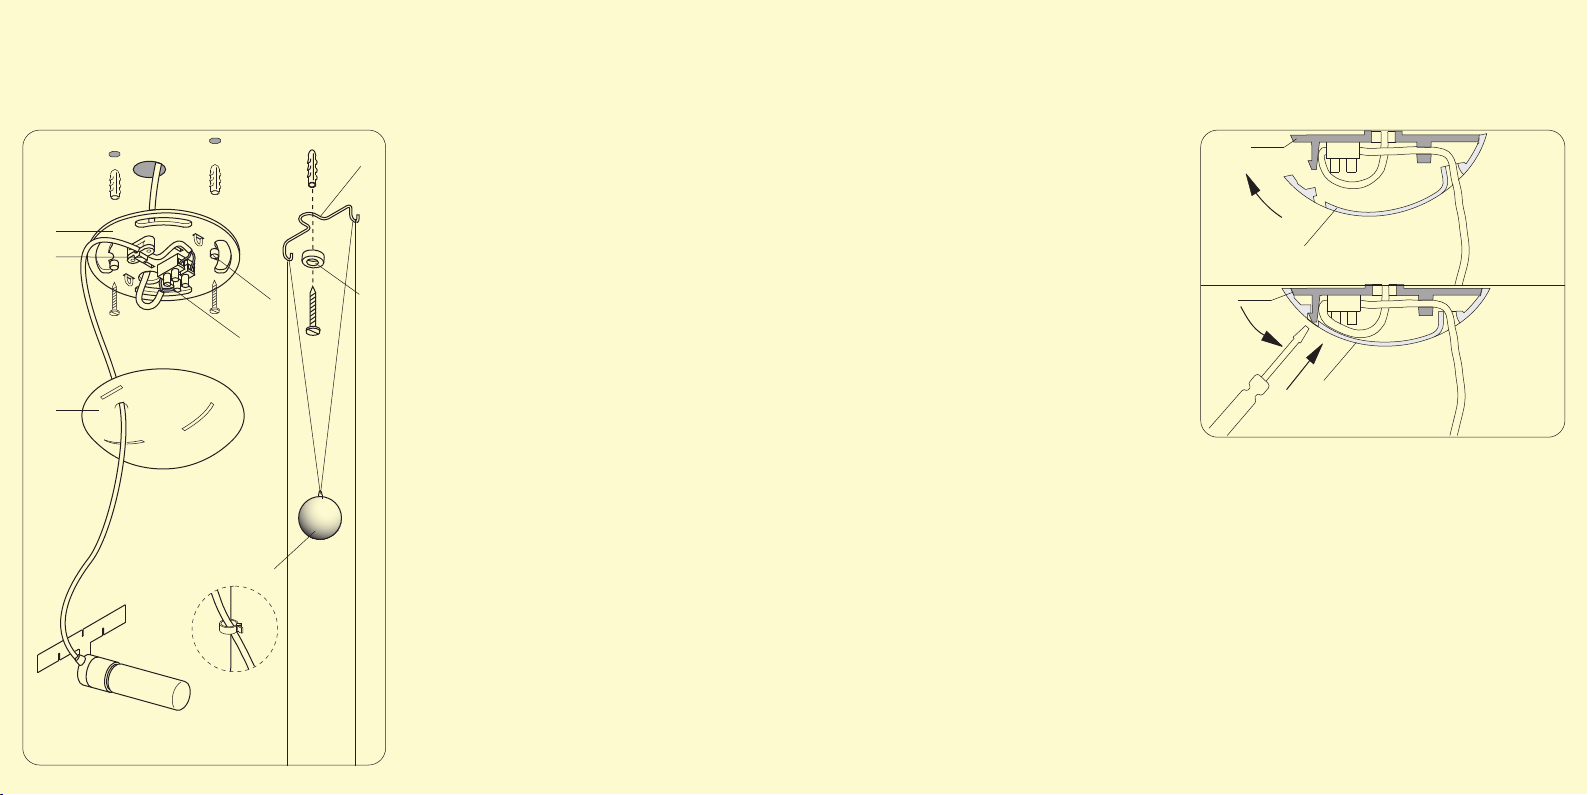
INSTALLAZIONEAll'atto dell'installazione e ogni qual volta si
intervenga sull'apparecchio, assicurarsi che sia stata tolta la
tensione di alimentazione!
Apparecchio adatto per montaggio su superfici
normalmente infiammabili.
MANUTENZIONE E SOSTITUZIONE LAMPADINEUtilizzare
esclusivamente il tipo di lampadina indicato, non superare mai
la potenza massima stabilita. Se il cavo di questo apparecchio
viene danneggiato deve essere sostituito esclusivamente
da personale qualificato e autorizzato dal costruttore
dell'apparecchio utilizzando il ricambio originale.
Utilizzare esclusivamente lampadine che non
necessitano di schermo di protezione.
PULIZIA APPARECCHIO/PARALUME
Per la pulizia del diffusore dalla polvere utilizzare un pennello
morbido e asciutto.
Se dopo aver letto queste istruzioni rimangono dei dubbi
contattare il rivenditore prima di montare l'apparecchio.
SAFETY OF THIS APPLIANCE IS GUARANTEED ONLY IF THESE
INSTRUCTIONS ARE ABIDED, IN THE PHASE OF
INSTALLATION OR USE; IT IS NECESSARY TO KEEP THEM.
THE MANUFACTURER IS NOT LIABLE FOR DAMAGES DERIVED
FROM AN INCORRECT USE OF THE APPLIANCE.
After unpacking the appliance, be sure it has not been damaged.
The packing components (plastic bags, expanded polystyrene,
paper clips) must be kept out of reach of children, as they are
potentially dangerous. Do not use the appliance if damaged.
This appliance must be intended to be used only for what
is has been designed. The manufacturer is not liable
for eventual damage due to misuse, incorrect or inadequate use.
Before connecting the appliance, be sure the voltage rate
correspond to those of the distribution network.
INSTALLATION
Upon installation and any intervention on the appliance, check
the power supply voltage is off!
This appliance is suitable for assembling on normally
flammable surfaces.
MAINTENANCE AND LIGHT BULB REPLACEMENT
Use only the indicated light bulb type, do not exceed the preset
maximum output. If the cable of the appliance is damaged it
must be replaced only by qualified personnel, authorized by the
appliance manufacturer, using the original spare parts.
Use only light bulbs that do not need a protectionscreen.
APPLIANCE/LAMPSHADE CLEANING
To clean the body use a dry soft brush.
If after reading these instructions there is any doubt, contact
the retailer before assembling the appliance.
DIE GERÄTESICHERHEIT IST NUR DANN GEWÄHRLEISTET, WENN
SIE DIESE INSTALLATIONS- UND BEDIENUNGSANLEITUNG
BERÜCKSICHTIGEN; BEWAHREN SIE DIE ANLEITUNG AUF. DER
HERSTELLER ÜBERNIMMT KEINE HAFTUNG BEI
UNSACHGEMÄSSER VERWENDUNG DES GERÄTS.
Überprüfen Sie nach dem Auspacken, ob das Gerät
unbeschädigt ist. Die Verpackung (Plastiktüten, Schaumstoff,
Klammern) dürfen nicht in Kinderhände geraten, da sie
mögliche Gefahrenquellen darstellen. Das Gerät nicht
verwenden, wenn es beschädigt ist. Dieses Gerät darf nur für
den vorgesehenen Einsatzzweck verwendet werden. Der
Hersteller haftet nicht bei Schäden, die auf unsachgemäßen,
falschen oder unvernünftigen Gebrauch zurückzuführen sind.
Vergleichen Sie die Daten auf dem Typenschild mit dem
vorhandenen Stromnetz, bevor Sie das Gerät anschließen.
INSTALLATION
Stellen Sie sicher, dass die Stromverbindung unterbrochen ist,
bevor das Gerät installiert oder gewartet wird!
Das Gerät ist zur Montage auf normal brennbaren
Flächen geeignet.
WARTUNG UND AUSTAUSCH DES LEUCHTMITTELS
Verwenden Sie ausschließlich den angegebenen Leuchtmitteltyp
und überschreiten Sie niemals die angegebene Maximalleistung.
Falls das Kabel des Geräts beschädigt ist, muss es durch einen
vom Hersteller autorisierten Fachmann mit Original-Ersatzteilen
ausgetauscht werden.
Verwenden Sie nur Leuchtmittel, die keine
Schutzscheibe benötigen.
REINIGUNG GERÄT/LAMPENSCHIRM
Für die Reiniging des Gehäuses einen weichen trockenen Pinsel
benutzen.
Falls Sie nach der Lektüre dieser Anleitung weitere Fragen
haben sollten, wenden Sie sich bitte an den Händler, bevor Sie
das Gerät montieren.
LA SÉCURITÉ DE L’APPAREIL N’EST GARANTIE QUE SI CES
INSTRUCTIONS SONT RESPECTÉES, AUSSI BIEN LORS DE
L’INSTALLATION QUE DE L’UTILISATION; IL FAUT DONC LES
CONSERVER. LE FABRICANT NE RÉPOND PAS DE DOMMAGES
DÉRIVÉS D’UNE UTILISATION INCORRECTE DE L'APPAREIL.
Après avoir déballé l’appareil, s’assurer de son intégrité. Les
éléments d'emballage (sacs en plastique, polystyrène expansé,
agrafes) ne doivent pas être laissés à la portée des enfants,
puisqu’ils constituent de sources potentielles de danger. Ne
pas utiliser l’appareil s’il est endommagé. Cet appareil ne devra
être destiné qu’à l’utilisation pour laquelle il a été
expressément conçu. Le fabricant ne peut pas être tenu
responsable de dommages éventuels dérivés d’utilisations
impropres, incorrectes ou insensées. Avant de brancher
l’appareil, s’assurer que les données de la plaque signalétique
correspondent à celles du secteur.
INSTALLATION
Lors de l’installation et à chaque intervention sur l’appareil, s’assurer
que la tension d’alimentation a été coupé!
Appareil apte au montage sur des surfaces
normalement inflammables.
ENTRETIEN ET REMPLACEMENT DES AMPOULES
Utiliser exclusivement le type d’ampoule indiqué, ne jamais
dépasser la puissance maximum établie. Si le câble de cet
appareil est endommagé, il doit être remplacé exclusivement
par du personnel qualifié et autorisé par le fabricant de
l'appareil, en utilisant une pièce de rechange d’origine.
Utiliser exclusivement des ampoules ne nécessitant pas
d’écran de protection.
NETTOYAGE DE L’APPAREIL/ABAT-JOUR
Pour le nettoyage du diffuseur utiliser un pinceau souple et sec.
Si après avoir lu ces instructions il en reste des doutes,
contacter le revendeur avant de monter l’appareil.
This manual suits for next models
1
Table of contents
Other Luce Plan Home Lighting manuals
Popular Home Lighting manuals by other brands

TaoTronics
TaoTronics Hello TT-DL26 user guide

FLOS
FLOS BRERA F1 Instruction for correct Installation and Use

Philips
Philips 55594-30-16 user manual

Dale Tiffany
Dale Tiffany TR10022 Assembly instructions

Triarch
Triarch Indoor Lighting 32343 Assembly instructions

Springdale Lighting
Springdale Lighting STT13018 Assembly instructions