Lumina LCD5E User manual

Specifications For Trouble Shooting Refer to Page 7
5.0kg
(Dry clothes)
595 530 840(mm)
1700W
240V 50Hz
31.5kg
Rated frequency
Thank you for selecting LUMINA dryer
Before operating this unit, please read this instruction manual thoroughly
Clothes Dryer
Instruction Book
Features
Part name
Installation: before use
Installation: placing your dryer
Operation Explaination
Pre-dry action
Put in clothes
Control panel
Operation of control panel
Other functions description
Cleaning the fi lter
Cleaning the cabinet / inner tub
Warning function
Troubleshooting
2
3
4
6
7
7
7
8
9
10
10
11
12
Catalogue Features
Front ex
haust ventilation
to
avoid additional ducting
on the wall.
Micro control: simple and convenient operation with
the help of micro control board
.
See through window
to monitor the cycle
.
Door open
s to 180 degrees.
Anti dust, anti humid, low noi
se design.
Max. rated volume dryer
: 5.0kg (dry clothes)
1.
2.
3.
4.
5.
6.
01
02
LCD5E Clothes dryer product features:
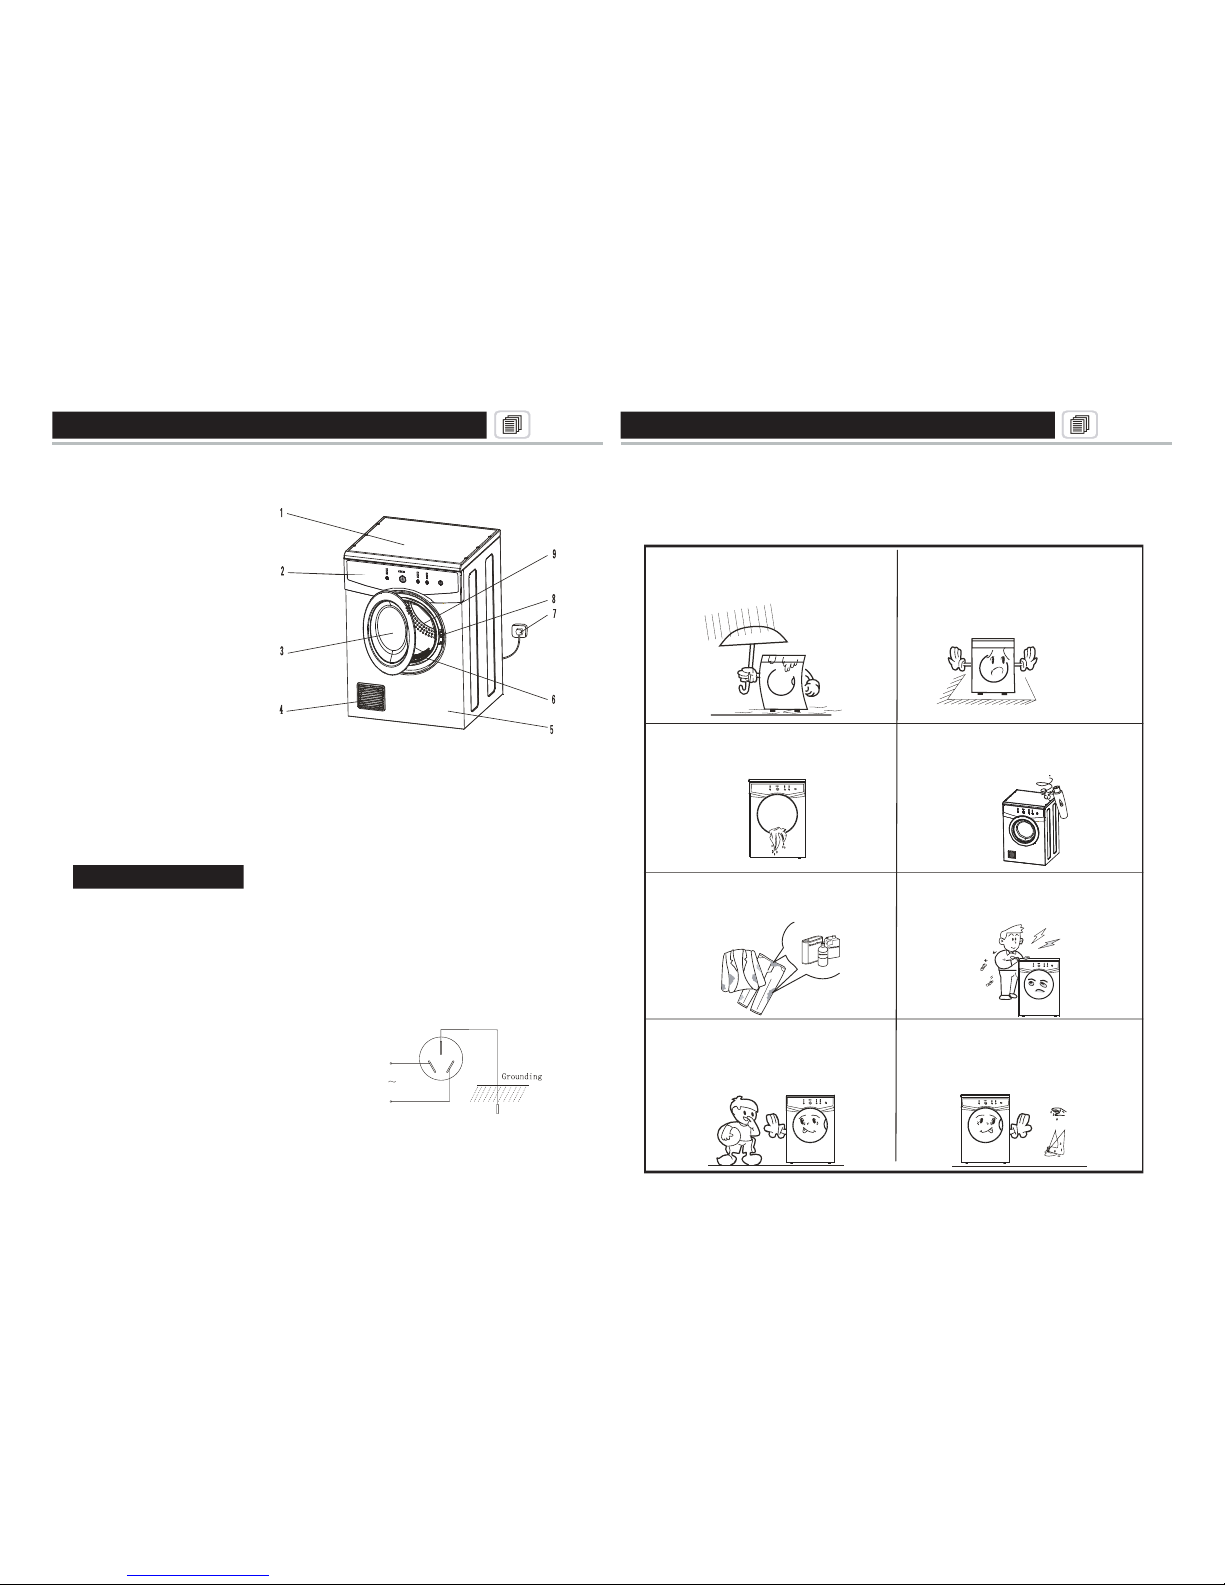
Part name - Installation before use
1. Top board
2. Control panel
3. Door
4. Front vent cover
5. Cabinet
6. Filter
7. Power lead
8. Door lock
9. Tumbling drum
NOTICE BEFORE USE
Power source and grounding
The dryer employs alternating current with the rated voltage and frequency.
When the voltage fl uctuates between 10% of rated voltage, the dryer can
work normally. A special seperate power socket next to the dryer is best for
convenience and safety. The method for connection of the socket is as the
fi gure below.
Installation before use
Precautions
Do not install or store the dryer where it will
be exposed to water or the weather.
Please install the dryer in a ventilated place
for better air circulation to avoid overheating.
A minimum of 10cm around the unit is
recomended.
Damp clothes have to be dehydrated well
before putting them into the dryer.
Ensure that there are no fl ammable liquids
near the dryer whilst in motion. Do not start
the dryer if there is any leakage / spillage
the dryer if there is any leakage / spillage
near the unit.
Do not use the unit to dry any clothes
containing any fl ammable liquids or
gasoline. Never insert any combustible
item inside the dryer.
Do not operate the unit when it is damaged,
malfunctioning, partially disassembled or has
missing or broken parts.
While the dryer is in motion the unit may
become hot. To avoid any injury, this
dryer is not intended to be use by infi rm
persons or children.
Please take care when using the unit. Do
not operate the unit when your hand/feet
is wet.
03
04
This appliance is not intended for use by young children or infi rm persons unless they have been
adequately supervised by a responsible person to ensure that they can use the appliance safely.
Young children should be supervised to ensure that they do not play with the appliance.

Installation before use Installation before use - placing your dryer
Do not put any heavy or hot articles on
top of your dryer to avoid damage to the
control panel.
Do not try to dry a raincoat, fl uffy clothes,
anything containing rubber or elasticity
materials inside the dryer.
To avoid any injury, only open the door of
the dryer when it has fi nish its cycle.
This section is left blank intentionally
This product belongs to type I electronic products. Please take note of safety issue as
described below:
1.Ensure that you use power which is buried in the earth and will not touch any social
equipment such as gas pipe or water pipe etc. Ensure that the lines are not connected.
2.Please use a power socket which meets the National Standard and will endure 10A current.
Not used for
dyer in the tub
Hang for dry
Drip dry
Flat dry
INSTALLATION:
Step 1.
Dryer should be placed in a ventilated area with no
less than 10
cm distance from the wall. If it is
placed
in a room such as bathroom, it is recommended
that
there are no obstacles 1.5m in front of the dryer.
Step 2. Horizontal adjustment (Levelling of the clothes dryer)
Hang heavy objects on string on the front and one
side of the dryer (refer to the figure on the right). If
A=A and B=B, then the dryer is properly level.
Alternatively, use a spirit level.
(refer to fi gure on the right.)
NOTE:
If the dryer is not installed horizontally, the dryer
will be unbalanced whilst in motion and may stop
working.
N
otice when installing the unit:
Do not install the unit in the open air or where it may
come into contact with water.
. Do not place the back of the dryer near a curtain.
Do not place the dryer near gas or fl ammable area.
Do not place the dryer near gas or fl ammable area.
05
06
Heavy object

A. PREPARATION BEFORE LOADING YOUR CLOTHES
Before
loading your clo
t
hes into the dryer please
take not
e of the following:
Installation before use - loading clothes
Clothes have to be washed and excess water removed before loading the
clothes into the dryer.
It is recommended to load the same type / colour when drying clothes.
Seperate lighter clothing from heavier clothing to ensure even circulation
inside the dryer. It is best to dry the clothes inside out.
Make sure any clothes with any decoration / buttons is safe for drying at
high temperature and will not damage the inner tub of the dryer.
It is better to turn pockets inside out for drying.
Before loading the dryer, check that the clothes are cleaned. Any residue
left on the clothing will not dissapear after drying and may damage the
inner tub of the dryer.
Never put any sharp or heavy objects inside the inner tub of the dryer.
Please make sure that the power socket is well connected and will not
touch any conduit of water supply or gas supply.
Make sure that the fi lter is clean and in the correct position.
For drying fi ll the inner
tub to 1/3 - 1/2 capacity as space is need to
For drying fi ll the inner tub to 1/3 - 1/2 capacity as space is need to For drying fi ll the inner
circulate the clothes and dry evenly.
When drying bigger items such as bedsheets, it is better to mix with small
pieces of clothing.
When drying out delicate clothing, it is best to mix with towels as not to
damage the material.
Do not over dry clothing as this may shrink some material.
1.
2.
3.
4.
5.
6.
7.
8.
9
.
Reference for drying clothing by weight
Installation before use - Control panel
Mixed-weave
clothes
about 800g
Single bed sheet
about
600g, cotton
Short sleeves shirt
Short sleeves shirt
about
180g, cotton
Jacket
about
800g, cotton
W
orking clothes
about
1120g
Underwear
about
70g, cotton
Jeans
about
800g
Sleepwear
about
200g
Socks
about 50g
mixed-weave
Towel quilt
about
900g, cotton
Long sleeves shirt
about
300g, cotton
B
.
LOADING CLOTHES
1.
2.
3.
4.
1. Power
2. Start / Pause
3. Program (extra dry / middle dry / light dry / 1 hour)
4. Heat ( full / half / airing )
5. Crease guard
Note: Push program and heat control on the same time to operate LOCK
function.
C
.
INSTRUC
TION ON CONTROL PANEL
07
08

Control panel operation
HOW TO OPERATE:
Push
POWER
button to turn on.
S
et the program sett
ing
by pressing SELECTION
;
the indicat
or light will lit
u
p
to indicate the current
selection
, continue
to press unti
l it
stops
on the
program which you
w
ant to select
.
HEAT
setting.
When you press HEAT setting, the indicator light will lit up to indicate the
current
heat setting continue to press until it stops on the program which
y
ou
want to select
.
CREASE
guard setting is best to be use on delicate fabric such as silk.
When you select CREASE guard, the indicator light will lit up to indicate
that CREASE guard is on.
Push
START / PAUSE
button to start the cycle. Push once to start.
To pause press START/PAUSE button again and wait for 3 seconds for
pause function to take effect.
LOCK/UNLOCK
Function
To Lock or unlock control panel of unit, press and hold PROGRAM and
HEAT button simultaneously.
Note: Pushing any button on LOCK mode will cause a short buzzer with
blinking light. To unlock press and hold PROGRAM and HEAT button
simultaneously.
1.
2.
3.
4.
5.
6.
Prog
ram function s
etting table
NOTE:
Cold wind function means there is only cold air for circulat
ion before fi
nishing the cycle in 10 mins.
Crease guard means after the program you
h
ave selected, there is an additional 30 secon
ds
for
the
cycle
. Inside te
mperature o
f the inner tube and humidity will not affe
ct the drying time.
Check the label attached to
the clothes
to defi ne and select the correct settings / heat for best resu
lt.
1.
2.
3.
End program
.
At the end of each cy
cle the buzzer will ring to indicate that the cy
cle is
completed and you can take out
the clothes from the dryer.
Clear the fi lter
, cabinet and inner tub after each cycle.
Accumulated
lint
inside the fi lter will affect the air circulation inside the inner
tub
inside the fi lter will affect the air circulation inside the inner tubinside the fi lter will affect the air circulation inside the inner
, it is best to
clean the fi lter after each use.
When cleaning the inner
tube or fi l
When cleaning the inner tube or fi l When cleaning the inner
ter
, mak
e
sure
you t
urn
off the unit.
7.
8.
CL
EANING FILTER
Turn off power.
Open the door
, take out fi lter.
The
lint fi lter is located
in the door ope
ning.
Remove the lint fi lter
.
Cleaning the fi lter.
Use damp cloth to clean the fi lter.
Installing the fi lter
.
Once the fi lter is cleaned and dry
, place
the fi lter back
inside the door o
pening.
1.
2.
3.
4
.
CLEANING THE CABINET AND INNER
TUB
Use damp cloth to
clean
the inner tub.
Never use water
directly to clean the inner tub
,
always use damp cloth
.
Do not use scour wipe to clean the inner tub to as this
may damage the surface.
Do not use g
asoline or alcohol to clean the inner tub.
Cleaning the fi lter
10
09
Other function - warning
WARNING FUNCTIONS
Step 1.
Warning Functions and solution.
Step 2.
A
uto
P
ower Off
function.
This machine will auto-power off after 10 minutes when you do not set any
program.
This
machine will auto-
power off after
the 6th buzz
power off after the 6th buzzpower off after
er signal on drying
cycle.
1.
2.
The sound of the dryer in motion can cause
:
Noise
or vibration; due to heavy w
et clothes turning and bumping
Air
bumping;
whilst drying
, the machine will generate steam w
hich will
come out
from pipe and this will cause bumping with the
base of t
he
inner tub
.
Timer noise when the u
nit fi nish operating.
Troubleshooting
12
11
Table of contents
Popular Dryer manuals by other brands


Bosch
Bosch WTH83008IT Installation and operating instructions

Asko
Asko T783CW operating instructions

GE
GE GTDL740EDWW installation instructions

Maytag
Maytag MGD6600TQ - R BravosR Steam Gas Dryer manual

Bosch
Bosch WTH830L5SN User manual and installation instructions

Tornado
Tornado Windshear Downdraft 98784 Operation & maintenance manual