manuals.online logo
Brands
  1. Home
  2. •
  3. Brands
  4. •
  5. luminii
  6. •
  7. Home Lighting
  8. •
  9. luminii Kurba Vertical KBL Series User manual

luminii Kurba Vertical KBL Series User manual

This manual suits for next models

1

Popular Home Lighting manuals by other brands

Philips LivingColors Iris user manual

Philips

Philips LivingColors Iris user manual

Safavieh Lighting TBL4385A Assembly instructions

Safavieh Lighting

Safavieh Lighting TBL4385A Assembly instructions

MOB MO6816 user manual

MOB

MOB MO6816 user manual

Schuller ALIVE operating manual

Schuller

Schuller ALIVE operating manual

Safavieh Lighting SADE FLL4015A manual

Safavieh Lighting

Safavieh Lighting SADE FLL4015A manual

JONATHAN Y JYL5019A manual

JONATHAN Y

JONATHAN Y JYL5019A manual

JONATHAN Y JYL6007A quick start guide

JONATHAN Y

JONATHAN Y JYL6007A quick start guide

Philips Ledino 31606/11/16 Specifications

Philips

Philips Ledino 31606/11/16 Specifications

Safavieh Lighting CANDRI TBL4427A manual

Safavieh Lighting

Safavieh Lighting CANDRI TBL4427A manual

Hunter Bullet Spotlight Kit Owner's guide and installation manual

Hunter

Hunter Bullet Spotlight Kit Owner's guide and installation manual

Philips 405441213 user manual

Philips

Philips 405441213 user manual

Philips Halogen Light Brochure & specs

Philips

Philips Halogen Light Brochure & specs

Philips 40736-11-16 user manual

Philips

Philips 40736-11-16 user manual

Pentair GLOBRITE Installation and user guide

Pentair

Pentair GLOBRITE Installation and user guide

Philips 55592-30-16 user manual

Philips

Philips 55592-30-16 user manual

Livoo Night light user manual

Livoo

Livoo Night light user manual

Schwaiger NFL45 user guide

Schwaiger

Schwaiger NFL45 user guide

FRITZ HANSEN AQ01 PLUG-IN manual

FRITZ HANSEN

FRITZ HANSEN AQ01 PLUG-IN manual

manuals.online logo
manuals.online logoBrands
  • About & Mission
  • Contact us
  • Privacy Policy
  • Terms and Conditions

Copyright 2025 Manuals.Online. All Rights Reserved.

Installation Instructions for Kurba Vertical & Kurba Horizontal
Models KBL-XX & KBM-XX
REV0.3 06262018*LUMINII RESERVES THE RIGHTS TO CHANGE SPECIFICATION & INSTRUCTION WITHOUT NOTICE
7777 N. Merrimac Ave
Niles, IL 60714
T 224.333.6033
F 224.757.7557
[email protected]
www.luminii.com
Page 1 of 4
E472444
Kurba Horizontal
Kurba Vertical
Please read complete instruction prior to installation
and keep for future reference!
Please read complete instruction prior to installation and keep for future reference!
*LUMINII RESERVES THE RIGHTS TO CHANGE SPECIFICATION & INSTRUCTION WITHOUT NOTICE
7777 N. Merrimac Ave
Niles, IL 60714
T 224.333.6033
F 224.757.7557
[email protected]
www.luminii.com
Page 2 of 4
E472444
Installation Instructions for Kurba Vertical & Kurba Horizontal
Models KBL-XX & KBM-XX
1. PRODUCT TO BE INSTALLED BY A QUALIFIED
ELECTRICIAN.
2. USE ONLY WITH CLASS 2 POWER UNIT
3. 24 VOLTS DC
4. SUITABLE FOR WET LOCATIONS
5. SURFACE MOUNT ONLY
CAUTION: Reference diagram below on Can and Can-nots,
when it comes to installing the Kurba Horizontal & Vertical !!!
Kurba Vertical
(KBL-XX)
Kurba Horizontal
(KBM-XX)
CAN
CAN-NOTS
2.5” radius
minimum 2.5” radius
minimum
LED surface
(gray color)
LED surface
(gray color)
bend in this direction only
LED surface
(gray color)
LED surface
(gray color)
twisting Kurba, will cause
damage to the LED
CAN
CAN-NOTS
bend in this direction only
twisting or bending LED in these positions will
cause damage to the LED
twisting or bending LED in these positions will
cause damage to the LED
bend LED in these positions only to avoid damage bend LED in these positions only to avoid damage
twisting Kurba, will cause
damage to the LED
LED surface
(gray color)
bending in the same
direction as the LED,
will cause damage to the LED.
Do not make sharp
bends, near the endcap
LED surface
(gray color)
bending in the same
direction as the LED,
will cause damage to the LED.
Do not make sharp
bends, near the endcap
REV0.3 06262018
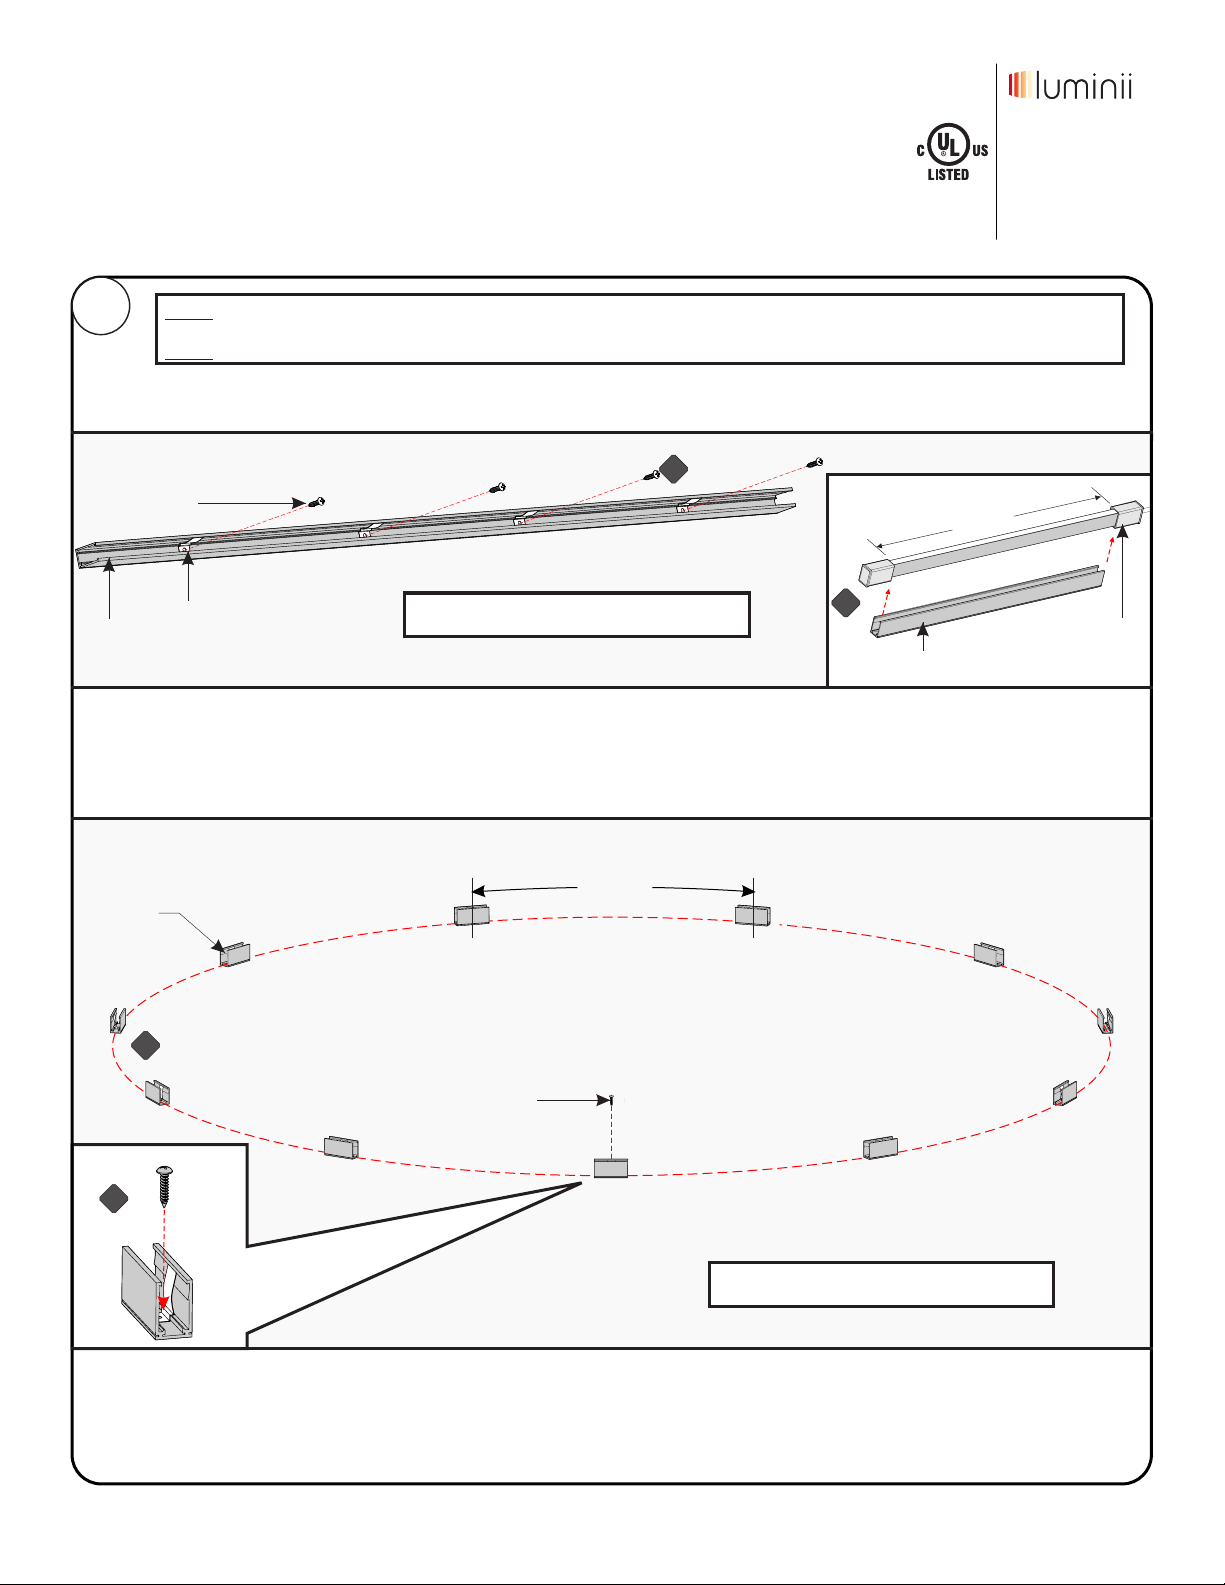
A.1 Line up the spring clips to the mounting holes. Followed by placing the mounting channel to the surface. Make sure its straight by using a level.
Mounting channel will only house the Kurba body (not the endcaps), refer to illustration above.
A.2 Secure channel to the surface by tightening all the provided screws. If mounting to something other than wood, we recommend using the proper
hardware.
Note: Prior to installation all 24VDC wires must be present within 72” of the installation. Refer to the power supply
installation instruction for additional information.
Note: More than one person is recommended for this installation.
*LUMINII RESERVES THE RIGHTS TO CHANGE SPECIFICATION & INSTRUCTION WITHOUT NOTICE
7777 N. Merrimac Ave
Niles, IL 60714
T 224.333.6033
F 224.757.7557
[email protected]
www.luminii.com
Page 3 of 4
E472444
Installation Instructions for Kurba Vertical & Kurba Horizontal
Models KBL-XX & KBM-XX
1
B.1 Determine the shape of the Kurba layout, then mark the pattern onto the surface. Then place a mounting brackets every 8” (minimum), on the
pattern may vary depending on the amount of curves.
B.2 Secure the mounting brackets to the surface by tightening the screw. If mounting to something other than wood, we recommend using the
proper hardware.
1.1 Once the location or pattern is determined for Kurba to be installed too. Start off by marking the area, depending on the pattern of installation
the amount of bracket may vary. Reference one of the options below to continue.
mounting
bracket
screw
KURBA
Body
A.1
B.1
screw
mounting
channel
endcap
A.2
8”away
(maximum)
B.2
1. PRODUCT TO BE INSTALLED BY A QUALIFIED
ELECTRICIAN.
2. USE ONLY WITH CLASS 2 POWER UNIT
3. 24 VOLTS DC
4. SUITABLE FOR WET LOCATIONS
5. SURFACE MOUNT ONLY
straight run with mounting channel
curved run with mounting brackets
Please read complete instruction prior to installation and keep for future reference!
spring clip
mounting
channel
REV0.3 06262018
*LUMINII RESERVES THE RIGHTS TO CHANGE SPECIFICATION & INSTRUCTION WITHOUT NOTICE
7777 N. Merrimac Ave
Niles, IL 60714
T 224.333.6033
F 224.757.7557
[email protected]
www.luminii.com
Page 4 of 4
E472444
Installation Instructions for Kurba Vertical & Kurba Horizontal
Models KBL-XX & KBM-XX
2
2.1 Carefully push the Kurba onto the channel or mounting brackets, then press in completely to secure in place.
- straight run with mounting channel
- curved run with mounting brackets
channel
mounting
bracket
kurba
2.1
kurba
2.1
3.1 Connect +24 VDC red wire from
the Kurba to the power supply +24
VDC red wire.
Connect -24VDC black wire from the
Kurba to power supply -24VDC
black wire.
3
class II
power
supply
24 VDC
120 VAC
+24 VDC RED
-24 VDC BLACK -24 VDC BLACK
+24 VDC RED
3.1
to Kurba
1. PRODUCT TO BE INSTALLED BY A QUALIFIED
ELECTRICIAN.
2. USE ONLY WITH CLASS 2 POWER UNIT
3. 24 VOLTS DC
4. SUITABLE FOR WET LOCATIONS
5. SURFACE MOUNT ONLY
Sample layout using the
optional mounting accessories
- split power feed
- factory joiner
Kurba Kurbasplit power feed
power
supply
KurbaKurbaKurba
power
supply
joinerjoiner
8”away
(maximum)
Please read complete instruction prior to installation and keep for future reference!
REV0.3 06262018