manuals.online logo
Brands
  1. Home
  2. •
  3. Brands
  4. •
  5. Lumio
  6. •
  7. Outdoor Light
  8. •
  9. Lumio Innovaplas 9010 User manual

Lumio Innovaplas 9010 User manual

Water tight IP68 connectors
REV. 15/04/2019
x 2
REQUIRED FOR SKU # 9010
INNOVALITE SOLAR POWERED LIGHT # 9010
WARNING
TABLE OF CONTENTS
OOLS REQUIRED (Not Included)
COMPATIBLE WITH ANY INNOVAPLAS STEP
CONTAINING THE INNOVAPLAS CREST ROUNDEL
90 days on manufacturing defects.
Replacement only.
Risk of drowning by entangle-
ment; secure the power cord
with tie wrap supplied as per
instructions.
A) Light installation on the step
B) Deck installation
C) Step combo Installation
D) User guide
E) Winterizing
T
*For Biltmor and Aquarius only.
LIMITED WARRANTY
CAUTION
The lighting fixture may be damaged if subjected to freezing weather.
Remove the entire step assembly from the pool and allow all water to
drain from the step and dry before storing.
Store in a dry location unexposed to winter conditions.
Do not submerge the solar panel the product could be damaged.
A
Pool step
Treaded ring
2) Insert the lighting fixture from the outside of the step.
3) Fasten the treaded ring and align the fixture properly in the step before tightening.
Tighten the ring moderately.
IMPORTANT:
Use supplied tie wraps to attach electric cord to a post as
shown. Do not submerge the connector the product could
be damaged.
LIGHT INSTALLATION ON THE STEP
1) Remove the Innovaplas round cap from the step by compressing 2 tabs at the back.
For the Biltmor or Aquarius step cut the 4 tabs with a utility knife to remove the blank
cap.
Utility knife
For Biltmor
or Aquarius
step.
Attaches
REV. 15/04/2019
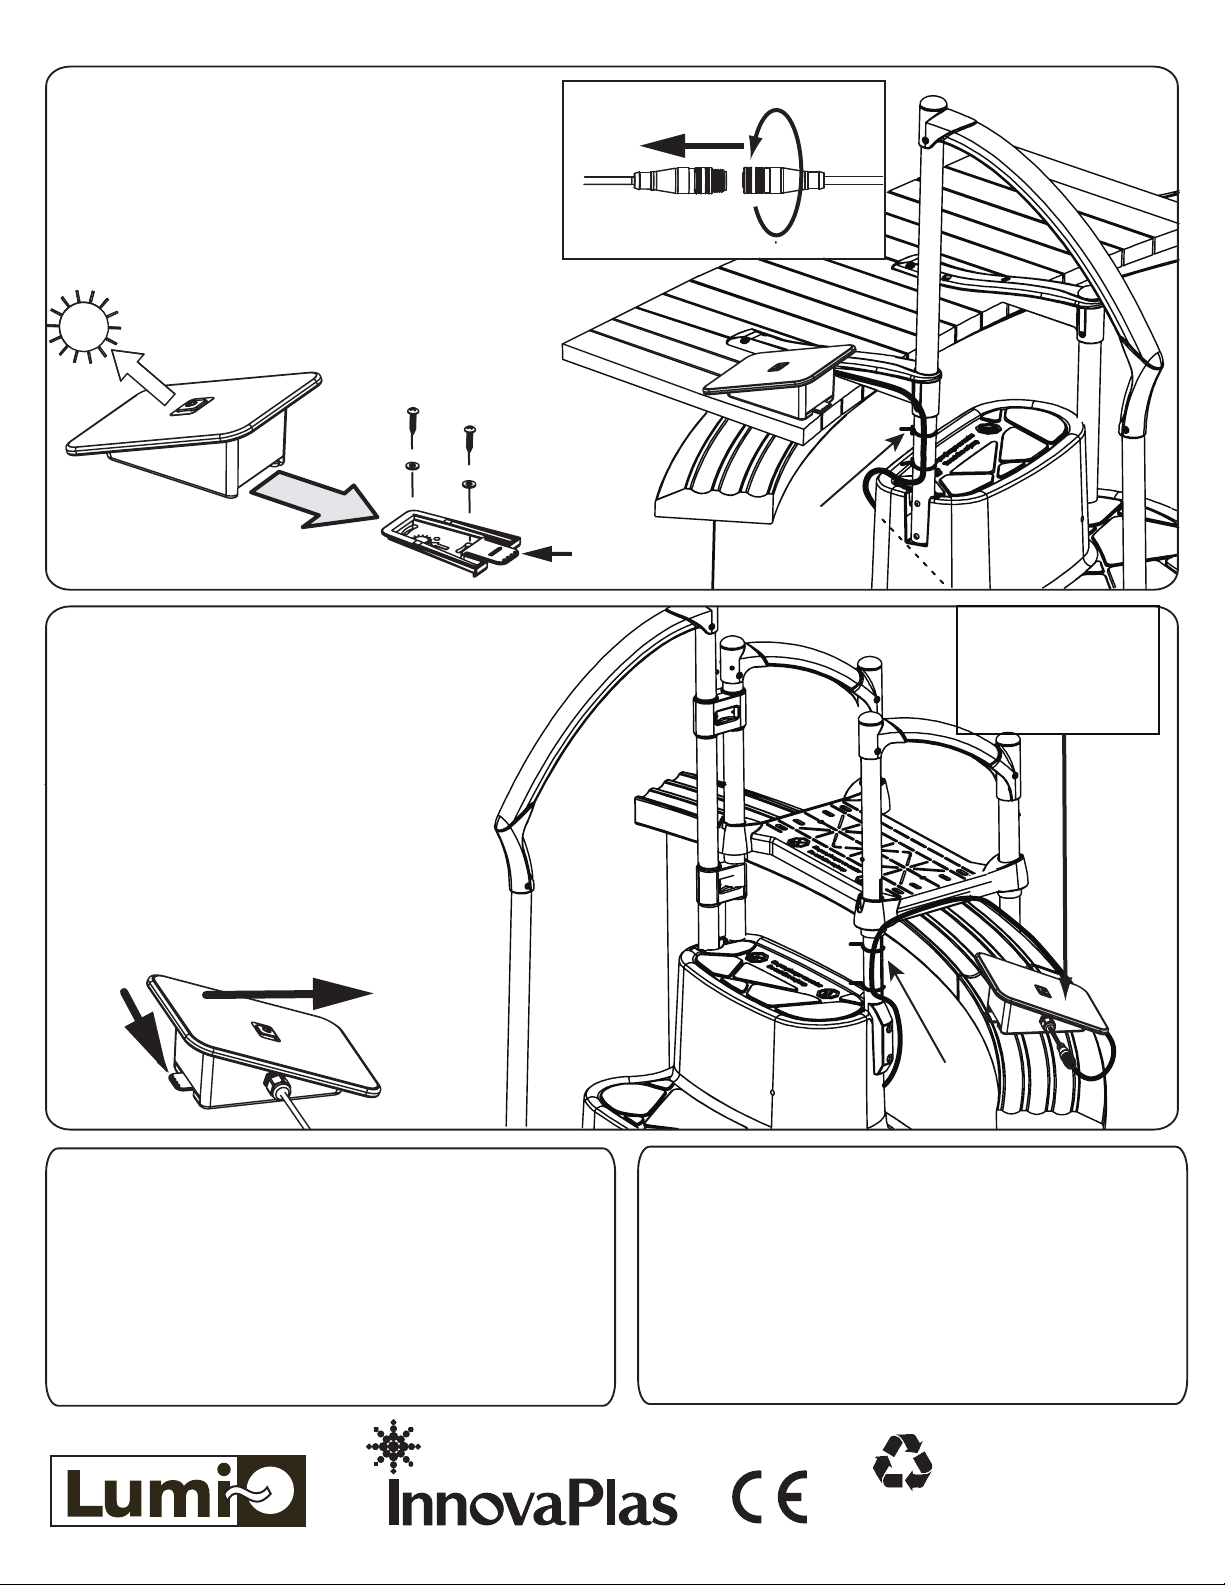
1) Disconnect the solar panel.
2) Unlock the solar panel from the mounting plate
and slide the panel out as shown.
3) Pull the step and light out of the water for
storage.
B
E
C
1)
Install the battery as per above instructions, making
sure that the panel is pointing toward the sun at noon.
2) Connect the panel to the light fixture according to the
drawing above, screw the connector sleeve
completely to seal the connector properly.
3)
Secure the electrical cord to the tubular post with
the two tie wraps provided.
Make sure that the cable is
routed away from the bathers. Keep the connectors
out of water.
Mounting
plate
*Locate and
orient the panel
properly for
optimal results.
Step A
Step B
Connection of cable
DUser guide
Press on the switch for 4 seconds to turn on or off
the light fixture.
A built in countdown timer will turn off the light after
2 hours.
The light will last for 3 hours on a fully charged
solar panel.
The light fixture is not designed to turn itself on at
sundown.
2257, Route 139
Drummondville, Qc.,
Canada J2A 2G2
WWW.INNOVAPLAS.COM
INNOVAPLAS
To take apart
Push Pull
DECK INSTALLATION*
STEP COMBO INSTALLATION*
WINTERIZING
TIE
WRAP
1) Identify the best location to install the solar panel.
The panel should be pointing toward the sun at
noon. Avoid major obstacles between the sun and
the panel. The panel should be exposed to a light
source for a minimum duration of 6 hours to perform.
2) Install the mounting plate with the screws and flat
washers supplied. A pictogram engraved on the
mounting plate will help you orient the panel
correctly.
3) Slide the panel housing into the mounting plate,
making sure that the panel is secured by the locking
tab.

Popular Outdoor Light manuals by other brands

Inspire Murray PL-0309 instruction manual

Inspire

Inspire Murray PL-0309 instruction manual

ADEO Services Inspire YONKERS ENKI instruction manual

ADEO Services

ADEO Services Inspire YONKERS ENKI instruction manual

MiaLuz MZ4004 manual

MiaLuz

MiaLuz MZ4004 manual

SLV Elektronik QUADRASYL D instruction manual

SLV Elektronik

SLV Elektronik QUADRASYL D instruction manual

Unilamp SIRIUS 300 installation manual

Unilamp

Unilamp SIRIUS 300 installation manual

Brighter PATT RGB user manual

Brighter

Brighter PATT RGB user manual

Roger Pradier Hogar 100 manual

Roger Pradier

Roger Pradier Hogar 100 manual

MOOD LIV Installation Notice

MOOD

MOOD LIV Installation Notice

Regent Lighting Solutions Echo installation instructions

Regent Lighting Solutions

Regent Lighting Solutions Echo installation instructions

HEPER DOMINO AFX 1 Installation & maintenance instructions

HEPER

HEPER DOMINO AFX 1 Installation & maintenance instructions

marset Jaima P307.54 Assembly instructions

marset

marset Jaima P307.54 Assembly instructions

planeo Agate Manual and safety instructions

planeo

planeo Agate Manual and safety instructions

LIGMAN HAMILTON 4 installation manual

LIGMAN

LIGMAN HAMILTON 4 installation manual

LIGMAN AUGUSTA 5 installation manual

LIGMAN

LIGMAN AUGUSTA 5 installation manual

Platek BLEND bollard Assembly instructions

Platek

Platek BLEND bollard Assembly instructions

OttLite A12G59-FFP manual

OttLite

OttLite A12G59-FFP manual

ARCHIPELAGO LIGHTING iUVC1 Instruction guide

ARCHIPELAGO LIGHTING

ARCHIPELAGO LIGHTING iUVC1 Instruction guide

Trilux Symbol I 450 Series Mounting instructions

Trilux

Trilux Symbol I 450 Series Mounting instructions

manuals.online logo
manuals.online logoBrands
  • About & Mission
  • Contact us
  • Privacy Policy
  • Terms and Conditions

Copyright 2025 Manuals.Online. All Rights Reserved.