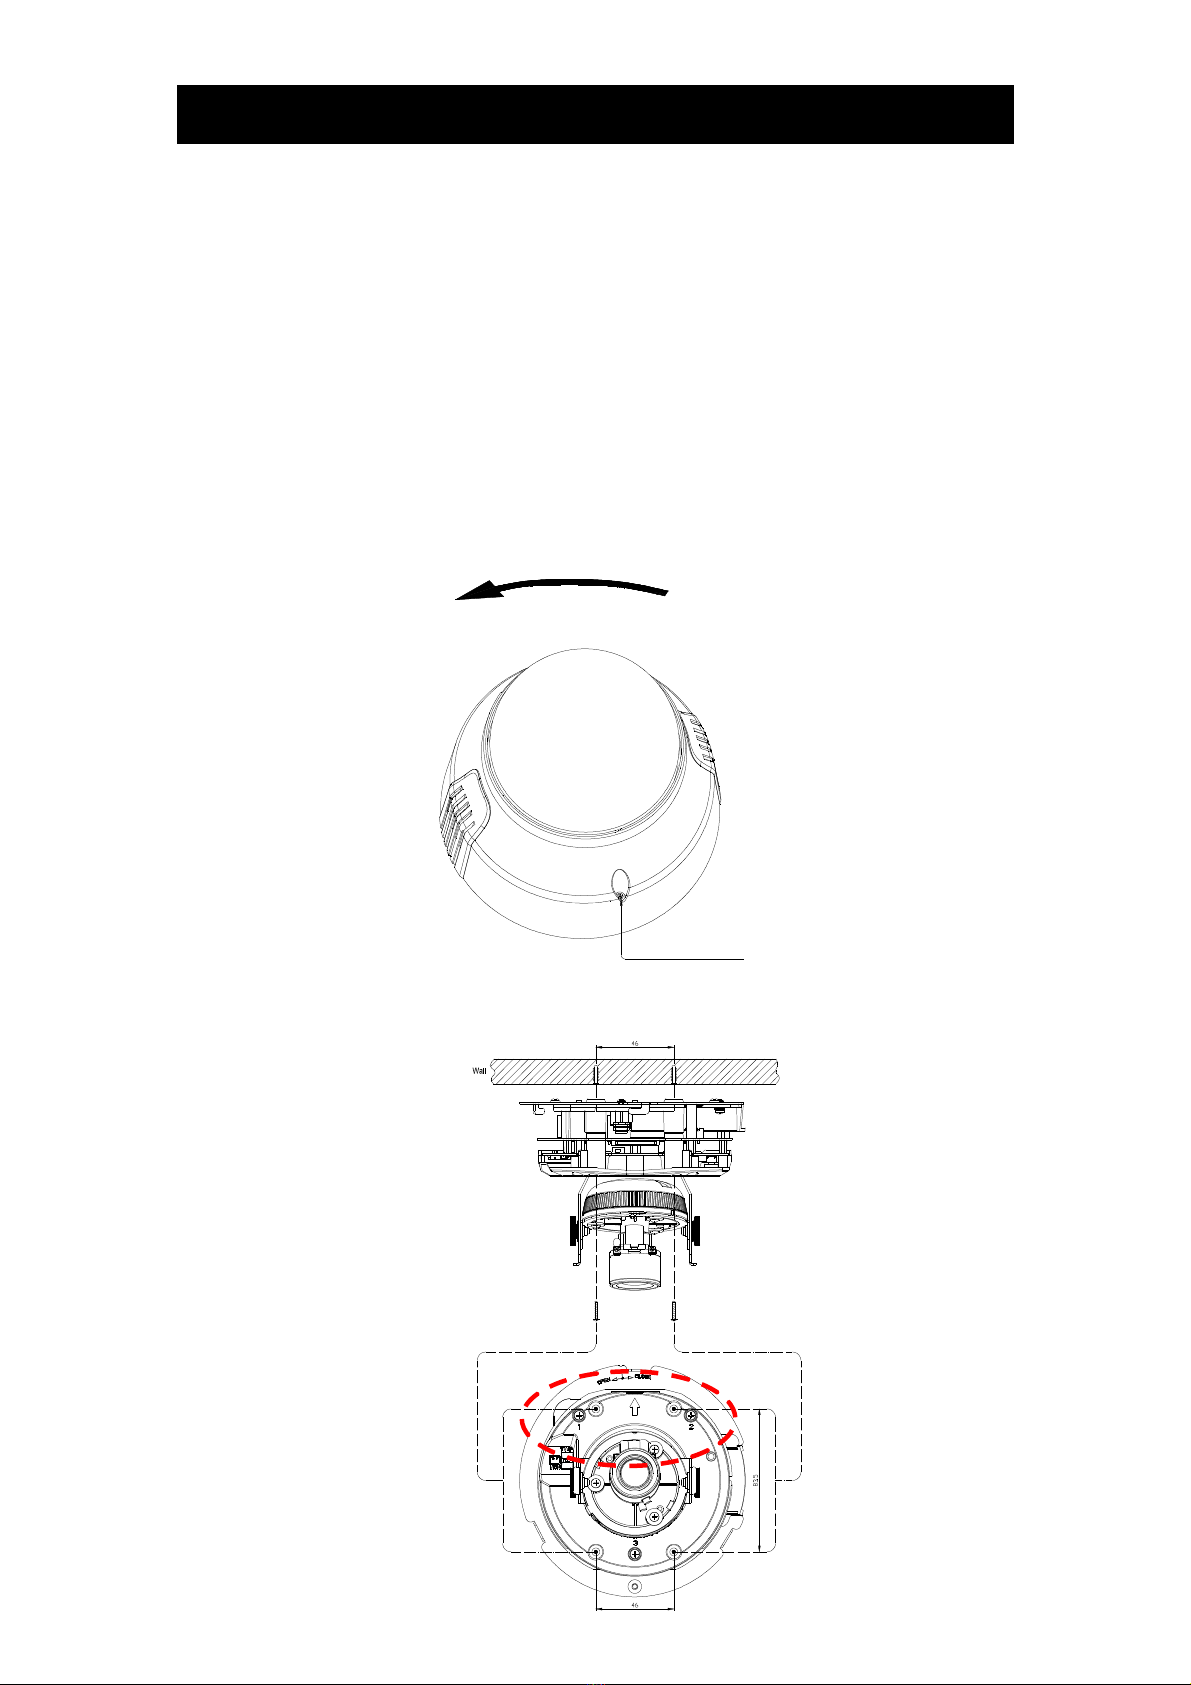
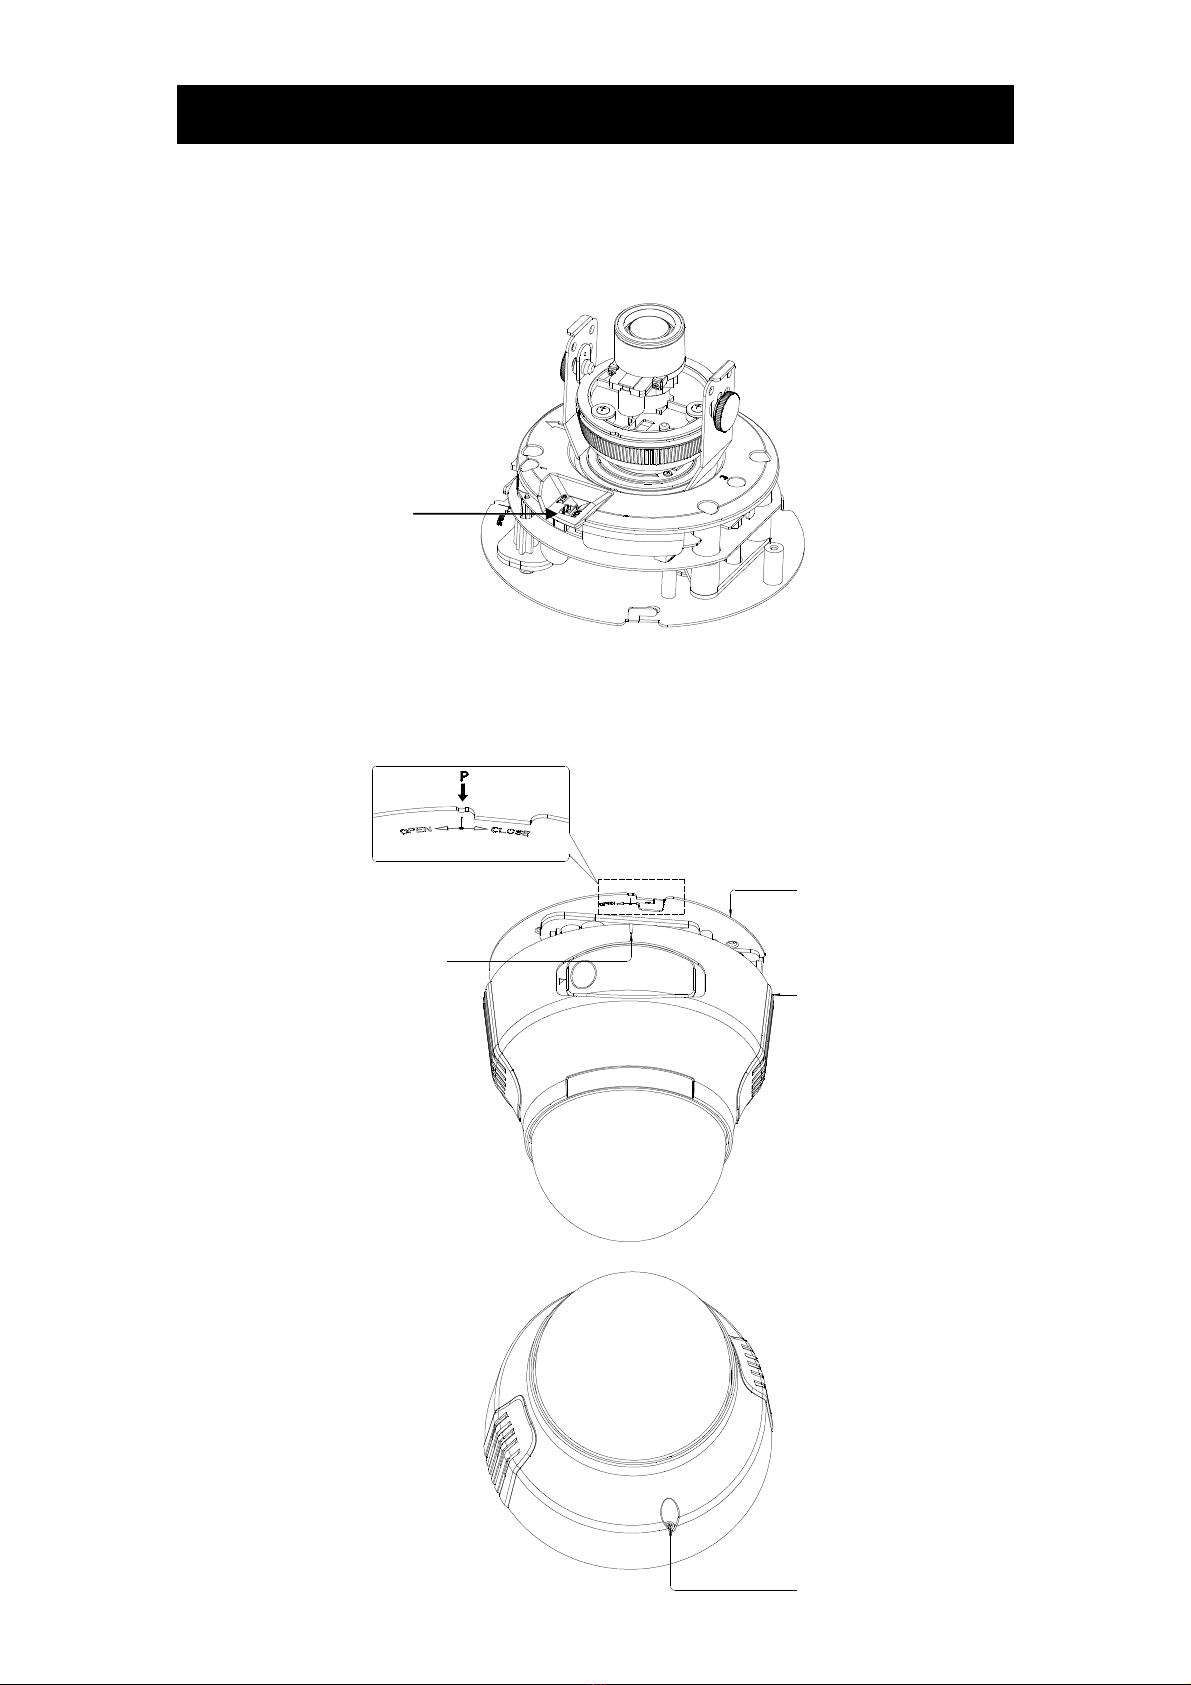
Lupus Electronics LUPUSNET LE341 User manual

1.3 Megapixel Netzwerkkamera
LUPUSNET
®
- LE341
Benutzer andbuc
830 A.2_CD

Einleitung
1. Hinweise zur Benutzung und Installation
・ Richten Sie die Kamera niemals direkt in die Sonne
・ Richten Sie die Kamera nicht direkt auf einen Scheinwerfer
・ Vermeiden Sie starke Stöße und Erschütterungen
・ Berühren Sie niemals die internen elektronischen Teile
・ Vermeiden Sie eine Installation der Kamera in direkter N he zu starken
elektromagnetischen Feldern
・ Halten Sie die vorgegebenen Einsatztemperaturen ein
1.1 Lieferumfang
Prüfen Sie, dass alle im Lieferumfang genannten Positionen in der Verpackung
enthalten sind
CD-ROM (x1)
Beinhaltet das Programm “IP-Finder” sowie das Englische Benutzerhandbuch
Schnell-Installationsanleitung (x1)
Schraubenset
Handbuch (X1)
Installationsmonitorkabel (X1)

Einleitung
1.2 Sic er eits inweise
SD Speicherkarte
● Eine SD-Speicherkarte kann nicht unendlich oft überschrieben werden. Sollten
nach l ngerer Zeit Speicherfehler auftreten, tauschen Sie die SD-Karte aus.
● Die Kamera unterstützt folgende SD-Karten: 64, 128, 256, und 512 MB, 1 und 2
GB SD Speicherkarten (3.3 V).
● Bilder können nicht auf eine ungeeignete SD-Karte gespeichert werden.
● Lesen Sie die Bedienungshinweise Ihrer SD-Karte sorgf ltig
● Da die SD-Karten nur in einer begrenzten Anzahl überschrieben werden können,
empfehlen wie Ihnen eine besonders große SD-Karte zu verwenden.
● Verwenden Sie keine Speicherkarte die bereits Daten enth lt.
● Ver ndern Sie nicht die Ordner, die auf der SD-Karte durch die Kamera erstellt
werden.
● Die von der Kamera gespeicherten Daten sind nicht im Exit oder DCF Standard.
Bilder können nur am PC wiedergegeben werden.
1.3 Stromadapter
Stellen Sie sicher, dass Sie für die Kamera ein geeignetes Netzteil verwenden. Ein
falsches kann die Kamera Überhitzen, zu Fehlfunktionen führen oder die Kamera
könnte sogar Feuer fangen.
Spezifikationen
Strombedarf
AC 24V /DC 12V, 1A

Einleitung
1.4 Übersic t
Die Netzwerkkamera kann Bilder und Echtzeitton über das Internet und Intranet
liefern. Die Kamera besitzt einen (RJ-45) 10BASE-T/100BASE-TX
Netzwerkanschluss.

Einleitung
1.5 Hauptfunktionen
● 1/3” Sony progressive scan CCD Bildaufnehmer
Ein hochauflösender progressive scan CCD (charge coupled device). Alle
TV-Linien werden zur gleichen Zeit aufgenommen, ohne Verzögerung.
● 1.3 Megapixel Auflösung
Die hohe Bildauflösung ermöglicht wesentlich größere aber dennoch sehr
detailierte Bildausschnitte.
● Interaktives 2-Wege-Audiosystem
Audio kann in zwei Richtungen übertragen werden. Die Kamera besitzt einen
Mikrofon- und einen Lautsprecheranschluss.
● Mail-Funktion
Diese Funktion sendet Ihnen automatisch bei Bewegungserkennung eine Email mit
Bild.
● Eingebaute SD-Karten-Schnittstelle
Die Nutzung einer SD-Karte ermöglicht die Bildaufnahme über eine lange Zeit.
Folgende Karten werden unterstützt: 8, 16, 32, 64, 128, 256, und 512 MB, 1,2
GB.
● Bewegungserkennung
Die Kamera kann in unterschiedlichen Bildbereichen auf Bewegungen reagieren.
● Die Slow-Shutter Funktion ermöglicht farbige Bilder selbst bei schwachen
Lichtverh ltnissen.
● Gleichzeitige MPEG4 und Motion-JPEG Übermittlung.
Um Netzwerkbandbreite zu schonen kann der Nutzer zwischen beiden
Übertragungsmethoden w hlen.
● Power over Ethernet (POE)
● 3-Achsen Halterung
● Monitor-Ausgang (TV) für einfache Installation
● Tag- und Nachtsichtmodus

Einleitung
1.6 Teile und Besc riftungen
Netzwerk
Ansc luss
Reset Knopf SD-Karte

Einleitung
1.7 Kamera installieren
ACHTUNG: Die Kamera könnte aufgrund falscher Installation herunterfallen.
■
Wand- oder Deckenmontage
1 Durch ein Loch in der Wand können die notwendigen Kabel in die Kamera
geführt werden..
2 Lockern Sie die seitliche Schraube und drehen Sie dann die Kamera nach links
um das Geh use öffnen zu können.
4 Schrauben Sie nun die Kamera fest
Sc raube

Einleitung
Monitor
Base
Cover
Mark
Sc raube
5 Über den 3-Achsialen Fuß können Sie die Kamera ausrichten. Mit den 2 Hebeln am
Objektiv l sst sich der Blinkwinkel und die Sch rfe des Bildes einstellen.
Kontrollieren Sie dies mit einem Live-Monitor.
6 Setzen Sie das Geh use wieder auf. Achten Sie auf die „P“-Position. Drehen Sie
nun das Geh use zu und fixieren Sie die Schraube.

Einleitung
7 Strom einsc alten
Die Kamera hat keinen eigenen EIN/AUS-Schalter. Stecken Sie einfach das Netzteil
ein.
1.8 Netzwerk konfigurieren
Systemvoraussetzungen
● Computer mit Administrator-Rechten
Mindestvoraussetzungen:
・ Windows2000 oder XP
・ Internet Explorer Version 6.0 oder höher
・ CPU: Intel Pentium 4 2GHz oder höher
・ Speicher: 512MB oder mehr
● Verbindungsger te wie HUB, SWITCH, Router und Netzwerkkabel.
● Kamera-Suchprogramm "IPFinder"
Installieren Sie das auf der CD mitgelieferte Programm. Es ermöglicht die Kamera
im Netzwerk zu finden und die IP-Adresse zu ndern.
1.9 Die Kamera mit dem Netzwerk und einem
Computer verbinden
IP Addresse
Um die Kamera im Netzwerk finden zu können, muss Ihr eine passende
IP-Adresse zugewiesen werden.
Es gibt 2 Möglichkeiten einer Adressvergabe:
・ Automatische Vergabe via DHCP Server
・ Eingabe einer manuellen Adresse
● Automatische Vergabe via DHCP Server
Die Kamera bezieht automatisch eine Adresse. Die Standardeinstellung der
Kamera ist DHCP
● Eingabe einer manuellen Adresse.
・ Geben Sie der Kamera manuell eine IP-Adresse wenn im Netzwerk kein

Einleitung
DHCP-Server aktiv ist oder Sie die Kamera direkt an einen PC
angeschlossen haben.
・ Für eine manuelle Vergabe setzen Sie DHCP ON/OFF auf OFF unter
"Network Basic Setting" geben Sie die IP Addresse, Subnet Maske, und den
Default Gateway, Primary DNS und Secondary DNS an.
Verbindungsmöglic keiten
Es gibt 2 Wege die Kamera anzuschliessen.
・Via Cross-Overkabel direkt an einen Laptop/PC
・Direkt an eine Dose, Router oder Switch
Die Kamera mit einem Computer verbinden
1 Verbinden Sie das Kabel mit der Kamera und dem HUB/SWITCH/ROUTER oder
direct mit dem PC/LAPTOP wenn Sie ein Cross-Over Kabel verwenden.
2 Die IP-Adresse des Computers einstellen (bei Direktverbindungen).
・ Geben Sie dem PC eine feste IP-Adresse, bei einer direkten Verbindung via
Cross-Overkabel (zB. 192.168.0.50).
3 Verbindungstest
・ Klicken Sie auf START -> Ausführen dann auf OK.
・ Geben Sie im Fenster “ping 192.168.0.30” ein und drücken auf OK.
・ Erscheint “Antwort von …” ist die Verbindung möglich.
4 Die Kamera via "IPFinder" suchen.
1. Starten Sie das Programm und klicken Sie auf Suchen (SEARCH)
・ In der Liste sollte die Kamera auftauchen.
2. Klicken Sie auf "IP DOME" um diese auszuw hlen.
・ Prüfen Sie die angezeigte Adresse.
3. Klicken Sie auf die Adresse doppelt um die Verbindung herzustellen.
・ Es erscheint nun die Eingabeaufforderung des Benutzernamens und Passworts
(Standard: admin PW: 1234)
4. Nach Eingabe erscheint das Softwarefenster
NOTE
● Um Bilder ohne Hilfe des IP-Finders zu sehen, geben Sie die IP-Adresse direkt im Browser ein:
http://192.168.0.30/
● Falls Sie einen anderen Port als "80" vergeben haben, müssen Sie diesen explizit angeben. ZB:
http://192.168.0.30:88

Einleitung
1.13 Using t e Camera Searc Application "IPFinder"
The "IPFinder" is an application for searching network cameras that can currently be
viewed from the administrator's personal computer or a user's personal computer,
and connecting to those cameras.
● Setting up "IPFinder"
1 Insert the CD in the CD-ROM drive of the personal computer.
2 Double-click the "Setup" file in the CD-ROM and install "IPFinder" in accordance
with the instructions in the screen.
Important
● "IPFinder" is compatible only with Windows 2000 and Windows XP. Glitches may
occur with your personal computer if it is operated by other OS. Do not install
"IPFinder" with other OS.
● Using "IPFinder" to Search for a Camera
1 From the "Start" menu, point to "Programs" and "IPFinder", and then select
"IPFinder".
2 Start up "IPFinder" and click "Search".
All the cameras currently connected to the network will appear. To Exit the
program, click "Exit".
3 Click the camera you want to login from the list of cameras.
The chosen camera name and IP address is displayed in the Network camera
log-in fields.
4 Log in the chosen camera as an administrator. (See "Log-in Screen")
・ To exit without performing log-in, click the Exit button.
NOTE
● Set the personal computer to "Administrator authorization" when using
"IPFinder."
Important
● We are not responsible for any damages caused by this software.

Einleitung
1.14 Log-in Screen
This product regards a person who has performed Administrator Log-in as an
"administrator". Administrator Log-in can perform all functions.
Administrator Log-in
1 Search the camera by "IPFinder", double-click the camera you wish to log-in.
・ The screen for inputting the user name and password will appear.
・ Launch the Internet browser, enter URL " ttp://192.168.0.30" in the
address box and click "OK." (Enter the same IP address set by you with the
network camera, as the IP address)
2 Input the administrator log-in ID and password in the user name and password
fields and click the OK button.
・ The administrator log-in screen and camera image screen will appear.
・ The administrator log-in ID and password are set to "admin" and to "1234"
respectively by default.
Important
Administrator Log-in allows rewriting of all settings. Be certain to change the
administrator log-in ID and password already set in the camera by default, to
ensure camera security. Keep the new administrator log-in ID and password handy
for future use. To change the administrator log-in ID and password, see
"Administrator Function/Password" portion.

Einleitung
1.15 Viewing and Listening
Images of the network camera can be viewed through the Internet browser of your
personal computer.
● Preparations before displaying
・ Enable cookies
・ Set "Browser setting when proxy server is used" when a proxy server is used.
・ Change "security" in Internet options as follows.
1) Click "Internet Option" on the tool menu.
2) Click the Security tab.
3) Click the "Intranet" icon if the camera to be operated is inside the intranet,
clicking the "Internet" icon if the camera is on the Internet.
4) Click "Level customize."
5) Check the following radio buttons in the displayed list:
・ "Enable" for "ActiveX control and plug in execute"
・ "Enable" for "Execution of script of ActiveX control marked safe even when
script is executed"
・ "Enable" for "Download of signed ActiveX control"
6) Click "OK."
● Log-in the camera.
・ Your browser will launch and the Camera login screen.
・ See "Log-in Screen" portion for the log-in method.
・ When the security warning screen (VeriSign) appears on the first use of the
system, click "Yes."
NOTE
Administrator authorization is needed to install "Active-X control." Install "Active-X
control" after changing the personal computer setting to "Administrator
authorization."
● Browser setting when proxy server is used
In case a proxy server is used, setting of the browser to bypass the proxy server
during communication with the network camera is recommended.
1) Launch the browser.
2) Choose "Internet option" on the tool menu.
3) Click "Connect" tab.
4) Click "LAN Setting."
The screen for setting a local area network (LAN) will appear.
5) Check if the checkbox "Will use a proxy server" is checked.
If the checkbox is not ticked
The browser is not set to use a proxy server. Click "Cancel" and quit setting.
If the checkbox is checked.
Click "Detail setting." A proxy setup screen will appear.
6) Enter the IP addresses of the network cameras in the field marked "Do not use
the proxy server with addresses started with the following.
7) Click "OK."
When Windows XP SP2 is used: Click "Install" for "Active-X control."
NOTE
● A proxy server protected by a firewall sometimes cannot be connected to the
network camera. Consult the network administrator so as to avoid impacts on
network camera operations.

Einleitung
● Communication with the network cameras via a proxy server may cause some
problem. Install the network cameras after consulting the network administrator.
● Using the network cameras via a proxy server sometimes takes a long time till
images are displayed after log-in or reduces the frame rate of delivered images.
Camera Image Screen
When using Windows XP SP2
If fails to display the Camera Image screen, operate as follows.
1) Choose "Pop-up Blocker" on the tool menu.
2) Choose "Always Allow Pop-ups from This Site...",
1. Snapshot: Click this icon to pop-up a still screen image
and save the jpg file under “NetworkCamera” folder in
“My Document” folder.
2. Audio: Click these 2 icons to set ON/OFF of microphone
and speaker.
3. Image: Select image format from MPEG-4 and JPEG.
4. E-PTZ: Select to display by the frame size or by the
setup resolution
5. Multi-function panel: Click center 2 icons to zoom in or
zoom out; click up/down/left/right to pan and tilt under
zoom in situation.

Set Up
2.1 Setting
Setup screen
Click the Setup button in the Camera Image screen.
Important
Performing user log-in does not display the Administrator Setup menu on the left
and displays only setup items that can be used by the user (set by "Administrator
Function" portion).
Only the system administrator can set all settings with the network camera. Clicking
the menu on the left of the Administrator Setup menu selects set items.
General setting met od
1 Click "Image Settings", "Network Settings", "Admin. Functions" "Event Log" or
"Information" in the Setting Menu.
・ The sub menu of the clicked setting will show up.
・ Unless logged in as an administrator, the Administrator Setup Menu will not be
displayed.
2 Click an item in the sub menu desired to set.
・ The setup screen for the clicked item appears on the right of the screen.
3 Configure each setting items.
・ Click the Save button to save settings.
・ Click the Reset button resets to settings last saved.
・ Click the Default button resets settings back to factory default.
NOTE
Click the Default button in the setup screen on "configuration Information" in
"Admin. Functions" resets all settings back to factory default

Set Up
2.2 Camera/Basic Settings
Basic items such as size and quality of delivered images of the camera can be set.
1 Click "Image Settings" on the Setting Menu.
・ A sub menu for Camera Settings will appear.
2 Click "Basic" in the sub menu.
・ The screen of "Camera - Basic Settings" will appear.
3 Configure each setting items.
・ Click the Save button to save settings.
・ The settings will not be reflected unless the Save button is clicked.
NOTE
This setting item can be set by user log-in also if the item is set correctly in the
settings for "Admin. Functions"
● Brightness Adjustment
The camera automatically adjusts the level of brightness of images. Adjust so that
the image level becomes optimum in accordance with conditions of the object.
Images become brighter higher the level is. Images are dark lower the level is.
NOTE
The brightness level of images are controlled automatically by adjustment of the
lens, AGC and slow shutter.
● Day/Night
Configures Auto black and white function. Auto B/W is the function to gain
sensitivity by turning to B/W automatically when it becomes dark. The image may
have some noise in B/W mode.
ON:Auto B/W takes action.
OFF:Auto B/W does not take action.
● Auto Gain Control
Set a maximum value for operational gain of the auto gain control circuit. Set to
maximum if the object is too dark and camera sensitivity is low. The camera
sensitivity increases in the order of "OFF," "standard" and "Max” Noise also
increases when Auto Gain Control is near maximum. Lighting is recommended to
obtain good image quality.
NOTE
If sensitivity is still short after setting Auto Gain control, set the high limit value of
the slow shutter and Day/Night function, to further increase sensitivity.
● Slow Shutter
Set a high limit value of the slow shutter. The camera sensitivity is maintained on
an optimum image level between 1x and a set high limit value. Increasing the high
limit value increases the camera sensitivity.
NOTE
Setting the high limit value of slow shutter other than to 1x automatically increases
the camera sensitivity to the set high limit value as the object becomes dark.
When the sensitivity is high, the exposure time becomes longer and frame rate

Set Up
becomes smaller. Blurred images sometimes are prominent with moving objects.
● Backlight Compensation
Set an area for backlight compensation. Backlight compensation is a function that
achieves the brightness of a selected area to an optimum image level. This
function is effective when the auto aperture lens tends to close due to an intense
light that enters in areas other than those wished to view so that areas desired to
see become dark and difficult to see. In this case, set the area so that the portion
wished to see enters the selected area. The area size is roughly as follows.
(The image level of shaded parts is maintained appropriate)
When OFF, rear light correction is not performed.
● Sharpness
Set a sharpness effect. The sharpness effect increases in the order of "LOW"
"MIDDLE," and "HIGH."
HIGH: Activates sharpness strong.
MIDDLE: Standard setting
LOW: Activates sharpness weak.
NOTE
Setting to "LOW" or "HIGH" increases the sharpness effect. After images, however,
sometimes become prominent when a moving object is photographed.
1. OFF
2. Upper 2/3 (Area des
ignation)
3. Lower 2/3 (Area designation)
4. Center
1
/3
5. Center 1/6 (Area designation)
6. Left (Area designation)
7
. Right (Area designation)

Set Up
2.3 Camera/Compression Settings
● Compression mode
-Operation Mode
- Both functions of JPEG and MPEG4 are effective.
- In the function of JPEG, resolution of FTP and E-mail becomes resolution same as
Monitor.
● JPEG - Following settings are enabled when "Compression Mode" is set to "JPEG".
-Resolution
Configure resolution. Higher Resolution results in larger image
Possible settings:1280×960 (SXVGA)/640×480 (VGA)/320×240 (QVGA)
-Compression Ratio
Set quality of delivered images. The size of image files (JPEG files) varies in
accordance with compression ratio.
Low compression: This setting produces highest image quality. The file size
increases.
Mid compression: Standard setting.
High compression: This setting produces lowest image quality. The file size
decreases.
-Monitor Frame Rate
● MPEG4 - Following settings are enabled when "Compression Mode " is set to
"MPEG4".
-Image Size
-Bit Rate
● Unicast Streaming – Unicast streaming is only for MPEG4
- Video Port Number – specify the port number you would like to use for Video
streaming, default is 5000
- Audio Port Number - specify the port number you would like to use for Audio
streaming, default is 5010
● Multicast Streaming – Multicast streaming is only for MPEG4

Set Up
2.4 Camera/Event Settings
External alarms and motion sensors can be set. Connecting a sensor or other device
to the alarm input terminal notifies an alarm when the sensor detects a trouble.
For example, mounting a sensor on a door notifies an alarm each time the door is
opened or closed. By setting the motion sensor to activate, an alarm is notified by
detecting a change in a screen.
1 Click "Image Settings" on the setting menu.
・ A sub menu for Camera Settings will appear.
2 Click "Event" in the sub menu.
・ The screen of "Camera - Alarm Settings" will appear.
3 Configure each setting items.
・ Click the Save button to save settings.
・ The settings will not be reflected unless the Save button is clicked.
● Alarm In
1) Set an "alarm" to be detected.
ON: Detects an external alarm.
OFF: Does not perform "Alarm In".
2) Set "Input type" for alarms if "Function" is set to other than "OFF".
Normally Opened (NO): A no-voltage contact system. Set in case of normally
open, closed in case of an alarm.
Normally Closed (NC): A no-voltage contact system. Set in case of normally
closed, open in case of an alarm.
NOTE
● Camera starts alarm recording when camera detects alarm signal. (Signal length
requires more than 100ms).
● Motion Detection
1) Function
ON: Camera detects motion. (A change in the screen is detected and an alarm
is sent)
OFF: Camera does not detect motion.
2) Sensitivity
Set "Sensitivity."
HIGH: It works with even a small change in brightness or motion is detected.

Set Up
MIDDLE: Intermediate between HIGH and LOW.
LOW: It works only when a large change in brightness or motion is detected.
NOTE
● Detection sometimes fails if the object is dark.
● Incorrect detection is sometimes made due to noise if the object is dark and AGC
gain is high. Set the sensitivity to low.
● Output Delay Time
Set a time to hold alarm output. Choose from 1, 5, 10, 15, 30 and 60 seconds. This
function is used when connecting to alarm output terminals and activating a siren,
buzzer or emergency light.
Table of contents
Other Lupus Electronics Security Camera manuals