Lutron Electronics RadioRA2 RRD-H1RLD User manual

RadioRA2 One-Way Transmitter
Frequency Changing Procedures
Rev. F 11/17/2014

The first question that would come to mind when seeing this document is to ask wh it is
necessar to change the frequenc of devices in the s stem manuall . Certain devices in the
RadioRA2 product famil are one wa transmitters (OWT). In other words, the do not
receive wireless commands from other devices in the s stem and can onl transmit or send
commands to s stem devices.
In a two Main Repeater s stem, the two Main Repeaters will not communicate wirelessl
together. Instead the communicate back and forth over IP, connected to the same network
via a router or switch. The two Main Repeaters essentiall choose different RF channels to
operate at, creating a s stem that is comprised of two different subnets.
To communicate the new RF channel to the devices within its subnet, each Main Repeater
will send this information to the s stem devices activated to it. Devices that can hear the
command will automaticall change their channels from the default 434.7MHz. Devices that
do not receive and can onl transmit need to be manuall configured to the necessar RF
channel in order to operate within the subnet.
These procedures will need to be followed when placing OWTs on both Main Repeaters or
having sensors designed to the second subnet (the second Main Repeater to go through
activation) of the s stem. The first Repeater through activation will retain the default
frequenc and thus not require these procedures.
All of the following procedures must always e
completed with the system in device Activation mode.
1
Wh ?

1
st
and 2
nd
Generation Ceiling Mount Sensors'''''''''''''.3
3
rd
Generation Ceiling Mount Sensors'''''''''''''''''4
Temperature Sensors''''''''''''''''''''''''..5
Wall Mount Sensors'''''''''''''''''''''''''.6
1
st
Generation Pico Wireless Controls'''''''''''''''''7
2
nd
Generation Pico Wireless Controls''''''''''''''''...8
2
Table of Contents
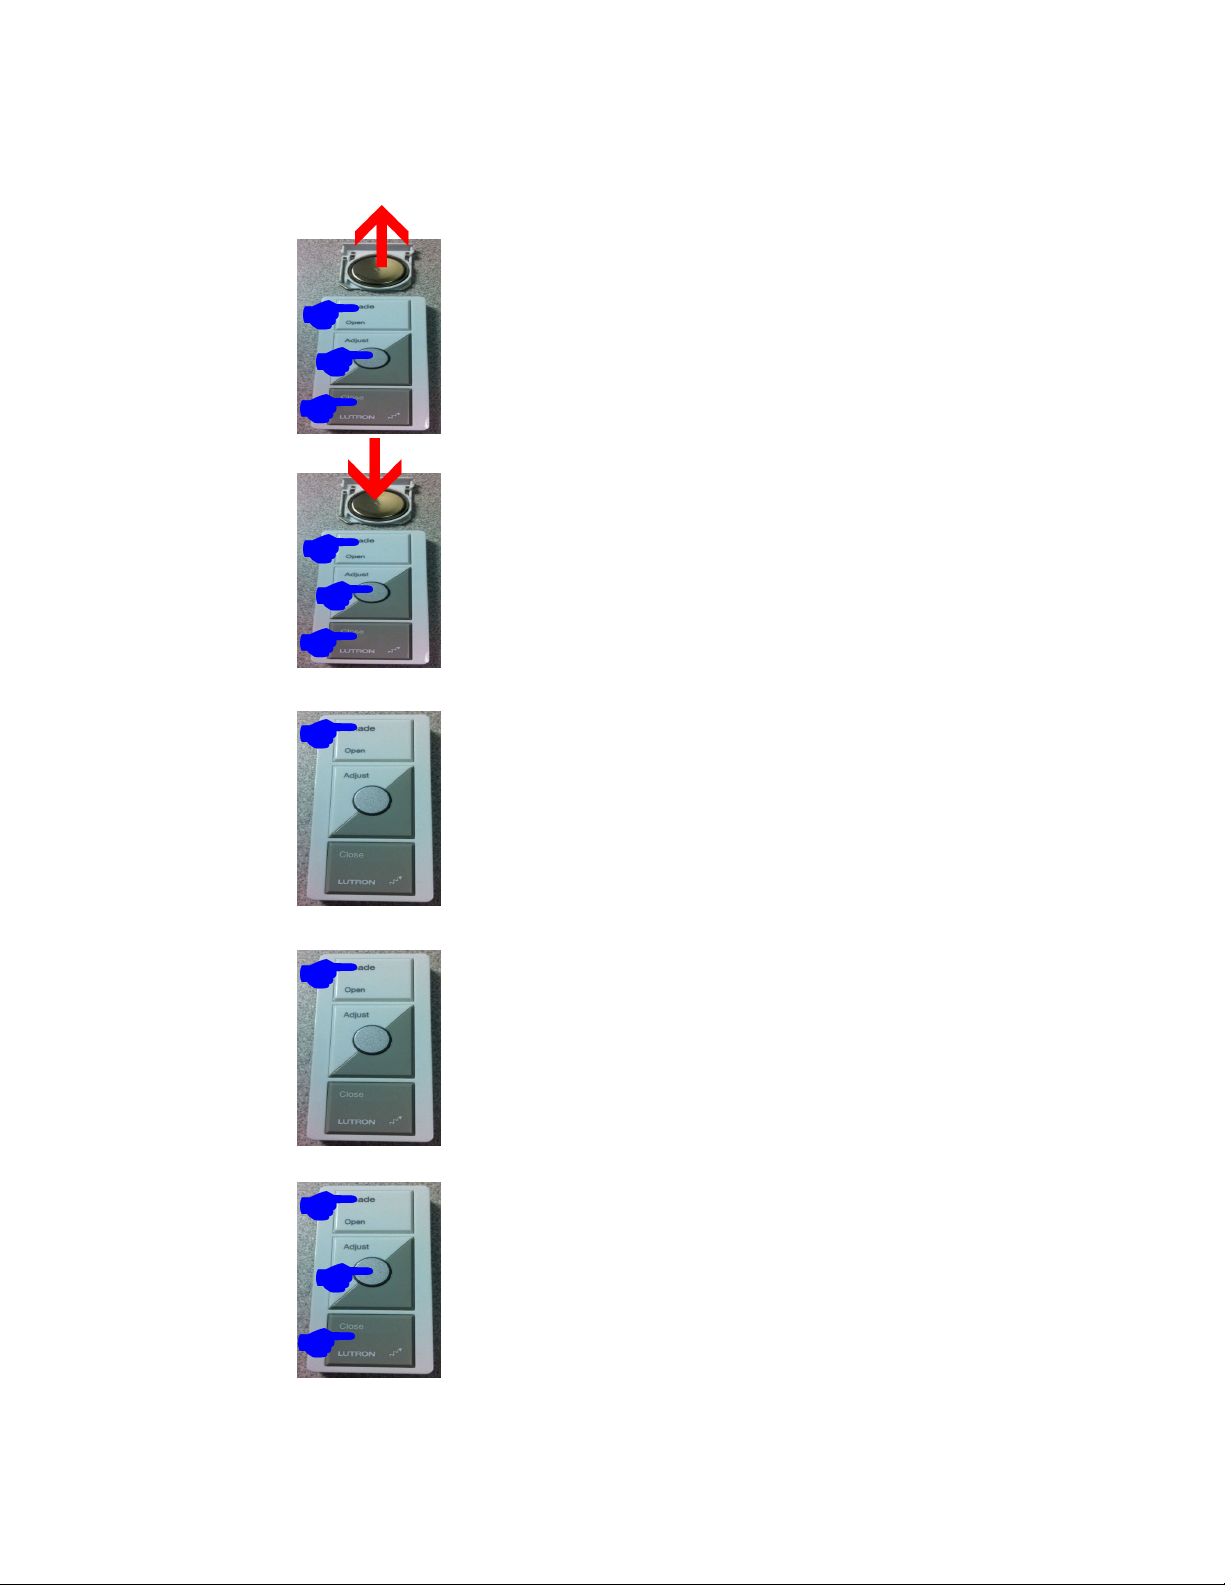
All of the following procedures must always e
completed with the system in device Activation mode.
4 Button Pico Wireless Controls''''''.'''''''''''''..9

1. Remove the batter from the sensor b
pulling on the small tab next to the
batter compartment and hold in the
Test, Lights ON, and Lights OFF
buttons.
Now that the frequency has een matched up to the Main
Repeater, proceed with device activation as specified in the
RadioRA2 Programming Utility.
2. Continue to hold all three buttons while
pushing the batter back into place. After
inserting the batter , continue holding the
three buttons for about 3 seconds until the
dome LED flashes rapidl .
3. Press the Lights ON button to tr the next
RF channel (15 total). Press the Lights OFF
button to tr the previous channel. Press
the Test button to repeat the current
channel.
4. Continue to c cle through the RF channels
until ou hear the Main or Aux Repeater
beep. The beep indicates that the proper
RF channel has been identified. At this
point stop pressing an of the buttons that
change the sensor’s RF channel!
5. Hold in the Test, Lights ON, and Lights
OFF buttons for about 3 seconds until
the dome LED stops flashing.
1
st
and 2
nd
Generation Ceiling Mount Sensors
LRF2-xCRB
x = O for Occupanc ; V for Vacanc
3

3. Continue to hold all three buttons while
pushing the batter back into place. After
inserting the batter , continue holding the
three buttons for 6 seconds until the dome
LED flashes rapidl .
1. Remove the batter from the sensor.
2. Hold in the button, Test button,
and one of the three buttons on the
back of the sensor.
4. Press the Test button to c cle through each
RF channel (15 total). Press the
button to resend the association
message at the currentl selected
channel.
5. Continue to c cle through the RF channels
until ou hear the Main or Aux Repeater
beep. The beep indicates that the proper
RF channel has been identified. At this
point stop pressing an of the buttons that
change the sensor’s RF channel!
6. Hold in the Button and Test button
For 6 seconds until the dome LED stops
rapid flashing.
Now that the frequency has een matched up to the Main
Repeater, proceed with device activation as specified in the
RadioRA2 Programming Utility.
3
rd
Generation Ceiling Mount Sensors
LRF2-xCR2B
x = O for Occupanc ; V for Vacanc
4

1. Remove the batter from the sensor and
hold in the Test and Link buttons.
Now that the frequency has een matched up to the Main
Repeater, proceed with device activation as specified in the
RadioRA2 Programming Utility.
2. Continue to hold both buttons while sliding
the batter back into place. After inserting
the batter , continue holding both buttons
for about 6 seconds until the LED flashes
rapidl .
3. Press the Test button to tr the next RF
channel (15 total). Press the Link button to
repeat the current channel.
4. Continue to c cle through the RF channels
until ou hear the Main or Aux Repeater
beep. The beep indicates that the proper
RF channel has been identified. At this
point stop pressing an of the buttons that
change the sensor’s RF channel!
5. Hold in the Test and Link buttons for about
6 seconds until the LED stops flashing.
Temperature Sensors
LRF2-TWRB
5

1. Remove the batter from the sensor and
hold in the Sensor, Lights ON, and
Lights OFF buttons.
Now that the frequency has een matched up to the Main
Repeater, proceed with device activation as specified in the
RadioRA2 Programming Utility.
2. Continue to hold all three buttons while
pressing the batter back into place. After
inserting the batter , continue holding all
three buttons for about 3 seconds until the
LED flashes rapidl .
3. Press the LIGHTS ON button to tr the next
RF channel (15 total). Press the LIGHTS
OFF button to tr the previous RF channel.
Press the TEST button to repeat the current
channel.
4. Continue to c cle through the RF channels
until ou hear the Main or Aux Repeater
beep. The beep indicates that the proper
RF channel has been identified. At this
point stop pressing an of the buttons that
change the sensor’s RF channel!
5. Hold in the Test, Lights ON, and Lights
OFF buttons for about 3 seconds until the
dome LED stops flashing.
Wall Mount Sensors
LRF2-x LB
x = O for Occupanc ; V for Vacanc
= K for Corner; H for Hallwa ; W for flat Wall
6
1. Remove the batter from the Pico and
hold in the Open/On, Preset, and Close/
Off buttons.
Now that the frequency has een matched up to the Main
Repeater, proceed with device activation as specified in the
RadioRA2 Programming Utility.
2. Continue to hold all three buttons while
pressing the batter back into place. After
inserting the batter , continue holding all
three buttons for about 3 seconds until the
LED flashes about once per second.
3. Press the Open/On button to tr the next RF
channel (15 total). Press the Close/Off
button to tr the previous channel. Press
the preset button to repeat the current
channel
4. Continue to c cle through the RF channels
until ou hear the Main or Aux Repeater
beep. The beep indicates that the proper
RF channel has been identified. At this
point stop pressing an of the buttons that
change the sensor’s RF channel!
5. Hold in the Open/On, Preset, and Close/
Off buttons for about 3 seconds until the
LED stops flashing.
1
st
Generation Pico Wireless Controls
RRD-P3BRL-x
x = L for Lights; S for Shades
7

1. Triple tap and hold the On/Open button
(top button) of the Pico. Hold the button
for at least 15 seconds. The Main and
Aux Repeaters will beep to let ou know
that the Pico is now in Frequenc
Changing Mode.
Now that the frequency has een matched up to the Main
Repeater, proceed with device activation as specified in the
RadioRA2 Programming Utility.
2. Press the On/Open (top) or Off/Close
(bottom) buttons to c cle through the 15 RF
frequencies. C cle through until ou hear
the Main or Aux Repeaters beep. Once ou
hear the beep, that means that the proper
RF channel has been identified. At this point
stop pressing an of the buttons that change
the sensor’s RF channel!
3. Press and hold the On/Open (top) and Off/
Close (bottom) buttons for at least 3
seconds to exit Frequenc Changing Mode.
The Main and Aux Repeaters will beep
once the Pico successfull exits the Mode.
2
nd
Generation Pico Wireless Controls
PJ-xB, PJ-xBRL, PJ2-xB, PJ2-xBRL, PJN-xB, and PJN-xBRL
x = 2 for two button; 3 for three button
8

1. Triple tap and hold the top button of the
Pico. Hold the button for at least 15
seconds. The Pico status LED will blink
once per second to let ou know that
the Pico is now in Frequenc Changing
Mode.
Now that the frequency has een matched up to the Main
Repeater, proceed with device activation as specified in the
RadioRA2 Programming Utility.
2. Press the top or bottom buttons to c cle
through the 15 RF frequencies. C cle
through until ou hear the Main or Aux
Repeaters beep. Once ou hear the beep,
that means that the proper RF channel has
been identified. At this point stop pressing
an of the buttons that change the sensor’s
RF channel!
3. Press and hold the top and bottom buttons
for at least 3 seconds to exit Frequenc
Changing Mode. The Main and Aux
Repeaters will beep once the Pico
successfull exits the Mode.
4 Button Pico Wireless Controls
PJ2-4B
9
Table of contents
Other Lutron Electronics Transmitter manuals


Popular Transmitter manuals by other brands


Dejero
Dejero EnGo 3x manual

Rosemount
Rosemount 4600 Reference manual

Speaka Professional
Speaka Professional 2342740 operating instructions

trubomat
trubomat GAB 1000 instruction manual

Teledyne Analytical Instruments
Teledyne Analytical Instruments LXT-380 instructions

Rondish
Rondish UT-11 quick start guide


