Neem de hier genoemde veiligheids- en montagevoorschriften in acht, bewaar deze gebruiksaanwijzing.
1. Lees deze handleiding zorgvuldig door. Raadpleeg bij twijfel het verkooppunt
2. Op grond van de veiligheids- en toelatingsvoorschriften is het zelf ombouwen (CE) en/of veranderen van lampen niet toegestaan:
In deze gevallen vervalt de garantie.
3. Stel het apparaat niet bloot aan hoge temperaturen, extreme belastingen of ander oneigenlijk gebruik. Ook in deze gevallen vervalt de garantie.
4. Dit product is geen speelgoed en dient door kinderen niet als zodanig gebruikt te worden.
Installatievoorschriften:
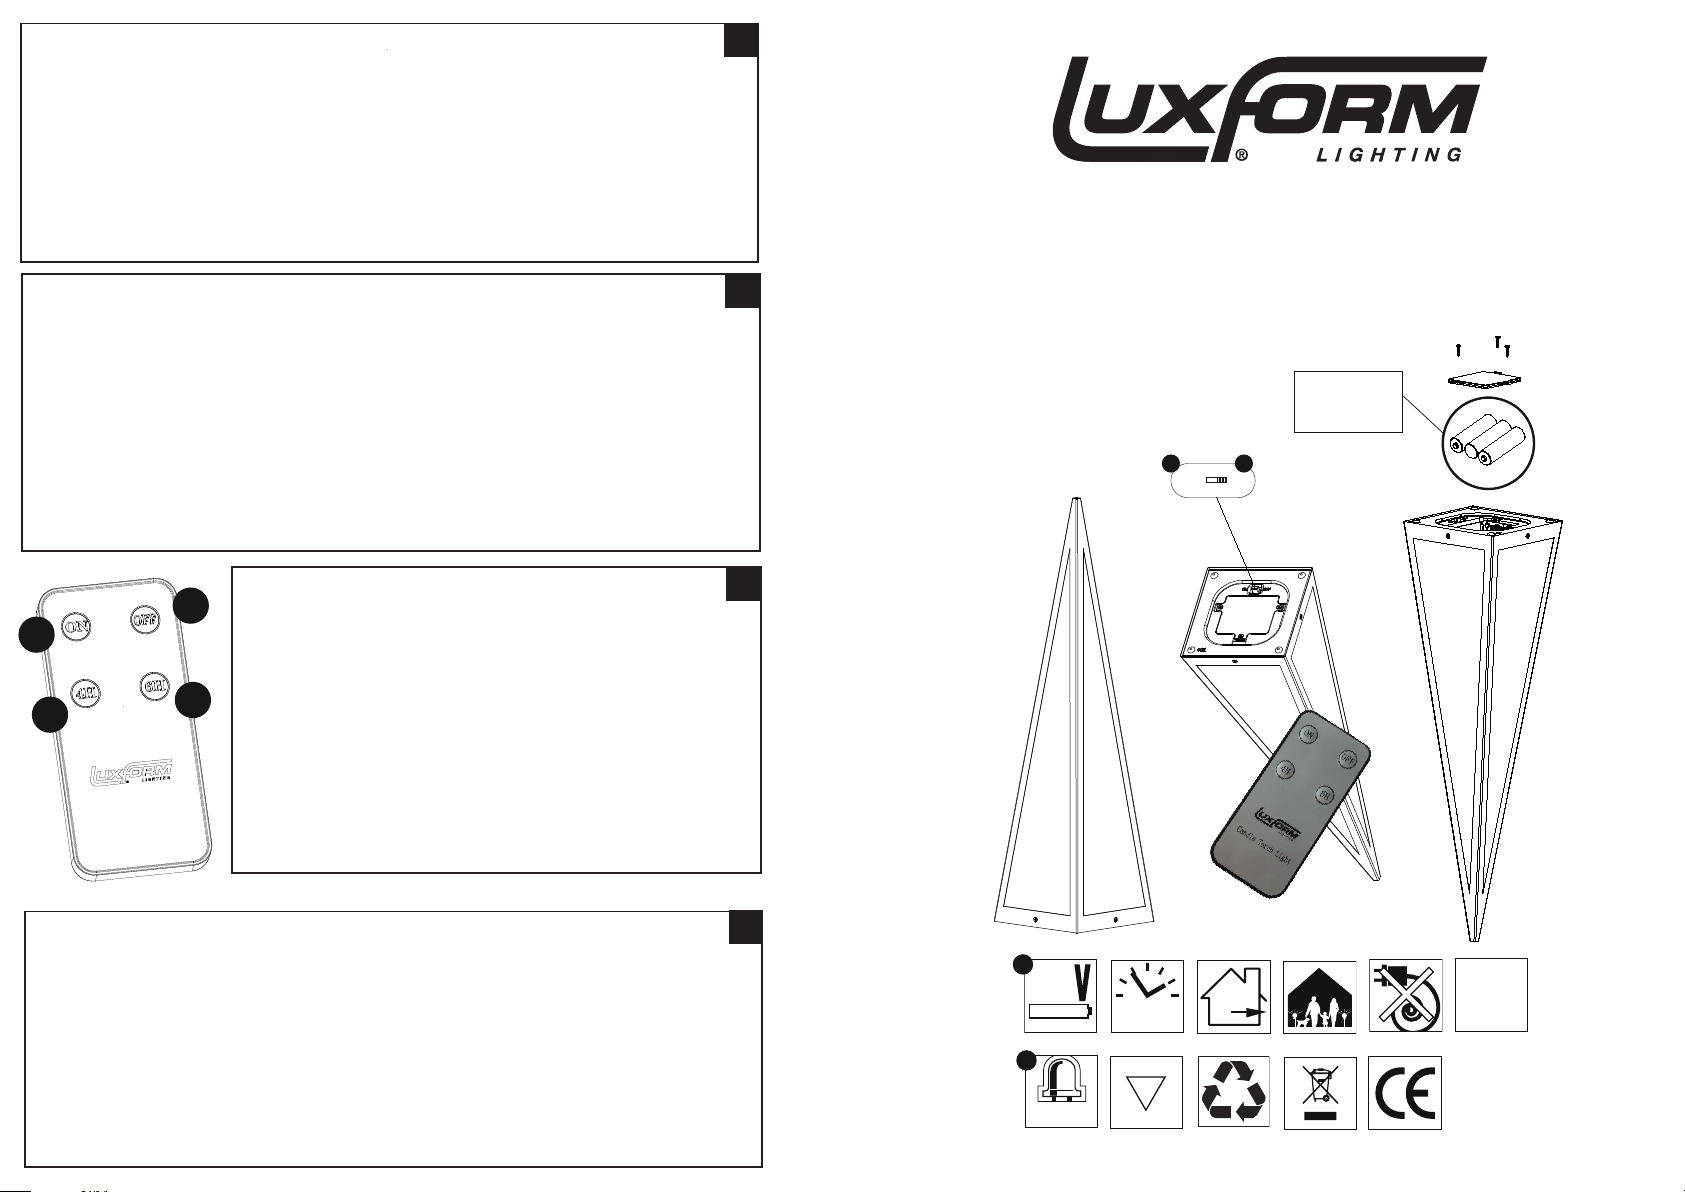
A.Voor gebruik altijd eerst de lamp inschakelen: Zet de schakelaar op ON of verwijder de circuitonderbreker.
B. Plaats de batterijen (niet bijgesloten) in de lamp.
C. Monteer of plaats de lamp zonder druk uit te oefenen op het kaars onderdeel van de lamp. Gebruik geen hamer!
D. Voor uitleg van de afstandsbediening wordt u naar andere zijde van de gebruiksaanwijzing verwezen.
Technische specicaties & richtlijnen per model:
. Houdt in elk geval alle technische specicaties van uw armatuur in acht! Raadpleeg hiervoor de pictogramcodes vermeld op in deze gebruiksaanwijzing.
. Hieronder vindt u de uitleg van de pictogrammen.
P9 Deze lamp gebruikt 3x AA Alkaline 1,5V batterijen (NIET bijgesloten).
P11 De afstandsbediening heeft een timer functie: voor 4 of 6 uren.
C7 Deze lamp is geschikt voor gebruik buitenshuis.
C1 Deze verlichting is uitermate veilig en geschikt voor gebruik in de buurt van mensen en huisdieren.
C9 Geen elektriciteitsaansluiting vereist.
L13 Deze lamp heeft een of meerdere LED’s (lichtdiode) als lichtbron. Dit combineert een lange levensduur met een zeer gering stroomverbruik.
Deze LED’s zijn niet verwisselbaar.
L15 Dit model bevat warm witte vlammende LED.
M2 Het armatuur is geschikt voor bevestiging/plaatsing aan/op normaal ontvlambare materialen/oppervlakten. Inbouwarmaturen mogen onder
geen enkele voorwaarde bedekt worden met isolatiemateriaal of gelijkwaardig materiaal.
M18 Verpakkingsmateriaal recyclen s.v.p.
M19 Op de juiste wijze verwijderen s.v.p.
Veuillez suivre scrupuleusement les consignes de sécurité et d’installation et conserver ce manuel en lieu sûr:
1. Lisez attentivement ce manuel. En cas de doute, demandez conseil en magasin.
2. Pour des raisons de santé et de securité, il n'est pas permis de convertir ou de changer ces lampes vous-même. Sinon, la garantie sera
nulle et non avenue.
3. N’exposez pas ce produit à des chaleurs ou des poids extrêmes ni à tout autre usage inapproprié. Sinon, la garantie sera nulle et non avenue.
4. Ce produit n’est pas un jouet pas être utilisé en tant que tel par des enfants.
Consignes d’installation:
A. Poussez le bouton sur MARCHE/ON ou enlevez la languette plastique.
B. Placez les piles (non incluses) dans la lampe.
C. Montez ou placez la lampe sans appliquer de pression sur la partie bougie de la lampe. Ne pas utiliser de marteau!
D. Pour une explication de la télécommande, veuillez vous reporter à l’autre côté du manuel.
Spécications techniques et consignes en fonction du modèle:
. Lisez attentivement l’ensemble des détails techniques de votre produit. Pour une explication de la télécommande, veuillez vous reporter à l’autre côté du manuel.
. Ci-dessous vous trouverez une explication des pictogrammes.
P9 Cette lampe utilise 3 piles alcalines AA 1.5V AA (non fournies).
P11 La télécommande a une fonction de minuterie: pour 4 ou 6 heures.
C7 Cette lampe est adaptée pour une usage en extérieur.
C1 À protéger des enfants et des animaux.
C9 Ne nécessite aucun branchement au courant électrique.
L13 Cet éclairage nécessite 1 ou plusiers LED comme source lumineuse. Il allie durée de vie et faible consommation. Les LED ne sont pas interchangeables.
L15 Ce modèle contient des LED aming blanc chaud.
M2 Ce produit doit être placé sur ou relié à des matériaux ou surfaces normalement inammables. Les produits encastrablesne doivent en aucun
cas être recouverts de matériaux isolants ou autres.
M18 Veuillez recycler l’emballage.
M19 Ne le jetez pas n’importe où.
Follow the safety and assembly instructions carefully and keep this manual in a safe place.
1. Read this manual carefully. If in doubt, consult the vendor.
2. Based on health and safety rules, you must not convert (CE), or make any changes to the lights yourself. Should you ignore this, the guarantee
will be null and void.
3. Do not expose the product to extreme heat, extreme pressure, or other inappropriate use. Should you ignore this, again the guarantee will be
null and void.
4.This product is not a toy and such it is not to be used as such by children.
Installation instructions:
A. Move the switch to ON or remove the plastic strip.
B. Place the batteries (which are NOT included in packaging) inside the light.
C. Assemble or place the lights without putting any pressure on the candle part of the light. Do not use a hammer!
D. For explanation of using remote control, please see back of this instruction manual.
Technical specications and guiding lines per model:
.Take notice of all technical specications for your product all times. See the pictorial signs on the instruction manual.
. Below is an explanation of the pictorial signs.
P9 This light uses (3x) batteries of the type AA 1,5V Alkaline (which are NOT included in packaging).
P11 The remote control has a timer option: for 4 or 6 hours.
C7 This light can be used outdoors.
C1 Safe around children and animals.
C9 No connection to the electrical circuit required.
L13 This light uses 1 or more LED’s as a light source.This combines a long life-time with low power consumption. LED’s are not interchangeable.
L15 This model contains LED in warm„softtone“ white with shimmering eect.
M2 The product is suitable for placement on/connecting to regularly ammable material/surfaces. Built in products must under no circumstances
be covered by isolation material, or any material of that sort.
M18 Please recycle packaging.
M19 Please dispose of batteries in the correct way.
Bitte beachten Sie hier die genannten Sicherheits- und Montagevorschriften und bewahren Sie diese Gebrauchsanweisung sorgfältig auf.
1. Bitte lesen Sie die Gebrauchsanleitung gründlich durch. Bei evt. Fragen wenden Sie sich bitte an IhreVerkaufstelle.
2. Auf Grund der Sicherheits- Und Zulassungsvorschriften ist ein selbst umbauen (CE) und/oder das ändern der Lampen nicht gestattet.
In diesen Fällen erlischt der Garantieanspruch.
3. Setzen Sie die Leuchten nie zu hohen Temperaturen, extreme Belastungen oder anderem unsachgemäß Gebrauch aus.
Auch in diese Falle erlischt der Garantieanspruch.
4. Dieses Produkt ist kein Spielzeug: Es sollte von Kinder nicht derartig angewandt werden.
Installationsvorschriften:
A.Vor der ersten Inbetriebnahme zuerst immer die Leuchte einschalten: Schalter auf ON, oder den Stromunterbrecher (Kunststoasche) entfernen.
B. Legen Sie die Batterien (nicht im Karton enthalten) in die Lampe ein.
C. Montieren oder platzieren Sie die Lampe, ohne Druck auf den Kerzenteil der Lampe auszuüben. Nie ein Hammer anwenden!
D. Zur Erläuterung der Fernbedienung wird auf die andere Seite der Gebrauchsanweisung verwiesen.
Technische Spezikationen & Richtlinien bei dem einzelnen Modell:
. Bitte, beachten Sie alle technischen Spezikationen Ihrer Lampe im Auge! Detailinformationen können Sie den
Piktogramme entnehmen., die auf der Bedienungsanleitung Ihres Modells erwähnt sind.
. Nachfolgend nden Sie die Erklärung der Piktogramme.
P9 Diese Lampe verwendet 3x AA-Alkaline-1,5-V-Batterien (NICHT enthalten).
P11 Die Fernbedienung verfügt über eineTimerfunktion: für 4 oder 6 Stunden.
C7 Diese Lampe ist für den Außenbereich geeignet.
C1 Sicher und geeignet für den Gebrauch in der Nähe von Menschen undTiere.
C9 Kein Elektrizitätsanschluß benötigt.
L13 Diese Lampe hat ein oder mehrere LED’s (Leuchtdioden) als Lichtquelle. Diese Kombination vereinigt eine lange Lebensdauer mit
einem sehr geringen Stromverbrauch. LED’s sind nicht Austausch oder ersetzbar.
L15 Dieses Modell enthält eine warmweiße ammende LED.
M2 Diese Lampen sind geeignet für dieVerwendung/Platzierung an/auf normalen entzündbaren Materialien/Oberächen. Einbauleuchten
dürfen unter keinen Umständen bedeckt werden mit Isolierungsmaterial oder anderweitigen Materialien/Gegenständen.
M18 Verpackungsmaterial bitte ordnungsgemäß entsorgen.
M19 Lampen und Zubehör gehören nicht in den Restmüll bitte dementsprechend entsorgen.
D
GB
F
NL