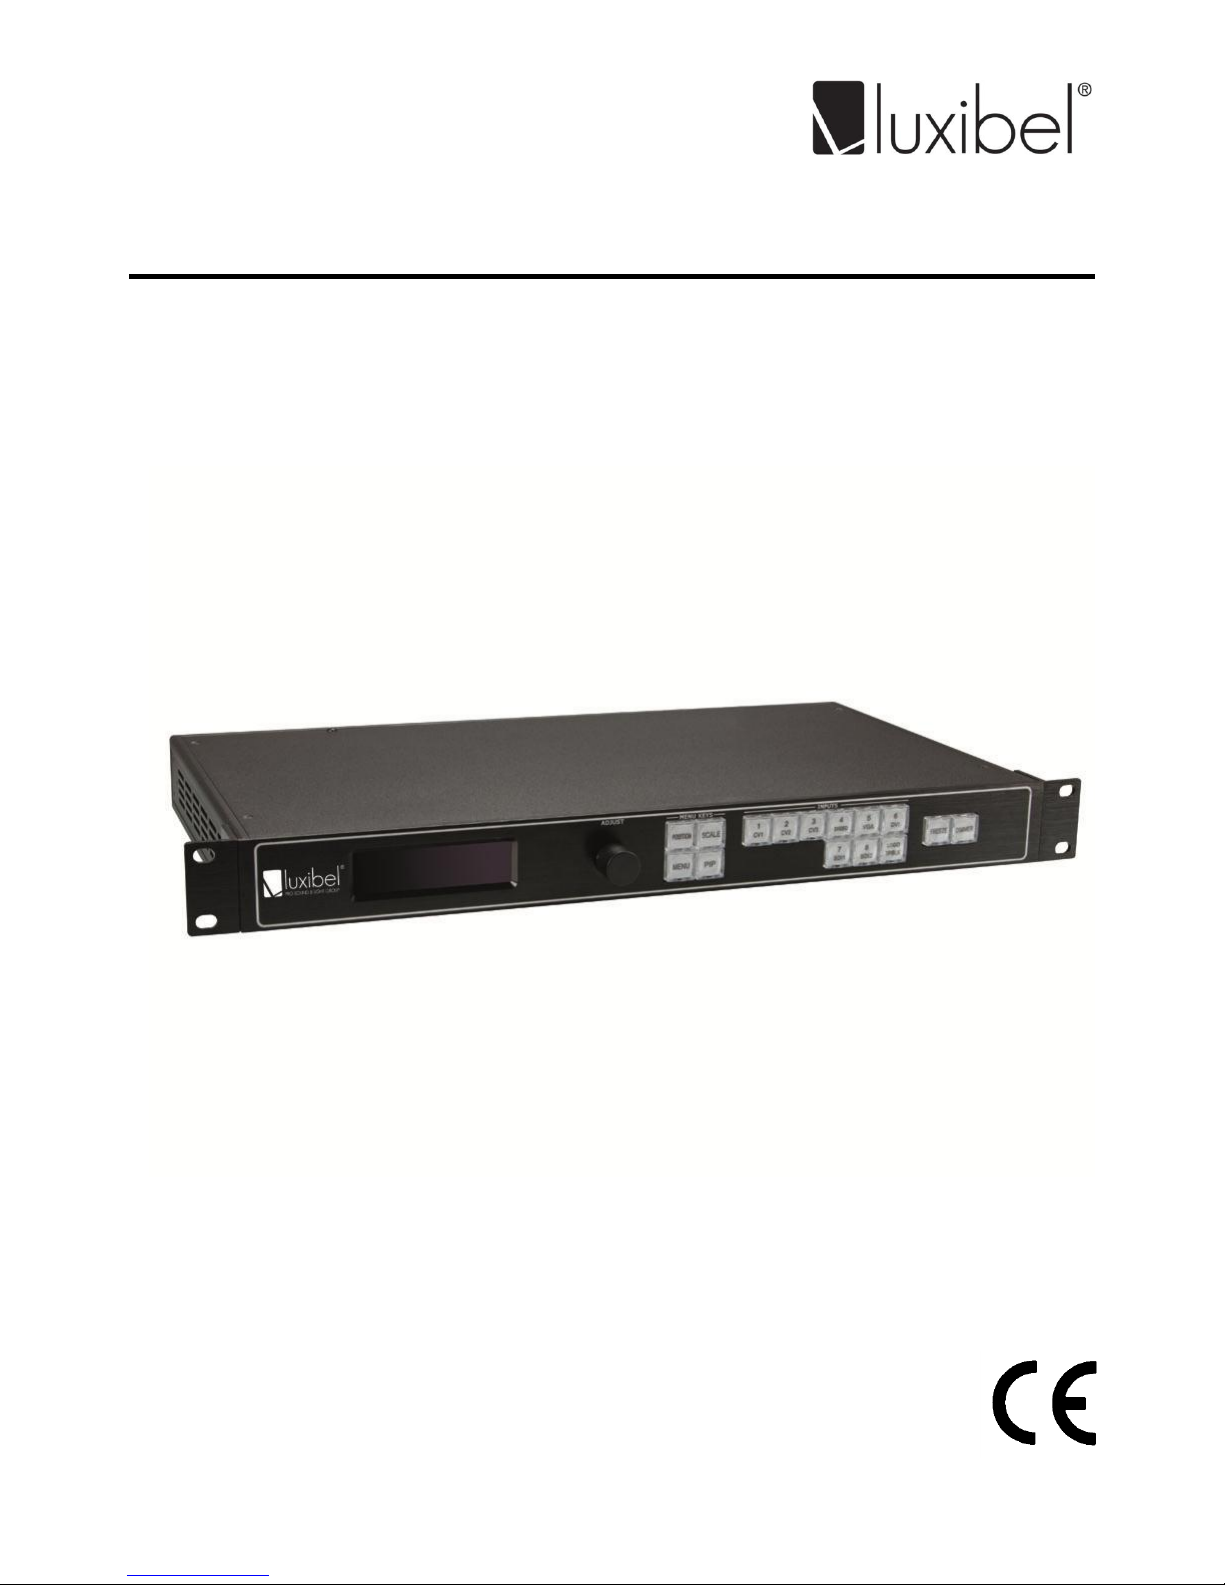
Luxibel LX496 User manual

LX496
2-LAYER SWITCHER AND SCALER
USER MANUAL

LX496
V. 01 –30/07/2014 2 ©Velleman nv
Menu Structure

LX496
V. 01 –30/07/2014 3 ©Velleman nv
USER MANUAL
1. Introduction
To all residents of the European Union
Important environmental information about this product
This symbol on the device or the package indicates that disposal of the device after its lifecycle could
harm the environment. Do not dispose of the unit (or batteries) as unsorted municipal waste; it should
be taken to a specialized company for recycling. This device should be returned to your distributor or to
a local recycling service. Respect the local environmental rules.
If in doubt, contact your local waste disposal authorities.
Thank you for choosing Luxibel®! Please read the manual thoroughly before bringing this device into service. If
the device was damaged in transit, do not install or use it and contact your dealer.
2. Safety Instructions
This appliance is not intended for use by persons (including children) with reduced physical, sensory
or mental capabilities, or lack of experience and knowledge, unless they have been given supervision
or instruction concerning use of the appliance by a person responsible for their safety.
Children shall be supervised to ensure that they do not play with the appliance.
Indoor use only. Keep this device away from rain, moisture, splashing and dripping liquids. Never
put objects filled with liquids on top of or close to the device.
Risk of electroshock when opening the cover. Touching live wires can cause life-threatening
electroshocks. Do not disassemble or open the housing yourself. Have the device repaired by
qualified personnel.
Do not operate the device without the cover installed.
Warning: If the supply cord is damaged, it must be replaced by the manufacturer, its service agent,
or similarly qualified persons in order to avoid any hazard.
Make sure that the available voltage does not exceed the voltage stated in the specifications in this
manual.
Always disconnect mains power when device not in use or when servicing or maintenance activities
are performed. Handle the power cord by the plug only.
There are no user-serviceable parts inside the device. Refer to an authorized dealer for service
and/or spare parts.
Do not use near inflammable products or in explosive atmospheres.
This device falls under protection class I. It is therefore essential that the device be earthed. Have a
qualified person carry out the electric connection.
The maximum ambient temperature is 45 °C. Do not operate the device at higher temperatures.
3. General Guidelines
Refer to the Velleman® Service and Quality Warranty on the last pages of this manual.
Keep this device away from dust and extreme temperatures. Make sure the ventilation
openings are clear at all times. For sufficient air circulation, leave at least 1" (± 2.5 cm) in
front of the openings.
Protect this device from shocks and abuse. Avoid brute force when operating the device.
Familiarise yourself with the functions of the device before actually using it.
All modifications of the device are forbidden for safety reasons. Damage caused by user modifications to
the device is not covered by the warranty.
Only use the device for its intended purpose. Using the device in an unauthorised way will void the
warranty.
Damage caused by disregard of certain guidelines in this manual is not covered by the warranty and the
dealer will not accept responsibility for any ensuing defects or problems.
Keep this manual for future reference.

LX496
V. 01 –30/07/2014 4 ©Velleman nv
4. Features
The LX496, incorporating VXP image processing technology, is a high-performance video scaler, scan convertor,
switcher and transcoder processor all in one. It is the ideal solution for converting RGB, HDTV, component, S-
video, composite (NTSC, PAL and SECAM), DVI (HDMI® compatible), SDI (SD/HD/3G compatible) into a user-
selectable video format.
The LX496 works as a real seamless, 2-layer switcher with a loop out for each input. All inputs support loop
trough output. It combines truly seamless, glitch-free switching with advanced scaling technology to meet the
requirements of high-quality, high-resolution video presentation. The LX496 is designed to deliver advanced
capabilities to high-end presentation environments.
3G/HD/SD SDI input
1 composite, 1 S-Video input
1 component input
VGA input support RGBHV / RGBS / RGSB
1 DVI input support 1080p video and 1600 x 1200, HDMI®1.3 compatible input, support video and graphic
input
1 DisplayPort (DP) input
5 audio inputs
1 DVI and 1 VGA output
1 XLR audio output
user-defined aspect ratio conversion and adjustment
pan and zoom
freeze
10-bit process
motion adaptive and field-to-frame de-interlacing modes
3.2 pull-down detection for NTSC and 2.2 film detection for PAL video source
decodes NTSC, PAL and SECAM
RS-232, USB, and Ethernet remote control
LED sending card (Linsn TS802) already installed
3 saving modes
3 independent memory presets
5. Application Scheme

LX496
V. 01 –30/07/2014 5 ©Velleman nv
6. Hardware Installation
Dimensions
The image below shows the dimensions of the device.
Precautions and Site Preparation
Before installation, please observe the following important safety and handling rules to avoid damage to the
equipment and personal injury.
To protect users from electric shock, ensure that the chassis connects to earth via the ground wire
provided in the AC power cord.
The mains plug should always remain readily operable. Unplug the power supply cord from the mains to
disconnect the device.
The environment where you install the device shall be clean, properly lit, free from static, and have
adequate power, ventilation, and sufficient space for all components.
Installation
The LX496 video scan convertor and scaler is designed to be rack-mounted. Before mounting this device, make
sure to read chapters 2. Safety Instructions and 3. General Guidelines first.
To install the device:
1. Mount in a 2U 19" rack.
2. Leave 1" (2.5 cm) on all sides to ensure proper ventilation.
3. Mount this device near PC for easy connection and setup.

LX496
V. 01 –30/07/2014 6 ©Velleman nv
7. Hardware Overview
7.1 Rear Panel
No.
Name on panel
Description
1
DIP switches
For normal operation, make sure the dip switches are in the upper position. Used
for IP software download/installation/upgrade.
2
LAN
8P8C 10/100 Mbps UDP interface.
3
USB
USB interface to connect to a computer.
4
RS232
6P6C (RJ11) connector to connect a computer via RS-232. You will need an
adapter cable (not incl.).
5
CV1-3
Composite video BNC input ports 1–3. Support video signals from players,
cameras, etc. Supports PAL, NTSC and SECAM.
6
S-VIDEO
mini-DIN-4 S-Video input port. Supports PAL, NTSC, and SECAM.
7
VGA
15-pin D-sub VGA connector for VGA input signals. Compatible with component
YPbPr signals.
8
DVI
DVI input port for sending card. To connect the DVI output from another video
processor. This connection does not support hot plugging.
9
8P8C 10/100Mbps interface to connect an LED screen + power supply jack for
sending card.
10
USB control port for sending card.
11
DVI IN
DVI input port for sending card. To connect the DVI output from another video
processor. This connection does not support hot plugging.
12
ON-OFF
On/off switch.
13
AC 85-264V
Power cord connector.
14
SDI LOOP
BNC output port to another SDI input.
15
SDI1-2
BNC input ports receiving signal from an HD player or camera.
16
CV1-3
Composite video BNC output ports 1–3. Support video signals from players,
cameras, etc. Supports PAL, NTSC and SECAM.
17
S-VIDEO
mini-DIN-4 S-Video output port. Supports PAL, NTSC, and SECAM.
18
VGA
15-pin D-sub VGA connector for VGA output signals. Compatible with component
YPbPr signals.
19
DVI
Connection to another LX496 or any device with DVI input.
20
DVI1
DVI (DVI-I) output to a monitor or LED screen that supports DVI. This connector
does not support hot plugging.
21
DVI2+VGA
DVI+VGA output connector (DVI-I). To connect to a monitor or LED screen that
supports DVI or VGA interfacing. $$$ This connector does not support hot
plugging. To connect to a VGA interface, you need a DVI-to-VGA adapter (not
incl.).
22
CVBS
Output connection to another CVBS input.

LX496
V. 01 –30/07/2014 7 ©Velleman nv
7.2 Front Panel
Also, refer to the image on page 6.
Plug in the power cord [13]and switch on the device using the on/off switch [12].
The display [23]shows the name of the device. The device performs a self-test, and then loads the last used
settings and sends the image to the target output.
Note: If you are using the device for the first time, the default input channel is CV1.
After initialisation, the display cycles through the following information:
current input channel
current output format
software program version
device serial number
IP address.
Use the front panel keys to use the settings menu. All keys are described in detail below.
Display [23]
Menu Keys [24]
POSITION
Image position adjustment
SCALE
Rescale the video image
MENU
Main menu access
PIP
Picture-in-picture/single picture image
Input Keys [25]
CV1–CV3
Corresponds with the CV1–CV3 connectors [5].
SVIDEO
Corresponds with the SVIDEO connector [6].
VGA
Corresponds with the VGA connector [7].
DVI
Corresponds with the DVI connector [8].
SDI1-SDI2
Corresponds with the SDI IN connector [15].
LOGO TP/
BLK
Test pattern key
Function Keys [26]
FREEZE
Image freeze/unfreeze
DIMMER
Image transparency adjustment
Navigation knob [27]
Turn the knob to navigate through the menu, press to confirm your selection.
8. Operation
8.1 Output Resolution
1. Measure the width and length of the LED screen, e.g. 1920 x 1080.
2. Press MENU to enter the menu.
3. Rotate the knob and select OUTPUT. Press the knob to confirm.

LX496
V. 01 –30/07/2014 8 ©Velleman nv
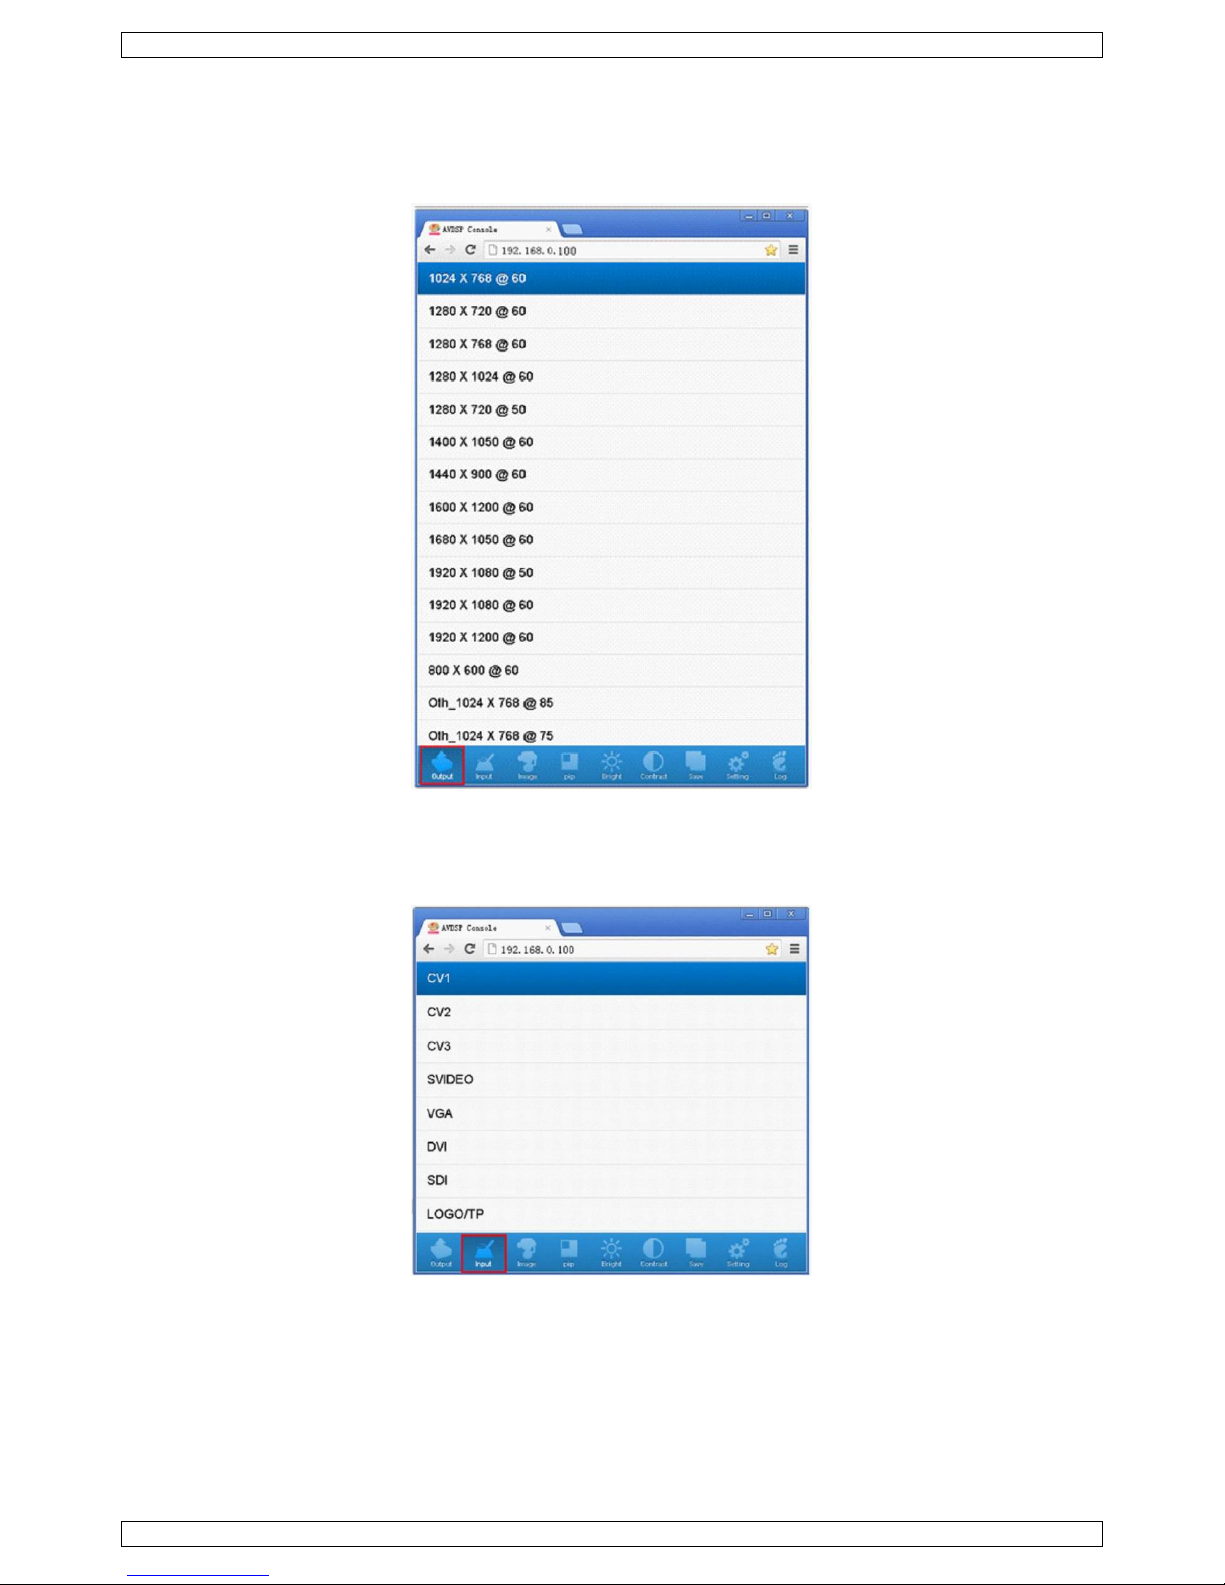
4. Rotate the knob and select OUTPUT RES. Press the knob to confirm.
5. Rotate the knob and select DVI/VGA RES. Press the knob to confirm.
6. Rotate the knob and select the desired output resolution. Press the knob to confirm.
7. Press MENU to return and exit the settings.
Note: The selected output format must be higher than or equal to the resolution of the output display. Make
sure to select the suitable resolution for best image quality. However, image will be poor when choosing
too large a resolution. The LX496 supports 13 output resolutions.
8.2 Seamless Input Switching
1. The LX496 allows seamless switching between channels.
2. Press the channel key on the front panel.
Note: The switching speed can be adjusted through the DIMMER button on the front panel.
8.3 Scale and Position Setting
Different channels may have different picture size and position. The LX496 allows you to set size and position
for each channel.
1. Press the corresponding channel button.
2. Press SCALE to enter the scale menu.
3. Respectively set the dimensions of the picture under WIDTH and HEIGHT. Press the rotating knob to
confirm.
4. Do the same for the picture position under POSITION and set POS X and POS Y.
5. Press MENU to return and exit the settings.
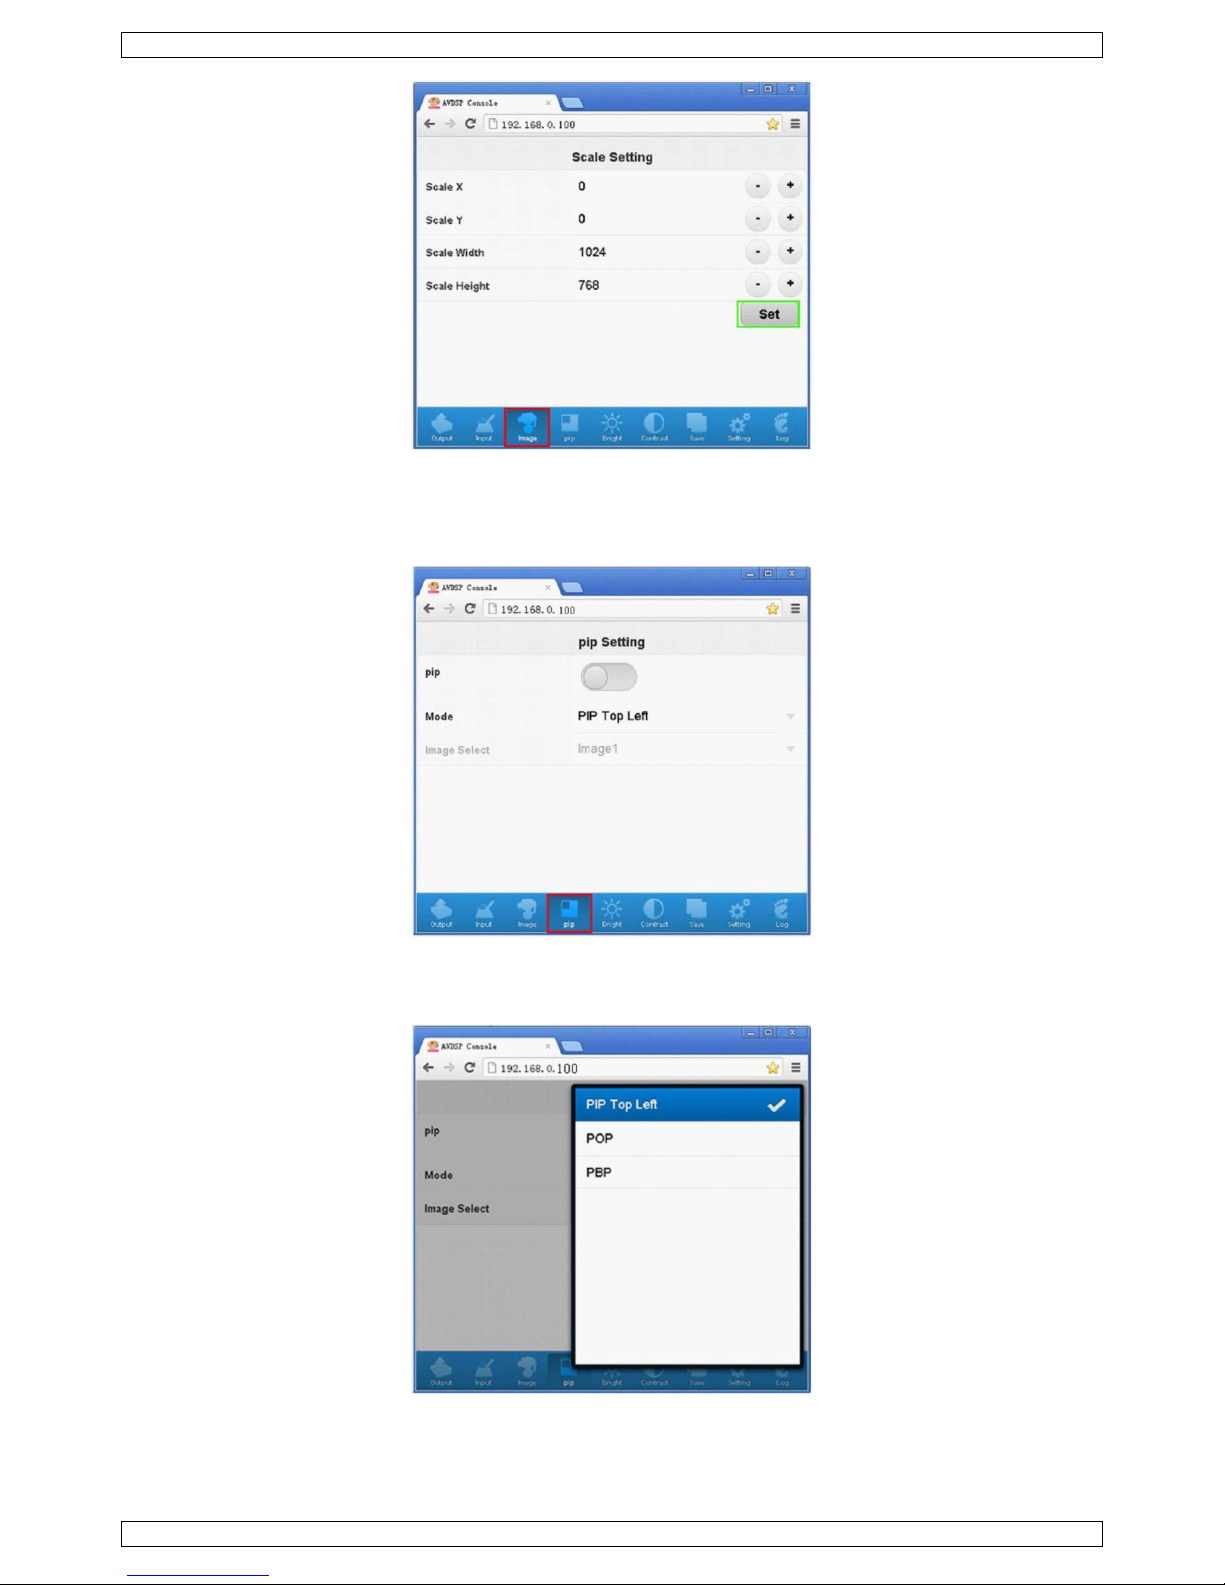
8.4 Realizing Picture-In-Picture (PIP) Images
Selecting the Primary and Secondary Images
1. Press the button corresponding to your primary image source.
2. Press PIP to select the picture-in-picture function.
3. Select your secondary image (select an image source different from your primary image source).
Setting Size and Position
1. Press MENU to enter the menu.
2. Rotate the knob and select OUTPUT. Press the knob to confirm.
3. Rotate the knob and select PIP SETTING. Press the knob to confirm.
4. Rotate the knob and select IMAGE1 or IMAGE2. Press the knob to confirm.
5. Press SCALE or POSITION and rotate the knob to select the corresponding image (IMAGE2). Press the knob
to confirm.
6. Rotate the knob to set the image size values and position. Press the knob to confirm.
7. Press MENU to return and exit the settings.
8. Press PIP to return to single-image screen.
8.5 Saving Parameters
1. Press MENU to enter the menu.
2. Rotate the knob and select VIEW. Press the knob to confirm.
3. Rotate the knob and select SAVE. Press the knob to confirm.
4. Rotate the knob and select USER1 or USER2. Press the knob to confirm.
5. Recall the saved parameters under RECALL.
9. Web Server
9.1 Setting up the Communication
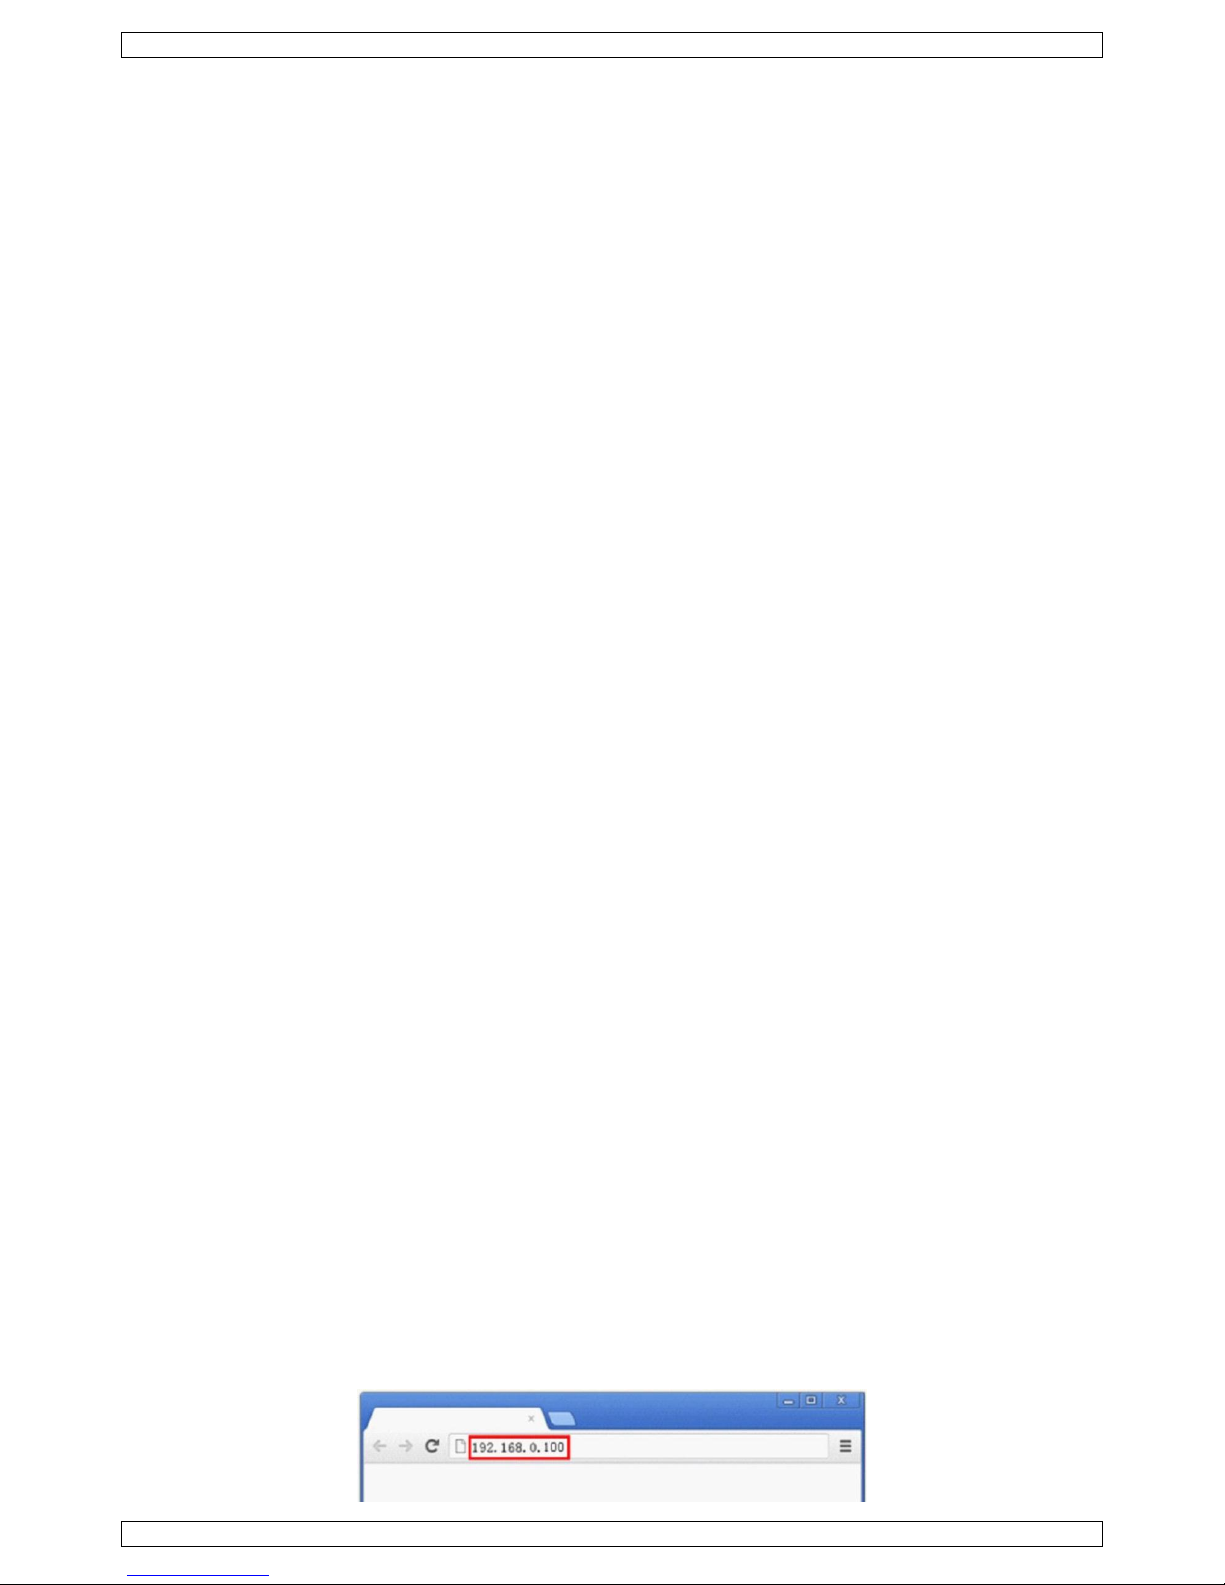
1. Open your Google Chrome browser.
2. Enter IP address 192.168.0.100 in the search engine and press RETURN on your keyboard.

LX496
V. 01 –30/07/2014 9 ©Velleman nv
9.2 Setting the Output Resolution
1. Select the OUTPUT icon in the taskbar.
2. The LX496 offers up to 15 different output resolutions to choose from.
3. Select the desired output resolution and the resolution will be updated automatically.
9.3 Switching the Input Signal
1. Select the INPUT icon in the taskbar.
2. Select the desired signal source.
9.4 Setting the Image Size and Position
1. Select the IMAGE icon in the taskbar.
2. Modify the parameters with + or -.
3. Click SET to confirm.

LX496
V. 01 –30/07/2014 10 ©Velleman nv
9.5 Setting Picture-In-Picture (PIP) Images
1. Select the PIP icon in the taskbar.
2. Click and hold the slider with the left mouse button, and slide to the right to activate the PIP function.
3. Next, choose the position of your secondary image. Click the MODE tab.
4. Choose the desired picture location: PIP Top Left, POP (Picture Outside of Picture meaning 2 pictures side
by side) or PBP (Picture by Picture meaning side-by-side display from 2 different video sources).

LX496
V. 01 –30/07/2014 11 ©Velleman nv
5. Finally, select the video source, i.e. IMAGE1 or IMAGE2.
6. You can now modify the parameters for the selected image by clicking the corresponding tab in the taskbar.
Note: The PIP function will display the same image if Image1 and Image2 have the same video input source.
9.6 Saving and Recalling Parameters
1. Select the SAVE icon in the taskbar.
2. Select the desired USERMODE by clicking the corresponding bullet.
3. You can now save (SAVE) or recall (CALL) parameters.
9.7 Other Settings
1. Select the SETTING icon in the taskbar.

LX496
V. 01 –30/07/2014 12 ©Velleman nv
2. Choose the desired language (English or Chinese) under the LANGUAGE tab.
3. Confirm by clicking SET.
4. The selection will be effective after rebooting. To do so, click the REB… button.
5. Proceed in the same way to modify the IP address (IP).
6. Also, lock or unlock the function keys (KEYLOCK) and set the alpha transparency level (DIMMER) if desired.
10. Troubleshooting
Problem
Possible Solution
No output image
Check your input signal
Please check that your input device is properly
connected and configured.

LX496
V. 01 –30/07/2014 13 ©Velleman nv
Check your output signal
Please check that your output device is properly
connected and configured.
Only a part of the image appears on the display
Your image may not be configured correctly
Zoom out your image. Reconfigure your image.
Abnormal colour with SDI input signal
Incorrect SDI input configuration
Press MENU to enter the menu. Select <INPUT> with
LEFT or RIGHT. Press SEL to enter the submenu.
Select <SDI ADJUST> with UP or DOWN. Press SEL
to enter the submenu. Select <H POS> with UP or
DOWN. Press SEL to enter the submenu. Adjust the
values with UP or DOWN.
11. Technical Specifications
video inputs
signal type
3 x composite, 1 x DVI (HDMI®1.3 compatible), 1 x VGA, 1 x 3G SDI
(optional), 1 x S-Video
connectors
4 x BNC, 4 x DVI-I, 1 x DB15, 1 x DIN4
nominal level
CVBS/Y 1 Vpp ± 3 dB (0.7 V video +0.3 V sync) 75 ohm RGB, Hsync,
Vsync 0 to 1 Vpp (0.7 V video +0.3 V sync) 75 ohm
black level
300 mV
sync-tip
0 V
standard
HDMI®1.3 compatible
impedance
75 ohm
horizontal frequency
autoscan 15 kHz to 100 kHz
vertical frequency
autoscan 50 Hz to 120 Hz
resolution range
autoscan 640 x 480 to 2048 x 1152
video processing
encoder
10 bit digital
digital sampling
30 bit, 10 bit per colour, 165 MH standard
colours
16.78 million
horizontal filtering
3 levels
vertical filtering
3 levels
encoder filtering
3 levels
video output
signal type
2 DVI, 1 VGA, 1 composite (CVBS), 1 3G SDI
connectors
2 DVI-I, 2 BNC
impedance
75 ohm
general
power supply
85-285 VAC 50/60 Hz
power consumption
25 W
weight
2.5 kg
Use this device with original accessories only. Velleman nv cannot be held responsible in the event
of damage or injury resulting from (incorrect) use of this device. For more info concerning this
product and the latest version of this manual, please visit our website www.luxibel.com. The
information in this manual is subject to change without prior notice.
© COPYRIGHT NOTICE
The copyright to this manual is owned by Velleman nv. All worldwide rights reserved. No part of this
manual may be copied, reproduced, translated or reduced to any electronic medium or otherwise without the
prior written consent of the copyright holder.

Velleman® Service and Quality Warranty
Since its foundation in 1972, Velleman® acquired extensive experience in the electronics world and currently
distributes its products in over 85 countries.
All our products fulfil strict quality requirements and legal stipulations in the EU. In order to ensure the quality,
our products regularly go through an extra quality check, both by an internal quality department and by
specialized external organisations. If, all precautionary measures notwithstanding, problems should occur,
please make appeal to our warranty (see guarantee conditions).
General Warranty Conditions Concerning Consumer Products
(for EU):
• All consumer products are subject to a 24-month warranty on production flaws and defective material as from
the original date of purchase.
• Velleman® can decide to replace an article with an equivalent article, or to refund the retail value totally or
partially when the complaint is valid and a free repair or replacement of the article is impossible, or if the
expenses are out of proportion.
You will be delivered a replacing article or a refund at the value of 100% of the purchase price in case of a flaw
occurred in the first year after the date of purchase and delivery, or a replacing article at 50% of the purchase
price or a refund at the value of 50% of the retail value in case of a flaw occurred in the second year after the
date of purchase and delivery.
• Not covered by warranty:
- all direct or indirect damage caused after delivery to the article (e.g. by oxidation, shocks, falls, dust, dirt,
humidity...), and by the article, as well as its contents (e.g. data loss), compensation for loss of profits;
- consumable goods, parts or accessories that are subject to an aging process during normal use, such as
batteries (rechargeable, non-rechargeable, built-in or replaceable), lamps, rubber parts, drive belts...
(unlimited list);
- flaws resulting from fire, water damage, lightning, accident, natural disaster, etc.…;
- flaws caused deliberately, negligently or resulting from improper handling, negligent maintenance, abusive
use or use contrary to the manufacturer’s instructions;
- damage caused by a commercial, professional or collective use of the article (the warranty validity will be
reduced to six (6) months when the article is used professionally);
- damage resulting from an inappropriate packing and shipping of the article;
- all damage caused by modification, repair or alteration performed by a third party without written permission
by Velleman®.
• Articles to be repaired must be delivered to your Velleman® dealer, solidly packed (preferably in the original
packaging), and be completed with the original receipt of purchase and a clear flaw description.
• Hint: In order to save on cost and time, please reread the manual and check if the flaw is caused by obvious
causes prior to presenting the article for repair. Note that returning a non-defective article can also involve
handling costs.
• Repairs occurring after warranty expiration are subject to shipping costs.
• The above conditions are without prejudice to all commercial warranties.
The above enumeration is subject to modification according to the article (see article’s manual).
Made in PRC
Imported by Velleman nv
Legen Heirweg 33, 9890 Gavere, Belgium
www.velleman.eu
Table of contents