Lynx FINISHLYNX BRONZE User manual

FinishLynx Bronze System Quick Start Guide Page 1
FINISHLYNX BRONZE PACKAGE
QUICK START GUIDE
FOR ETHERLYNX VISION CAMERAS
Updated April 2017

FinishLynx Bronze System Quick Start Guide Page 2
Quick-Start Guide - FinishLynx Bronze Package Timing System
Please verify that your FinishLynx Bronze Package contains all the components pictured here. If something is missing, or if you have
questions setting up your system after following this quick start guide, call: 1-800-989-5969. For additional tech support documents
and downloads, visit www.finishlynx.com/support/
Item
Description
Part #
Item
Description
Part #
Carrying Case
1A207
Normally closed start
sensor with light
3L400
EtherLynx Vision high
sensitivity camera
5L500
500 ft. start sensor cable
3A100
Not pictured
Timer-Enabled option for
5L500 camera
5LTE
Connection box
C-Box
C-Mount 8-48mm f1.2
Manual Zoom Lens
C848
Connection box cable
451
CS Mount 2.8-10mm P-Iris
lens
CS2810P
25 ft. Ethernet cables (x2)
C10BT-25
CS Mount to C Mount
Adapter
MCS-C
Capture button and
USB/Serial adapter
1A205U
Geared head
BG3275
Power Injector for Power
Over Ethernet
IDL-PoE
Super head clamp
BG2909
Lynx USB Flash Drive with
FinishLynx32 and LynxPad
5LSW and
9LSW01
Camera tripod
BG3036
Be sure to keep your USB flash drive safe. It includes your Serial Numbers, Software, & Quick-Start Guides.
To access the files, insert the flash drive in your computer and click on START.html.
Items not included
Laptop or netbook computer running Microsoft Windows. Your computer needs: 1 available serial port (or USB port with serial
adapter), and 1 available Ethernet port.
Plumb bob and string. The plumb bob is available at your local hardware store, and you can use any type of string, as long as it
is at least the width of your track (optional).
Printer (optional)
Introduction
In this QSG, you will learn how to configure the FinishLynx network, set up the EtherLynx Vision camera and align it with the finish
line using the EasyAlign software feature. You will also learn how to capture, evaluate, and print a FinishLynx results image, and
import a start list created in LynxPad.

FinishLynx Bronze System Quick Start Guide Page 3
Step 1. Go to the track
Bring your FinishLynx system (and an assistant) to the track.
Make sure there is power available for your computers and
for the Power over Ethernet switch. The EtherLynx Vision
camera and the IdentiLynx camera will receive their power
via the Ethernet data cables.
Set up a table near the finish line, ideally on the infield if
power is available. The finish line should have black lane
markers painted or taped on the finish. If not, we suggest you
use black matte tape to designate lane lines. This will help
you align the camera and get clearer images.
Step 2. Install the software
A. FinishLynx
Install FinishLynx from the USB thumb drive provided with your
system or download the latest version at:
www.finishlynx.com/product/software/finishlynx-results-software/
Follow the instructions on your screen to install FinishLynx.
When prompted, enter the serial numbers provided on the
flash drive.
1. Start FinishLynx by clicking the Windows Start button and
selecting All Programs | FinishLynx.
B. LynxPad
Install using the Lynx flash drive or download the latest
version of LynxPad at:
http://www.finishlynx.com/product/event-management/lynxpad/
Follow the instructions on your screen to install LynxPad.
When prompted, enter the serial number found inside the
Lynx flash drive.
Note: You should Right Click on the installer and select Run
as Administrator to install LynxPad, if you do not, you will not
be able to print from LynxPad.
Step 3. Evaluate a sample image
1. Start FinishLynx. Click File - Open….
2. Double-click Sprint.evn to open the sample event.
Note: This sample is a two-camera image. Your Bronze
System uses only 1 line-scan camera and produces single-
camera images.
3. Click the mouse once on the torso of a competitor on the
left side of the screen. A red hairline appears. Enter the
lane number for the athlete in the identification box.
4. Press the Enter key on your computer. The finisher’s
time appears in the start list above the image.
5. Repeat these steps for all of the competitors on the
screen. You have just successfully evaluated a race in
FinishLynx.
6. Click File | Close window. If you want to reuse the image
later for practice evaluation, click No when asked to save
your changes. Close FinishLynx.
Step 4. Configure the network for Windows
OS prior to Windows 7 (See Step 5 below for
Windows 7, 8 and higher)
1. Click the Microsoft Windows Start button and select
Control Panel, or click Start | Settings | Control Panel.
2. Double-click Network Connections.
3. Right-click the Local Area Connection associated with the
network interface card (NIC) in use and select Properties.
The Local Area Connection Properties dialog appears.
4. Make sure you see a line that reads, Internet Protocol
(TCP/IP). You may have to scroll down to see it.
a. Click Install and select Protocol.
b. Click Add....
c. Click to select the Microsoft TCP/IP option and then
click OK.
5. Check the box next to Internet Protocol (TCP/IP).
6. Click to select Internet Protocol (TCP/IP) and then click
Properties. The Internet Protocol (TCP/IP) Properties
dialog appears.
7. Click the Use the following IP Address: button and then
type the following numbers:
IP address: 192.168.0.5
Subnet mask: 255.255.255.0. Click Ok and then click
Ok again.
8. If you are running Windows XP, follow these steps to
disable the firewall. Otherwise continue to Step 6
d. Open the Windows Network & Sharing Center.
e. Right-click the Local Area Connection associated
with your system, and select Properties. The Local
Area Connection dialog appears.
f. Click the Advanced tab.
g. Make sure the box under Internet Connection
Firewall is unchecked.
h. Click Ok and then exit the Network Connections
screen. Restart your computer.
Step 5. Configure the network for Windows
7 & 8 (if applicable)
Note: Sections 1 and 2 should be completed on both
FinishLynx and Meet Management computer.

FinishLynx Bronze System Quick Start Guide Page 4
1. Go to the windows Control Panel. On the top right is
View By with a drop down arrow. Click the drop down
arrow and choose Small or Large Icons.
2. Find and double click on Network and Sharing
Center. They are listed alphabetically by icon name.
3. This will open the Network and Sharing Center. On the
left is a blue section titled Control Panel Home.
4. Click on the Change Adapter Settings icon.
5. A new window will open displaying your network
connections. Right click on the Wireless Network
Connection and select Disable from the list of
items. This is only necessary for the FinishLynx Capture
computer.
6. Right click on the Local Area Connection and select
Properties from the list of items. A new window will
appear with a list of connection items. Click to select
Internet Protocol Version 4 (TCP/IPv4) and click the
Properties button.
7. A Properties window will appear and is typically set to
Obtain an IP address automatically. Click to select the
radio button for Use the following IP address. In the box
for IP address, enter 192.168.0.5 for FinishLynx and hit
Tab key to auto fill in Subnet mask 255.255.255.0
8. Click OK and navigate back to the Control Panel. In the
control panel click on the Windows Firewall icon. Under
Control Panel Home, on the left, click on Turn Windows
Firewall on or off.
9. Turn off both Home and Public Firewalls (Domain for
Windows Pro).
Step 6. Set up the camera and tripod
Setup the tripod in line with the finish line, preferably on the
infield and approximately 10 feet back. Note: Minimum
recommended camera distance from track is 8 feet (at this
distance you may not be able to see the feet of the athlete in
Lane 1 –being able to see the feet is not a requirement for
accurate timing on the Torso of the athlete). If you need to be
closer than this you may have to use the optional 6mm lens
supplied with your Bronze package.
1. Extend the tripod legs so the geared head is
approximately 7 ft high.
2. On the near side of the finish line, hold a plumb bob so
that it is suspended directly above the middle of the
finish line. This is the plumb line, shown as a in the image
below.
3. Tie string to the screw on the top of the tripod head.
Have your assistant take the other end of the string to
the far side of the finish line and hold the string taught.
This is the sight line, shown as bin the image below.
4. Move the tripod to the left or right until the plumb line
and sight line touch at position C in the image below. The
tripod is now in the plane of the finish line.
Step 7. Attach the camera to the tripod
1. Secure the geared head to the top of the tripod.
2. Note how the camera mounting plate is attached to the
top of the geared head. Then, pull back on the lever at
the top of the geared head to release the mounting
plate.
3. Tighten the mounting plate to the bottom of the camera
by turning the screw with a flathead screwdriver.
4. Attach the camera and mounting plate to the tripod by
clicking the mounting plate into place on the geared
head.
5. With the camera lens lined up with and facing the finish
line, make minor adjustments to the tripod legs so both
bubbles on the tripod are centered.
6. When you are finished, your camera assembly should
resemble the picture below.
7. Turn the black knob on the geared head that controls the
tilt of the camera so that it is at about a 30 degree angle
to the ground.
sight line
plumb
line

FinishLynx Bronze System Quick Start Guide Page 5
Step 8. Connect the cables
Connection Box
Sensor
USB
Cat 5 Ethernet
DB 15 Cable
XLR
Capture
Button
PoE
Injector Cat 5 Ethernet
AC AC
EtherLynx Vision
Camera
1. Connect the female end of connection box cable to the
port on the back of the camera labeled Connection Box
and the male end to the left side of the connection box.
2. Connect an Ethernet cable between the back of the
camera labeled POE 10/100/1000 to the port labelled
Out on the Power over Ethernet injector.
3. Connect an Ethernet cable to the network connection on
your computer and the other end to a port labelled In on
the Power over Ethernet injector.
4. Connect the male end of the start sensor cable to the
connection box where it says Start. Attach the start
sensor to the other end of the cable and keep the start
sensor close by.
5. Connect the capture button to a 9-pin serial port, or a
USB port with the supplied adaptor on your computer.
6. Turn on the camera by pressing and holding the black
power button on the back.
Step 9. Align the EtherLynx camera
Note: The EtherLynx Vision camera can be aligned using
either 1-D mode or 2-D EasyAlign mode. We recommend
using EasyAlign. If you are using an older model EtherLynx
camera, however, it must be aligned using classic 1-D mode.
NOTE If running a wireless Ethernet card on your computer,
we recommend that you disable it while the camera is
booting.
Start FinishLynx. Wait while the green status bar in the lower
right corner of the screen completes its cycle.
Align Vision Camera in EasyAlign 2-D Video Mode
1. Activate EasyAlign by clicking on the 2D align Icon in
the top left hand corner of the FinishLynx Hardware
Control screen.
The icon turns green and the 2-D video viewer
appears within the software. The 2-D viewer makes it
easy to see how your camera is aligned on the finish. The
goal is to align the green vertical line with the painted
finish line and near its front edge.
2. Adjust Camera Orientation
Use the tripod's Tilt, Pan, and Swivel knobs to adjust the
camera orientation of the camera on the finish. You want to
ensure that the green vertical line is perfectly aligned on the
white finish line and that all lanes are visible in the viewer.
Tilt
Pan
Swivel
Have your assistant run through the finish line and watch
where he/she appears on the computer monitor. The goal is
for the runner’s torso to be fully visible in both the inside and
outside lanes. Once the camera position is correct, you can
then optimize the remote lens settings.
3. Adjust & Optimize Lens Settings
- Adjust lens aperture ring to control the amount of light
in the lens. If your picture looks too white or washed
out, turn the aperture ring to a higher f-number, to let
less light in.
- Adjust lens focus ring to infinity (∞). This ensures your
Far Focus (lanes farthest from camera) appears crisp.
.
aperture ring
focus ring
After your far lanes appear in focus, ensure that your
near lanes are similarly in focus as well. This will usually
be the case automatically. Note: If you are having a hard

FinishLynx Bronze System Quick Start Guide Page 6
time getting crisp focus, try opening your lens iris and
allowing the AGC to drop closer to zero
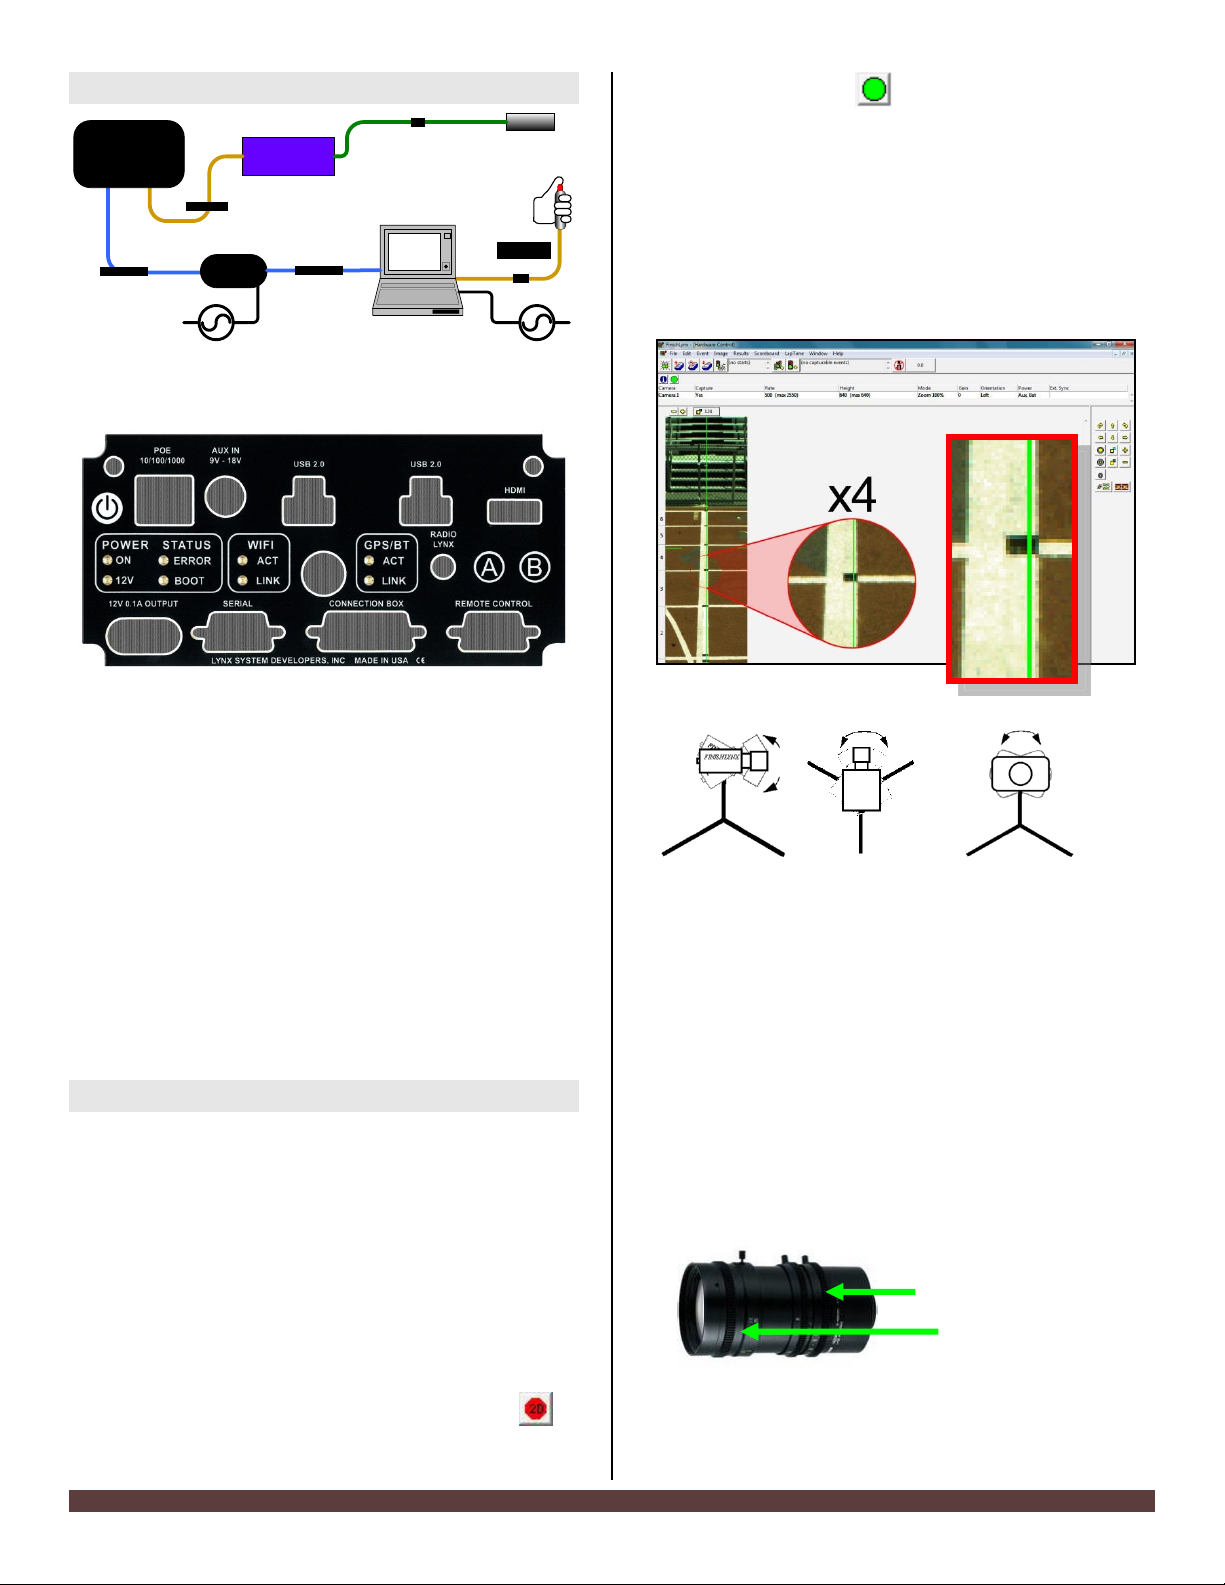
4. Once the camera appears to be aligned, Click, the green
alignment icon to close 2D alignment and then click
on the red 1-D alignment icon ..
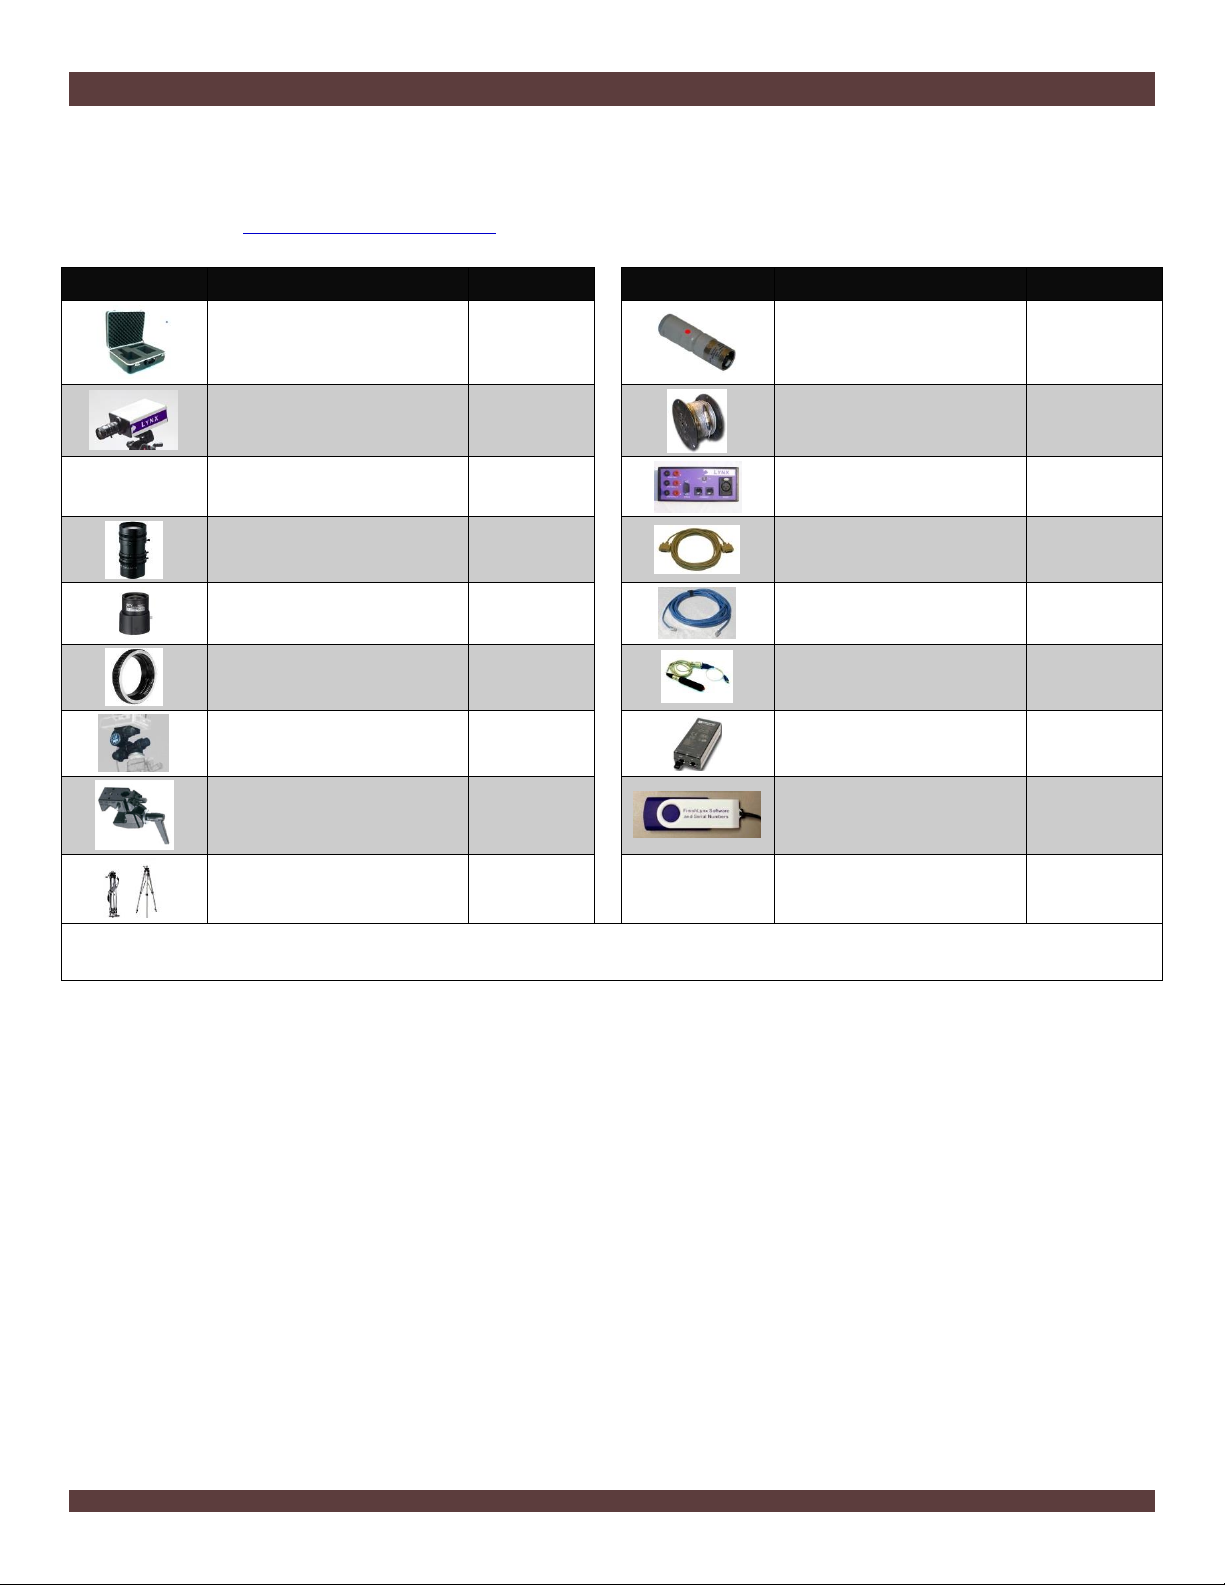
You will know when your camera is aligned on the finish
line because the 1-D image will be primarily white. See
image below for proper 1-D alignment.
If you followed the steps closely in 2-D align, the camera
should already be aligned in 1-D mode as well. The 1-D
image should look similar to the following screen
capture:
Step 10. Adjust the camera settings
1. Click Camera Settings Icon to open the Camera
Settings dialog.
2. Click to select the Setup tab:
a. Name: enter a name to identify the camera(s)
b. Image Orientation: select the correct orientation
for finish (infield would be Left orientation)
c. Identify By: select Lane for track competition
d. Lanes: enter the number of lanes on the track; the
remaining should be left as default.
3. Click to select the Parameters tab
a. Rate: type a value in the field between 800-1000 for
sprints (400m and under) or type 600-800 for
distance events. Change this value when moving
between sprints and distance races, or else the
competitors in your FinishLynx image appear
distorted.
Note: Image distortion does not affect timing
accuracy.
b. Frame Height: will vary by camera models, 640 is
recommended for most track competitions;
c. Gain Method: set to AGC for outdoor light and set
up. Set Brightness to 70. Use Manual when needed.
Adjust the value based on quality of image in
alignment mode.
4. Click to select the Inputs tab:
a. Start Sensor: is defaulted to Closed for the wired
gun start.
5. Click to select the Capture tab:
a. Capture Method: select Manual if using the Capture
Button. Select the correct USB/Serial Port from the
Capture Button drop down listing.
6. Click OK to close the Camera Settings and it is advised to
restart the FinishLynx software.
7. Set White Balance
a. Open a new event in FinishLynx by clicking in
the top left corner of the screen.
b. Capture a small amount of image containing a white
object, like a person wearing a white shirt.
c. Right-click and draw a box around a small amount of
the white image. You may need to zoom in to the
image to do this.
d. Click Image from the Menu bar and select Set white
balance.
Step 11. Create a shared directory for
FinishLynx and LynxPad
1. Right-click on your computer desktop and select New |
Folder. When the New Folder appears, change the name
to Practice competition.
2. In FinishLynx, click File | Options…. Click the Browse
button on the Event Directory: and navigate to the
Practice competition directory you just created. Then,
click Ok.
3. Still in FinishLynx, click File | Options… and click the
Database tab. Click the Browse… button next to the
Output Directory: and navigate to the Practice
competition directory. Then, click Ok.
4. Now, start LynxPad by clicking the Windows Start button
and then All Programs | LynxPad.
5. Click File | Options… and uncheck the Load Existing
Results on Program Start box. Then, click Ok.
6. Open the sample competition by clicking File | Open.
Navigate to C:\LynxPadData\Sample and then double-
click the lynx.cmp file. A practice competition opens on
the screen.
7. Still in LynxPad, click File | Options…. Click the Browse
button next to the Directory: text field. Navigate to the
Practice competition file you created earlier. Select it
and click Ok. Click Apply and then click Ok again.
8. Still in LynxPad, click File | Save as… and navigate to the
Practice competition folder. Then, click Ok. Now,
FinishLynx can get start lists created in LynxPad, and
LynxPad can import results generated by FinishLynx.

FinishLynx Bronze System Quick Start Guide Page 7
Step 12. Use FinishLynx with LynxPad Data
1. In FinishLynx, click to load the schedule of events
from LynxPad. The Go To Event dialog appears.
2. Click the Load Schedule button once. Click the drop-
down list under the Load Schedule button. A list of
events appears. Click to select the “110 Meter Hurdles
Men (9, 3, 1)” event in the list, and then click Ok. The
first heat of the third round of the men’s 110m hurdles
opens on the FinishLynx screen.
3. Either use a starting gun, or knock the sensor sharlpy
against a hard object - this simulates the firing of the
starting gun and starts the yellow FinishLynx timer.
4. Have your assistant run through the finish line while you
press down and hold the red capture button to capture
the image. Release the button as soon as he/she has run
completely through the finish line.
5. Practice evaluating the image by following the same
steps you followed earlier in Step 3
6. Click File | Save to save the race to the Practice
competition directory.
7. Crop space between competitors in your FinishLynx
image by right-clicking and drawing a box around the
unwanted space. Release the mouse button and select
Crop from the dialog that appears.
8. (Optional) Print the results and a portion of the
FinishLynx image by right-clicking on the image and
drawing a box around the portion you want to appear in
your printout. For example, the first place finisher or a
close finish between two competitors. Click Ok and then
select the printer from the Print dialog to print the image
and results.
9. Click File | Close window and then click Yes to save
changes you made to the FinishLynx image when you
cropped it.
10. In LynxPad, click to highlight Men 110 Meter Hurdles in
the Events window. The start list appears in the Heats
window.
11. Still in LynxPad, click Competition | Refresh All Results.
The results from the race you just evaluated appear in
LynxPad.
This completes the FinishLynx Bronze Package Quick Start
Guide.
Looking for more resources? Visit our YouTube
Channel for setup and support videos.
https://www.youtube.com/user/LynxSystemDevelopers/

FinishLynx Bronze System Quick Start Guide Page 8
Notes:
Table of contents
Other Lynx Digital Camera manuals