manuals.online logo
Brands
  1. Home
  2. •
  3. Brands
  4. •
  5. Mäktig
  6. •
  7. Water Pump
  8. •
  9. Mäktig 600548 User manual

Mäktig 600548 User manual

4
Plastic Rotary
Pump 600548
Hand Rotary Pump is used for
dispensing Urea, Adblue, DEF,
Glycerine, Water based media,
Antifreeze, Detergents, Washing
fluids, Chemicals and other fluids
compatible with materials of
construction of the pump.
The pump is designed to deliver
up to 8 oz. per stroke.
This pump is self-priming. It is
supplied with two 2” MNPT bung
adapters designed to fit most
15-55 gallon drums & a 3 piece
threaded suction tube.
It can be used with most
petroleum based products.
Strainer fitted at the suction
tube inlet stops contaminants
from entering the pump
RECOMMENDED USE
Urea, DEF / Adblue,
DO NOT USE WITH
Acetone, Lacquer, Mineral Oils,
Solvents, Turpentine etc.
Discharge Spout
Crankshaft
Crank Arm
Suction Tube
Strainer
Bung Nut
Handle
Bung Cross Bolt
SPECIFICATIONS
PUMP TYPE Rotary
FLOW 8 oz. per stroke
MAXIMUM FLUID TEMPERATURE 104° F / 40° C
MOUNTING 2” MNPT Bung
SUCTION TUBE OUTLET O.D. 1-7/32”
SUCTION TUBE 3 piece / Threaded
DISCHARGE TUBE OUTLET O.D. 1”
OUTLET TYPE 2 Pc curved discharge spout
WETTED MATERIAL OF
CONSTRUCTION
Stainless Steel, Ryton, Viton
and Glass Filled Polypropylene
MAXIMUM VISCOSITY 2000 SSU
UPTO
5 litres (1.3 gallon) /
20 turns
DELIVERS
FEATURES
FLUIDS
UREA DEF / ADBLUE
INSTRUCTION MANUAL
5
PUMP ASSEMBLY & INSTALLATION
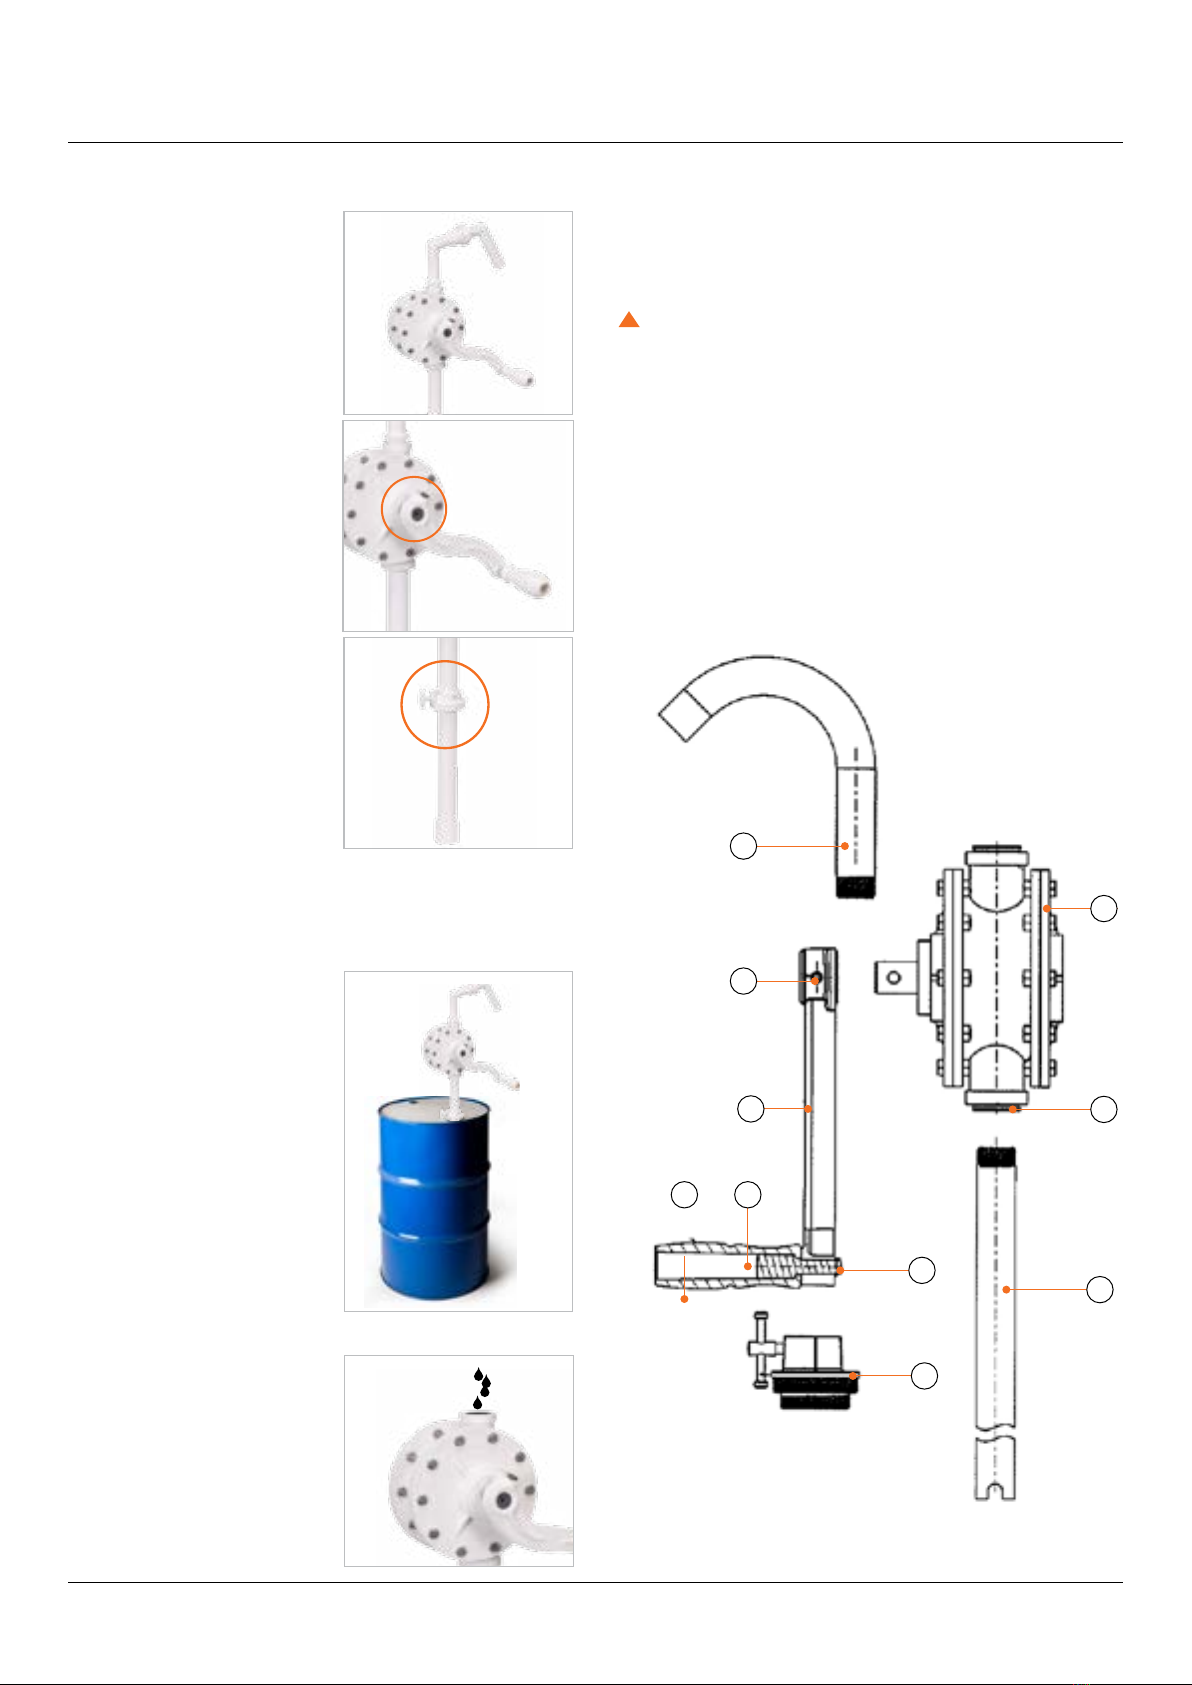
EXPLODED VIEW
Failure to follow all safety information can result in death, personal injury
and/or property damage.
• Never operate the pump near open flames or source of spark. Some
media may be flammable or explosive.
• Wear safety glasses at all times when working with this pump.
• Wear a face shield, proper apparel and suitable respiratory
equipment when pumping hazardous chemicals.
• In case of accident, immediately seek medical attention. Do not try
to treat the injury yourself.
• Keep work area clean, uncluttered and properly lighted.
• Use only genuine factory parts for repair.
Note: It is a good practice to use a sealant such as Teflon to have totally
leak-proof connection.
If the pump is about to be re-used after an extended period of time, it
may loose it’s prime & may require re-priming.
(Refer priming).
1. Assemble the 2 parts of the
Discharge spout together
& fasten the assembly onto
the outlet on the main pump
body. Use PTFE tape or
equivalent sealant tape.
Note: Do not use paste pipe
sealant.
2. Insert the pump handle shaft
through the pump shaft. Fix
the pump handle onto the
crank arm & connect the
crank to the crankshaft on
the pump body. Secure the
connection using the hex
bolt & hex nut provided.
Make sure that the bolt fits
onto the depression in the
crankshaft.
3. Assemble the suction tube
parts, depending upon the
drum size on which the
pump is to be installed.
The tail pipe with the
strainer may be connected
direct onto the pump inlet
or assembled with one
extension or both extensions,
depending upon drum
size. All 3 parts must be
connected for use with 55
gallon / 205 litre drums.
4. Choose the bung adapter
from the two that best fits
your drum. Each pack comes
with two adapters, which
have slight dierence in
the threads to suit dierent
drums. Slide the selected 2”
bung onto the tube from the
top end & tighten the suction
tube onto the inlet on the
main pump body.
5. Insert the pump assembly
into the drum from the 2”
bung opening on the drum.
6. Once the bottom of the
pump touches the base of
the drum, securely fasten the
bung onto the drum. Now
very lightly tighten the bung
cross bolt onto the suction
tube
PRIMING
In a rare case, where the pump
does not get primed, the same
can be done by removing the
discharge spout & pouring
about 30 ml (1 oz) of same liquid
being pumped into the outlet
& reassemble the discharge
spout & start operating the
pump handle till pump starts
dispensing fluid.
1
10
7
6
8
5
4
2
3
10
! WARNING:
6
TROUBLESHOOTING
PARTS LIST
PROBLEM CAUSE SOLUTION
Pump does not dispense fluid or does not prime Pump not able to create adequate suction Prime the pump. Remove the discharge spout
on the pump & pour about 1 oz. of the fluid being
pumped into the outlet & Reassemble the spout &
start operating the pump handle till pump starts
dispensing.
Pump is drawing in air, instead of fluid Tighten all connections of suction tube & of the
suction tube with pump inlet. Inspect pump cover(s)
and seals for leaks. Tighten fasteners or replace
gaskets / seals
Leakage of media from the crankshaft Damaged seal due to use with media not suitable for
use with pump
Replace seal with genuine replacement seal from
manufacturer.
Handle dicult or impossible to move Pump has not been used for a long time Remove pump cover and inspect for deposits on
components and corroded parts. Clean or replace
parts. Flush pump with the media being used if pump
is not in use for a long period.
Damaged or worn pump parts Remove pump cover & inspect internal parts. Replace
worn or damaged parts.
REF NO. PARTS DESCRIPTION QTY.
1Plastic Rotary Pump Body 1
2Lever (Machining) 1
3Grub Screw 1
4Handle 1
5Handle Pin 1
6E-Clip 1
7Suction Pipe Assembly 1
8Drum (Bung) Nut 1
9Bend Pipe 1
10 Non Drip Cap 2

Other Mäktig Water Pump manuals

Mäktig 316 User manual

Mäktig

Mäktig 316 User manual

Mäktig 601625 User manual

Mäktig

Mäktig 601625 User manual

Popular Water Pump manuals by other brands

ITT Goulds Pumps i-FRAME 3640 Installation, operation and maintenance manual

ITT

ITT Goulds Pumps i-FRAME 3640 Installation, operation and maintenance manual

Sulzer XJ 50 Assembly and installation instruction

Sulzer

Sulzer XJ 50 Assembly and installation instruction

PFT G4X Super operating manual

PFT

PFT G4X Super operating manual

Blue-White industries ProSeries Chem-Feed CFPS-1 manual

Blue-White industries

Blue-White industries ProSeries Chem-Feed CFPS-1 manual

Giant P470H installation instructions

Giant

Giant P470H installation instructions

Crivit FLOOR PUMP instruction manual

Crivit

Crivit FLOOR PUMP instruction manual

Browlee-Morrow Vulcan Pumps HDS Series Installation, operation and maintenance manual

Browlee-Morrow

Browlee-Morrow Vulcan Pumps HDS Series Installation, operation and maintenance manual

Smiths Medical CADD-Prizm PCS II Technical manual

Smiths Medical

Smiths Medical CADD-Prizm PCS II Technical manual

Simer A5500 owner's manual

Simer

Simer A5500 owner's manual

Q-Pumps QIS Series Operation and maintenance manual

Q-Pumps

Q-Pumps QIS Series Operation and maintenance manual

DAB FEKA VS Instruction for installation and maintenance

DAB

DAB FEKA VS Instruction for installation and maintenance

Thermo Scientific Air Cadet operating manual

Thermo Scientific

Thermo Scientific Air Cadet operating manual

Videotec WASEX Series instruction manual

Videotec

Videotec WASEX Series instruction manual

Oase FP 1500 operating instructions

Oase

Oase FP 1500 operating instructions

Milwaukee M18 Operator's manual

Milwaukee

Milwaukee M18 Operator's manual

SHURflo 9300 series owner's manual

SHURflo

SHURflo 9300 series owner's manual

AirTech L12 Installation and operating manual

AirTech

AirTech L12 Installation and operating manual

EBARA CDX 70 manual

EBARA

EBARA CDX 70 manual

manuals.online logo
manuals.online logoBrands
  • About & Mission
  • Contact us
  • Privacy Policy
  • Terms and Conditions

Copyright 2025 Manuals.Online. All Rights Reserved.