MachPower HC-HASAN60-PLUS User manual

User Manual
Nebulized hypochlorous acid sanitiser
EN
Manuale Utente
Sanificatore ad acido ipocloroso nebulizzato
ITA
Manual de usuario
Higienizante de ácido hipocloroso nebulizado
ES
HC-HASAN60-PLUS

Patented Product
Mach Power® official Italian distributor
Hypochlorous acid is among the sanitizing recommended by
the EPA to combat the Sars-CoV-2 coronavirus
U
N
I
T
E
D
S
T
A
T
E
S
E
N
V
I
R
O
N
M
E
N
T
A
L
P
R
O
T
E
C
T
I
O
N
A
G
E
N
C
Y

ENG
Index
Introduce
Product Structure
Product Data
Safety and operation information
Operation
Cleaning and maintenance
Faq
Please read this manual carefully before use!
4
4
5
5
6
9
10
...
...
...
...
...
...
...
3

Introduce
Thank you for choosing and using our products! This product uses sub-chamber
electrolysis technology to generate hypochlorous acid sanitizing, ideal for all envi-
ronments.
Product Structure
1Accelerator
2Top cover of fog water tank
3Inside handle
4Fogging tube
5Water tank assembly
6Outside handle
7Air outlet
8Fuselage assembly
9Touch panel
aOn/Off button
bAmount of fog
cHumidification
dTiming
References to the rotating diffuser
Front
Rotation activation button
Rear
USB power interface
Fan adjustment button
Front Rear
4

5
ENG
Product Data
Voltage AC-100V-240V
Input voltage DC-5V
Noise ≤35db (A)
Frequency 50Hz
Power 28W
Max mist output 200-350mL/h
Standard GB4706.1-2005 GB4706.48-2009
Capacity 4.2L
Product Roadmap
(The above pictures are for reference only, subject to change without prior notice)
Fuse
DC 35V
Voltage
charger
Transducer
Two color indicator
Water shortage
protection switch
Fan
DC 12V
DC 12V
AC 220V / 50HZ / 25W
L
N
Safety and operation information
To avoid possible injury to persons or property, carefully read the following safety
precautions.
1. Please do not remove the plug with wet hands to avoid the risk of electric
shock.
2. Do not move the device while it is running.
3. Do not modify the device at will to avoid electric shock.
4. The power cable must not be cracked, damaged, excessively bent, twisted,

6
knotted or heavy or blocked, it could cause electric shock, short circuit or fire.
5. Power sources other than the rated voltage must not be used. It is recommen-
ded to use the power supply with input voltage of DC-5V and current ≥ 1.5a.
6. Do not allow children to use the device.
7. If the power cable is broken, it must be replaced by specialized technicians to
avoid damage.
8. For internal use only.
9. Do not put hot water over 40 degrees into the tank to avoid deformation of the
body.
10. Do not let the water flow into the air intake, it could cause breakdowns.
11. Please do not add water directly to the tank.
12. Please do not put metal in the tank, bad atomization may occur.
13. Keep away from household appliances when the device is in operation.
14. If the machine is tilted, cut off the power supply before handling it.
15. If the internal temperature is below 0 degrees, pour the water into the tank, so
as not to damage the machine in case of freezing.
16. Do not place the device in places directly exposed to intense light or hot air.
17. If it is not used for a long time, disconnect it from the power supply.
18. The accelerator must not be washed with water to avoid damaging it.
19. The product has not been designed for purposes other than those specified in
this manual.
20. It is not recommended to place the device on furniture and tables.
Operation
Electric Operation
1. Place the device on the floor and add water.
2. Connect to the power supply.
3. In case of lack of water in the tank or low water level in the tank, the safety devi-
ce inside will automatically disconnect the atomization circuit. It will not produce
any cloud and the corresponding icon will light up. If you need to continue saniti-
zing, you must first turn off the power and disconnect the plug, then add water to
the tank. (Note: You need to restart the device when adding water)
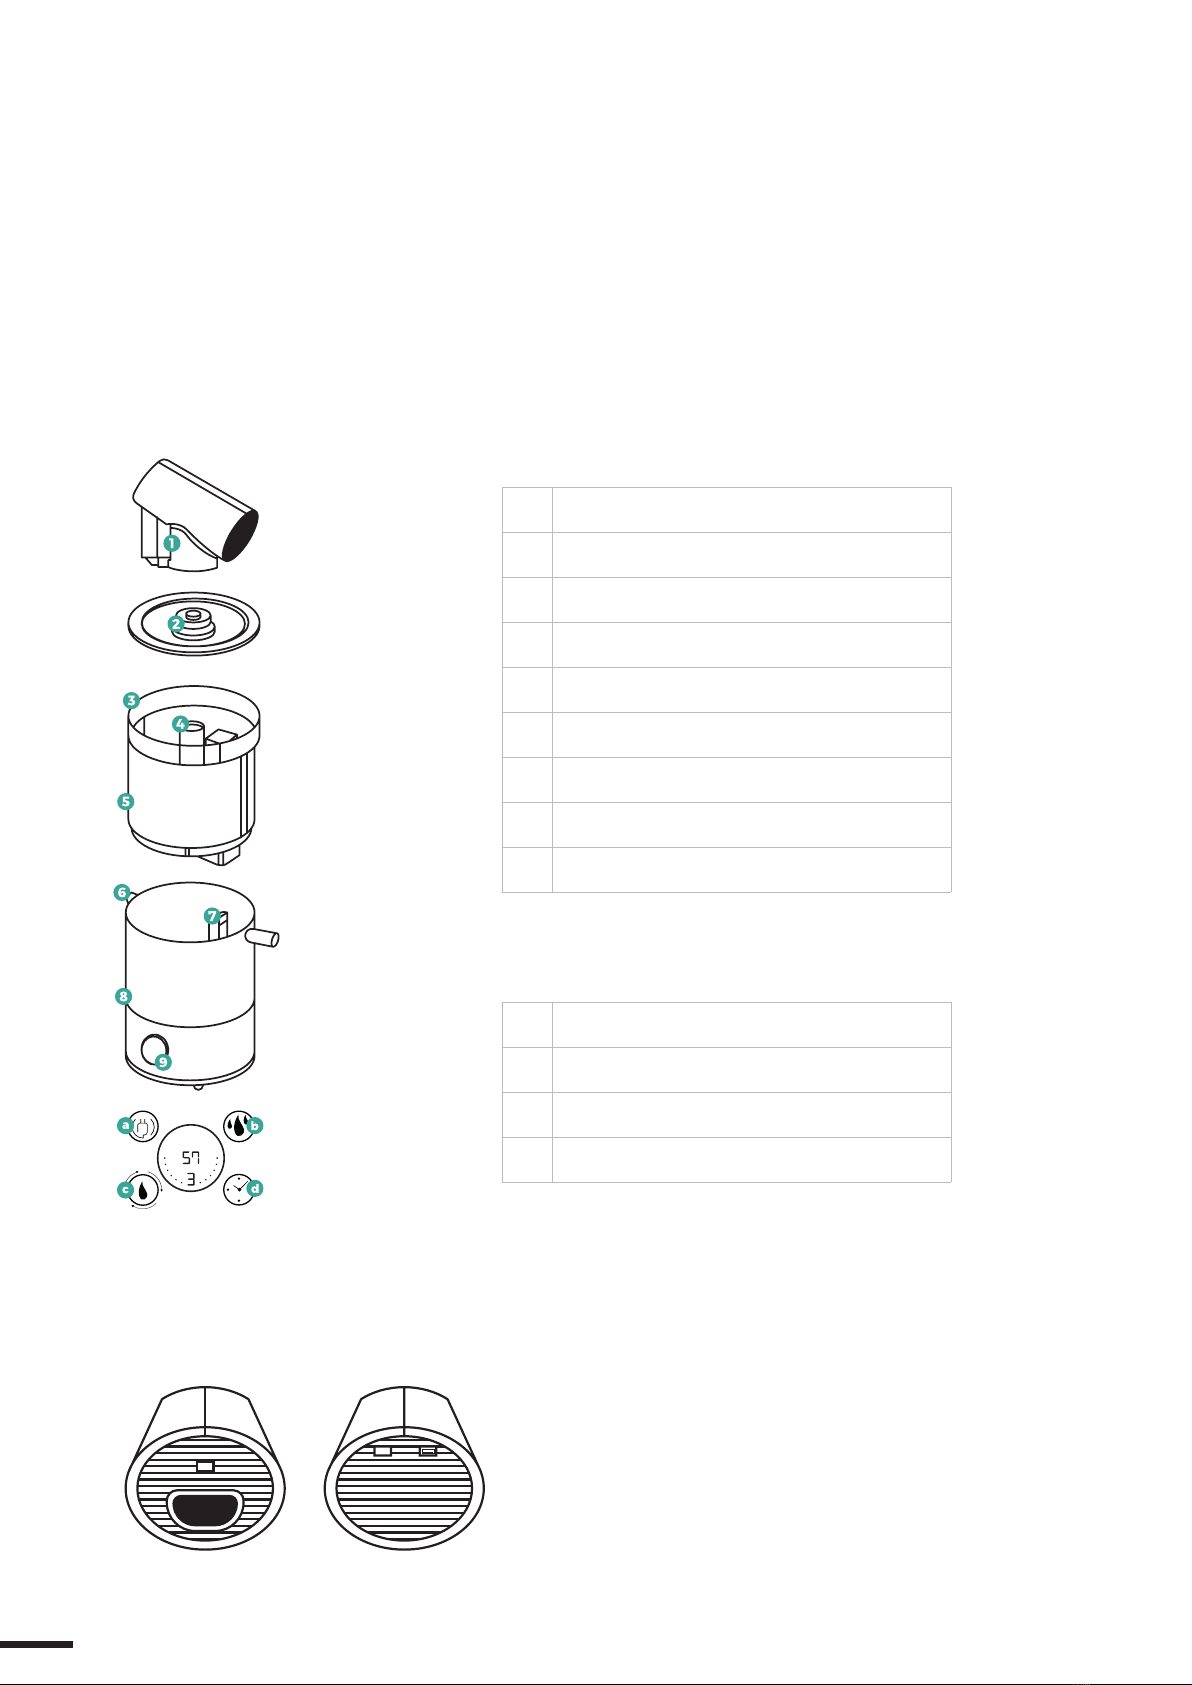
4. After adding the water, close the top lid of the tank and place the diffuser on
the connector in the center. Make sure that the diffuser and its gear engage nor-
mally, otherwise it may cause the swivel diffuser not to work.
5. Insert the Mini USB cable of the accelerator into the USB port on the back of
the accelerator and the other end into the USB port of the device (Note: the input
voltage of the device is 5V ≥ 1.5a) .After power on, the accelerator enters in standby

7
ENG
mode.
6. Press the button to activate the fan. the fan is activated in first speed; Press the
button again to activate the second speed; Press again to go to third speed; press
the button for the fourth time to stop the fan and enter standby mode, a blue
indicator will light up in working mode.
7. Press the accelerator switch to activate rotation, press the button again to stop
it.
Water tank filling operation steps
Please inject clean tap water witing 0~40°C
1Place the device on the floor
2Fill the tank with 4.2L of water (up to the indicated edge) add the salt
(max 6g - we recommend using the specific pre-dosed Mach Power salt)
3Lift up the fog cover of the water tank
4Pour the water into the tank
Be sure to turn off the switch when adding water, and pull of the power plug
Machinery operation
1. Place the device on the floor;

8
2. Remove the internal tank
3. Add water and salt to the tank and reposition it inside the machine;
4. Press the power button;
5. Adjust the amount of cloud by pressing the corresponding button on the touch
panel;
6. The operation of the accelerator is the same as above.
Note: There may be a slight leakage of water from the bottom due to condensa-
tion which is considered normal
Function introduction of remote Control
1. Before operating the remote control, pull out the insulating tape at the bottom
and plug it back in when not in use.
2. Operate according to the remote control panel.
Note: If the position of the buttons on the remote control panel is changed, the
real object shall prevail.
1Infrared transmitter
2Insulation tape
Ditital operation
Switch: Plug in the power and touch this key. The digital screen will light up, indi-
cating that you have entered the working state. It can be shut down if you touch it

9
ENG
again.
Fog quantity: This key is used to adjust the fog quantity, which can be divided
into three different positions: large, medium and small cycle control. When the
water level in the tank is lower than the set limit, the machine will start alarm and
sound continuously for 5 seconds. The water-shortage icon will be lit and stop
spraying
Constant humidity: set the range of 45%-95%RH. When set to the corresponding
value, the current value will be automatically defaults if it is not operated for 3
seconds. When the current humidity reaches the set value, the machine will auto-
matically stop spraying.
Timing: Set the working time of the spray, set the range of 1-2-4-8 hours, and se-
lect the setting cycle.
Cleaning and maintenance
Please clean the water tank atomizer regularly. Before cleaning, be sure to turn off
the power and unplug it.
External cleaning of the sanitizer: rinse with a soft, damp cloth to remove surface
stains.
Internal cleaning of the sanitizer: if there is dirt or limescale in the sanitizer and
in the tank, pour an adequate amount of water and vinegar (ratio 1: 1) to obtain
the cleaning effect. Pay attention to the float when cleaning the tank.
Cleaning the water tank: if the tank is dirty, pour in an adequate amount of water
and vinegar (ratio 1: 1), dry with a soft cloth and then fill the tank.Common fault
handling
Nota: Never use rough objects to touch the sanitizer, only with a cotton swab or
soft cloth.Do not clean the surfaces with a cloth soaked in chemical solvents, ga-
soline, kerosene or polishing powder.Do not use detergents to clean the machine,
it is better use clean water. When cleaning, prevent water from entering the devi-
ce, in order to avoid humidity of the internal electrical parts and possible failures.
Do not remove the components of the device.

10
Faq
The indicator light is off. There is no
wind or fog
Make sure the power cord is plugged in
properly
Make sure the power cord is plugged in
properly
The indicator is bright red with wind
and no fog
Make sure the tank is dry
Make sure the float cap is out or un-
pressed
The fog a little
Verify atomizer fouling
Make sure the water is dirty or has been
stored for too long
Fog cover leakage fog Confirm that the fog cap has been mo-
dified
Accelerator not working
Verify that the USB plug is connected
to the power supply. To verify that you
are connected, unplug the USB plug
and try again
The machine can be turned on, but
cannot work in third gear
The machine can be turned on, but
cannot work in third gear
Unable to shake head normally
1. Please remove the accelerator from
the connector
2. Press the shake switch and observe
whether the shake gear is turning
3. If the head gear rotates normally,
please put the accelerator on the con-
nector again to ensure that the head
gear and the connector gear engage
normally.
HOCl and Oxygen function
1: Fill the tank with 4.2L of water (up to
the indicated edge) add the salt (max
6g - we recommend using the specific
pre-dosed Mach Power salt)
2: When not add salt ,just add water
will be Oxygen Humidifier for increase
the Oxygen and humidifier density in
the room.

11
ENG
(If the fault is still not removed, please send it to the local after-sales service for
maintenance.)
1. Indicator off, no air and no cloud: check that the power cable plug is properly
inserted.
2. Red indicator, air present, but there is no cloud: check if the water tank is
empty.
3. Small amount of cloud: check that the sanitizer is in an upright position. Make
sure the water is not dirty or has not been in the tank for too long.
4. Loss of fog: check if the fog cover is adequately covered. (If the problem persi-
sts, contact your dealer.)

12
Prodotto brevettato
Mach Power® distrubutore ufficiale italiano
L'acido ipocloroso è tra i disinfettanti raccomandati dall'EPA
per combattere il coronavirus Sars-CoV-2
U
N
I
T
E
D
S
T
A
T
E
S
E
N
V
I
R
O
N
M
E
N
T
A
L
P
R
O
T
E
C
T
I
O
N
A
G
E
N
C
Y

ITA
13
Indice
Introduzione
Struttura del prodotto
Informazioni prodotto
Informazioni sulla sicurezza e sul funzionamento
Funzionamento
Pulizia e manutenzione
FAQ
Si prega di leggere attentamente questo manuale prima dell'uso!
14
14
15
15
16
19
20
...
...
...
...
...
...
...
13

14
Introduzione
Grazie per aver scelto e utilizzato i nostri prodotti! Questo prodotto utilizza la tec-
nologia di elettrolisi sotto camera per generare sanificante con acido ipocloroso,
ideale per tutti gli ambienti.
Descrizione Prodotto
1Diffusore rotante
2Coperchio serbatoio acqua
3Impugnatura interna
4Tubo nube
5Serbatoio acqua
6Impugnatura esterna
7Presa d’aria
8Corpo
9Pannello touch
aTasto Accensione
bQuantita di nube
cUmidificazione
dTimer
Riferimenti relativi al diffusore rotante
Anteriore
Pulsante di attivazione della rotazione
Posteriore
Interfaccia alimentazione USB
Pulsante di regolazione della ventola
Anteriore Posteriore
14

ITA
15
Informazioni Prodotto
Voltaggio AC-100V-240V
Voltaggio dingresso DC-5V
Rumore ≤35db (A)
Frequenza 50Hz
Potenza 28W
Nube massima 200-350mL/h
Standard GB4706.1-2005 GB4706.48-2009
Capacità 4.2L
Schema prodotto
(Le immagini sopra sono solo di riferimento, soggette a modifiche senza preavviso)
Fusibile
DC 35V
Commutatore
di tensione
Trasduttore
Indicatore a due colori
Interruttore di protezione
mancanza d'acqua
Ventola
DC 12V
DC 12V
AC 220V / 50HZ / 25W
L
N
Informazioni sulla sicurezza e sul funzionamento
Per evitare possibili danni a persone o cose, leggere attentamente le seguenti pre-
cauzioni sulla sicurezza.
1. Si prega di non togliere la spina con le mani bagnate per evitare il rischio di
scosse elettriche.
2. Non spostare il dispositivo mentre è in funzione.
3. Non modificare il dispositivo a piacimento per evitare scosse elettriche.
4. Il cavo di alimentazione non deve essere lesionato, danneggiato, eccessivamen-

16
te piegato, attorcigliato, annodato o appesantito o bloccato, potrebbe causare
scosse elettriche, cortocircuiti o incendi.
5. Non devono essere utilizzate sorgenti di alimentazione diverse dalla tensione
nominale Si consiglia di utilizzare l'alimentazione con tensione di ingresso di DC-
5V e corrente ≥ 1,5a.
6. Non consentire ai bambini di utilizzare il dispositivo.
7. Se il cavo di alimentazione è rotto, deve essere sostituito da tecnici specializzati
per evitare danni.
8. Solo per uso interno.
9. Non inserire acqua calda oltre i 40 gradi nel serbatoio per evitare deformazioni
del corpo.
10. Non lasciare che l'acqua fluisca nella presa d’aria, potrebbe causare guasti.
11. Si prega di non aggiungere acqua direttamente al serbatoio.
12. Si prega di non mettere metallo nel serbatoio, potrebbe verificarsi una cattiva
atomizzazione.
13. Tenere lontano dagli elettrodomestici quando il dispositivo è in funzione.
14. In caso di inclinazione della macchina, interrompere l'alimentazione prima di
maneggiarla.
15. Se la temperatura interna è inferiore a 0 gradi, versare l'acqua nel serbatoio, in
modo da non danneggiare la macchina in caso di congelamento.
16. Non posizionare il dispositivo in luoghi direttamente esposti a luce intensa o
aria calda.
17. Se non viene utilizzato per un lungo periodo, scollegarlo dall’alimentazione.
18. Il diffusore non deve essere lavato con acqua per evitare di danneggiarlo.
19. Il prodotto non è stato progettato per scopi diversi da quelli specificati in que-
sto manuale.
20. E' sconsigliato posizionare il dispositivo su mobili e tavoli.
Funzionamento
Funzionamento elettronico
1. Posizionare il dispositivo sul pavimento e aggiungere acqua.
2. Collegare all'alimentazione.
3. In caso di mancanza d’acqua nel serbatoio o il livello dell'acqua nel serbato-
io basso, il dispositivo di sicurezza all'interno disconnetterà automaticamente il
circuito di atomizzazione. Non produrrà alcuna nube e l'icona corrispondente si
accenderà. Se si ha la necessità di continuare la sanificazione, è necessario prima
spegnere l'alimentazione e scollegare la spina, quindi aggiungere acqua al serba-

ITA
17
toio. (Nota: è necessario riavviare il dispositivo quando si aggiunge acqua)
4. Dopo aver aggiunto l'acqua, chiudere il coperchio superiore del serbatoio e
posizionare il diffusore sul connettore al centro. Assicurarsi che il diffusore e il suo
ingranaggio si innestino normalmente, potrebbe altrimenti causare il non funzio-
namento del diffusore girevole.
5. Inserire il cavo Mini USB del diffusore nella porta USB sul retro del diffusore e
l’altra estremità nella porta USB del dispositivo (Nota: la tensione di ingresso del
dispositivo è 5V ≥ 1.5a) .Dopo l'accensione, il diffusore entra in modalità standby.
6. Premere il tasto per l’attivazione della ventola. la ventola si attiva in prima velo-
cità; Premere nuovamente il tasto per attivare la seconda velocità; Premere nuo-
vamente per passare alla terza velocità; premere il pulsante per la quarta volta per
fermare la ventola e attivare la modalità standby.Nella modalità di lavoro si accen-
derà una spia blu.
7. Premere l'interruttore del diffusore, per attivare la rotazione, ripremere il pulsan-
te per fermarla.
Riempimento del serbatoio d’acqua
Riempire con acqua con temperatura compresa tra 0 ~ 40°C
1Posizionare il dispositivo sul pavimento
2
Riempire la tanica con 4,2L di acqua(fino al bordo indicato) aggiungere
il sale (max 6g - si consiglia di utilizzare il sale specifico pre-dosato Mach
Power)
3Alzare il coperchio del serbatoio
4Riempire la tanica con il composto
Assicurarsi che il dispositivo sia spento e che non sia collegato alla presa elettrica.

18
Funzionamento della macchina
1. Posizionare il dispositivo sul pavimento;
2. Estrarre il serbatoio interno
3. Aggiungere acqua e sale nel serbatoio e riposizionarlo all’interno della macchi-
na;
4. Premere il pulsante di accensione;
5. Regolare la quantità di nube premendo il tasto corrispondente sul pannello
touch;
6. Il funzionamento del diffusore è lo stesso come sopra.
Nota: Potrebbe verificarsi una lieve fuoriuscita di acqua dal fondo a causa della
condensa che è da considerarsi normale
Introduzione alla funzione del telecomando
1. Prima di utilizzare il telecomando, estrarre il nastro isolante dalla parte inferiore,
in caso di lunghi periodi di inutilizzo rimettere il nastro isolante.
2. Operazioni del telecomando.
Nota: se la posizione dei pulsanti sul telecomando viene modificata, fare riferi-
mento al telecomando fisico.
1Trasmettitore a infrarossi
2Nastro isolante
Switch: Interruttore
Amount of fog: Quantità di nube
Night Light: Illuminazione
Timing: Timer

ITA
19
Funzionamento dello schermo digitale
Interruttore: Collegare l'alimentazione e toccare questo tasto. Lo schermo digitale
si accenderà, indicando che il dispositivo è acceso, per spegnere toccare nuova-
mente.
Quantità di nube: Questo tasto viene utilizzato per regolare la quantità di nube,
suddivisa in tre diverse regolazioni: ampia, media e minima. Quando il livello
dell'acqua nel serbatoio è inferiore al limite minimo, il dipsositivo attiva l'allarme e
suona ininterrottamente per 5 secondi. L'icona di mancanza d'acqua si accenderà
e smetterà di nebulizzare.
Umidità costante: Impostare l'intervallo di umidità relativa tra 45% -95%. Una vol-
ta impostato il valore, diventerà il valore predefinito se non viene modificato per
3 secondi. Quando l'umidità raggiunge il valore impostato, la macchina smetterà
automaticamente di nebulizzare.
Timer: Impostare il tempo di lavoro del dispositivo, è possibile impostare l'inter-
vallo di 1-2-4-8 ore e selezionare il ciclo.
Pulizia e manutenzione
Si prega di pulire regolarmente il serbatoio dell'acqua. Prima di pulire, assicurarsi
di spegnere l'alimentazione e scollegarla.
Pulizia esterna del sanificatore: risciacquare con un panno morbido e umido per
rimuovere le macchie superficiali.
Pulizia interna del sanificatore: se c'è sporco o calcare nel sanificatore e nel ser-
batoio, versare una quantità adeguata di acqua e aceto (rapporto 1:1) per ottenere
l'effetto pulente. Prestare attenzione al galleggiante durante la pulizia del serbato-
io.
Pulizia del serbatoio dell'acqua: Se il serbatoio è sporco, versare una quantità
adeguata di acqua e aceto (rapporto 1:1), asciugare con un panno morbido e suc-
cessivamente riempire il serbatoio.
Quando non viene utilizzato per un lungo periodo, pulire e asciugare e conservare

20
nella confezione originale in un luogo asciutto.
Nota: Non usare mai oggetti ruvidi per toccare il sanificatore, solo con un batuffo-
lo di cotone o un panno morbido.Non pulire le superfici con un panno impregna-
to di solventi chimici, benzina, cherosene o polvere lucidante.Non usare detergen-
ti per pulire la macchina, è meglio usare acqua pulita. Durante la pulizia, evitare
che l'acqua entri nel dispositivo, in modo da evitare umidità delle parti elettriche
interne e eventuali guasti. Non rimuovere i componenti del dispositivo.
Faq
La spia è spenta. Nessuna nube viene
prodotta
Assicurarsi che il cavo di alimentazione
sia collegato correttamente
Assicurarsi che l’alimentazione sia ac-
cesa
La spia è spenta. Nessuna nube viene
prodotta
Verificare la presenza di acqua nel ser-
batoio
Assicurarsi che il tappo del galleggiante
sia aperto o non ostruito
Poca Nube
Verificare che il sanificatore non sia
sporco
Assicurasi che l’acqua nel serbatoio sia
pulita
Perdita Potenza nube Il beccuccio della nube è stato mano-
messo
Il diffusore non funziona
Verificare che la presa USB sia collegata
all'alimentazione. Per verificare di esse-
re connesso, scollegare la presa USB e
riprovare.
Il dispositivo funziona, ma non alla
terza velocità
Si prega di utilizzare alimentazione con
tensione DC-5V
Table of contents
Languages: