Maclean Energy MCE502 User manual

EN I Electric Glass Panel Heater
with WiFi Control
Instruction Manual
MCE502
Please read the manual carefully prior to use

Safety Instructions
Read the manual before you use the heater. Keep the manual and ensure it
stays with the heater if you give it to a new owner.
Before use, check that the heater and all supplied accessories are complete and
intact.
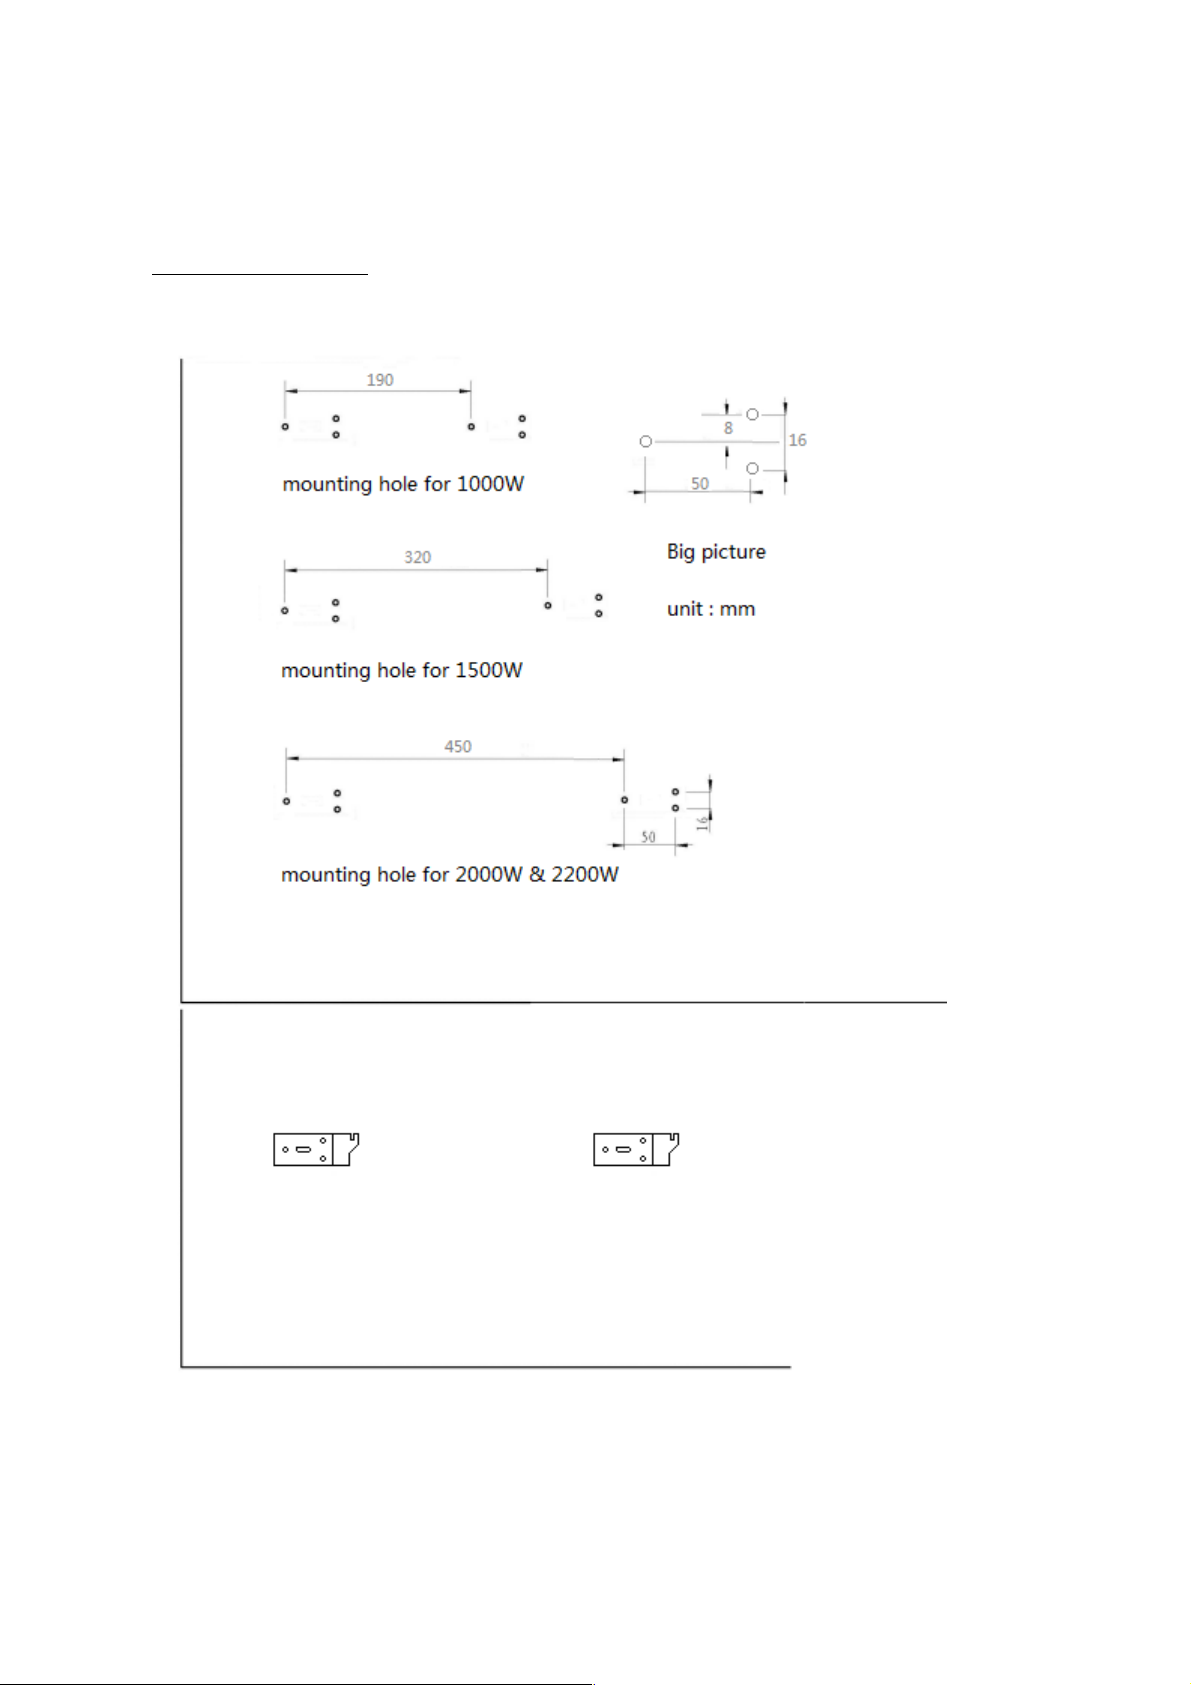
he heater must be installed as per installation instructions. he heater must be
plugged into a socket that meets the following requirements: AC 230V,
frequency 50/60Hz.
he heater is only suitable for indoor use. Do not use it outdoors!
Do not leave the heater unattended during use. Keep the heater out of the reach
of children: risk of burns.
Do not use an external controller with the heater. he heater must not be set to
switch on when it will be unattended.
Do not use the heater near flammable or explosive materials: risk of fire or
explosion.
Inserting items into the protective grill of the heater is strictly prohibited: risk of
electric shock.
Do not touch the metal housing as it will get hot when the heater is in use: risk of
burns. Set aside some time to let the heater cool before you turn it off and store
it.
Unplug the heater if it is going to be out of use for a long time.
Prior to each use of the electric heater, make sure it is in a good condition and
intact. Do not plug in or use the heater if the casing, wire or plug are damaged.
he heating element may be damaged if the heater is dropped or hit. Check that
the element is not damaged prior to each use. Do not use the heater if the
element is broken.
Disconnect the plug from the socket when moving or cleaning the heater. When
disconnecting, first turn off the switch, then unplug the plug. Do not yank the
cable.
Demolition of the electric heater without authorization is strictly prohibited.
Please look for professional service personnel if the heater is damaged.
he product is limited to home use only.
During use, do not let bare skin touch the surface of the appliance: risk of burns.
Do not share the heater’s socket with other appliances: risk of fire due to
excessive load.
CAU ION: never cover the heater. Covering the heater risks overheating and
fire.
he heater must not be located immediately below an electrical socket-outlet.
If the supply cord is damaged, it must be replaced by the manufacturer, its
service agent or a similarly qualified person to avoid a hazard.
Avoid the use of an extension cord as this may overheat and cause a fire risk.
his heater is not intended for use in bathrooms, laundry areas or similar
locations where there may be moisture. Never place the heater where it may
fallinto a bathtub or other water receptacle

Do not use the heater in the immediate surroundings of a bath, shower or
swimming pool.
Children of less than 3 years should be kept away unless continuously
supervised.
Children aged from 3 years to 8 years shall only switch on/off the appliance
provided that it has been placed or installed in its intended normal operating
position and they have been given supervision or instruction concerning use of
the appliance in a safe way and understand the hazards involved. Children aged
from 3 years and less than 8 years shall not plug in, regulate and clean the
appliance or perform maintenance.
his appliance can be used by children aged 8 years and above and persons
with reduced physical, sensory or mental capabilities or lack of experience and
knowledge if they have been given supervision or instruction concerning use of
the appliance in a safe way and understand the hazards involved. Children shall
not play with the appliance. Cleaning and user maintenance shall not be made
by children without supervision.
CAU ION: some parts of this product can become very hot and cause burns.
Particular attention must be given where children and vulnerable people are
present.
Installation Instructions
Before installing, check that all parts are complete and the product is intact.
If you want to use the electric heater freestanding, please fit with the feet
provided with the heater, following the instructions below. Make sure the heater
is mounted on a level, stable and clean surface.
Freestanding Installation
1. Put the product upside down on a
soft cotton cloth or carpet.
2. Fix the feet to the base of the
heater using the screws provided.
Line up the holes in the base with
the holes in feet, put the screws
through the holes and tighten with
a screwdriver.

Wall Mounted Installation
4 Hoo Type Brac et
1. ake out 4 brackets, 6 expansion screws and 6 screws out from the box, and fix 2 brackets
onto the wall according to the distances between holes of the bracket, as depicted in the
picture below.
2. Fix 2 brackets onto the bottom of productst, as depicted in the picture below.

3. Hold the side of the product, look at the position of the wall hole of the rear cover, and slide the
wall to the top of the slot, that is, the installation of the wall is completed, as depicted in the picture
below.
Note: Prior to the drilling, make sure there is no cable or other pipelines on the wall to avoid damage.
Remember that the screws on the wall shall be fixed and firm to ensure the safety installation of the
electric heater on the wall. Please note the safe distance mentioned below.
During installation, the heater must be maintained sufficiently safe distance from combustible
materials and gas and away from water.
During wall-hanging installation, keep the installation height from the ground greater than 15 cm.
Hanging-type heater shall be no less than 50 cm away from the ceiling.

Using the Heater
Control Pad
Display Screen
WiFi Connection Keyboard Lock
Comfort Mode
Eco Mode
Current emperature
imer
Working Status –
Anti-Frost Mode
Displays temperature or
timer settings
heating if icon
displayed, not
heating if not
displayed

Heater Control Panel
• he heater will beep as it power on. he heater starts on standby mode, displaying the
WiFi icon and the current temperature of the room in
• press the ON/OFF button. You will see the heating icon and the ECO mode icon
. his means the device is in the ECO mode state.
• o change heating mode, press the MODE button to cycle through the modes: ECO
mode ,Comfort mode and anti-frost mode . he mode icons will flash as you
cycle through them. After a few seconds the mode icon will stop flashing and the heater will heat in
that mode.
• o adjust the set temperature of any of the modes, You can then use the UP and DOWN
buttons to adjust the temperature. emperature range is from 5°C –50°C.
• o set the timer, press the IME button while the heater is in heating mode. imer range
is 1 – 24 hours. he digits will flash while setting and then the screen will return to heating mode.
he timer icon on the screen will show that the timer has been set. he heater will heat until
the time has elapsed.
• o schedule your heater to switch on later, press the IME button while on standby
mode. U. Delay range is 1 – 24hours. he digits will flash while setting and then the screen will
return to heating mode. he timer icon on the screen will show that the timer has been
set. he heater will switch on when the delay has elapsed.
• o set the child lock, press and hold the UP button. he padlock icon will appear on
the screen and the control panel will be locked out. o release, press and hold the down
button. he padlock icon will disappear, indicating that all the buttons can be used again.
• he remote control button and function all same heater control panel ,but the remote control
without hold press function ,the more use distance is 2M.
•long press the time button can turn off all the display lights and press any key to light up the
display screen of the product. the product enters the low light mode after pressing the stop press
the button for 30 seconds.In the low light mode, control the product through the APP, the product
will not sound!

Connecting to WiFi
1. o connect your heater to the WiFi, the first step is to download the Smart Life
app onto your smart phone or tablet. You can find the app by scanning the QR
code below or searching “Smart Life” in the Google Play or Apple app store.
2. Download and install the app. Unless you already have a Smart Life account, you
will need to create an account by tapping Register.
he device will automatically determine your country, although you can
change this if necessary. Enter your phone number or email address. If you
enter a phone number, a verification number will be sent to your phone:
enter this number to verify, then create a password. If you enter your email
address, you’ll just need to create a password.
3. o add your heater to the app, first put the heater in WiFi connection mode. he
heater is in WiFi connection mode when the WiFi icon is flashing. If the wifi
icon is not flashing, go to standby mode and hold down the button for three
seconds.
4. Once the icon is flashing, go to the app and press Add a Device. Select the
device type (Small Appliances > Heater) and confirm that the indicator is
flashing. You will then be prompted to enter your WiFi password. his allows
the app to find your heater using your WiFi.

5. he app will then display its connecting screen.
NOTE if the heater is failing to connect, press and
hold the button for three further seconds.
It will then switch to its secondary connection
mode. he heater has two connection
modes: one where the
icon flashes slowly (once per second) and one
where the icon flashes fast (three times per
second). Most devices will connect on the fast
flashing mode.
6. he heater will beep and display a solid icon when the device is connected.
he app will confirm that the heater has been added. You can now name
the device, share it with family members, or proceed to scheduling your
heating.

Using the Smart Life App
You can use the app to control multiple devices. he status of your devices is shown
on the device list:
Offline (device is turned off at wall / rocker switch)
urned Off (device is in standby mode)
urned On (device is in heating mode)
When the heater is online, tap the device name to go to the control interface. Note:
when the heater is offline, you will not be able to control it with the app.
Controlling the Heater
Set emperature
emperature
Adjust
Programming
ON / OFF
Current
emperature
Select Mode

You can change the heater’s current mode by tapping the mode buttons. You can adjust
the mode’s temperature using the + and – buttons when you’re on that mode.
Scheduling your Heating
You can program your heating by creating a schedule of “events”, where the heater
switches on or off. hese events can be temporary, like setting a timer, or they can be
recurring, so the heater switches on at the same time every week. You can set an
unlimited number of events, switching the heater on and off across the week.
For every event, you must set a start time. hen, choose whether you want it to
repeat. Select “Only Once” if you just want to set a timer for now. If you want the
event to repeat, select which days you want it to occur. Finally, choose whether you
want the heater to switch on or off. Make sure you confirm your settings at every
stage and press save to keep the event.
Each event will appear in your schedule. You can activate and de-activate events
using the toggle. You can also delete events by swiping left and tapping Delete.
he heater will beep when it begins a new heating event. he heater will heat at
whatever mode it was last set to: you cannot schedule mode changes. Note, if you
change the heater’s setting during an event – i.e. turning it on when it is scheduled to
be off – the heater will remain as it is until the next scheduled event.

Smart Features
he "Smart" section of the SmartLife app allows you to add
functions that make your heating easier and more intuitive to
control. he Smart section can be reached be pressing the
Smart icon at the bottom of the app.
Scenarios
Scenarios are customisable commands that bring all your devices together to
perform set actions. hey appear as shortcuts on the app which you can trigger by
tapping the image, offering a quick and easy means of co-ordinating your heating.
For example, you could create a "Heat Boost" scenario that, at one tap, switches
all your panel heaters on, at high power mode, at 30 °C.
o create new scenarios, press the button while on the Scenario screen. You
can add as many heaters as you want to a scenario. You can control whether they
switch on or switch off, what mode they run on, and what temperature they are set
to. Any device controlled by the SmartLife app can be added to a scenario.
Automation

Automation allows you to set up actions that are triggered by external events.
riggers include the weather, temperature, humidity, sunset, sunrise and your
location. You can add multiple actions and multiple triggers for each automation
event, so you could, for example, set all your heaters to come on at 21 °C if you
arrive home when it's snowing! o create new scenarios, press the button while on
the Scenario screen.
Voice integration
Smart Life is compatible with both Amazon Alexa and Google Home.
o connect, first download the SmartLife skill onto your Alexa or Google home
app. You can then link your Alexa or Google home app with your SmartLife app.
Depending on your device, your voice control app may discover your devices
automatically, or you may need to prompt it to do so.
Once the SmartLife skill is enabled and linked with your SmartLife app, you should
get notifications whenever you add a new heater or scenario. he notification will
tell you what to say to control the heater or scenario by voice.
You can find quick guides to connecting the app to both Google Home and Alexa
in the FAQ section:
Press then
Example commands:
OK Google turn on Glass Heater *
Alexa, switch off Glass Heater
OK Google, switch Glass Heater to 25 degrees
Alexa, set Glass Heater to 9 degrees
OK Google, turn on Comfort **
* where Glass Heater is what you've named the heater in the SmartLife app
** where Comfort is the name of a scenario created in the SmartLife app
Sharing
You can share control of your devices with family members. Go to then Family
Management then Add Member. Add your new family member's email address or
phone number to send an invitation. Note you can only share to numbers and
email addresses that are connected to app-compatible devices: smart phones or
tablets.
When you add new members you can choose whether or not to set them as an
administrator. Members added as administrators will have all family permissions,
including the facility to delete the family. Members not set to administrator can
control scenarios and devices but cannot add or remove them.
FAQs
Find the answer to many troubleshooting problems in the app's FAQ section. Go
to then .

ERP LABEL
Item Symbol Value Unit Item Unit
Heat output Type of heat input, for electric storage local
space heaters only (select one)
Nominal heat output Pnom 2.0 KW manual heat charge control, with
integrated thermostat No
Minimum heat output
(indicative) Pmin 1.00 KW manual heat charge control with room
and/or outdoor temperature feedback No
Maximum continuous
heat output Pmax,c 2.0 KW electronic heat charge control with room
and/or outdoor temperature feedback No
Auxiliary electricity
consumption fan assisted heat output No
At nominal heat output elmax N/A KW Type of heat output/room temperature control
(select one)
At minimum heat output elmin N/A KW single stage heat output and no room
temperature control No
In standby mode elSB 0.00089 KW wo or more manual stages, no room
temperature control No
with mechanic thermostat room
temperature control No
with electronic room temperature control No
electronic room temperature control plus
day timer Yes
electronic room temperature control plus
week timer No
Other control options (multiple selections
possible)
room temperature control, with presence
detection No
room temperature control, with open
window detection No
with distance control option Yes
with adaptive start control No
with working time limitation No
with black bulb sensor No
he product is for household use only.

Cleaning and care
Maintenance
Always disconnect the appliance and let it completely cool before any maintenance. Use a vacuum
cleaner to remove dust on grilles. Clean the outside of the unit with a damp cloth and then dry it
with a dry cloth. Never immerse the unit in water, nor let water drip into the unit.
Storing
Always disconnect the appliance, let it completely cool and clean it before storing. If you do not use
the device for a long period, put back the unit and the instruction manual to the original carton and
store in a dry and ventilated place. Do not place any heavy items on top of carton during storing as
this may damage the appliance.
Hints on disposal
According to the European waste regulation 2012/19/EU this symbol on
the product
or on its packaging indicates that this product may not be treated as
household waste.
Instead it should be taken to the appropriate collection point for the
recycling of electrical
and electronic equipment. By ensuring this product is disposed of
correctly, you will help
prevent potential negative consequences for the environment and human
health, which
could otherwise be caused by inappropriate waste handling of this
product. For more de
tailed information about recycling of this product, please contact your
local council or your
household waste disposal service.
Declaration of conformity
his product is conform to the following European Directives:
2014/30/EU (EMC)
2014/35/EU (LVD)
2011/65/EU (RoHS)
2009/125/EC (ErP) + Regulation (EU) 2015/1188
Table of contents
Other Maclean Energy Heater manuals
Popular Heater manuals by other brands

BN Thermic
BN Thermic SMH-R30S instructions

Frico
Frico Jaguar Series Mounting and assembly instruction

Toyotomi
Toyotomi 4963505710927 operating manual

Scarlett
Scarlett comfort SC-FH53002 instruction manual

Somogyi Elektronic
Somogyi Elektronic home FKH 400 instruction manual

Desa
Desa H.S.I. Series owner's manual

Oceanic
Oceanic OCEASF2000 user manual

Dometic
Dometic TwinBoost4000 Installation and service manual

Bimar
Bimar HP129 Instruction booklet

TPI
TPI 2900/D SERIES installation instructions

Protemp
Protemp Sun-Stream PT-70-SS-A User's manual and operating instructions

Goldair
Goldair GCV330 operating instructions