Macrom M-OF7020 User manual

NAVIGATION MULTIMEDIA RECEIVER

1
Safety Precautions
Never expose this unit to moisture or
water.
Please don't change the fuse on
the power cord without professional
guidance, using improper fuse may
cause damage to this unit or even cause
re.
If one of the following symptoms is
found:
(a). Water or moisture enters the unit;
(b). Smoking;
(c). Peculiar smell.
Turn off the product and take it
immediately to service center
Only connect the unit to a 12-volt power
supply with negative grounding.
MUTE
OK
MUTE
OK
Never use the video display function
while the vehicle is in motion. Is allowed
to use video function with the vehicle
in motion only for the vision of the rear
camera.
MUTE
OK
MUTE
OK
MUTE
OK
MUTE
OK
Thank you for purchasing this product.
Please read through these operating
instructions so you will know how to
operate your model properly. After you
have finished reading the instructions,
keep this manual in a safe place for
future reference.
To ensure safe driving, please adjust
the volume to a safe and comfort level
in case of emergency situations.

2
1. Never disassemble or adjust the unit without any professional guide.
For details, please consult any professional car shop / dealer for inquiry.
2. If the front panel or TFT monitor is squalid, please use a clean silicone cloth and neutral
detergent to wipe off the spot. Using a rough cloth and non-neutral detergent such as alcohol
for cleaning may result in scratching or decoloration to the applicant.
3. If any abnormal behavior of the unit is found, please refer to trouble shooting guide of this
manual. If no relevant information is found,please press the [RESET] key on the front panel to
resume factory default.
4. If you have parked the car in hot or cold weather for a long time, please wait until the
temperature in the car becomes normal before operating the unit.
5. To prevent the damage to the screen, avoid touching it with sharp objects.
6. To provide a clear demonstration and an alternative for easy understanding to the operation of
this unit, graphic illustrations areused.
However, these illustrations are some different from the actual images displayed on the screen.
7. Operate the unit correctly according to this manual to prevent unnecessary problem. The
guarantee won't be valid if the problem is caused by inappropriate operation.
Made for iPod touch (2nd, 3rd and 4th generation), iPod classic, iPod nano (2nd, 3rd, 4th, 5th and
6th generation), iPod mini, iPod with video, iPhone 4, iPhone 3GS, iPhone 3G or iPhone.
iPhone, iPod, iPod classic, iPod nano, iPod mini and iPod touch are trademarks of Apple inc.,
registered in the U.S. and other countries.
“Made for iPod”, and “Made for iPhone” mean that an electronic accessory has been designed
to connect specically to iPOd, or iPhone respectively, and has been certied by developer to
meet Apple performance standards. Apple is not responsible for the operation of this device or it’s
compliance with safety and regulatory standards.
The BLUETOOTH ® world mark and logos are registered tredamarks owned by the Bluetooth
SIG, Inc. and any use of such marks by ALDINET S.p.A. is under license.
The MACROM brand is a registere trademark of ALDINET S.p.A. and any use of such marks by
ALDINET S.p.A. is under license.
Precautions

3
Contents
Safety Precautions ...................................1
Precautions...............................................2
Contents....................................................3
Before using..............................................4
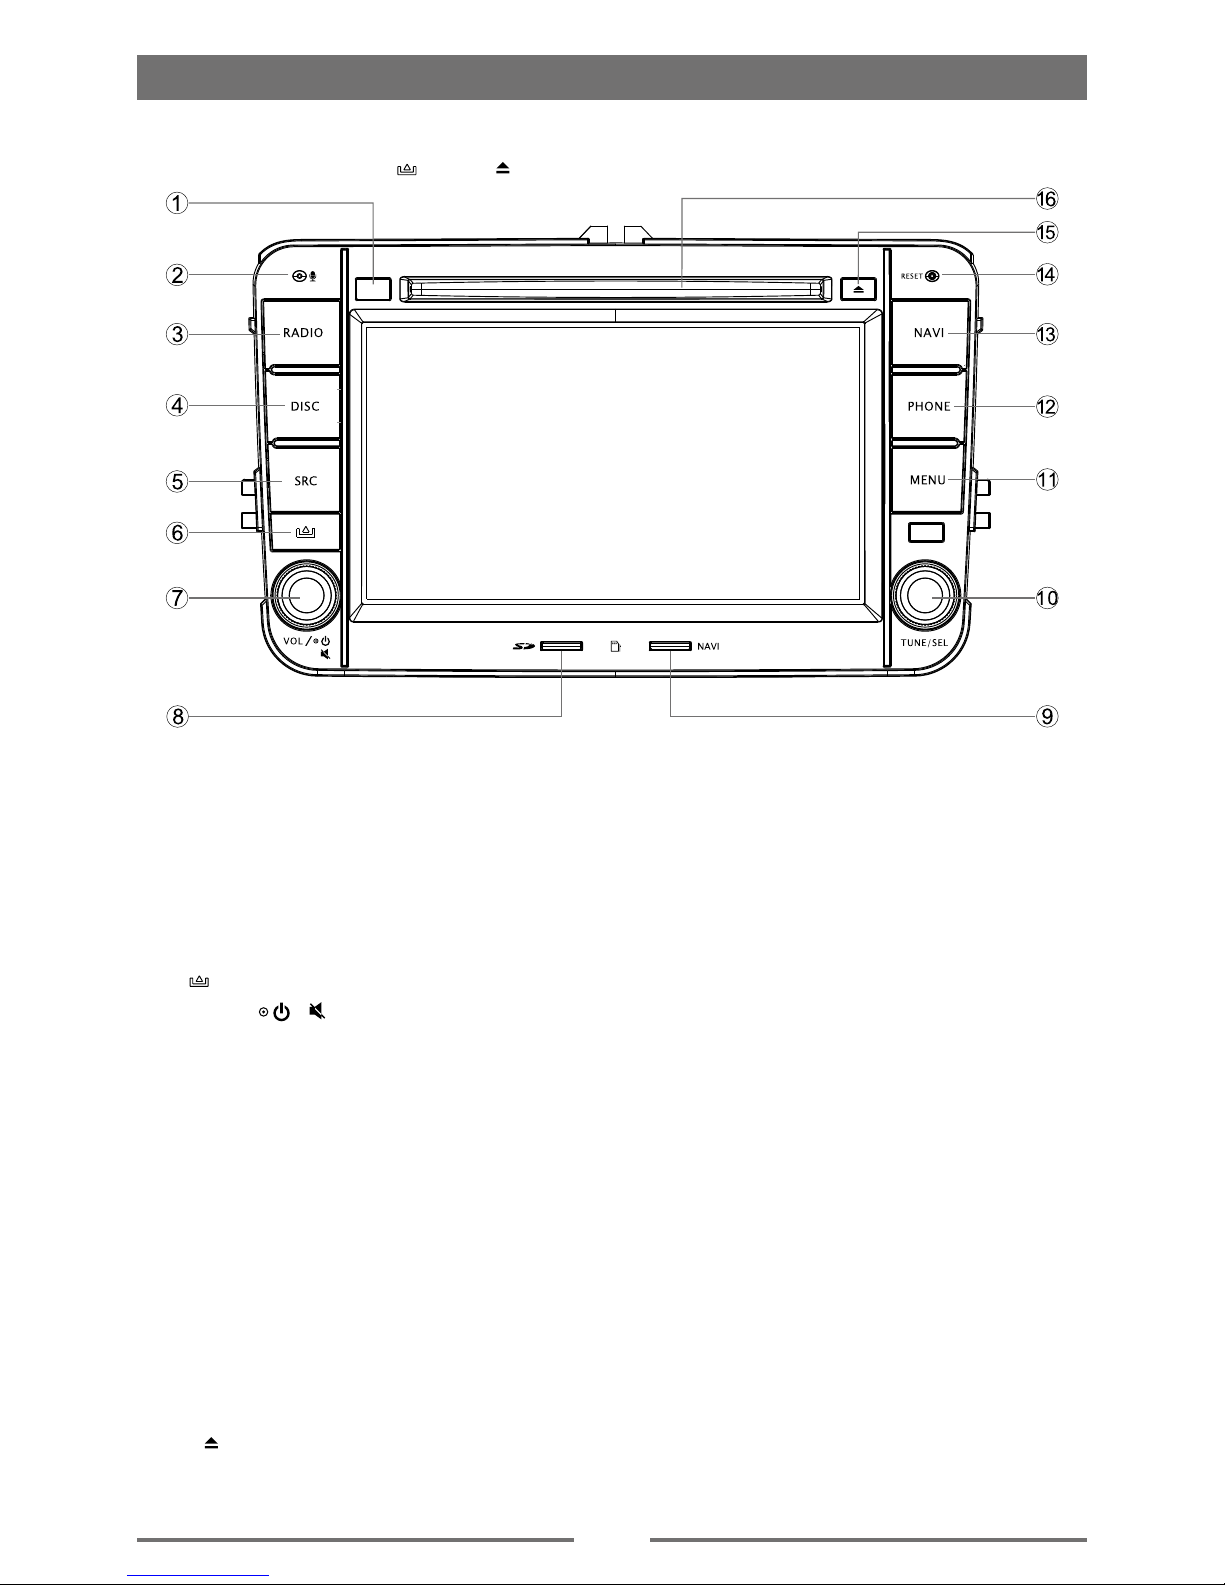
Front Panel .............................................4
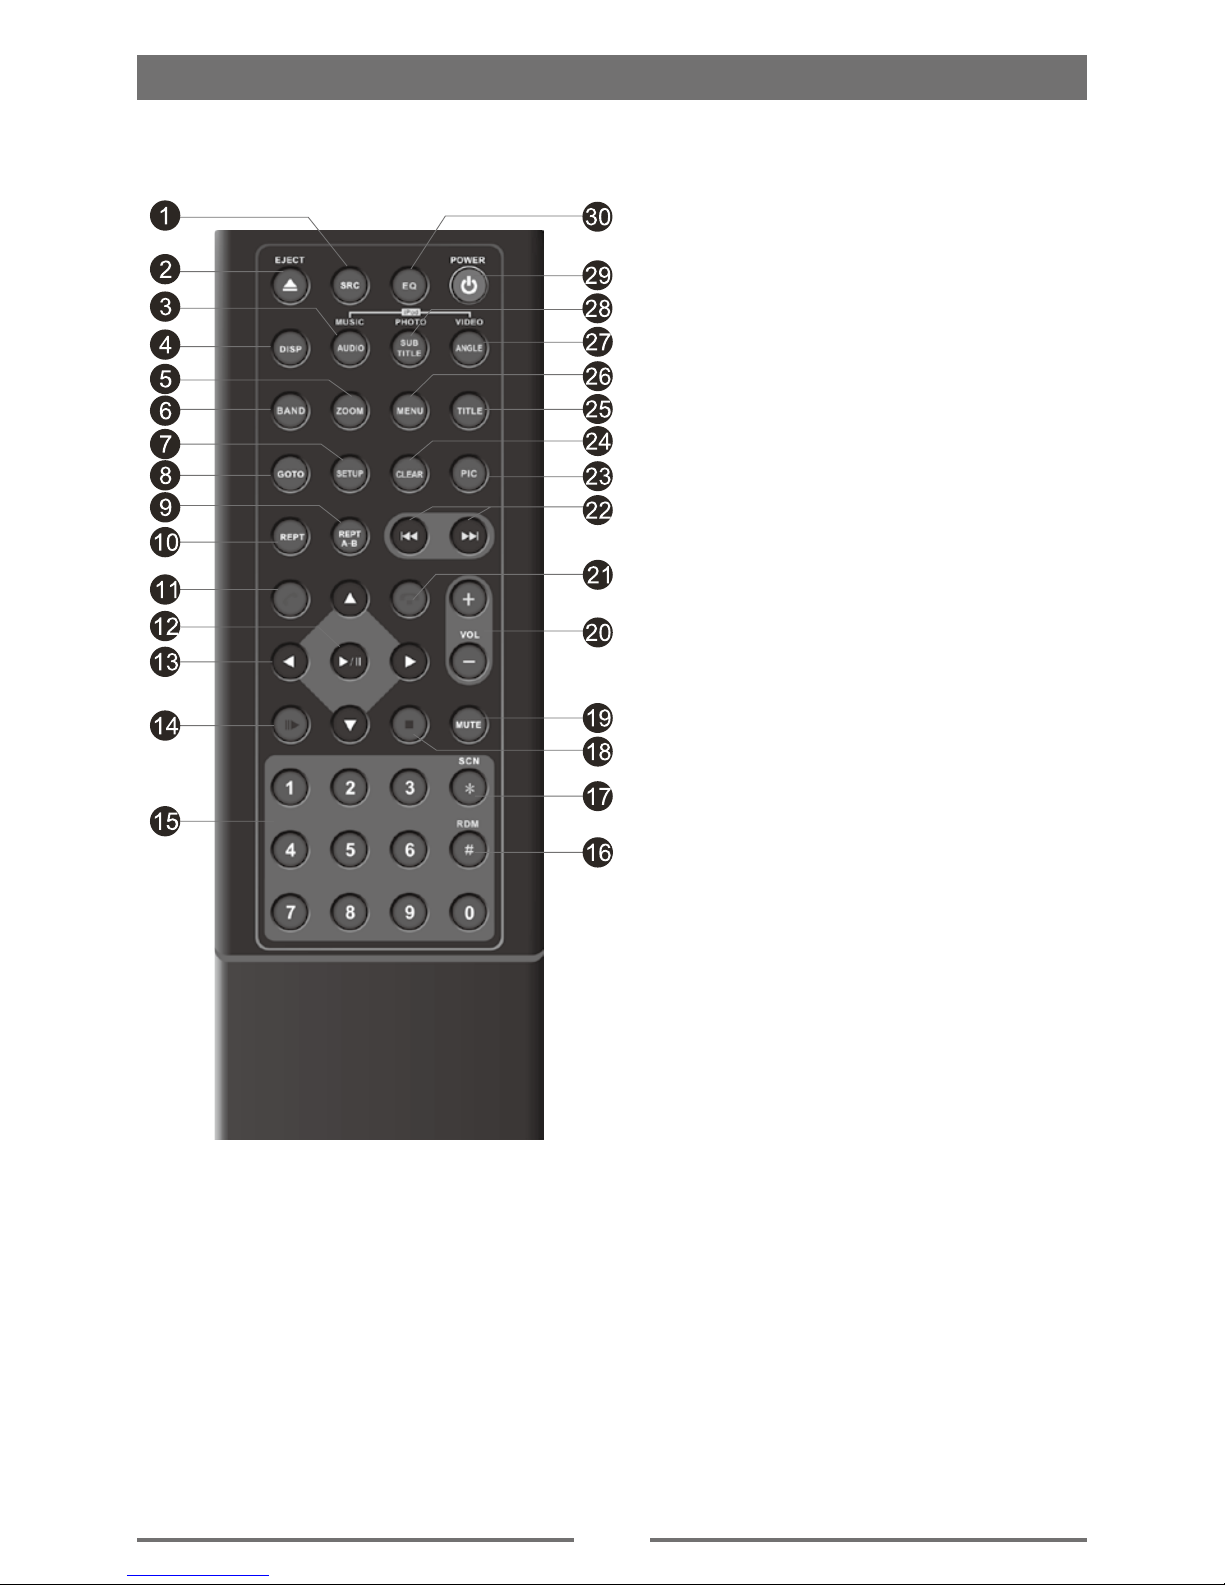
Remote Control.......................................5
Notes of remote control using.................6
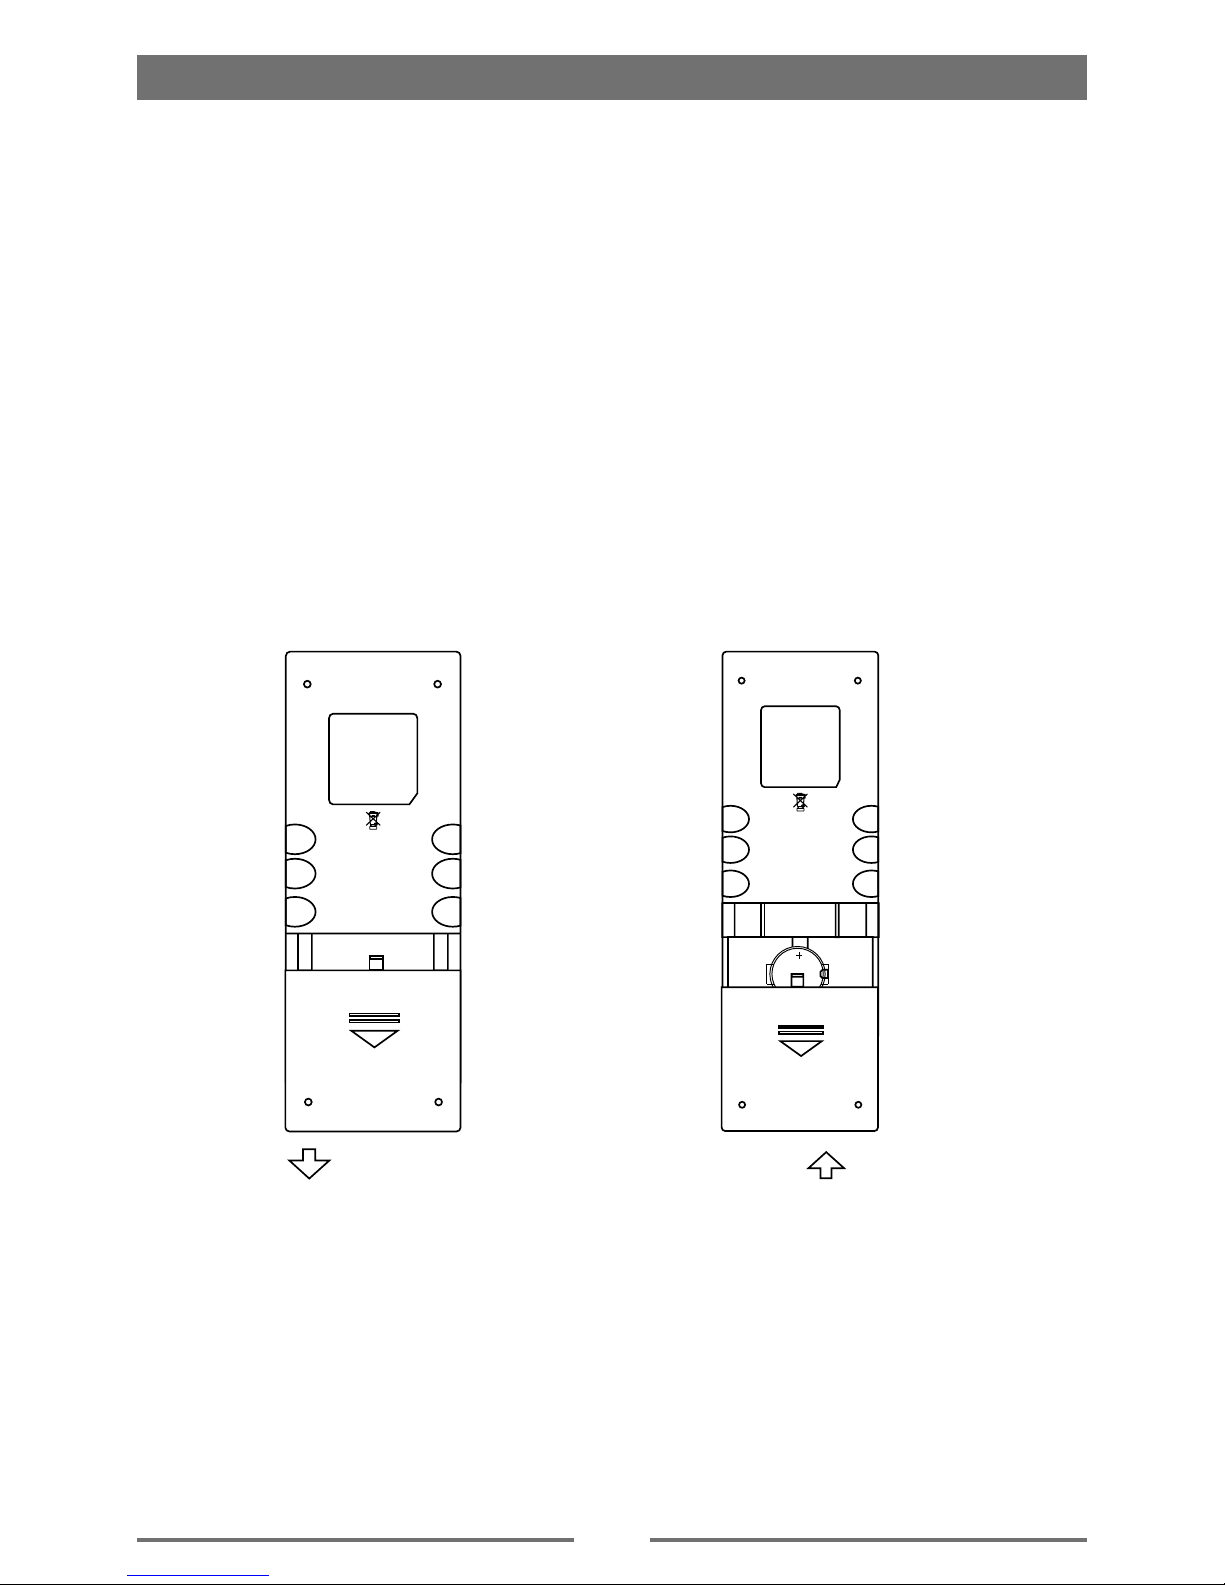
Uninstall Battery......................................6
Install Battery..........................................6
Basic operations.......................................7
Power On/Off .........................................7
Mute........................................................7
Adjust the volume ...................................7
Playing source selection.........................7
When parking brake applied...................7
When reverse driving..............................7
Radio mode...............................................8
Select radio as playing source................8
Select one radio band.............................8
Tune........................................................8
Preset station..........................................8
Local Seeking .........................................9
RDS Basics ............................................9
PLAY........................................................10
Load Disc..............................................10
Eject the Disc........................................10
Connect USB/iPod Device....................10
Remove the USB/iPod Device..............10
Insert MicroSD Card .............................10
Remove the MicroSD Card...................10
Select a Media Source..........................10
Play/Pause............................................11
Previous/Next .......................................11
Fast Forward/Backward........................11
Search for a Folder...............................11
Repeat ..................................................11
Repeat A-B ...........................................12
Random Play ........................................12
Select Audio Mode................................12
Select Subtitle Language......................12
Change View Angle ..............................12
Rotate Pictures .....................................13
Zoom.....................................................13
Bluetooth mode ......................................14
Pair the Bluetooth-enabled devices......14
Disconnect Bluetooth device ................14
Make a call............................................14
Receive call ..........................................15
Switch Phone Call to the Mobile...........15
Adjust Bluetooth Settings......................15
Select iPod as playing source...............16
Play.......................................................16
Adjust sound ..........................................17
Adjust volume .......................................17
Mute......................................................17
Select preset equalizer .........................17
Adjust fader/balance.............................17
SETUP......................................................18
Display System.....................................18
Adjust video settings.............................18
Adjust general Settings.........................18
Adjust sound settings............................19
Adjust DVD rating .................................19
Adjust language settings ......................19
Adjust Bluetooth settings ......................19
Adjust volume settings..........................20
Other modes ...........................................21
Listen to other devices..........................21
Reset ....................................................21
Remove the unit....................................21
Replace fuse.........................................21
GPS ......................................................21
Rear Zone.............................................21
Device connections................................22
Specications .........................................25
Region code .........................................26
Cautions of disc using...........................26
Troubleshooting .....................................27
No power ..............................................27
No sound ..............................................27
No response to the remote control .......27
Disc does not play ................................27
No image ..............................................27
Image ashes or distorted ....................27
Noise in broadcasts ..............................27
Preset stations lost ...............................27
Fuse is broken ......................................28
Display show ERR-12...........................28
About Bluetooth device.........................28
Appendix .................................................29

4
Front Panel
Press any key except [ ] and [ ] to turn on the unit.
1. Remote Sensor
2. Microphone
3. [RADIO] Key: Switch to the Radio source
4. [DISC] Key: Switch to the Disc source
5. [SRC] Key: Switch to the media source menu, select a source from the menu.
6. [ ] Key: Release the detachable panel.
7. [ VOL / / ] Knob:
Adjust volume (rotate)
Mute (short press)
Turn off the unit (long press)
8. MicroSD card slot
9. Map card slot
10. [TUNE/SEL] Knob:
Radio mode: Tune for radio station (rotate)
Media mode: Skip to the previous or next title, chapter or track (rotate)
Media mode: Play/Pause (press)
Media mode: Enter Equalizer menu (long press)
11. [MENU] Key: Switch to Main Menu
12. [PHONE] Key: Switch to Phone mode
13. [NAVI] Key: Switch to Navigation mode
14. [RESET]: Load the original setting.
15. [ ] Key: Eject disc
16. Disc slot
Before using
Notice:
The graphic in this manual is for reference
only, and may be different from that in real
unit. Reference to real unit is suggested.

5
Remote Control
Before using
1. Media source menu.
2. Eject the disc
3. Select DVD dialogue language
Show music catalog
4. Display information
5. Zoom
6. Select radio band
7. Setup menu
8. Goto search
9. A-B Repeat
10. Repeat playback
11. Call out
12. Play / Pause / Enter
13. Move the cursor up/down/left/right.
Up/down: Manual tuning
14. Slow playback
15. Numeric keys
16. Random playback
17. Intro playback
18. Stop playback
19. Mute the volume
20. Adjust volume
21. Hang up
22. Previous/Next
23. Video setting (only DVD)
24. Not enabled
25. DVD title
26. Main menu
27. Select view angle
Show video catalog
28. Select DVD subtitle language
Show photo catalog
29. Unit power
30. Open EQ setting menu

6
Notes of remote control using
1) Aim the remote control at the remote sensor on the unit.
2) Remove the battery from the remote control or insert a battery insulator if the battery has not
been used for a month or longer.
3) DO NOT store the remote control under direct sunlight or in high temperature environment, or it
may not function properly.
4) The battery can work for 6 months under normal condition. If the remote control can't work,
please change the battery.
5) Use“button shaped” lithium battery“CR2025”(3V) only.
6) DO NOT recharge, disassemble, heat or expose the battery in re.
7) Insert the battery in proper direction according to the ( + ) and ( - ) poles.
8) Store the battery in a place where children cannot reach to avoid the risk of accident.
Uninstall Battery
Slide out the battery compartment tray
at the bottom on the back of the remote
control.
Install Battery
Use button-shaped lithium battery
CR2025 (3V)” only. Insert the battery
to the battery tray with proper direction
according to the (+) and (-) poles.
Before using
PULL OUT PUSH IN

7
Power On/Off
Turn on: Press any key except [ ] on the front panel or [POWER] key on the remote control.
Turn off: When on, long press [ VOL / / ] knob on the panel or press [POWER] key on the
remote control.
Mute
Press [ VOL / / ] knob on the panel or [MUTE] button on the remote control to mute the
sound.
Pressing again or adjusting volume will release muting.
Adjust the volume
Rotate [ VOL / / ] knob on the panel or press [ + ] / [ - ] button on the remote control to
increase/decrease the volume level.
Playing source selection
Press [RADIO] Key to switch to the Radio source.
Press [DISC] Key to switch to the Disc source
Press [SRC] Key to switch to the media source menu, then select a source from the menu, such
as USB, SD Card, Aux.
Press [PHONE] Key to switch to Phone mode
Press [NAVI] Key to switch to Navigation mode
• Whensomedevicesarenotready,theycannotbeselected.
• Youshouldstopswitchingwhentheplayingsourceyoudesiredhasbeenselectedandwaitfor
someseconds,theunitwillautoentertheplayingsourcemodeyouhaveselected.
Parking brake
Key tWhile driving, if you play a video le, the display will show the message: “WARNING! For
your safety, watching videos is disabled. Insert brake “. Rear seat passengers can watch the video
via the rear video output if connected to the additional monitors.
When reverse driving
Engaging reverse gear, if the rear-view camera is connected, the unit automatically switches to
CAMERA function. After removing the reverse, the unit will return to the audio mode previously in
use.
Basic operations

8
Select radio as playing source
Press [ Radio ] button on the panel to enter main radio menu.
Select one radio band
Press the [ BAND ] button on the bottom of the user interface or
on the remote control unit to select one radio band among FM1,
FM2, FM3 and AM1.
Tune
Auto tuning
Press the [ ] / [ ] key on the remote control or [ ] / [ ] icon on the user interface to seek a
higher / lower station.
To stop searching, repeat the operation above or press other keys having radio functions.
Note:
When a station is received, searching stops and the station is played.
Manual tuning
Method 1:
During manual tuning, the frequency will be changed in steps.
Press the [ ] or [ ] key on remote control or rotate the [ TUNE ] knob on the panel to tune in a
higher / lower station.
Method 2:
1. Touch the [ Frequency ] button on the user interface to show Numeric keyboard.
Touch number buttons to input desired frequency.
3. Touch [ CANC ] to clear the input numbers.
4. Touch [ Enter ] to conrm.
4. Touch [ ] to return to main radio menu.
Preset station
The unit has 4 bands, and each band can store 6 stations,
hence the unit can store 24 stations in total.
Manual store
1. Tune to a station.
2. Press and hold a Memory position(1~6) on the middle of radio menu to save
the selected station.
Tune to a preset station
1. Select desired band.
2. Touch one of the preset stations (1 to 6).
Radio mode

9
Local Seeking
Touch [Options] on the screen, touch the buttons right to [ Local ] to turn on/off Radio Local
function.
When Local On, only stations with sufcient signal strength will be detected.
RDS Text
RDS service availability varies with areas. Please understand if RDS service is not available in
your area, the following service is not available.
AF Mode
AF (Alternative Frequency): When the radio signal strength is poor, enabling the AF function will
allow the unit to automatically search another station with the same PI (program identication) as
the current station but with stronger signal strength.
Touch [Options] on the main radio menu, touch the buttons right to AF to turn on/off AF function.
AF On: AF function is activated.
AF Off: AF function is disabled.
TA Mode
Some RDS FM stations periodically provide trafc information.
TP (Trafc Program Identication)
This station can broadcast trafc information.
TA (Trafc Announcements Identication)
Touch the [ TA ] button on the user interface to to turn on/off TA function.
When TA mode is turned on, the TA indicator will appear on the screen.
When traffic announcement is received, the unit will temporarily switch to the tuner mode
(regardless of the current mode) and begin broadcasting the announcement at TA volume level.
After the trafc announcement is over, it will return to the previous mode and volume level.
To adjust TA volume, press [Options] on the bottom right of the screen, then use [ + ] / [ - ] button
to increase/decrease the TA volume level.
Touch [ ] to return to main radio menu.
Radio mode

10
Load Disc
You can play video, audio or images stored on the following discs:
• DVD Video, DVD-R, DVD-RW
• VCD
• Audio CD, CD-R, CD-RW
Note:
Ensure that the disc contains playable content.
Eject the Disc
Press the [ ] key on the front panel or remote control to eject the disc. When the disc is ejected,
the unit switches to the previous source.
Connect USB Device
1. Insert the small end of the supplied USB cable to the rear USB port,
2. Connect the other end of the cable to your USB device.
Connect iPod/iPhone Device
1. Insert the jack and USB supplied cable to the rear dedicated port,
2. Connect the other end of the cable to your iPod/iPhone device.
Remove the USB/iPod Device
1. Select other source.
2. Remove the USB/iPod device.
Insert MicroSD Card
1. Insert the MicroSD card into the card slot.
Play starts automatically.
Remove the MicroSD Card
1. Select other source.
2. Press the card until you hear a click sound.
3. Remove the card.
Select a Media Source
1. Press [SRC] button on the front panel,
2. Select a media source from the list, such as USB, SD Card.
PLAY

11
Play/Pause
1. Once a disc, USB or SD/MMC card is inserted, play starts
automatically.
For DVD movie, if a menu appears, press [ ] to start play.
2. To pause, touch [ ].
To resume play, touch [ ].
Previous/Next
Touch [ ] / [ ] key on the screen to skip to previous/next track/
chapter.
Fast Forward/Backward (Video)
Press repeatedly [ ] / [ ] key on the screen to playback fast
forward/backward (2x,4x,8x,20x).
Fast Forward/Backward (DVD)
Long press [ ] / [ ] key on the screen repeatedly to playback
fast forward/backward (2x,4x,8x,20x).
Search for a folder
For video les
1. Touch [ Video ] to display all available video folders.
2. Touch a folder,then touch [ ] or [ ] to select a le.
3. Touch [ ] to start play.
4. Touch [ ] to stop and resume.
For audio les
1. Touch [ Music ] to display all available audio folders.
2. Touch a folder,then touch [ ] or [ ] to select a le.
3. Touch [ ] to start play.
4. Touch [ ] to stop and play to resume.
For picture les
1. Touch [ Picture ] to display all available picture folders
2. Touch a folder,then touch [ ] or [ ] to select a picture.
3. Touch [ ] to view the picture.
4. Touch [ ] to exit playing and play to resume.
Repeat
For DVD/VCD movie disc:
1. Touch bottom half of the screen to display control buttons menu,
if necessary.
2. Touch [ 1/2 ] to display the 2nd menu.
3. Touch [ ] to select:
DVD
Repeat chapter: play the current chapter repeatedly.
Repeat title: play all chapters in the title repeatedly.
Repeat off: cancel repeat play.
VCD
Repeat single: play the current chapter repeatedly.
Repeat all: play all chapter in the all disc repeatedly.
Repeat off: cancel repeat play.
PLAY
(Video)
(DVD)
(CD/MP3)

12
For CD/MP3/WMA les:
1. Touch [ ] to select:
[ ]: Play the current chapter repeatedly.
[ ]: Play all the tracks in current folder repeatedly.
[ ]: Play all the tracks repeatedly.
[ ]: Cancel repeat play
Tip
You can also press REPEAT on the remote control to select repeated play mode.
PLAY
Select Subtitle Language
For DVD discs that contain two or more subtitle languages.
1. Press [MENU] button on the front panel to show setting list menu.
2. Touch [Settings] to enter system setting menu.
3. Touch [Language] and [DVD Subtitle] to spread language list.
4. Select desired subtitle language.
Tip
You may also press SUBTITLE on the remote control repeatedly to select subtitle language.
Change View Angle
Some DVDs contain alternate scenes,such as scenes recorded from different
camera angles.For such DVDs,you can select from the available alternate scenes.
1. During play, touch bottom half of the screen to display menu on the screen.
2. Touch [ 1/2 ] to display the 2nd menu, if necessary.
3. Press [ Angle ], the view angle is changed.
(Video)
(DVD)
Repeat A-B
You can repeat a specic of video le (repeat A-B).
1. Touch bottom half of the screen to display control menu, if
necessary.
2. Touch [ 1/2 ] to display the 2nd menu, if necessary.
3. Touch [ A-B ] repeatedly to mark:
Rep A-: the start of the section.
Rep A-B: the end of the section.
The selected section plays repeatedly.
4. To exit A-B repeat mode, touch [AB] again. [Rep AB off] is
displayed.
Random Play
You can play audio tracks/les in random order.
During play, touch [ ] or [Random] to turn random play on or off.
When random play on, the icon lights up.

13
Rotate Pictures
1. When you view pictures, touch bottom half of the screen to
display control buttons menu on the screen.
2. Touch [ Rotate ] repeatedly to rotate the picture.
Zoom
You can zoom in pictures for a close view.
1. When you view pictures, touch bottom half of the screen to
display menu on the screen.
2. Touch [ 1/2 ] to display the 2nd menu, if necessary.
3. Touch [ ] repeatedly to zoom the picture.
4. Use [ ], [ ], [ ], [ ] keys to pan through the enlarged
picture.
PLAY

14
You can make or receive phone calls with Bluetooth-enabled phones through the unit. You can
also listen to music from a Bluetooth-enabled device.
Pair the Bluetooth-enabled devices
To connect your Bluetooth device to the unit,you need to pair the device to the unit. Pairing needs
only to be done once. You can pair up to ve devices.
1. Turn on the Bluetooth function on the device.
2. Search for Bluetooth device with the device.
3. Select “M-OF7020” in the pairing list.
4. Enter pairing code display on the screen if necessary.
If pairing succeeds, phone name is displayed.
Tip:
• The operational range between this unit and a Bluetooth device is approximately 10 meters (30
feet).
• Before you connect a Bluetooth device to this unit, familiarize yourself with the Bluetooth
capabilities of the device.
• Compatibility with all Bluetooth device is not guaranteed.
• Any obstacle between this unit and a Bluetooth device can reduce the operational range.
• Keep this unit away from any other electronic device that may cause interference.
Disconnect Bluetooth device
To disconnect one device, touch [ Disconnect ].
Tip
• The device will also be disconnected when the device is moved beyond the operational range.
• If you want to reconnect the device to the unit, place it within the operational range.
• If you do not want to reconnect the device to the unit automatically, touch [ Options ], then
touch [Off] button after [ Auto connect ]. For details, see the “Adjust Bluetooth settings” section.
Make a call
1. Press [Phone] on the front panel.
2. Select the desired Phone, then press [Connect].
3. It’s possible to search a phone number from one of these lists:
∙ [Missed calls]
∙ [Received calls]
∙ [Dialed calls]
∙ [Mobile phone book]
4. Touch [ ], [ ] to scoll the list.
Or touch [ ] to dial number directly, then touch [ ](green)
to dial.
Bluetooth mode

15
Receive call
1. If there is incoming call, [Incoming call...] ashed on the screen.
2. Press [ ](green) on the screen to accept call.
2. When conversation ends, touch [ ](red) to terminate the call.
Tip
∙ You can select to accept calls automatically by set [Auto answer] to [On] status.
Switch Phone Call to the Mobile
If you do not want your passenger to hear your incoming call, you can switch the call to the
mobile.
1. During talking, touch [ Privacy ].
The voice is transferred from the car’s loudspeaker to the mobile phone.
Bluetooth Settings
1. In Bluetooth mode,touch [ Options ].
The option menu is displayed.
2. Touch [On] or [Off] keys to activate or deactivate.
∙ [Bluetooth]: to turn on or off “Bluetooth” function.
∙ [Auto Connect]: to turn on or off “Auto connect” function.
∙ [Auto Answer]: to turn on or off “Auto answer” function.
∙ [Phone Book Sync]: touch [On] to synchronize phone book.
∙ [Pairing Code]: to set paring code.
Bluetooth mode

16
Select iPod as playing source
Turn on the unit’s power, and connect an iPod to the unit via a iPod cable, the unit will load the
iPod automatically.
Play
For audio les
1. When the music root menu appears on the screen,
touch an option (such as PlayLists, Artists...),
then touch [ ] or [ ] to select a le.
2. Touch the selected option to play back.
3. To pause, touch [ ].
To resume play, touch [ ].
4. Skip to previous/next track, press [ ] / [ ] key.
NowPlaying: If you return to the root menu when playing a song, you can touch [ Now Playing ] to
continue the previous playback.
For video les
1. Touch [ Video ] to display video folders root.
2. Touch an option, then touch [ ] or [ ] to select a folder or le.
3. Select the desired le to start play.
4. During play, touch bottom half of the screen to display menu on the screen.
5. Touch [ Menu ] to stop playback and return to the root menu
6. Skip to previous/next video, press [ ] / [ ] key.
For picture les
1. Touch [ Images ] to display video folders root.
2. Then operate on your iPod.
iPod

17
Fader/balance
Press [ Menu ] button on the front panel, then touch [Fader - Balance] on the screen.
You can also adjust the front and rear speaker balance, the left and right speaker balance,and
subwoofer settings.
1. Touch [ Left ], [ Right ] to adjust Balance value.
Touch [ Back ], [ Front ] to adjust Fader value.
Touch [ 0 ], [24] to adjust Subwoofer volume.
3. Touch [ ] to exit.
Equalizer
1. Press [ Menu ] button on the front panel, then touch [Equalizer] on the screen.
2. Touch [ + ] or [ - ] to select a preset EQ.
∙ [User] ∙ [Jazz]
∙ [Techno] ∙ [Optimal]
∙ [Rock] ∙ [Flat]
∙ [Classic] ∙ [Pop]
3. To modify manually, select [User] preset, then touch [ + ] or [ - ]:
∙ Treble range: -14 to +14
∙ Medium range: -14 to +14
∙ Bass range: -14 to +14
4. Touch [ ] to exit.
Adjust sound

18
SETUP
Settings
1. Press [MENU] button on the front panel.
2. Touch [Settings].
The settings menu is displayed.
Video settings
1. Touch [Video].
2. Touch on the option desired. If necessary, select an item from the drop-down menu:
Video settings Options Description
Aspect Ratio Full For widescreen display
Normal For normal display
Video Input You can select the video input format : Auto/NTSC/PAL
Detect parking brake On/Off You can set the parking on or off.
Parking Assistance On/Off You can set the parking assistance on or off.
Rear Camera On/Off When you drive in reverse, the rear view displayed or not.
3. Touch [ ] to exit.
General Settings
1. Touch [General].
2. Touch [ ] or [ ] to scroll.
3. Touch on the option desired. If necessary, select an item from the drop-down menu:
General settings Options Description
Radio region
USA
Select one that matches your location.
Asia
Japan
Europe
Europe (LW)
OIRT
Sensitivity Local/Distance Receive local or distant radio singal.
Dimmer mode Auto/Low/Medium/Normal/High You can select the dimmer mode.
Key colour You can select the key colour.
Beep On Burn on the beep sound. Each time you press a button,
the unit beeps.
Off Turn off the beep sound.
Calibration Calibrate the touch screen.
Load factory Reset the unit.
5. Touch [ ] to exit.

19
Sound settings
1. Touch [Sound].
2. Touch on the option desired. If necessary, select an item from the drop-down menu:
Sound settings Options Description
Subwoofer On Turn on the subwoofer.
Off Turn off the subwoofer
Subwoofer Filter Select the frequency of Subwoofer Filter.
Dynamic Bass
Boost
On The dynamic Bass Boost functions is on.
Off The loudness function is off.
3. Touch [ ] to exit.
DVD rating
1. Touch [DVD rating].
2. Touch on the option desired. If necessary, select an item from the drop-down menu:
DVD rating Options Description
Set Password Set password to restrict the play of discs. The supper password is 4321.
Rating Level
Kid safe Acceptable for children.
G Acceptable for general viewers.
PG Parental guidance suggested.
PG-13 Unsuitable for children under age 13.
PG-R Recommend parents to restrict children under 17 to view.
R Restricted recommend parents to guide children under 17 to view.
NC-17 Unsuitable for children under age 17.
Adult Acceptable for adults only.
3. Touch [ ] to exit.
Language settings
1. Touch [Language].
2. Touch on the option desired. If necessary, select an item from the drop-down menu:
Language settings Description
On Screen Display Select on-screen display language.
DVD Audio Select DVD audio language. Options available are depends on DVD disc.
DVD Subtitle Select DVD subtitle language. Options available are depends on DVD disc.
Disc Menu Select DVD menu language. Options available are depends on DVD disc.
3. Touch [ ] to exit.
Bluetooth settings
1. Touch [Bluetooth].
Bluetooth settings Options Description
Microphone Internal Use internal microphone
External Use external microphone (need to be connected)
3. Touch [ ] to exit.
SETUP
Table of contents
Other Macrom Car Receiver manuals