Macrom M-DVD4660R User manual

$/',1(763$
9,$/(&&2/20%2
75(==$12610,
,7$/<
%QJOLVK

1
Safety Precautions
4. To ensure safe driving, please adjust the volume to a safe
& comfort level in case of emergency situations.
5. Never expose this unit, amplifier, and speakers to moisture or
water for preventing electric sparks or fires.
6. Please don't change the fuse on the power cord without profe-
ssional guidance, using improper fuse may cause damage to
this unit or even cause fire.
7. Please power off this unit at once and send it back to the after-
sales service center or the dealer /distributor you purchased
from if one of the following symptoms is found:
(a). No audio output;
(b). No image output;
(c). Water or other obstacle
enters the unit;
(d). Smoking;
(e). Peculiar smell.
1. Only connect the unit to a 12-volt power supply with negative
grounding.
2. Never install this unit where the operation & condition for safety
driving is restrained.
3. Never use the video display function in the front when driving to
prevent the violation of laws & regulations and also to reduce the
risk of traffic accident except using for rear view video camera.
MUTE
OK
MUTE
OK

2
Safety Information
WARNING
Operate the unit correctly according to the manual instruction to prevent
unnecessary problem.
CAUTION
This product is a CLASS 1 LASER PRODUCT. Use of controls or adjustments
or performance of procedures other than those specified herein may result in
hazardous radiation exposure. Do not open covers and do not repair yourself.
4GHGTUGTXKEKPIVQSWCNKſGFRGTUQPPGN
TWO LASER PRODUCTS
Wave length: CD:780nm DVD:650nm
Laser power: No hazardous radiation is emitted with safety protection.
6QTGFWEGVJGTKUMQHſTGGNGEVTKEUJQEMCPFCPPQ[KPIKPVGTHGTGPEGWUGQPN[VJG
included components.
CD NOTES
• Playing a defective or dusty CD can cause dropouts in sound.
• Hold CDs as illustrated.
• Do not touch the unlabeled side.
Ŗ &QPQVCVVCEJCP[UGCNNCDGNQTFCVCRTQVGEVKQPUJGGVVQGKVJGT
side of a disc.
• Do not expose a CD to direct sunlight or excessive heat.
• Wipe a dirty CD from the center outward with a cleaning cloth.
• Never use solvents such as benzine or alcohol.
• This unit cannot play 3-inch ( 8cm ) CDs.
• Never insert a 3-inch CD contained in the adapter or an irregularly
shaped CD. The unit may not be able to eject it.
Contents
Safety Precautions.................................................1
Safety Information..................................................2
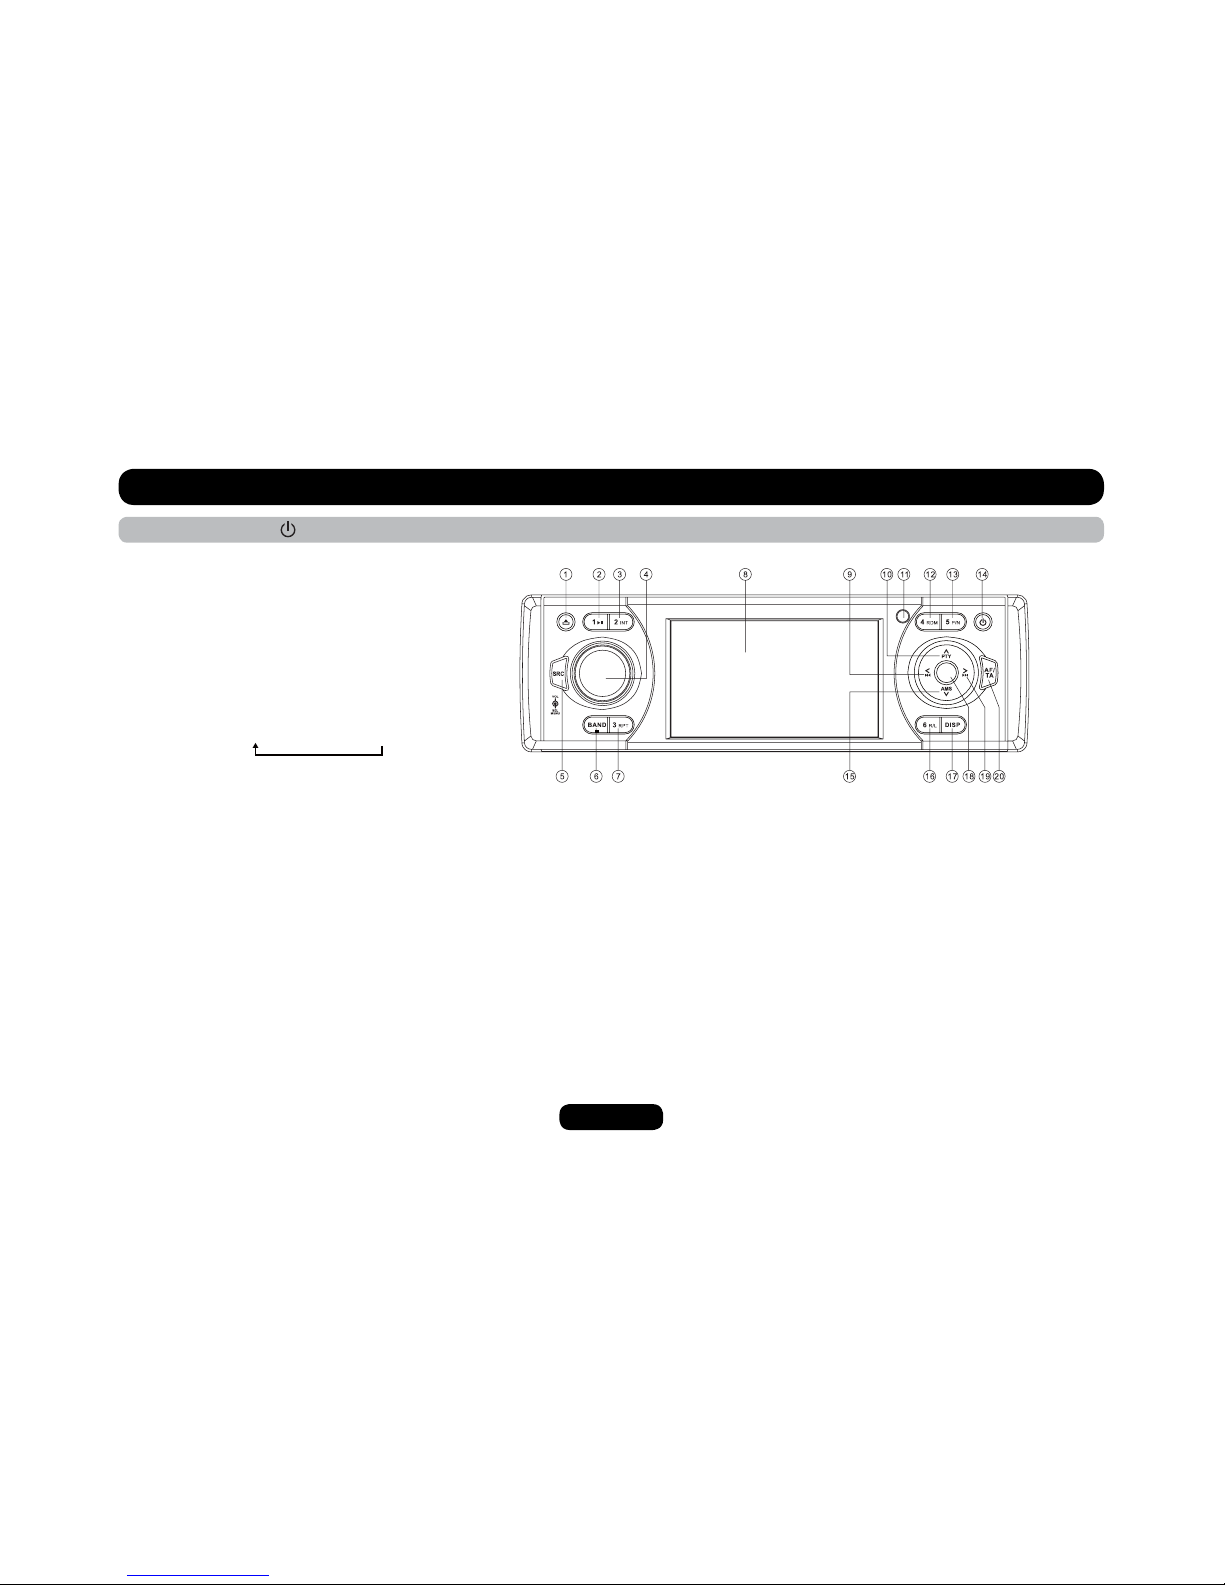
Panel Controls .......................................................3
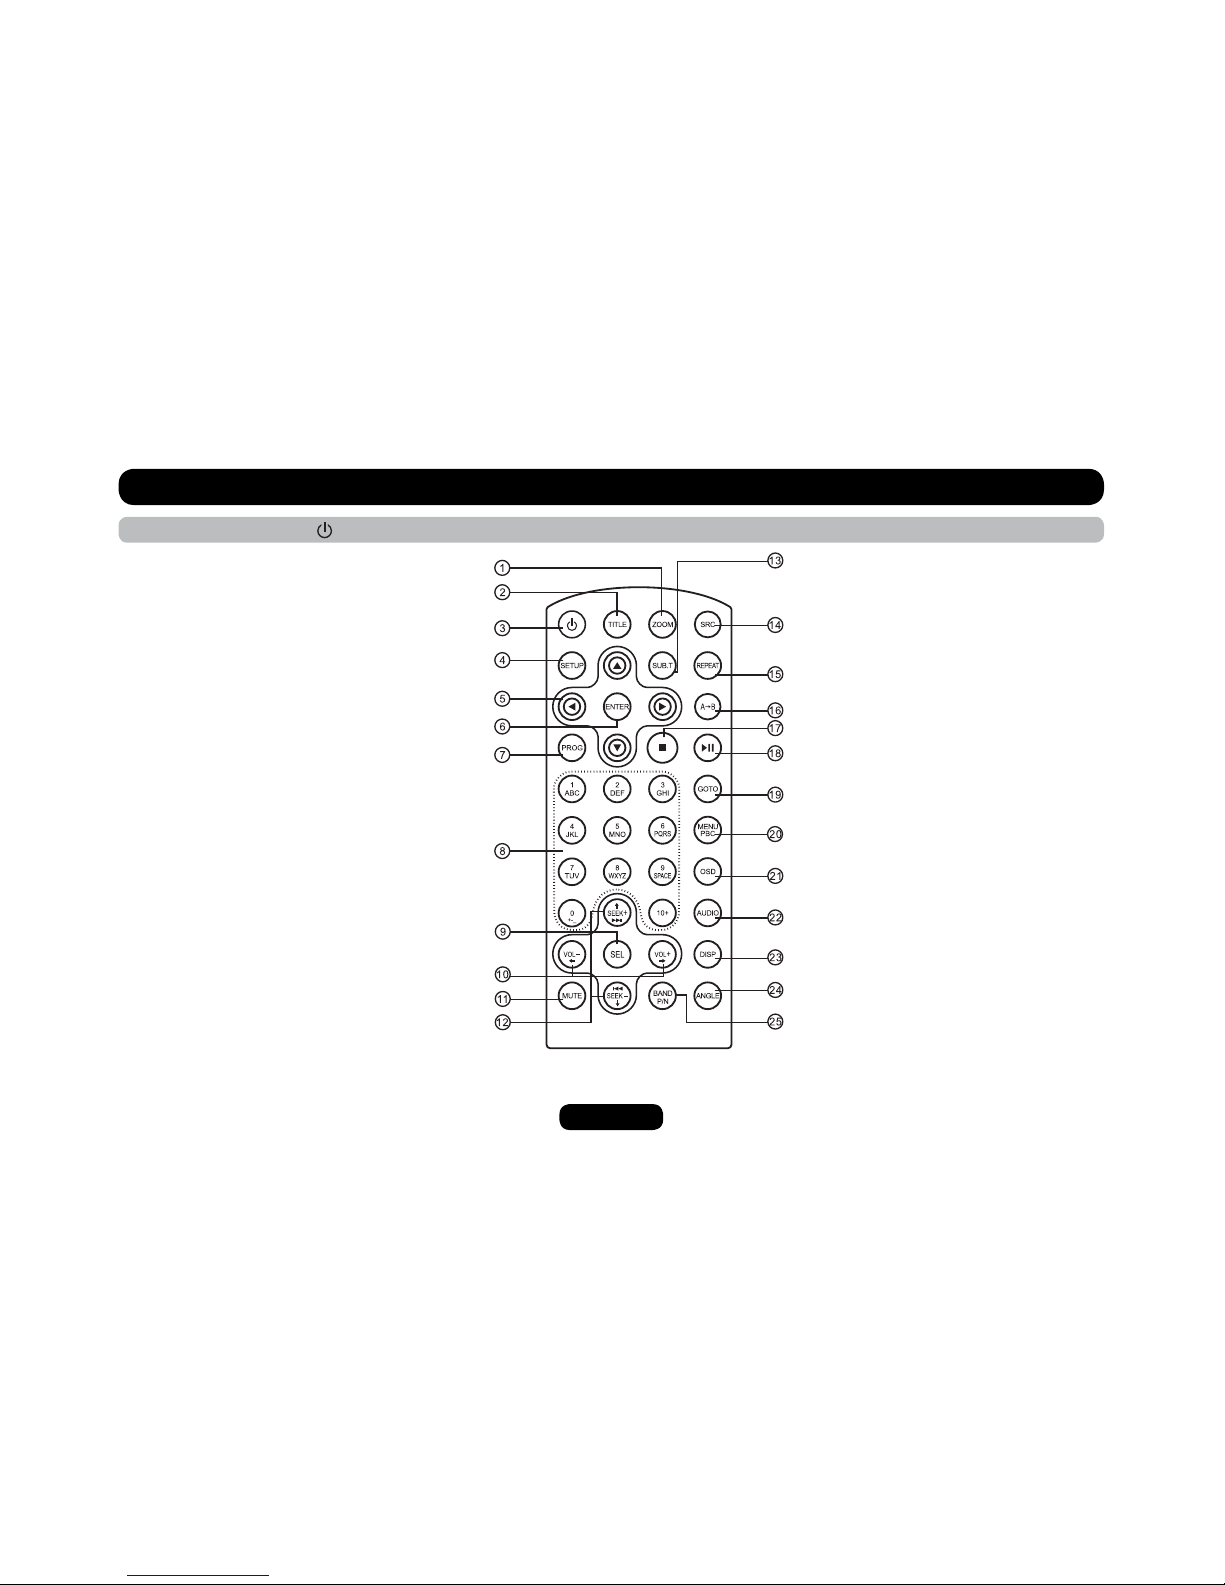
Remote Controls................................................ 4-5
Getting Started.......................................................6
USB/SD/MMC MP3 Playback................................7
General Operation .................................................8
Rotary Knob Menu........................................... 9-12
Radio ...................................................................13
DVD & AV IN Mode .............................................14
Radio and Clock ..................................................14
RDS ( Radio Data System )........................... 15-16
Disc Playback ......................................................17
Disc Playable.......................................................17
Audio/Video/Picture File Playback.......................18
Track Playback .............................................. 19-20
DVD Playback......................................................21
DVD Setup...........................................................22
DVD System Setup........................................ 22-23
DVD Language Setup..........................................24
DVD Audio Setup.................................................25
DVD Video Setup.................................................26
DVD Digital Setup................................................27
Electrical Connections ................................... 28-29
Installation Guide.................................................30
Anti-Theft System ................................................31
Troubleshooting...................................................32
5RGEKſECVKQPU.......................................................33

3
Panel Controls
16 Button 6: - DVD Audio Channel
- VCD Audio Channel L/R/ST
- Folder Down (USB/SD/MP3/Disc)
* Button 1~6: Radio Preset: Press to listen to a preset station.
Hold for more than 2 seconds to store station.
17 Display Switch/Time Adjust
&RQ¿UP2SHUDWLRQLQVHWWLQJVPRGH
19 - Radio Tune
- Track Skip/Seek
- Next Track (DVD/CD mode)
- Fast Forward (DVD/CD mode)
0DQXDO7XQLQJ)RUZDUGV5DGLRPRGH
0HQX&XUVRUULJKW03PRGH
$OWHUQDWLYH)UHTXHQF\2Q2II
7UDI¿F$QQRXQFHPHQWV3UHVVPRUHWKDQVHFRQGVWRWXUQRQRII
Power On/Off: Press to turn On/Off the unit.
MUTE
OK
3DQHO2SHQ
2 Button 1: Play/Pause
3 Button 2: Intro Play
4 - Rotate the knob to adjust volume level.
3XVKWRVHOHFW%$675(%$/)$'%5,&216$7
Rotate the knob to adjust level.
5 - Radio
- Disc Play (When disc inserted)
- USB (When USB inserted)
- Card (When SD/MMC inserted)
- AV-in
6-Band Switch: FM1-FM2-FM3-AM1-AM2
- CT On/Off (press more than 2 seconds when in Radio
FM1/FM2/FM3 mode)
- Stop
7 Button 3: Track Repeat play
8 3.5 inch TFT Display
9 - Radio Tune
- Track Skip/Seek
- Last Track (DVD/CD mode)
- Fast Rewind (DVD/CD mode)
0DQXDO7XQLQJ%DFNZDUGV5DGLRPRGH
- Menu Cursor left (MP3 mode)
5'63URJUDP7\SH
- Menu Cursor up (MP3 mode)
11 Remote Sensor
12 Button 4: Track Random Play
13 Button 5: -Video System PAL/NTSC/AUTO
- Folder Up (USB/SD/MP3/Disc)
14 -Power On/Off (press more than 2 seconds)
- Mute On/Off
15 - AMS: Radio Auto Preset/Radio Preset Scan
- Menu Cursor down (MP3 mode)

4
14 - Radio
- Disc Play (when disc inserted)
- USB (when USB inserted)
- Card (when SD/MMC inserted)
- AV-in
15 REPEAT
16 AĺB Repeat
17 Stop/Return
18 Play/Pause
19 Goto Search
20 - DVD MENU
- PBC (For VCD 2.0 or up)
21 On Screen Display
22 - DVD Audio
- VCD Audio L/R/ST
23 On Panel Display
24 Angle (DVD only)
25 - Video System PAL/NTSC/AUTO
- Radio Band
Remote Controls
Power On/Off: Press to turn on/off the unit.
1 Zoom (DVD/VCD only)
2 Title (DVD only)
3 Power On/Off
4 Setup
5 Menu Cursor
6 Enter
7 Program
8 Digit Area
9 - Audio Mode Select Bas/Tre/Bal/Fad/Bri/Con/Sat
- Push more than 2 seconds to Menu mode
10 Volume
11 Mute
12 - Radio Tune
- Track Skip/Seek
13 Subtitle (DVD only)

5
Remote control operating range
The remote control can operate within a distance of 3~5m.
1
(CR 2025)
2
Remote Controls
Replacing the lithium battery of remote control
unit.
When the range of the operation of the card remote control
DGEQOGUUJQTVQTPQHWPEVKQPUYJKNGQRGTCVKPITGRNCEGVJG
battery with a new lithium battery. Make sure the battery polarity
replacement is correct.
1. Pull out the battery holder while pressing the stopper.
2. Insert the button-type battery with the stamped(+) mark facing
upward. Insert the battery holder into the remote control.
WARNING :
• Store the battery where children cannot reach. If a child
CEEKFGPVCNN[UYCNNQYUVJGDCVVGT[EQPUWNVCFQEVQTKOOGFKCVGN[
Ŗ &QPQVTGEJCTIGUJQTVFKUCUUGODNGQTJGCVVJGDCVVGT[QT
FKURQUGKVKPCſTG
• Do not expose or bring into contact the battery with other metallic
materials.
Ŗ 9JGPVJTQYKPICYC[QTUCXKPIVJGDCVVGT[YTCRKVKPVCRGCPF
KPUWNCVGQVJGTYKUGVJGDCVVGT[OC[IKXGQHHJGCVETCEMQTGXGP
ECWUGCſTG

6
Press the button to open the panel and press to eject the disc.
Light up when you slide the
panel down; flashes when
you remove the panel.
Note: Pressing the RESET button
by inserting a pointed tool such as
the end of an unbent paper clip.
Getting Started

7
1. Loading SD/MMC card
USB/SD/MMC MP3 Playback
Press the SRC button to non-USB mode and take out the USB
device from the USB jack.
USB/SD/MMC Notes
75$HWPEVKQPUƀCUJOGOQT[V[RG/2OWUKERNC[
1. SD/MMC card support
75$ƀCUJOGOQT[KP5&//%UWRRQTV
3. Support FAT 16 & FAT 32
4. File name: 32 byte/dir name: 32 byte/tag name: 32 byte
5. Tag (id3 tag ver 2.0)
- title/artist/album: 32 byte support
6. Multi card reader not support
7. USB 1.1 support
Open the panel and insert the SD/MMC card into the slot. Close the
RCPGNVJGWPKVYKNNTGCFVJGſNGQHVJGECTFCWVQOCVKECNN[
2. Take out SD/MMC card
Push SRCDWVVQPVQPQP5&OQFGRTGUUVJG5&//%ECTFVQRQR
out. Take out the card.
3. Loading USB device
+PUGTV75$FGXKEGKPVQVJG75$LCEM6JGWPKVYKNNTGCFVJGſNGKP
the USB device automatically.
4. Take out USB device

8
Switching On and Off
1. Press to turn on the unit.
2. Press SRCQPEGQTOQTGVQUGNGEV[QWTFGUKTGFHWPEVKQP&+5%6WPGT4CFKQ75$5&//%#8KP
3. Press to power off (press more than 2 seconds).
9JGP[QWUYKVEJQHHVJGU[UVGOQTECTKIPKVKQPVJGUGVVKPIUVWPGTRTGUGVUCPFVJGXQNWOGNGXGNYKNNDGTGVCKPGFKPVJGWPKVUOGOQT[
VOL Knob Function
2TGUUVJGMPQDQPEGVQUGNGEV$#5564'$.'$#.#0%'(#&'4$4+)*60'55%1064#565#674#6+10TQVCVGVJGMPQDVQCFLWUV
General Operation
BASS
TREBLE
BALANCE
FADER
BRIGHTNESS
CONTRAST
SATURATION
SETTING
BASS
TREBLE
BALANCE
FADER
BRIGHTNESS
CONTRAST
SATURATION
SETTING
SETTING
BASS
TREBLE
BALANCE
FADER
BRIGHTNESS
CONTRAST
SATURATION
SETTING
BASS
TREBLE
BALANCE
FADER
BRIGHTNESS
CONTRAST
SATURATION
BASS
TREBLE
BALANCE
FADER
BRIGHTNESS
CONTRAST
SATURATION
SETTING
BASS
TREBLE
BALANCE
FADER
BRIGHTNESS
CONTRAST
SATURATION
SETTING
BASS
TREBLE
BALANCE
FADER
BRIGHTNESS
CONTRAST
SATURATION
SETTING

9
Rotary Knob Menu
EQ mode
Rotate the knob to select EQ sound effect:
ROCK - POP - CLASSIC - FLAT - EQ OFF
LOUD mode
Rotate the knob to choose loud on or off.
2TGUUVJGMPQDOQTGVJCPUGEQPFUVQGPVGTOGPWOQFGVJGP
each press changes the mode as follows:
EQ MODE LOUD BEEP 12 /24 MODE TA MODE
RETUNE PARKING TA-VOL VOL-MODE A-VOL
SUBWOOFER SUBW-VOL

10
Rotary Knob Menu
BEEP ON/OFF mode
Rotate the knob to choose button beep sound on or off.
12/24 mode
Select 12 hours mode or 24 hours mode.
TA mode
Rotate the knob to choose TA ALARM or TA SEEK mode. If the
TA (Traffic Announcements) is turned on and there is no traffic
RTQITCOKFGPVKſECVKQPEQFGTGEGKXGFKPVJGURGEKſGFVKOGPQ6#
TP will display and either TA ALARM or TA SEEK will be activated.
TA ALARM mode : Alarm is turned on.
TA SEEK mode: TA SEEK is automatically activated.

11
Rotary Knob Menu
RETUNE mode
Rotate the control to choose RETUNE-S or RETUNE-L.
RETUNE-S or RETUNE-L is time length selection of TA SEEK
retune interval.
4'670'55JQTV6#5''-4GVWPGKPVGTXCNKUUGEQPFU
4'670'..QPI6#5''-4GVWPGKPVGTXCNKUUGEQPFU
REMARK: RETUNE mode functions for TA during TA SEEK mode
only.
PARKING mode
Rotate the knob to turn rear parking attention on or off. While unit
GPVGT2#4-+0)10OQFGRNC[VJGXKFGQFKUEVJGUETGGPCRRGCTő
&10169#6%*8+&'19*+.'&4+8+0)ŒCPFDNCPMUETGGP
TA-VOL
Rotate the knob to choose TA-VOL level.
VOL - MODE
4QVCVGMPQDVQEJQQUG81..#56VJGVWTPQPXQNWOGNGXGNKUVJG
volume level of latest power off.
4QVCVGMPQDVQEJQQUG81.#&,VJGPTQVCVGVJGMPQDVQUGVVJG
turn-on volume level .

12
Rotary Knob Menu
A - VOL
Rotate the knob to choose A-VOL level.
SUBWOOFER
4QVCVGVJGMPQDVQEJQQUG57$911('4HTGSWGPE[*\*\
120Hz.
SUBW - VOL(optional)
Rotate the knob to choose SUBWOOFER level.

13
Radio
Band
1. Press VQRQYGTQPVJGPRTGUU54%QPEGQTOQTGVQUGNGEV
tuner.
2. Press BAND once or more to select FM1 FM2 FM3
AM1 AM2&KURNC[UJQYUYCXGDCPFHTGSWGPE[CPFRTGUGV
station number if already stored.
Tune
Radio tune by step manually:
Press or less than 2
seconds.
Radio seek automatically:
Press or more than 2
seconds.
Press either button to
store the selected station.
05:59
AF REG
FM: 104.15 MHz
PS: NO NAME
LOUD EQ OFF

14
DVD & AV IN Mode
DVD Mode
2TGUU54%DWVVQPVQUGNGEV&8&OQFGYJGPFKUEKUKPUGTVCPFWPKVKUTGCFKPI
FKUEVJGPRTGUUVJG&+52DWVVQP6JG.%&YKNNFKURNC[
AV IN Mode
Press SRC button to select AV IN mode (when unit is reading).
The LCD will display:
AMS : Auto Memory Store
2TGUU#/5DTKGƀ[VQUECPVJGRTGUGVUVCVKQP
HQTUGEQPFUGCEJ*QNFOQTGVJCPUGEQPFUVJG
6 strongest available stations will be automatically
saved in the memory of preset button 1 - 6.
Clock Setting
2TGUU&+52OQTGVJCPUGEQPFUOKPWVG
FKURNC[DNKPMUTQVCVGVJGMPQDVQUGVOKPWVG
2TGUUVJGMPQDQPEGJQWTFKURNC[DNKPMUTQVCVG
the knob to set hour.
2TGUU&+52VQEQPſTO
Radio and Clock
AF

15
RDS ( Radio Data System )
4&5UGTXKEGCXCKNCDKNKV[XCTKGUYKVJCTGCU2NGCUGWPFGTUVCPFKH4&5UGTXKEGKUPQVCXCKNCDNGKP[QWCTGCVJGHQNNQYKPIUGTXKEGKUPQVCXCKNCDNG
RDS Basics
#(#NVGTPCVKXG(TGSWGPE[9JGPVJGTCFKQUKIPCNUVTGPIVJKURQQTGPCDNKPIVJG#(HWPEVKQPYKNNCNNQYVJGWPKVVQCWVQOCVKECNN[UGCTEJCPQVJGT
UVCVKQPYKVJVJGUCOG2+RTQITCOKFGPVKſECVKQPCUVJGEWTTGPVUVCVKQPDWVYKVJUVTQPIGTUKIPCNUVTGPIVJ
PS (Program Service name): The name of station will be display instead of frequency.
AF Mode:
AF on: AF function is activated.
AF off: AF function is disabled.
4GOCTM#(KPFKECVQTQP.%&YKNNƀCUJWPVKN4&5KPHQTOCVKQPKUTGEGKXGF+H4&5UGTXKEGKUPQVCXCKNCDNGKP[QWTCTGCVWTPQHHVJG#(OQFG
REG Mode: Press PTY for more than 2 seconds to switch REG mode on and off.
REG on: AF function will implement the regional code (of the PI) and only stations in the current region can be tuned automatically.
REG off: AF function will ignore the regional code (of the PI) and stations in the other regions can also be tuned automatically.
6TCHſE#PPQWPEGOGPVU
5QOG4&5(/UVCVKQPURGTKQFKECNN[RTQXKFGVTCHſEKPHQTOCVKQP
626TCHſE2TQITCO+FGPVKſECVKQP$TQCFECUVKPIQHVTCHſEKPHQTOCVKQP
6#6TCHſE#PPQWPEGOGPVU+FGPVKſECVKQP4CFKQCPPQWPEGOGPVUQPVTCHſEEQPFKVKQPU
6#/QFG9JGP6#OQFGKUVWTPGFQPVJG6#KPFKECVQTYKNNDNKPM
9JGPVTCHſECPPQWPEGOGPVKUTGEGKXGFVJG6#KPFKECVQTYKNNFKURNC[6JGWPKVYKNNVGORQTCTKN[UYKVEJVQVJGVWPGTOQFGTGICTFNGUUQHVJGEWTTGPV
OQFGCPFDGIKPDTQCFECUVKPIVJGCPPQWPEGOGPVCV6#XQNWOGNGXGN#HVGTVJGVTCHſECPPQWPEGOGPVKUQXGTKVYKNNTGVWTPVQVJGRTGXKQWUOQFG
CPFXQNWOGNGXGN9JGP6#KUVWTPGFQP5''-5%#0#/5HWPEVKQPECPQPN[DGTGEGKXGFQTUCXGFYJGPVTCHſERTQITCOKFGPVKſECVKQP62
code is received.
EON (Enhanced Other Networks )
9JGP'10FCVCKUTGEGKXGFVJG'10KPFKECVQTNKIJVUCPFVJG6#CPF#(HWPEVKQPUCTGGPJCPEGF
6#6TCHſEKPHQTOCVKQPECPDGTGEGKXGFHTQOVJGEWTTGPVUVCVKQPQTUVCVKQPUKPQVJGTPGVYQTM
AF: The frequency list of preset RDS stations is updated by EON data. EON enables the radio to make fuller use of RDS information. It
EQPUVCPVN[WRFCVGUVJG#(NKUVQHRTGUGVUVCVKQPUKPENWFKPIVJGQPGVJCVEWTTGPVN[VWPGFKPVQ+H[QWRTGUGVCUVCVKQPCTQWPFVJGCTGCCV[QWTJQOG
[QWYKNNNCVGTDGCDNGVQTGEGKXGVJGUCOGUVCVKQPCVCPCNVGTPCVKXGHTGSWGPE[QTCP[QVJGTUVCVKQPUGTXKPIVJGUCOGRTQITCO'10CNUQMGGRU
track of locally available TP stations for quick reception.

16
PTY Reception ( Program Type )
4&5(/UVCVKQPURTQXKFGCRTQITCOV[RGKFGPVKſECVKQPUKIPCN
Example: news, rock, info, sport, etc.
PTY Mode:
Press PTYVQVWTPQPVJG2TQITCO6[RGTGEGRVKQPVJGRTGXKQWU
PTY type is shown. Press PTY once again to enter the MUSIC
V[RGQTRTGUUVYKEGVQGPVGTVJG52''%*V[RGVJGPWUGDWVVQPU
1 - 6 to select the desired program type. The selected PTY type
is shown and searching starts if no other function is selected for
UGEQPFU+HVJGTGKUPQEQTTGURQPFKPIRTQITCOV[RG0126;
is shown and the unit will return to normal mode.
PTY Type Preset:
Press PTY once to enter the MUSIC type or press PTY twice to
enter the SPEECH type. Then use function to select the
desired program type.
RDS ( Radio Data System )

17
Disc Playback Disc Playable
Disc Load / Eject
Load: Press DWVVQPVQƀKRFQYPVJGRCPGN+PUGTVVJGFKUEKPVQ
the slot.
Eject: Press DWVVQPVQƀKRFQYPVJGRCPGN2TGUU to eject
the disc.
Disc Playback
9JGPFKUEKPUGTVGFFKURNC[UJQYU.1#&(QT/2QTFKUEYKVJ
OKZGFſNGUTGCFKPIVKOGOC[GZEGGFOKPWVG
2. ERROR will be displayed if error found in disc operation.
(QT8%&%&8%&QT%&KEQPYKNNCRRGCTQPVJGFKURNC[
9JKNG/29/#ſNGURNC[DCEM/29/#KEQPYKNNCRRGCTQP
the display.
(QT&8&&8&KEQPYKNNCRRGCTQPVJGFKURNC[CPF6+6.'
appears. Press ENTER or to play.
File type supported
#WFKQſNG/2OR9/#YOC
8KFGQſNG/2CXK&+8:
/2')XQD
/2')FCV
2KEVWTGſNG,2')LRI
/2ſNG+51QT+51,QNKGVHQTOCV/CZ
characters.
Max. nested directory is 8 levels.
The max. album number is 99.
The max. length of each track is 99 minutes 59 seconds.
Supported sampling frequency for MP3 disc: 8KHz to
48KHz (44.1KHz preferably).
Supported bit-rates of MP3 disc are: 32 - 320 kbps (128
kbps preferably).
&KUECPFſNG016UWRRQTVGF
##%&.(/72.5/2241ſNGUCPFſNGUYKVJ&4/
Open session discs.

18
Audio/Video/Picture File Playback
9JGP#7&+12+%674'8+&'1ſNGKURNC[GF%CVGIQT[(QNFGT(KNG
NKUVYKNNDGFKURNC[GFQPVJGUETGGPCPFHKNGHQNFGTPCOGDGKPI
played will be displayed on top. Current selected item will be
highlighted.
Category Select
Use / to select AUDIO
PICTURE
VIDEO
2TGUU'06'4VQEQPſTO
Folder Select
Use / to enter folder list and use / VQUGNGEVFGUKTGFHQNFGT
RTGUU'06'4VQEQPſTO
File Select
Use / VQGPVGTſNGNKUVCPFWUG / VQUGNGEVFGUKTGFſNGRTGUU
'06'4VQRNC[DCEMRTGUU to return.
(QT2+%674'RTGUU VQUNKFGUJQYVJGRKEVWTGURTGUU241)VQ
select picture showing style.
(QT/75+%RTGUU YKNNGPVGTKPVTQNQIQVJGPRTGUU to return.
[ \ ]:MP3 SOND: FOLDER
USB
OK
On the panelOn the remote control

19
REPEAT
&WTKPIRNC[DCEMRTGUURPT once or more.
- RPT icon will appear on the display.
- For VCD/CD: Display appears RPT ONE RPT ALL RPT OFF
- For DVD: Display appears RPT CHAPTER RPT TITLE RPT
OFF
- For File disc: Display appears RPT ONE RPT DIR RPT ALL
RPT OFF
0QVG+H[QWFQPQVUGNGEV426QPYJGPVJGGPVKTG
FKUEQT6+6.'RNC[DCEMJCUſPKUJGFVJGU[UVGOYKNN
UVQR+HPQQVJGTEQPVTQNCHVGTOKPWVGUVJGWPKVYKNN
into standby mode.
REPEAT A B
Select desired passage to repeat playback.
- Press AB once to select starting point. Display shows REPEAT A.
- Press A B again to select ending point.
Display shows REPEAT A $CPFUGNGEVGF
passage start to replay.
- Press A Bonce again to exit. Display shows
A B CANCELLED.
Track Playback
Select desired track
- Press or to skip to the next track.
7UGCPFDWVVQPUQPVJGTGOQVGEQPVTQNVQUGNGEV
desired track number.
Fast forward / backward during playback
Press or HQTOQTGVJCPUGEQPFUQPEGQTOQTGVQUGNGEV:
:::VQHCUVDCEMYCTFQTHQTYCTFVTCEMFWTKPIRNC[DCEM
&WTKPIVJGHCUVHQTYCTFQTDCEMYCTFQRGTCVKQPRTGUU DTKGƀ[VQ
playback again.
&WTKPIVJGHCUVHQTYCTFQTDCEMYCTFQRGTCVKQPVJGXQNWOGYKNNDG
muted.
INTRO (for CD/VCD only)
You can play the beginning of every track for 15 seconds in
sequence.
&WTKPIRNC[DCEMRTGUUINT once.
- INT ON/OFF will appear on the display.
2. Press INT again to select the current track.
Random track playback (for CD/VCD/MP3 Only)
You can play all the tracks in random order.
&WTKPIRNC[DCEMRTGUURDM once or more.
- RDM icon will appear on the display.
2. Press RDM again to select normal playback.
Other manuals for M-DVD4660R
1
Table of contents
Other Macrom Car Receiver manuals