Magic Chef MCEM1B User manual

ESPRESSO MAKER
MCEM1B
-HOUSEHOLD USE ONLY-
CAUTION:
BEFORE USE, PLEASE READ AND FOLLOW ALL IMPORTANT
SAFEGUARDS, PRECAUTIONS AND OPERATING INSTRUCTIONS.
1

2
Table of Contents
Safety Instructions -------------------------------------------- 3-5
Parts and Features -------------------------------------------- 6
Operating Instructions --------------------------------------- 7-8
Troubleshooting ----------------------------------------------- 8
Cleaning and Maintenance --------------------------------- 9-10
Mineral Deposit and Decalcifying ------------------------ 10-11
Warranty ---------------------------------------------------------- 12
Spanish Section ------------------------------------------------ 13-24

What You Need to Know About Safety Instructions
Warning and Important Safety Instruction appearing in this manual are not meant
to cover all possible conditions and situations that may occur. Common sense,
caution and care must be exercised when installing, maintaining, or operating
appliance.
Always contact your dealer, distributor, service agent or manufacturer about
problems or conditions you do not understand.
When using electrical appliances, basic safety precaution should always be
followed, including the following:
IMPORTANT SAFEGUARDS
1) Read all instructions.
2) This appliance is for household use only. Do not use outdoors.
3) Do not use this appliance for other than its intended use.
4) Before using for the first time, check if voltage indicated on the base
of the appliance corresponds to the voltage in your home.
5) Do not turn the power on unless this appliance is properly
assembled.
6) Close supervision is necessary when any appliance is used by or
near children.
7) Do not operate any appliance with a damaged cord or plug, or after
the appliance malfunctions or has been damaged in any manner.
3

Return appliance to authorized service center for examination, repair
or adjustment.
8) The use of attachments or accessories not recommended or sold by
the manufacturer may result in fire, electric shock or injury.
9) Unplug the appliance from the outlet when not in use, assembling
and disassembling, and before cleaning. Make sure the appliance
cools down completely before assembling, disassembling and
cleaning.
10) Do not let cord hang over edge of table or counter, or touch hot
surfaces.
11) Do not place the appliance on or near a hot gas or electric burner, or
in a heated oven.
12) Do not touch hot surfaces. Use handles or knobs.
13) To connect, always plug the cord into the wall outlet first. To
disconnect, turn the knob to “OFF” and then remove plug from wall
outlet.
14) Never use the carafe on a range top or in a conventional microwave
oven.
15) Never use warm or hot water to fill the water tank. Use cold water
only.
16) Snap the lid securely to the carafe before serving.
17) Scalding may occur if the cover is lifted or removed during the
brewing cycle.
18) Do not set a hot carafe on a wet or cold surface.
19) Do not use a cracked carafe, or a carafe that has a loose or
weakened handle.
20) To avoid interruption of airflow underneath the appliance, use on a
hard, flat level surface only.
21) Always be sure that the water tank boiler cap is tightened securely
before turning the appliance on.
22) Do not clean the espresso maker with scouring powders, steel wool
pads, or other abrasive materials.
WARNING:
To protect against electric shock, fire, and injury to persons, do not
immerse main cord, plug or unit in water or any other liquid.
4

5
CAUTION:
To avoid possible burns and other injuries, DO NOT remove the
boiler cap until the steam pressure is completely released.
CAUTION:
This product is equipped with a polarized plug (one blade is wider
than the other blade) as a safety feature to reduce the risk of
electrical shock. This plug will fit into a polarized outlet only one
way. This is a safety feature. If you are unable to insert the plug into
the electrical outlet, try reversing the plug. If the plug still does not
fit, contact a qualified electrician.
Never use the plug with an extension cord unless the plug can be
fully inserted into the extension cord. Do not alter the plug of the
appliance or any extension cord used with this appliance. Do not
attempt to defeat the safety purpose of the polarized plug.
SAVE THESE INSTRUCTIONS

Parts and Features
1. Water Tank Boiler Cap
2. Indicator Light
3. Control Knob
4. Water Tank
5. Carafe Lid
6. Filter Basket
7. Steam Nozzle
8. Retainer Clip
9. Filter
10. Glass Carafe
11. Base Grid
6

Before Your First Use
Carefully unpack the coffee maker and remove all packaging materials. Wipe the
heating stand with a clean, damp cloth. Do not immerse the heating stand in
water or other liquid. To remove any dust that may have accumulated on the
removable parts during packaging, wash the carafe, lid and filter basket with
warm soapy water. Rinse and dry. We recommend that prior to brewing your first
pot of coffee, you “brew” just the cold water without ground coffee or a paper
filter. This will remove any dust that may have settled inside the coffee maker.
Operating Instructions
MAKING ESPRESSO
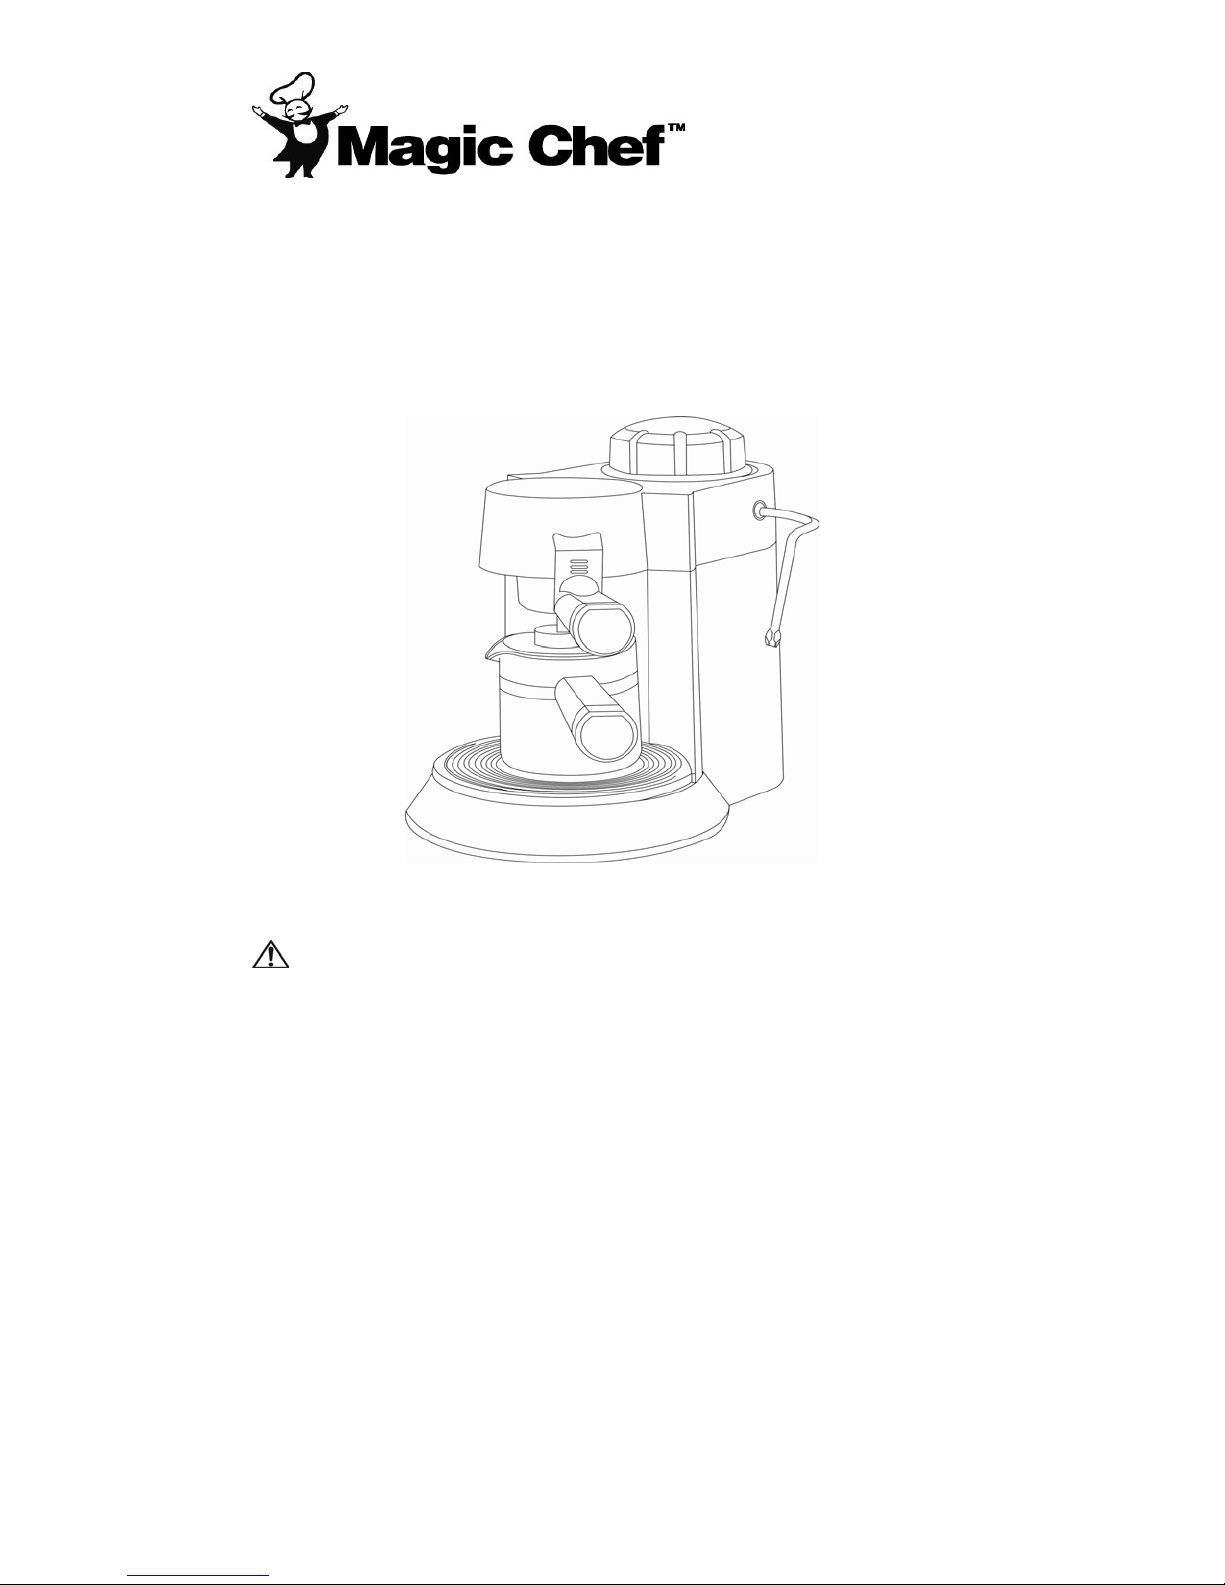
1) Place your espresso maker on a flat, level surface, such as a countertop.
Plug the espresso maker into a 120_volt 60Hz AC only outlet.
2) Make sure that the control knob(3) is in the “OFF” position.
3) Fill the glass carafe(10) with cold water to the desired amount.
4) Unscrew the water tank boiler cap(1) by turning counter-clockwise and pour
water into the water tank(4). Do not fill all the way to the top of the water
tank(4) because there will not be enough area to generate steam.
5) Screw the water tank boiler cap(1) back on by turning clockwise and make
sure that it is tightly secured.
6) Remove the filter basket(6) by grabbing the filter handle and sliding 1/4th to
the left. The filter basket(6) will now be able to release.
7) Make sure that the filter(9) is inside the filter basket(6). The retainer clip(8)
is to hold the filter basket(6) and the filter(9) together. Fill with fresh ground
espresso coffee to the desired amount. Clean any excess coffee from the
rim of the filter basket(6).
8) Release and pull back the retainer clip(8) and position it underneath the
brew head and slide it 1/4th to the right. Make sure the filter basket(6) is on
tight.
9) Place the carafe lid(5) on the glass carafe(10) so that the carafe lid(5)
opening is facing the spout and set it on the base grid(11).
10) Turn the control knob(3) to “ “ position. The indicator light(2) will turn on to
let you know that the espresso maker is on.
NOTE: It will take couple of minutes before the espresso begins to drip into
the glass carafe.
7
11) When brewing has completed, you can use the steam remaining in the
water tank for frothing milk. First, pour 3 to 4 oz. of cold milk into a small
pitcher, which should fit underneath the steam nozzle(7). Then turn the
control knob(3) to “ “ position for frothing. (If you find the steam is not
enough for frothing milk, pour some water into water tank.) In just a few

seconds, as steam is injected into the milk, it will begin to froth up. To finish
frothing, turn the control knob(3) back to “Off”.
CAUTION:
DO NOT remove the water tank boiler cap(7) until the steam
pressure in the machine has been released COMPLETELY. To
remove all steam pressure, turn control knob(3) to the “ ” position
and allow all steam pressure and residual water to completely
cease.
12) Unplug the power cord and allow the machine to cool.
MAKING CAPPUCCINO
1) Repeat steps 1-9 on “MAKING ESPRESSO”.
2) Fill a small pitcher with 1/3rd of cold milk and set it next to the machine.
3) Turn the control knob(3) to the “ ” position. When the espresso reaches
the “ ” mark on the glass carafe(10), turn the control knob(3) to the
“OFF” position. By that time, the boiler should have created enough steam
to start frothing the milk. Froth milk before finishing the espresso to prevent
from running out of the steam.
4) Hold the prepared pitcher underneath the steam nozzle(7). Rotate the
control knob(3) slowly to the “ ” position. Gently move the pitcher in a
circular motion around the steam nozzle(7). Because warm milk does not
froth, froth just below the surface of the milk to avoid heating up the milk.
5) When the milk has almost doubled in volume, insert the steam nozzle(7)
down into the milk for heating. To avoid splattering hot milk, turn control
knob(3) “OFF” before removing the steam nozzle(7) out of the milk. After
frothing, set the pitcher aside to allow the frothed milk to settle.
6) Turn the control knob(3) back to the “ ” position to finish making the
espresso.
7) Turn the control knob(3) to the “ ” position to flush out any remaining milk
from the steam nozzle(7).
8) When the espresso has stopped flowing into the carafe, turn the control
knob(3) to the “OFF” position. Pour the espresso into a cup that has at least
5 ounces of capacity. Then add the steamed milk to the espresso and spoon
on the frothed milk.
9) Unplug the power cord and allow the machine to cool. Do not remove the
boiler cap until all the steam in the machine has been released.
8

9
Troubleshooting
Problem Causes
Coffee does not brew • No water in the water tank
• Coffee grind is too fine
• Too much coffee in the filter
• Boiler cap is not tight and steam is escaping
• Machine is not turned on, or plugged in
Coffee brews too quickly • Coffee grind is too coarse
• Not enough coffee in the filter
Coffee leaks around the
edge of the filter holder
• Filter holder is not inserted in the brew head
properly
• There are coffee grounds around the filter
holder rim
• Too much coffee in the filter
• Coffee is packed too tightly
No steam is generating • The water tank is empty
• Too much water in the tank and not enough
room for steam
Steam splatters out of
the spout
• The water tank is empty or low and not
enough pressure
Milk is not foamy after
frothing
• Ran out of steam
• Milk is warm or hot
Cleaning and Maintenance
COMPLETELY CLEAN AND DRY ALL PARTS AFTER EVERY USE.
Always turn coffee maker “Off” and remove the plug from the electrical outlet
before cleaning it.
Clean the steam nozzle immediately after frothing milk with the remaining
steam, which will help soften the milk residue outside and inside of the steam
nozzle. Wipe with damp cloth.
The espresso carafe, carafe lid, filter basket, and base grid can be washed with
soapy water or placed on the top rack of your dishwasher only.
Never immerse base unit in water or other liquid. Do not remove boiler cap while
espresso maker still has pressure. After the pressure has been released, remove
boiler cap. Discard the remaining water through the top opening of the water

tank. Place the boiler cap back in its place. Always empty the water tank between
uses.
Wipe base unit with a clean, damp cloth. Never use rough, abrasive materials or
cleansers to clean the base unit.
Do not store the filter holder in the brew head. This can adversely affect the
space between the brew head and the filter holder while brewing espresso.
Mineral Deposits and Decalcifying
Mineral deposit build-up frequently occurs in espresso makers. This build-up is
quite normal and is caused by minerals commonly found in drinking water.
Periodically, your espresso maker will need cleaning to remove any mineral
deposits that may form. Excessive steaming or prolonged brewing cycle is a sign
that your espresso maker needs decalcifying. During decalcifying, more steaming
will occur than while making espresso.
1) Make sure that the plug is disconnected from the electrical outlet and the
control knob is in the “OFF” position.
2) When the espresso maker is cool and all of the pressure has been released,
remove the boiler cap and pour 8 ounces of undiluted white vinegar into the
water tank.
3) Place the boiler cap back on and allow sitting overnight with the vinegar
solution in the water tank.
4) Slowly remove the boiler cap and discard vinegar through the top opening of
the espresso maker.
5) Rinse the water tank thoroughly with tap water.
To decalcify internal parts
6) Remove the water tank boiler cap and pour 8 ounces of undiluted white
vinegar into the water tank.
7) Screw the water tank boiler cap back on top of the water tank. Make sure the
cap is tightly secured.
8) Insert the filter basket into the brew head and place the glass carafe with lid
on the base grid.
9) Plug the espresso maker into an electrical outlet.
10) Turn the control knob to the “ ” position. Let half of the vinegar to flow into
the carafe and then turn the control knob back to “OFF” position.
11) Place a cup with cold water underneath the steam nozzle and insert the
nozzle into the water. Turn the control knob to the “ ”position slowly. This
10

will clean any residue left in the steam nozzle from frothing milk. After a few
seconds, turn the control knob back to “OFF” position
12) Turn back to the “ ” position and finish brewing rest of the vinegar solution.
13) Fill the espresso maker with fresh water and follow the steps in the “Before
Your First Use” to flush out any remaining cleaning solution.
SAVE THESE INSTRUCTIONS
11

12
Magic Chef Limited Warranty
This Magic Chef product is warranted, to the original purchaser or gift recipient,
to be free from any manufacturing defects under normal use and conditions for a
period of one (1) year from the date of purchase as shown on retailer’s receipt.
The obligation of Magic Chef under this warranty shall be limited to repair or
replacement (at our option) during the warranty period, of any part that proves to
be defective in material or workmanship under normal installation and use. The
product is returned to Magic Chef or an Authorized Service Center POSTAGE
PREPAID. A copy of the original receipt along with your name, address and
phone number must accompany products returned. Include a description of the
defect along with the date you purchased the product.
This warranty shall be invalid if the product is damaged as a result of misuse,
abuse, negligence, defacement, destruction, accident, fire or other casualties or
alterations in any manner. Improper repair, improper use of electrical voltages or
currents, alteration of serial number, maintenance by any person or entity other
than our own Service Facility or Center, or any use not in conformity with product
instruction, shall render this warranty invalid.
Magic Chef assumes no responsibility for damage resulting from the use of this
product in a manner or location other than that for which it was intended.
WARRANTY CONDITIONAL TO NORMAL AND NON-COMMERCIAL USE OF
THIS APPLIANCE FOR DOMESTIC USE ONLY.
For the nearest Authorized Service Center, contact:
Magic Chef Customer Service: 1-888-775-0202
Or visit our website at www.magicchef-ewave.com
Magic Chef is a trademark of the Maytag Corporation and is
used under license to MC Appliance Corp. All rights reserved.

MAQUINA DE CAFÉ EXPRES
MCEM1B
-USO DOMESTICO EXCLUSIVAMENTE-
PRECAUCIÓN:
ANTES DE USAR, SÍRVASE LEER Y OBSERVAR TODAS LAS
ADVERTENCIAS, PRECAUCIONES E INSTRUCCIONES DE USO.
13

14
Tabla de Contenidos
Instrucciones de Seguridad -------------------------------- 15-17
Partes y Características ------------------------------------- 18
Instrucciones de Uso ----------------------------------------- 19-21
Resolución de problemas ----------------------------------- 21
Limpieza y Mantenimiento ---------------------------------- 21-22
Depósito de minerales y descalcificación ------------- 22-23
Garantía ----------------------------------------------------------- 24

¿Qué necesita saber sobre las instrucciones de seguridad?
Las advertencias e instrucciones de seguridad importantes que aparecen en
este manual no cubren todas las condiciones y situaciones que pueden
presentarse. Cuando instale, utilice o realice el mantenimiento del
electrodoméstico, aplique el sentido común, y opere con precaución y cuidado.
Si tiene alguna duda, póngase en contacto con su proveedor, distribuidor,
agente de servicios o fabricante.
Siempre que utilice un electrodoméstico, asegúrese de observar las
precauciones básicas de seguridad, incluyendo las siguientes:
MEDIDAS IMPORTANTES DE SEGURIDAD
1) Leer todas las instrucciones.
2) Este aparato es para uso doméstico exclusivamente. No utilizar en
exteriores.
3) No utilizar el electrodoméstico para un uso diferente del indicado.
4) Antes de utilizar por primera vez, verificar si la tensión indicada en la
base del electrodoméstico coincide con la tensión suministrada en su
hogar.
5) No poner en funcionamiento el aparato antes de armar
correctamente.
6) Se recomienda supervisar atentamente cuando el aparato sea
utilizado por niños o en presencia de éstos.
15

7) No poner en funcionamiento ningún electrodoméstico si el cable o
enchufe están dañados o si se detectó mal funcionamiento o
desperfecto alguno. Llevar a un servicio técnico autorizado para su
revisión, reparación o ajuste.
8) El uso de accesorios fuera de los recomendados o vendidos por el
fabricante puede originar incendios, golpes de corriente o lesiones.
9) Desenchufar el aparato cuando no se utilice, cuando se proceda al
armado o desarmado, y antes de limpiar. Verificar que esté
completamente detenido antes de desarmarlo.
10) No dejar el cable colgando del borde de la mesa o mesada, o en
contacto con las superficies calientes.
11) No colocar el artefacto sobre un quemador u horno caliente, ni en las
proximidades de los mismos.
12) No tocar las superficies calientes. Utilizar asas o perillas.
13) Para conectar, enchufar primero en el tomacorriente de la pared.
Para desconectar, girar el control a la posición “OFF“ (apagado) y
luego retirar el enchufe del tomacorriente de la pared.
14) No utilizar la jarra sobre una hornalla o en un horno de microondas
convencional.
15) No utilizar agua tibia o caliente para llenar el recipiente del agua.
Utilizar solamente agua fría.
16) Verificar que la tapa esté bien ajustada a la jarra antes de servir
cualquier bebida.
17) Se pueden producir quemaduras si se saca la tapa durante el ciclo de
preparación.
18) No coloque la jarra caliente sobre una superficie húmeda o fría.
19) No utilice una jarra agrietada, o que tenga el asa floja o dañada.
20) Para evitar la falta de circulación de aire debajo del aparato, ubicar
solamente sobre superficie rígida y plana.
21) Verificar que la tapa de salida de vapor esté bien ajustada antes de
poner en funcionamiento la máquina.
22) No limpie la cafetera exprés con limpiadores en polvo, esponjas
metálicas u otros materiales abrasivos.
ADVERTENCIA:
Para evitar riesgos de golpes de corriente, incendio y lesiones
personales, no sumergir el cordón, el enchufe o la unidad en agua u
otro líquido.
16

17
PRECAUCIÓN:
Para evitar quemaduras y otras lesiones, NO retire la tapa de salida
de salida de vapor hasta que no haya salido toda la presión de
vapor.
PRECAUCIÓN:
Este producto cuenta con un dispositivo de seguridad para reducir
el riesgo de golpe de corriente que consiste en un enchufe
polarizado (con una pata más ancha que la otra). Sólo hay una
forma de colocarlo en un tomacorriente polarizado. Ésta es una
medida de seguridad. Si no puede enchufar en el tomacorrientes,
intente darlo vuelta. Si a pesar de esto no logra enchufarlo, llame a
un electricista autorizado.
No utilice el enchufe con un alargue salvo que el enchufe calce
perfectamente en el mismo. No modifique el enchufe del aparato o
de cualquier alargue que utilice con este aparato. No intente burlar
el dispositivo de seguridad del enchufe polarizado.
GUARDE ESTAS INSTRUCCIONES

Partes y Características
1. Tapa de salida de vapor
2. Luz indicadora
3. Perilla de control
4. Del recipiente para el agua
5. Tapa del jarra
6. Porta filtro
7. Boquilla de vapor
8. Lengüeta de retención
9. Filtro
10. Jarra de vidrio
11. Rejilla de la base
18

Antes de usar por primera vez
Desembalar con cuidado la cafetera y retirar todas los materiales del embalaje.
Limpiar el plato térmico con un paño húmedo limpio. No sumergir el plato térmico
en agua u otro líquido. Para retirar el polvo acumulado en las partes removibles
durante el proceso de embalaje, lavar la jarra, la tapa y el porta filtro con agua
jabonosa tibia. Enjuagar y secar. Antes de preparar la primera jarra de café,
recomendamos "procesar" sólo agua sin granos de café o filtro de papel. De esta
forma, se eliminará el polvo que se haya acumulado dentro de la cafetera.
Instrucciones de uso
PREPARACIÓN DE CAFÉ EXPRÉS
1) Colocar la cafetera sobre una superficie lisa y nivelada, como por ejemplo,
la mesada. Enchufar la cafetera solamente en un toma corriente de
120_volt 60Hz AC.
2) Verificar que la perilla de control (3) se encuentre en la posición "OFF"
(apagado).
3) Llenar la jarra de vidrio (10) con la cantidad deseada de agua fría.
4) Retirar la tapa de salida de vapor (1) girando en sentido contrario a las
agujas del reloj y verter agua en el recipiente para el agua (4). No llenar el
recipiente para el agua (4) hasta el borde porque no queda espacio
suficiente para que se genere el vapor.
5) Volver a colocar la tapa de salida del vapor (1) girando en sentido de las
agujas del reloj y verificar que esté correctamente colocada.
6) Retirar el porta filtro para café exprés (6) tomando del asa y girando 1/4
hacia la izquierda. En esta posición, el porta filtro (6) se puede retirar.
7) Verificar que el filtro (9) esté dentro del porta filtro (6). La lengüeta de
retención (8) sirve para mantener el porta filtro (6) y el filtro (9) juntos.
Colocar la cantidad deseada de café molido exprés. Limpiar el exceso de
café depositado en los bordes del porta filtro (6).
8) Liberar y jalar hacia atrás la lengüeta de retención (8), colocarla debajo del
cabezal y girar 1/4 hacia la derecha. Verificar que el porta filtro (6) esté bien
ajustado.
9) Colocar la tapa de la jarra (5) en la jarra de vidrio (10) de forma tal que el
orificio de la tapa de la jarra(5) enfrente el pico y colocar la jarra sobre la
rejilla de la base (11).
10) Girar la perilla de control (3) a la posición “ “. La luz indicadora (2) se
encenderá para indicarle que la cafetera exprés está encendida.
NOTA: Demorará unos minutos hasta que la cafetera empiece el proceso
de filtrado en la jarra de vidrio.
19

11) Cuando finalice la preparación, puede utilizar el vapor que queda en el
recipiente del agua para espumar leche. Primero verter de 3 a 4 onzas de
leche fría en una jarra pequeña, que debe caber debajo de la boquilla para
vapor (7). Girar la perilla de control (3) a la posición " “ para espumar. (Si
el vapor no es suficiente para espumar la leche, verter agua en el recipiente
para el agua). En pocos segundos, al inyectar vapor en la leche, ésta
comenzará a espumarse. Para terminar de espumar, volver a girar la perilla
de control (3) a la posición “Off“ (apagado).
PRECAUCIÓN:
NO retirar la tapa de salida de vapor (7) hasta que la presión de
vapor en la máquina no se libere COMPLETAMENTE. Para liberar
toda la presión de vapor, girar la perilla de control (3) a la posición
“” y dejar salir toda la presión de vapor y el agua que quede.
12) Desenchufar y dejar enfriar la máquina.
PARA PREPARAR CAPUCCINO
1) Repetir los pasos de 1 a 9 de "PARA PREPARAR CAFÉ EXPRÉS"
2) Llenar la jarra pequeña con 1/3 de leche fría y dejarla cerca de la máquina.
3) Girar la perilla de control (3) a la posición “ “. Cuando la máquina llegue a
la marca “ ” de la jarra de vidrio (10), girar la perilla de control (3) a la
posición “OFF” (apagado). Para ese momento, la caldera habrá formado
suficiente vapor como para empezar a espumar la leche. Espumar la leche
antes de terminar el exprés para evitar que se termine el vapor.
4) Ubicar la jarra que preparó debajo de la boquilla para el vapor (7). Girar la
perilla de control (3) lentamente a la posición " ". Mover suavemente la
jarra con movimientos circulares debajo de la boquilla para el vapor (7).
Como la leche tibia no se espuma, espumar sólo debajo de la superficie de
la leche para evitar calentarla.
5) Cuando la leche casi ha duplicado su volumen, introducir la boquilla para el
vapor (7) en la lecha para calentarla. Para evitar que la leche caliente
salpique, girar la perilla de control (3) a la posición "OFF" (apagado) antes
de retirar la boquilla (7) de la leche. Después de espumar, colocar la jarra a
un lado para dejar que la leche espumada se asiente.
6) Volver a girar la perilla de control (3) a la posición “ “ para terminar de
preparar el café exprés.
7) Girar la perilla de control (3) a la posición " " para expeler los restos de
leche de la boquilla para el vapor (7).
8) Cuando finalice el proceso de filtrado del café exprés, girar la perilla de
control (3) a la posición “OFF” (apagado). Verter el café exprés en una taza
que tenga por lo menos 5 onzas de capacidad. Agregar luego leche
espumada e incorporarla con una cuchara.
20
This manual suits for next models
1
Table of contents
Languages:
Other Magic Chef Coffee Maker manuals

Magic Chef
Magic Chef MCSCM10PGBST User manual

Magic Chef
Magic Chef MCECM1NB User manual

Magic Chef
Magic Chef MCCM1TB12 User manual

Magic Chef
Magic Chef MCSCM12PST User manual

Magic Chef
Magic Chef MCL12CMRT User manual

Magic Chef
Magic Chef MCCM1NB12 User manual

Magic Chef
Magic Chef MCSCM12SS User manual

Magic Chef
Magic Chef CM1T User manual

Magic Chef
Magic Chef BVRVMC12 User manual

Magic Chef
Magic Chef 94155 User manual