Magic Chef 3422PRA User manual

Gas Range Featuring
• Conventional Surface Burners
• Analog clock & timer
• Self--cleanoven
• Automatic oven cooking
8113P044-60
(1/93)


Time-0f-DayClock
ANALOG CLOCK AND TIMER
12
11 o 1
765
TO SETCLOCK: Push inand turn Min-
ute Timer knob to thecorrect timeofday.
BesureMinuteTimer hand is on OFFaf-
ter setting clock.
TO SETMINUTE TIMER:Turn knob in
either direction to the desired time.
Whenthe buzzersounds, manuallyturn
the "rimerto OFF.
4

SurfaceCooking
IGNITION SYSTEM TO LIGHT SURFACE BURNER ADDITIONAL INFORMATION
Yourrangefeaturespilotless ignition.A 1. Place utensil on burnergrate. •Whenthe range isfirst installed,the
spark from the ignitor will lightthe burn- pilots maybedifficult to lightdue toair
er. 2. Push in and turn knob to the LITE inthegasline.Tobleedoffairfromthe
position. After the burner lights, turn line, hold a lighted match nextto the
ABOUT THE SURFACE the knobto the desiredflame size. burner and turn knob on. When the
BURNER FLAME burner lights,turn theknob off and
• A properlyadjustedburnerwithclean proceedasdirected.
portswillbightwithin a fewseconds. _ • Be sure allsurface controls are sel
• On natural gas, the flame will be blue _ inthe OFF position priorto supplying
with a deeper blue core;there should be gasto the appliance.
no trace of yellow in the flame. •CAUTION:If flame should go oul
A yellow flame indicates an improper during a cooking operation, turn the
burner off. If gas has accumulated
mixture of air/gas.This wastes fuel, so and a strong gas odor is detected,
haveaservicemanadjustthemixtureifwait 5 minutesfor the gasto dissi-
a yellowflameoccurs. NOTE: The knob on your appliancepate before relighting burner.
•On LPgas, someyellowtippingisac- may not look likethe knob in thisil- •Youmay heara "popping"soundon
ceptable.Thisisnormalandadjustment lustration,but it will operateasde-LP gas when thesurfaceburner is
isnot necessary, scribedin thisbooklet,turnedoff.Thisisanormaloperating
soundofthe burner.
•Ifa knobisturnedveryquicklyfrom
HItoLOsetting,theflamemaygoout,
particularlyiftheburneriscold.
To operate surface burner during a
power failure:
1.Holda lightedmatch to thedesired
surface burner head.
2. Push in and turn knob to the LITE
position. The burnerwill then light.
3. Adjust knob to obtain the desired ifthisoccurs, turntheknobtotheOFF
flame size.position.Wait several seconds, then
lightthe burner again.
(continued next page)
5

SurfaceCooking(continued)
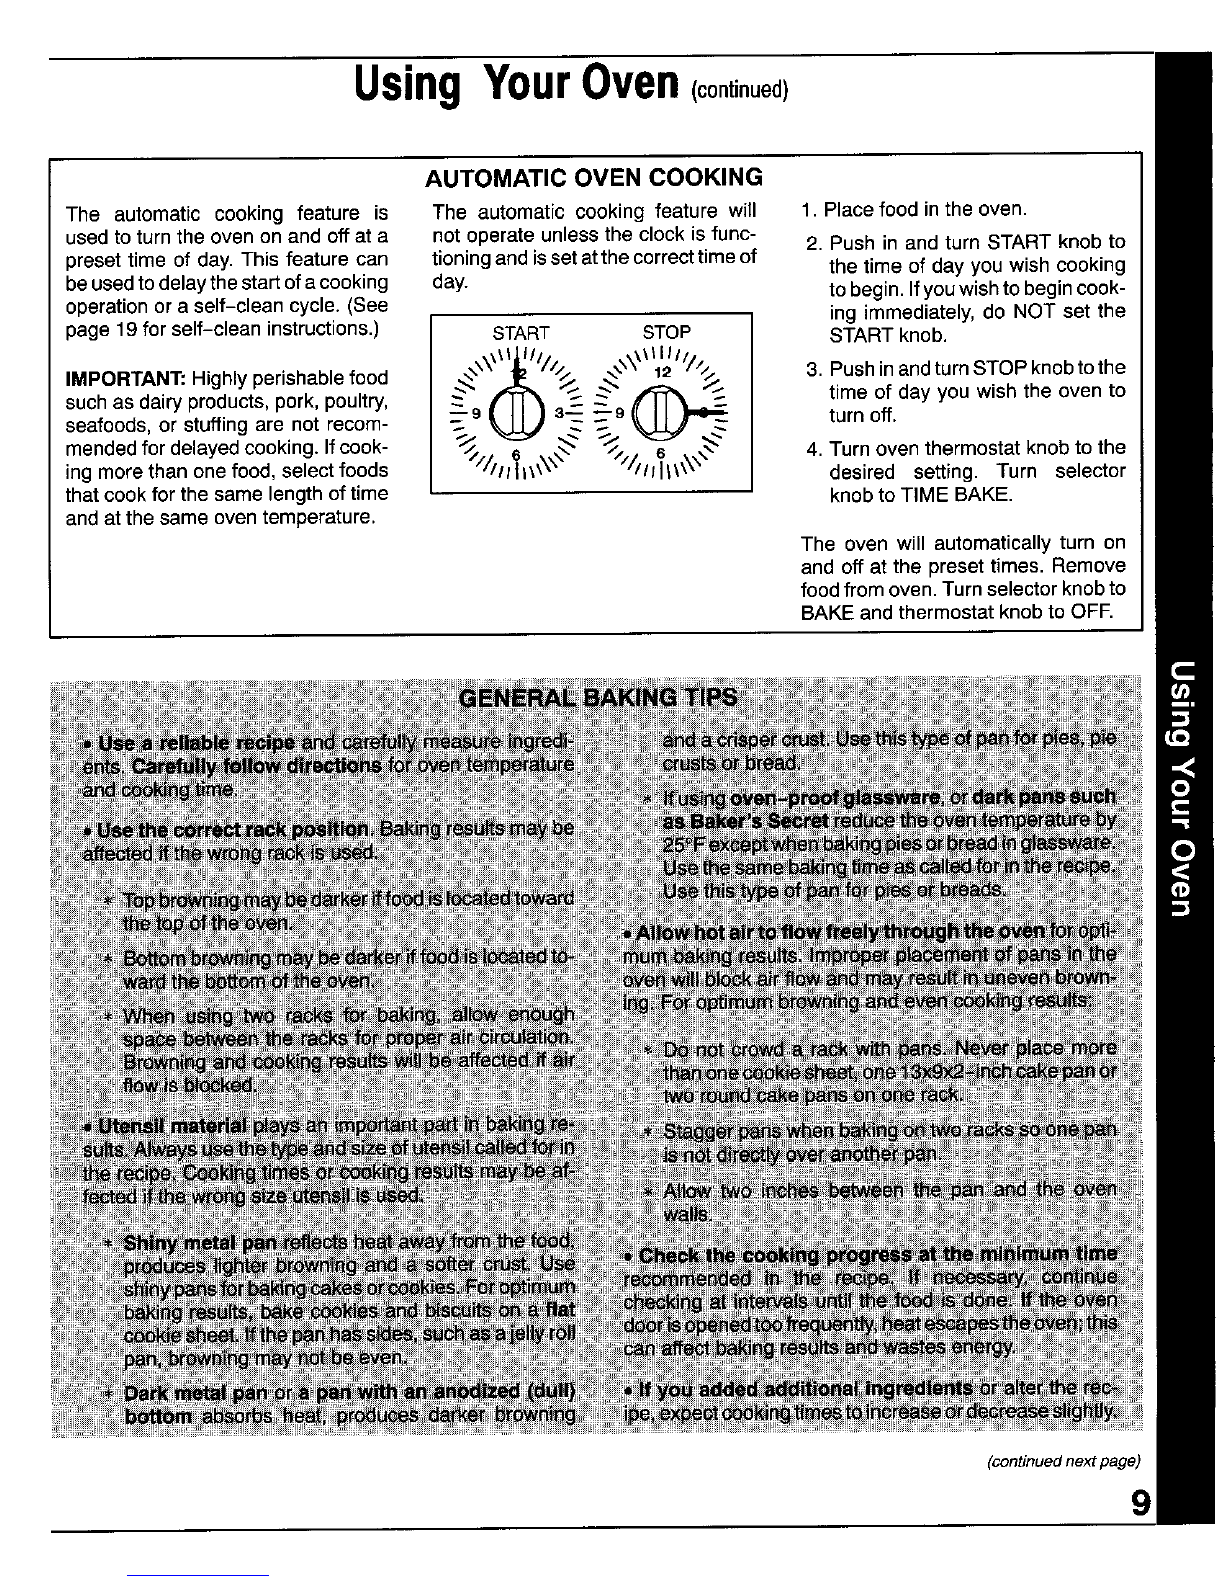
FACTORS THAT DETERMINE SELECTING FLAME SIZECANNING
FLAME SIZE • Use a HIGH flame settingto quickly Acceptablewater-bathorpressurecan-
UTENSIL SIZE: Adjustthe flame size bringliquidstoaboilorto beginacook-netsshouldnotbeoversizedandshould
soitdoesnotextendbeyondtheedgeof ingoperation.Then reduceto alower haveaflatbottom.Thefollowingare not
the cookingutensil.This isforpersonal settingtocontinuecooking.Neverleave recommended:Oversizedcannersor a
safetyandto preventpossibledamage food unattended when using a HIGH verylargecannerthatrestsontwosur-
to the appliance, utensil or cabinets flame setting,face burnergrates.
abovetheappliance. When canning, use the HIGH setting
just until the water comes toa boil or
-- pressureisreachedinthe pressurecan-
_'_--'_'ner,then reduceto thelowest flame set-
__J_tingthat maintains the boil or pressure.
.___'• An intermediateflame size isused to
continue a cooking operation. Foodwill
• Utensils which extend more than two notcookany fasterwhen a higher
inches beyond the grate or touch the flame setting is used than thatneed-
cooktop may cause heatto build up, re- ed to maintain a gentle boil. Remem-
suiting in damage to the burner grate, ber,waterboilsatthesametemperature
burner or cooktop, whether boiling gently or vigorously.
• Utensils, suchas woks with a support • Use alowflame size tosimmer or keep
ring,which restrictaircirculation around foods at serving temperatures.
the burnerwill causeheattobuild upand
may result in damage to the burner I
grate, burner or cooktop. -_c__-J ""/_
UTENSIL MATERIALS: Optimum
cookingperformancecan be achieved
whenheavygauge,flat,smoothbottom,
metalutensilswith straight sidesand
tightfittinglidsare used.
•Aluminum oraluminum-clad stain-
less steel pans heatmoreevenlyso a
slightlylargerflame can beused.
•Stainless steel, porcelain andheat-
proofceramic orglass heatunevenly;
cast aluminum and iron heat slowly;
and, Teflon-coated utensilsaresensi-
tiveto heat.Thesematerialsrequirea
lowerflametoproducemoreevencook-
ing results.Adjustflame so it extends
halfwayto the edge of theutensilbot-
tom.
COVERED UTENSILS: Foods cook
faster when the utensil is covered be-
cause more heat is retained. Lower the
flame size when covering utensils.
6

UsingYourOven
OVEN VENT OVEN THERMOSTAT
The oven ventis locatedat the base of The oventhermostatknobisusedtose-
thebackguard,Whenthe ovenisinuse, lectandmaintaintheoventemperature.
this area may feel warmor hotto the Alwaysturnthisknobjusttothedesired
touch, To prevent problemsdo not: temperature- notto a highertempera-
Blockthe ventopening,touch the areatureandthen back. Thisprovidesmore
near the openingorplace utensilsnear accurate oventemperatures.Turn this
the ventopening, knobtoOFF wheneverthe ovenisnotin
use.
OVEN BURNER
The sizeand appearance of a properly _,_ t
IGNITION SYSTEM adjusted ovenburnerflameshould beas
Yourappliance features pilotless igni- shown:
tion. A glo barwill lightthe oven burner, r_
Be sure oven control is set in the OFF
positionpriorto supplyinggasto the ap-
pliance. Coneincenterissmaller THERMOSTAT
On some models,there is an indent at
the 350°F setting.
Coneapprox.1/2-inch SELECTOR KNOB
The SELECTOR knob determinesthe
typeofovenoperation.Turnthisknobto
The oventemperatureismaintainedby desiredsetting.Eachsettingisidentified
cyclingtheburneron and off.Afterthe byan indent (stop)anda"click"sound.
oven temperature has been set,there
will be about a 45 second delay before
theburnerignites.This isnormaland noBAKE
gas escapes during this delay. _ _ O
TIME BAKE
(continuednextpage)

UsingYourOven(continued)
TO SET THE OVEN PREHEATING
1. When cool,place the racks inthe de- Preheatingis necessaryfor proper bak-
sired rack positions, ing results. Allow the oven to heat until
the desired oventemperature isreached
2. Pushin andturn the oventhermostat (approximately 10 to 15 minutes). Se-
knob to the desired oven tempera-lectingatemperature higherthan thede-
tufa. Turnthe selector knob to BAKE. sired temperature will not preheat the
Allow theoven to preheat for 10to 15 oven anyfaster. Infact,this may have a
minutes when baking, negative effect on baking results.
3.Place the food in the center of the
oven, allowing a minimum of two in-It isnot necessaryto preheatfor broiling
ches between the utensil(s) and the unless darker browning is desired or if
oven walls, cooking thin (3/4-inch) steaks.Allow
burnerto preheat2 to 3 minutes.
4. Check the food for doneness at the
minimum time given in the recipe. Preheatingis not necessaryfor roasting
Cook longer if necessary. Opening operations.
theovendoor frequently causes heat
loss which may affectcooking results
and increase cookingtime.
5. Turn the oven thermostat knob to
OFFand removefood from the oven.
(continued next page)
8

UsingYourOven(continued)
AUTOMATIC OVEN COOKING
The automatic cooking feature isThe automaticcooking feature will 1. Placefoodintheoven.
usedtoturntheovenonand offat a notoperateunlesstheclockisfunc- 2. Pushin and turnSTART knobto
presettimeofday. Thisfeaturecan tioningandissetatthecorrecttimeofthetimeof dayyouwishcooking
beusedtodelaythestartofacooking day. tobegin.Ifyouwishtobegincook-
operationora self-clean cycle.(See ing immediately,do NOT set the
page 19for self-clean instructions.) START STOPSTARTknob.
IMPORTANT:Highlyperishablefood _\\_/_/ >_'.\\_..__,2/_.'_<3. PushinandturnSTOPknobtothe
such as dairy products,pork, poultry, _ _ _ _ time of day youwishthe oven to
seafoods, or stuffingare not recom-_-9 3_ _-o _ turnoff.
mendedfordelayedcooking.Ifcook-//6 _'- ,, s\4.Turn oventhermostat knobto the
ing morethan one food, select foods ////the\\':;'//111__\ desired setting. Turn selector
thatcookforthesamelengthoftimeknobtoTIME BAKE.
andatthesameoventemperature.The oven will automaticallyturn on
and off at thepresettimes. Remove
foodfromoven.Turnselectorknobto
BAKE andthermostatknobtoOFF.
(continued next page)
9

CommonBakingProblemsAndWhyTheyHappen
Cakes are uneven. Panstouching each other or Cakes don't brown on top.incorrect rack position.
oven walls. Temperaturetoo low.
Batter uneven in pans. Overmixing.
Oven temperature too low or Toomuch liquid.
bakingtime too short. Pan size too large or too little
Oven not level, batter in pan.
Undermixing. Oven door opened too often.
Too much liquid.
Cake high in middle. Temperaturetoo high. Excessive shrinkage. Too little leavening.
Overmixing.
Bakingtime too long. Pantoo large.
Overmixing. Temperaturetoo high.
Toomuch flour. Baking time too long.
Pans touching each other or Pans too close to each other
oven walls,or ovenwalls.
Incorrect rack position.
Cake falls. Toomuch shortening or sugar. Uneven texture. Toomuch liquid.
Too much or too little liquid. Undermixing.
Temperaturetoo low. Temperaturetoo low.
Oldor too littlebaking powder. Bakingtime too short.
Pan too small.
Ovendoor opened frequently. Cakes have tunnels. Not enough shortening.
Added incorrect type of oil to Toomuch baking powder,
cake mix. Overmixing or attoo high a
Added additionalingredients speed.
to cakemix or recipe. Temperaturetoo high.
Cakes, cookies,biscuits Incorrect rack position.
don't brown evenly. Oven door notclosed properly. Cakes crack on top. Batter overmixed.
Door gasket not sealing Temperaturetoo high.
properly. Toomuch leavening.
Incorrect use of aluminum foil. Incorrect rack position.
Oven not preheated.
Pans darkened, dented or
warped. Cake not done in middle. Temperaturetoo high.
Pan too small.
Bakingtime too short.
Cakes, cookies, biscuits too Oven not preheated.
brown on bottom.Panstouching each other or
oven wafts. Pie crust edges toobrown. Temperaturetoo high.
Incorrect rack position. Pans touching each other or
incorrect useof aluminum foil. oven walls.
Placed 2 cookie sheets on oneEdges of crusttoo thin.
rack. Incorrect rack position.
Used glass, darkened, stained,
warped or dull finish metal Pies or cakes don't brown Used shiny metal pans.
pans.(Use a shiny cookie on bottom. Temperaturetoo low.
sheet.) Pies have soaked crust. Temperaturetoo lowat startof
baking.
Fillingtoojuicy,
Used shiny metal pans.
10

UsingYourOven(continued)
HOW TO BROIL
Broiling is a method of cooking used for tender steaks, rare interior,the meat should be close to the burner.Place
chops,hamburgers,chicken,fish, and somefruits and vege- the panfurther down ifyouwishthe meatwell doneor ifspat-
tables. The food is placed directly under the oven burner, taring and smoking occurs.
Thecookingtime isdeterminedbythe distance betweenthe The distance from the burner depends on the thickness of
meat and the burner, the desired degree of doneness, and themeat and desired degree of doneness.Thin cutsshould
thethickness of the meat. beplaced onrack #1(top)or #2 (middle);thicker cutsshould
be placedon rack #2 or #3 (bottom).Broil untilthe topof the
GENERAL TIPS meat is browned. Itshould be approximately half cooked by
Broilingrequirestheuseofthebroilerpanandinsertsupplied thetime thetopisbrowned,
withyourappliance.Itisdesignedtodrainexcessliquidand
fataway from thecooking surfaceto prevent spatters, Trimexcessfatto preventexcessivespatteringorsmoking.
Cutslashesintheouteredgesofthemeatto preventcurling
smokeandflareups. duringcooking.
Foreasierclean-up, linethebroilerpan (bottompiece)with
aluminumfoilandspraytheinsertwithanon-stickvegetable If youplantoseasonthemeat, it isbetterto doso afterthe
coating,Donotcoverthebroilerpaninsertwithaluminumfoil surfacehas browned.Salt tendsto delay browningwhich
asthis preventsfat fromdrainingintothepan below.Thecan resultinovercooking.Saltingbeforecookingalsodraws
broilercanbe preheatedforafewminutes.However,donot thejuicesout ofthemeat, causingdryness.
preheatthe broiler pan and insert.
Ifthe foodisplacedtoocloseto the burner,overbrowning
and smoking may occur.Generallyfora brown exterior and
TO BROIL:
BROILING CHART 1. TurntheovenTHERMOSTATknobto
Quantity&/or Rack Approx, Minutes/Side BROIL. Turn SELECTOR knob to
Food Thickness Position* Doneoess 1st Side 2nd Side BROIL,
Bacon (450°F) thickslice 2well 3 -4 1- 2 It is possible to broil longer cooking
Beef Patties 3/4" thick 2 rare 2 - 3 2 - 3 foods such as pork chops at a lower
2 medium 4-5 3-4 temperature to prevent overbrown-
2well 4-6 4-5 ing. Turn the thermostat knob to
450°F, rather than BROIL, for low
Steaks (450°F) 1" thick 2 rare 3 - 4 3 - 4
2 medium 5 6 3- 5 temperature broiling.
2 well 6- 8 5- 72. Preheat for 2 to 3 minutes ifdesired.
11/2_thick 2 rare6-7 5-6 NOTE: Cooking times in the Broil
2 medium 7 8 6- 7
(450oF) 3 well 9 11 9 11 Chart are based on a 2 to 3 minute
preheat.
Chicken Breast 3 well 10- 14 8 - 10
Halves(450°F) 3.Place the broiler pan on the recom-
Fish Fillets (450°F) 1"thick 2 5-7 4- 6 mended rack position shown in the
1/2"thick 2 3- 5 3- 5 broiling chart.
HamSlices t/2"thick 2 3-5 2-4 4. Follow the suggested times in the
(precooked) broiling chart. Meat should beturned
once about halfway through its cook-
PorkChops (450°F) 1" thick 4 well 9 - 11 6- 8 ing time.
Weiners/Sausage 2 2 - 3 1 - 2 5. Check the doneness by cutting a slit
(precooked) in the meat near the center to check
*The top positionis rack #1. the color.
11

Maintenance
COOKTOP BURNER GRATES SURFACE BURNERS
Yourrangewillfeatureeitheranupswept Surface burnersaresecured in place
cooktopora flatcooktop.Bothtopscan duringtransportationwith springclips.
beliftedupforconvenientaccesstothe Once therangeisinstalled,thesemay
burnerboxarea.Theflatcooktopcanbe be removedto allowquickand easyre-
removed.Theupswepttopishingedand movalofthe burner.
canberaisedbutnotremoved. TO REMOVE BURNER:
To raise upswept took'top: When
cool,graspfront edgeofcooktopand When reinstallingsquaregrates,placeAllowburnertocool.Liftcooktop.Tore-
gentlyliftupuntilthetwosupportrodsat indentedsidestogethersostraightsidesmovebumer, liftupslightlyand pullout.
thefr°nt°fthec°°kt°psnapint°place' are at fr°nt and rear'_,l__ I_ 1
Tolower top"Hold frontedge of cook- _/_
top and carefully pushback on eachLJ=== J
supportrodto releasethe notchedsup-
port. Thengentlylowertop into place.
Thesupportrodswillslideintothe rangeBurnergratesaredurablebut maylose
frame, their shinedueto usageand hightem-
peratures.
To remove flat ¢ooktop: When cool,
first removegrates and drip bowls, if
equipped.Grasptwofrontburnerwells
andliftup.
f. 1
The top can be completely removed or, if
equippedwitha metalsuppport rod, can
rest on the rod. Support rod is located
across thefront of the burner box. (continued next page)
12

Maintenance(continued)
OVEN DOOR OVEN RACKS STORAGE DRAWER
Thetwoovenracksaredesignedwitha The storagedrawerat the bottomofthe
lock-stopedgeto keeptheracksfromrangeissafeandconvenientforstoring
comingcompletelyoutofthe oven. metal and glass cookware. DO NOT
storeplastic,paperware,foodor flam-
Toremove: Besuretherackiscool.Pull mablematerialinthis drawer.Remove
therackstraightoutuntilitstops.Tiltthedrawertocleanunderrange.
frontofthe rackupandcontinuepulling Storecleanbroilerpanand insertinthe
When openingoven door,allowsteam therackoutoftheoven.
andhotairtoescapebeforereachingin broilerdrawer.
oventocheck,addor removefood. Toreplace:Tiltthefrontendoftherack To remove: Empty drawer then pull
upandplacetherackbetweentherack drawerout to thefirststopposition.Lift
To remove door: Open door to thesupports.Slideitbackuntilitclearstheupfrontofdrawerandpulltothesecond
"stop"position(openedabout4 inches) lock-stopposition.Lowerthefrontand stopposition.Graspsidesandliftupand
andgraspdoorwithbothhandsat each slidetherackstraightin.Pulltherackout out to removedrawer. Gently move
side.Donotusedoorhandleto liftdoor.tothelock-stoppositiontobesureit isdrawerside-to-sideas you pull the
Liftupevenlyuntildoorclearsthehingepositionedcorrectlyandthenreturnitto drawerout.
arms. itsnormalpositon.
To remove: When cool, remove the To replace: Fit ends of drawer glides
ovenracks.Slidethetwo catches, Io- ontorails.Liftupdrawerfrontandgently
cated at each rear corner oftheovenpush in to first stop position. Gently
bottom,towardthefrontoftheoven. movedrawerside-to-sideas you push
inthedrawer.Lift updraweragain and
_ _ continue to slide drawer to the closed
position.
Toreplace door: Grasp door at each _51//,
side,alignslotsinthedoorwiththe hinge _,_{__r_/_ JJ--
armsand slidedoordownontothe hinge
arms untilcompletelyseated on hinges._ t 3
Lift therearedgeof theovenbottom
slightly,thenslideitback untilthefront
edgeoftheovenbottomclearstheoven
frontframe. Removeovenbottomfrom
oven.
To replace: Fit frontedge of oven bot-
tomintofrontframe.Lowerrearofoven
bottomand slide thecatchesback to
lockovenbottom intoplace.(continued next page)
13

Maintenance(continued)
OVEN LIGHT HOW TO REMOVE PROPORTIONAL VALVE
RANGE FOR CLEANING ADJUSTMENT (if equipped)
AND SERVICING The LOW setting should produce a sta-
Followthese proceduresto removeap-bleflamewhenturningthe knobfromHI
Before replacingoven light bulb, DIS- plianceforcleaningor servicing: to LO.The flame shouldbe 1/8 inchor
CONNECT POWER TO RANGE. Be lowerandmustbestableonallportson
surebulband rangepartsare cool.Do LOWsetting.
nottoucha hotbulbwithadampclothas 1. Shut-offgassupplyto appliance. To adjust: Operate burneron HI for
the bulbmaybreak, about5 minutesto preheatburnercap.
To replace oven light: Use a dry pot 2.Disconnectelectrical supplyto ap-TumknobbacktoLO;removeknob, end
holder, to prevent possible harm to pliance,ifequipped,insertasmallscrewdriverintothecenter
hands;andvery carefully unscrewbulb ofthe valve stem.Adjustflame size by
coverand bulb.Replacewitha 40-watt 3, Disconnectgas supplytubingto ap-turningadjustmentscrewineitherdirec-
APPLIANCE bulb,Replace bulbcover,pliance, tion.
Reconnectpowertothe rangeandreset
clock. 4. Slide range forward to disengage
rangefromthe anti-tipbracket.(See
InstallationInstructionsforlocationof
-_ 5. Reverseprocedure to reinstall.If gas
linehasbeendisconnected,checkfor
gas leaksafter reconnection. (SeeIn-
stallation Instructionsfor gas leaktest
method.)
LEVELING LEGS
NOTE: A qualifiedservicershoulddis-
connect and reconnectthe gas supply.
Levelinglegsarelocatedoneachcorner
of the base of the range.To prevent range from accidently tip-
ping,range must be securedto the floor
by sliding rear leveling leg into an anti-
tip bracket supplied with the range.
WARNING: Possible risks mayresult
_/from abnormal usage, including exces-
sive loading ofthe oven door and of the NOTE: All gas adjustments should be
riskof tip over, shouldthe appliance not done by a qualified servicer only.
be reinstalled according to the installa-
tion instructions.
Place a level horizontally on an oven
rackand check front-to-back and side-
to-side. Level byturning the legs.
14

GeneralInformation
ELECTRICAL CONNECTION USE OF ALUMINUM FOIL
Appliances which requireelectrical Use aluminum foil ONLY as
power are equippedwith a three- instructed in this book. Improperuse
prong grounding plug whichmustbeofaluminumfoil may causedamage to
plugged directly into a properly theoven, affectcookingresults,andcan
groundedthree-hole 120voltelectrical alsoresultinshockand]orfirehazards.
outlet. Foilcan beusediftheseguidelinesare
followed:
/r-_i_, • Do not use aluminum foil directly
_under the cookware. Foil will reflect
_ heatawayfromtheutensilcausinginad-
equatebrowning.Placinga piedirectly
' onfoilmayresultinasoggybottomcrust
andinadequatebrowning.
• Do not placealuminumfoil directly
A/ways disconnect power to appli- onthe oven bottomas this may dam-
ance before servicing. age the oven bottom,Apiece of foil
The three-pronggroundingplugoffers that is slightlylarger than thecooking
protectionagainst shock hazards.DO utensilcanbeplacedontherackdirectly
NOT CUT OR REMOVE THE THIRD belowthe rackcontainingthe utensil,
GROUNDING PRONG FROM THE
POWERCORD PLUG.• Do not completely cover an oven
rack with foil. Thisblocksairflowinthe
oven, constitutesasafety hazard, and
will adversely affect cooking results.
• Never cover the broiler insertwith
aluminum foil as this prevents fat
from draining tothepan below, The
broilerpancan be linedwithfoil,
15

CareandCleaning
CLEANING CHART
PARTS CLEANING AGENTS DIRECTIONS
Baked Enamel •Soap andwater Useadrytowel orclothtowipe upspills,especiallyacLd(milk,lemonjuice,fruit, mustard,
or Porcelain Enamel • Paste of bakingsodaand water tomato sauce)or sugary spills. Surface may discoloror dullif soil isnot immediatelyre-
.Cooktop *Mild liquid cleaner moved. Thisisespecially importantfor white surfaces.
•Oven door ,,Glass cleaner
• Bronerdrawer When surface iscool,washwith warm soapywater,rinseand dry. Forstubbornsoil, use
•Side panels mildly abrasivecleaning agentssuch asbakingsoda paste orBon Ami. Ifdesired, athin
• Backguard coatofmildappliancewax canbeused toprotectthe sidepanels.A glasscleaner canbe
usedto add "shine"to thesurface.
NOTE:Do notuseabrasive, causticor harshcleaningagentssuchassteelwool padsor
oven cleaners. These productswill scratch or permanently damage thesurface.
NOTE:Never wipea warmorhot surfacewith a dampcloth asthis may damagethe sur-
face and may cause asteam burn.
Broiler pan and ,,Soapand water Removefromovenafter use. Coolthenpouroffgrease.Placesoapycloth overinsertand
insert •Plasticscouring pad pan;let soakto loosen soil. Washinwarm soapywater.Use soap-filled scouring padto
• Soap-filled scouring pad remove stubborn soil. Clean in dishwasher if desired.
• Dishwasher NOTE:Foreasiercleanup,sprayinsertwith anon-stick vegetablecoatingandlinebroiler
panwith aluminum foil.
NOTE: Alwaysstore clean broiler panand insertin the broiler compartment. If pan and
insertarenotcleanedafter eachuse,thesoil mightbecomehot enoughto ignitethenext
time the oven is used.
Burner box • Soap and water Burnerbox, locatedunderlift-up cooktop, should becleanedfrequentlyto removespil-
•Pasteof baking soda and water lovers.If soil isnot removed and isallowed to accumulate, itmay damage thefinish. To
• Non-abrasive plasticpad or sponge cleanremove gratesand surface burners andclean with soapand water,rinse anddry.
•Liquidcleaner
• Glass cleaner
Chrome drip bowls, • Soap and water Clean bowls after each usewith soapand water. Remove stubborn stains with baking
if equipped•Paste of bakingsoda and water sodapasteand plasticscouringpad.Topreventscratchingthefinish, donotuseabrasive
• Plastic scouring pad cleaning agents.Rinse, dry and replace.
NOTE:Bowlscanpermanentlydiscolorifexposedto excessiveheatorifsoilis aflowedto
bakeon.
Control knobs •Soap andwater Toremoveknobsfor cleaning,gentlypullforward. Washinmilddetergentand water.Do
notsoak knobsinwater.Do notuseabrasive cleaningagents.Theywillscratchfinishand
removemarkings,Rinsedryand replace.TurnON each burner to see if knobs have
been replaced correctly.
(continuedon nextpage)
16

CareandCleaning(continued)
PARTS CLEANING AGENTS DIRECTIONS
Glass •Soapendwater Washwithsoapandwater.Useawindowcleanerandasoftclothaftercleaning.Remove
•Backguard •Pasteofbakingsodaandwater stubbornsoilwithpasteofbakingsodaandwater.Rinsewithaclothwrungout inclear
• Ovenwindow • Glasscleaner water.Dry.Donotuseabrasivematerialssuchasscouringpads,steelwoolorpowdered
cleaningagents.
NOTE: TOavoidinside staining of oven door glass, do not oversaturate cloth.
Grates •Detergentandwater Gratesaremadeof porcelain-coatedsteel,Theycanbe cleanedatthesinkwithdeter-
•Non-abrasiveplasticpad gentandwaterorinthedishwasher,TOcleanbakedonsoil,placea dampsoapypaper
toweloverthegrateand letstandfor30rainutas.Useanon-abrasiveplasticpadtoscour
stubborn soil.
NOTE:Neveroperateburnerwithout agrate inplace.Toprotectthe porcelainfinishonthe
gratefromexcessive heat,neveroperatesurface burnerwithout acooking utensilonthe
grate.It isnormalfor grates to lose their shine over a periodof time.
Metalfinishes •Soapand water Wash with soap and water. Removestubborn soilwithpaste ofbaking soda andwater.
• Backguard •Paste of bakingsodaandwater Usea windowcleaneranda softclothtoremovefingermarksorsmudges.
• Trimparts•Glass cleaner
•Manifoldpanel NOTE:Donotuseovencleaners,abrasiveorcaasticagents.Theywilldamagethefinish.
Oven bottom Seepage 19for instructions,
• Self-clean porcelain Protectthe oven bottomby(1) usinglargeenoughcookwareto preventboilovers;(2)
placeapieceofaluminumtoil,that isslightlylargerthanthecookware,on thelowerrack.
NEVER place foil directly on the oven bottom.
Protectovenbottomagainstacidspills (milk,cheese,tomato,lemonjuice,etc.)orsugary
spills (piefilling) asthey may pitor discolorthe oven bottom.
Oven cavity See page 19forinstructions.
•Self-cleanporcelain Wipeacidorsugarstainsassoonastheoveniscoolasthesestainsmaydiscolororetch
theporcelain.
I
Oven racks I• Soapandwater Cleanwithsoapywater.Removestubbornsoilwithcleansingpowderorsoapfilledscour-
• Cleansing powders ing pad. Rinseand dry.
Plastic pad
j• Soap filledscouring padNOTE: Ifracksbecome difficulttoslide,athincoat ofvegetable oilonthe undersideofthe
rackwitt makestidingeasier.
Plasticfinishes • Soapand water When surface iscool, clean withsoap andwater; rinse, and dry. Usea windowcleaner
• Doorhandles • Pasteof baking soda and water and asoftcloth.
• Backguardtdm _• Non-abrasive ptast_cpad or sponge
• Overlays NOTE:Neveruseovencleaners,abrasiveorcausticliquidorpowderedcleaningagents
• Knobs on plastic finishes. These cleaning agents will scratch or marr finish.
• End caps NOTE: Topreventstaining ordiscoloration, wipeupfat,grease or acid (tomato, lemon,
vinegar,milk,fi'uit juice, marinade) immediately witha dry paper towel or cloth.
Silicone rubber • Soapand water Washwith soap and water, rinseand dry. Do notremovedoor gasket.
•Doorgasket
Surface burners •Soap andwater Cleanas necessarywithwarm soapywater.Removestubbornsoilbyscouringwitha
•Pasteofbakingsodaand water non-abrasiveplasticscouringpadandapasteofbakingsodaandwater.Cleanportswith
•Plasticscouringspongeorpad astraightpin.Donotenlargeordistorttheports.Donotusea woodentoothpick.Itmay
breakoffand clogport.DO NOTCLEAN BURNERSWITH THE FOLLOWING caustic
cleaners:ovencleaners,steelwoolorabrasivecleaningagents.Thesemaydamagefin-
ish.Burnerscanbedriedintheovenset at t40°E CAUTION:Burnerand burnertube
mustbe dry before use.
17

Self-CleanOven
HOW TO SET OVEN FOR A CLEAN CYCLE
1. Close the oven door.
2. Move the door lock lever to the right
(locked position).
3. Turn the Thermostat knobto CLEAN.
Q
4.Turn the Selector knobto CLEAN.
Q
5 Push in andturn the STOP knob ahead
3 hours.
STOP
\\\XHIII
..\_ 42 7//,
Iz e\"
/Imh_k x
(continued next page)
18

Self-CleanOven(continued)
BEFORE SELF-CLEANING DURING SELF-CLEANING AFTER SELF-CLEANING
Theself-cleanovenusestemperatures Itisnormalforthecooktopof therangeAboutonehourafter thecleancycleis
abovenormalcookingtemperaturesto to becomehot duringaclean cycle, completed,theinternallockwill disen-
automaticallyclean theentireoven. Therefore,touchingthecooktopduring gageandthe doorlatchcanbereturned
a self-clean cycleshouldbeavoided, to its original(unlocked)position.Turn
selectorknobtoOFF.
Theovenautomaticallybeginsto heat
upwhenthedoorislocked.Astheoven
reachescleaningtemperaturesan inter- Do not attempt to unlock door until
hallockengagesandtheovendoorcan internal lock disengages. Door and
Turnoff oven light beforeclean cycle, notbeopened.Donotforcelatchtothelatch will be damaged if the latch is
Thelifeofthebulbmay beshortenedif leftoncetheinternallockengages, forced to the left before internal lock
leftonduringthecleancycle.Thefirstfewtimes theoveniscleaned, disengages.
Cleanoven frame, door frameand somesmokeandodormaybedetected.
aroundtheovenventwitha non-abra- This is normalandwill reduceordisap-
sivecleaningagent suchas BonAmi. pear with use. Iftheoven is heavily Somesoil may leavea lightgray,pow-
These areasarenot exposedto clean- soiled,or if thebroilerpanis left in the dery ashwhichcan beremovedwith a
ingtemperaturesandshouldbecleaned oven,smokeandodormayoccur, dampcloth.If soilremains,it indicates
to preventsoilfrombakingonduringthethat theclean cycle was not long
cleancycle. As theoven heatsand cools,you may enough.Thesoilwillberemovedduring
hear sounds of metal parts expanding the next clean cycle.
Wipe up excess grease or spillovers and contracting. This is normal and will
from the oven bottom to prevent exces- not damage your appliance.
sive smoking or flare-ups during the If the oven racks do not slide smoothly
cleancycle, after a clean cycle, wipe racks and em-
bossed rack supports with a small
Do notuse oven cleaners or ovenliner amount ofvegetableoil to restore ease
protective coatings of any kind on the of movement.
self-clean ovenfinishor aroundanypart
of the oven.
Topreventdamage,do notcleanorrub Fine,hair-likelinesmay appear inthe
thegasketaroundtheoven door.Theoveninterioror ovendoor.Thisisanor-
gasketisdesignedtosealinheatduring realconditionresultingfromheatingand
thecleancycle, coolingof theporcelainfinish. These
linesdo not affecttheperformanceof
theoven.
19
This manual suits for next models
5
Table of contents
Popular Cooker manuals by other brands

Porter&Charles
Porter&Charles FEC 90 Operation manual

Range Master
Range Master CLASSIC 110 GAS FSD user guide

Master cook
Master cook Dynamic KGE-3468ZSB DYN instruction manual

German pool
German pool DIC-148DB user manual

Range Master
Range Master INC90DFFBL User's guide & installation instructions

Junker
Junker JH33AC50 instruction manual