Mainstreet Equipment 541EC1D User manual

User Manual
Electric Convection Ovens
Models: 541EC1D, 541EC1C, 541EC2D, 541EC2C
Please read and keep these instructions. Indoor use only.
2/2023
4003027

2Mainstreet Equipment
User Manual
WARNING
•Any incorrect installation, maintenance, or self-modication can lead to property loss, bodily harm, or death.
Please contact Main Street Equipment for any adjustment or maintenance. Service must be performed by an
authorized technician.
•For the safety of everyone involved, please keep the equipment away from any ammable or explosive objects
and substances. Do not store or use any such items in the vicinity of this unit.
•This equipment should not be operated by persons with insucient experience or knowledge of the
equipment (including children), nor should it be used by those with physiological, perceptual, or mental
disabilities without proper supervision.
•Keep children away from the equipment for their safety.
•Always keep this manual accessible. When transferring possession of the equipment to a third party, the manual
must also be handed over. All users must operate the unit in compliance with this manual.
•Any nearby walls, surfaces, kitchen supplies, etc. should be noncombustible and heat resistant. Please pay
special attention to re prevention regulations.
!
Congratulations on your purchase of Main Street Equipment commercial cooking equipment! At Main Street
Equipment, we take pride in the design, innovation, and quality of our products. When used as intended and with
proper care and maintenance, you will experience years of reliable operation from your Main Street Equipment
equipment. To ensure optimal performance, we have outlined the following instructions and guidelines in this manual
carefully for your review. Main Street Equipment declines any responsibility in the event users do not follow the
instructions or guidelines stated here.
CONTENTS
Product Overview .......................... 3
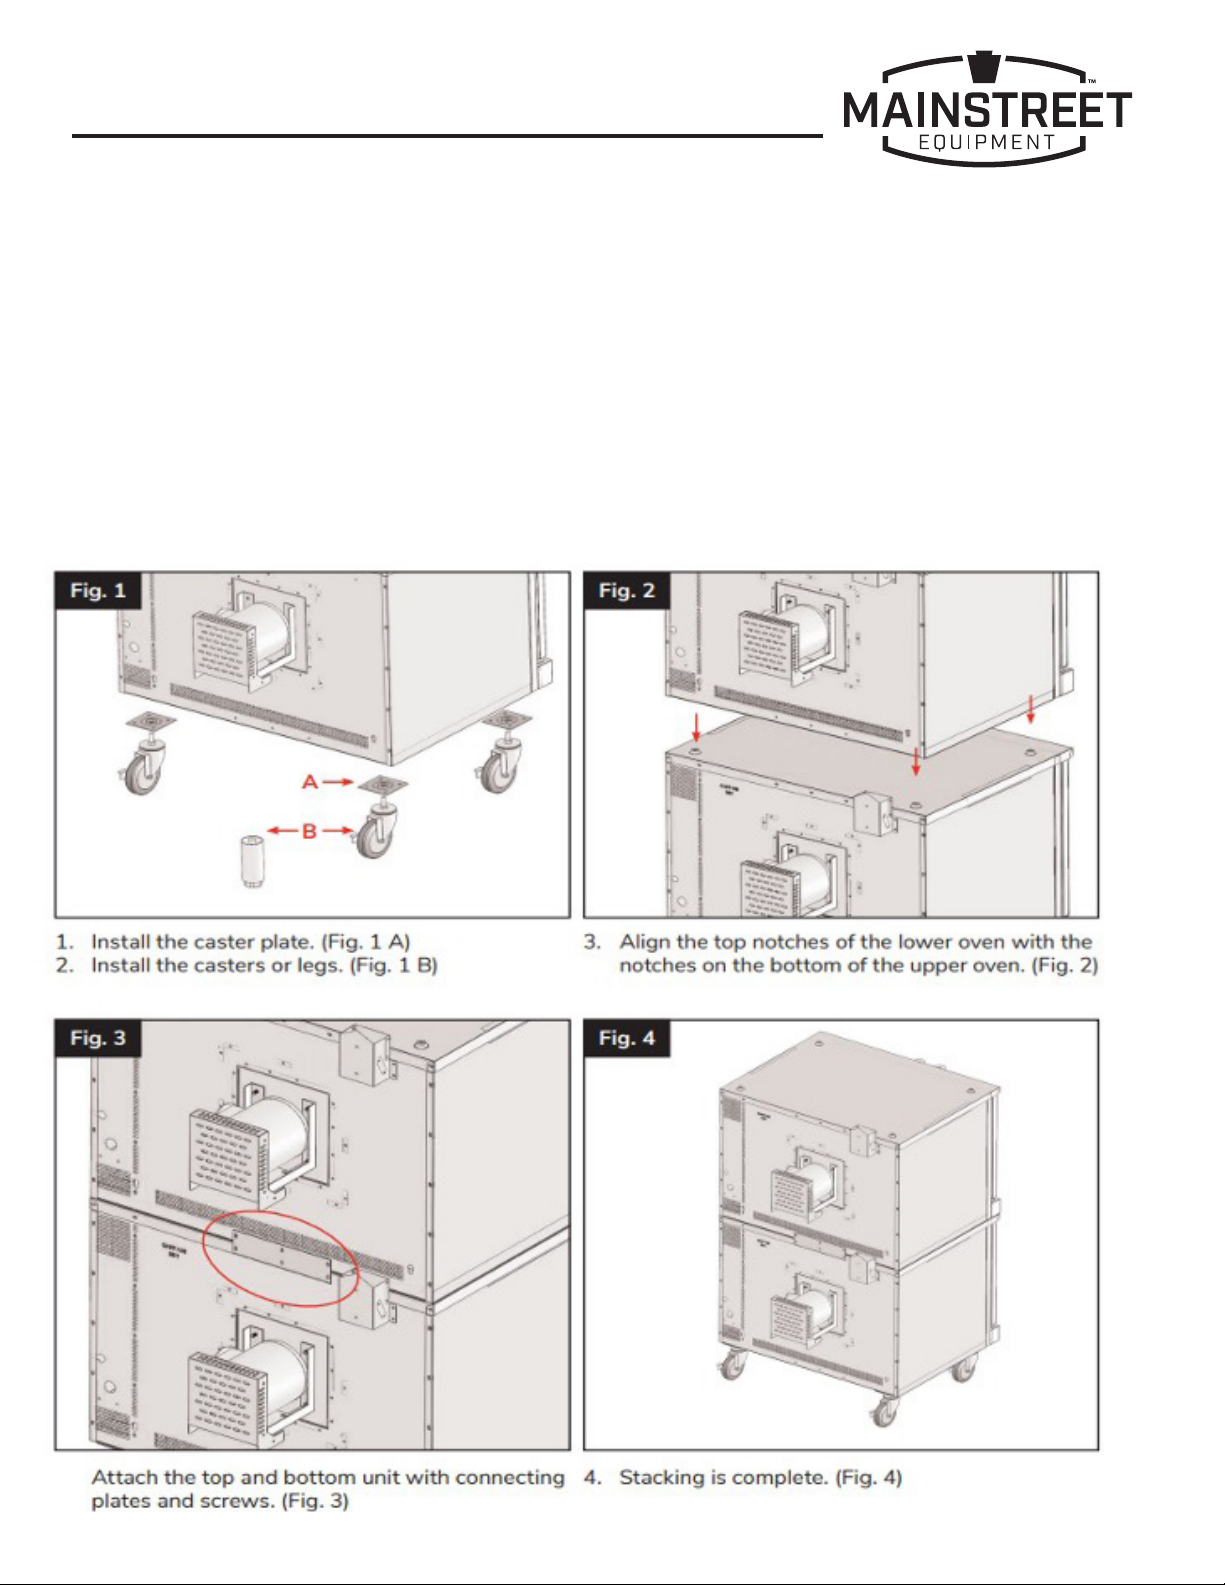
Stacking Oven Instructions ..................3
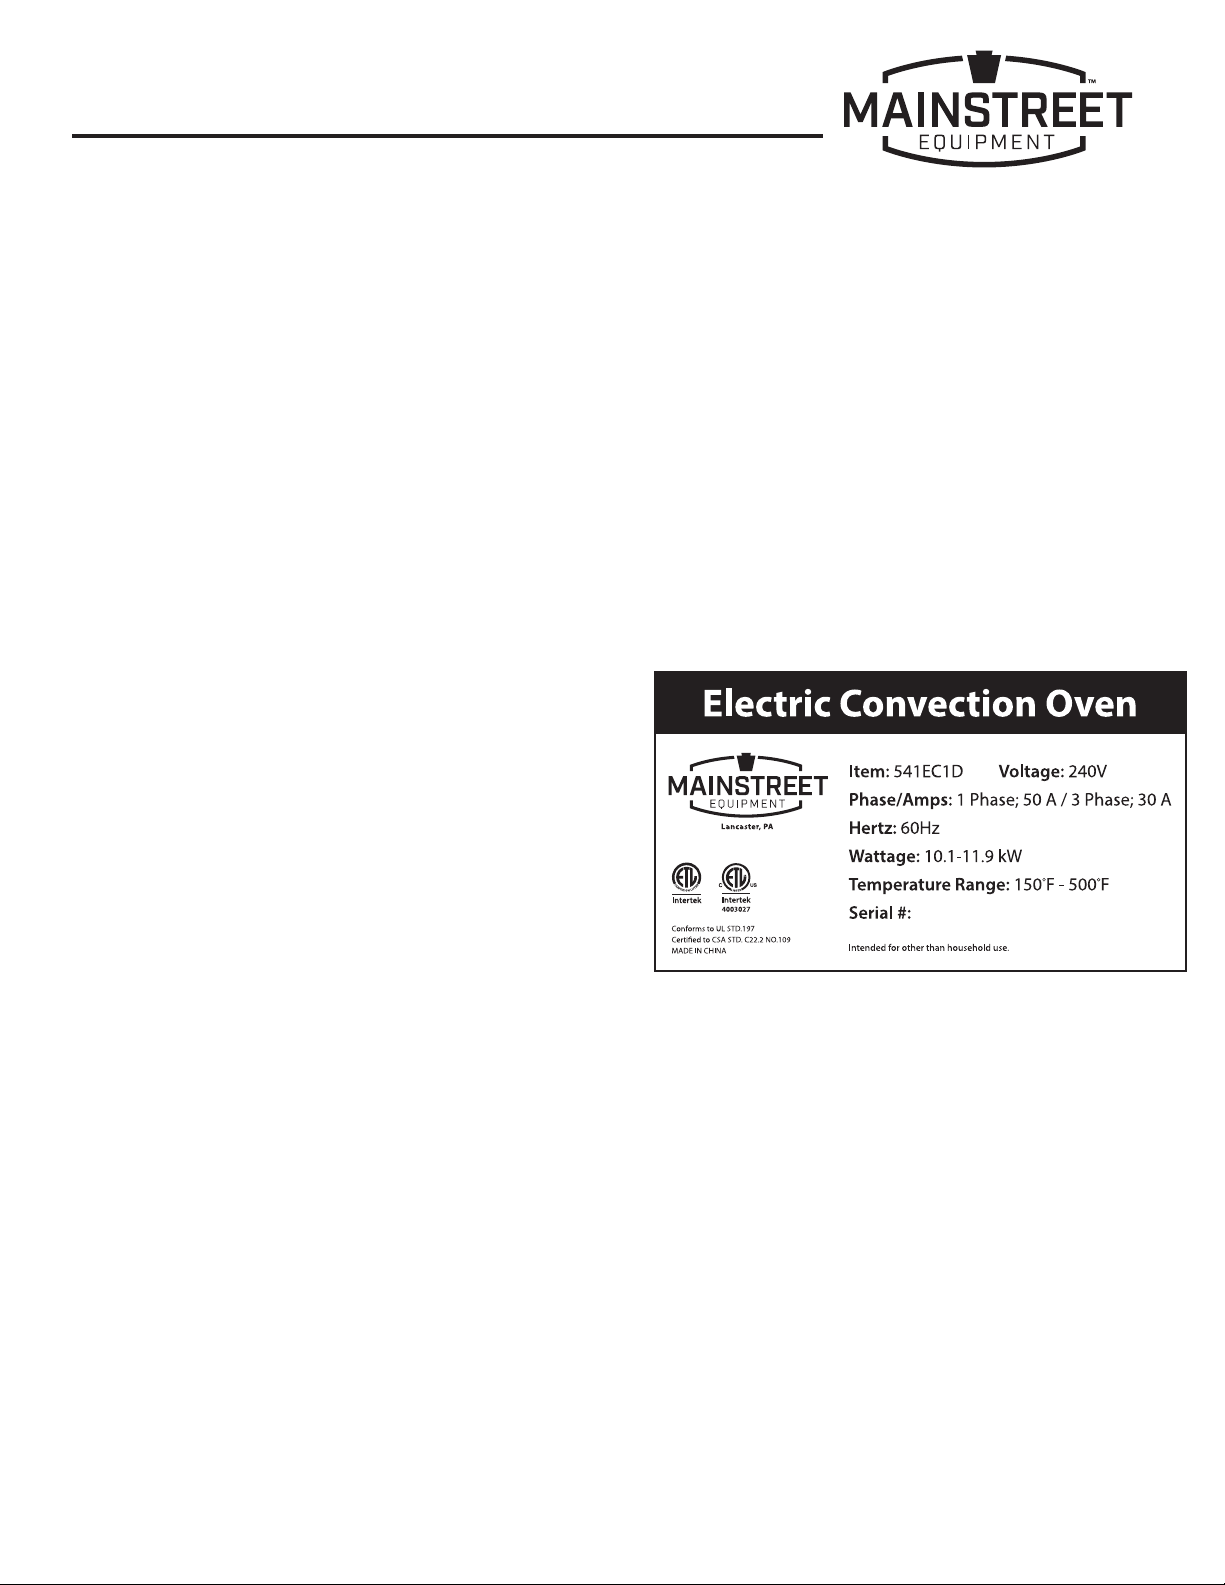
Specications .............................. 4
Notes for Installer .......................... 5
Startup ..................................... 5
Electrical Connection ........................6
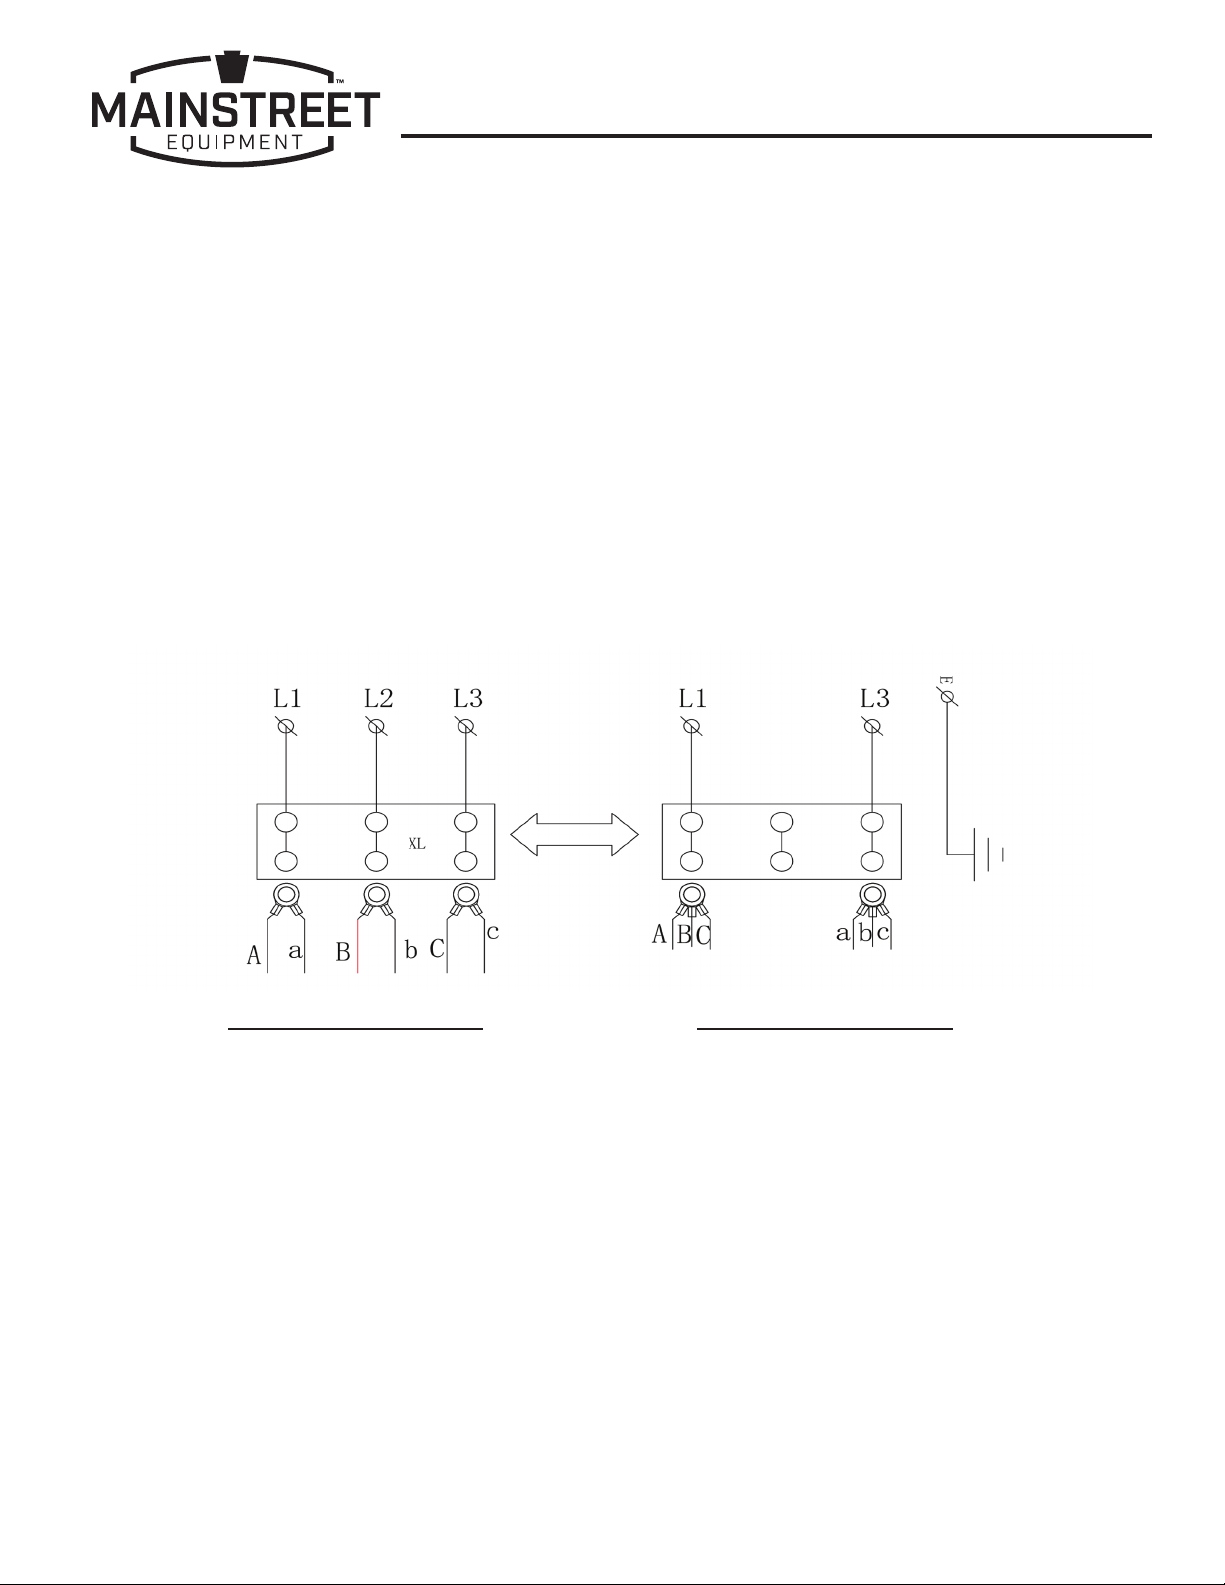
Phase Conversion Instructions...............6
Exhaust System ..............................7
Electrical Diagrams ........................7-8
Operating Instructions ...................9 -11
Cleaning and Maintenance ................ 12

3Mainstreet Equipment
User Manual
PRODUCT OVERVIEW
The 541EC1D/C features a sturdy steel construction with 4 adjustable legs. It is equipped with a built-in two speed
convection fan for temperature uniformity throughout the cavity. This oven features high eciency heating
elements and an electronic thermostat to ensure accurate temperate for precise cooking.
STACKING OVEN INSTRUCTIONS
NOTE: Requires two like ovens and stacking kit (#54117046014)
NOTE: We require the stacking to be performed by an authorized service agent or installer. It takes two people
to lift the ovens.

4Mainstreet Equipment
User Manual
SPECIFICATIONS
SPECIFICATIONS 541EC1C 541EC1D
1 Phase 3 Phase 1 Phase 3 Phase
Total Power 11.5 kW 10.1-11.9 kW
Voltage 208 240
Amps 55 34 50 30
Overall Dimensions (Single Oven) 38/” × 41½” × 54/”
Overall Dimensions (Stacked Oven) 38/” × 41½” × 63½”
Oven Chamber Dimensions 29” × 22¼” × 20”
Temperature Changes 150-500°F
Fan Speed (High) 0.5 HP
Fan Speed (Low) 0.14 HP
Weight (Single Oven) 403.45 lb.
Clearance 0” sides, 2” rear, 6” from
heat producing equipment
NOTE: 541EC2D/C ovens consist of two like 541EC1D/C ovens - please see the spec table above for the
individual oven/cavity specications.
NOTE: Each oven requires its own electrical connection.
NOTE: Please note that while the phases on these ovens are convertible, the voltages cannot be converted.
If you have the wrong voltage, you will need to purchase a unit with the correct voltage.

5Mainstreet Equipment
User Manual
STARTUP
1. Remove packaging before beginning installation.
NOTE: Some parts are protected with an adhesive lm. Remove any glue residue with approved substances,
such as Noble Chemical Strike All Purpose Cleaner (#147STRIKE1G); never use abrasive substances. (See Cleaning
& Maintenance on pg. 12 for our other recommended cleaning agents and further cleaning instructions).
2. Mount the feet, adjusting them to make the unit level.
3. The electrical connections must be close to the equipment and easy to reach.
4. Place the unit under an exhaust hood to comply with your local regulations.
5. Install the unit at least 2” from the wall and at least 6” from other heat-producing equipment.
Any wall, surface, cabinet, table, etc. in close proximity to the equipment should be made of non-combustible
materials with proper thermal insulation.
6. Law provisions, technical regulations, and directives:
The manufacturer requires the installation to be
performed according to national and local codes and
must be performed by a licensed installer.
7. Checking the functions: The serial plate, like the
example to the right, is located on the right side panel.
Please ensure that the voltage stated on the serial
plate is compatible before performing the electrical
connection.
NOTES FOR THE INSTALLER
•Explain and demonstrate to the user how the equipment works according to the instructions,
and ensure that the user manual is accessible.
•Remind the user that any structural alterations or modications made to the room that houses the equipment
will warrant a recheck of the equipment functions.
•Do not install the equipment close to other units that can reach high temperature, as the electrical
components could be damaged. A 6” minimum clearance is required from such equipment.

6Mainstreet Equipment
User Manual
ELECTRICAL CONNECTION
The oven must be electrically grounded in accordance with all local and national codes (in the USA, the National
Electrical code ANSI/NFPA no. 70 is applicable).
PHASE CONVERSION INSTRUCTIONS
Please follow the below steps to convert the phase of your oven to match your application.
NOTE: Only phase can be converted. The voltage of these ovens cannot be converted.
Please ensure that your oven is the proper voltage to be used with your electrical connection.
3 Phase 1 Phase
Convert 3 phase to 1 phase
1. Remove wires ‘a’, ‘B’, ‘b’, and ‘C,’ from their
terminal block locations
2. Secure wires ‘A’, ‘B’, and ‘C,’ to the same
terminal block location
3. Secure wires ‘a’, ‘b’, and ‘c,’ to the same
terminal block location
Reference image above
Convert 1 phase to 3 phase
1. Remove wires ‘a’, ‘B’, ‘b’, ‘C,’ from their
terminal block locations
2. Secure wires ‘A ,’ and ‘a,’ to the same terminal
3. Secure wires ‘B,’ and ‘b,’ to the same terminal
block location
4. Secure wires ‘C,’ and ‘c,’ to the same terminal
block location
Reference image above

7Mainstreet Equipment
User Manual
EXHAUST SYSTEM
The room where the equipment is installed must be tted with air intakes to guarantee the correct operation
of the unit and air exchange.
•During installation, make sure the air suction and evacuation ways are free from any obstacles.
•This unit must be installed per all applicable hood regulations.
•This unit is not designed to be directly connected to an evacuation duct for the discharge of
combustible products.
ELECTRICAL DIAGRAMS
208V

8Mainstreet Equipment
User Manual
240V

9Mainstreet Equipment
User Manual
0
5
1
0
1
5
2
0
2
5
3
0
3
5
4
0
4
5
5
0
5
5
6
0
O
F
F
1
5
0
1
7
5
2
0
0
2
2
5
2
5
0
2
7
5
3
0
0
3
2
5
3
5
0
3
7
5
4
0
0
4
2
5
4
5
0
4
7
5
5
0
0
LIGHTS
FAN SPEED
HI
ON COOK
COOLOFF
LOW
COOK TEMPERATURE
°F
POWER
COOK TIMER (MIN.)
POWER FAN MODE
HEAT ON
Power Switch:
Switch ON to use the oven; switch
OFF when done using the oven.
Cook Timer:
Turn knob to set a cook time. An
alarm will sound when the timer
runs out. Turn the knob to OFF
to cancel the alarm. The timer is
a reminder to the user; the timer
does not control the oven.
HI/LOW Fan Speed:
Use to select fan speed (HI/LOW).
The appropriate speed is
determined by the type of food
being cooked.
Fan Mode:
In COOK mode, the fan runs
continuously except when the
doors are open. The fan does
not cycle with the operation of
the burners. In COOL mode, the
fan runs continuously even if
the doors are open. To rapidly
cool the oven after cooking is
completed, open the doors and
switch the fan mode to COOL.
HEAT-ON Indicator:
The HEAT-ON indicator will light
when the burners are on and
will remain on while the oven
preheats.
Cook Temperature
Control:
Turn the knob to desired
temperature. When the set point
is reached, the HEAT ON indicator
will be o. When the burners
maintain the set temperature, the
indicator will cycle between ON
and OFF.
Oven Interior
Light Switch:
Press to turn on the light. The light
is controlled independently.
OPERATING INSTRUCTIONS
CONTROL PANEL:
POWER Indicator:
Lights up when the unit is
connected and the Power Switch
is on the “ON”position.

10 Mainstreet Equipment
User Manual
COOKING INSTRUCTIONS:
1. Turn the oven ON using the Power Switch at the top of the control panel.
2. Select the desired fan speed using the Fan Speed switch. The appropriate fan speed (HI or LOW) depends on
the type of food being cooked.
3. Switch the Fan Mode to COOK. The fan will run continuously when the oven doors are closed (the fan does
not cycle on and o with the burners). If this switch is set to COOL, the fan will continue to run when the oven
doors are open.
4. Set the cooking temperature by turning the Cook Temperature Control until the indicator mark on the knob
is pointed to desired cooking temperature. The HEAT ON indicator will light when the burners are on and will
remain on while the oven preheats.
5. Wait until the HEAT ON indicator has gone out. At that time the oven will have reached the set cooking
temperature.
6. Open the oven doors, load the product into the oven, and close the doors.
7. You can use the Cook Timer as a reminder of when to remove the product from the oven. Turn the Cook Timer
knob until the indicator mark points to the desired cooking time (up to 55 minutes). The timer knob will rotate
counterclockwise as the timer runs down, indicating how much time remains. You can turn the knob while
cooking to increase or decrease the remaining time. When the timer runs out, a buzzer will sound for a short
time, then turn itself o. (To immediately silence the buzzer, turn the Cook Timer knob to the OFF position.)
The timer is a reminder to you; it does not control the oven.
•If you open the oven doors, the burners and fan will shut o until the doors are closed. However, the
timer will continue running even if the doors are open.
•To turn on the oven light, press and hold the switch located at the bottom of the control panel.
8. To rapidly cool the oven cavity when nished cooking: Turn thermostat down to lowest level, open the
oven door, switch the fan to COOL mode, and fan speed to HI. This will cause the fan to run even with the
doors open.
9. When you are done cooking, turn the Cook Temperature Control to the lowest setting (fully counterclockwise)
and ip the Power Switch to OFF.

11Mainstreet Equipment
User Manual
HIGH TEMPERATURE RESET :
WARNING: PLEASE UNPLUG AND DISCONNECT UNIT BEFORE REMOVING THE BOLT AND OPENING THE
CONTROL PANEL TO AVOID INJURY.
1. Remove the 7mm bolt that secures the control
panel. (Fig. 1/2)
2. Open the control panel by carefully pulling down,
lowering it from the top. (Fig. 3)
3. Reset the temperature limiter. The temperature
limiter is installed on a small bracket behind
the control panel (Fig. 4). Press the reset button
manually. The unit will operate under the new
settings once powered on.
4. Close the control panel and re-install the 7mm bolt
to secure.
5. Power the unit on for inspection.
WARNINGS !
1. Always ensure proper supervision while the
equipment is in use.
2. Simple adjustments to knobs, leg height, etc. do
not require assistance from specialized personnel. For more technical adjustments, please consult a
qualied technician.
3. Use only parts and accessories recommended by Mainstreet Equipment.
4. During the initial uses of the equipment, an acrid or burning smell may be detected. This will disappear after
two or three uses. Or set unit to 450-500°F for 30 min. or until smell starts to disappear, then turn unit o and
let cool.
5. The equipment will remain hot for a short time after use (residual heat). Avoid all physical contact with the unit
during this time to prevent injury.
6. This equipment is strictly for professional use and must be used by qualied personnel.
7. The installation, startup, and maintenance of this equipment must be carried out by a qualied technician.
8. All installation must be carried out according to the law. Mainstreet Equipment is not responsible for damages
due to an incorrect installation, improper maintenance, or incorrect use.
NOTE: These are very important regulations; if they are neglected, the equipment may not perform
properly or the user may be placed at risk and void manufacturer warranty.

12 Mainstreet Equipment
User Manual
CLEANING & MAINTENANCE
1. Before cleaning, turn o the unit and let it cool down.
2. Carefully clean the equipment daily to promote proper operation and long life.
3. Steel surfaces must be cleaned with cleaning agents such as Noble Chemical Sunbright, Noble Chemical
Knockout, or Noble Chemical Blast, diluted in very hot water using a soft cloth; do not use abrasive powder
detergents or corrosive substances. The use of acids can aect the unit’s operation and safety. Do not use
brushes, steel cottons, or abrasive disks made with other metals or alloys that may cause rust stains due to
contamination. For the same reason, avoid contact with iron objects. Do not use stainless steel brushes, as
they can cause damaging scratches.
4. Metal powder, metal shavings, and iron material in general can cause stainless steel to rust. Supercial rust
stains may be present on new equipment and they can be removed with a detergent diluted in water and a
scouring pad. If dirt is dicult to remove, a sponge may be used. Please note that rust is not covered by
the warranty.
5. Use only approved substances to clean the unit as some chemicals could damage the unit. Rinse properly after
cleaning with clean water, do not spray directly with water jet.
6. We recommend that the user subscribes to a maintenance agreement to have the equipment checked at least
once per year by an authorized technician.
7. Before carrying out any maintenance or repair, disconnect and unplug the equipment. Use only original spare
parts supplied by Main Street Equipment.
8. If the equipment is not going to be used for a long period of time, it is advised to clean the equipment and
surrounding areas properly.
This manual suits for next models
3
Table of contents
Popular Oven manuals by other brands

Bosch
Bosch CMG8764 7 Series User manual and installation instructions

Teka
Teka HL-890 quick start guide

Heinner
Heinner HBO-V6510GCDRC-GBK manual

Frigidaire
Frigidaire 318205103 Use & care manual

Euromaid
Euromaid DS 2 Installation & operation instructions

NEFF
NEFF B57CR22.0B User manual and installation instructions

Tricity Bendix
Tricity Bendix SOMERSET Operating and installation instructions

AEG Electrolux
AEG Electrolux U88106 user manual

Toastess
Toastess Elegance TO-318 Instruction booklet

Bosch
Bosch HBG7721 2 Series User manual and installation instructions

Samsung
Samsung BF641FST Service manual

Italian Design
Italian Design La Cottura FE960 manual