Majestic WT 249 User manual

P.1
Mod.: WT 249
INSTRUCTION MANUAL
LCD WEATHER STATION WITH PROJECTION

P. 2

P. 3
QUICK SETUP
STEP 1:
Plug in the enclosed AC/DC adaptor to an AC wall outlet and then the DC jack to the back of your weather station.
STEP 2:
Keep your weather station and wireless outdoor transmitter next to each other. Slide open the battery cover at the back of
your wireless outdoor transmitter, then insert 2 x AAA new alkaline batteries to the battery compartment. Make sure the
Channel selector switch is at 1position. Replace the battery cover.
Your weather station will receive data signal from the outdoor transmitter in few seconds. Then place your outdoor transmitter
in a dry and shaded area.
STEP 3:
The weather station computes weather forecasts based on changes in pressure sensor. However, when using the weather
station for the first time, it may take up to a few days of collecting sufficient information for more accurate forecasts.
Manual setting of the weather forecast can slightly accelerate this process.
Please refer to “TO SET THE WEATHER STATION “ Step 9”.
TO POWER UP THE CLOCK
Plug in the AC/DC adaptor to an AC household outlet, and then plug the DC jack to the lower right back of the unit. Your unit
is ready to work for you.
TO INSTALL BACKUP BATTERIES
Your weather station requires 2 x new AA batteries (not included) to provide backup power to it in the event of a temporary
power interruption.
1. Place your weather station face down on a flat and soft surface.
2. Slide and remove the battery cover at the back of your unit.
3. Insert 2 x new AA batteries into the battery compartment by observing the correct “+” and “-“ polarity.
4. Slide and replace the battery cover.
Remarks:
Do not mix old and new batteries.
Do not mix alkaline, standard or rechargeable batteries.
Alkaline batteries are recommended for optimal usage of this clock.
If AC power is interrupted, the backlight can light 8 seconds, by pressed Snooze button, alarm can work, but projection does
not function when only backup batteries are used to power your unit. The backup batteries will keep all settings of your unit.

P. 4
TO INSTALL THE OUTDOOR TRANSMITTER
After your weather station is powered up, put it and the wireless outdoor transmitter next to each other. Then slide open the
battery cover at the back of your wireless outdoor transmitter, insert 2 x AAA alkaline batteries to the battery compartment by
observing the correct “+” or “-“ polarity. Replace the battery cover.
Your weather station will receive data signal from the outdoor transmitter in a few second. The OUTtemperature and humidity
will be displayed.
Insert the holder to the bottom of the outdoor transmitter for desktop or insert it to the back of the transmitter for wall mount
purpose.
Remarks:
Keep in mind that your outdoor sensor has a 50-meter open air transmission with no obstructions. Actual transmission range
will vary depending on what is in the path of the signal. Each obstruction (roof, walls, floors, ceilings, thick trees, etc.) will
effectively decrease signal range.
TO SET THE WEATHER STATION
You can set your weather station in the sequence of time, 12/24HR, calendar, snooze duration and weather forecast condition.
1. Press and hold SET, the hour digits flash. Press / OUT or button to set the hours. Press and hold / OUT or
will accelerate your setting.
2. Then press SET again, the minute digits flash. Press / OUT or button to set the minutes. Press and hold
/OUT or will accelerate your setting.
3. Press SET once again, the time digits change to “24Hr”. Press / OUT or to select “12Hr” time format. When
12Hr time format is selected, PM indicator will be displayed.
4. Press SET once again, “2019” digits flash. Press / OUT or button to set the year.
5. Press SET once again, month digits flash. Press / OUT or button to set the month.
6. Press SET once again, date digits flash. Press / OUT or button to set the date.
7. Press SET once again, “n05” flash. Press / OUT or button to set the snooze duration from 5 minutes to 60
minutes.
8. Press SET once again, weather icons flash. Press / OUT or button to set the current weather
condition.
/C/ F
/C/ F
/C/ F
/C/ F
/C/ F
/C/ F
/C/ F
/C/ F
/C/ F
/C/ F

P. 5
SUNNY AND
CLOUDY
(PARTLY SUNNY)
CLOUDY
RAINY
STORMY
9. Then press SET once again to save the settings, or it will return to normal mode in around 10 seconds if no further press
of any other buttons.
TO SET ALARM 1 AND 2
1. At normal time display mode, press and hold AL 1.2 / ON.OFF, icon and the alarm hour digit flash. Press / OUT or
to set the hours of your desired alarm time.
2. Press AL 1.2 / ON.OFFonce again, the alarm minute digits flash. Press / OUT or button to set the minutes of
your desired alarm time.
3. Press AL 1.2 / ON.OFF once again, “1-7” flash. Press / OUT or button to select “1-7” or “1-5” or “6-7” or “1-1”
1-7: daily alarm (alarm works through Monday to Sunday)
1-5: weekdays alarm (alarm works through Monday to Friday only)
6-7: weekends alarm (alarm works Saturday and Sunday only)
1-1 :single day alarm (alarm only works for one single time and then off)
4. Press SET once again to complete set-up. If no key is pressed the settings are automatically saved in approximate 10
seconds.
TO TURN ON OR OFF YOUR DAILY ALARM
1. At normal time display mode, press AL 1.2 / ON.OFF once to turn on Alarm 1 only, appears on the LCD.
2. Press AL 1.2 / ON.OFFonce again to turn on Alarm 2 only, appears on the LCD.
3. Press AL 1.2 / ON.OFFonce again to turn on both Alarm 1 & 2, both and appear on the LCD.
4. Press AL 1.2 / ON.OFFonce again to turn off both Alarm 1 & 2, both and disappear on the LCD.
TO USE SNOOZE ALARM
When time reaches your set alarm time, your weather station will give a beep sound to wake you up. The corresponding
or will flash.
1. Press SNOOZE once to stop the alarm temporarily, the corresponding or keeps flashing. The alarm will beep
again according to your set snooze duration.
2. When the alarm is sounding, press AL 1.2 / ON.OFF once, the alarm will stop for the day, or become static.
Alarm Duration: 2 minutes
TO USE THE HI-LO DIMMER
At normal time display mode, press SNOOZE to adjust the brightness (Hi/ Lo/ Off) of the LCD display. This can only be done
when the AC/DC adaptor is being used.
SUNNY
/C/ F /C/ F
/C/ F

P. 6
Remarks: if only the backup batteries are used, pressSNOOZE once to activate the backlight for 8 seconds. It is not possible
to keep the display on during the use of the product with batteries.
TO DISPLAY TEMPERATURE IN DEGREE °C OR °F
Simply press / C/ F to display temperature in degree °C or degree °F.
TO USE THE PROJECTION (operated by adaptor only)
1. Press PROJECT once to turn on the projection. Press PROJECT again to reduce the projection light.
2. Press and hold PROJECT to activate auto scrolling function to view the current outdoor temperature (rounded to the
nearest digit) and the current time for 5 seconds alternately. Press / C/ F to select degree Celsius or degree Fahrenheit
temperature readout in projection view. Keep pressed PROJECT for 3 seconds again to turn off auto scrolling function.
3. Press PROJECTonce again to turn off the projection.
When the projection is on, press and hold SNOOZE to flip the projection view upside down. At the back of your unit, use the
rotary knob to rotate the projection view by 90 degree.
WEATHER FORECAST INDICATOR
There are five possible types of weather icons that will be displayed:
SUNNY RAINY
SUNNY AND
CLOUDY
(PARTLY
SUNNY)
STORMY
CLOUDY
Remarks: Moving your weather station from one floor of a building to another floor will affect the accuracy of your weather
station, which should operate at the same altitude all the time. If you move it to a new location, it will take 12 hours to get
stable and accurate again.

P. 7
IF YOU LOSE THE OUTDOOR TEMPERATURE AND HUMIDITY
When the outdoor temperature and humidity digits show '---", the wireless transmission is either interrupted or lost. Press and
hold the / OUT button to start searching for the signal from the outdoor transmitter with the flashing.
If you continue to lose the outdoor temperature and humidity display, which could happen in extreme cold weather, try placing
the transmitter in a different location until you havesmooth transmission of temperature / humidity data.
LOW BATTERY INDICATION OF YOUR OUTDOOR TRANSMITTER
The icon will appear to indicate the battery level of your outdoor transmitter is getting low. You may need to replace the
batteries of your outdoor transmitter with new ones.
Extreme cold weather (e.g. below 14 °F) will also cause low battery voltage.
CARE OF YOUR WEATHER STATION CLOCK
1. Do not expose the unit to extreme temperature, water or direct sunlight.
2. Avoid contact with any corrosive materials.
3. Do not subject the unit to excessive force, dust or humidity.
4. Do not open the inner back case or tamper with any components of this unit.
5. Do not plug in any other AC/DC adaptor with incorrect specifications or voltage.
6. Always place your outdoor transmitter in a dry and shaded area away from direct sunlight or rain.
SPECIFICATIONS:
Temperature Range
Indoor 0°C to +50°C (+32°F to +122°F) (display shows HH.H / LL.L if out of this range)
Outdoor -20°C to +70°C (-13°F to +158°F) (display shows HH.H / LL.L if out of this range)
Humidity Range
%59-%02roodnI
%59-%02roodtuO
Temperature Resolution 0.1°C / 0.1°F
RH% Resolution 1%
srh42tamrofemiT
00:0emiT
Alarm 1 and 2 6:00 am
Alarm Duration 2 minutes
Snooze Duration 5 minutes
WT 249
SVEGLIA CON STAZIONE
BAROMETRICA E PROIEZIONE
DELL’ORA
Alimentazione: 5A.0V / 0.6A
Batteria di Back up: 2x1.5V AA
(non inclusa)
Consumo: 3.0 W
New Majestic S.p.A.
Via Rossi Martini, 41
26013 Crema (CR)
Made in China
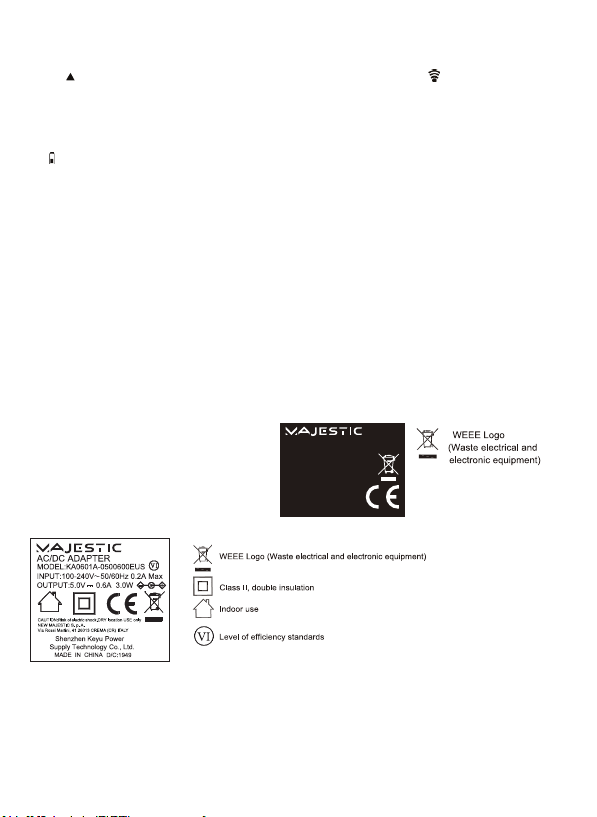
1. AC adaptor manufacturer’s name:
SHENZHEN KEYU POWER SUPPLY TECHNOLOGY CO., LTD.
2. Model identifier: KA0601A-0500600EUS
3. Input voltage: AC100 - 240V
4. Input AC frequency: 50/60Hz
5. Output voltage: DC5.0V
6. Output current: 0.6A
7. Output power: 3.0W
8. Average active efficiency: ≥69.65%
9. No-load power consumption: ≤0.1W
Other manuals for WT 249
1
Table of contents
Other Majestic Weather Station manuals
Popular Weather Station manuals by other brands

La Crosse Technology
La Crosse Technology S88785 Quick setup guide

hager
hager TG053A User instructions

NATURE & DECOUVERTES
NATURE & DECOUVERTES 53150040 quick start guide

Hama
Hama EWS-3200 Operating instruction

Ambient
Ambient EZ2-35W2MC quick start guide

Bresser
Bresser WIFI WSC PRO 7in1 instruction manual