Malcotools FasGroov FGVK User manual

www.malcotools.com
INSTRUCTIONS
1
FOR SAFE, FAST, ACCURATE
FABRICATION OF 1” AND 1-1/2”
FIBERGLASS DUCTBOARD.
DEVELOPED WITH THE END USER IN MIND, BY THE
COMPANY THAT MEANS HAND TOOLS FOR THE HVACR
INDUSTRY.

www.malcotools.com
2
FABRICATING SYSTEM
KIT CONTENTS
VEE-GROOVE
KITS
SHIPLAP KITS
1 inch 1-1/2 inch Description
Cat. No. Cat No.
FGVK FGVKL Vee-Groove Kit with following:
FGV1 FGL1 #1 Tool
FGV FGLV Vee Tool
FGV5 FGL5 #5 Tool
FGV6 -- #6 Tool
FGS FGS Square
FGK FGK Duct Knife
FGM FGML Male Shiplap Knife
FGF FGFL Female Shiplap Knife
FGC * Tool Case
Order FGVLKW
for 1-1/2” Vee Kit
WITHOUT square.
1 inch 1-1/2 inch Description
Cat. No. Cat No.
FGSLK FGSLKL Shiplap Kit with following:
FGV1 FGL1 #1 Tool
FG24 FGL24 Vee Tool
FGV3 FGL3 #3 Tool
FGV5 FGL5 #5 Tool
FGV6 -- #6 Tool
FGS FGS Square
FGK FGK Duct Knife
FGM FGML Male Shiplap Knife
FGF FGFL Female Shiplap Knife
Order FGSLKLW
for 1-1/2” Shiplap Kit
WITHOUT square.
INTRODUCTION ...................................... 4
SETTING UP TOOLS
Adjusting FasGroov Square ..................... 9
Hand Tool blade height adjustment ....... 10
Blade removal / replacement................ 14
SHIPLAP FABRICATION.......................... 16
VEE-GROOVE FABRICATION ................... 20
RELATED TOOLS AND ACCESSORIES..... 24
The duct fabrication procedures outlined in
this manual pertain to two common methods
of one-piece duct construction in standard
1” OR 1-1/2” ductboard. For applications
requiring ductwork larger than that which
can be constructed from a single piece of
ductboard, consult the NAIMA fibrous Glass
Duct Construction Standards Manual or your
ductboard manufactures fabrication manual
for information on the two-piece “U”, two
piece “L”, and four-piece construction meth-
od.

www.malcotools.com
INTRODUCTION
Tool Features:
• FasGroov Tool identification incorporates
both the numbering system of fabrication
machines and the traditional hand tool
color coding system. FasGroov Tools are
available for both shiplap and vee-groove
fabrication methods.
• Easy, turn-the-knob, blade height adjust-
ment. Scrap lifts cleanly out of groove.
Blades are also easily removed without
removing screws.
• Molded plastic handles are ergonomically
designed to fit angle of grip and reduce
arm and hand fatigue on-the-job.
• Extruded, anodized, aluminum body is
durable and lightweight. Grooved surface
on sled bottom facilitates easy sliding.
SHIPLAP METHOD
VEE-GROOVE METHOD
#1
GRAY
#2/4
DARK
ORANGE
#3
ORANGE
#5
BLUE
#1
GRAY
VEE
RED
#5
BLUE
CUT FLAP
CUT FLAP
Easy
sliding,
scrap
lifts
cleanly
out of
groove.
Molded handles
ergonomically
designed to
reduce arm
and hand
fatigue.
Blades remove
without removing
screws.
Grooved sled
bottom facilitates
easy sliding.
Patent No’s.
5,040,297
5,077,899
Easy turn-the-knob
blade height adjustment
compensates for
thickness
variations
in standard
1 and 1-1/2 inch
board.
3

www.malcotools.com
Use
#6 Tool
to shorten
length of
duct section,
by measuring
from outside
edge of material
to be scrapped.
Use knob
under handle
to raise or
lower blade
and adjust
depth of cut.
• 1” FasGroov kits also include a #6 tool (Tan
color coded FGV6) for creating duct sections
less than standard 4 foot lengths. The #6
replaces a shiplap knife for making a shiplap
groove at fitting end prior to closure of duct
section. The #6 may also be used for two-
piece and four-piece ductboard fabrication.
1/2”
FGV6
Easy one-piece layout:
• FasGroov Square permits fast and accu-
rate layout without marking cuts or cal-
culating add-on dimensions. Lay out duct-
board as you cut. Simply align dimension on
FasGroov Square with edge of previous cut
and move across the board. Square is also
easily adjustable for angled cuts.
Single blade knives:
• Single blade FasGroov Knives are safer to
use and also feature comfortable molded
handles. Male and Female Shiplap Knives
can be used on closed duct sections.
FGK
Duct Knife
use this point to
cut fiberglass without
tearing ductboard skin.
4

www.malcotools.com
For right or left hand use:
• Right hand orientation of 1” kits is eas-
ily changed by converting #5 Tool and
FasGroov Square for left hand fabrication.
Tool handles may also be turned around to
provide left hand grip angle.
Right hand
operation.
Left hand
operation.
CONVERTING FASGROOV SQUARE
FOR LEFT HAND USE.
1. Remove the angle adjustment knob and the end
pivot knob.
2. Position the ruler stamped leg so that the 3 holes
are to your left. (Rule reads left to right.)
3. Remove the protractor for the “L” shaped leg by
removing the two screws.
4. Flit the protractor over and install on the opposite
end of the “L” shaped leg.
5. Place the “L” leg/protractor assembly on top of
the ruled leg.
6. Align the pivot knob holes and install the pivot
knob.
7. Install the angle adjustment knob in any of the
fixed positions or the sliding position.
8. After converting your square for left hand use,
double check the accuracy in the fixed° position
with a roofing square. Built-in manufacturing
hole tolerances will allow you to true the square.
Note: 1-1/2” Kit cannot be converted for left hand use.
SETTING UP TOOL
Adjusting Fasgroov Square
PREDETERMINED SETTINGS
Place adjustment knob into hole corresponding
to most used angles.
OTHER ANGLES
Place adjustment screw into protractor adjust-
ment slot and tighten at desired angle.
STORAGE
Step 1: Remove angle adjustment knob and
fold ends of FasGroov Square together.
Step 2: Place angle adjustment knob into the
storage hole and tighten.
Ruler
stamped
leg.
Pivot knob.
Angle
adjustment
knob shown
here in 90°
predetermined
hole setting.
Adjustment slot
for other angles.
Screws holding
protractor to
“L” shaped leg.
Protractor scale etched
2 sides for right or left
hand use.
5

www.malcotools.com
Hand Tool blade height
adjustment:
FASGROOV #1 TOOL
Push the FasGroov #1 Tool along the left edge
of a test piece of ductboard. Measure the depth
of cut of the female shiplap groove, it should be
half the thickness of the ductboard (see illustra-
tion).
If adjustment is needed: (1) Turn the blade
adjustment knob counterclockwise to lower the
blade for a deeper cut or (2) Turn the blade
adjustment knob clockwise to raise the blade
for a shallower cut. Repeat adjustment until the
proper depth of cut is achieved.
FASGROOV #2/4 AND #3 TOOLS
Push the FasGroov #2/4 Tool and FasGroov #3
Tool through a test piece of ductboard. Measure
the amount of fiberglass remaining between the
foil backing and the deepest part of the shiplap
cut (see illustration).
If adjustment is needed: (1) Turn the blade
adjustment knob counterclockwise to lower the
blade for a deeper cut or (2) Turn the blade
adjustment knob clockwise to raise the blade for
a shallower cut.
Repeat adjustment until the proper depth of cut
is achieved.
#1 TOOL
Adjustment
knob
Blade
1”
1/2”
3/4”
1/16”
FGV24
1/16”
FGV3
1/8”
FGL24
1/8”
FGL3
1” 1”
#2/4 TOOL #3 TOOL
#1 #2/4 #3 #24
#1
6

www.malcotools.com
FGV
1-3/4”
FGLV
2-5/8”
1”
1-1/2”
VEE TOOL
FASGROOV-VEE TOOL
Push the FasGroov-Vee Tool through a test
piece of ductboard.
Measure the amount of fiberglass remaining
between the foil backing and the deepest part
of the vee-groove cut. There should be 1/8” of
fiberglass remaining (see illustration for width
of cut.)
If adjustment is needed: (1) Turn the blade
adjustment knob counterclockwise to lower the
blade for a deeper cut or (2) Turn the blade
adjustment knob clockwise to raise the blade for
a shallower cut.
Repeat adjustment until the proper depth of cut
is achieved.
FASGROOV #5 TOOL
Push the FasGroov #Tool through a test piece of
ductboard.
The blade should cut deep enough to skin all of
the fiberglass off the foil backing. By using more
pressure on the FasGroov #5 Tool, any remain-
ing fiberglass may be cleaned off the foil.
If adjustment is needed: (1) Turn the blade
adjustment knob counterclockwise to lower the
blade for a deeper cut or (2) Turn the blade
adjustment knob clockwise to raise the blade for
a shallower cut.
Repeat adjustment until the proper depth of cut
is achieved.
Note: It is important to use this tool according to
the direction arrows on the label.
#5 TOOL
Use FGK Knife
to cut staple flap.
VEE VEE VEE #5
#5
7
www.malcotools.com
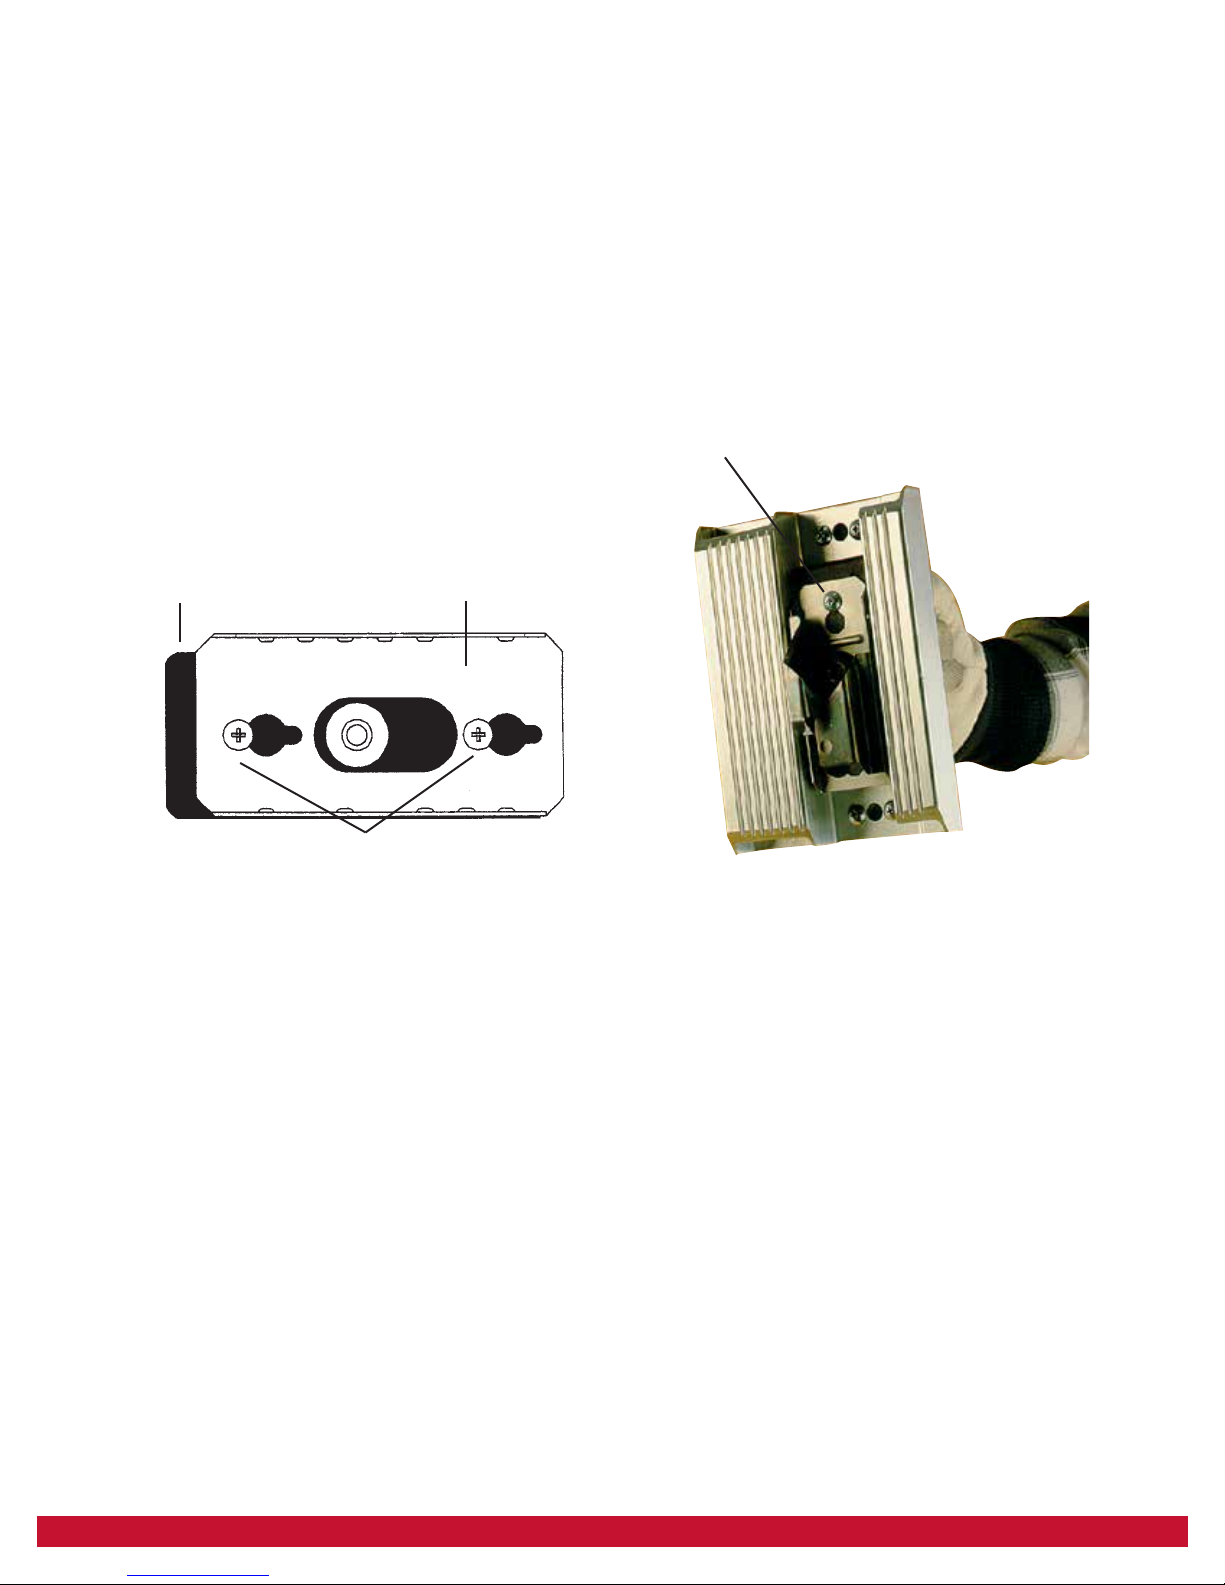
Blade removal, replacement:
Since the blade adjustment mechanism is the
same for all FasGroov Tools, this procedure
applies to any tool requiring blade removal/
replacement.
BLACK PLASTIC SUPPORT BLADE ASSEMBLY
SCREWS
Loosen Screws
Slide and remove worn blade assembly.
Place new blade into the black plastic support
and retighten screws.
Note: Initial cutting friction may be realized due
to rust prevention factory finish on the blade.
Blades remove
without removing
screws.
8

www.malcotools.com
SHIPLAP FABRICATION
#1
GRAY
#2/4
DARK
ORANGE
#2/4
DARK
ORANGE
#3
ORANGE
#5
BLUE
W1 H1 W2 H2
Face the factory made female shiplap edge of a
ductboard section. Place the FasGroov #1 Tool
against the left edge of the ductboard. Push the
FasGroov #1 Tool closely along the left edge to
produce a female shiplap groove.
Set the FasGroov Square on top of the duct-
board. Place the ruled edge along the factory
made female shiplap edge. Measure the desired
inside duct width dimension (W1) and align with
the right edge of cut made previously by the
FasGroov #1 Tool. Place the FasGroov #24 Tool
against the slide edge and push along to produce
a right hand shiplap groove.
Move the FasGroov Square to the right and mea-
sure the desired inside duct height dimension
(H1). Align dimension with the right edge of cut
previously made by the FasGroov #2/4 Tool.
#1 TOOL
#2/4 TOOL
#3 TOOL
CUT FLAP
9

www.malcotools.com
Place the FasGroov #3 Tool against the slide
edge and push along to produce a left hand shi-
plap groove.
#3 TOOL
Move the FasGroov Square to the right and
measure the desired inside duct width dimension
(W2). Align with the right edge of cut previ-
ously made by the FasGroov #3 Tool. Place the
FasGroov #2/4 Tool against the slide edge and
push along to produce a second right hand shi-
plap groove.
Move the FasGroov Square to the right one last
time and measure the desired inside duct height
dimension (H2). Align dimension with the right
edge of cut previously made by the FasGroov
#2/4 tool. Place the FasGroov #5 Tool against
the slide edge and push along to produce a staple
flat groove.
Place the FasGroov Duct Knife on the right edge
of cut previously made by the FasGroov #5 Tool.
Cut completely through the foil to finish the
grooving process.
Fold the duct section together. Staple and tape
the duct section with manufacturer approved
products.
10

www.malcotools.com
VEE-GROOV FABRICATION
#1
GRAY
#2/4
DARK
ORANGE
#2/4
DARK
ORANGE
#3
ORANGE
#5
BLUE
W1 H1 W2 H2
Face the factory made female shiplap edge of a
standard four foot ductboard section. Place the
FasGroov #1 Tool against the left edge of the
ductboard. Push the FasGroov #1 Tool closely
along the left edge to produce a female shiplap
groove.
Set the FasGroov Square on top of the duct-
board. Place the ruled edge along the factory
made female shiplap edge. Measure the desired
inside duct width dimension (W1) and align
with the right edge of cut made previously by
the FasGroov #1 Tool. Place the FasGroov Vee-
Tool against the slide edge and push along to
produce a vee groove.
Move the FasGroov Square to the right and mea-
sure the desired inside duct height dimension
(H1). Align dimension with the right edge of cut
previously made by the FasGroov Vee-Tool.
#1 TOOL
VEE TOOL
#3 TOOL
CUT FLAP
11

www.malcotools.com
Place the FasGroov-Vee Tool against the slide
edge and push along to produce another vee
groove.
Move the FasGroov Square to the right and
measure the desired inside duct width dimension
(W2). Align dimension with the right edge of
vee groove made in the previous step. Place the
FasGroov-Vee Tool against the slide edge and
push along to produce a third vee groove.
Move the FasGroov Square to the right ,one last
time and measure the desired inside duct height
dimension (H2). Align dimension with the right
edge of cut previously made by the FasGroov-
Vee Tool.
Place the Fasgroov #5 Tool against the slide
edge. make sure the blade is turned the proper
way or in the proper set of holes to produce a
staple flap groove in the right handed vee groove
direction. For blade removal/replacement, see
page 14. Push along to produce a staple flap
groove.
#5 TOOL
Place the FasGroov Duct Knife on the right edge
of cut previously made by the FasGroov #5 tool.
Cut completely through the foil to finish the
grooving process.
Fold the duct section together. Staple and tape
the duct section with manufacturer approved
products.
12
Table of contents


