MANN LAKE HH-100 User manual

Honey Stick Machine
Complete Kit
HH-100
501 1st St S, Hackensack, MN 56452
500 Santa Anita Dr., Woodland, CA 95776
485 Stewart Rd, Wilkes-Barre, PA 18706
1600 Commerce Street, Marshall, TX 75672
Telephone: 800-880-7694
www.mannlakeltd.com

Now that you have decided to make Honey Scks, there are a few things you should know:
1. You are going to get scky - anyme you work with bees or honey, it is inevitable. Protect your clothes
and work surface accordingly.
2. The me it takes to ll the straws is directly related to the amount and temperature of the honey in
your pail. Working with room temperature honey in the spring is going to be dierent than working
with room temperature honey in the middle of the hot summer. Working in a heated room or with a
bucket heater on your pail will increase the ow of the honey and make the process go faster.
3. Sealing the Honey Scks at the base (the second seal) is going to result in a “burnt” honey smell when
honey gets onto the sealer. Have a container of hot water and a wash rag handy to clean o the sealer
between llings.
Now, let’s get started!
Make sure before you begin that all equipment is clean and wash any as necessary with warm water and a
so cloth.
You’re going to need straight and phillips screwdrivers, socket wrench with a 9/16” deep socket, and an
adjustable wrench.
Male adapter
Hose adapter
Ball Valve
Shut-O Valve
Note: you are provided with 10 male adapters;
1 is extra in case one breaks and needs to be
replaced. Teon tape is oponal to place around
the male adapters.
Install the hose adapter into the shut-o valve using an adjustable wrench
to ghten.

Install one end of your hose assembly
onto the hose adapter and slide the
clamp as far up onto the hose adapter
as possible. The clamp should go up
to the hose adapter. Tighten with a
straight head screw driver.
Install the opposite end of the hose assembly to the hose adapter located
on the boom of the pail. Again, make sure the clamp is moved all the
way up to the hose adapter.
The easiest way to install the male adapters is with a 9/16” deep socket. If you
don’t have one available, use an adjustable wrench. Tighten them unl they
stop turning. Note: you will sll see some threads between the adapter and the
ball valve. This is normal.
Next you will assemble the pole to hold the bucket. It
comes in 2 pieces that need to be joined. The ng
is already installed on one end. Just slide the hooked
end into the ng and ghten with the at head
screwdriver.
Once the arm pieces are joined, slide the
boom of the arm onto the table bracket. If
there is a screw through the end of the arm,
align the screw with the slot in the bracket.
Once you have installed the bracket onto the
table or counter you will be using, you can
adjust the direcon of the pail using the upper
connecon from the previous step. Simply
loosen the screw and reposion the arm to the
desired direcon and reghten.
Aach the bracket to your work surface and
ghten well.
table or counter here
ghten here
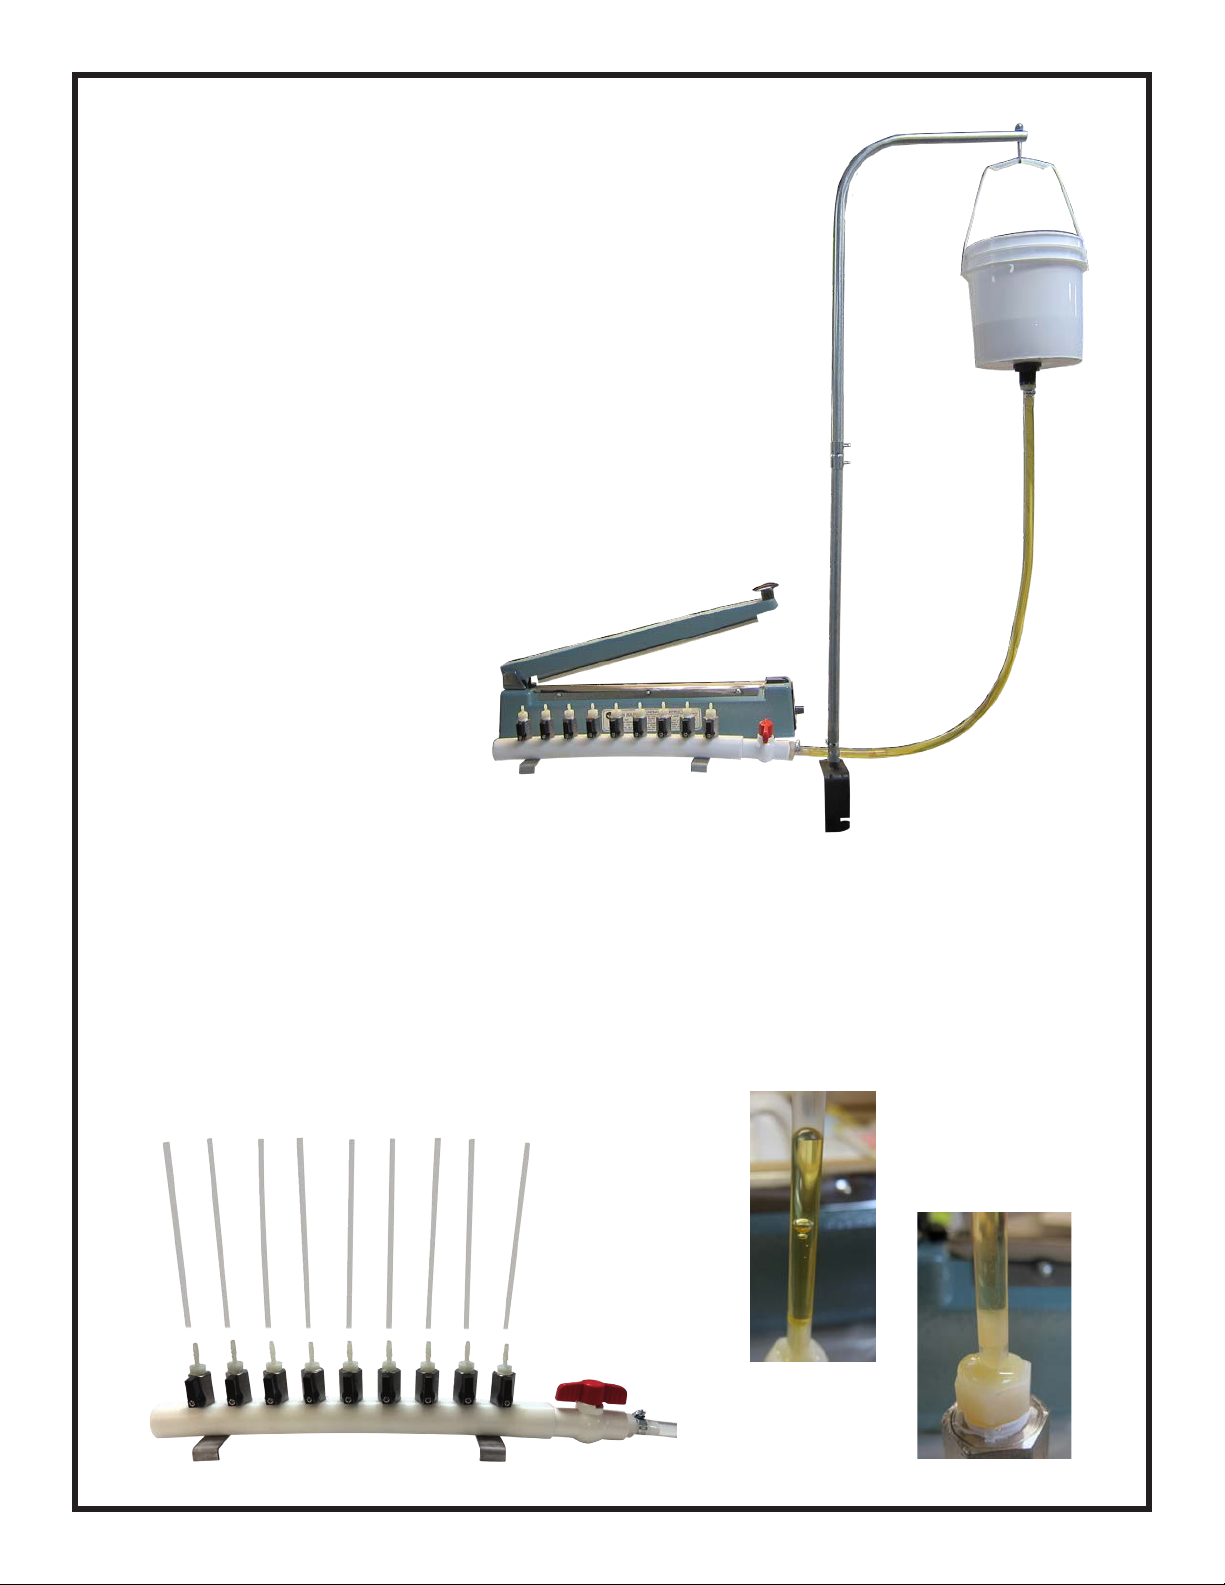
Add your sealer to your work surface and you are ready to begin.
First and foremost, turn o the red shut-o valve and the ball
valves.
Fill your pail with honey, keeping in mind that the temperature
of your room and your honey play a large role in how quickly the
honey moves. Aaching a heat lamp (available at a farm store
designed to keep chicks warm) to the pole will aid in warming the
honey and increasing the ow rate.
Place one straw on each of the male adapters. Turn on your red shut-o valve and each of the ball
valves. The honey will start to ow into the straws. Especially on the rst set of straws you will see some
air bubbles, that is normal and unavoidable. You can squeeze that honey back into your pail if that is
unacceptable to you. The honey ows at a prey consistant rate with the straws closest to the shut o
valve lling rst. Fill straws to be within about 1/2” (1.27 cm) of the top of the straw. Stop the ow when
the straws are lled by either the shut-o valve or the individual ball valves. Small amounts of leakage
between the straw and the male adapters is normal.
One Year Limited Warranty: Mann Lake warrants this product, to original purchaser, for one year from purchase date to
be free of defects in materials and workmanship. This warranty is the only written or express warranty given by Mann Lake
ALL IMPLIED WARRANTIES OF MERCHANTABILITY AND OF FITNESS ARE HEREBY EXCLUDED. Mann Lake’s obligation under
this warranty is limited to repair or replacement of the product, at its option. IN NO CASE SHALL MANN LAKE BE LIABLE FOR
ANY INCIDENTAL OR CONSEQUENTIAL DAMAGES FROM BREACH OF THIS WARRANTY.
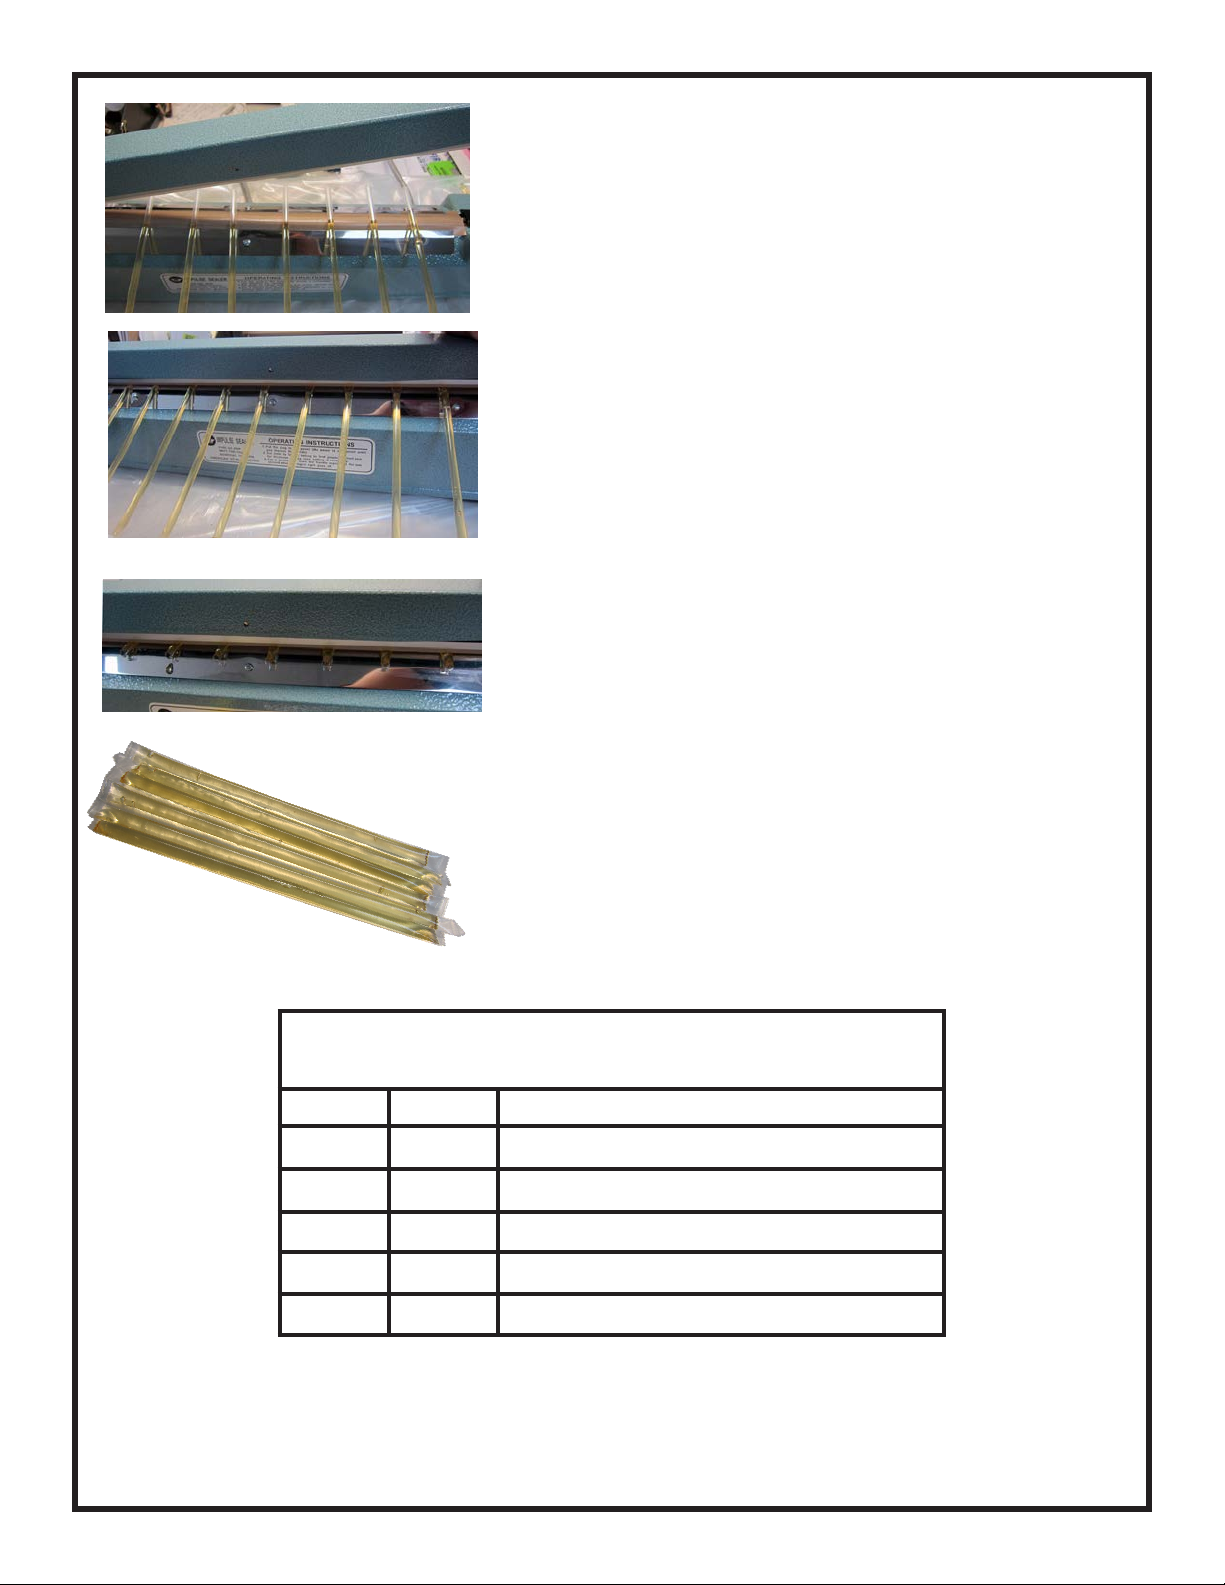
Now that the straws are lled, pick up the manifold and hold
the ends of the straws in the sealer. Seal as close to the honey
as you can. Press the sealer down and hold it unl it cycles (you
can hear it), li up just a lile and push it down again and hold
it for several seconds aer it cycles o. This gives the seal me
to cool, making it much more reliable.
Check and see that the seal is viable. Now push the straws into
the sealer unl the male adapters are just outside the sealing
area. Repeat the sealing procedure as above on the base of
the straw. Remember that in some instances there is honey
between the layers of the straw. It might take a lile more
me, and you will smell burnt honey that gets on the sealer.
You can seal above the honey level and have a small air pocket
in the straw if you so choose.
While the sealer is closed and aer the seals have cooled,
pull the manifold away, and the straws will come o of the
manifold.
You now have 9 honey straws. Place the sealed straws in a sink
or dish pan of warm water. This will clean o any honey on the
outside of the straw. Once you are nished lling all that you
want, take the straws from the sink/pan, dry them and trim the
ends.
We produced straws that were around 6” in length aer being
trimmed. These straws contained approximately 4.8 grams
of honey. At this rate you would produce approximately 100
straws per pound of honey.
PARTS IN THE BOX
1 CN-400 1 GALLON PAIL W/LID AND FITTING
1 HH-101 COMPLETE MANIFOLD W/FEET
1 HH-102 HOSE & CLAMP KIT
1 HH-103 ½” EMT L BRACKET W/HARDWARE
1 CN-405 500 CNT JUMBO STRAWS
1 HD-304 16” HEAT SEALER
Table of contents
Popular Industrial Equipment manuals by other brands


Nordson
Nordson MELTEX PG Series manual

Reliable
Reliable DDX-LP PrePak Instructions for installation, operation care and maintenance

WEISS
WEISS CR1000C Mounting instructions

Samoa
Samoa PIT ROLLING DRAINER Technical service guide

probst
probst FTZ-UNI-50 operating instructions

Siemens
Siemens 5WG1 262-1EB11 Operating and mounting instructions