MANONI Smarty 300 VX BV Specification sheet

Instructions for use and maintenance Models
Smarty 300 VX VE
Smarty 300 VX BV
Smarty 300 VX BVC
Smarty 300 IX
Translation of original instructions
Edition October 2011
Slicers

1
FOREWORD
1 This manual has been prepared by MANCONI to provide Clients with all possible information on
the machine and the safety precautions relating to it, as well as instructions for operation and
maintenance, which will enable them to obtain the best possible performance, and to keep the
machine working efficiently for a long time.
2 This manual should be given to all employees entrusted with the operation and periodic
maintenance of the machine.
3 The design of our machines is subject to possible revision and for this reason some models may
include parts that differ from those illustrated in this manual. This will in no way invalidate the
explanations given in the manual.
4 The technicians of the Technical Assistance Service (TAS) authorised by MANCONI represent a
wealth of experience gained during years of working in close collaboration with machines users,
and will also supply you with original MANCONI spare parts.
5 We thank you for having chosen a MANCONI product and are at your service for any other
information.
MANCONI & C. s.r.l.

1
WARRANTY CERTIFICATE
(Copy to be delivered to the TAS Manconi)
Machine mod. _________________________________ serial n. __________________
Acquired by ________________________________________________________________
Your place
Post code__________ City ____________________________Country ____________________
Street __________________________________________ Tel. number _____________________
The above-mentioned company claims to have taken note of the warranty conditions and accept
them without reservation.
Date __________________ Stamp and signature of legal representative
Stamp and signature of authorized TAS
WARRANTY CONDITIONS
The warranty is valid only with the following conditions:
a – The installation and start-up must be performed by the Technical Assistance Service (TAS) authorized dealer by
Manconi
b – For the normal use of the machine is not allowed to cut frozen foods, fish and meat on the bone, non-food product
c – Warranty will be not valid if:
1 – the machine is subjected to operate with unstable voltage (ie with variations that exceed the normal limits of
electricity supplier).
2 – the machine is subjected to cleaning with high pressure water jets, steam or water spray.
3 – the machine is tampered by unauthorized personnel.
4 – on the machine are used not genuine parts by MANCONI.
EXTENDED WARRANTY
a – Warranty will be valid till 12 (twelve) months from the first installation and testing date.
b – Warranty will be valid only with the deliver to MANCONI delaer of this certificate, completed in all parts and in
any information.
c – Warranty offer a free replacement by the dealer of defective parts, transportation charges for delivery and return
are paid by the customer.
d – Warranty doesn’t cover normal wear of components (blades, grinding wheels for sharpening).
e – Repairs made during the warranty period will not extend or renewal the warranty duration.
Ed. 09/10
Via Varese 8 - 21040 Sumirago (VA) - Italy - Tel. +39 0331 994. 292 - Fax +39 0331 995.577 - www.manconi.com - info@manconi.com
cap.soc. € 70.200,00 int. vers. C.C.I.A.A. Varese - REA n. 88580 Iscrizione Registro nazionale gestione sistemi RAEE nr. IT 08020000002345
cod.fisc./p. iva iscr. reg. imprese di Varese 00237860127 n. mecc. VA 000623
MANCONI&C Srl

2
Page intentionally left blank

3
English
EC-Declaration of Conformity
(according to 2006/42/EC, Annex II, No.1 A)
- Company name: Manconi & C. S.R.L
- Address: Via Varese 8 21040 Sumirago (VARESE)
- Mr. Manconi Paolo is authorised to compile the technical file according to Annex VII A.
- Address of the authorized person: Via Varese 8 21040 Sumirago (VARESE)
- We hereby declare that:
SLICING MACHINE Mod. __________________________________ S/N _____________________.
fulfils all relevant provisions of Directive 2006/42/EC.
The machinery is also in compliance with all relevant provisions of the following EC-directives:
Low Voltage directive 2006/95/CE
Electromagnetic compatibility directive 2004/108/CE
RoHS directive 2002/95/CE
Food Material directive 1935/2004/CE
The following harmonised standards (or parts thereof) were applied:
EN 1974:1998 Slicing machines - Safety and hygiene requirements
EN 60204-1 Safety of machinery - Electrical equipment of machines – Part 1: General requirements
EN 55014: Electromagnetic compatibility - Requirements for household appliances, electric tools and similar
apparatus
Place and date: Sumirago, 1° January 2011
DC Rev.13 Gen 11
INDEX OF CONTENTS
Via Varese 8 - 21040 Sumirago (VA) - Italy - Tel. +39 0331 994. 292 - Fax +39 0331 995.577 - www.manconi.com - info@manconi.com
cap.soc. € 70.200,00 int. vers. C.C.I.A.A. Varese - REA n. 88580 Iscrizione Registro nazionale gestione sistemi RAEE nr. IT 08020000002345
cod.fisc./p. iva iscr. reg. imprese di Varese 00237860127 n. mecc. VA 000623
MANCONI&C Srl

4
PAGE
Section 1 SAFETY INFORMATION, RISKS AND RESIDUAL RISKS
1.1 GENERAL PRECAUTIONS, RISKS AND RESIDUAL RISKS 5
1.2 MECHANICAL SAFETY 6
1.3 ELECTRICAL SAFETY 6
Section 2 TECHNICAL DATA
2.1 GENERAL DESCRIPTION 6
2.2 MAIN CHARACTERISTICS 6
2.3 DIMENSIONS AND PERFORMANCES 7
Section 3 UNPACKING
3.1 CHECKS ON RECEPTION 14
3.2 DISPOSAL OF THE PACKAGING 14
Section 4 INSTALLATION
4.1 POSITIONING OF THE MACHINE 14
4.2 ELECTRICAL CONNECTION 14
4.3 FUNCTIONAL CHECKS 17
Section 5 HOW TO USE THE SLICER
5.1 LOADING THE FOODSTUFF AND CUTTING 17
5.1.1 GRAVITY SLICER “IX SMARTY” 17
5.1.2 STRAIGHT SLICER “VX VE SMARTY” 18
5.1.3 STRAIGHT SLICER “VX BV SMARTY” 18
5.1.4 STRAIGHT SLICER “VX BVC SMARTY” 18
5.2 SHARPENING THE BLADE WITH INTEGRATED SHARPENER 19
Section 6 CLEANING
6.1 GENERAL REMARKS 20
6.2 DISASSEMBLY 20
6.3 CLEANING 22
Section 7 NORMAL SERVICE 24
Section 8 DISMALTING AND DISPOSAL 25
Section 9 TROUBLESHOTTING 25

5
Section 1
SAFETY INFORMATION, RISKS AND RESIDUAL RISKS
1.1 GENERAL PRECAUTIONS, RISKS AND RESIDUAL RISKS
The slicer should be used by trained personnel only, who must be completely familiar with the safety
regulations contained in this manual. Should it be necessary to alternate operators, training should be
provided in good time.
Despite the EC professional slicers are equipped with devices in order to prevent electrical and
mechanical risks (both during operation and during cleaning and maintenance operations), there are
residual risks not be completely eliminated, which appear in this manual in the form of CAUTION.
They concern the risk of cuts, bruises and other caused by knife or other machine components.
Provide to operator accessories needed to protect the person: metal mesh safety gloves, gloves with high-
grip, gowns with elastic cuffs, caps to keep hair, safety shoes.
Even though the machine is well provided with safety devices, hands should not come near the blade or other
moving parts.
Do not use your hands to hold the product to be sliced. Always pushing the product holder with carriage
handle. Be especially careful when using the grip of the plates mod. "SMARTY IX&VX" because they have
sharp pins to hold the goods, which can cause skin damage. We recommend the use of metal mesh safety
gloves.
Avoid to wear clothes and accessories that can be caught by moving parts of the slicer (necklaces, bracelets,
ties, scarves, ear wire, scarves).
Do not let affection grippers or other accessories work.
Do not use the slicer for frozen products, meat or fish containing bones, or for anything except foodstuffs.
Do not use the machine for vegetable cutting, unless for some it is possible to use the standard holding and
pushing devices.
Always check that the run pilot lamp lights up when the machine is switched ON.
Before any cleaning or maintenance operation, disconnect the machine from the mains.
When cleaning or servicing the slicer (i.e. when the guards have been removed) keep in mind the residual
risks
Check the power cable periodically. A worn or damaged cable constitutes a serious electrical hazard. If the
cable is damaged it must be replaced by a special cable or assembly available from the TAS authorized by
Manconi
Switch off the slicer in case of unusual noise.
Place the slicer machine in a dry place, non-slippery, with good lighting, glare or flashing, no position on the
outside.
Do not attempt any repair by yourself, but always call in the MANCONI authorised TAS.
After each use, always turn off the slicer, always close the gauge plate, do not leave the slicing machine
with removable parts or disassembled parts in a position that could cause damage.

6
1.2 MECHANICAL SAFETY
As far as safety against mechanical risks are concerned, the slicer described in this manual complies with the
Directive EN 1974: 1998 + A1 “Food processing machinery – Slicing machines – Safety and hygiene
requirements” so is compliant with machine directive 2006/42/CE.
Safety has been achieved by means of:
a) A non-removable blade guard around the blade, to protect the area not used for the cutting.
b) A food carriage that can be removed only when the gauge plate knob is at the stroke end clockwise (i.e. on
a position to protect the cutting edge of the blade) and when the carriage is at the end of its stroke towards the
operator. These conditions are blocked mechanically by the food carriage removing.
c) Removable blade cover.
d) A set of finger-guards in transparent plastic material, mounted on the food carriage.
e) The last slice device may not be stopped in the upper position for 60 mm from the blade (applicable to CE
models only).
CAUTION!
In compliance with paragraph 1.7.2 “WARNING ABOUT RESIDUAL RISKS” of directive 98/37/EC
Annex I, we draw your attention to the fact that the blade safety guard does not completely eliminate
the risk of cuts in the sharpening area, although it drastically reduces the possibility and the extent of
injury.
1.3 ELECTRICAL SAFETY
The protection against electrical risks conforms to Norm EN 60204 and so it complies with the requirements
of Directive 2006/95/EC.
The control circuit has been fitted with a relay that necessitates deliberate relighting of the slicer in the event
of accidental loss of current.
Given to the good insulation of the electrical circuit and the excellent rust-resistance materials employed, the
slicer can be installed and used even in damp premises. It is built to resist the washing conditions created by a
rain jet of water (protection IPX3).
Section 2
TECHNICAL DATA
2.1 GENERAL DESCRIPTION
This slicer has been designed to provide:
- Possibility to cut without interruption any type of sausages, ham, meat, cheese and all the products that can
be blocked on the carriage.
- Safety in operation, cleaning and maintenance.
- Maximum hygiene, thanks to the meticulous design of components in contact with the foodstuff and by the
use of rustproof materials.
- High cutting precision.
- Maximum cutting capability.
- Toughness of all the parts.
- Ergonomic and rational movements for the maximum ease of use.
- Use at temperatures between 5°C and 40°C (41.0 to 104.0 °F).

7
2.2 MAIN CHARACTERISTICS
- External parts of the machine are produced in aluminium-magnesium alloy suitable for the contact with the
foodstuff, mirror polished and anodised.
- Parts and bits in stainless steel, to avoid risks of oxidations.
- The cutting blade is driven by a completely enclosed motor with ample external ventilation, drive
transmission is obtained with a ground worm screw and helical gear.
- Noise and vibration are not considered to be significant hazards.
- Blade sharpener
Integrated sharpener: is developed for a simple and e safety use. The group is removable for an easy
cleaning operation
- Safety devices comply with current regulations; some of these are made of resistant plastic materials
suitable for contact with foodstuffs, and are transparent for easier control of the cutting operations.
- Sealed electrical parts and suitable materials make it possible to wash the outside of the slicer with a rain jet
of water.
2.3 DIMENSIONS AND PERFORMANCES
CAUTION!
The electrical characteristics of the machine are indicated on the identification label. Before making
this connection see 4.2 “ELECTRICAL CONNECTION”.
OVERALL DIMENSIONS
Picture 1 – Overall Dimensions “VX VE SMARTY”
* Overall dimensions with carriage support at the end of its stroke.
657*
501
512
610
389
547
275
492

8
Picture 2 – Overall Dimensions “VX BV SMARTY”
Picture 3 – Overall Dimensions “VK BVC SMARTY”
* Overall dimensions with carriage support at the end of its stroke.
* Overall dimensions with carriage support at the end of its stroke.
670
572
501
729*
572
389
300
492
620
522
501
678*
389
572
557
300

9
Picture 4 – Overall Dimensions “IX SMARTY”
Technical data U.M. Model 300
VE BV BVC IX
Blade diameter mm 300 300 300 300
Blade speed RPM 250 250 250 250
Slice thickness from–to mm 0-16 0-16 0-16 0-16
Carriage stroke mm 297 297 297 297
Electrical protection IP grade
IPX3 IPX3 IPX3 IPX3
Weight Kg 27,2 30,9 31,1 26,5
Monophase motor 120V 60hz 220-230V 50hz
W 242 242 242 242
Triphase motor 220-230V / 380-400V W 350 350 350 350
Cutting capacity (Max diameter) mm 220 220 220 220
Cutting capacity (Max rectangle) mm 255x220
255x220
255x220
255x220
* Overall dimensions with carriage support at the end of its stroke.
609
512
501
658
509
409
275
481
10
STRAIGHT SLICER VERSION “VX VE SMARTY”
Picture 5 – MAIN COMPONENTS “VX VE SMARTY”
CAPTIONS
01 – ON Switch 12 – Tie-rod knob
02 – OFF Switch 13 – Sharpener cover
03 – Light indicator 14 – Sharpener knob
04 – Slice thickness control 15 – Slice deflector
05 – Main frame 16 – Gauge plate
06 – Foot 17 – Last slice device handle
07 – Carriage lock lever 18 – Last slice device
08 – Carriage support 19 – Carriage
09 – Blade ring cover 20 – Carriage arm
10 – Blade 21 – Thumb guard
11 – Blade cover
1
2
3
4
5
6
7
8
9
10
11
12
13
14
15
16
17
18
19
20
21

11
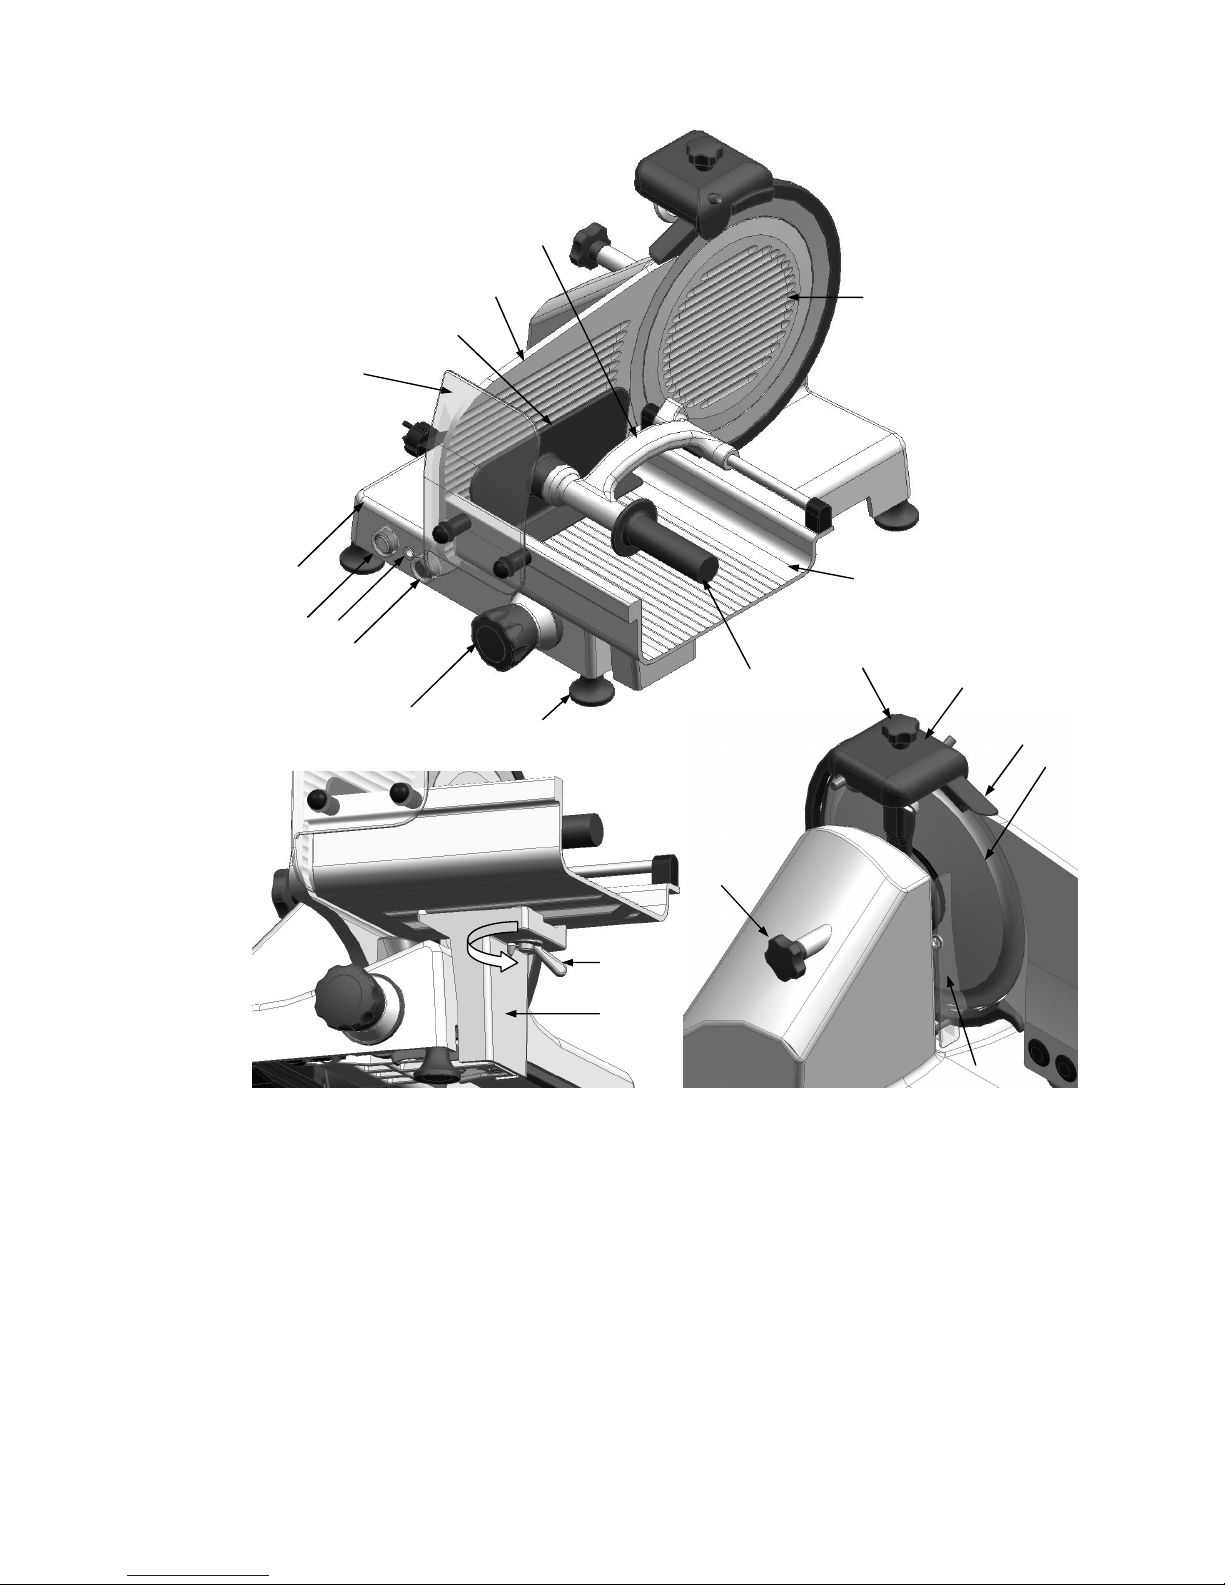
STRAIGHT SLICER VERSION “VX BV SMARTY”
Picture 6 – MAIN COMPONENTS “VX BV SMARTY”
CAPTIONS
01 – ON Switch 12 – Tie-rod knob
02 – OFF Switch 13 – Sharpener cover
03 – Light indicator 14 – Sharpener knob
04 – Slice thickness control 15 – Slice deflector
05 – Main frame 16 – Gauge plate
06 – Foot 17 – Plate handle
07 – Carriage lock lever 18 – Last slice device
08 – Carriage support 19 – Carriage
09 – Blade ring cover 20 – Regulation knob
10 – Blade 21 – Last slice device handle
11 – Blade cover 22 – Sliding plate
1
2
3
4
5
6
7
8
9
10
11
12
13
14
15
16
17
18
22
20
21
19

12
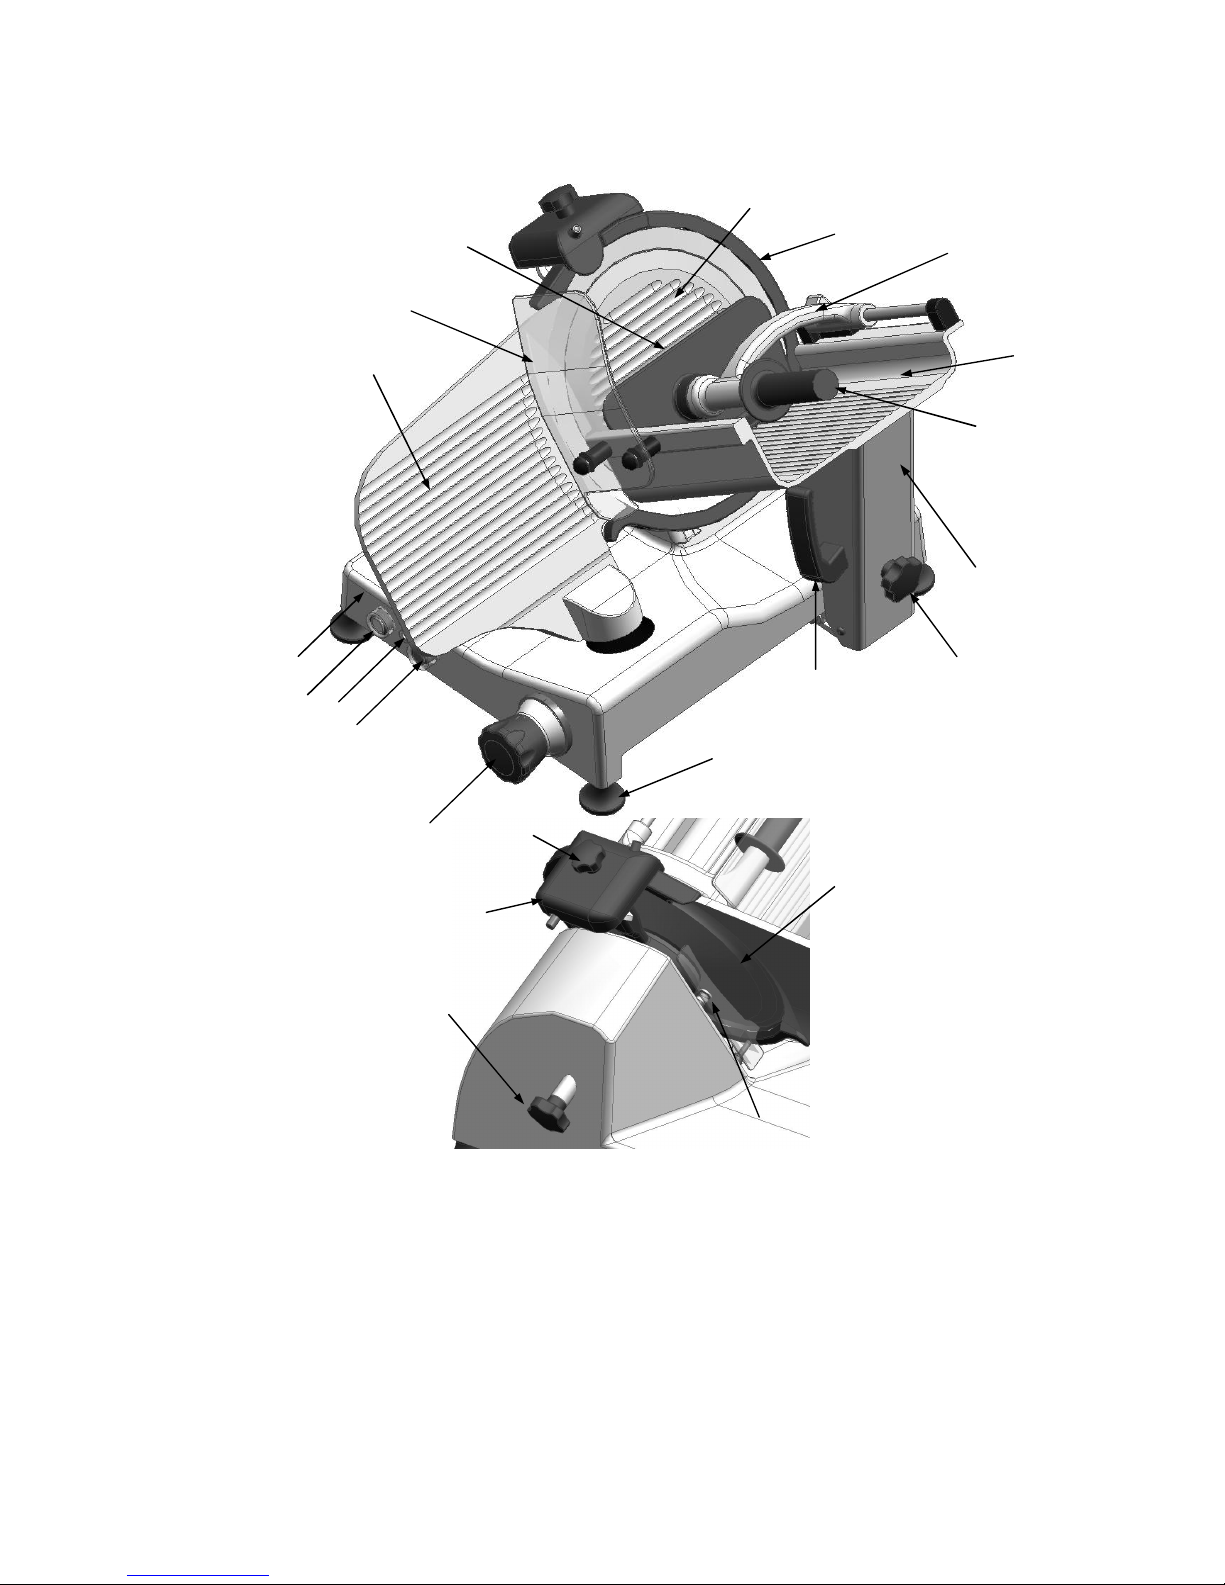
STRAIGHT SLICER VERSION “VX BVC SMARTY”
PICTURE 7 – MAIN COMPONENTS “VX BVC SMARTY”
CAPTIONS
01 – ON Switch 12 – Tie-rod knob
02 – OFF Switch 13 – Sharpener cover
03 – Light indicator 14 – Sharpener knob
04 – Slice thickness control 15 – Slice deflector
05 – Main frame 16 – Gauge plate
06 – Foot 17 – Plate handle
07 – Carriage lock lever 18 – Last slice device
08 – Carriage support 19 – Carriage
09 – Blade ring cover 20 – Sliding plate
10 – Blade 21 – Column arm
1
2
3
5
4
6
7
8
17
9
10
12
13
14
15
11
16
18
19
20
21
22
23
13
11 – Blade cover 22 – Height arm regulator
23 – Regulation knob
GRAVITY SLICER VERSION “IX SMARTY”
Picture 8 – MAIN COMPONENTS “IX SMARTY”
CAPTIONS
01 – ON Switch 13 – Sharpener cover
02 – OFF Switch 14 – Sharpener cover knob
03 – Light indicator 15 – Slice deflector
04 – Slice thickness control 16 – Blade
05 – Main Frame 17 – Blade ring cover
06 – Foot 18 – Gauge plate
07 – Carriage handle 19 – Last slice device handle
09 – Carriage knob 20 – Last slice device arm
10 – Carriage support 21 – Last slice device
11 – Blade Cover 22 – Carriage
12 – Tie-rod Knob 23 – Thumb guard
1
2
3
5
4
6
7
9
10
17
16
11
12
13
14
15
18
19
20
21
22
23

14
Section 3
UNPACKING
3.1 CHECKS ON RECEPTION
When the package containing the slicer arrive, carry out a careful examination of the packaging to check that
it has not suffered serious damage during transport.
If an external examination shows signs of ill treatment, blows or fall, the Courier must be informed of this
damage and an accurate report of any damage to the machine itself must be written.
CAUTION!
Damaged packing does not necessarily mean that the machine has been damaged, since it will also have
been protected by high efficient shock-absorbent polyurethane foam.
3.2 DISPOSAL OF THE PACKAGING
The packing elements (carton, plastic strapping and polyurethane foam) are products that can be placed
together with solid urban rubbish and can therefore be disposed of without difficulty.
When the machine is installed in countries with special regulations, the packaging must be disposed of in
accordance with the regulations in force.
Section 4
INSTALLATION
4.1 POSITIONING THE MACHINE
The surface on which the slicer is to stand should allow for the measurements indicated in the overall
dimensions, and should therefore be sufficiently spacious, perfect flat, dry, smooth, stable and at a height of
about 80 cm. Reevaluate the height considering the height of the operator in charge to use the slicer.
If it is intended to clean the slicer with a jet of water, in addition to the characteristics already listed, the
surface should be slightly convex at its centre (roughly 3 mm) and have some form of run-off at the sides for
the collection and drainage of the water.
When positioning the slicer it is equally important to take into consideration the positions of the food carriage
as indicated in the overall dimensions.
4.2 ELECTRICAL CONNECTION (Ref. pic. 5-6-7-8)
The slicer should be connected to a regular EEC socket. Compare the available voltage and power with the
ones given on the identification label. If they do not match, do not connect the slicer and ask for the Manconi
TAS.
Picture 9 – Identification label
Label legend:
(1) Machine model
(2) Serial number
(3) Year of production
(4) Voltage rating
(5) Frequency

15
(6) Power
(7) Manconi code identification of the slicer
Before finally connecting the machine to the three-phase power, check the direction of blade rotation by
pressing the ON button (1) and stopping it immediately with the OFF button (2) (see pic. 5-6-7-8). The
direction of blade rotation must be counter clockwise when facing the machine from the blade cover side. If
the direction is incorrect call Manconi authorised TAS.
The three phase motors installed in the machine can operate either with a 380-400V or 220-230V three-phase
power supply. If not otherwise specified slicers are delivered for 308-400V.
For adaptation to a 220-230V three-phase network the Manconi authorised TAS shall be called in.
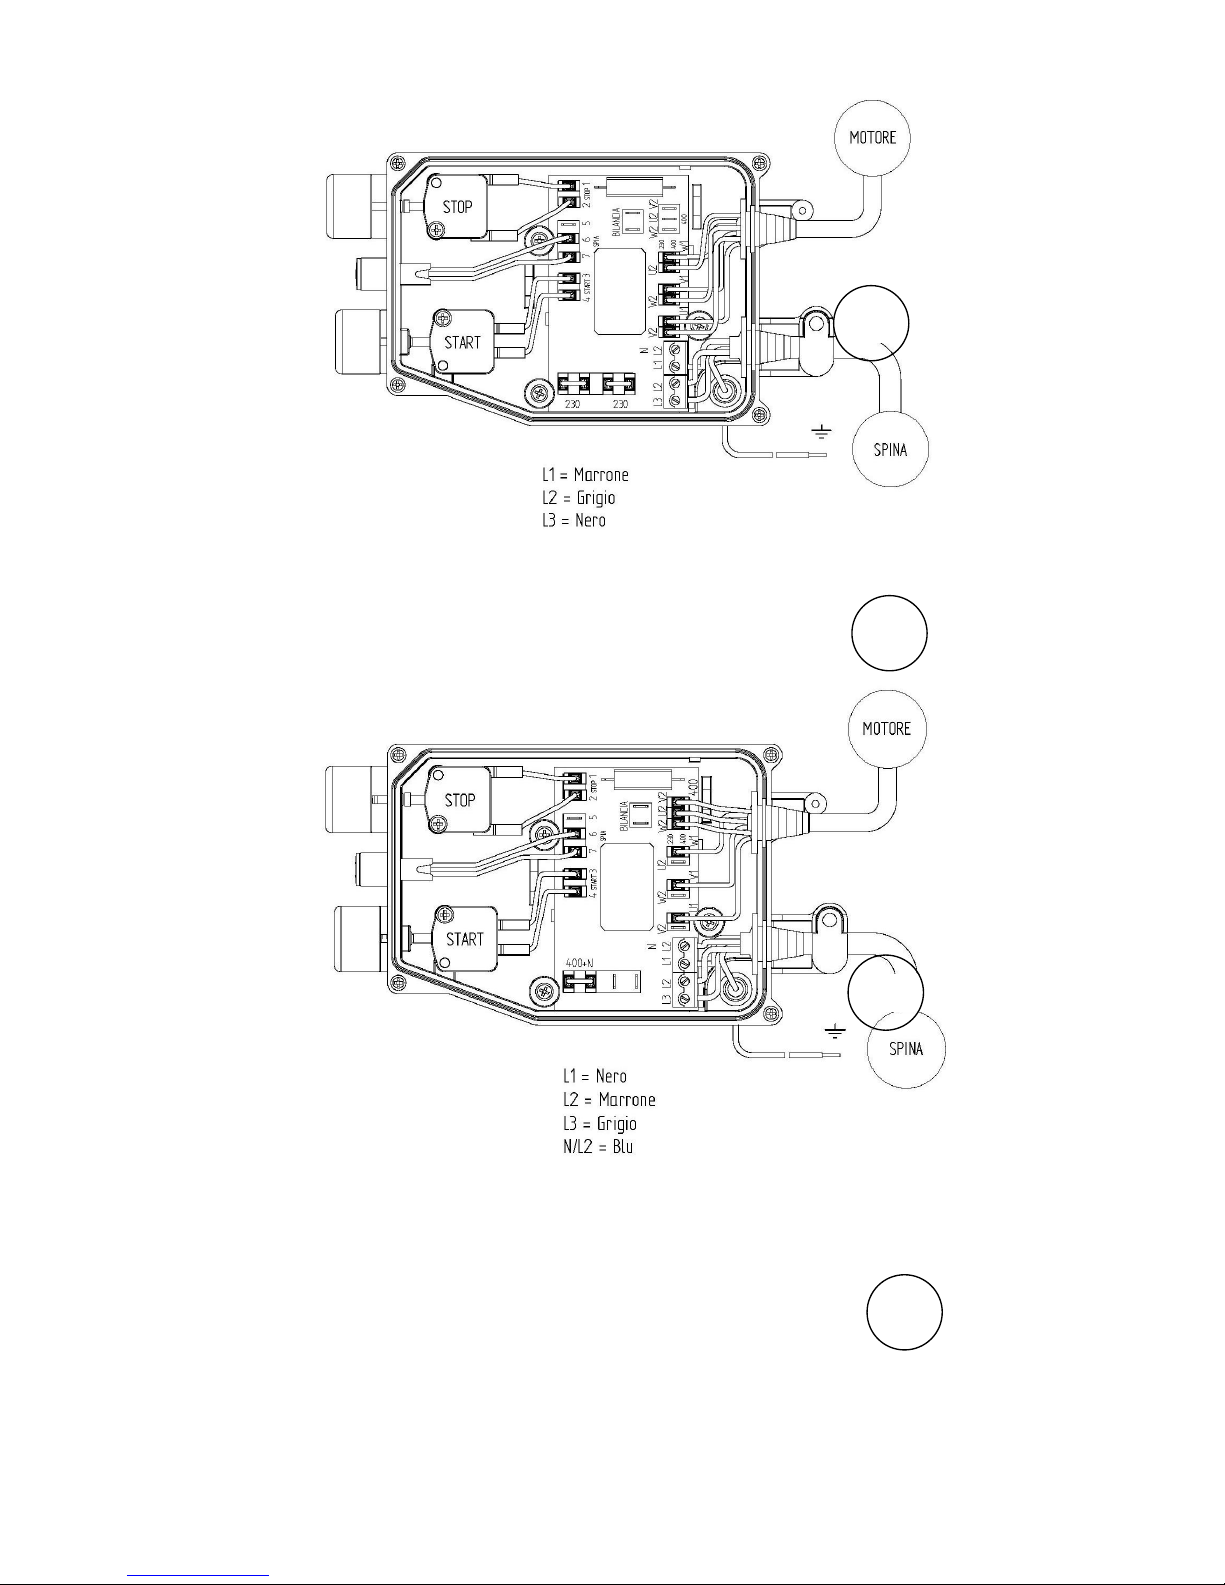
Pictures 10-11-12-13
shown the slicers electrical
boxes.
L1 = Marrone
N = Blu
1 = Spina
2 = Motore
Picture 10 – Mono
phase electrical
box 230V/50Hz
L1 = Nero
N = Bianco
1 = Spina
2 = Motore
Picture 11 – Three phase electrical box 400Volt 50 Hz (3P+T)
Motor
Plug
Brown
Blue
Motor
Plug
Brown
Grey
Black
16
Picture 12 – Three
phase electrical
box 230Volt 50
Hz (3P+T)
Picture 13 – Three phase electrical box 400Volt 50 Hz (3P+N+T)
Motor
Plug
Brown
Grey
Black
Motor
Plug
Black
Brown
Grey
Blue

17
4.3 FUNCTIONAL CHECK (Ref .Pic. 5-6-7-8)
On the straight slicers, before proceeding with the checks, the food carriage included in the machine packing
must be installed (see Section 5).
The functions can be tested several times by the following procedure:
- Press the ON button (1) and the OFF button (2) and check that the white indicator light (3) goes on and off,
the motor starts and stops, the blade runs and stops.
- Check that the food carriage, the sliding plate and the last slice device slide smoothly
- Check the functioning and the adjustment of the gauge plate.
- Check that the food carriage can be removed with the graduated knob (4) at the stroke end clockwise only
and that, after removal, the knob remains blocked making impossible the gauge plate opening.
- Check the functioning of the sharpener. Section 5
HOW TO USE THE SLICER
WARNING!
The foodstuff should only be loaded onto the carriage with the slice control knob (4) at the stroke end
clockwise and the motor switched off. These conditions, apart for being essential safety rules, keep the
product to be sliced from knocking the cutting edge of the blade, which could be damaged.
All cutting operations should be performed by gripping the provided handles or knobs.
Cutting movement should be executed with a speed which is both constant and appropriate to the
hardness of the product to be sliced. This rule is useful because, in addition to give a slice with a good
appearance, it does not put undue strain either on the cutting edge of the blade or on the motor.
Sharpen the blade as soon as the sliced product begins to look ragged or roughened and when the
effort needed to cut increases. For the sharpening procedures, see paragraph 5.2.
5.1 LOADING THE FOODSTUFF AND CUTTING
5.1.1 GRAVITY SLICER “IX SMARTY” (Ref. Pic.8)
WARNING!
Before load the foodstuff on carriage plate (22), lock the last slice device (20) at the special plate fixed
onto the posterior side of the carriage. Be careful to the pins (21) cause them could be dangerous for
your skin.
- Place the foodstuff for slicing on the carriage (22), position it up against the surface facing the operator and
against the gauge plate (18).
- Block the position of the foodstuff with the last slice device (21) pressed over the product.
- Use the knob (4) to adjust the slice thickness.
- Start the machine with the ON switch (1).
- If the foodstuff is enough consistent to be kept against the gauge plate without any further pressure, grip the
handle (7) attached to the carriage support (10) and start the alternating slicing movement.
- On the contrary, if the foodstuff moves from its position against the gauge plate, grip the handle (19), keep
the foodstuff pressed against the gauge plate with a suitable pressure and start the alternating slicing
movement.
- When the weight or the reduced size of the foodstuff are no longer enough to give a good cut, due to the
loss of the gravity effect or to the lost pressure from top, use the front face of the last slice device (21) to
press the foodstuff against the gauge plate.
WARNING!

18
- At the end of the cutting operation, return the knob (4) at the stroke end clockwise
and switch off the machine with the OFF button (2).
This manual suits for next models
1
Table of contents


