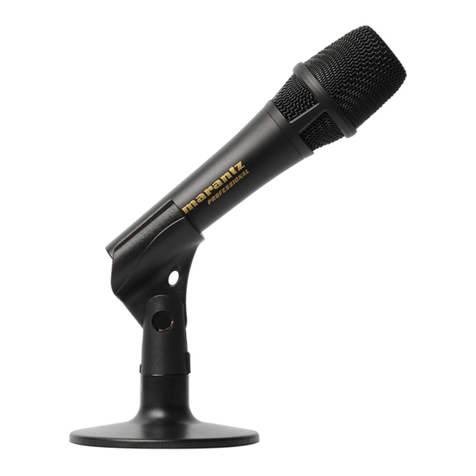
Marantz professional MPM-4000U User manual

Quickstart Guide (English)
Guía de inicio rápido (Español)
Guide d’utilisation rapide (Français)
Guida rapida (Italiano)
Schnellstart-Anleitung (Deutsch)
v1.3
Technical Specifications
Microphone Type 14 mm condenser
Polar Pattern Cardioid
Frequency Response 30 Hz – 18 KHz
Sensitivity -32 dB (0 dB = 1 V/Pa @ 1 kHz)
Max SPL 130 dB (@ 1 KHZ ≤1 % THD)
Stereo Output Power 400 mW
Bit Depth 16 bit
ADC Sampling Rate
8, 11.025, 16, 22.05, 32, 44.1, 48 kHz
THD+N 0.01%
SNR 89 dB
Dynamic Range 89 dB
DAC Sampling Rate
32, 44.1, 48 kHz
THD+N 0.005%
SNR 96 dB
Dynamic Range 93 dB
Dimensions
(diameter x length)
1.81” x 6.61” (microphone only)
46 mm x 168 mm (microphone only)
Weight 0.82 lb. (microphone only)
0.37 kg (microphone only)
Specifications are subject to change without notice.
Trademarks and Licenses
Marantz is a trademark of D&M Holdings Inc., registered in the U.S. and other countries. Marantz Professional
products are produced by inMusic Brands, Inc., Cumberland, RI 02864, USA.
Apple and macOS are trademarks or service marks of Apple Inc., registered in the U.S. and other countries.
Windows is a registered trademark of Microsoft Corporation in the United States and other countries.
1234
5
Guía de inicio rápido (Español)
Contenido de la caja
MPM-4000U Podcast Mic Tarjeta de descarga de software
Cable USB-C a USB-
A
Gu
í
a de inicio rápido
Soporte de micrófono para escritorio con pipeta Manual sobre la seguridad y garantía
Soporte
Para la información más reciente acerca de este producto, visite marantzpro.com.
Para obtener soporte adicional del producto, visite marantzpro.com/support.
Cómo conectar su dispositivo
1. Extienda las patas de la base del soporte de micrófono y colóquelo sobre el escritorio o superficie en
donde tendrá el MPM-4000U Podcast Mic. También puede ajustar la altura del soporte aflojando la
mariposa y extendiendo el tubo telescópico. Vuelva a ajustarla antes de sujetar la pipeta para micrófono.
2. Atornille la pipeta del soporte para micrófono en la base.
3. Sujete el micrófono a la abrazadera. Encaje a presión el micrófono con los controles apuntando hacia
usted.
4. Con el micrófono sujeto en la abrazadera, puede aflojar la perilla en la pipeta del micrófono para
inclinarlo hacia arriba y abajo, y ajustar el ángulo según desee.
V
uelva a ajustarla antes de utilizar el
micrófono.
5. Utilice el cable USB-C a USB-A incluido para conectar el MPM-4000U Podcast Mic a su ordenador.
Conecte el extremo del cable que tiene el conector USB-C al puerto correspondiente del MPM-
4000U Podcast Mic y el extremo del cable que tiene el conector USB-A al puerto correspondiente
de su ordenador.
Importante: Marantz Professional recomienda utilizar exclusivamente el cable suministrado para
obtener los mejores resultados. Si está utilizando el adaptador USB-A a USB-C para establecer una
conexión USB-C en ambos extremos, debe conectarlo al puerto USB-C del ordenador y no al puerto
USB-C del micrófono.
6. Una vez conectado, el micrófono se encenderá. Utilice el botón Mute para silenciar o anular el
silenciamiento de la señal de audio.
7. Consulte las instrucciones de Configuración de audio a continuación para asegurarse de que su
ordenador se encuentre configurado para grabar audio proveniente del MPM-4000U Podcast Mic.
8. Para monitorizar la salida de audio del micrófono/ordenador mientras lo utiliza, conecte auriculares
(no incluidos) a la salida Headphone Out de 3,5 mm (1/8 pulg.) del MPM-4000U Podcast Mic.
Características
1. Botón de silenciamiento: Pulse este botón para silenciar o anular el silenciamiento de la señal de
audio proveniente del micrófono.
2. Ganancia: Gire esta perilla para ajustar la ganancia de la señal del micrófono.
3. Volumen de auriculares: Gire esta perilla para ajustar el nivel de audio de la salida de auriculares.
4. Puerto USB-C: Use el cable USB-C a USB-A incluido para conectar este puerto a un puerto
disponible en su ordenador.
5. Salida para auriculares: Utilice esta salida estándar de 3,5 mm (1/8 pulg.) para conectar auriculares
a fin de monitorizar la señal de audio del micrófono/ordenador.
Configuración de audio
Para configurar el MPM-4000U Podcast Mic como su dispositivo de grabación de audio predeterminado,
siga estas instrucciones para su dispositivo/sistema operativo.
Windows:
1. Acceda al panel de control de Sound (Sonido). Esto puede hacerse accediendo al Control Panel
(Panel de control) >Hardware and Sound (Hardware y sonido) >Sound (Sonido).
2. Haga clic en la pestaña Recording (Grabación) y seleccione la MPM-4000U de como dispositivo
predeterminado.
3. Haga clic en Properties (Propiedades) en la esquina inferior derecha. En la nueva ventana, haga clic
en la pestaña Advanced (Avanzadas) y seleccione 1-channel, 16-bit, 48000 Hz (Studio Quality) (1
canales, 16 bits, 48000 Hz [calidad de estudio]) como formato predeterminado.
4. Deshaga la selección de las dos casillas que están bajo Exclusive Mode (Modo exclusivo).
5. Haga clic en OK (Aceptar) para cerrar la ventana de Properties (Propiedades). Luego haga clic en O
K
(Aceptar) para cerrar el panel de control de Sound (Sonido).
6. Abra el software de grabación que planea utilizar en su ordenador.
7. Abra los ajustes de su software y seleccione MPM-4000U como su entrada de audio.
macOS:
1. Vaya a Applications > Utilities > Audio MIDI Setup (Aplicaciones > Utilidades > Configuración MIDI
de audio).
2. En la ventana Audio Devices (Dispositivos de audio), seleccione MPM-4000U en la columna izquierda.
3. Haga clic derecho en MPM-4000U y seleccione Use this device for sound input (Utilizar este
dispositivo para la entrada de sonido).
4. Salga de la Audio MIDI Setup (Configuración MIDI de audio).
5. Abra el software de grabación que planea utilizar en su ordenador.
6. Abra los ajustes de su software y seleccione MPM-4000U como su entrada de audio.
Quickstart Guide (English)
Box Contents
MPM-4000U Podcast Mic
USB-C to USB-A Cable
Tabletop Mic Stand with Mic Clip
Software Download Card
Quickstart Guide
Safety & Warranty Manual
Support
For the latest information about this product, visit marantzpro.com.
For additional product support, visit marantzpro.com/support.
Connecting Your Equipment
1. Extend the legs of the Microphone Stand Base and position it on the desk or other surface
where you’ll be keeping the MPM-4000U Podcast Mic. You can also adjust the length of the
stand by loosening the clutch and extending the telescoping tube. Tighten to secure before
attaching the microphone clip.
2. Screw the Microphone Stand Clip onto the base.
3. Fasten the microphone to the clamp. Push to snap in the microphone with the controls facing you.
4. With the microphone fastened to the clamp, you can loosen the knob on the microphone clip
to tilt the microphone up and down to adjust its angle as desired. Tighten to secure before
using the microphone.
5. Use the included USB-C to USB-A cable to connect the MPM-4000U Podcast Mic to your
computer. Connect the USB-C end of the cable to the corresponding port on the MPM-4000U
Podcast Mic and connect the USB-A end of the cable to the corresponding port on your
computer.
Important: Marantz Professional recommends only using the supplied cable for best results. If
using a USB-A to USB-C dongle for USB-C connection at both ends, the dongle must be
attached at the computer’s USB-C port, not at the microphone’s USB-C port.
6. Once connected, the microphone will power on. Use the Mute button to mute or unmute the
audio signal.
7. See the Audio Configuration instructions below to make sure your computer is set up to
record audio from MPM-4000U Podcast Mic.
8. To monitor the microphone’s/the computer's audio output while you use it, connect headphones
(not included) to the 1/8" (3.5 mm) Headphone Out on the MPM-4000U Podcast Mic.
Features
1. Mute Button: Press this button to mute or unmute audio signal from the microphone.
2. Gain: Turn this knob to adjust the microphone signal gain.
3. Headphone Volume: Turn this knob to adjust the audio output level of the headphones
output.
4. USB-C Port: Use the included USB-C to USB-A cable to connect this port to an available port
on your computer.
5. Headphones Out: Use this standard 1/8" (3.5 mm) output to connect headphones for
monitoring the microphone signal/computer audio signal.
A
udio Configuration
To set the MPM-4000U Podcast Mic as your default audio recording device, follow the directions
below based on your computer’s operating system.
Windows:
1. Access the Sound control panel. You can do this by going to Control Panel > Hardware and
Sound > Sound.
2. Click the Recording tab and select MPM-4000U as the default device.
3. Click Properties in the lower right-hand corner. In the new window, click the Advanced tab
and select 1-channel, 16-bit, 48000 Hz (Studio Quality) as the default format.
4. Uncheck both boxes under Exclusive Mode.
5. Click OK to close the Properties window. Then Click OK to close the Sound control panel.
6. Open the recording software that you plan to use on your computer.
7. Go to your software’s settings and select MPM-4000U as your audio input.
macOS:
1. Go to Applications > Utilities > Audio MIDI Setup.
2. In the Audio Devices window, select MPM-4000U in the left column.
3. Right-click MPM-4000U and select Use this device for sound input.
4. Quit Audio MIDI Setup.
5. Open the recording software that you plan to use on your computer.
6. Go to your software’s settings and select MPM-4000U as your audio input.

Guide d'utilisation rapide (Fran
ç
ais)
Contenu de la boîte
MPM-4000U Podcast Mic Carte de téléchargement de logiciel
Câble USB-C vers USB-A Guide d'utilisation rapide
Consignes de sécurité et informations
concernant la garantie
Support pour microphone avec pince
A
ssistance
Pour les toutes dernières informations concernant ce produit, veuillez visiter marantzpro.com.
Pour de l’assistance supplémentaire,veuillez visiter marantzpro.com/support.
Raccordement de votre équipement
1. Déployez les pieds du support de microphone et placez-le sur la surface sur laquelle vous utiliserez
le MPM-4000U Podcast Mic. Vous pouvez également ajuster la hauteur du support en desserrant la
bague et en déployant le tube télescopique. Resserrez la bague avant de fixer la pince de microphone.
2. Vissez la pince de microphone sur la base.
3. Fixez le microphone sur la bride. Appuyez pour enclencher le microphone en orientant les
commandes face à vous.
4. Une fois le microphone fixé à la bride, vous pouvez desserrer la vis de réglage de la pince du
microphone pour incliner le microphone de haut en bas afin d’ajuster son angle. Resserrez la vis de
réglage avant d’utiliser le microphone.
5. Utilisez le câble USB-C vers USB-A fourni pour brancher le MPM-4000U Podcast Mic à un
ordinateur. Branchez l’extrémité USB-C du câble au port correspondant sur le MPM-4000U Podcast
Mic et l’extrémité USB-A du câble au port correspondant sur l’ordinateur.
Important : Marantz Professional recommande d'utiliser uniquement le câble fourni pour de meilleurs
résultats. Si vous utilisez un adaptateur USB-A vers USB-C pour une connexion USB-C aux deux
extrémités, veillez à ce que l’adaptateur soit branché au port USB-C de l'ordinateur et non au port
USB-C du microphone.
6. Une fois branché, le microphone s'allume. Utilisez la touche Mute pour activer et désactiver la mise
en sourdine du signal audio.
7. Consultez ensuite la section Configuration audio ci-dessous afin de vous assurer que l’ordinateur
est configuré pour enregistrer de l'audio à partir du MPM-4000U Podcast Mic.
8. Si vous souhaitez contrôler la sortie audio du microphone pendant que vous l’utilisez, branchez un
casque (non fourni) à la sortie casque 3,5 mm du MPM-4000U Podcast Mic.
Caractéristiques
1. Mute : Cette touche permet d’activer et de désactiver la mise en sourdine du signal microphone.
2. Gain : Ce bouton permet de régler le gain du signal microphone.
3. Volume casque : Ce bouton permet d’ajuster le volume de la sortie casque.
4. Port USB-C : Utilisez le câble USB-C vers USB-A fourni pour relier ce port au port USB d’un
ordinateur.
5. Sortie casque : Cette sortie standard de 3,5 mm permet de connecter un casque d’écoute afin de
contrôler le signal audio du microphone/de l'ordinateur.
Configuration audio
Pour définir le MPM-4000U Podcast Mic comme appareil d’enregistrement audio par défaut, veuillez
suivre les instructions pour votre appareil/système d’exploitation ci-dessous :
Windows :
1. Accédez au panneau de configuration Sound (Son). Pour ce faire, accédez au Control Panel (Panneau
de configuration) > Hardware and Sound (Matériel et audio) > Sound (Son).
2. Cliquez sur l'onglet Recording (Enregistrement) et sélectionnez MPM-4000U comme appareil pa
r
défaut.
3. Cliquez sur Properties (Propriétés) dans le coin inférieur droit. À partir de la nouvelle fenêtre, cliquez
sur l'onglet Advanced (Advancé) et sélectionnez l'option 1-channel, 16-bit, 48000 Hz (Studio Quality)
(1 canaux, 16 bits, 48 000 Hz [Qualité CD]) comme le format par défaut.
4. Décochez les deux options sous Exclusive Mode (Mode exclusif).
5. Cliquez OK pour fermer la fenêtre Properties (Propriétés). Puis cliquez OK pour fermer le panneau de
configuration Sound (Son).
6. Lancez le logiciel d’enregistrement que vous prévoyez utiliser sur l'ordinateur.
7. Accédez aux paramètres du logiciel et sélectionnez MPM-4000U comme entrée audio.
macOS :
1. Allez à Applications > Utilities > Audio MIDI Setup (Applications > Utilitaires > Configuration audio
et MIDI).
2. Dans la fenêtre Audio Devices (Périphériques audio) qui s'affiche, sélectionnez MPM-4000U dans la
fenêtre de gauche.
3. Faite un clic droit sur MPM-4000U et sélectionnez Use this device for sound input (Utiliser ce
périphérique pour l'entrée audio).
4. Quitter le menu de Audio MIDI Setup (Configuration audio et MIDI).
5. Lancez le logiciel d’enregistrement que vous prévoyez utiliser sur l'ordinateur.
6. Accédez aux paramètres du logiciel et sélectionnez MPM-4000U comme entrée audio.
Schnellstart-
A
nleitung (Deutsch)
Lieferumfang
MPM-4000U Podcast Mic Software-Download-Karte
USB-C auf USB-A-Kabel Schnellstart-Anleitung
Tischmikrofonständer mit Mikrofonclip Sicherheitshinweise und Garantieinformationen
Kundendienst
Für die neuesten Informationen zu diesem Produkt, besuchen Sie marantzpro.com.
Für zusätzlichen Produkt-Support besuchen Sie marantzpro.com/support.
A
nschließen Ihrer Geräte
1. Ziehen Sie die Beine des Mikrofonständers aus und positionieren Sie sie auf einem Schreibtisch
oder einer anderen Oberfläche, auf der Sie das MPM-4000U Podcast Mic aufstellen möchten. Sie
können die Länge des Ständers auch einstellen, indem Sie die Klammer lösen und das Teleskoproh
r
ausfahren. Ziehen Sie sie vor dem Anbringen des Mikrofonclips fest.
2. Schrauben Sie den Mikrofonständerclip auf die Basis.
3. Befestigen Sie das Mikrofon an der Klemme. Drücken Sie, bis das Mikrofon einrastet. Die
Bedienelemente sollten in Ihre Richtung zeigen.
4. Wenn das Mikrofon an der Klemme befestigt ist, können Sie den Knopf am Mikrofonclip lösen, um
das Mikrofon nach oben und unten zu neigen und den Winkel wie gewünscht anzupassen. Ziehen
Sie alles fest, bevor Sie das Mikrofon verwenden.
5. Verwenden Sie das mitgelieferte USB-C auf USB-A Kabel, um Ihr MPM-4000U Podcast Mic an Ihren
Computer anzuschließen. Schließen Sie das Ende des USB-C-Kabels an den entsprechenden
Anschluss des MPM-4000U Podcast Mic an und verbinden Sie das Ende des USB-A-Kabels mit dem
entsprechenden Anschluss Ihres Computers.
Wichtig: Marantz Professional empfiehlt, nur das mitgelieferte Kabel zu verwenden, um optimale
Ergebnisse zu erzielen. Wenn Sie einen USB-A-auf-USB-C-Dongle für die USB-C-
V
erbindung an
beiden Enden verwenden, muss der Dongle am USB-C-Anschluss des Computers und nicht am
USB-C-Anschluss des Mikrofons angeschlossen werden.
6. Nach dem Anschließen wird das Mikrofon eingeschaltet. Verwenden Sie die Stummschalttaste, um
das Audiosignal stummzuschalten oder die Stummschaltung aufzuheben.
7. Befolgen Sie anschließend die Anweisungen zur Audiokonfiguration, um sicherzustellen, dass Ihr
Computer für die Audioaufnahme mit dem MPM-4000U Podcast Mic eingerichtet ist.
8. Um den Audioausgang des Mikrofons/Computers während der Verwendung zu überwachen,
schließen Sie die Kopfhörer (nicht im Lieferumfang enthalten) an den 3,5mm (1/8")
Kopfhörerausgang des MPM-4000U Podcast Mic an.
Funktionen
1. Stummschalttaste: Drücken Sie diese Taste, um das Audiosignal vom Mikrofon stummzuschalten
oder die Stummschaltung aufzuheben.
2. Gain: Drehen Sie diesen Regler, um die Verstärkung des Mikrofonsignals einzustellen.
3. Kopfhörerlautstärke: Mit diesem Regler stellen Sie die Lautstärke des Kopfhörerausgangs ein.
4. USB-C Port: Verwenden Sie das mitgelieferte USB-C auf USB-A Kabel, um diesen Anschluss mit
einem freien USB-Anschluss Ihres Computers zu verbinden.
5. Kopfhörerausgang: Verwenden Sie diesen Standardausgang von 3,5mm (1/8"), um Kopfhörer für
das Monitoring des Mikrofonsignals/Computer-Audiosignals anzuschließen.
A
udiokonfiguration
Befolgen Sie diese Anweisungen für Ihr Gerät/Betriebssystem, um MPM-4000U Podcast Mic als Ihr
Standard-Audioaufnahmegerät einzustellen.
Windows:
1. Greifen Sie auf das Steuerfeld Sound zu. Sie können dies tun, indem Sie zum Control Panel
(Systemsteuerung) > Hardware und Sound > Sound gehen.
2. Klicken Sie auf die Registerkarte Recording (Aufnahme) und wählen Sie MPM-4000U als Standard-
Gerät aus.
3. Klicken Sie in der rechten unteren Ecke auf Properties (Eigenschaften). Klicken Sie im neuen Fenster
auf die Registerkarte Advanced (Erweitert) und wählen Sie 1-channel, 16-bit, 48000 Hz (Studio
Quality) (1-Kanal, 16 Bit, 48000 Hz [Studio-Qualität]) als Standardformat aus.
4. Deaktivieren Sie beide Kontrollkästchen unter Exclusive mode (Exklusivmodus).
5. Klicken Sie auf OK, um das Fenster Properties (Eigenschaften) zu schließen. Dann klicken Sie auf OK,
um das Fenster Sound zu schließen.
6. Öffnen Sie die Aufzeichnungssoftware, die Sie auf Ihrem Computer verwenden möchten.
7. Gehen Sie zu den Einstellungen Ihrer Software und wählen Sie MPM-4000U als Audio-Eingang.
macOS:
1. Wählen Sie Applications > Utilities > Audio MIDI Setup (Anwendungen > Dienstprogramme > Audio-
MIDI-Setup).
2. Wählen Sie im Fenster Audio Devices (Audiogeräte) die Option MPM-4000U in der linken Spalte aus.
3. Klicken Sie mit der rechten Maustaste auf MPM-4000U, und wählen Sie Use this device for sound
input (Dieses Gerät für Soundeingabe verwenden).
4. Schließen Sie das Fenster Audio MIDI Setup.
5. Öffnen Sie Ihre Lieblingsaufnahme-, Podcasting- oder Gaming-Software.
6. Gehen Sie zu den Einstellun
g
en Ihrer Software und wählen Sie MPM-4000U als Audi
o
-Ein
g
an
g
.
Guida rapida (Italiano)
Contenuti della confezione
MPM-4000U Podcast Mic Scheda per il download del software
Cavo da USB-C a USB-A Guida rapida
Supporto per microfono da tavolo con clip microfono Istruzioni di sicurezza e garanzia
A
ssistenza
Per le ultime informazioni in merito a questo prodotto, recarsi alla pagina marantzpro.com.
Per ulteriore assistenza sul prodotto, recarsi alla pagina marantzpro.com/support.
Collegamento del dispositivo
1. Estendere le gambe della base del supporto microfono e posizionarlo sul tavolo o su un’altra
superficie dove si desidera posare il MPM-4000U Podcast Mic. È anche possibile regolare la
lunghezza del supporto allentando la frizione ed estendendo il tubo telescopico. Stringere per fissarlo
prima di collegare la clip microfono.
2. Avvitare la clip del supporto microfono alla base.
3. Fissare il microfono al morsetto. Spingere per far scattare il microfono con i comandi rivolti verso di
sé.
4. Con il microfono fissato al morsetto, allentare la manopola sulla clip microfono per inclinarlo verso
l’alto e verso il basso per regolarne l’angolazione come desiderato. Stringere per fissarlo prima di
utilizzare il microfono.
5. Servirsi del cavo da USB-C a USB-A in dotazione per collegare l'MPM-4000U Podcast Mic al
computer. Collegare l’estremità USB-C del cavo alla porta corrispondente dell’MPM-4000U Podcast
Mic e l'estremità USB-A alla porta corrispondente sul computer.
Importante: Per i migliori risultati, Marantz Professional consiglia di utilizzare unicamente il cavo in
dotazione. Se si utilizza un dongle da USB-A a USB-C per il collegamento USB-C a entrambe le
estremità, questo deve essere collegato alla porta USB-C del computer, non alla porta USB-C del
microfono.
6. Una volta collegato, il microfono si accenderà. Servirsi del tasto Mute per silenziare o riattivare il
segnale audio.
7. Si vedano le istruzioni per la Configurazione audio qui di seguito per assicurarsi che il computer sia
configurato in modo tale da registrare l’audio proveniente dall’MPM-4000U Podcast Mic.
8. Per monitorare l’uscita audio del microfono/computer mentre è in uso, collegare le cuffie (non in
dotazione) all’uscita cuffie da 1/8" (3,5 mm) del MPM-4000U Podcast Mic.
Caratteristiche
1. Tasto Mute: premere questo tasto per silenziare o riattivare il segnale audio proveniente dal
microfono.
2. Gain (guadagno): girare questa manopola per regolare il livello di guadagno del microfono.
3. Volume cuffie: girare questa manopola per regolare il livello dell’audio dell’uscita cuffie.
4. Porta USB-C: servirsi del cavo da USB-C a USB-A in dotazione per collegare questa porta ad una
porta libera del computer.
5. Uscita cuffie: servirsi di questa uscita standard da 1/8 (3,5 mm) per collegare le cuffie per il
monitoraggio del segnale del microfono/del segnale audio del computer.
Configurazione audio
Per impostare il MPM-4000U Podcast Mic come dispositivo di registrazione audio predefinito, seguire le
indicazioni specifiche per il proprio dispositivo/sistema operativo.
Windows:
1. Accedere al pannello di controllo Sound (Audio). Per farlo, recarsi al Control Panel (Pannello di
controllo) > Hardware and Sound (Hardware e audio) > Sound (Audio).
2. Cliccare sulla scheda Recording (Registrazione) e selezionare MPM-4000U come periferica
predefinita.
3. Cliccare su Properties (Proprietà) nell'angolo inferiore destro. Nella nuova finestra, cliccare sull
a
scheda Advanced (Avanzate) e selezionare 1-channel, 16-bit, 48000 Hz (Studio Quality) (1 canali,
16-bit, 48000 Hz [qualità da Studio]) come formato predefinito.
4. Togliere il segno di spunta da entrambe le caselle in Exclusive mode (Modalità esclusiva).
5. Cliccare su OK per chiudere la finestra Properties (Proprietà). Poi Cliccare su OK per chiudere il
pannello di controllo Sound (Audio).
6. Aprire il software di registrazione che si intende utilizzare sul proprio computer.
7. Recarsi alla pagina delle impostazioni del software e selezionare MPM-4000U come ingresso audio.
macOS:
1. Recarsi su Applications > Utilities > Audio MIDI Setup (Applicazioni > Utilità > Audio MIDI Setup).
2. Nella finestra Audio Devices (dispositivi audio), selezionare MPM-4000U nella colonna sinistra.
3. Fare clic col tasto destro su MPM-4000U e selezionare Use this device for sound input (utilizza
questo dispositivo per ingresso audio).
4. Lasciare Audio MIDI Setup.
5. Aprire il software di registrazione che si intende utilizzare sul proprio computer.
6. Recarsi alla pagina delle impostazioni del software e selezionare MPM-4000U come ingresso audio.
Other Marantz professional Microphone manuals
