Marantz CD7300 User manual

Model CD7300 User Guide
Compact Disc Player
TEXT
CLASS 1 LASER PRODUCT
LUOKAN 1 LASERLAITE
KLASS 1 LASERAPPARAT

ENGLISH
WARRANTY
For warranty information, contact your local
Marantz distributor.
RETAIN YOUR PURCHASE RECEIPT
Your purchase receipt is your permanent record of
a valuable purchase. It should be kept in a safe
place to be referred to as necessary for insurance
purposes or when corresponding with Marantz.
IMPORTANT
When seeking warranty service, it is the
responsibility of the consumer to establish proof
and date of purchase. Your purchase receipt or
invoice is adequate for such proof.
FOR U.K. ONLY
This undertaking is in addition to a consumer's
statutory rights and does not affect those rights in
any way.
FRANÇAIS
GARANTIE
Pour des informations sur la garantie, contacter le
distributeur local Marantz.
CONSERVER L'ATTESTATION D'ACHAT
L'attestation d'achat est la preuve permanente
d'un achat de valeur. La conserver en lieu sur pour
s'y reporter aux fins d'obtention d'une couverture
d'assurance ou dans le cadre de correspondances
avec Marantz.
IMPORTANT
Pour l'obtention d'un service couvert par la
garantie, il incombe au client d'établir la preuve de
l'achat et d'en corroborer la date. Le reçu ou la
facture constituent des preuves suffisantes.
DEUTSCH
GARANTIE
Bei Garantiefragen wenden Sie sich bitte an Ihren
Marantz-Händler.
HEBEN SIE IHRE QUITTING GUT AUF
Die Quittung dient Ihnen als bleibende Unterlage
für Ihren wertvollen Einkauf Das Aufbewahren der
Quittung ist wichtig, da die darin enthaltenen
Angaben für Versicherungswecke oder bei
Korrespondenz mit Marantz angeführt werden
müssen.
WICHTIG!
Bei Garantiefragen muß der Kunde eine
Kaufunterlage mit Kaufdatum vorlegen. Ihren
Quittung oder Rechnung ist als Unterlage
ausreichend.
NEDERLANDS
GARANTIE
Voor inlichtingen omtrent garantie dient u zich tot
uw plaatselijke Marantz.
UW KWITANTIE, KASSABON E.D. BEWAREN
Uw kwitantie, kassabon e.d. vormen uw bewijs van
aankoop van een waardevol artikel en dienen op
een veilige plaats bewaard te worden voor evt,
verwijzing bijv, in verbend met verzekering of bij
correspondentie met Marantz.
BELANGRIJK
Bij een evt, beroep op de garantie is het de
verantwoordelijkheid van de consument een
gedateerd bewijs van aankoop te tonen. Uw
kassabon of factuurzijn voldoende bewijs.
ESPAÑOL
GARANTIA
Para obtener información acerca de la garantia
póngase en contacto con su distribuidor Marantz.
GUARDE SU RECIBO DE COMPRA
Su recibo de compra es su prueba permanente de
haber adquirido un aparato de valor, Este recibo
deberá guardarlo en un lugar seguro y utilizarlo
como referencia cuando tenga que hacer uso del
seguro o se ponga en contacto con Marantz.
IMPORTANTE
Cuando solicite el servicio otorgado por la garantia
el usuario tiene la responsabilidad de demonstrar
cuá¥do efectuó la compra. En este caso, su recibo
de compra será la prueba apropiada.
ITALIANO
GARANZIA
L’apparecchio è coperto da una garanzia di buon
funzionamento della durata di un anno, o del
periodo previsto dalla legge, a partire dalla data di
acquisto comprovata da un documento attestante
il nominativo del Rivenditore e la data di vendita.
La garanzia sarà prestata con la sostituzione o la
riparazione gratuita delle parti difettose.
Non sono coperti da garanzia difetti derivanti da
uso improprio, errata installazione, manutenzione
effettuata da personale non autorizzato o,
comunque, da circostanze che non possano
riferirsi a difetti di funzionamento dell’apparecchio.
Sono inoltre esclusi dalla garanzia gli interventi
inerenti l’installazione e l’allacciamento agli
impianti di alimentazione.
Gli apparecchi verranno riparati presso i nostri
Centri di Assistenza Autorizzati. Le spese ed i
rischi di trasporto sono a carico del cliente.
La casa costruttrice declina ogni responsabilità per
danni diretti o indiretti provocati dalla inosservanza
delle prescrizioni di installazione, uso e
manutenzione dettagliate nel presente manuale o
per guasti dovuti ad uso continuato a fini
professionali.
PORTUGUÊS
GARANTIA
Para informações sobre a garantia, contactar o
distribuidor Marantz local.
GUARDAR O RECIBO DE COMPRA
O recibo é o registo permanente da compra que
fez. Deve ser guardado num local seguro, para ser
apresentado em questões relacionadas com o
seguro ou para quando tiver de contactar a
Marantz.
IMPORTANTE
Quando procurar assisténcia técnica ao abrigo da
garantia, é da responsabilidade do consumidor
estabelecer a prova e data de compra. O recibe é
prova adequada.
SVENSKA
GARANTI
För information om garantin, kontakta Marantz
lokalagent.
SPAR KVITTOT
Kvittot är ett inköpsbevis på en värdefull vara. Det
skall förvaras säkert och hänvisas till vid
försäkringsfall eller vidkorrespondens mod
Marantz.
VIKTIGT
Fö att garantin skall gälla är det kundens sak att
framställa bevis och datum om köpet. Kvitto eller
faktura är tillräokligt bevis fö detta.
DANSK
GARANTI
Henvend dem til Deres MARANTZ-forhandler
angående inrformation om garantien.
GEM DERES KVITTERING
Deres købskvittering er Deres varige bevis på et
dyrt køb. Den bør gemmes godt og anvendes som
bevis, hvis De vil tegne en forsikring, eller hvis De
kommunikerer med Marantz.
VIGTIGT
Det påhviler forbrugeren at skaffe bevis for købet
og købsdatoen, hvis han eller hun ønsker
garantiservice. Deres købskvittering eller faktura
er et fuldgyldigt bevis herpå.

1
ENGLISH
FOREWORD
This section must be read before any connection is
made to the mains supply.
WARNINGS
Do not expose the equipment to rain or moisture.
Do not remove the cover from the equipment.
Do not insert anything into the equipment through
the ventilation holes.
Do not handle the mains lead with wet hands.
Do not cover the ventilation with any items such
as tablecloths, newspapers, curtains, etc.
No naked flame sources, such as lighted candles,
should be placed on the equipment.
When disposing of used batteries, please comply
with governmental regulations or environmental
public instruction’s rules that apply in your country
or area.
CE marking
The CD7300 conforms with the EMC directive
and low-voltage directive.
EQUIPMENT MAINS WORKING SETTING
Your Marantz product complies with the household
power and safety requirements in your area.
This product can be powered by 230 V AC only.
COPYRIGHT
Recording and playback of any material may require
consent. For further information refer to the
following:
— Copyright Act 1956
— Dramatic and Musical Performers Act 1958
— Performers Protection Acts 1963 and 1972
— any subsequent statutory enactments and
orders
INTRODUCTION
Thank you for selecting the Marantz CD7300 CD
Player for your A / V system.
This Compact Disc Player incorporates a number of
features designed to enhance the listening of your
favorite audio sources.
Please read these operating instructions carefully.
We recommend that you read the entire user guide
before you attempt to connect or operate the player.
After you have reviewed the contents of this
manual,we suggest that you make all system con-
nections before you attempt to operate the unit.
INSTALLATION
Remember the following important points when in-
stalling the player:
• Do not expose the player to rain or moisture, as this
may cause damage to the player.
• All players produce some heat during operation
and this heat must be allowed to disperes freely.
Do not close any ventilation openings and insure
that there is adequate ventilation space behind,
beside and above the player.
• Prevent extra heat from reaching the unit. Never
put the player in the full glare of the sun or near a
heat source.
PRECAUTIONS
The following precautions should be taken when
operating the equipment.
GENERAL PRECAUTIONS
When installing the equipment ensure that:
– the ventilation holes are not covered.
– air is allowed to circulate freely around the equip-
ment.
– it is placed on a vibration-free surface.
– it will not be exposed to excessive heat, cold,
moisture or dust.
– it will not be exposed to direct sunlight.
– it will not be exposed to electrostatic discharges.
In addition, never place heavy objects on the equip-
ment.
If a foreign object or water does enter the equipment,
contact your nearest dealer or service center.
Do not pull out the plug by pulling on the mains lead;
grasp the plug.
It is advisable when leaving the house for an ex-
tended period, or during a thunderstorm, to discon-
nect the equipment from the mains supply.
PRECAUTIONS IN CONNEC-
TION
• Be sure to unplug the power cable from the AC
outlet or turn off the POWER switch before
proceeding with any connection.
• Connect one cable at a time observing the “input”
and “output”.
This will avoid any cross connection between
channels and signal inputs and outputs.
• Insert the plugs securely. Incomplete connection
may result in noise.
• Prior to connecting other audio and video
equipment to the CD7300, please read their
owner’s manuals.
CONTENTS
BEFORE USING .................................. 2
NOTES ABOUT THE DISCS ......................... 2
INAPPROPRIATE PLACES FOR INSTALLA-
TION .............................................................. 2
ABOUT PLAYING COPY-CONTROLLED CDS .....
2
DO NOT PLACE OBJECTS ON TOP ............ 2
CAUTIONS ON HANDLING POWER CORD 2
DO NOT ATTEMPT REPAIRS YOURSELF ... 2
PRECAUTIONS ............................................. 2
CAUTIONS ON HANDLING BATTERIES ...... 2
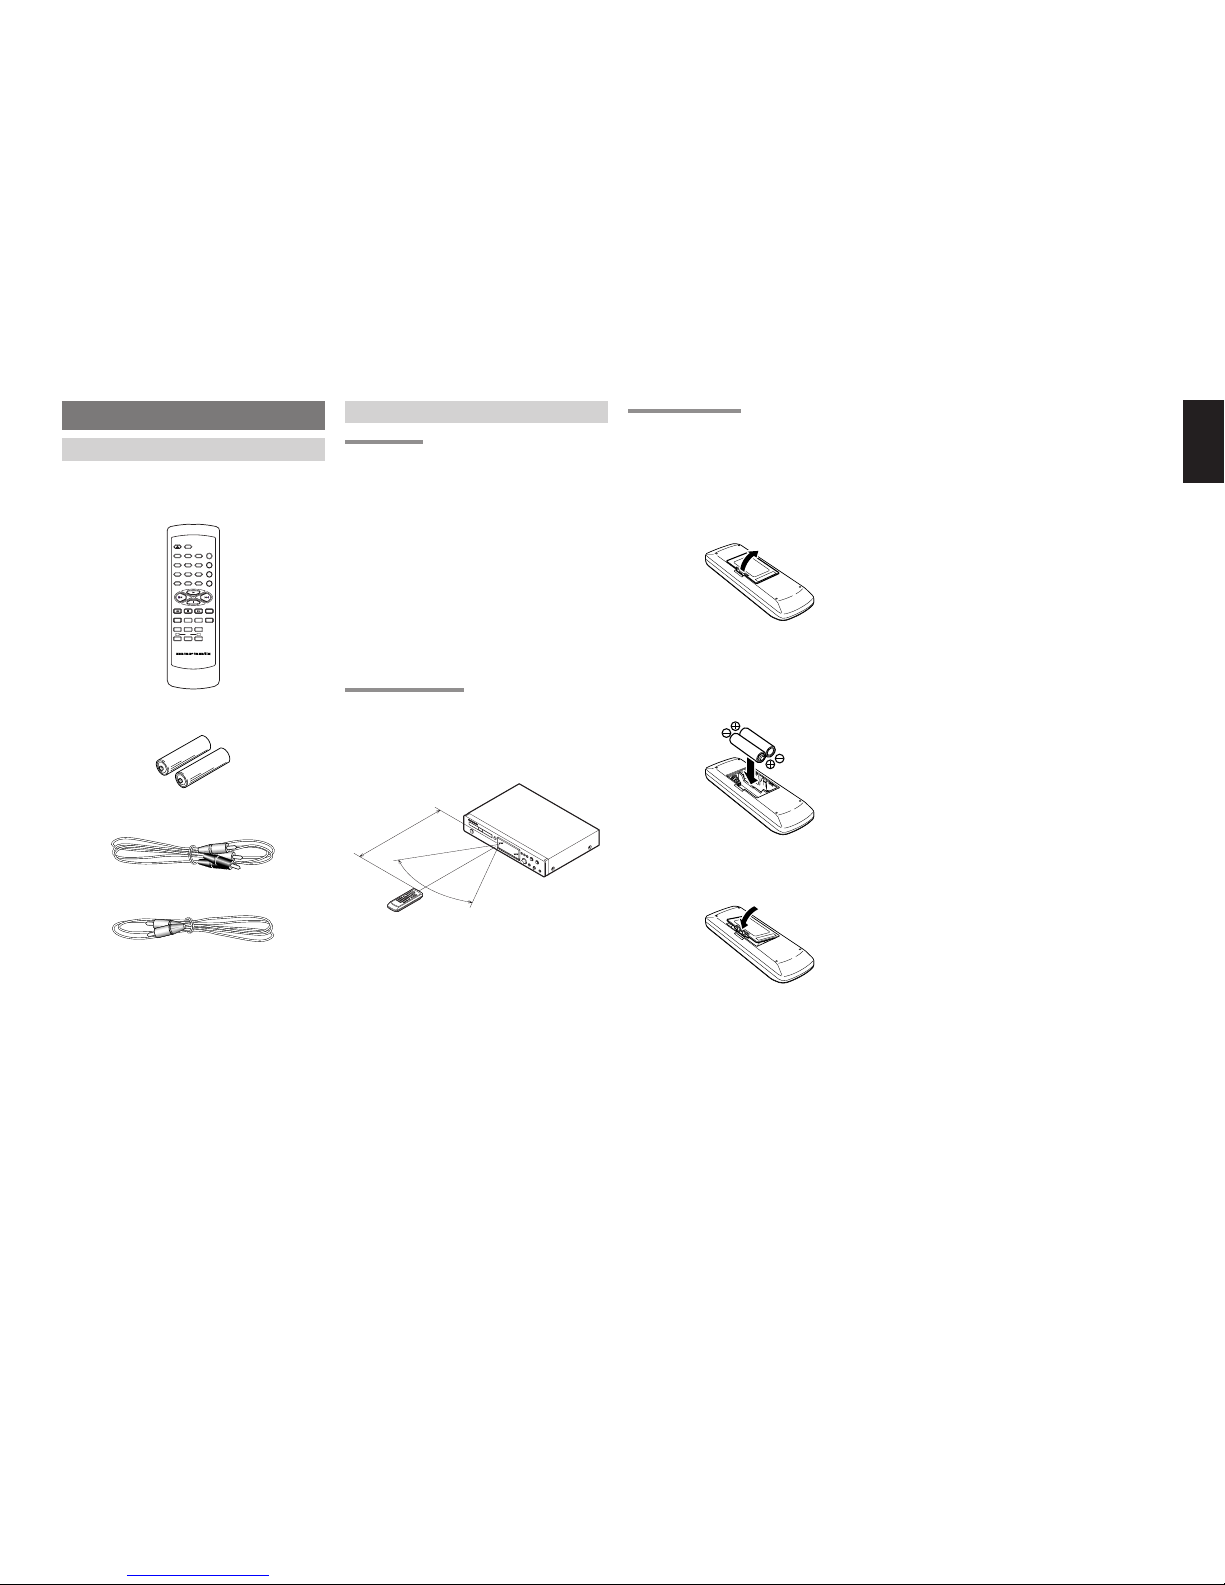
ACCESSORIES ................................... 3
CHECKING THE ACCESSORIES ................. 3
USAGE OF REMOTE CONTROL UNIT ........ 3
FEATURES .......................................... 4
CONNECTIONS................................... 5
CONNECTING TO AN AMPLIFIER ............... 5
CONNECTING TO A DIGITAL AUDIO
COMPONENT ............................................... 5
NAMES AND FUNCTIONS ................. 6
FRONT PANEL .............................................. 6
DISPLAY ........................................................ 7
REMOTE CONTROL UNIT ............................ 8
REAR PANEL ................................................ 9
BASIC OPERATIONS........................ 10
PLAYING CDS ............................................. 10
PLAYING A SPECIFIC TRACK .................... 10
PLAYING A SPECIFIC PART OF A SPECIFIC
TRACK ......................................................... 11
ADVANCED OPERATIONS ............... 12
REPEAT PLAY (PLAYING THE SAME
TRACKS REPEATEDLY) ............................. 12
RANDOM PLAY (PLAYING TRACKS IN A
RANDOM SEQUENCE) .............................. 12
AMS PLAY (SEARCHING FOR A SPECIFIC
TRACK) ....................................................... 13
PROGRAM PLAY (PLAYING TRACKS IN THE
PREFERRED SEQUENCE) ........................ 13
DELETE PROGRAM PLAY (PLAY WITH
UNDESIRED TRACKS SKIPPED) .............. 14
PITCH CONTROL (CHANGING THE PLAY
SPEED) ....................................................... 16
SETTING THE PLAY FUNCTIONS .... 17
USING EASY JOG ...................................... 17
VARIOUS PLAY FUNCTIONS (PLAY MODES) ..
17
OTHER FUNCTIONS ......................... 20
LAST MEMORY ........................................... 20
CD-TEXT ..................................................... 20
CR-R/CD-RW DISC PLAY ........................... 20
MP3 ............................................................. 21
SPECIFICATIONS AND DIMENSIONS ....
22
SPECIFICATIONS ....................................... 22
DIMENSIONS (UNIT: MM) .......................... 22
TROUBLESHOOTING ....................... 22

2
ENGLISH
BEFORE USING
NOTES ABOUT THE DISCS
* Handle the discs carefully so as not to scratch
their surfaces.
* Keep the surfaces of the discs clean at all
times.
When cleaning the surfaces of discs, always be
sure to use the special cleaner and wipe the
surfaces in the directions shown in the figure below.
* Do not attach pieces of paper or stickers to
the label surfaces of the discs.
When a disc has a piece of plastic tape or rental
CD label with paste protruding from the edge or
when a disc still bears traces of sticky tape or
adhesive labels, do not attempt to play it. If such
a disc is played on the CD player, you may find
that you cannot remove it or that some other kind
of malfunctioning may occur.
* Do not use discs which come in special
shapes.
Do not attempt to play heart-shaped or octagonal
discs or discs with any other special shapes. You
may find that you cannot remove them or that some
other kind of malfunctioning may occur in the
player.
* Use discs which satisfy the CD standards such
as those with the “CD logo”, “ ” or “
TEXT
”
mark on their disc label surfaces.
No guarantees are made for playback if discs
which do not satisfy the appropriate CD standards
are used.
Similarly, no guarantees are made for their sound
quality even if it is possible to play such discs.
* To protect your discs from damage, avoid
placing them in the following locations.
•Where they will be exposed to direct sunlight or
where they will be close to a heater or other
heat-radiating appliance
•Where the humidity level is high or it is very dusty
•Near a window or other such location where they
may be exposed to rain
* Get into the habit of putting the discs back in
their cases after use.
INAPPROPRIATE PLACES FOR
INSTALLATION
To keep your player in perfect working order for the
longest possible time, avoid installing the player in
the following locations.
•Wherever it will be exposed to direct sunlight
•Wherever it will be close to a heater or other heat-
radiating appliance
•Wherever the humidity is high or ventilation is poor
•Wherever it is very dusty
•Wherever it will be subject to vibration
•On top of a rickety stand or in an unstable location
which is tilted at an angle
•On top of an amplifier or other component which
dissipates a great deal of heat
•In an audio rack with little space at the top and
bottom or other location where the heat dissipation
will be obstructed
To ensure proper heat dissipation, install the player
while leaving clearances between the player and
wall or other components, as shown in the figure
below.
+
OPEN/CLOSE
-
/
•
Wipe the surface radially
from the
center.
•
Do not wipe the surface in
the circumferential direction.
10 cm or more 10 cm or more
2 cm or more
5 cm or more
ABOUT PLAYING COPY-CONTROLLED
CDS
•Some copy-controlled CDs may not conform to
official CD standards. They are special discs and
may not play on the CD7300.
DO NOT PLACE OBJECTS ONTOP
•Refrain from placing any objects on top of the
player.
CAUTIONS ON HANDLING POWER
CORD
•Do not touch the power cord with wet hands.
•When disconnecting the power cord, always make
sure that you take hold of the plug. Yanking out or
bending the cord can damage it and/or cause
electric shocks or a fire.
•Get into the habit of disconnecting the power plug
before leaving home.
DO NOT ATTEMPT REPAIRS
YOURSELF
•Refrain from lubricating the player: doing so can
cause malfunctioning.
•Only qualified engineers with specialized expertise
are authorized to repair the pick-up and parts
inside the player.
PRECAUTIONS
•In winter, droplets of water form on the insides of
the windows of a heated room: this is called
condensation. This CD player uses an optical lens,
so the condensation may form in the following
cases.
- In a room immediately after the heating has
been turned on
- In a room where the humidity level is high
- When the player has been suddenly brought
from a cold location into a warm room
Since, in cases like this, the track numbers may
not be read and the player is prevented from
operating properly, wait about 30 minutes, and then
operate the player.
•This player may cause interference on a tuner or
TV set. If this is the case, place it further away
from the tuner or TV set.
•Compact discs have much less noise than analog
records and hardly any noise is heard before play
starts. Bear in mind, therefore, that if the volume
control on the amplifier is set too high, you will risk
damaging other audio components.
•This player is designed to play music CDs only. It
cannot play CD-ROMs used with personal
computers, game CDs, video CDs or DVDs (video/
audio).
CAUTIONS ON HANDLING
BATTERIES
Misuse of the batteries can result in electrolyte
leakage, rupturing, corrosion, etc.
Bear in mind the following points when using
batteries.
•Remove the batteries from the remote control unit
if the unit is not going to be used for a prolonged
period (a month or more).
•Do not use an old battery together with a new one.
•Insert the batteries while ensuring that their ª
and ·poles are properly aligned with the
corresponding markings on the remote control unit.
•Batteries with the same shape may have different
voltages. Do not use different types of batteries
together.
•If electrolyte has leaked, thoroughly wipe the inside
of the battery compartment, and then insert new
batteries.

3
ENGLISH
ACCESSORIES
CHECKING THE ACCESSORIES
After opening the cover of the packing box, check
that the following accessories are included.
•Remote control unit (RC7300CD)
OPEN/CLOSE
DISPLAY
3
REPEAT
12
654
AMS
RANDOM
978
PROGRAM
0
A-B
CANCEL
TEXT
TIME
SCROLL/
RECALL
RC7300CD
MENU ENTER
INDEX+
Q.REPLAY
INDEX-
+
PITCH
-
RESET
REMOTE CONTROLLER
•Size “AA”batteries x 2
•Audio connecting cord (1 meter long)
•Remote control connecting cord (90 cm long)
•User Guide
•Warranty card
USAGE OF REMOTE CONTROL UNIT
PRECAUTIONS
- Do not allow direct sunlight, an inverter fluorescent
light or other strong source of light to shine onto
the player’s infrared signal reception window
(remote sensor). Otherwise, the operation of the
remote control unit may be disabled.
- Bear in mind that operating the remote control unit
may cause other devices operated by infrared rays
to be operated by mistake.
- The remote control unit cannot be operated if the
space between the controller and the player’s
remote sensor is obstructed.
- Do not place any objects on top of the remote
control unit. Doing so may cause one or more
buttons to be held down which will cause the
batteries to run down.
OPERATIONAL RANGE
As shown in the figure below, the player can be
operated by the remote control unit in a range which
of about 5 meters from the player’s remote sensor
and over an angle up to 30 degrees to the left and
30 degrees to the right of the position directly in front.
LOADING BATTERIES
Before using the supplied remote control unit for the
first time, load the batteries in the remote control unit.
The batteries provided are used to verify the
operations of the remote control unit only.
1Take hold of the tab on the battery cover which
is found on the back side of the remote control
unit, and pull it up.
2Load the two new size “AA”batteries inside the
battery compartment while taking care to align
their polarities correctly with the polarity markings
(ªwith ªand ·with ·).
3Push the battery cover down in the direction of
the arrow to close it.
5m
60°
Size “AA”(SUM-3)
batteries x 2

4
ENGLISH
FEATURES
• Marantz’s unique high-density voltage amplifier
module HDAM®circuit featured
This player features Marantz’s same unique
HDAM®(high-density voltage amplifier module)
circuit which is incorporated into the model SA-
12S1 SACD multi-channel player in its audio output
circuit. The circuit achieves a high signal
processing speed and wide band as a result,
ensuring playback with a high sound quality.
• CS4396 high-performance D/A converter made by
Cirrus Logic used
The CS4396 D/A converter whose CD playback
circuitry has the same design as the CS4397 D/A
converter, which was also made by Cirrus Logic
and which has proved to be a valuable asset for
the Marantz model SA8260 SACD player, has
been adopted.
During CD play, the PCM signals recorded on the
disc are oversampled to 128fs inside the D/A
converter and then processed by a combination
of the dynamic element matching (DEM) and multi-
element switched capacitors to achieve playback
characterized by a high linearity.
This new CD playback technology opens the door
to new dimensions in high-sound-quality CD play.
• Separate configuration of digital and analog parts
The digital part consisting of the servo, decoder
and microcomputer circuitry is packed onto the CD
mechanism board where it is separated from the
analog (audio circuitry) part.
This configuration shuts out the pulsive noise
generated from the digital part and helps to yield
pure music playback.
• Display OFF function incorporated
The “display OFF”function enables the main unit
display to be turned off. By turning off this display,
the pulsive noise generated from the display is
reduced, thus eliminating its effects on the music
signals.
• Double-layer chassis construction using a 2.0 mm
thick steel plate (weighing 1.5 kg) at the bottom
Endowing the bottom panel (bottom chassis) with
a double-layer construction yields a vibration-
damping structure that diminishes the effects of
both the rotational vibrations of the discs and
external vibrations.
• Playback of unfinalized CD-R/CD-RW discs
supported
The CD7300 can play even the CD-R and CD-
RW discs on which information can still be
recorded—something that conventional CD
players could not do.
Since this player can play unfinalized discs which
have some remaining recording time, partially
edited discs can be played as well.
• MP3 file play and display of text information (ID3
tag) supported
This player supports CD-R/CD-RW discs with MP3
file recordings. It also supports the text information
(ID3 tag) of the MP3 files so that track information,
the names of the artists and other text information
can be displayed. (Text cannot be displayed in
Japanese.)
• Pitch control function
The “pitch control”function enables the play speed
(pitch) to be varied over a ±12% range. This feature
is particularly useful for musical instrument practice
sessions.
• Quick replay function
By a single-action operation, the “quick replay”
function enables play to be moved back from the
current play position for the time equivalent to the
setting (setting range: 1 to 30 seconds) and play
to be resumed.
This function makes it possible to return to a part
of the track that was just played so it can be heard
again.
• EASY JOG control function
This player comes with an EASY JOG control
which has become such a familiar function with
media such as MDs. Using this control together
with the numeric buttons (0 to 9) on the front panel
enables tracks to be located speedily and various
playback functions to be set conveniently.
• CD-TEXT display supported
• Timer play supported
• VAM2202 dedicated audio mechanism made by
Philips featured

5
ENGLISH
CONNECTIONS
This CD player is connected to an amplifier, CD
recorder and other components for use. To ensure
that the components are connected properly, refer
to the instruction manuals that come with the
components to be connected.
Before connecting the components, be absolutely
sure to turn off their power.
CONNECTING TO AN AMPLIFIER
Use the audio connecting cord to connect the player
with a stereo amplifier or AV amplifier. Do not connect
the player to the PHONO input connectors on the
amplifier.
When making the connections, insert the plugs
securely into the connectors. Failure to insert the
plugs securely may result in noise.
L
R
REMOTE
CONTROL
OPT.COAX.
ANALOG OUT
EXTERNAL INTERNAL
IN
OUT
DIGITAL OUT
L
R
CONTROL
REMOTEPRE OUT
GND
PHONO
R
L
CD
/DVD
AUX
TUNERPHONO
L
R
REC
PLAY
CD-R
OUT
IN
REC
PLAY
MD/TAPE
R
SPE
A
SPEAKERS IMP
E
CONNECTING TO A DIGITAL AUDIO
COMPONENT
The player has one digital optical output connector
and one digital coaxial output connector.
You can enjoy digital recording when the player is
connected to a CD recorder or other digital recording
component.
CONNECTING THE OPTICAL OUTPUT CONNECTOR
Use an optical digital connecting cable available on
the market. Insert the plug firmly in until it clicks into
place. Do not bend or bundle the optical digital
connecting cable.
L
R
REMOTE
CONTROL
OPT.COAX.
ANALOG OUT
EXTERNAL INTERNAL
IN
OUT
DIGITAL OUT
INTERNAL
EXTERNAL
N
ALOG IN/OUT
OUTPUT OUTPUT
R
L
DIGITAL IN/OUT
INPUT
OPTICALCOAXIAL CONTROL
REMOTE
INPUT OUTPUT
IN
OUT
(Red) (White)
Audio connecting cord (supplied)
Signal flow
Amplifier
(Red) (White)
Optical digital connecting
cable (available on market)
Signal flow
CD recorder, MD deck, AV amplifier, etc.
CONNECTING THE COAXIAL OUTPUT CONNECTOR
Use a coaxial digital connecting cable available on
the market.
L
R
REMOTE
CONTROL
OPT.COAX.
ANALOG OUT
EXTERNAL INTERNAL
IN
OUT
DIGITAL OUT
INTERNAL
EXTERNAL
A
NALOG IN/OUT
OUTPUT OUTPUT
R
L
DIGITAL IN/OUT
INPUT
OPTICALCOAXIAL CONTROL
REMOTE
INPUT OUTPUT
IN
OUT
Coaxial digital connecting cable
(available on market)
CD recorder, MD deck, AV amplifier, etc.
Signal flow

6
ENGLISH
NAMES AND
FUNCTIONS
FRONT PANEL
DISPLAY
OFF
PLAY/PAUSE
+
OPEN/CLOSE STOP
EASY JOG
-
PHONES
DISPLAY
LEVELQUICK REPLAY
POWER ON/OFF
CD PLAYER CD7300
1
23456789
0
/
TIMER
DISC
TEXT
12 34 56 78 91011121314151617181920
TTL
TRK INDX
TTL
TIME
MP3
RNDM
PROG A
—
B
RPT
1
S.PLAY
z x n Ú1 Ú2 Ú5 Ú6c v m
Ú4Ú3Ú0.,b
zz
zz
z
POWER ON/OFF switch
This is used to turn the player’s power ON and OFF.
When it is pressed, the display lights and the power
is turned on; when it is pressed again, the power is
turned off.
xx
xx
x
Disc tray
This is where the CD to be played is placed.
cc
cc
c
OPEN/CLOSE
0
button
This is used to open and close the disc tray. When it
is pressed, the disc tray opens; when it is pressed
again, it closes.
vv
vv
v
Remote sensor
This senses the infrared control signals sent from
the remote control unit.
bb
bb
b
DISPLAY OFF indicator
This lights in the DISPLAY OFF mode (when the
display is off).
nn
nn
n
Numeric buttons (0 to 9)
These are used to specify the numbers of the tracks
to be played.
mm
mm
m
Display
This shows the settings, play status, text information,
etc.
,,
,,
,
DISPLAY button
This is used to turn off the display (DISPLAY OFF
mode).
When it is pressed, the display is turned off; when it
is pressed again, the display comes on.
..
..
.1
(search backward) button
This is used to search backward during play.
It also serves as the album selector button when
playing discs with MP3 files recorded on them.
⁄0⁄0
⁄0⁄0
⁄0 ¡
(search forward) button
This is used to search forward during play.
It also serves as the album selector button when
playing discs with MP3 files recorded on them.
⁄1⁄1
⁄1⁄1
⁄1
EASY JOG/push enter button
Preceding or subsequent tracks can be searched
(tracks can be skipped) by turning the jog dial
clockwise or counterclockwise. In addition, the play
functions (play modes) can be set using the jog dial.
⁄2⁄2
⁄2⁄2
⁄2
QUICK REPLAY button
This is used to search backward from the current
play position for the time equivalent to the setting
and resume play.
⁄3⁄3
⁄3⁄3
⁄3
STOP
7
button
This is used to stop play.
⁄4⁄4
⁄4⁄4
⁄4
PLAY/PAUSE
6
button
This is used to start play or temporarily suspend play.
⁄5⁄5
⁄5⁄5
⁄5
PHONES LEVEL control
This is used to adjust the headphones volume level.
The level increases when it is turned clockwise.
⁄6⁄6
⁄6⁄6
⁄6
PHONES jack
The headphones are connected to this jack. Use
headphones that come with a standard plug.

7
ENGLISH
DISPLAY
aa
aa
a
Main display
This displays the time information and text information
of the disc played, the setting menus, etc.
bb
bb
b
TEXT indicator
This lights when a disc supporting CD-TEXT has
been loaded.
cc
cc
c
DISC indicator
This flashes during readout of the table of contents
(TOC) information on the disc.
dd
dd
d
TIMER indicator
This lights when timer play has been set.
ee
ee
e
TTL (total track) indicator
This lights above the display of the total number of
tracks recorded on the disc.
ff
ff
f
RNDM (random) indicator
This lights during random play.
gg
gg
g
TRK (track) indicator
This lights above the display of the number of the
track being played, etc.
TIMER
DISC
TEXT
12 34 56 78 910 1112 1314 1516 1718 1920
TTL
TRK INDX
TTL
TIME
MP3
RNDM
PROG A
—
B
RPT
1
S.PLAY
c
ab t
g if h j k l n po q
s
ed m r
hh
hh
h
PROG (program) indicator
This lights during program play.
ii
ii
i
INDX (index) indicator
This lights above the display of the index number
being played, etc.
jj
jj
j
A-B (A-B repeat) indicator
This lights during A-B repeat play.
kk
kk
k
RPT (repeat) indicator
This lights during repeat play.
ll
ll
l
1 (1-track repeat) indicator
This lights during 1-track repeat play.
mm
mm
m
S.PLAY (single track play) indicator
This lights during single track play.
nn
nn
n8
(pause) indicator
This lights when play is temporarily suspended.
oo
oo
o
TTL (total time) indicator
When the total remaining time or total program time
is displayed, this lights above that display.
pp
pp
p3
(play) indicator
This lights during play.
qq
qq
q
TIME indicator
This lights while the elapsed time or other such time
is displayed.
rr
rr
r
Pitch control indicator
This displays the pitch control setting.
ss
ss
s
MP3 indicator
This lights when a disc on which MP3 files have been
recorded is loaded.
tt
tt
t
1 - 20, (music calendar)
This displays the track numbers recorded on the disc,
the track numbers still to be played, and the track
numbers programmed for program play. During MP3
file play, the album is displayed.

8
ENGLISH
REMOTE CONTROL UNIT
OPEN/
CLOSE DISPLAY
3
REPEAT
12
654 AMS
RANDOM
978
PROGRAM
0A-B
CANCEL
TEXT
TIME
SCROLL/
RECALL
RC7300CD
MENU ENTER
INDEX
Q. REPLAY
RESET
REMOTE CONTROLLER
PITCH
q !3
!4
!5
!6
!7
!9
@0
@2
!8
w
e
r
u
i
o
!0
!1
!2
y
t
@1
qq
qq
q
OPEN/CLOSE
0
button
This is used to open and close the disc tray.
When it is pressed, the disc tray opens; when it is
pressed again, it closes.
ww
ww
w
Numeric buttons (0 to 9)
These are used to specify the numbers of the tracks
to be played.
ee
ee
e
PROGRAM button
This is pressed to initiate program play.
rr
rr
r3
(play) button
This is used to start play.
tt
tt
t4
,
¢
(track skip) buttons
4: Use this to return to the start of the track now
playing or return to the start of the previous
track.
¢: Use this to advance to the start of the
subsequent track.
yy
yy
y7
(stop) button
This is used to stop the play.
uu
uu
u8
(pause) button
This is used to temporarily suspend play.
ii
ii
i1
,
¡
(search) buttons
1: This button is used to search backward when
it is held down during play.
¡: This button is used to search forward when it
is held down during play.
These buttons also serve as the album selector
buttons when playing discs with MP3 files recorded
on them.
oo
oo
o
TEXT button
This is used to switch the main display from the time
display to the text display.
!0!0
!0!0
!0
MENU button
This is used to switch to the play function (play mode)
setting menu.
!1!1
!1!1
!1
INDEX -/+ (index down/up) buttons
These are used to skip and search indexes. They
can be used with discs on which index numbers have
been recorded.
!2!2
!2!2
!2
PITCH -/RESET/+ (pitch control down/reset/
up) buttons
These are used to adjust the play speed (pitch) with
a ±12% range.
!3!3
!3!3
!3
DISPLAY button
This is used to turn off the display (DISPLAY OFF
mode).
!4!4
!4!4
!4
REPEAT button
This is used to play one track or all the tracks on the
disc repeatedly.
!5!5
!5!5
!5
AMS (auto music scan) button
This is used to play the intros of all the tracks in
sequence starting from the first track for the duration
equivalent to the setting.
!6!6
!6!6
!6
RANDOM button
This is used to play the tracks in a random sequence.
!7!7
!7!7
!7
A-B (A-B repeat) button
This is used to set start point (A) and end point (B)
when a particular section is to be played repeatedly.
!8!8
!8!8
!8
CANCEL button
This is used to cancel the programmed tracks.
!9!9
!9!9
!9
TIME button
This switches the main display from the text display
to the time display. It can also switch the time display
during play.
It can display how much time has elapsed and how
much play time remains for the current track as well
as how much play time remains for the whole disc.
During MP3 file play, it displays the elapsed time only.
@0@0
@0@0
@0
SCROLL/RECALL button
This is used to scroll the text display when text is
displayed. When it is pressed during program play,
it is possible to check which tracks have been
programmed.
@1@1
@1@1
@1
ENTER button
This is used to enter the play function settings.
@2@2
@2@2
@2
Q.REPLAY (quick replay) button
This is used to search backward from the current
play position for the time equivalent to the setting
and resume play.

9
ENGLISH
REAR PANEL
AA
AA
A
ANALOG OUT (analog output) connectors
The music signals during play are output from these
connectors.
BB
BB
B
DIGITAL OUT COAX. (digital coaxial output)
connector
The music signals during play are output digitally from
this coaxial output connector.
* Digital signals are not output during MP3 file play
or pitch control play.
CC
CC
C
DIGITAL OUT OPT. (digital optical output)
connector
The music signals during play are output digitally from
this optical output connector.
* Digital signals are not output during MP3 file play
or pitch control play.
DD
DD
D
REMOTE CONTROL IN and OUT connectors
Using the supplied remote control connecting cable,
these connectors enable this player to be connected
to a Marantz component equipped with remote
control connectors. These connections make it
possible to control an entire system that centers on
the amplifier or other such component.
L
R
REMOTE
CONTROL
OPT.COAX.
ANALOG OUT
EXTERNAL INTERNAL
IN
OUT
DIGITAL OUT
ADE FBC
EE
EE
E
EXTERNAL/INTERNAL switch
Before the player was shipped from the factory, this
switch was set to INTERNAL to enable the remote
sensor built into the player to be used.
Before using the supplied connecting cable to make
the connection between the player and the remote
control connectors on a Marantz equipment, set the
switch to EXTERNAL.
Note:
* Signals cannot be received from the remote control unit
if the switch is kept at EXTERNAL when the player is
to be used on its own.
FF
FF
F
AC POWER SOURCE CONNECTION
With the POWER switch set to the OFF position, plug
the mains lead into a mains outlet providing the right
voltage.

10
ENGLISH
PLAYING A SPECIFIC TRACK
SPECIFYING THE NUMBER OF A TRACK TO BE
PLAYED (DIRECT SEARCH)
Select the number of the track to be played directly
by pressing the numeric buttons (0 to 9) on the player
or remote control unit.
To select track number 10 or above, use the numeric
buttons to select the higher digit first and then select
the lower digit.
Once the number of the track is selected, play will
start automatically.
Example: To play track 3
Press the “3”numeric button.
OPEN/
CLOSE DISPLAY
3
REPEAT
12
1
234
Example: To play track 12
Press the “1”numeric button.
OPEN/
CLOSE DISPLAY
3
REPEAT
12
1
234
Within 1 second, press the “2”numeric button.
OPEN/
CLOSE DISPLAY
3
REPEAT
12
1
234
Note:
* If a disc recorded with MP3 files also contains some
data files which are not MP3 files, the track before or
after the number of the selected track may be played.
Direct search is supported only for the album being
played.
BASIC OPERATIONS
PLAYING CDS
OPEN/CLOSE
DISPLAY
3
REPEAT
12
654 AMS
RANDOM
978
PROGRAM
0A-B
CANCEL
TEXT
TIME
SCROLL/
RECALL
RC7300CD
MENU ENTER
INDEX +
Q. REPLAY
INDEX -
+
PITCH
-
RESET
REMOTE CONTROLLER
DISPLAY
OFF
PLAY/PAUSE
+
OPEN/CLOSE STOP
EASYJOG
-
PHONES
DISPLAY
LEVELQUICK REPLAY
POWERON/OFF
CDPLAYER CD7300
1
23456789
0
/
2 3, 4 5
5
3, 4
1. Turn on the power of the amplifier to which the
player is connected, and use the input selector
on the amplifier to select “CD”(the player’s input
source which has been connected).
2. Press the POWER button on the player to turn
on the power.
3. Press the OPEN/CLOSE 0button on the player
or remote control unit. Place the CD to be played
in the extended disc tray while ensuring that the
label with the printed text is facing up.
In the case of a single (8 cm) CD, align it with the
indentation in the center of the tray.
4. Press the OPEN/CLOSE 0button on the player
or remote control unit to retract the disc tray.
Pushing the front of the disc tray lightly also
causes the tray to be retracted. Once the disc
tray has been retracted, “TOC Reading”appears
on the display, after which the total number of
CD tracks and total remaining time are displayed.
In the case of a disc that supports CD-TEXT, the
album title is displayed, and then the total number
of CD tracks and total remaining time are
displayed.
5. Press the 6button on the player or 3button
on the remote control unit to start play. Adjust
the volume level at the amplifier.
STOPPING PLAY
PLAY/PAUSE
+
STOP
-
PHONESLEVEL
REPLAY
/
Press the 7button on the player or remote control
unit during play.
PAUSING PLAY
TIME
PLAY/PAUSE
+
STOP
-
PHONESLEVEL
REPLAY
/
During play, press the 6button on the player or 8
button on the remote control unit to temporarily
suspend play.
To resume play from the place where it was
temporarily suspended, press the 6button on the
player or the 3button or 8button on the remote
control unit.
REMOVING THE CD
OPEN/
CLOSE DISPLAY
OPEN/CLOSE
LAYER CD7300
After play has finished, press the OPEN/CLOSE 0
button on the player or remote control unit to extend
the disc tray, and remove the CD.
After the CD has been removed, press the OPEN/
CLOSE 0button again to retract the disc tray. The
disc tray should always be retracted when the player
is not in use.

11
ENGLISH
PLAYING A PREVIOUS OR SUBSEQUENT TRACK
(TRACK SKIP)
Advancing to a subsequent track
QUICK REPLAY
EASY JOG
Press the ¢button on the remote control unit for
the number of times equivalent to the number of
tracks through which play is to be advanced.
Play can also be advanced to the tracks ahead by
turning EASY JOG on the player clockwise. When
EASY JOG is no longer turned in the stop mode, the
selected track is played after one second elapses.
Returning to the start of the track now playing or a
previous track
QUICK REPLAY
EASY JOG
When the 4button on the remote control unit is
pressed, play returns to the start of the track now
playing. Play returns to the previous track which is
equivalent to the number of times the button was
pressed.
In the same way, play can also be returned to the
start of the track now playing by turning EASY JOG
dial on the player counterclockwise. If it is turned
further, play will return to the previous track which is
equivalent to the amount by which the dial was
turned.
When EASY JOG is no longer turned in the stop
mode, the selected track is played after one second
elapses.
Note:
* If a disc recorded with MP3 files also contains some
data files which are not MP3 files, the track before or
after the number of the selected track may be played.
PLAYING A SPECIFIC PART OF A SPECIFIC
TRACK
USING THE INDEX FUNCTION (INDEX SKIP)
TEXT
SCROLL/
RECALL
MENU ENTER
INDEX
Q. REPLAY
An index search can be performed during the play of
a track whose index has been recorded.
This function is useful for starting play at a specific
location of a long track. It returns play to a previous
index which is equivalent to the number of times the
INDEX- button on the remote control unit was
pressed; alternatively, it advances play to a
subsequent index which is equivalent to the number
of times the INDEX+ button on the remote control
unit was pressed.
If the index skip function is operated for a CD with no
indexes recorded, the “No Index”message appears
on the main display, and play returns to the start of
the track now playing.
Note:
* The index skip function cannot be used for discs recorded
with MP3 files.
SEARCHING A SPECIFIC PART OF A TRACK (SEARCH)
While listening to a track being played, it is possible
to search a specific part of that track by a forward or
backward search.
Forward searching through the track now playing
TIME
P
L
+
STOP
EASY JOG
-
DISPLAY
LEVEL
QUICK REPLAY
The search (forward search) mode is established by
holding down the ¡button on the player or remote
control unit.
During MP3 file play, play advances to the album
title which is equivalent to the number of times the
button has been pressed. Holding down the button
initiates a forward search.
Backward searching through the track now playing
TIME
P
L
+
STOP
EASY JOG
-
DISPLAY
LEVEL
QUICK REPLAY
The search (backward search) mode is established
by holding down the 1button on the player or
remote control unit.
During MP3 file play, play returns to the album title
which is equivalent to the number of times the button
has been pressed. Holding down the button initiates
a backward search. (Returns during backward
searches are not constant.)
PLAYING THE LAST FEW SECONDS AGAIN DURING
PLAY (QUICK REPLAY)
TEXT
SCROLL/
RECALL
MENU ENTER
INDEX
Q. REPLAY
PLAY/PAUSE
+
STOP
G
-
PHONESLEVEL
QUICK REPLAY
/
When the QUICK REPLAY button on the player or
Q.REPLAY button on the remote control unit is
pressed during play, play will be returned by the
number of seconds set (factory setting for quick
replay time: 10 seconds), and the same section will
be played again. With a disc containing MP3 files, it
will take some moments for replay to begin.
For details on how to set the quick replay time. (See
page 19.)

12
ENGLISH
ADVANCED
OPERATIONS
REPEAT PLAY (PLAYING THE SAME
TRACKS REPEATEDLY)
PLAYING ALL TRACKS REPEATEDLY (ALL-TRACK
REPEAT)
This function repeatedly plays all the tracks. Repeat
play is possible even during random play or program
play.
Press the REPEAT button on the remote control unit.
OPEN/
CLOSE DISPLAY
3
REPEAT
12
The “RPT”indicator on the display lights, and the
repeat play of all the tracks starts.
12 34 56 78 910 1112 1314 1516 1718
TTL
TRK INDX
TIME
RPT
5
5
5
5
5
5
To stop all-track repeat play and resume normal play,
press the REPEAT button on the remote control unit
twice. The “RPT”indicator on the display goes off.
All-track repeat play can also be initiated using EASY
JOG on the player. (See page 17.)
PLAYING ONE TRACK REPEATEDLY (1-TRACK
REPEAT)
This function repeatedly plays one track only. Even
during random play or program play, it repeats the
track being played.
Press the REPEAT button on the remote control unit
twice while the track to be repeated is playing.
OPEN/
CLOSE DISPLAY
3
REPEAT
12
The “RPT”and “1”indicators light, and track now
playing is repeated.
12 34 56 78 910 1112 1314 1516 1718
TTL
TRK INDX
TIME
RPT
1
5 5
5
5
5
5 5
5
5
5
To stop 1-track repeat play and resume normal play,
press the REPEAT button on the remote control unit
to turn off the “RPT”indicator on the display. 1-track
repeat play can also be initiated using EASY JOG
on the player. (See page 17.)
PLAYING A SPECIFIC PART REPEATEDLY
(A-B REPEAT)
This function repeatedly plays a specific part of a
track that you want to hear.
1. During play, press the A-B button on the remote
control unit at the start point of the part to be
repeated.
RANDOM
978
PROGRAM
0A-B
CANCEL
The “A-”indicator on the display now lights.
Display example: A-B repeat , point A (start), track
1, 5 sec.
12 34 56 78 910 1112 1314 1516 1718
TTL
TRK INDX
TIME
A
—
5
5
5
5
5
5
2. Press the A-B button on the remote control unit
at the end point of the part to be repeated.
RANDOM
978
PROGRAM
0A-B
CANCEL
The “A-B”indicator on the display now lights, and
the designated part (from point A to point B) is
played repeatedly.
Display example: A-B repeat , point B (end), track 1,
20 sec.
12 34 56 78 910 1112 1314 1516 1718
TTL
TRK INDX
TIME
A
—
B
5
5
5
5
5
5
To stop A-B repeat play and resume normal play,
press the A-B button on the remote control unit to
turn off the “A-B”indicator on the display.
Note:
* The A-B repeat play function cannot be used during
random play. Neither can it be used with discs on which
MP3 files have been recorded.
RANDOM PLAY (PLAYING TRACKS IN A
RANDOM SEQUENCE)
This function rearranges the tracks into a random
sequence and it then plays all the tracks in this
random sequence. If it is used together with repeat
play, the same tracks can be repeatedly played but
in a different sequence every time.
During play or stop, press the RANDOM button on
the remote control unit.
654 AMS
RANDOM
978
The items on the music calendar appear on the
display one after the other, and the “RNDM”indicator
lights.
78 910 1112 1314
RNDM
5
5
5
5
5
5
5
5
Random play now starts.
12 34 56 78 910 1112 1314 1516 17
TTL
TRK INDX
TIME
RNDM
5
5
5
5
5
5
5
5
To stop random play and resume normal play, press
the RANDOM button on the remote control unit. The
“RNDM”indicator on the display goes off.
Random play can also be initiated using EASY JOG
on the player. (See page 18.)
SKIPPING TRACKS DURING RANDOM PLAY TO
SEARCH OTHER TRACKS
When the ¢button on the remote control unit is
pressed or EASY JOG on the player is turned
clockwise during random play, the next track is
selected at random and played.
Conversely, when the 4button on the remote
control unit is pressed or EASY JOG on the player is
turned counterclockwise during random play, play
returns to the start of the track now playing. If the
same operation is repeated, play is initiated in the
reverse order in which the tracks were played.

13
ENGLISH
AMS PLAY (SEARCHING FOR A SPECIFIC
TRACK)
This function comes in handy when searching for a
specific track that you want to hear.
During stop or play, press the AMS (auto music scan)
button on the remote control unit.
3
REPEAT
12
654 AMS
The total number of tracks, track “1”and “SCAN”light
on the display, and the “3”indicator flashes.
12 34 56 78 910 1112 1314 1516 1718
5
5
5
5
5
5
are played in succession for the duration which has
been set (factory setting: 10 seconds).
12 34 56 78 910 1112 1314 1516 1718
TTL
TRK INDX
TIME
5
5
5
5
5
5
Once the track you want to hear has been found,
press the AMS button again. The “3”indicator now
lights, and the track found and whatever comes after
that track will now be played normally.
When the RANDOM button on the remote control
unit is pressed during AMS play, the AMS play
function is released, and the random play mode is
established.
AMS play can also be initiated using EASY JOG on
the player. (See page 18.)
PROGRAM PLAY (PLAYING TRACKS IN THE
PREFERRED SEQUENCE)
The order in which the CD tracks are played can be
rearranged into the sequence desired. Up to 30
tracks can be programmed.
PROGRAM PLAY IN THE TIME DISPLAY MODE
In the case of a CD-TEXT disc, first press the TIME
button on the remote control unit to set the main
display to the time display mode.
TIME
TEXT
12 34 56 78 910 1112 1314 1516 1718
TTL
TTL
TIME
1. During stop, press the PROGRAM button on the
remote control unit.
RANDOM
978
PROGRAM
0A-B
CANCEL
“Program”appears for an instant on the main
display.
TEXT
PROG
5
5
5
5
5
5
5
5
The PROG indicator flashes, and the program
mode is established.
TEXT
TTL
TTL
TIME
PROG
5
5
5
5
5
5
5
5
2. Press the numeric buttons on the remote control
unit or player that correspond to the track
numbers (the tracks can also be selected using
the 4and ¢buttons). To select track number
10 or above, use the numeric buttons to select
the higher digit first and then select the lower
digit.
3
REPEAT
12
654
AMS
RANDOM
978
PROGRAM
0
A-B
CANCEL
1
23456789
0
Display example: When track 2 has been selected
TEXT
2
TTL
TRK
TTL
TIME
PROG
5
5
5
5
5
5
5
5
3. Repeat step 2 to program the desired tracks in
sequence. At each step of the programming,
the number of tracks programmed and their total
time appear on the main display. Up to 30 tracks
can be programmed.
TEXT
246810
TTL
TRK
TTL
TIME
PROG
5
5
5
5
5
5
5
5
4. Once all the tracks have been programmed,
press the 7button on the player or remote control
unit or press the PROGRAM button on the
remote control unit.
PROGRAM
0A-B
CANCEL
PLAY/PAUSE
+
STOP
-
PHONESLEVEL
REPLAY
/
The PROG indicator stops flashing and lights up
instead, and the program is entered.
TEXT
246810
TTL
TTL
TIME
PROG
5. Press the 6button on the player or the 3
button on the remote control unit. Play now starts
in the programmed sequence.
Program play will start even when step 4 is
omitted.
Program play can also be initiated using EASY
JOG on the player. (See page 18.)
Note:
* Programming in the text display mode cannot be
performed for tracks which have no text information
for their titles.

14
ENGLISH
DELETE PROGRAM PLAY (PLAY WITH
UNDESIRED TRACKS SKIPPED)
This function makes it possible to skip those tracks
that you do not want to hear during CD play. Up to
30 tracks can be deleted from the program.
DELETE PROGRAM PLAY IN THE TIME DISPLAY
MODE
In the case of a CD-TEXT disc, first press the TIME
button on the remote control unit to set the main
display to the time display mode.
TIME
TEXT
12 34 56 78 910 1112 1314 1516 1718
TTL
TTL
TIME
1. During stop, press the PROGRAM button on the
remote control unit, and then press the CANCEL
button.
RANDOM
978
PROGRAM
0A-B
CANCEL
“Delete Prog.”appears for an instant on the main
display.
TEXT
12 34 56 78 910 1112 1314 1516 1718 19
PROG
5
5
5
5
5
5
5
5
The total number of CD tracks and the total play
time appear on the main display, the PROG
indicator flashes, and the delete program mode
is established.
TEXT
12 34 56 78 910 1112 1314 1516 1718
TTL
TTL
TIME
PROG
5
5
5
5
5
5
5
5
2. Press the numeric buttons on the remote control
unit or player that correspond to the track number
that you do not want to hear (the track can also
be selected using the 4and ¢buttons).
3
REPEAT
12
654
AMS
RANDOM
978
PROGRAM
0
A-B
CANCEL
1
23456789
0
Display example: When track 2 has been selected
TEXT
1 3 4 5 6 7 8 9 10 11 12 13 14 15 16 17 18
TTL
TRK
TTL
TIME
PROG
5
5
5
5
5
5
5
5
3. Repeat step 2, and upon completion of the
programming, press the 7button on the player
or remote control unit or press the PROGRAM
button on the remote control unit.
PROGRAM
0A-B
CANCEL
PLAY/PAUSE
+
STOP
-
PHONESLEVEL
REPLAY
/
The PROG indicator in the display stops flashing
and lights up instead, and the delete program is
entered. Up to 30 tracks can be deleted from
the program.
PROGRAM PLAY IN THE TEXT DISPLAY MODE
In the case of a CD-TEXT disc, tracks can be selected
by title for program play.
If the main display is set to the time display mode,
press the TEXT button on the remote control unit to
establish the text display mode.
TEXT
TIME
SCROLL/
RECALL
MENU ENTER
TEXT
12 34 56 78 910 1112 1314 1516 1718 19
1. During stop, press the PROGRAM button on the
remote control unit.
RANDOM
978
PROGRAM
0A-B
CANCEL
“Program”appears for an instant on the main
display. Then the PROG indicator flashes, and
the program mode is established.
TEXT
PROG
5
5
5
5
5
5
5
5
2. Press the 4and ¢buttons on the remote
control unit or use EASY JOG on the player to
select the track. (The track can also be selected
using the numeric buttons but in this case the
title is not displayed).
QUICK REPLAY
EASY JOG
The title of each selected track is scrolled, and
once it has been scrolled, it is programmed
automatically. If you do not want to program the
track, select another track before the scrolling is
completed.
TEXT
2 3 4 5 6 7 8 9 10 11 12 13 14 15 16 17 18 19
3. Repeat step 2 to program the desired tracks in
sequence. Up to 30 tracks can be programmed.
4. Once all the tracks have been programmed, press
the 7button on the player or remote control unit
or press the PROGRAM button on the remote
control unit.
PROGRAM
0A-B
CANCEL
PLAY/PAUSE
+
STOP
-
PHONESLEVEL
REPLAY
/
The PROG indicator stops flashing and lights up
instead, and the program is entered.
246810
TTL
TTL
TIME
PROG
5. Press the 6button on the player or the 3button
on the remote control unit. Play of the selected
tracks now starts in the programmed sequence.
Program play will start even when step 4 is
omitted.
Program play can also be initiated using EASY
JOG on the player. (See page 18.)
Note:
* Programming in the text display mode cannot be
performed for tracks which have no text information
for their titles.

15
ENGLISH
TEXT
1357911131517
TTL
TTL
TIME
PROG
4. Press the 6button on the player or the 3button
on the remote control unit. The CD is now played
but with the deleted tracks skipped.
Delete program play can also be initiated using
EASY JOG on the player. (See page 18.)
DELETE PROGRAM PLAY IN THE TEXT DISPLAY
MODE
In the case of a CD-TEXT disc, the tracks that are
not desired can be selected by title for delete program
play.
If the main display is set to the time display mode,
press the TEXT button on the remote control unit to
establish the text display mode.
TEXT
TIME
SCROLL/
RECALL
MENU ENTER
TEXT
12 34 56 78 910 1112 1314 1516 1718 19
1. During stop, press the PROGRAM button on the
remote control unit, and then press the CANCEL
button.
RANDOM
978
PROGRAM
0A-B
CANCEL
“Delete Prog.”appears for an instant on the main
display.
TEXT
12 34 56 78 910 1112 1314 1516 1718 19
PROG
5
5
5
5
5
5
5
5
The total number of CD tracks and the album
title appear on the main display, the PROG
indicator flashes, and the delete program mode
is established.
TEXT
12 34 56 78 910 1112 1314 1516 1718 19
TTL
TTL
TIME
PROG
5
5
5
5
5
5
5
5
2. Press the 4and ¢buttons on the remote
control unit or use EASY JOG on the player to
select the track which you do not want to hear.
(The tracks can also be selected using the
numeric buttons but in this case the titles will not
be displayed.)
QUICK REPLAY
EASY JOG
The title of each selected track is scrolled, and
once it has been scrolled, it is deleted
automatically. If you do not want to delete the
track, select another track before the scrolling is
completed.
TEXT
2 3 4 5 6 7 8 9 10 11 12 13 14 15 16 17 18 19
PROG
5
5
5
5
5
5
5
5
3. Repeat step 2, and upon completion of the
programming, press the 7button on the player
or remote control unit or press the PROGRAM
button on the remote control unit.
PROGRAM
0A-B
CANCEL
PLAY/PAUSE
+
STOP
-
PHONESLEVEL
REPLAY
/
The PROG indicator in the display stops flashing
and lights up instead, and the delete program is
entered. Up to 30 tracks can be deleted from
the program.
TEXT
1357911131517
TTL
TTL
TIME
PROG
4. Press the 6button on the player or the 3
button on the remote control unit. The CD is now
played but with the deleted tracks skipped.
Delete program play can also be initiated using
EASY JOG on the player. (See page 18.)
Note:
* Delete programming in the text display mode cannot be
performed for tracks which have no text information
for their titles.

16
ENGLISH
CHECKING THE PROGRAM OR DELETE PROGRAM
CONTENTS
TEXT
TIME
SCROLL/
RECALL
MENU ENTER
During programming operation or program play, press
the SCROLL/RECALL button on the remote control
unit.
With program play, the programmed tracks are
displayed one after the other in sequence on the main
display.
With delete program play, the deleted tracks are
displayed one after the other in sequence on the main
display.
CHANGING THE PROGRAM OR DELETE PROGRAM
CONTENTS
PROGRAM
0A-B
CANCEL
TEXT
TIME
SCROLL/
RECALL
MENU ENTER
Deleting tracks which were programmed for program
play
When the SCROLL/RECALL button on the remote
control unit is pressed during programming, the
programmed tracks are displayed one after the other
in sequence.
As soon as the track to be deleted from the program
has appeared, press the CANCEL button on the
remote control unit immediately. The number of the
deleted track is cleared from the music calendar on
the display.
Canceling the deletion of tracks which were deleted
for delete program play
When the SCROLL/RECALL button on the remote
control unit is pressed during delete programming,
the deleted tracks are displayed one after the other
in sequence.
As soon as the track whose deletion is to be canceled
has appeared, press the CANCEL button on the
remote control unit immediately. The number of the
track whose deletion was canceled is displayed in
the music calendar on the display.
RETURNING PROGRAM PLAY TO NORMAL PLAY
(CANCELING THE ENTIRE PROGRAM)
PLAY/PAUSE
+
STOP
-
PHONESLEVEL
REPLAY
/
Press the 7button on the player or remote control
unit twice during program play or once during stop.
The PROG indicator on the display goes off, and the
entire program is canceled.
OPEN/
CLOSE DISPLAY
OPEN/CLOSE
LAYER CD7300
Alternatively, a program can be canceled when the
disc tray is opened by pressing the OPEN/CLOSE
0button on the player or remote control unit.
Adding tracks to the program
RANDOM
978
PROGRAM
0A-B
CANCEL
Press the PROGRAM button on the remote control
unit during stop. The status of the PROG indicator
in the display changes from lighted to flashing, and
more tracks can be added to the program.
PRECAUTIONS FOR PROGRAM AND DELETE
PROGRAM PLAY
∗The program play and delete program play
functions cannot be used with discs on which MP3
files have been recorded.
∗When using the numeric buttons to select tracks 1
to 9 on a CD with 10 or more tracks in total, allow
1.5 seconds or so to elapse after the button
corresponding to the number of the previous track
was pressed before pressing the button
corresponding to the number of the next track.
∗When using the numeric buttons to select track
10 or up on a CD with 10 or more tracks in total,
press the button corresponding to lower digit within
1.5 seconds or so after the button corresponding
to the higher digit was pressed.
∗When using the 4and ¢buttons for
programming, keep pressing one of these buttons
with less than half a second or so in between until
the number of the desired track is displayed.
∗If the total time for a program exceeds 99 minutes,
the time display will appear as “– –: ––.”
PITCH CONTROL (CHANGING THE
PLAY SPEED)
The play speed (pitch) can be changed across a
±12% range.
∗Digital signals are not output during pitch control.
INCREASING THE PLAY SPEED
Press the PITCH+ button on the remote control unit.
INDEX
Q. REPLAY
RESET
PITCH
Each time the button is pressed, the play speed is
increased in 1% increments (up to a maximum of
+12%), and it is displayed on the main display.
12 34 56 78 910 1112 1314 1516 1718
REDUCING THE PLAY SPEED
Press the PITCH- button on the remote control unit.
INDEX
Q. REPLAY
RESET
PITCH
Each time the button is pressed, the play speed is
reduced in 1% increments (up to a minimum of -12%),
and it is displayed on the main display.
12 34 56 78 910 1112 1314 1516 1718
RETURNING PLAY TO THE NORMAL SPEED (0%)
Press the PITCH RESET button on the remote
control unit.
INDEX
Q. REPLAY
RESET
PITCH
“Pitch: 0%”appears on the main display.
If the PITCH RESET button on the remote control
unit is pressed again, play returns to the previous
speed setting.
12 34 56 78 910 1112 1314 1516 1718
Pitch control can also be performed using EASY JOG
on the player. (See page 19.)

17
ENGLISH
SETTING THE PLAY
FUNCTIONS
USING EASY JOG
The front panel of the player features the EASY JOG
dial to facilitate a number of different operations to
be performed.
Under normal circumstances, play re-starts at the
start of the previous or subsequent tracks by turning
the dial clockwise or counterclockwise. The dial also
enables the play functions (play modes) to be set
from the menu. The menu can also be operated from
the remote control unit.
SETTING THE PLAY FUNCTIONS (PLAY MODES)
TEXT
TIME
SCROLL/
RECALL
MENU ENTER
QUICK REPLAY
EASY JOG
When EASY JOG is pressed or when the MENU
button on the remote control unit is pressed, the play
function (play mode) setting mode is established.
QUICK REPLAY
EASY JOG
When EASY JOG is turned clockwise or
counterclockwise in this mode, the play function
menu is switched.
The play function (play mode) menu can also be
switched by pressing the MENU button or the 4or
¢button on the remote control unit.
Shown below is the play function (play mode) menu
which is switched when EASY JOG is turned.
TEXT
TIME
SCROLL/
RECALL
MENU ENTER
QUICK REPLAY
EASY JOG
At the desired play function (play mode), either press
EASY JOG on the player or press the ENTER button
on the remote control unit to select the mode
concerned.
For subsequent details on the play functions (play
modes), refer to pages 17 to 19.
Single Track Play
Repeat
Program
Delete Program
Random
AMS (Auto Music Scan) Time
Pitch Control
Quick Replay Time
Timer Play
EASY JOG turned
counterclockwise
or 44
44
4button
pressed
EASY JOG turned
clockwise or ¢¢
¢¢
¢
or MENU button
pressed
VARIOUS PLAY FUNCTIONS (PLAY
MODES)
SINGLE TRACK PLAY (ON/OFF)
This function enables single play searches which
come in handy at such times as practicing musical
performances or using the player at broadcast
facilities.
1. Press EASY JOG and then turn it so that “Single
Play”appears on the main display.
TEXT
12 34 56 78 910 1112 1314 1516 1718
2. Press EASY JOG (or press the ENTER button
on the remote control unit) to select Single Track
Play.
TEXT
TIME
SCROLL/
RECALL
MENU ENTER
QUICK REPLAY
EASY JOG
3. Turn EASY JOG (or press the 4or ¢button
on the remote control unit).
QUICK REPLAY
EASY JOG
“Single:ON”and “Single:OFF”appear alternately
on the main display.
TEXT
12 34 56 78 910 1112 1314 1516 1718
4. With “Single:ON”displayed, press EASY JOG
(or press the ENTER button on the remote control
unit). Single Track Play mode is now set, and
“S.PLAY”lights on the display.
TEXT
TIME
SCROLL/
RECALL
MENU ENTER
QUICK REPLAY
EASY JOG
When ON is set, operation stops temporarily at
the start of the track, and play stands by. Play is
started by pressing the 6button on the player.
When the track concerned comes to an end,
operation stops temporarily at the start of the
next track.
REPEAT (ALL/1/OFF)
This function enables some or all of the tracks on a
disc to be played repeatedly.
1. Press EASY JOG and then turn it so that
“Repeat”appears on the main display.
12 34 56 78 910 1112 1314 1516 1718
2. Press EASY JOG (or press the ENTER button
on the remote control unit) to select Repeat.
TEXT
TIME
SCROLL/
RECALL
MENU ENTER
QUICK REPLAY
EASY JOG
3. Turn EASY JOG (or press the 4or ¢button
on the remote control unit).
QUICK REPLAY
EASY JOG
The function is switched through three settings:
“Repeat:ALL”(all-track repeat) →“Repeat:1”(1-
track repeat) →“Repeat OFF”→“Repeat:ALL.”

18
ENGLISH
AMS (AUTO MUSIC SCAN) TIME
The AMS function enables the intros of all the tracks
starting from track 1 to be played for the duration
which has been set one after the other. In the case
of this player, it enables the intro play time to be set.
1. Press EASY JOG and then turn it so that “AMS
Time”appears on the main display.
12 34 56 78 910 1112 1314 1516 1718
2. Press EASY JOG (or press the ENTER button
on the remote control unit) to select AMS Time.
TEXT
TIME
SCROLL/
RECALL
MENU ENTER
QUICK REPLAY
EASY JOG
3. Turn EASY JOG (or press the 4or ¢button
on the remote control unit).
QUICK REPLAY
EASY JOG
The AMS play time setting now appears on the
main display. The factory setting is 10 seconds
but this can be increased (to a maximum of 30
seconds) by turning EASY JOG clockwise or
reduced (to a minimum of 3 seconds) by turning
it counterclockwise.
12 34 56 78 910 1112 1314 1516 1718
12 34 56 78 910 1112 1314 1516 1718
4. Set the time, and press EASY JOG (or press the
ENTER button on the remote control unit) to enter
the setting and start AMS play.
TEXT
TIME
SCROLL/
RECALL
MENU ENTER
QUICK REPLAY
EASY JOG
Minimum
Maximum
12 34 56 78 910 1112 1314 1516 1718
12 34 56 78 910 1112 1314 1516 1718
4. Press EASY JOG (or press the ENTER button
on the remote control unit) to enter the displayed
status.
TEXT
TIME
SCROLL/
RECALL
MENU ENTER
QUICK REPLAY
EASY JOG
At the “Repeat:ALL”(all-track repeat) setting, all
the tracks on the CD are played repeatedly; at
the “Repeat:1”(1-track repeat) setting, one track
is played repeatedly.
PROGRAM
This function enables the tracks to be rearranged
into the desired sequence for play.
Press EASY JOG and then turn it so that “Program”
appears on the main display.
12 34 56 78 910 1112 1314 1516 1718
Press EASY JOG (or press the ENTER button on
the remote control unit) to select Program.
TEXT
TIME
SCROLL/
RECALL
MENU ENTER
QUICK REPLAY
EASY JOG
The PROG indicator flashes on the display, and the
tracks can be rearranged in the desired sequence.
Turning EASY JOG clockwise executes the same
function as NEXT ¢(the track number is
incremented); conversely, turning it counterclockwise
executes the same function as PREVIOUS 4(the
track number is decremented). The program settings
are the same as the ones on page 13.
The program function cannot be used with discs on
which MP3 files have been recorded.
DELETE PROGRAM
This function makes it possible to play the CD with
the tracks that are not desired skipped.
Press EASY JOG and then turn it so that “Delete
Prog.”appears on the main display.
12 34 56 78 910 1112 1314 1516 1718
Press EASY JOG (or press the ENTER button on
the remote control unit) to select Delete Program.
TEXT
TIME
SCROLL/
RECALL
MENU ENTER
QUICK REPLAY
EASY JOG
The PROG indicator flashes on the display, the total
number of tracks and the total play time are displayed,
and the tracks which are not going to be played can
be selected.
Turning EASY JOG clockwise executes the same
function as NEXT ¢(the track number is
incremented); conversely, turning it counterclockwise
executes the same function as PREVIOUS 4(the
track number is decremented). The delete program
settings are the same as the ones on page 14.
The delete program function cannot be used with
discs on which MP3 files have been recorded.
RANDOM (ON/OFF)
This function enables the tracks to be rearranged in
a random sequence and played.
1. Press EASY JOG and then turn it so that
“Random”appears on the main display.
12 34 56 78 910 1112 1314 1516 1718
2. Press EASY JOG (or press the ENTER button
on the remote control unit) to select Random.
TEXT
TIME
SCROLL/
RECALL
MENU ENTER
QUICK REPLAY
EASY JOG
3. Turn EASY JOG (or press the 4or ¢button
on the remote control unit).
QUICK REPLAY
EASY JOG
“Random:ON”and “Random:OFF”appear
alternately on the main display.
12 34 56 78 910 1112 1314 1516 1718
4. With “Random:ON”displayed, press EASY JOG
(or press the ENTER button on the remote control
unit) to enter the setting. “RNDM”indicator lights
on the display.
TEXT
TIME
SCROLL/
RECALL
MENU ENTER
QUICK REPLAY
EASY JOG
When the disc is played at the “Random:ON”
setting, its tracks are all rearranged into a random
sequence and played.
Other manuals for CD7300
2
Table of contents
Other Marantz CD Player manuals

Marantz
Marantz HD-CD1 User manual

Marantz
Marantz CD6006 User manual

Marantz
Marantz DR4160 User manual

Marantz
Marantz CD5004N1B User manual

Marantz
Marantz SA7001/F User manual

Marantz
Marantz CD7300 User manual

Marantz
Marantz CD5001 User manual

Marantz
Marantz SA1/F1N User manual

Marantz
Marantz CD5003 User manual

Marantz
Marantz ND8006 User manual

Marantz
Marantz VC-8100 User manual

Marantz
Marantz SA-11S3 User manual

Marantz
Marantz CD6007 User manual

Marantz
Marantz VC4400 User manual

Marantz
Marantz HD-CD1 User manual

Marantz
Marantz CD-43 User manual

Marantz
Marantz CD5004 User manual

Marantz
Marantz CD-94 User manual

Marantz
Marantz SA8003 User manual

Marantz
Marantz SA-KI RUBY User manual