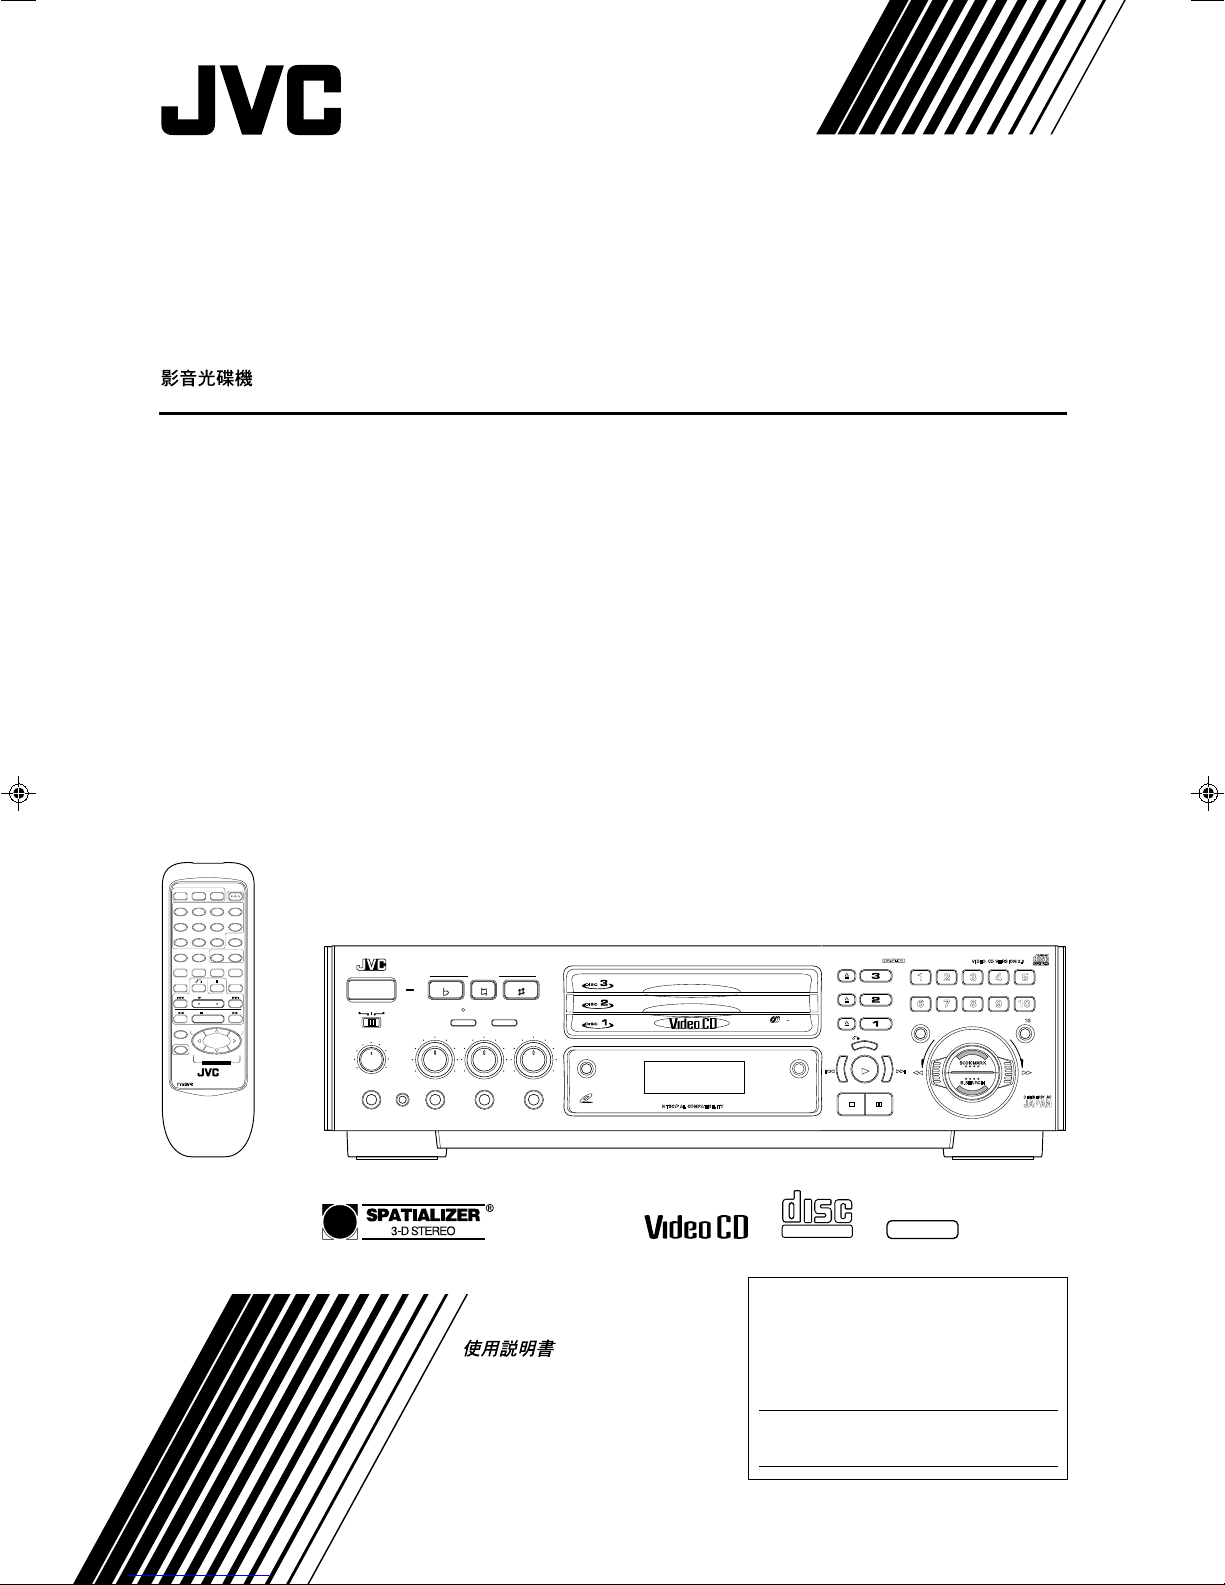
JVC XL-MV35TN User manual

XL-MV35TN
LVT0023-001A
[ U, UF ]
XL-MV35TN
INSTRUCTIONS
For Customer Use:
Enter below the Model No. and Serial No.
whicharelocatedeitherontherear,bottomor
side of the cabinet. Retain this information for
future reference.
Model No.
Serial No.
LVT0023-001A
[ U, UF ]
GRAPHICS
'
PlayBack
Control
VIDEO CD PLAYER
'
COMPACT
DIGITAL VIDEO
VCD POWER
TV POWER
DISC 1 DISC 2 DISC 3
VIDEO
INTRO HIGHLIGHT BOOK
DIGEST MPX
V.REPLACE
RANDOM
REPEAT SLOW
V.MASKING
SELECT
1 2 3 4
5 6 7 8
9 10 +10 ON SCREEN
PROGRAM CANCEL B.MARK B.SEARCH
TV/VIDEO
SPATIALIZER
TV VOL+
bTV VOL– #
SHIFT
STOP
TV
PROG
–
TV
PROG
+
KEY CONTROL
MULTI BRAND REMOTE CONTROL
RM-SXMV55U
1 2 3 4 5
STILL
NEXT
SELECT
PREV
RETURN
PlayBack Control
VIDEO CD VERSION 2.0
6 7 8 9 01
PROGRAM
BCOKMARK
B.SEARCH
+
10
DOWN
POWER
KEY CONTROL
STANDBY
NORMAL
MIN MAX
DIGITAL ECHO
PHONES KEY CONTROL
PBC OFFKARAOKE
NORMAL UP
XL-MV35 VIDEO CD PLAYER
MIN MAX
MIC 1
MIN MAX
MIC 2
MIN MAX
MIC 3
SPATIALIZER MPX
BOCK DIGEST
VIDEO INTRO
DISC
3
TRIPLE TRAY
NTSC/PAL COMPATIBILITY
VIDEO CD
DESIGNED BY JVC

XL-MV35TN
LVT0023-001A
[ U, UF ]
Warnings
IMPORTANT for the U.K.
DO NOT cut off the plug for this equipment. If the plug fitted is
not suitable for the power points in your home or the cable is too
short to reach a power point, then obtain an appropriate safety-
approved extension lead or consult your dealer.
BE SURE to replace the fuse only with an identical approved
type, as originally fitted.
If nontheless the plug is cut off, remove the fuse and dispose of
the plug immediately, to avoid a possible shock hazard by
inadvertent connection to the power supply.
If this product is not supplied fitted with a plug then follow the
instructions given below:
IMPORTANT.
DO NOT make any connection to the terminal which is marked
with the letter E or by a safety ground symbol or coloured green
or green/yellow.
The wires in the lead on this product are coloured in accordance
with the following codes:
Blue : Neutral
Brown : Live
As these colours may not correspond with the coloured markings
identifying the terminals in your plug proceed as follows:
The wire which is coloured blue must be connected to the
terminal which is marked with the letter N or coloured black.
The wire which is coloured brown must be connected to the
terminal which is marked with the letter L or coloured red.
IF IN DOUBT - CONSULT A COMPETENT ELECTRICIAN.
Caution –– POWER switch!
Disconnect the plug to shut the power off completely. The POWER
switch in any position does not disconnect the unit from the power
source. The power can be remote controlled.
CAUTION
To reduce the risk of electrical shock, fire, etc.:
1. Do not remove screws, covers or any parts.
2. Do not expose this appliance to rain or moisture.
G-1

XL-MV35TN
LVT0023-001A
[ U, UF ]
1. CLASS 1 LASER PRODUCT
2. DANGER:Invisiblelaserradiationwhenopenandinterlockfailedor
defeated. Avoid direct exposure to beam.
3. CAUTION: Do not open the top cover. There are no user service-
able parts inside the Unit; leave all servicing to qualified service
personnel.
LABELS
IMPORTANT FOR LASER PRODUCTS
2 WARNING LABEL PLACED INSIDE THE UNIT1CLASSIFICATION LABEL PLACED ON REAR ENCLOSURE
CLASS 1
LASER PRODUCT
G-2
DANGER: Invisible laser
radiation when open and
interlock failed or defeated.
AVOID DIRECT EXPOSURE
TO BEAM. (e)
ADVARSEL: Usynlig laser-
stråling ved åbning, når
sikkerhedsafbrydere er ude
af funktion. Undgå udsæt-
telse for stråling (d)
VARNING: Osynlig laser-
strålning när denna del är
öppnad och spärren är
urkopplad. Betrakta ej
strålen. (s)
VARO: Avattaessa ja suo-
jalukitus ohitettaessa olet
alttiina näkymättömälle
lasersäteilylle. Älä katso
säteeseen. (f)

Page 24
XL-MV35TN
LVT0023-001A
[ U, UF ]
Table of contents
We would like to thank you for purchasing one of our JVC products.
Before connecting this unit to the wall outlet, read the instructions
carefully to ensure that you obtain the best possible performance. If
you have any questions, consult your JVC dealer.
GENERAL INFORMATION ............................................................ 1
Care and handling of compact discs ............................................... 1
BEFORE USING FOR THE FIRST TIME ....................................... 2
Basic connections ........................................................................... 2
Connecting player to a TV or amplifier
using the audio video cord......................................................... 2
Video out select ......................................................................... 2
Connecting the power cord ........................................................ 2
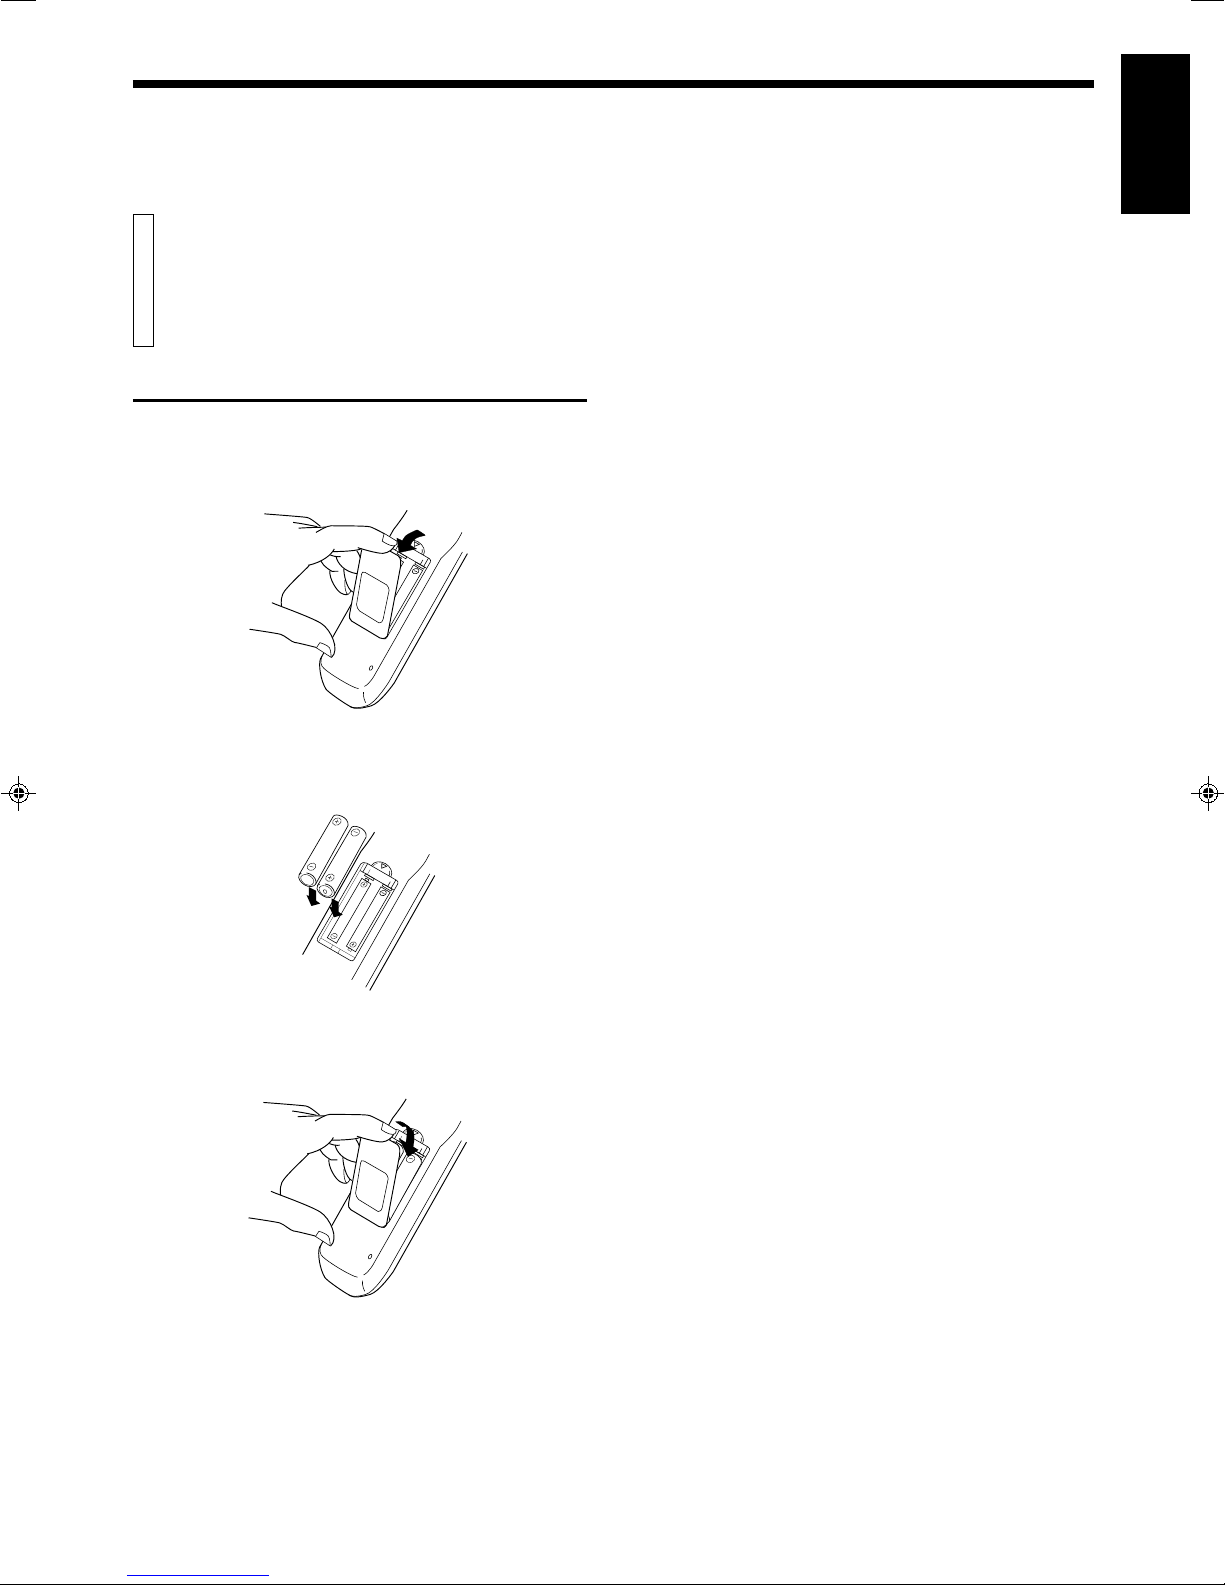
Installing batteries ........................................................................... 3
Putting batteries in the remote control ....................................... 3
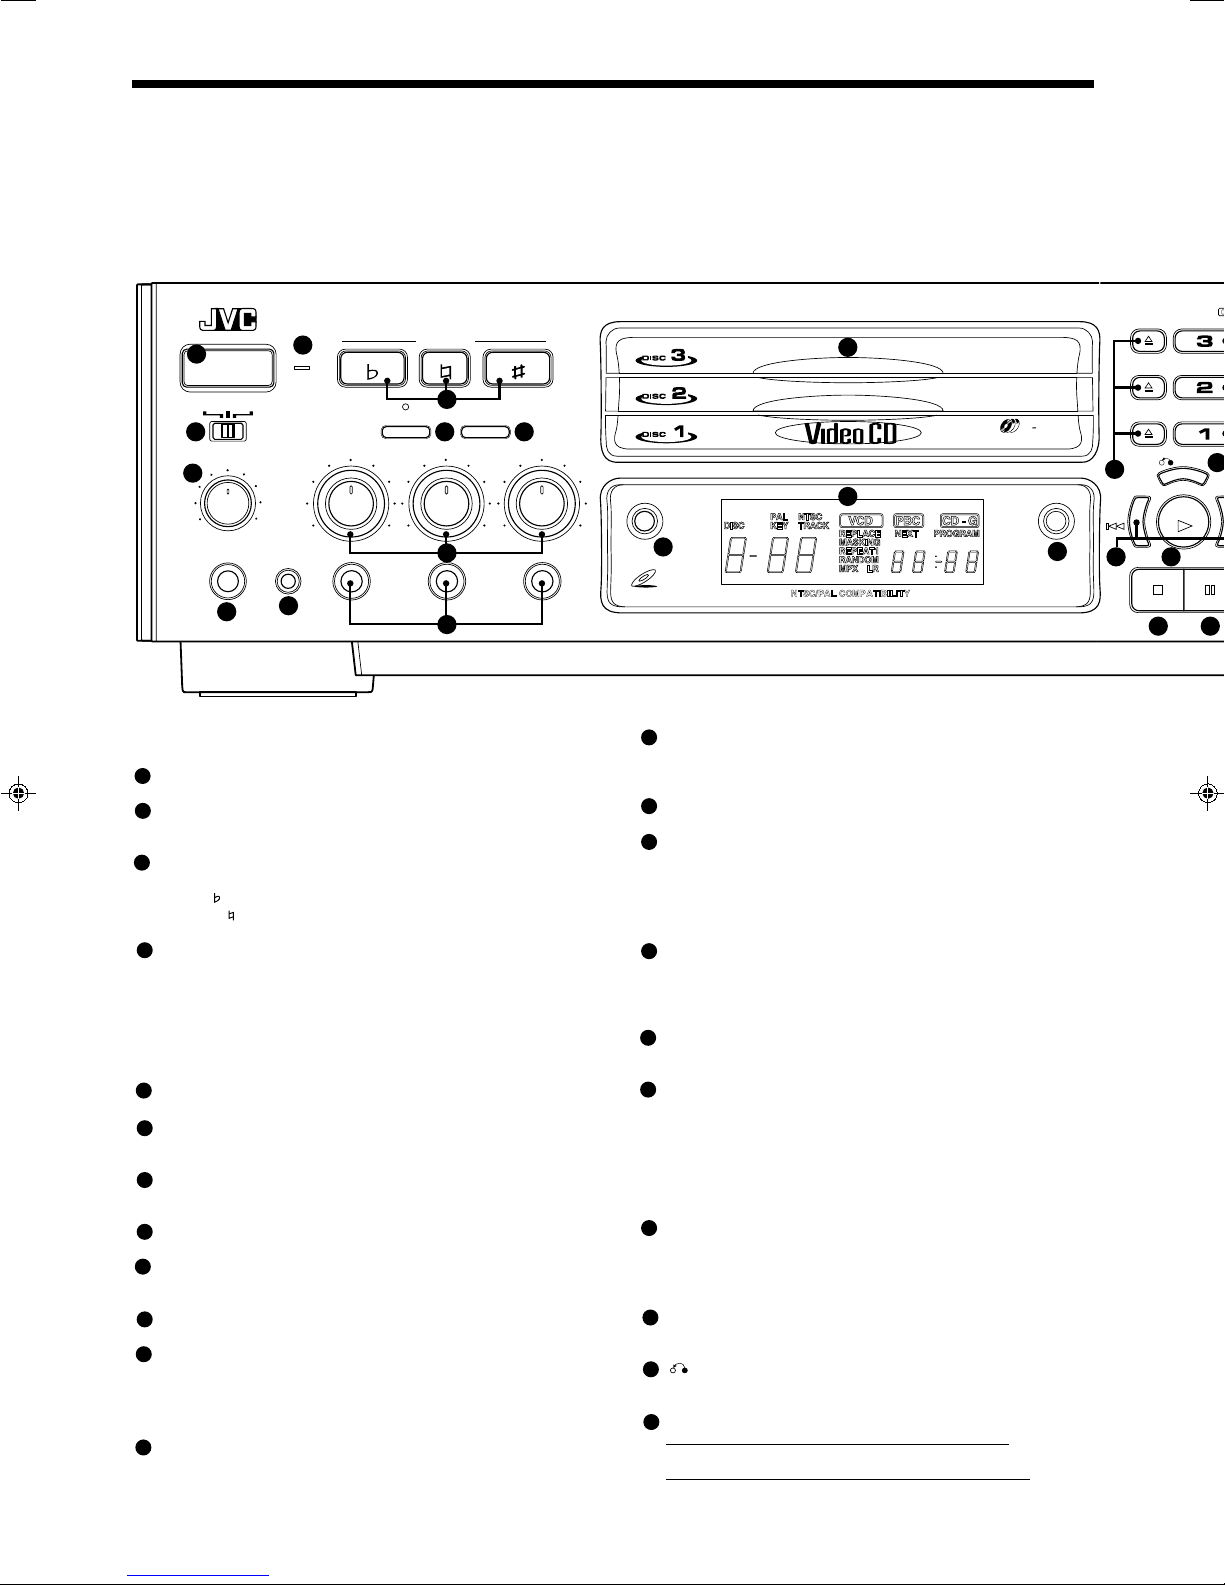
OVERVIEW OF CONTROLS ......................................................... 4
Left front panel of the Player...................................................... 4
Center front panel of the Player ................................................. 4
Right front panel of the Player ................................................... 4
Remote control unit.................................................................... 5
BASIC OPERATIONS .................................................................... 6
Now you can play a variety of video CDs!! ..................................... 6
Overview of the three modes ..................................................... 6
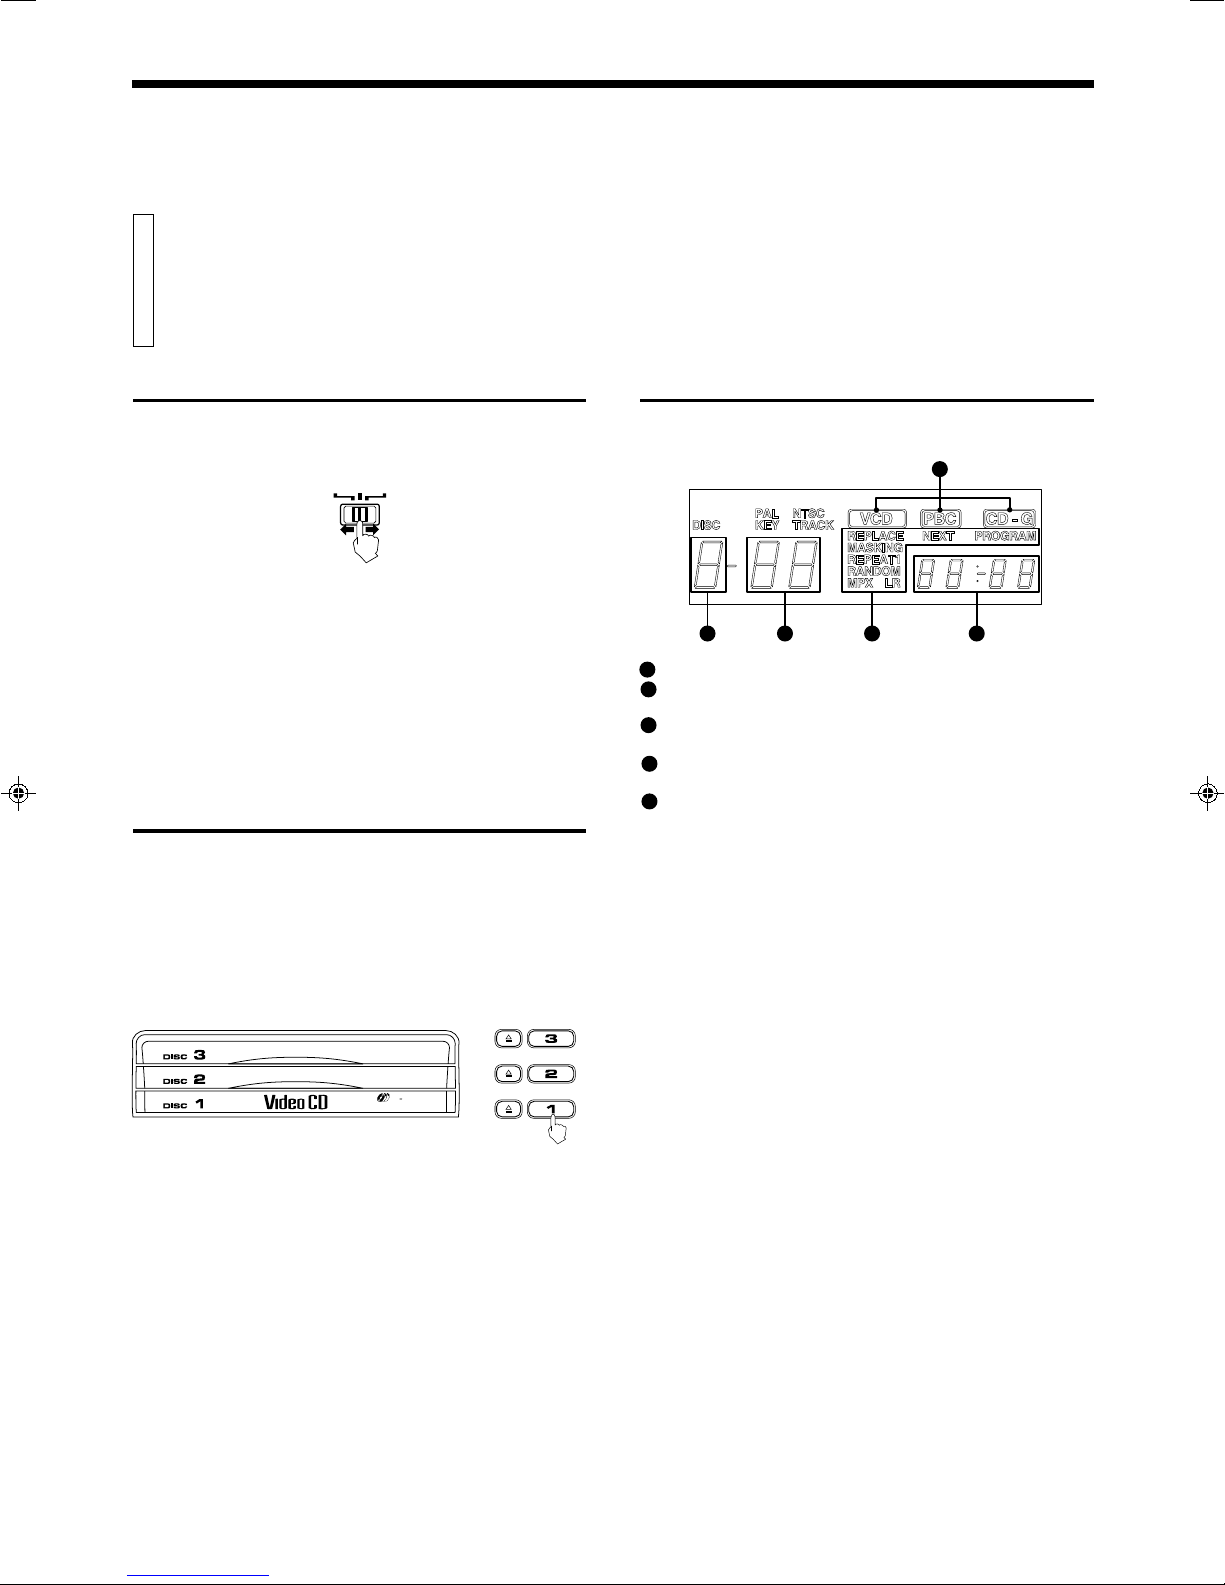
Triple disc tray usage................................................................. 6
Display window .......................................................................... 6
Preparation for playing............................................................... 7
Inserting/removing disc(s).......................................................... 7
Starting to play disc(s) ............................................................... 7
Using number keys .................................................................... 7
Stopping play ............................................................................. 8
Pausing play .............................................................................. 8
Auto search/Manual search ....................................................... 8
Slow-motion playback on the remote control unit ...................... 8
Using stereo headphones .......................................................... 9
Using the remote control ................................................................. 9
Presetting the remote control to operate your own TV .............. 9
Using the SHIFT button on the remote control unit.................. 10
Preset code table ..................................................................... 10
VARIOUS UNIQUE FUNCTIONS................................................. 11
Various functions can enhance your enjoyment ........................... 11
Display of operations status..................................................... 11
Programming the track sequence you want............................. 11
Canceling a programmed track................................................ 11
Clearing a program .................................................................. 11
Repeating tracks ...................................................................... 12
Randomly playing tracks.......................................................... 12
Playing a multiplex sound CD .................................................. 12
Viewing the VIDEO INTRO of a video CD ............................... 12
Programming during VIDEO INTRO ........................................ 13
Viewing the highlights of a video CD ....................................... 13
Selecting the SPATIALIZER mode .......................................... 13
Playback with the bookmark function............................................ 14
Making segments for later viewing with the bookmark function 14
Using the BOOKMARK DIGEST button................................... 14
Using the BOOKMARK SEARCH button ................................. 14
Canceling individual bookmarks .............................................. 14
Canceling all bookmarks on individual discs............................ 15
Using a microphone ...................................................................... 15
Using a wired microphone ....................................................... 15
Adjusting music key ................................................................. 16
Adjusting echo effect................................................................ 16
Vocal replace ........................................................................... 17
Vocal masking.......................................................................... 17
OPERATION OF PLAYBACK CONTROL FUNCTION ............... 18
Playing Video CDs with Playback Control function ....................... 18
Video CDs with Playback Control function............................... 19
RESTRICTING USE OF YOUR DISCS ........................................ 20
Locking a disc with the Read-Protect function .............................. 20
Locking a disc .......................................................................... 20
Canceling Read-Protect........................................................... 20
Canceling Read-Protect for a single viewing ........................... 20
GRAPHIC/DIGITAL AUDIO CDs ................................................. 21
Playing CD Graphics/digital audio CDs ........................................ 21
Playing CD Graphics................................................................ 21
Playing digital audio CDs ......................................................... 21
SPECIFICATIONS ........................................................................ 22
Main specifications........................................................................ 22
TROUBLESHOOTING ................................................................. 23

Page 1
English
XL-MV35TN
LVT0023-001A
[ U, UF ]
How to handle CDs
When handling a compact disc, do not touch the surface of the disc
(reflective silver side –– the side without the label).
Since compact discs are made of plastic, they are easily damaged. If
a disc gets dirty, dusty, scratched or warped, the sound will not be
picked up correctly and, in addition, such a disc may cause the CD
player to malfunction.
Which compact discs can be used?
Many types of compact discs are sold for a variety of uses. The Video
CD Player can play the following compact discs:
• Video CD
foraudioandvideo (moving picture) reproduction,
including multiplex sound.
• Video CD with Playback Control function
featuring menu-type operation and super-fine still
pictures for audio and video (moving picture) re-
production, including multiplex sound.
• CD Graphics (CD-G)
for audio and video (still picture) reproduction,
including multiplex sound.
• Digital Audio CD
including single discs
for audio reproduction.
CDs you can't play back
DonotplaybackCD-ROMs,DVDs,orCD-isonthisequipment. Doing
so may generate a noise which can damage your speakers.
Using the remote control
The remote control is ready to use when its batteries are installed
properly.
To use it, point its infrared light-emitting window toward the display
window of the player and press a button. The operating range of the
remote control is up to about seven meters in front of the player and
within about 30 degrees to each side –– with nothing between the
remote control and the player interrupting the beam path.
If pressing a button on the remote control does not produce any
response, check to make sure it is pointed correctly and try again. If it
still does not function, check the batteries.
Care and handling of
compact discs
GENERAL INFORMATION
Care of the label side
Do not damage the label side, stick paper or use any adhesive on its
surface.
Storage
Make sure that discs are kept in their cases. If discs are piled one on
topofanotherwithouttheirprotectivecases,theycanbedamaged. Do
notputdiscsinalocationwheretheymaybeexposedtodirectsunlight,
or in a place where the humidity or temperature is high. Avoid leaving
discs in your car!
Maintenance of discs
If there are fingerprints or dirt adhering to a disc, wipe it with a soft dry
cloth, moving from the center outwards.
If a disc is difficult to clean, wipe with a cloth moistened with water.
Never use record cleaners, petrol, alcohol or any anti-static agents.
CAUTION
Sometimes during play noise or images may be garbled. This is
sometimesduetothedisc. (Itmay notbe upto industrystandards.)
These symptom are caused by the discs, not by the malfunction of
the Player.
GRAPHICS
'
'
PlayBack
Control
COMPACT
DIGITAL VIDEO

Page 2
XL-MV35TN
LVT0023-001A
[ U, UF ]
The Video CD Player must be connected directly to a television set or
anamplifierthat is connected to a televisionor monitor. The television
set or the amplifier must have audio input jacks for right and left
channels and a video input jack.
Select a level, dry location free of dust and vibration, having a
temperature maintained between 5 and 35°C (41 and 95°F).
Connecting the player to a TV or amplifier
using the Audio Video cord
FirstconnecttheAudioVideocord—before connectingthe ACpower
cord.
Firmly insert the yellow pin plug of the Audio Video cord in the yellow
VIDEOOUT jack on therearpanelof the player;theredpin plug in the
red AUDIO OUT (RIGHT) jack; and the white pin plug in the white
AUDIO OUT (LEFT) jack. (The RIGHT and LEFT output jacks are for
the right and left audio channels.)
Then make sure that the television, amplifier or receiver is turned off,
disconnect the AC power cord, and firmly insert the pin plugs at the
other end of the Audio Video cord into the matching video and audio
INPUT jacks.
BEFORE USING FOR THE FIRST TIME
Basic connections
Notes
• When you play an NTSC disc in PAL AUTO mode on a PAL
exclusive TV, the image may be distorted.
If the signal doesn’t synchronize, change the mode to “PAL”.
• Select the mode before you play the disc. If you change the mode
during play, images may get distorted. In this situation stop the
player and reset the mode.
• WhenyouplayanNTSCdiscinPALAUTOmodeonaMultisystem
TV,the image mayblinkfora moment. This symptomiscausedby
thePlayerdetecting the formula of the disc,not by a malfunction of
the Player.
Connecting the power cord
IMPORTANT (not applicable for China)
Check the setting of the *LINE VOLTS switch on the rear panel of
the player.
Change the setting if the switch is not set for the main voltage
supplied to your home.
After the audio-video connectors had been connected, insert the
female end of the power cord firmly into the AC POWER CORD
socketlocated on the rearpaneloftheplayer. Then insert themale
end of the power cord into the wall outlet.
Whenthepowercordisconnected,theSTANDBYindicatoronthe
left-hand side of the player’s front panel comes on. [See “overview
of Controls” for a description of the controls on the player.]
Video out select
Set the VIDEO OUT SELECT switch on the rear panel to NTSC, PAL,
or PAL AUTO mode according to your television system.
NTSC .................... for NTSC exclusive TV
PAL ....................... for PAL exclusive TV
PAL AUTO ............ for Multisystem TV
PALAUTOdetectstheformulaofthedisc(NTSC/
PAL) automatically and plays the image on the
screen correctly.
RIGHT LEFT
PAL
NTSC PAL AUTO
AUDIO OUT
VIDEO
OUT
VIDEO OUT SELECT
(Yellow)(Red) (White) To input audio jack of
the television/amplifier/
receiver
Audio Video cord
To input video jack of
the television/amplifier/
receiver
220V-240V
115V-127V
AC POWER CORD
LINE VOLTS
Wall outlet
AC power cord

Page 3
English
XL-MV35TN
LVT0023-001A
[ U, UF ]
BEFORE USING FOR THE FIRST TIME
Putting batteries in the remote control
Thebattery compartment is located on the back of the remote control.
1. Insert a finger in the recess under the battery compartment
cover, and pull off the cover.
Installing batteries
2. Place the two accessory R6P (SUM-3)/AA (15F) batteries in
theremotecontrolaccordingtothepolaritymarkings(“+”and
“–”) inside the compartment and on the batteries.
3. Insert the two tabs of the cover in their respective slots, and
snap the cover in place.
The batteries last about one year with normal use. If function of the
remote control become erratic, replace the batteries.
Precautions for the safe use of batteries
Observe the following precautions for the safe use of batteries. Their
life will be shortened, they may burst or their contents may leak if they
are used improperly.
• Removebatteriesfromtheremotecontrolifitisnotgoingtobeused
for a long period of time.
• Remove dead batteries and dispose of them properly.
• Neverleavedeadbatterieslyingaround,takethemapart,mixthem
with other refuse, or throw them into an incinerator.
• Never touch liquid that has leaked out of a battery.
• Do not mix new and old batteries, or batteries of different types,
when replacing them.

Page 4
XL-MV35TN
LVT0023-001A
[ U, UF ]
OVERVIEW OF CONTROLS
The following is an explanation of the the basic function of controls
on the front panel of the Player and the remote control. The function
of some controls may be restricted in actual use depending on the
on-going operations. The remote control has twelve (12) unique
function buttons in addition to those on the player.
Left front panel of the Player
(Controls marked (R) have equivalents on the remote control.)
POWER button (R)
Turns the power on and off.
STANDBY indicator (Red)
Lights when the power cord is connected and the power is turned
off.TheSTANDBYindicator is not lit when the player is turned on.
KEY CONTROL button (R)
Transposes the music key.
DOWN button: used to flatten by a half tone.
NORMAL button: returns to original key tone.
UP # button: used to sharpen by a half tone.
MODE switch
Switches the KARAOKE/NORMAL/PBC OFF mode.
KARAOKE mode: one track playing mode.
NORMAL mode: continuous plural tracks playing mode. Re-
quired also for the Playback Control (PBC)
function.
PBC OFF mode: inhibits the Playback Control (PBC) function
of the video CD.
SPATIALIZER button (R)
Changes the sound mode. (See page 13.)
MPX button (R)
Activates the multiplex function, which switches to NORMAL
(stereo), L-ch monaural and R-ch monaural.
DIGITAL ECHO knob
Adjusts the degree of the echo effect for the microphone voice (1
through 3).
MIC1 to MIC3 knobs
Adjustsvolume ofthemicrophone correspondingto MICnumber.
PHONE jack
Used for connecting stereo headphones. The volume is set to a
predetermined level and is not adjustable.
KEY CONTROL jack
Used for connecting a microphone with key control function.
MIC jacks (1 through 3)
Used for connecting microphones (1 through 3). The jacks corre-
spond to MIC 1 to 3 volume knobs located above.
Center front panel of the Player
DISC1 to DISC3 trays
Used to load discs. To insert/remove one or up to three (3) discs,
press the 0OPEN/CLOSE button located at the right of the tray
corresponding to disc number.
VIDEO INTRO button (R)
Applies to video CDs only. The introductory five (5) seconds of
tracksonavideoCDaredisplayedonthetelevisionscreeninorder
to present the contents of the video CD.
Display window
Shows information about the status of operation.
BOOK DIGEST button (R)
DisplaysvideosegmentsyoumarkedwiththeBookmarkfunction.
(See page 14.)
Right front panel of the Player
0(OPEN/CLOSE) buttons (Disc number 1 to 3)
Used to open and close disc trays 1 to 3 respectively. When, after
opening the DISC1 tray, another 0(OPEN/CLOSE) button is
pressed, the DISC1 tray is first closed, then the other DISC tray
selected is opened.
DISC1 through DISC3 buttons with indicators (Green) (R)
Plays the disc of the number indicated on the button. As soon as
the disc begins playing, the indicator blinks.
Number keys (1 to 10) (R)
Usedtospecify a track number for playing,changing, or program-
ming. To operate numbers above ten (10), press the +10 button
once. The number keys (1 to 10) are then assigned the numbers
11to 20 insteadof1to 10. Themaximumkeynumber assignment
is 99.In PBCfunctionoperation,the numberkeysare additionally
utilizedfortheselection ofmenuitems.Seepage 18“Operationof
Playback Control function”.
PROGRAM button (R)
Any desired sequence of tracks can be programmed with the
numberkeys andthe+10 button. (Ontheremote controluse+10)
The program button cannot be used while the Playback Control
function is activated.
+10 button (R)
Used to shift the numbers assigned to the number keys to 11 or
higher (maximum 99).
RETURN button (R)
Utilized for operation with the PBC function. This button is used to
return to a menu screen during play.
4/ ¢PREV / NEXT buttons (R)
During operation with the Playback Control function
Invokes previous or next screen.
During operation without the Playback Control function
Skipsforwardorbackwardquicklyfromcurrenttrackbeingplayed.
1
STILL
NEXT
SELECT
PREV
RETURN
Play
B
6
PROGR
A
DOWN
POWER
KEY CONTROL
STANDBY
NORMAL
MIN MAX
DIGITAL ECHO
PHONES KEY CONTROL
PBC OFFKARAOKE
NORMAL UP
XL-MV35 VIDEO CD PLAYER
MIN MAX
MIC 1
MIN MAX
MIC 2
MIN MAX
MIC 3
SPATIALIZER MPX
BOOK DIGEST
VIDEO INTRO
DISC
3
TRIPLE TRAY
NTSC/PAL COMPATIBILITY
VIDEO CD
15
13
12
2524
2322
21 1716
8
3
654
7
910
12
11
14
1
2
3
4
5
6
7
8
9
10
11
12
13
14
15
16
17
19
18
20
21
22

Page 5
English
XL-MV35TN
LVT0023-001A
[ U, UF ]
OVERVIEW OF CONTROLS
3SELECT (PLAY) button (R)
Starts to play the disc with/without the Playback Control function.
7(STOP) button (R)
Stops play.
8STILL (PAUSE) button (R)
Temporarily suspends playing. Video motion freezes and audio
reproduction stops. Pressing the button repeatedly advances the
picture frame-by-frame. (Video CD only)
BOOKMARK button (R)
Places a “bookmark” at video segments you want to find later for
almost instant replay. (See page 14.)
B. SEARCH button (R)
Retrieves video segments which you marked with a bookmark.
(See page 14.)
Jog/Shuttle dial
Used for fast-forward, fast rewind, and still play.
Remote control unit
VCD POWER/TV POWER button
Turns the player on and off.
Whenpressedafteryou holddowntheSHIFTbutton, turnstheTV
on or off.
ON SCREEN button
Controlswhetherornotcontrolandoperationstatusaredisplayed
on the television screen or monitor.
CANCEL button
Cancels the latest track you have programmed. The latest pro-
grammed track is canceled whenever you press this button. Also
used to cancel a bookmark.
HIGHLIGHT button
Appliesto a video CD to seehighlightsofatrack. Displays the first
(5) seconds of each of nine (9) equal-time segments of the track.
MPX/V.REPLACE button
Activates the multiplex function. (See page 12)
WhenpressedafteryouholddowntheSHIFTbutton,activatesthe
vocal replace function, inserting your voice in place of the disc
vocals.
RANDOM/REPEAT button
Changes the disc track program to a random sequence from disc
1 through 3 respectively.
When pressed after you hold down the SHIFT button, repeats a
track or inserted discs from 1 to 3.
SLOW/V.MASKING button
Starts slow-motion playback.
WhenpressedafteryouholddowntheSHIFTbutton,activatesthe
voice masking function, playing the music with low-level vocals.
1/ ¡MANUAL SEARCH button
Shifts the playing location backward and forward quickly. Holding
down the button causes it to go much faster.
TV/VIDEO/SPATIALIZER button
Used to preset the remote control unit, to control some functions
on your TV set. (See page 10.)
WhenpressedafteryouholddowntheSHIFTbutton,changesthe
sound ambiance. (See page 13.)
SHIFT button
Usedtogetherwithotherkeysforvariousfunctions. (Seepage10)
TV VOL + / TV VOL – keys
Turns the TV volume up or down.
TV PROG – / TV PROG + / KEY CONTROL
Changes the television channel.
WhenpressedafteryouholddowntheSHIFTbutton,changesthe
key in which the music plays. (See page 16.)
VCD POWER
TV POWER
DISC 1 DISC 2 DISC 3
VIDEO
INTRO HIGHLIGHT BOOK
DIGEST MPX
V.REPLACE
RANDOM
REPEAT SLOW
V.MASKING
SELECT
1 2 3 4
5 6 7 8
9 10 +10 ON SCREEN
PROGRAM CANCEL B.MARK B.SEARCH
TV/VIDEO
SPATIALIZER
TV VOL+
bTV VOL– #
SHIFT
STOP
TV
PROG
–
TV
PROG
+
KEY CONTROL
31
32
33
39
40
34
35
29
30
36
37
38
MULTI BRAND REMOTE CONTROL
RM-SXMV55U
The controls with identical names on the Player and on the remote
control have the same function and are used in the same manner.
23
24
25
26
27
28
29
30
31
32
33
34
35
36
37
38
39
40
1 2 3 4 5
STILL
NEXT
SELECT
PREV
RETURN
PlayBack Control
VIDEO CD VERSION 2.0
6 7 8 9 01
PROGRAM
BOOKMARK
B.SEARCH
+
10
K DIGEST
D
ISC
T
RAY
28
20
27
19
15
25
18
24
2322
21 1716
26
DESIGNED BY JVC

Page 6
XL-MV35TN
LVT0023-001A
[ U, UF ]
BASIC OPERATIONS
Now you can play a
variety of video CDs!!
Overview of the three modes
ThisPlayerhasthree(3)modes: KARAOKE,NORMAL,andPBCOFF
mode. Theseare selected by the MODE switch. Thispermits various
ways of playing a video CD.
Display window
The display window indicates many aspects of control and operation
status.
Shows the disc number being played.
Showsmainlythetotalnumberoftracksandthetracknumberbeing
played.
Shows mainly the cumulative time (minutes and seconds) of the
track. Afterward, total time of the disc is displayed.
The combination of VCD, PBC, and CD-G indicators shows the
type of disc being played.
Each indicator in this area lights when the corresponding function
is activated.
KARAOKE mode:One track playing mode. Whenever one track has
completed play, the Player stops.
NORMAL mode: Continuous plural track playing mode. The Player
plays tracks continuously in the order they appear
on the disc.
PBC OFF mode: This mode is identical to the NORMAL mode,
except that the PBC function is inhibited.
To set the mode, move the MODE switch on the left side of the front
panel.
Triple disc tray usage
Uptothree(3)discscanbeloadedinthePlayer.Youmayinsertadisc
into any of the disc trays 1 through 3.
If you want to play only a specified disc, press the corresponding disc
1, 2 or 3 button located to the right of the 0(OPEN/CLOSE) button.
When three discs are inserted, basic order of playing is as follows.
• Pressing DISC 1: DISC 1 → DISC 2 → DISC 3 → STOP
• Pressing DISC 2: DISC 2 → DISC 3 → DISC 1 → STOP
• Pressing DISC 3: DISC 3 → DISC 1 → DISC 2 → STOP
NORMAL PBC OFFKARAOKE
DISC
3
TRIPLE TRAY
4
1 52 3
1
2
3
4
5

Page 7
English
XL-MV35TN
LVT0023-001A
[ U, UF ]
BASIC OPERATIONS
Preparation for playing
Turnonthetelevisionset,amplifierorreceivertowhichthePlayer
is connected. Then select the proper channel and mode to
operate the Player, and set the sound volume to a reasonable
level.
Press the POWER button on the front panel or remote control.
The STANDBY indicator
goes out.
The display window shows the initial information as shown below.
POWER STANDBY
ON/STANDBY
Easy start up
WithoutpressingthePOWERbuttonyoucanstartupthePlayerby
pressing 3SELECT button or disc buttons.
Inserting/removing disc(s)
Press the 00
00
0(OPEN/CLOSE) button (1 through 3) to open the disc
tray. Then place the disc in the round recess of the tray with label
side up. To close the tray, press the 00
00
0(OPEN/CLOSE) button
again.
If you press the 0(OPEN/CLOSE) button of the disc which is playing,
the Player stops and then opens the tray.
If you press the 0(OPEN/CLOSE) button of a disc that is not being
played, you can change discs without stopping play.
Note
• When loading a disc in the disc tray, be sure to position the disc
inside the recess. Otherwise, the disc will be damaged when the
disc tray is closed, and the disc cannot be removed from the unit.
CORRECT
CD
Tray
INCORRECT
Starting to play disc(s)
Pressthe33
33
3SELECT(PLAY)button. ThePlayerstartstoplayfrom
the disc indicated in the display window.
PressoneoftheDISC1through3buttonsandthePlayerplaysthe
disc you pressed, from the 1st track. For individual track selec-
tion, use the number keys or the 44
44
4/ ¢¢
¢¢
¢PREV/NEXT buttons.
or
SELECT
When you start play, the Display window shows the disc number and
the track number being played.
During play, the indicator on the DISC button blinks.
If the PBC function is activated, the display window shows “Pb” until
youplayatrack,andthetelevisionscreenshowstheinitialmenu,DISC
number, and “PBC”. See page 18, “Operation of Playback Control
function”.
When you press 3SELECT button during play, the disc will restart
from the beginning of the track except when the PBC function is
activated.
Using number keys
Press the number keys to select numbers.
On the Player.................... 1 to 10 and +10 key
Example: For number 5, press 5. For number 15, press +10, then 5.
For number 20, press +10 button, then 10. For number 32, press +10
three times, then 2.
On the remote control .....1 to 10 and +10 key
Select numbers as described above.
1 2 3 4
5 6 7 8
9 10 +10
Note
• Whenyoupressthenumberkeys,thetrackwillstartplayingwithout
pressing 3SELECT button.
1 2 3 4 5
6 7 8 9 01
+
10

Page 8
XL-MV35TN
LVT0023-001A
[ U, UF ]
BASIC OPERATIONS
Stopping play
Press the 77
77
7(STOP) button to stop play at any time.
Auto search/Manual search
On the Player, during play, pressing the 44
44
4button once causes
the Player to replay the current track from the beginning. Press-
ingthe¢¢
¢¢
¢buttononcecausesthePlayertoskiptothenexttrack.
The current position on the disc is displayed on the television
screen.
Pausing play
Press the 88
88
8STILL (PAUSE) button to temporarily suspend play.
Notes
• When the 8STILL (PAUSE) button is pressed once, “PAUSE”
appearsonthetelevisionscreen,thevideomotionfreezesandthe
soundisturnedoff.Thestillpictureadvancesframe-by-frameeach
time the 8STILL (PAUSE) button is pressed, or the shuttle dial is
rotated to the right. This frame-by-frame function is effective only
for video CDs.
• To release the pause, press the 3SELECT or blinking DISC 1
through 3 button.
• During “PAUSE” the time counter on the display will blink.
STILL
STILL
Rotating the shuttle dial to the right causes the disc to fast
forward. Rotating it to the left causes it to fast reverse.
(Remote control)
NEXTPREV
Note
• Insomecircumstances,thisfunctionisnotavailablewhenthePBC
function is activated.
• Theangle at whichyouhold the shuttledialdetermines the manual
search speed.
Slow-motion playback on the remote
control unit
Press the SLOW/V.MASKING button to play in slow-motion. By
pressing the SLOW/V.MASKING button consecutively, the play-
back speeds are cycled as shown below.
SLOW
V.MASKING
On the remote control, holding down the 11
11
1/¡¡
¡¡
¡buttons causes
the disc to fast forward or reverse.
Continuing to hold down the buttons causes it to search much
faster.
2-1
B 33– – – E M.SEARCH
1:30
or
(Television screen)
BCOKMARK
B.SEARCH
(Remote control)
1/4 1/8 1/16 Normal
Note
• This function can only be used when playing a Video CD.

Page 9
English
XL-MV35TN
LVT0023-001A
[ U, UF ]
PHONES
BASIC OPERATIONS
Using the remote control
Presetting the remote control to operate
your own TV
Youcan use the Player’sremotecontrolunit to controlsomefunctions
on your TV set (e.g., turning the TV on and off, adjusting volume, or
selectingchannels). First, though, youmustpreset the remotecontrol
to make it compatible with your TV.
Operation
1. Check the Preset Code Table (page 10) to determine the two-
digit brand code number for your TV.
2. WhileholdingdowntheTV/VIDEO/SPATIALIZERbuttononthe
remote control, press the Number keys to insert the two-digit
brandcode number. (For example, if thecode number is "28",
press Number key 2, then 8. If the first digit is a "0", press 10.
Thus,if the code numberis "09", press Number key 10, then9.
If the code number is "10", press Number key 1, then 10. If it
is "20", press Number key 2, then 10.)
Notes
• Before the remote control unit leaves the factory, the brand code
number is set as No. 01 (JVC).
• Depending on your television set’s age and other factors, brand
code numbers may be different from those shown in the table. In
sucha case,tryoutother codesuntilyou find onethatcorresponds
to your television.
3. While still holding down the TV/VIDEO/SPATIALIZER button,
press the STOP button on the remote control.
4. The TV is turned off if the code number is correct. Repeat the
procedure from the beginning if you weren’t successful the
first time.
TV/VIDEO
SPATIALIZER
STOP
Using stereo headphones
Connecting stereo headphones
Connect stereo headphones to the PHONES jack at the lower-left of
the front panel. The volume level is fixed and cannot be adjusted.
+

Page 10
XL-MV35TN
LVT0023-001A
[ U, UF ]
BASIC OPERATIONS
Preset code table
No.
01
02
03
04
05
06
07
08
09
10
11
12
13
14
15
16
17
18
19
20
21
22
23
24
25
26
27
28
Television manufacturer
JVC
PANASONIC
SONY
SHARP
TOSHIBA/BEIJING/CHANGHONG
MITSUBISHI/CHANGHONG
HITACHI
SANYO
FUNAI
AIWA
DAEOO
SAMSUNG
LG (GOLDSTAR)
THOMSON
FERGUSON
PHILIPS/TCL/CHANGHONG
GRUNDIG
ITT
MIVER
FINLUX
NOKIA
NEC
JINXING/PEONY1
PEONY2
PEONY3/CHANGHONG
KONKA
PEIJIN/NOBLEX
TCL
Using the SHIFT button on the remote
control unit
You can control other functions with the remote control, simply by
holding down the SHIFT button while pressing another button. Some
ofthesefunctionsareusefulforKaraokeandVideoCDplaying,others
for controlling the TV.
77
77
7SHIFT button functions for Karaoke and Video CD playing
SHIFT + MPX ⇒VOCAL REPLACE
SHIFT + RANDOM ⇒REPEAT
Push RANDOM several times to toggle the repeat function:
ALL DISC →1 TRACK →OFF
SHIFT + SLOW ⇒VOCAL MASKING
SHIFT + TV/VIDEO ⇒SPATIALIZER
Push TV/VIDEO several times to toggle the SPATIALIZER func-
tion:
SPATIALIZER H →SPATIALIZER L →OFF
SHIFT + TV PROG – ⇒KEY CONTROL ( )
SHIFT + TV PROG + ⇒KEY CONTROL (#)
77
77
7SHIFT button functions to control the TV
SHIFT + VCD POWER ⇒Turns the TV on and off
SHIFT + 1 ⇒TV Channel 1
SHIFT + 2 ⇒TV Channel 2
•
•
•
SHIFT + 10 ⇒TV Channel 0*
SHIFT+ONSCREEN⇒1-(ThefirstdigitofaTVChannelnumber
10 to 19. Push a Number key to insert the second digit.)*
SHIFT + B.SEARCH ⇒2 - (The first digit of a TV Channel number
20 to 29. Push a Number key to insert the second digit.)*
SHIFT + +10 ⇒-/- - (To change a one - digit or to change a two -
digit TV channel number, using a Number key.)*
SHIFT+ B.MARK ⇒ENTER(Push after choosing achannel. This
function registers the channel you have chosen.)*
Note
• Theasterisk * indicates that these operations do not work for some
manufacturers’ television sets.
SHIFT

Page 11
English
XL-MV35TN
LVT0023-001A
[ U, UF ]
2-1 1:30
PROGRAMMED SONGS
VARIOUS UNIQUE FUNCTIONS
Display of operations status
Preparation
This function is controlled by the remote control.
Operation
Pressthe ON SCREEN buttonon the remote control. By pressing
the ON SCREEN button, the following information may be easily
and quickly displayed or removed from the television screen.
Time,Echoeffect, Key control, Program, Repeat, Random,Multiplex-
ing, Vocal replace, Vocal masking, Bookmark, etc.
Various functions can
enhance your enjoyment
2. Specify the disc by the DISC (1 through 3) button and then the
track by the number keys successively. You can program up
to nine (9) tracks by repeating this procedure.
3. To play the programmed tracks press the 33
33
3SELECT button.
Notes
• The track number playing, next track programmed, and number of
programmedtracks are displayed from the left-topof the television
screen. You may use the ON SCREEN button to delete this
information.
• Once the programmed track is played, it is deleted from the
program.
• You may continue to program even while the disc is playing.
Canceling a programmed track
Operation
There are three (3) canceling functions (canceling the last pro-
grammed track, canceling the current track, canceling the next
track to be played).
• To cancel the last programmed track press the CANCEL
button on the remote control and the last programmed track
will be canceled. This can be done while a disc is playing.
(Television screen)
(Remote control)
Programming the track sequence you want
Preparation
It is not possible to enter programming mode during play. If playing,
stop the player with the 7STOP button.
Operation
1. Press the PROGRAM button to enter the programming mode.
PROGRAM is displayed in the Display Window.
(Television screen)
PROGRAMMED SONGS
2-1 3-1
2-2 1-1
2-3 1-2
2-4 1-3
2-5 The number located lowest is the
last track programmed.
• To cancel the current track press 77
77
7STOP button.
• To cancel the next track, wait until the current track has
finished and press the ¢¢
¢¢
¢button and the next track will be
canceled and the unit will go to the next programmed track.
Note
• To verify the tracks you programmed, stop the Player and see ON
SCREEN information
Clearing a program
To delete all programmed tracks you have entered, press the 77
77
7
STOP button and then the PROGRAM button. “PROG OFF” will
be displayed on the television screen.
PROGRAM
STILL
Note
• ThePlayer doesnotcancelthetrack programevenif the 7(STOP)
button is pressed. Pressing the 3SELECT (PLAY) button again
causes the Player to resume playing from the next track.
PROGRAM
ON SCREEN

Page 12
XL-MV35TN
LVT0023-001A
[ U, UF ]
VARIOUS UNIQUE FUNCTIONS
Playing a multiplex sound CD
This function is used for multiplex sound discs.
Operation
Bypressing theMPX button consecutively,channel multiplexing
modes are cycled as shown below.
Repeating tracks
It is possible to repeat all discs or only a single track.
Preparation
This function is controlled by the remote control.
Operation
Hold down the SHIFT button while you press the RANDOM/
REPEAT button on the remote control. Channel REPEAT modes
are cycled as shown below.
RANDOM
REPEAT
(Remote control) (Display window)
→All discs
→1 track
REPEAT ALL
(All discs) REPEAT1
(1 track) REPEAT OFF
Notes
• When playing a programmed sequence of tracks, only one track
repeat is available.
• Only REPEAT1 and REPEAT OFF are available in KARAOKE
mode.
• The Repeat function is not available when the player is set to PBC
ON.
• Only REPEAT ALL is available when the player is in RANDOM
mode.
• You cannot repeat the segment between bookmarks.
Randomly playing tracks
Preparations
• This function is controlled by the remote control.
• The RANDOM button is effective only in NORMAL or PBC OFF
mode.
• This function plays tracks randomly from one disc.
Operation
1. Stop the Player.
2. Press the RANDOM/REPEAT button and random playing will
start.
(Remote control)
3. To cancel random playing, after stopping the Player (77
77
7STOP
button), press the RANDOM/REPEAT button again.
Note
• Random is not effective in program or KARAOKE mode.
STILL
(Television screen)
Viewing the VIDEO INTRO of a video CD
Preparation
When you play a video CD with the Playback Control function, the
mode switch should be in the PBC OFF mode or KARAOKE mode.
Operation
1. Play the disc you want to see a digest of.
2. Press the VIDEO INTRO button on the Player or the remote
control just after starting disc play. Then the Player starts to
display in sequence the first five (5) seconds and track num-
bers of all tracks on the disc.
VIDEO
INTRO
3. To select a track during digest display, press the number key
corresponding to the item number on the television screen.
(Television screen)
(Television screen)
NORMAL
(left-channel/
right-channel)
L-CH MONO R-CH MONO
RANDOM
REPEAT
RANDOM
REPEAT
MPX
123
VIDEO INTRO
456
789
(Remote control)

Page 13
English
XL-MV35TN
LVT0023-001A
[ U, UF ]
Programming during VIDEO INTRO
Operation
1. Stop play.
2. Press the PROGRAM button so that PROGRAM is lit in the
display.
3. Press the disc button you want to play, and enter 1 on the
number keys.
4. Pressthe33
33
3SELECTbuttonandthen,afterthedischasstarted
to play, press the VIDEO INTRO button.
5. The Player starts to display in sequence the first five (5)
secondsandtracknumbersofalltracksonthedisc. Selectthe
numbers you want to program. You can program nine (9)
tracks.
6. Press the 33
33
3SELECT button to play.
Selecting the SPATIALIZER mode
Youcanchangethesoundambianceandenjoyadifferentsoundusing
the Spatializer function.
Operation
1. Choose one of the following two sound modes to change the
sound ambiance.
SPATIALIZER H : For movies and television programs
SPATIALIZER L : For music clips
2. To select the Spatializer mode, push the SPATIALIZER button
one or more times.
When one of the Spatializer modes is selected, the
SPATIALIZER indicator on the front panel is illuminated.
VARIOUS UNIQUE FUNCTIONS
Eachtimeyoupressthebutton,youtogglethemodeasfollows:
Viewing the highlights of a video CD
This function is used for a movie video CD.
Preparations
• When you play a video CD with the Playback Control function, the
modeswitch should beinthePBC OFF modeorKARAOKEmode.
• This function is controlled by the remote control unit.
Operation
1. Start playing the track you want to see the highlights of.
2. After the track begins to play, press the HIGHLIGHT button on
the remote control.
3. To select one of the nine (9) segments, press the number key
(1 to 9) of the segment which you want to play.
Notes
• Whenyouchooseahighlightitwillstartfromfive(5)secondsbefore
the shown time below each segment.
• The highlights show the proceeding five (5) seconds up to the
displayed time on each highlight.
• Thesegmentsareeachofnine(9)equal-timedivisionsofthetrack.
• Nine (9) different highlights are displayed for one (1) minute.
• If no highlight is chosen in the one (1) minute period in NORMAL
mode or PBC OFF mode, the next nine (9) segment highlights will
begin. In KARAOKE mode highlights will stop.
• While in VIDEO INTRO or HIGHLIGHT, sometimes image is
partiallydistorted. Thissymptomiscausedbynoiseinthediscitself
or incorrect manufacturing, not by a malfunction of the Player.
(Remote control)
HIGHLIGHT
(Television screen)
3. To cancel the effect, press the SPATIALIZER button until the
word “OFF” appears on the television screen.
Note
• Depending on which type of TV, amplifier or receiver to combine
with this device or which software to play back, sound may be
distorted when the SPATIALIZER function is turned on. In such
cases, set SPATIALIZER mode to “L”.
• In the following cases, the SPATIALIZER function does not work
evenwhenitisturnedon. Alwaysusethisfunctioninspecifiedmode.
1) Be sure to set MPX mode of this device to “OFF (Lch + Rch)”.
When set to “L mono” or “R mono” mode, the SPATIALIZER
function does not work.
2) Be sure to set the sound mode of the TV, amplifier or receiver
which is connected to this device to “STEREO”. When set to
monauralmode,theSPATIALIZERfunctiondoesnotwork. The
SPATIALIZERfunctiondoesnotworkwithmonauralTV,either.
3) Whensoundmultiplex(KARAOKE)softwareisplayedbackwith
theSPATIALIZERfunctionturnedon,youmayhavean“unnatu-
ral” feeling of sound spatiality. To play back sound multiplex
software, basically set SPATIALIZER mode to “OFF” or “L”.
4) The SPATIALIZER function does not work for the sound which
is recorded through the MIC terminal of this device.
• Thisfunction isnoteffectiveifyou attempttouse, atthesame time,
thesimilarfunctionofatelevision,receiverorotherdeviceconnected
to this Video CD Player. Turn off the function on your television,
receiver, or other device before selecting your Video CD Player’s
SPATIALIZER mode.
SPATIALIZER
SPATIALIZER H SPATIALIZER L OFF
123
HIGH LIGHT
456
789
(Television screen)
Certain audio features of this product manufactured
under a license from Desper Products, Inc.,
Spatializer® and the circle-in- square device are
trademarks owned by Desper Products, Inc.

Page 14
XL-MV35TN
LVT0023-001A
[ U, UF ]
VARIOUS UNIQUE FUNCTIONS
Marking segments for later viewing with
the Bookmark function
TheBookmarkfunctionlets youmarksegments ofaVideoCD,so that
youcanhavealmostinstantplaybackofdesiredsceneslater. Youcan
mark segments on up to ten discs, with a maximum of nine segments
per disc.
Evenifyoutakethediscoutoftheplayer,itsbookmarkswillstaystored
for later use, until you erase them.
Operation
While playing the disc, press the BOOKMARK button at the
segmentsyouwanttomarkforlater playing. Bookmarknumbers
appear on the television screen.
Playback with the
Bookmark function
Using the BOOKMARK SEARCH button
77
77
7With PBC off
1. Press the BOOKMARK SEARCH button while playing a disc.
TheBOOKMARKSEARCHlightwillflashonandoff,indicating
the Player is in the Bookmark Search mode.
Notes
• The Bookmark function works only with Video CDs.
• The BOOKMARK function is most easily used when the Player is
in PBC OFF mode.
• When you begin marking segments in any one of the three Player
modes (KARAOKE, NORMAL or PBC OFF), all subsequent mark-
ings and searches for that disc must be done in the same mode.
• If you mark a segment when the Player is set for the Playback
Control (PBC) function, the mark is placed at the beginning of the
scene.
Using the BOOKMARK DIGEST button
1. Press the BOOKMARK DIGEST button while playing the disc.
2. The marked segments will be highlighted on the screen, with
their respective numbers (maximum of nine).
3. Press the Number key (1 to 9) which corresponds to the
number of the segment where you want to start play.
Note
• If you plan to use the BOOKMARK DIGEST function, register all
bookmarks with the player in the same mode.
• The Bookmark Digest function is not available in PBC function.
2. Press the Number key (1 to 9) which corresponds to the
numberof the segment whereyou want to start play. Or press
the 44
44
4or ¢¢
¢¢
¢button until the desired bookmark number
appears on the screen.
Note
• To exit the Bookmark Search mode and return to regular viewing,
press the BOOKMARK SEARCH button again.
77
77
7With PBC on
1. Press the BOOKMARK SEARCH button while playing a disc.
The play will stop and the Player will enter Bookmark Search
mode.
2. Press the Number key (1 to 9) which corresponds to the
number of the segment where you want to start play.
Note
• The Bookmark Search function ends automatically, and the player
returns to reqular viewing.
Canceling individual bookmarks
1. If the Player is in PBC OFF mode, start playing the segment
whose bookmark you want to cancel.
2. Press the CANCEL button. The bookmark for the segment
immediately preceding the part you are playing will be can-
celed. (If the Player is in KARAOKE or NORMAL mode, the
bookmark with the highest number will be canceled.)
BOOK DIGEST
BOOKMARK
1 2 3 4 5
6 7 8 9 01
+
10
B.SEARCH
B.SEARCH
CANCEL
Note
• When you cancel a bookmark number, all subsequent bookmark
numbers change, moving up one level to fill the gap you made.
• If the Player is in PBC ON mode, the last bookmark you registered
will be canceled.

Page 15
English
XL-MV35TN
LVT0023-001A
[ U, UF ]
77
77
7When the disc whose bookmarks you want to cancel is not in
the Player:
This cancels all bookmarks on the disc which was played the least
recently.
1. Hold down the 77
77
7STOP button on the Player for at least three
seconds.
Using a microphone
Using a wired microphone
Operation
1. Insert the connector cable into the end of the microphone.
2. Press the cable sleeve against the microphone base and turn
clockwise. Keep turning until sung.
3. Uptothree(3)microphonescanbeconnectedtotheMICjacks
on the front panel.
VARIOUS UNIQUE FUNCTIONS
MIC 1 MIC 2 MIC 3
MIN MAX
MIC 1
MIN MAX
MIC 2
MIN MAX
MIC 3
MIN MAX
MIC 1
MIN MAX
MIC 2
MIN MAX
MIC 3
STILL
Canceling all bookmarks on individual
discs
77
77
7When the disc whose bookmarks you want to cancel is in the
Player:
This cancels all bookmarks on the disc whose play you stopped.
1. Stop play. Hold down the 88
88
8STILL (PAUSE) button on the
Player for at least three seconds.
DISC: 3
BOOKMARK
CANCEL
The total number of
discs with bookmarks
PROGRAMMED SONGS
(Television screen)
STILL
DISC: 1
BOOKMARK
CANCEL
PROGRAMMED SONGS
(Television screen)
4. Switch the microphone power on.
5. Turn the MIC 1 through MIC 3 knobs clockwise (level up) or
counterclockwise (level down) as desired.
2. Keep holding down the 88
88
8STILL (PAUSE) button until book-
mark information on the television screen stops blinking.
2. Keep holding down the 77
77
7STOP button until bookmark infor-
mation on the television screen stops blinking.

Page 16
XL-MV35TN
LVT0023-001A
[ U, UF ]
Adjusting music key
Press the KEY CONTROL buttons ( or #) to change the key in
which the music plays. To return the music to its original key,
press the NORMAL button.
You can adjust the music using the remote control unit also.
Notes
• The degree the key has been sharpened or flattened is displayed
on the television screen.
• When the song ends the key control will return to NORMAL mode
automatically.
Adjusting echo effect
Turn the DIGITAL ECHO knob clockwise (level up) or counter-
clockwise (level down) to adjust the echo effect as desired.
MIN MAX
DIGITAL ECHO
DOWN
KEY CONTROL
NORMAL UP
VARIOUS UNIQUE FUNCTIONS
Table of contents
Other JVC CD Player manuals