Mareno Salamander SE40 User manual

SPARE PARTS DIAGRAM FOR
First Choice Group
Blakeney Way, Kingswood Lakeside
Cannock, Staffs, WS11 8LD
TEL: 01543 577778 FAX: 01543504141
Email: [email protected]
Web: www.firstchoice-cs.co.uk
Salamander Grill
SE40 /SE60 / SE80

SE 40 SE 60 SE 80 SCP
Dimensioni External Außenmaße Dimensions Dimensiones mm mm mm mm
esterne dimensions extérieures externas 400x450 600x450 800x450 550x450
x500h 500h x500h x500h
Dimensioni Plate Abmessungen Dimensions Dimensiones mm mm mm mm
piano cottura dimensions Kochplatte plaque de cuisson plano de cocción 400x350 600x350 800x350 550x350
Potenza Installed Nennleistung Puissance Potencia kW kW KW KW
installata power installée instalada 2 4 6 6
Tensione Voltage Spannung Tension Tensión V 230 ~
V 230 ~ V 400~2N V 400~3N V 400~3N
Schema di foratura parete in calcestruzzo per fissaggio staffe
Schema für Betonwandbohrungen zur Befestigung der Wandhalterungen
Diagram for drilling cement walls for the fastening of brackets
Schéma de perçage de la paroi en béton pour fixer les étriers
Esquema de perforación de la pared de hormigón para fijación soportes
1

Part 1 Installation
General instructions
The appliance referred to in this manual has been
manufactured in conformity to the following Directives:
73/23/EEC, 93/68/EEC “Low Voltage”; 89/336/
EEC, 92/31/EEC, 93/68/EEC “Electromagnetic
Compatibility".
The appliance shall be installed by a qualified tech-
nician according to the regulations and directives in
force in the country where it is installed, as well as the
instructions in this manual. The appliance shall be
used exclusively by trained personnel and only for
the purpose for which it has been designed. The
appliance should be checked once a year by a
qualified technician.
Remove the packaging form the appliance as well
as the protective plastic sheet, and, if necessary, re-
move traces of glue with a suitable solvent. Remove
the screw, to be found on the rear of the appliance,
which locks the movable shelf in place. To dispose of
the packaging, follow local directives.
The technical specifications are to be found on the
specification plate attached to the appliance’s rear
panel.
When installing the appliance, all the regulations
in force shall be observed, such as:
• all applicable national laws in effect;
• all regional or local regulations, such as building codes;
• directives and regulations of the local electrical
energy supplier;
• accident prevention regulations in effect;
• fire prevention regulations;
• applicable I.E.C. regulations.
The appliance should be installed under an
extractor fan for the removal of cooking fumes.
If the appliance is installed near walls,
panels or kitchen furniture, etc., these must
be made of fire-proof material; if they are
not, they must be protected with fire-proof
material which insulates from heat.
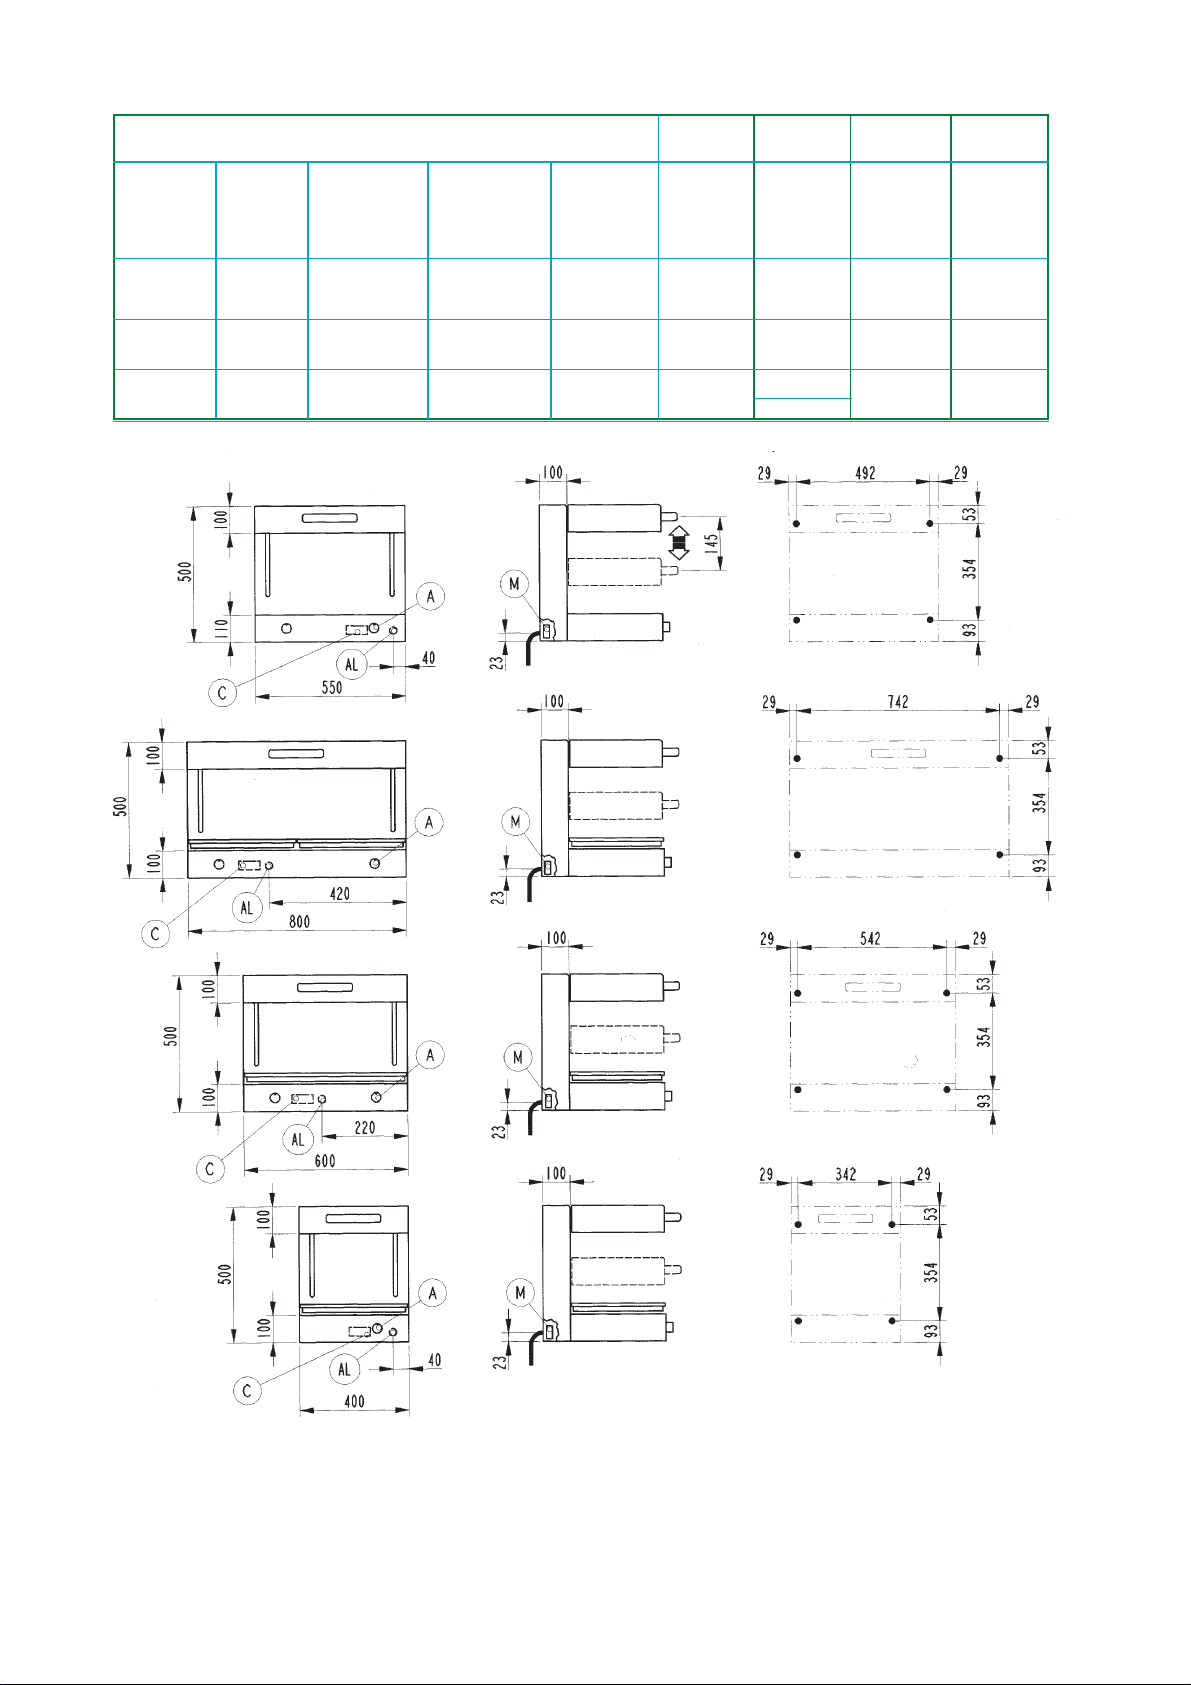
ELECTRIC SALAMANDER SE 40 - SE 60 - SE 80 - SCP
Connection to the mains
Before connecting the appliance to the mains, com-
pare the electrical set-up data on the data plate to the
characteristics of the local electrical energy supply.
The appliance is equipped with a connecting cable
to which the installer must connect a circuit breaker
which cuts off the flow of electricity in all poles; the
distance between the open contacts must be at least
3 mm. The circuit breaker must be easy to reach.
The cable must not be placed near heat sources.
The area around the cable must not have a tempera-
ture above 50°C. If the cable must ever be replaced,
consult the wiring diagram attached. The supply
cable’s characteristics must be of a HO7 RN-F type,
or higher, and its minimum cross-section must be in
accordance with the following table:
MODEL CABLE CROSS-SECTION
SE 40 V 230~ 3x1,5 mm2
SE 60 V230~ 3x2,5 mm2
SE 60 V400~2N 5x1,5 mm2
SE 80 V400~ 3N 5x1,5 mm2
SCP V400~ 3N 5x1,5 mm2
Remove panel “C”, to be found on the rear side,
in order to make the “M” terminal board accessible.
Disconnect the conductors of the electric supply cable
from the terminal board, loosen the cable clamp, and
replace the cable following the procedure inversely.
It is absolutely necessary to earth the appliance.
For this purpose, there is a screw marked with the
symbol near the terminal board to which the
earthing conductor must be connected.
The appliance must also be connected to a
unipotential earthing circuit. The connection must be
made by means of the screw marked to be found
on the rear panel of the appliance.
The Manufacturer declines any responsi-
bility for damage caused by improper or in-
correct installation or maintenance of the ap-
pliance, or failure to observe safety regula-
tions!
GB IE
4

General instructions
Part 2 Use
Connections to the mains, installation, and
maintenance of the appliance shall be car-
ried out by qualified technicians only, in ob-
servance of all applicable regulations!
• Should the appliance be wall-mounted, use the
appropriate optional brackets which must be re-
quested. Make sure that the wall is made of ma-
sonry, and not from any inflammable material, and
can bear a load equivalent to a 60 kg weight.
The brackets which are to be fastened to the wall
should be fixed by making holes, as shown on the
installation diagram, and using 4 steel screw an-
chors suitable for M6 screws (SLM6 Fischer or
equivalent.)
• This appliance has been designed exclusively for
cooking food. It has been designed for use in
community kitchens and must be operated exclu-
sively by qualified personnel.
• Care must be taken when operating the machine
as surfaces are very hot.
Maintenance
No particular maintenance is necessary other than
normal cleaning. The appliance should be checked once a year by a repair service. For this purpose
a maintenance contract should be stipulated.
Failure to function properly
Failure to function does not always depend on the
quality of the components used. These appliances
are manufactured using top quality components. Fail-
ures may be caused by voltage surges, or dust and
dirt in the operating components.
In any situation where improper functioning of the
appliance is suspected, turn it off and disconnect
it from the mains. Call the authorised repair service.
Unauthorised persons should never at-
tempt to repair the appliance, or carry out
maintenance. Tampering with the appliance
voids the warranty!
Cleaning and care of the appliance
Do not wash the appliance with water
jets, as water might reach the electric com-
ponents, resulting in faulty operation and
damage to safety systems!
• If the appliance will not be used for a long period
of time, disconnect it from the mains and clean it
with soapy water, rinse it off and dry it carefully.
Spread a thin layer of vaseline oil on the surface.
• The bowl must be washed with soapy water daily.
• Let the appliance cool down before cleaning the
bowl, or any other parts.
Turning the appliance off
• Place the knob in the off position “ ” • Press the circuit breaker switch to disconnect the
appliance from the mains.
Turning the appliance on
• Press the circuit breaker switch to connect the ap
pliance to the mains.
• Rotate knob “A” so that the indicator mark on the
control panel corresponds to the cooking tempera-
ture desired.
The green warning light comes on to indicate the ap-
pliance is powered. Each time the temperature
drops below the predetermined value, the energy-
regulator switches the heating elements.
When in position "∞", the heating elements are
always on..
5

12
SE 40
V. 230~
Cod. 1040
Dis. 541016700
00287

13
SE 60
V. 230~
Cod. 1060
Dis. 541017000
00287

14
SE 60
V. 400/2~
Cod. 1064
Dis. 541016800
00287

15
SE 80
V. 400/3~
Cod. 1080
Dis. 541016900
00287

16
SCP
V. 400/3~
Cod. 50060
Dis. 541017100
00287

17
5410.001.00
SCHEMA ELETTRICO - WIRING DIAGRAM
SE40 V. 230~

18
5410.008.00
SCHEMA ELETTRICO - WIRING DIAGRAM
SE60 V. 230~

19
5410.006.00
SCHEMA ELETTRICO - WIRING DIAGRAM
SE60 V. 400 2~

20
5410.003.01
SCHEMA ELETTRICO - WIRING DIAGRAM
SE80 V. 400 3~

21
5410.030.01
SCHEMA ELETTRICO - WIRING DIAGRAM
SCP V.400 3~

Il costruttore si riserva il diritto di modificare senza preavviso, le caratteristiche delle apparecchiature presenti in questa pubblicazione.
The manufacturer reserves the right to modify the appliances presented in this publication without notice.
Der Hersteller behält sich das Recht vor, die in dieser Broschüre vorgelegten Geräte ohne Voranzeige zuändern.
Le Fabricant se réserve le droit de modifier sans préavis les caractéristiques des appareils présentés dans cette publication.
El Constructor se reserve el derecho de modificar sin previo aviso, las caracteristicas de los aparatos presentados en esta publicacion.
04/99
This manual suits for next models
3
Table of contents
Other Mareno Grill manuals
Popular Grill manuals by other brands

Redmond
Redmond SteakMaster RGM-M825P user manual

stockli
stockli SWING operating instructions

tepro
tepro Billings 1043 instruction manual

Asmoke
Asmoke AS700P Assembly and operating instructions

Tera Gear
Tera Gear 13 01 3008TG Assembly instructions and owner's guide

Weber
Weber SMOKEY MOUNTAIN COOKER owner's guide