Mark 47-53 GM User manual

6625 West Wilshire * Oklahoma City, OK 73132 * (405)721-7945 * Fax (405)721-8906
www.mar-k.com
BED PARTS ASSEMBLY GUIDE
47-53 GM SHORT STEPSIDE
If you have not yet disassembled your original bed, make notes or sketches and take pictures of part locations
to aid in the assembly procedure. Use the following steps to assemble the entire bed to test fit all parts.
1. Begin by installing a 5/16" flat washer, lock washer, and nut onto one
end of the front bed panel tie rod. Stand the front bed panel on end.
Insert the tie rod end without hardware into the front bed panel top curl
plug. While looking down through the curl, align the tie rod with the oppo-
site end plug of the front panel curl. See figure 1.
2. Insert the tie rod end without hardware through the top hole in bed side.
Secure with a 5/16" flat washer, lock washer, and nut. Bolt the front bed
panel side flange to the inside of the bed side with (4) 1/4"-20 x 5/8" hex
head bolts, lock washers, and nuts. See figure 2.
3. Remove the hardware from the other end of the front bed panel tie rod.
Install this end through the other bed side and secure with a 5/16" flat
washer, lock washer, and nut.
4. Bolt the front bed panel to the other bed side with (4) 1/4"-20 x 5/8" hex
bolts, lock washers, and nuts. See figure 3.
5. Fit the rear cross sill inside the lower portion of the bed side rear stake
pockets with the open side of the rear cross sill facing downward. See
figures4and5. Thebracketandflangedsideoftherearcrosssillfaces
towardthefrontbedpanel.
6. Using(10) 5/16"-18 x 3/4"indented hex head bolts,nuts,and lock wash-
ers, bolt the rear cross sill to the stake pockets. Leave the top two holes
for tailgate hinges empty for now.
fig. 1
fig. 2
fig. 3
fig. 4
fig. 5
JAZ:instructions\instruct\47-53bed.pm6 pg 1

JAZ:instructions\instruct\47-53bed.pm6 pg 2
6625 West Wilshire * Oklahoma City, OK 73132 * (405)721-7945 * Fax (405)721-8906
www.mar-k.com
7. Once these four pieces of the bed are assembled, you will need to make
sure your bed is square. Measure the bed width at the top and bottom of
bed sides to ensure that the bed sides are straight up and down and are
50" apart. See figure 6. These measurements should be within 1/16" of
each other to ensure bed squareness. Tighten rear cross sill bolts.
8. Also measure crosswise from the front of the bed to opposite rear of the
bed on both sides. See figure 7. Now tighten all bolts.
9. Place the assembly on supports horizontally to gain access to both
the top and bottom of the bed floor area. See figure 8. This can also be
achieved by standing the bed assembly vertical. Place a blanket or other
suitable protection on the floor and stand the bed assembly on the front
bed panel.
10. Place the wood boards that have only one bed strip groove (referred to
as “edge boards”) under the angle strips on the bed sides. See figure 9.
The non-grooved edge should be toward the bed side. Leave approxi-
mately a 1/16" inch gap between the bed side and the board.
11. Mark all holes to be drilled in the two wood boards through the angle
strips square holes. See figure 9.
12. Remove these two boards and drill all holes marked using a 3/8" wood
bit. Be careful not to splinter the other side of the board when drilling.
Placing a wood block behind the board where drilling will help prevent
this. See figure 10.
fig. 6
fig. 7
fig. 8
fig. 9
fig. 10

JAZ:instructions\instruct\47-53bed.pm6 pg 3
6625 West Wilshire * Oklahoma City, OK 73132 * (405)721-7945 * Fax (405)721-8906
www.mar-k.com
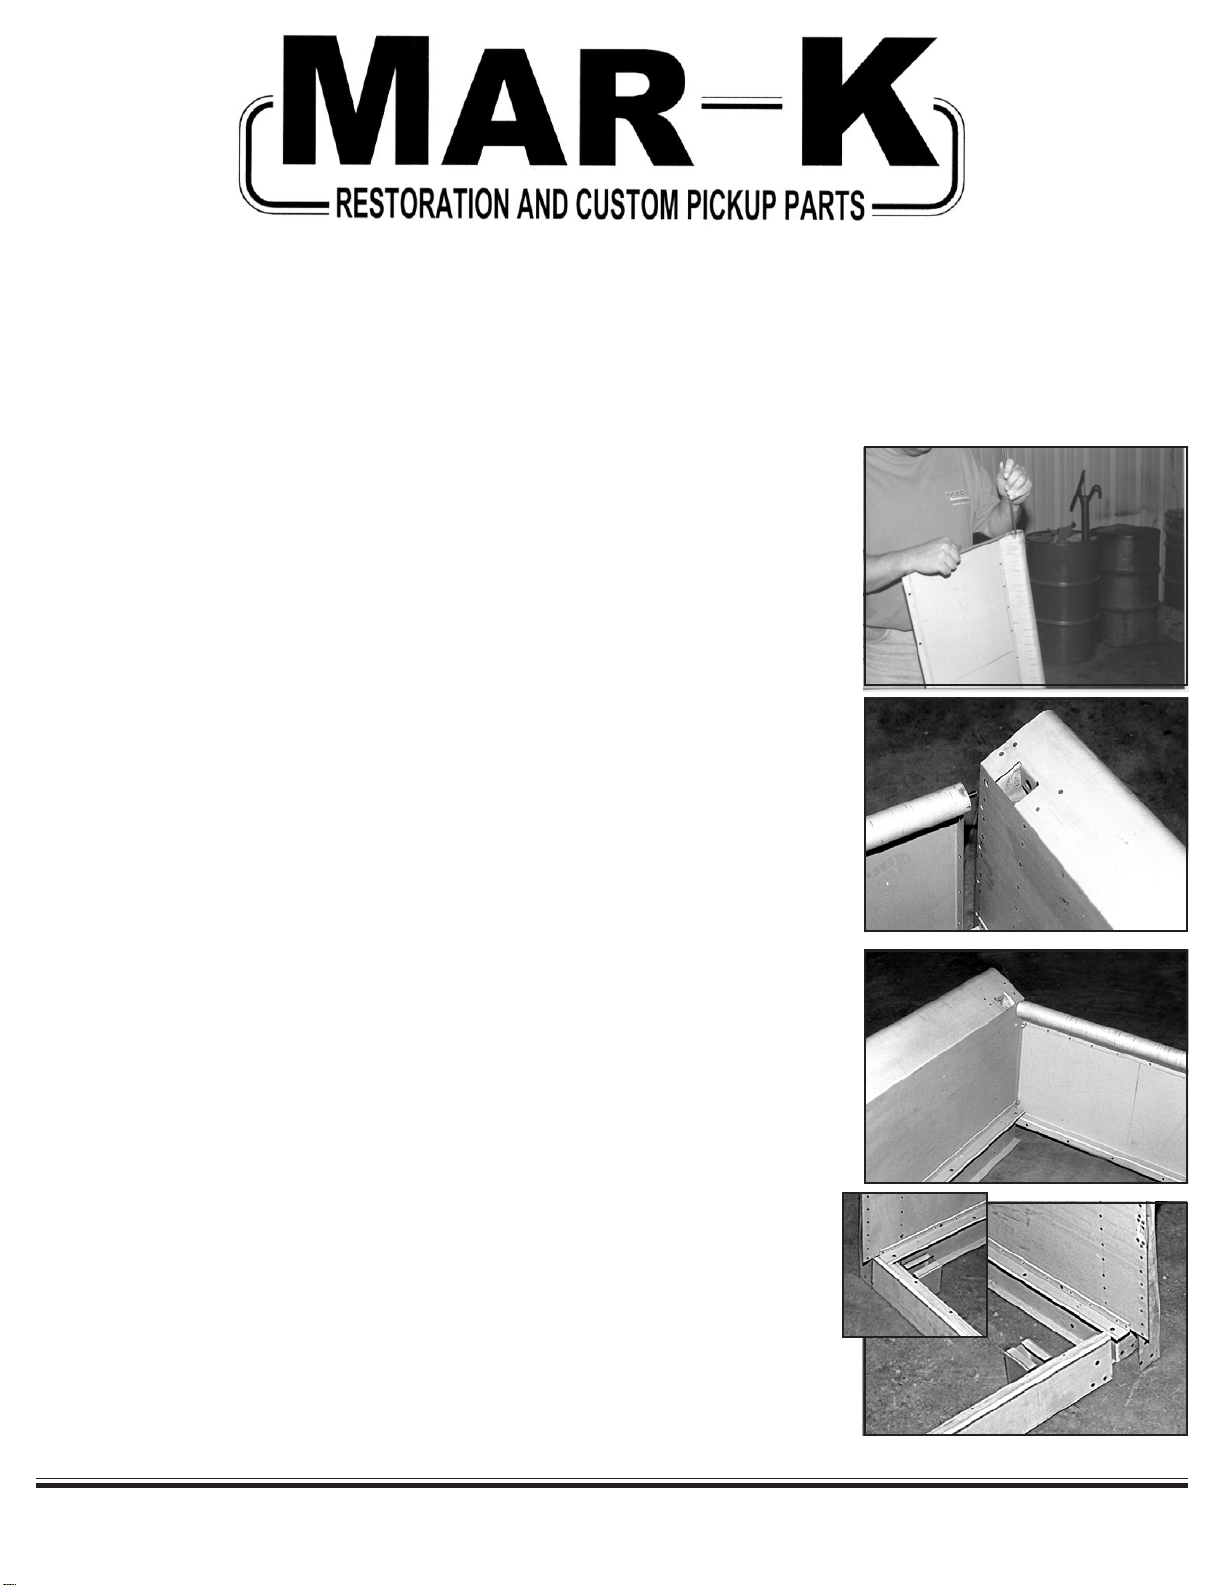
13. Install the edge boards underneath the angle strips as in step 10. Place
5/16"-18 x 1-1/2" carriage bolts through the angle strips through the
boards. See figure 11. Leave off the lock washers and nuts for now.
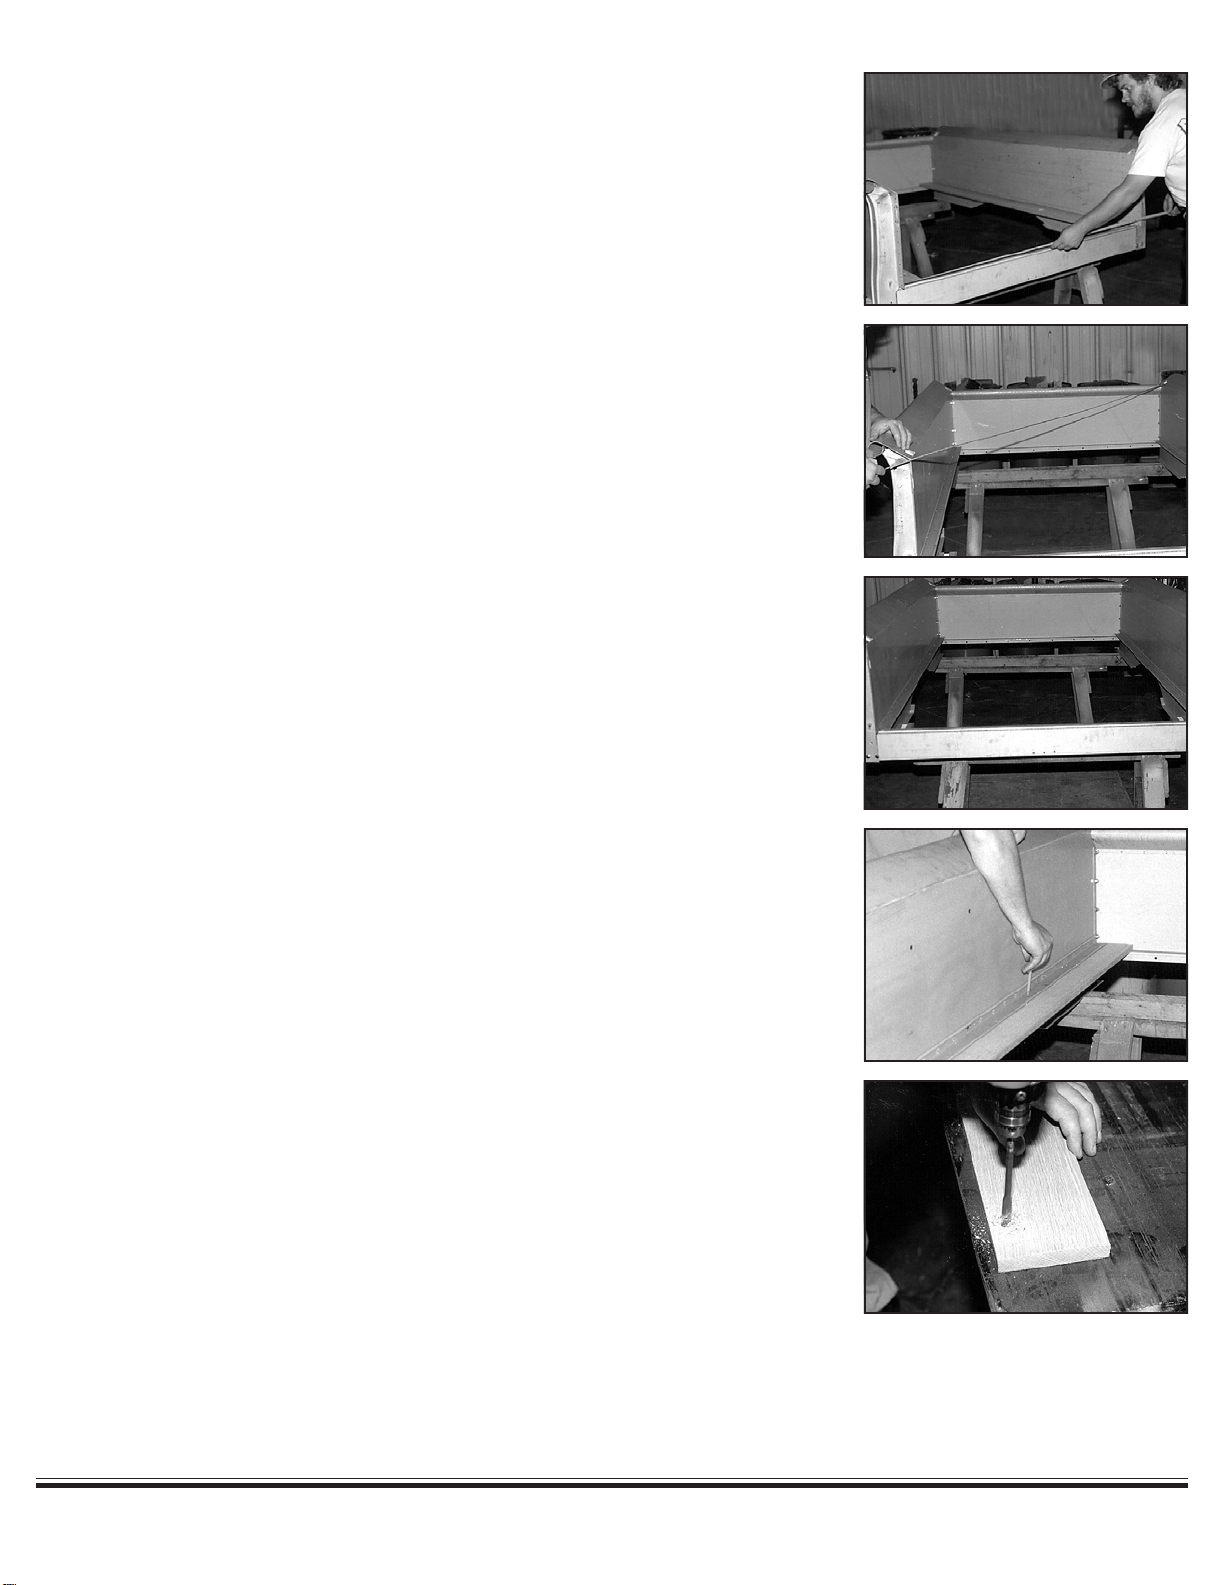
14. Slidethe two center-hole cross sill brackets onto the front cross sill (iden-
tified by the hole pattern on the side leg of the cross sill), and attach the
front cross sill to the first angle strip bolt from the front bed panel. This
cross sill also bolts to the front bed panel with nine 1/4"-20 x 5/8” hex
head bolts, lock washers, and nuts supplied with the front panel hard-
ware. See figure 12.
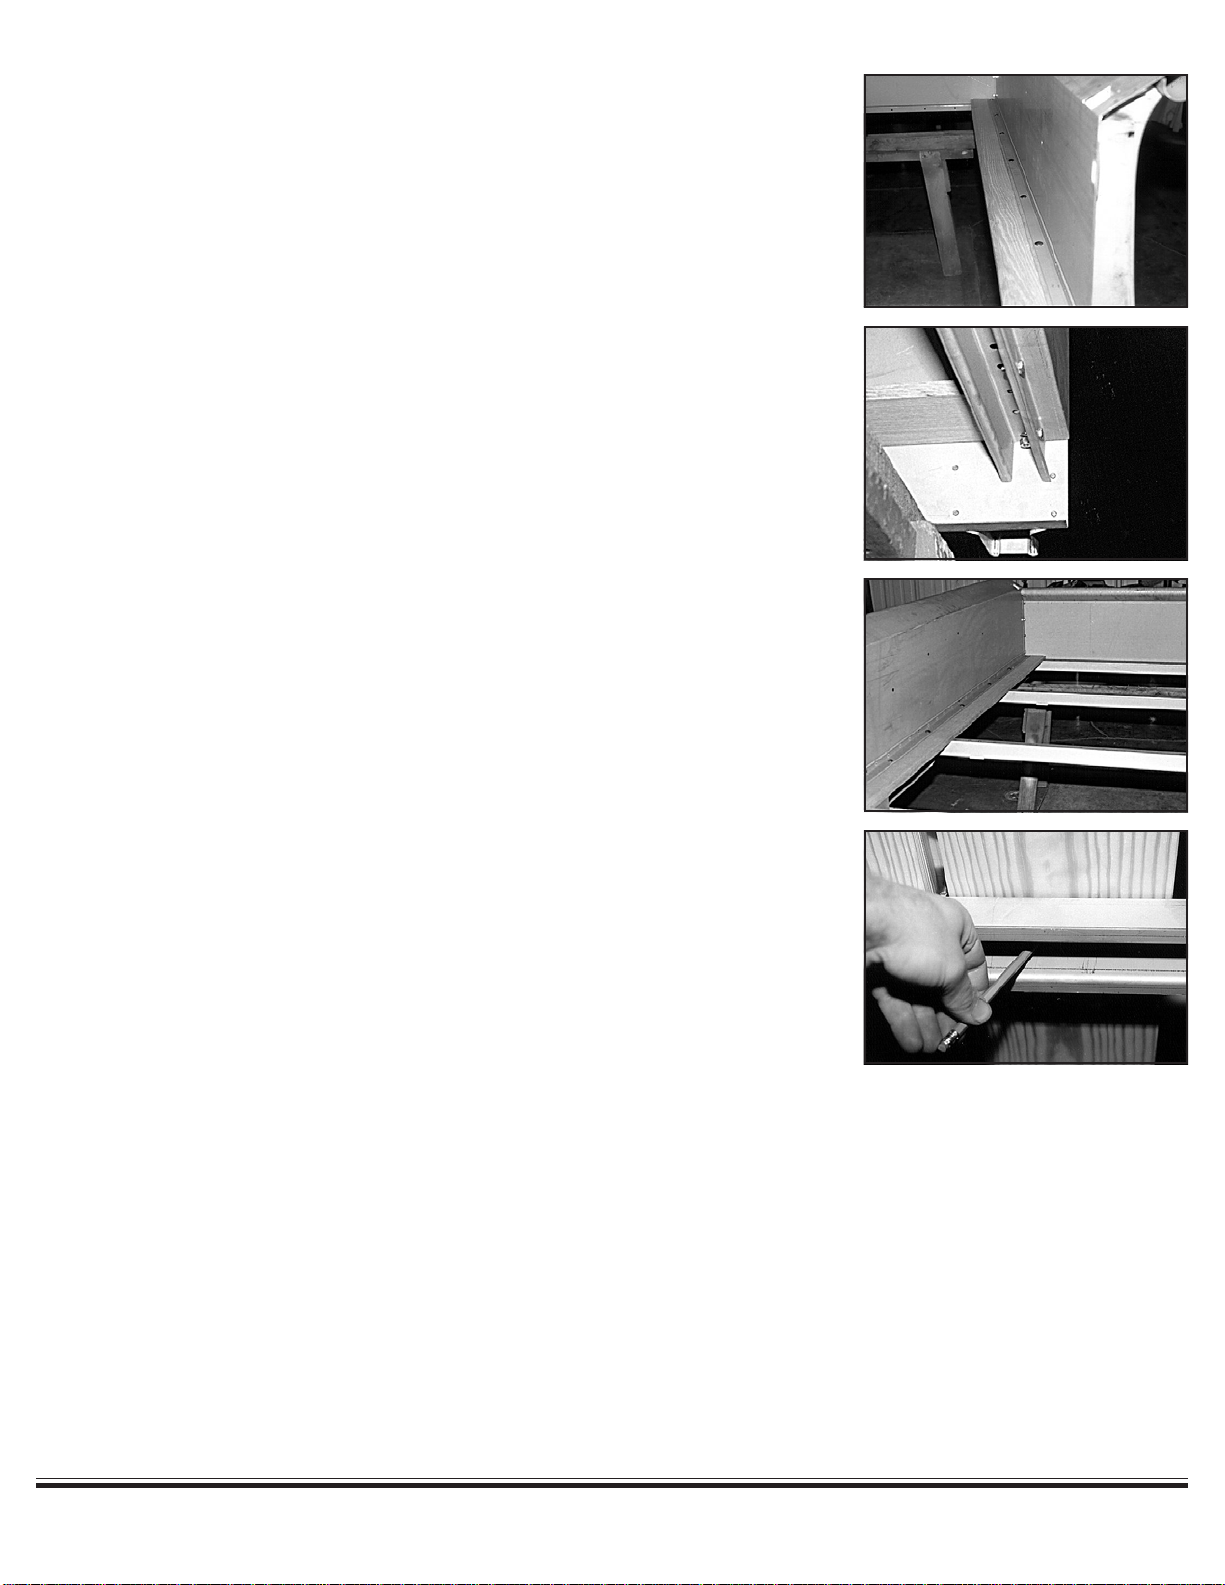
15. If the truck is a 47 or 48 and you are using the original style gas tank
mounted under the bed near the front, the second cross sill will have to
be trimmed to fit over the gas tank. The second cross sill has brackets
that are not necessary for installation, but were original. Slide the two
offset-hole cross sill brackets onto the third cross sill from the front bed
panel, with the holes offset toward the bed sides. Attach the second and
third cross sill to the 5/16 angle strip bolt approximately 26-7/8” and 53-
7/16” respectively from the front bed panel. See figure 13. Install lock
washer and nut hand tight.
Note: The next step is to drill and countersink the locations for the bed-to-
frame bolts and offset washers that sit on the top of the wood surface.
If wood was purchased with the frame holes predrilled, skip to step 26.
If wood was purchased without holes, the following steps will direct
you through this process.
16. Install the second board on each side next to the edge board from step
#13. Leave a 1/2" gap between them. Install a bed strip between these
boards and secure it to the cross sills and the rear cross sill with the 1/4"-
20 x 1-1/4" carriage bolts, lock washers, and nuts. If using MAR-K’s cus-
tombed strips with hidden fasteners, follow the instructions suppliedwith
the bed strips for correct installation.
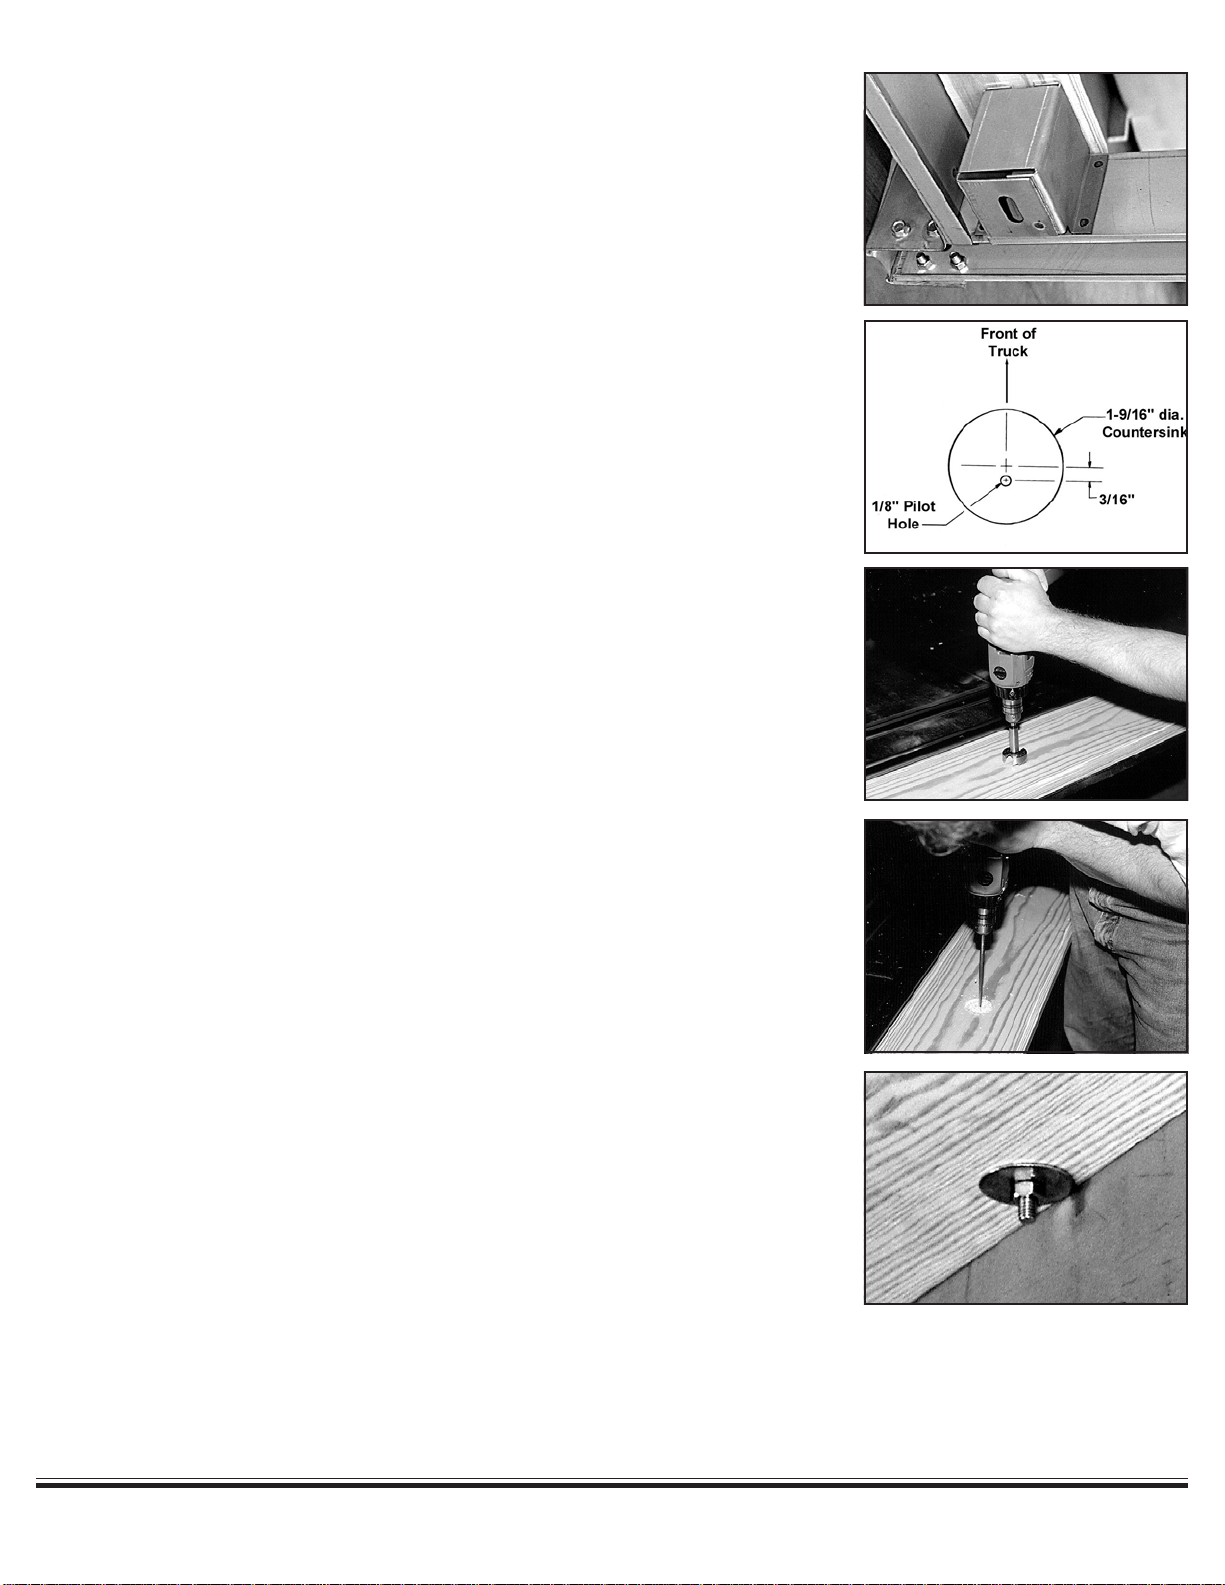
17. The first cross sill near the front bed panel is the first bed-to-frame hole location. Mark the bottom of the
second board from each side through the 1/2" diameter cross sill holes that are 36-5/8" apart from center
of hole to center of hole. See figure 14.
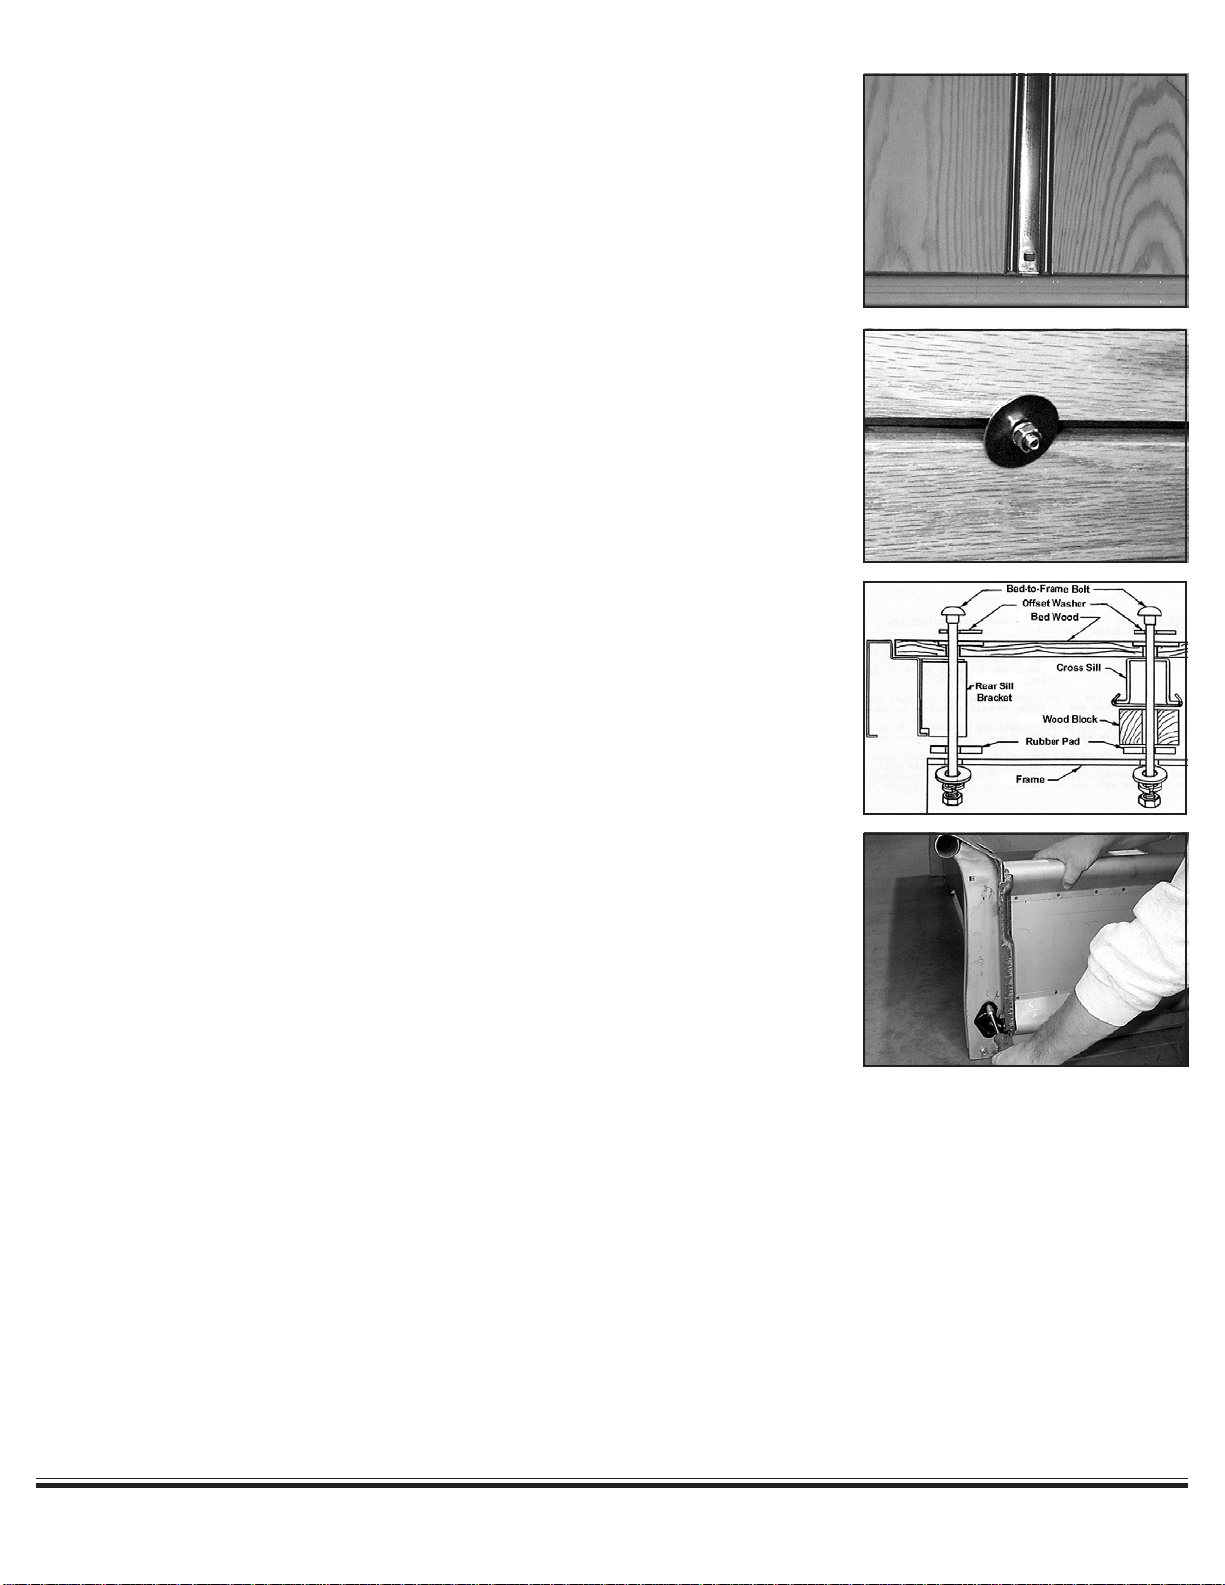
18. Thesecondbed-to-frameboltlocationisin the third cross sill counting back from the front bed panel. Mark
the bottom of the outer two wood boards through the 1/2" diameter cross sill holes that are 44-1/4" apart
from center of hole to center of hole. The second cross sill does not have a bed-to-frame bolt.
See figure 14.
fig. 11
fig. 12
fig. 13
fig. 14

JAZ:instructions\instruct\47-53bed.pm6 pg 4
6625 West Wilshire * Oklahoma City, OK 73132 * (405)721-7945 * Fax (405)721-8906
www.mar-k.com
19. The third bed-to-frame bolt location does not pass through a cross sill.
There are two brackets attached to the rear cross sill.These large brack-
ets should fit against the bottom of the outer wood boards on each side.
See figure 15.
20. Markthebottomoftheouterwoodboardsthroughthebigbrackets. The
spacingofthe bracket holes in reference to each other should be44-1/4"
apart.This mark should be73-1/4"backfrom thefront ofthewood boards
tothe centerofthe mark.
21. Make reference as to which end of each board is at the front of the bed.
Remove the bed strips, cross sills, and the 4 boards. The bottom side of
theseboardsshouldnowhave 1/2"diameter holesmarked onthem. Drilla
1/8"diameterpilotholethroughthecenterofeachmarkcompletelythrough
theboards.
22. On the top surface of the boards, measure 3/16" from each pilot hole to-
wardthe frontofeach boardand mark theboards forthecountersink. See
figure16.
23. Using a 1-9/16" diameter Forstner bit, a drill press if available, or a hand
drill, countersink each location approximately 1/8" to 5/32" deep. See fig-
ure17.
24. Fromthe top surface, drill throughthe1/8" pilot holes witha1/2" drill bit to
complete the bed-to-frame holes. See figure 18. Before drilling the hole,
placeapieceofscrapwooddirectlyunderthe1/8”holetopreventsplinter-
ingas thedrillbreaks through.
25. Reinstall the side boards. The front cross sill gets the center hole brack-
ets. All brackets should line up with the bed-to-frame holes in the sills
and wood when reassembled.
26. Tack weld the cross sill brackets in place on the sills. Make sure that the
bed-to-frame spacing measurements are the same as listed in steps 17,
18, and 20.
27. Where there is not a cross sill attached to the angle strip bolts, install a 1-1/2" outside diameter flat washer
with a 5/16" diameter hole on the bottom of the wood surface before installing lock washer and nut hand
tight. See figure 19.
fig. 15
fig. 17
fig. 18
fig. 19
fig. 16

JAZ:instructions\instruct\47-53bed.pm6 pg 5
6625 West Wilshire * Oklahoma City, OK 73132 * (405)721-7945 * Fax (405)721-8906
www.mar-k.com
28. Place the next boards from step #17 into position on both sides leaving
approximately a 1/2" space between the boards. Place a bed strip in the
grooves on top of the boards.The end of the strip with the hole closest to
the end is positioned on the rear cross sill. See figure 20. The cross sill
holes should line up to a bed strip hole. Loosely install the 1/4" bed strip
bolts, lock washers, and nuts.
29. Where there is not a cross sill under the bed strip bolt, install a 1-1/2"
outside diameter washer with a 1/4" diameter hole before installing lock
washer and nut. See figure 21.
30. Continue installing boards and strips from both sides working towards
the center. Remember not to tighten down any bolts completely to leave
room for adjustment of boards and or strips from side to side.
31. After the spacing between the bed strips and wood boards has been
adjusted, tighten all bed strip and angle strip bolts.
32. Install the completed bed assembly to the truck frame. This will enable
you to check the alignment of the bed-to-frame locations. The order in
which parts are installed to the frame is: rubber pad, wood blocks, and
bed assembly. See figure 22. The offset wood blocks go on the third
cross sill from the front bed panel with the offset brackets. The holes are
offset to the outside.
33. After checking alignment of bed assembly to cab and frame mounting
holes, install the bed-to-frame bolts and offset washers through the top
of the wood. The 3/8-16 X 12" long bed bolts go through the front pair of
frame mounting locations.The rest are only 6" long. Install the flat wash-
ers, lock washers, and nuts.
34. Attach one hinge onto passenger bed side rear stake pocket. Secure with (2) 5/16"-18 x 3/4" indented hex
head bolts. Install tailgate to this hinge. Install second hinge into other end of tailgate. Bolt second hinge to
driver stake pocket. See figure 23.
fig. 21
fig. 22
fig. 23
fig. 20

JAZ:instructions\instruct\47-53bed.pm6 pg 6
6625 West Wilshire * Oklahoma City, OK 73132 * (405)721-7945 * Fax (405)721-8906
www.mar-k.com
fig. 24
35. Install tailgate chain eyebolts into stake pockets. This model has a left
andright tailgate chain hook. See figure 24. Securewith5/16" lock wash-
ers and nuts.
36. You have assembled the entire bed. Check all parts for correct fit and
alignment. Be sure the bolts are in place and that all dimensions are
correct. Now remove the bed from the frame and disassemble the parts
to prepare for painting.
FINALASSEMBLY
After the parts are painted, the bed is assembled by the same procedure. By taking the time to assemble and
test fit the bed before painting, you have reduced the chances for errors or problems in final assembly.
©Copyright 1999 MAR-K Quality Parts, L.L.C. All rights reserved.
Table of contents
Popular Indoor Furnishing manuals by other brands

BUT
BUT 4894223227162 Assembly instructions

Ameriwood HOME
Ameriwood HOME Bristol 3339872COM Instruction booklet

Amart Furniture
Amart Furniture MARSEILLE 67374 Assembly instruction

Tech Craft
Tech Craft NCL62 Assembly instructions

Ameriwood HOME
Ameriwood HOME 9914303COM manual

abc home living
abc home living 25852 instruction manual

StyleWell
StyleWell KENDALL COVE GB-11070-SRP Use and care guide

Habitat
Habitat Greta 803440 manual

IKEA
IKEA CIRKUSTALT Assembly instructions

BABYHOOT
BABYHOOT Carlton instructions

Little Partners
Little Partners GROW WITH ME CHAIR LP0800 Assembly

RTA Products
RTA Products Techni Sport TS42 Assembly instructions