manuals.online logo
Brands
  1. Home
  2. •
  3. Brands
  4. •
  5. Marksman
  6. •
  7. Car Alarm
  8. •
  9. Marksman M3a User manual

Marksman M3a User manual

Installation Manual Model: M3a
For Technical Assistance call (800) 638-3600 or visit www.magnadyne.com
Step 1: Wiring Diagram
Black Wire Antenna (Do Not Ground)
Black Wire Ground to Vehicle Frame
Brown Wire Positive Output to Siren
Red Wire To Battery +12V
Connect this Wire to Ground
for Negative Parking Light System
2-Pin White
Sensor Port
(White)
White Wire Parking Light Relay Output
Red Wire with White Stripe Parking Light Relay Input
Gray Wire (-) 200mA Channel 2 / Pager Output
Orange Wire 200mA Grounded when Armed
Yellow Wire To Ignition Switched +12V
Green Wire Negative Door Pin Switch Input
Blue Wire Instant Trigger Ground Input
Violet Wire Positive Door Pin Switch Input
Black Wire (-) Negative Door Unlock Output
Red Wire (-) Negative Door Lock Output
30
87A
87 86
85
From ignition switch
Constant +12V
To start solenoid
(Relay not supplied)
Cut
LED
Valet Switch
2-Pin Blue
3-Pin Black
6-Pin White
5-Pin White
Dual-Zone
Shock Sensor
© Copyright 2004 Magnadyne Corporation M3A-OMIM Rev. A 2-4-04
D. Active Arming “Lock”
1. Press the “Lock” button on the transmitter.
2. The siren will chirp once and the parking light will flash once indicating that the system is now armed. The
vehicle’s doors will lock upon arming when interfaced with security system.
Silent Arming/Disarming: Press the “Lock” and “Unlock” button together on the transmitter to arm or disarm you securi-
ty system. No chirp sound will be heard, arm/disarm confirmation will be through the vehicles parking lights only.
E. Passive Arming
Active arming/disarming is controlling you security system via the remote transmitter. This security system is equipped
with an optional Passive Arming feature, which allows the security system to arm 30 seconds after the last door is closed.
Operation:
1. Turn the ignition to the “Off” position and exit the vehicle.
2. After all entrances are closed the security system’s LED will flash fast for 30 seconds. If you reopen any door, the hood
or trunk, the security system LED will stop flashing. It will begin flashing again once all the vehicle’s entrances are
closed.
3. After the 30-second timer has elapsed, the security system will automatically “Arm”. The siren will chirp one time and
the parking lights will flash one time.
Passive Door Locking: (see Feature No. 3 on programming chart) The vehicle doors will automatically lock after passive
arming cycle has been completed.
F. Active Disarming “Unlock”
1.
Press the “Unlock” button on the transmitter.
2.
The siren will chirp twice and parking lights will flash twice indicating that the security system is now disarmed. The
vehicle doors will unlock disarming when interfaced with the security system.
Tamper Disarming: If alarm is triggered upon disarming the system, the siren chips 4 times and the parking lights flash 3
times.
Automatic Rearm: (see feature No. 5 on programming chart) If this feature is selected, the security system will automati-
cally rearm itself 60 seconds after disarming with remote transmitter. Automatic rearm will cancel if any door is opened
before the 60 seconds timer has elapsed.
G. Valet Mode
The valet switch allows you to temporarily bypass all alarm functions, eliminating the need to give your transmitter to
parking attendants or garage mechanics. When the system is in valet mode, all alarm function are bypassed, however
the remote panic feature and remote door locks will remain operational.
Enter Valet Mode:
1. Turn the ignition to the “On” position.
2. Push and hold valet switch for 2 seconds until the LED turns on. The LED will remain on as long as the system is in
the Valet Mode.
Exit Valet Mode:
1. Return to normal operation, turn ignition “On”.
2. Push and hold the valet switch for 2 seconds, the LED will turn off to indicate the system is exiting the valet mode.
H. Panic Function
The transmitter can be used as a remote panic switch to manually trigger the alarm in case of emergency.
1.
Press and hold the “Lock” button on the transmitter for 3 seconds. The alarm will immediately sound.
2.
To stop the alarm, press the “Lock” or “Unlock” button on the transmitter, the panic mode will be turned off immediately.
3.
If the button is not pressed, the alarm will automatically stop after 30 seconds.
I. 60 Second Rearming
If your security system has become triggered, the siren will sound for 60 seconds and then stop and reset to a fully
armed condition.
Note: If a protected entrance is left open, your security system will remain triggered for two more 60 second cycles then
full rearm excluding the door input trigger (door input trigger is no longer functional). Closing the entrance will reset the
door input trigger within 7 seconds.
J. Anti Car-Jacking
Warning: If you don’t need this alarm system’s car-jacking function to be “On”, set it to “Off”. The default car-jacking
setting is “Off”
(see Feature No. 8 on programming chart)
.
Pressing and holding the “Lock” and “Unlock” button on the transmitter for 1 second while the vehicle’s ignition is “On”
will trigger the car-jacking. The parking lights will turn on for 1.5 seconds to indicate car jacking is activated.
1.
60 seconds after the system has been triggered, the siren starts alarming and the parking lights start flashing.
2.
90 seconds after the system has been triggered.
A. The siren will still be sounding and the parking light flashing and,
B. The starter disable will activate to prevent the vehicle from being restarted,
C. It will remain active until the vehicle’s battery power is exhausted.
Override the System to Turn Off Car-Jacking:
Turn the ignition switch from
“
Off
”
to
“
On
”
, and within 10 seconds push valet switch, the siren will stop and the system will disarm.
Combined Button Mode
Transmitter Button Action System Function / Remark
Press and Release Arm/Lock Doors or Disarm/Unlock Doors
Press/Hold 3 Seconds Panic Function
Press Twice Arm/Lock Doors and Delete Optional Sensor
Press and Hold for Pop Trunk Release / Channel 2 Output
3 Seconds
Press Both Buttons Silent Arm / Disarm (Ignition in “Off” Position)
Press Both Buttons Activate Car-Jacking (Ignition in “On” Position)
and Hold for 1 Second
Owner’s Manual Model: M3a
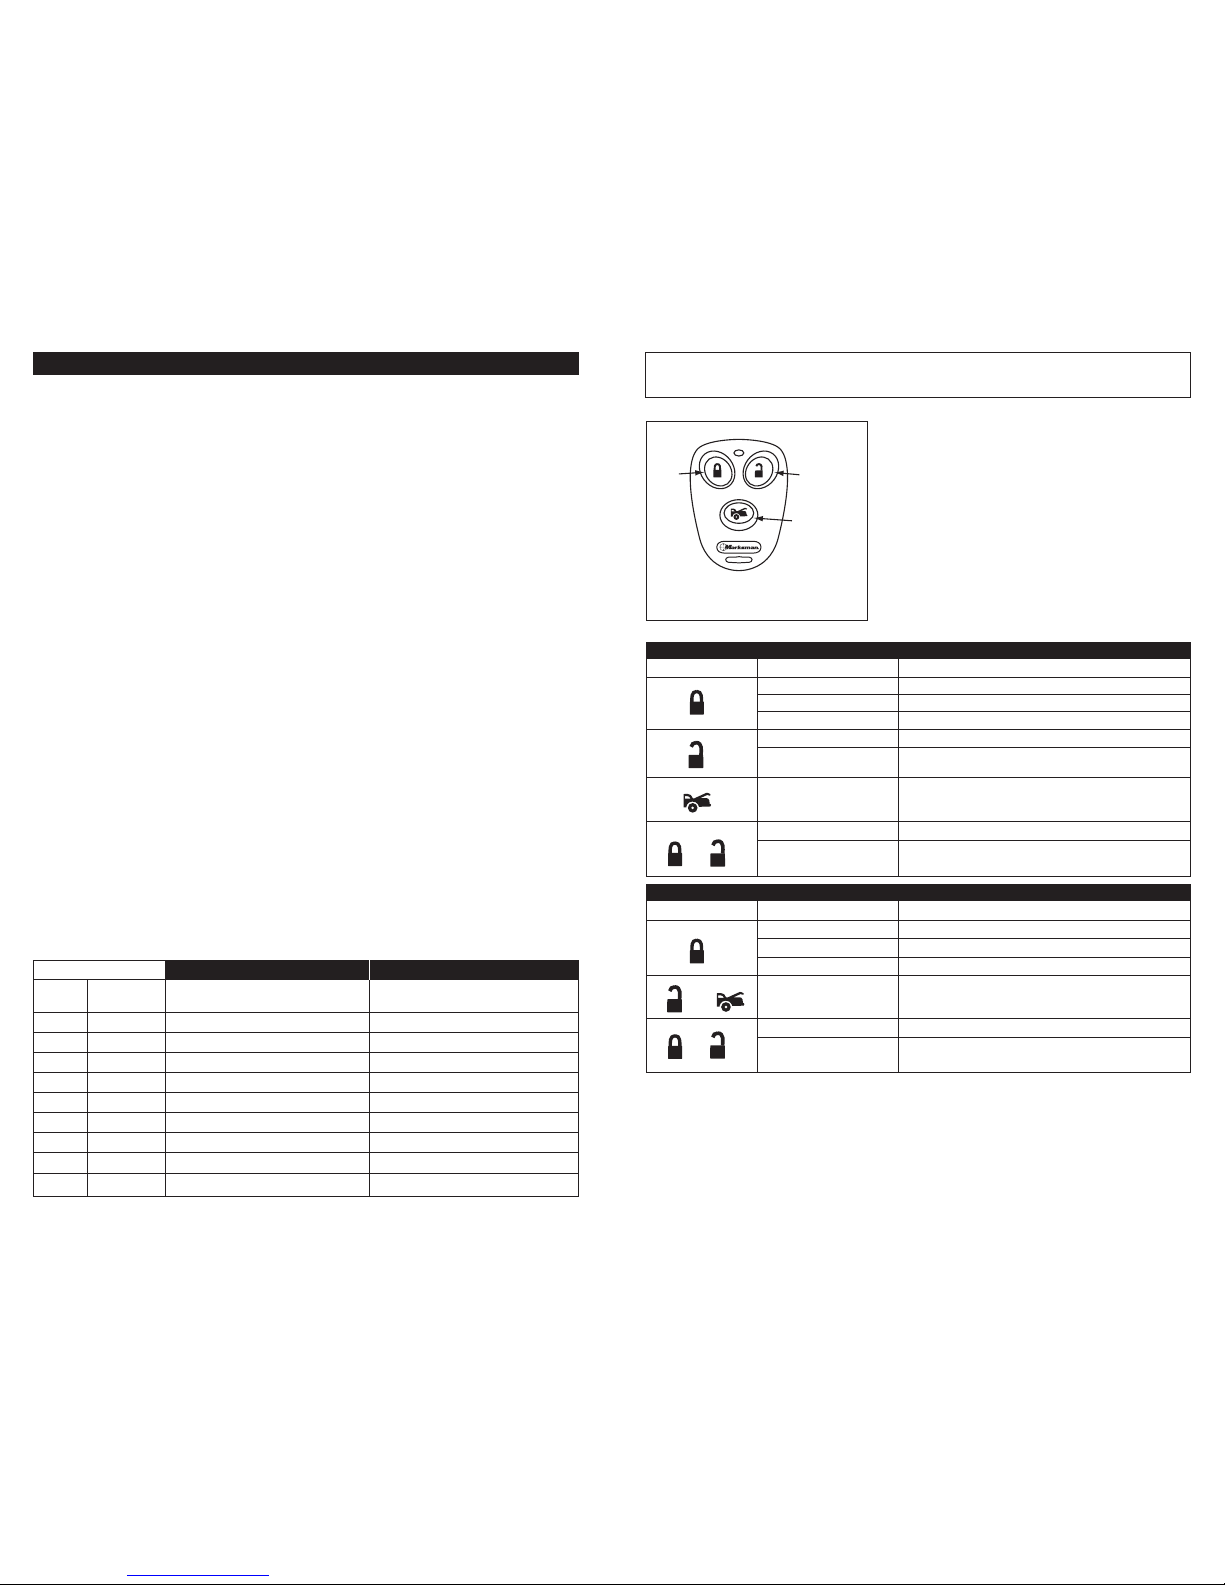
A. Transmitter Operation
+
or
B. Alarm Indicators
LED Indicator
LED is off = Alarm is disarmed.
LED is flashing slowly = Alarm is armed.
LED is flashing fast = Passive arming.
LED is on (solid) = Valet mode.
LED flashes twice then pauses = Tamper warning, alarm was triggered.
Chirp Indicator
One siren chirp = Security system is armed.
Two siren chirps = Security is disarmed.
Four chirps = Tamper warning, alarm was triggered.
Parking Light Indicator
Parking lights flash one time = Security system is armed.
Parking lights flash two times = Security is disarmed.
Parking lights flash three times = Tamper warning, alarm was triggered.
Lock Unlock
Trunk Release /
2nd Channel
Dedicated Button Mode Shown
Step 2: Programming
A. Programming the Transmitters
The security system has 2 transmitter programming modes. Up to 4 transmitters can be programmed.
1. “Combined” button, (Button 1 is Arm/Disarm).
2. “Dedicated” buttons, (Button 1 is Arm, Button 2 is Disarm) (Factory default setting).
To program the transmitters:
1. Turn ignition to “On” position.
2A. Push the valet switch 3 times to enter “Combined Button Mode”.
There will be 1 long chirp and 1 short chirp of confirmation of entering combined button mode.
2B. Push the valet switch 6 times to enter “Dedicated Button Mode”.
There will be 2 long chirps and 1 short chirp of confirmation of entering dedicated button mode.
3. Press any button on 1st transmitter, 1 short chirp to confirm code is learned.
4. Press any button on 2nd transmitter, 2 short chirps to confirm code is learned.
5. Press any button on 3rd transmitter, 3 short chirps to confirm code is learned.
6. Press any button on 4th transmitter, 4 short chirps to confirm code is learned.
7. Exit transmitter programming by turning “Off” the ignition key or after 15 seconds the
security system will automatically exit transmitter programming and chirp 3 times.
Note: If more than 4 transmitters programmed, the system only keeps the last 4 transmitter codes.
B. Programming System Features (Factory preset all features to “On” position, except car-jacking)
To enter feature programming:
1. Turn the ignition “On” then “Off”.
2. Within 10 seconds push the valet switch 3 times (a long chirp).
3. Again push the valet switch 3 times (a long chirp again to confirm being in feature programming mode).
To program a feature:
4. Push the valet switch the same number of times as the feature number (see chart below).
5. Turn ignition switch from “Off” to “On” to set the feature.
Example:
• Push valet switch 2 times (Activates Active/Passive Arming Programming). The siren will chirp 2 times, LED will
flash 2 times to confirm entry to this feature.
• Select Active Arming, turn ignition from “Off” to “On”, 1 chirp for confirmation.
• Select Passive Arming, turn ignition from “On” to “Off”, 2 chirps for confirmation.
• If you want to program Auto Rearm (5th feature) when the system is on Active/Passive Arming, push valet switch 3
times again (Siren chirps 5 times, LED flashes 5 times). The system will add on the previous valet switch pushing.
To exit feature programming:
6. During programming, if you don’t respond to previous step in 15 seconds or any time press the ARM button on the
transmitter it will exit feature programming. 3 long chirps will indicate you have exited feature programming.
Turn Ignition from “Off” to “On” Turn Ignition from “On” to “Off”
Feature Chirp/LED Feature “On” Feature “Off”
Number Confirmation
(Factory Default Setting)
1 1 Chirp “On” Chirp “Off”
2 2 Active Arming Passive Arming
3 3 Passive Arming with Door Locks Passive Arming without Door Locks
4 4 Ignition On/Off with Door Lock/Unlock
Ignition On/Off without Door Lock/Unlock
5 5 Auto Rearm “On” Auto Rearm “Off”
6 6 2-Pulse Unlock “Off” 2-Pulse Unlock “On”
7 7 Door Lock Time 0.8 seconds Door Lock Time 3.5 seconds
8 8 Car-Jacking “Off” Car-Jacking “On”
9 9 Channel 2 (Trunk) Output Pager Output
C. Dual-Zone Shock Sensor
1. Light impacts to the vehicle will cause a prewarning (warn-away) chirp from the siren or horn. These light impacts will
not set the alarm into full trigger even if they are repetitive.
2. Hard impacts to the vehicle will bypass the prewarning indicator and activate a full alarm trigger.
Dedicated Button Mode (Factory Default Setting)
Transmitter Button Action System Function / Remark
Press and Release Arm/Lock Doors
Press and Hold 3 Seconds Panic Function
Press Twice Arm/Lock Doors and Delete Optional Sensor
Press and Release Disarm/Unlock Doors
Press Button Disarm/Unlock Doors and Pop Trunk Release
and Hold for 3 Second
Press and Hold for Pop Trunk Release / Channel 2 Output
3 Seconds
Press Both Buttons Silent Arm / Disarm (Ignition in “Off” Position)
Press Both Buttons Activate Car-Jacking (Ignition in “On” Position)
and Hold for 1 Second
+

Other manuals for M3a

1

Other Marksman Car Alarm manuals

Marksman Marksman Extreme Series X9 User manual

Marksman

Marksman Marksman Extreme Series X9 User manual

Marksman EXTREME X7 User manual

Marksman

Marksman EXTREME X7 User manual

Marksman M8a User manual

Marksman

Marksman M8a User manual

Marksman Extreme X3 Installation instructions

Marksman

Marksman Extreme X3 Installation instructions

Marksman M5A User manual

Marksman

Marksman M5A User manual

Marksman M7a User manual

Marksman

Marksman M7a User manual

Marksman M12A User manual

Marksman

Marksman M12A User manual

Marksman MARKSMAN X11 User manual

Marksman

Marksman MARKSMAN X11 User manual

Marksman EXTREME X7 User manual

Marksman

Marksman EXTREME X7 User manual

Marksman Marksman Extreme Series X9 User manual

Marksman

Marksman Marksman Extreme Series X9 User manual

Marksman M6A User manual

Marksman

Marksman M6A User manual

Marksman M10 User manual

Marksman

Marksman M10 User manual

Marksman X4 User manual

Marksman

Marksman X4 User manual

Popular Car Alarm manuals by other brands

Prestige Prestige Platinum 128-8122 owner's manual

Prestige

Prestige Prestige Platinum 128-8122 owner's manual

Magicar M871A installation guide

Magicar

Magicar M871A installation guide

Avital AviStar 3300 owner's guide

Avital

Avital AviStar 3300 owner's guide

Scytek electronic Vectra X1 product manual

Scytek electronic

Scytek electronic Vectra X1 product manual

BMW 3 G EWS installation instructions

BMW

BMW 3 G EWS installation instructions

Vision TR537S user guide

Vision

Vision TR537S user guide

Valet 562T installation guide

Valet

Valet 562T installation guide

Conrad 841086 operating instructions

Conrad

Conrad 841086 operating instructions

Expero Omega SAT user manual

Expero

Expero Omega SAT user manual

Xpresskit OptimaX series installation guide

Xpresskit

Xpresskit OptimaX series installation guide

Directed Electronics 560XV installation guide

Directed Electronics

Directed Electronics 560XV installation guide

K-9 K9-Mundial-3 quick start guide

K-9

K-9 K9-Mundial-3 quick start guide

Clifford 5706X owner's guide

Clifford

Clifford 5706X owner's guide

Magicar M871A user guide

Magicar

Magicar M871A user guide

CrimeStopper CAS-968 install guide

CrimeStopper

CrimeStopper CAS-968 install guide

Voxx Electronics PRESTIGE APS57TM owner's guide

Voxx Electronics

Voxx Electronics PRESTIGE APS57TM owner's guide

Clifford Intelliguard 770 owner's guide

Clifford

Clifford Intelliguard 770 owner's guide

OnStar Gen 6 owner's guide

OnStar

OnStar Gen 6 owner's guide

manuals.online logo
manuals.online logoBrands
  • About & Mission
  • Contact us
  • Privacy Policy
  • Terms and Conditions

Copyright 2025 Manuals.Online. All Rights Reserved.