Rev.2 15/01/2010
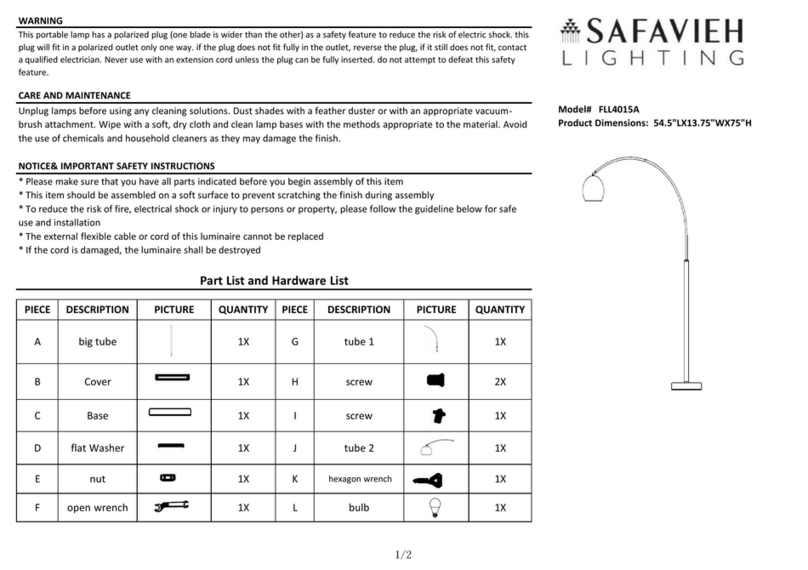
L.76 H.52
L.60 H .38
Design: BrianSironi 2009
MartinelliLuce s.p.a.
Via T.Bandettini 55100 Lucca – Italia
tel. +39 0583 41.83.15 telefax +39 0583 41.90.03
ART. 807 ELICA Beweglicher Tischgerät Birnen: 54 x 0.4 W LED
807/J ELICA J 36 x 0.4 W LED
KORREKTE INSTALLATIONS, GEBRAUCHS UND WARTUNGSANLEITUNG
ANWEISUNGEN
Um den Produkt korrekt installieren zu können, sind folgende Anleitungen zu befolgen, die eine Garantie für Ihre Sicherheit darstellen.
Es ist notwending diese Anweisungen für ein mögliches zukünftiges Nachsehen und für Wartungszwecke aufzubewaren.
Dieser Gerät kann auf normalerweise feuergefährliche Flächen montiert werden.
Innenraumgerät (nicht wasserfest).
Dieses Symbol zeigt Klasse II (Doppelisolierung).
Dieser Gerät entspricht den geltenden Richtlinien und Normen.
Symbol für die Entsorgung/Beseitigung des Geräts (siehe ENTSORGUNG/BESEITIGUNG DES RAEE-GERÄTS)
INHALT DER PACKUNG
-Gerät
-Speiseapparat
-Säckchen: Befestigungsdübel (4)+ entsprechende Inbusschlüssel,
weisse Deckdübel (3)+entsprechender Schraubenziehr
INSTALLATION/ MONTAGE
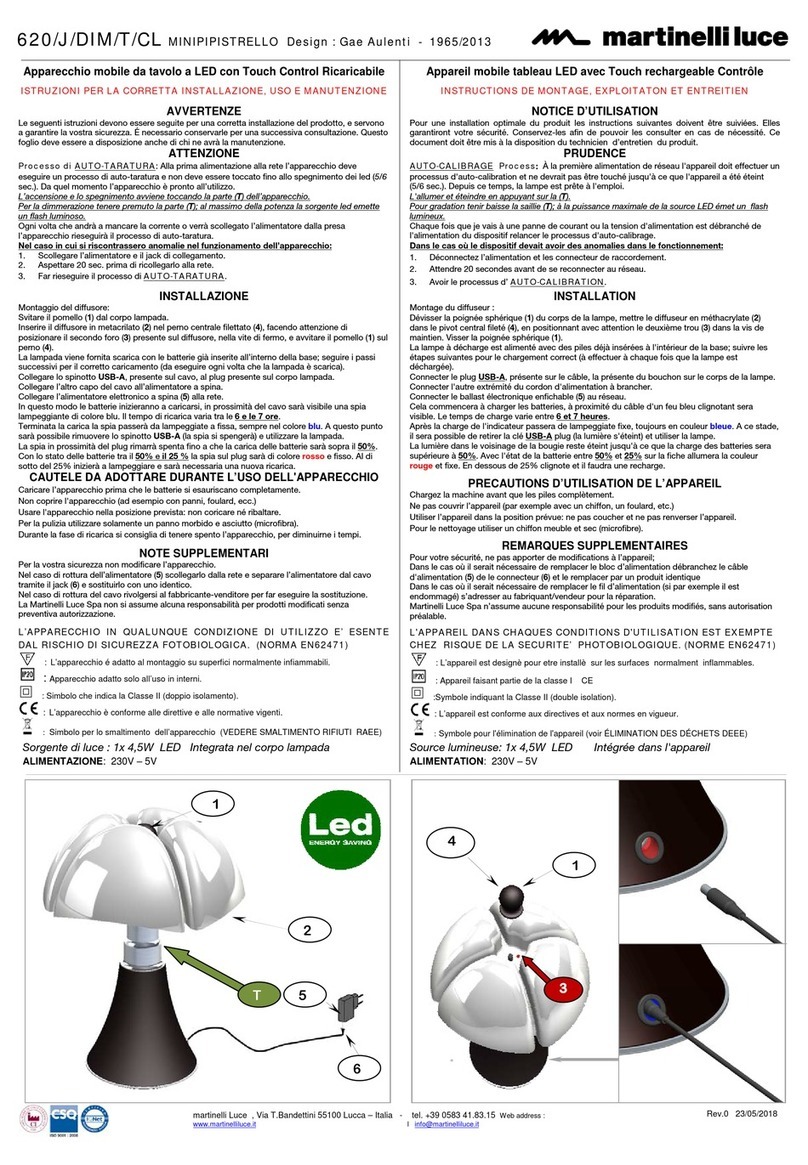
-Den Gerät aus der Verpackung hinausziehen (Z), indem man sorgfältig auf das Gewicht des Kegels-Basis aufpassen soll (1) und
indem man das mit dem Arm verbundene Speisekabel nicht verspannen soll(2). Während dieser Prozedur empfiehlt es sich zur
selben Zeit den Kegel bei den eigens dazu bestimmten Schlitzen (A) und bei der Basis zu ergreifen, den Arm (2) bei dem eigens dazu
bestimmten Schlitz (B) zu ergreifen. (Abbildung.1);
-Den Arm (2)auf den Kegel (1) setzen, indem man den Keil (5) in das im Arm liegenden eigens dazu bestimmten Gehäuse einfügt.
(Abbildung.2);
NB: Während dieser Prozedur soll man die Hülse (6) im innern des Keils (5) gleiten lassen. Es empfiehlt sich den Arm so zu
positionieren, dass die Spitze in entgegengesetzter Position im Vergleich zum Speisekabel ist. (Abb.2-3);
-Den Arm (2) am Kegel (1) befestigen, indem man durch die mitgelieferte eigens dazu bestimmte Inbusschlüssel die
Befestigungsdübel anschraubt und anzieht (4). Während dieser Prozedur soll man den Arm nach unten drücken, bis der Arm die
vom Pfeil gezeigte Position erreicht (Y), damit der Arm (2) am Kegel (1) haftet. (Abb.2-3);
-Nachdem man den Metalldübel befestigt hat (4), soll man den mitgelieferten weissen Deckdübel anschrauben (3). (Abb.2);
-Man soll den Speise-Jack (7) des Transformators bei der entsprechenden Kegel-Steckdose verbinden. (Abb.2);
VORSICHTSMAßNAHMEN, DIE MAN WÄHREND DES GEBRAUCHS DIESES GERÄTS ANWENDEN SOLL
-Die Lampe wird indem eingeschaltet, dass man den Arm in der und entgegen der Uhrzeigerrichtung dreht (2). (Seitenabbildung)
-Das Gerät soll nicht bedeckt werden (z.B. mit Tüchern, Kopftüchern, u.s.w.);
-Das Gerät soll in der vorausgesehener Position benutzt werden: das Gerät soll weder niedergelegt noch umgekippt werden;
-Während der Wartungsprozeduren (Ersatz einer Birne oder Reinigung), soll man immer den Stecker von der Steckdose entfernen;
-Für die Reinigung soll man nur ein trockenes Tuch benutzen;
ZUSATZANMERKUNGEN
-Das Gerät wird durch einen Aussen-Transformator gespeist: (WS/GS INPUT:100-240V OUTPUT:24v)
-Für Ihre Sicherheit empfiehlt es sich, das Gerät nicht umzuändern;
-Wenn es notwending sein sollte, den Speisekabel zu ersetzen (z.B. falls es zufä beschädigt werden sollte), soll man sich am
Hersteller wenden, um das korrekte Ersatzteil zu bekommen und den Ersatz durchführen zu lassen.
- Martinelli Luce Spa übernimmt keine Verantwortung für Produkte, die ohne eine im Voraus von derselben Firma gegebene
Ermächtigung umgeändert wurden
Y
A A
Z
1
2
4
3
5
6
7
B
Fig.1 Fig.2 Fig.3
Rev.2 15/01/2010
L.76 H.52
L.60 H .38
Design: BrianSironi 2009
MartinelliLuce s.p.a.
Via T.Bandettini 55100 Lucca – Italia
tel. +39 0583 41.83.15 telefax +39 0583 41.90.03
ART. 807 ELICA Dispositif mobile de bureau Ampoules: 54 x 0.4 W LED
807/J ELICA J 36 x 0.4 W LED
MODE D’EMPLOI POUR UNE INSTALLATION CORRECTE, POUR L’EMPLOI ET L’ENTRETIEN.
NOTICES
Pour une installation correcte du produit il faut observer les suivants modes d’emploi visant à garantir votre sécurité. Il est nécessaire de
les garder pour une compulsation successive aussi bien que pour l’entretien.
Ce dispositif est indiqué pour l’assemblage sur des surfaces normalement inflammables.
Dispositif pour intérieurs (non protégé de l’eau).
Symbole indiquant la Classe II (double isolation).
Le dispositif est conforme aux directives et aux lois en vigueur.
Symbole de l'écoulement du dispositif (voir ECOULEMENT DU DISPOSITIF RAEE)
CONTENU DE L’EMBALLAGE
-Dispositif
-Ballast
-Sac :Goujon d’amblocage (4) + clé six-pans mâles correspondante,
goujon blanc de couverture (3)+tournevis correspondant
INSTALLATION/ ASSEMBLAGE
-Extraire le dispositif de l’emballage (Z) en faisant attention au poids de la base du cône (1) et en s’assurant que la ligne d’alimentation
jointe au bras n’est pas forcée (2). Au cours de cette opération on conseille de prendre en même temps le cône des fentes spéciales
(A) et de la base, le bras (2) de la fente spéciale (B). (Fig.1);
-Positionner le bras (2) sur le cône (1) en introduisant la clavette (5) dans le logement spécial du bras. (Fig.2);
NB: Au cours de cette opération faire glisser la gaine (6) à l’intérieur de la clavette (5). On recommande de positionner le bras de telle
sorte
que la pointe est au bout opposé de la ligne d’alimentation. (Fig.2-3);
-Verrouiller le bras (2) au cône (1) en vissant et en serrant le goujon d’ablocage (4) avec la clé six-pans mâles spéciale équipée. Au
cours de cette opération presser le bras vers le bas dans la position indiquée par la flèche (Y) afin de faire adhérer le bras (2) au cône
(1). (Fig.2-3);
-Après avoir serré le goujon de metal (4) visser le goujon de couverture blanc (3) équippé. (Fig.2);
-Connecter le jack d’alimentation (7) du transformateur dans l’embout du cône correspondant. (Fig.2);
MESURES PRUDENTIELLES A PRENDRE EN UTILISANT LE DISPOSITIF
-On allume cette Lampe en tournant le bras (2) dans le sens des aiguilles d'une montre et dans le sens inverse des aiguilles d'une
montre. (Fig. à côté)
-Ne pas couvrir le dispositif (par exemple avec des chiffons, des foulards, etc.);
-Utiliser le dispositif dans la position prévue: ne pas coucher ou renverser le dispositif;
-Au cours de l’entretien (pour remplacer l’ampoule ou pour le nettoyage) débrancher la fiche de la prise.
-Pour le nettoyage n’utiliser qu’un chiffon sec; NOTICES SUPPLEMENTAIRES
-Le dispositif est alimenté par un transformateur extérieur: (AC/DC INPUT:100-240V OUTPUT:24v)
-Pour votre sécurité ne pas modifier le dispositif ;
-Au cas où il serait nécessaire de remplacer la ligne d’alimentation (par exemple si elle s’abîme par hasard) contacter le fabricant pour
se procurer la pièce de rechange correcte et pour faire exécuter la substitution.
-Martinelli Luce Spa n’assume aucune responsabilité pour les produits modifiés sans autorisation préventive
Y
A A
Z
1
2
4
3
5
6
7
B
Fig.1 Fig.2 Fig.3
