Masalta MFS 14 User manual

OPERATION MANUAL
FLOOR SAW MFS 14
WARNING
!
To reduce the risk of injury, all operators and maintenance personnel must read and understand these
instructions before operating, changing accessories, or performing maintenance on Masalta power
equipment. All possible situations cannot be covered in these instructions. Care must be exercised
by everyone using, Maintaining or working near this equipment.
R

1
Table of Contents
1. SAFETY INFORMATION.....2
1.1 Safety Precautions .. . 2
1.2 Operating Safety . . .3
1.3 Blade Safety .. .. ..4
1.4 Transportation Safety 4
1.5 Service Safety .. . 4
1.6 Safety Labels .. .....5-6
2. OPERATION ....... 7
2.1 Controls & Components ... 7
2.2 Application ... .8
2.3 Operating Principle .8
2.4 Assembling the blade . .... .. ....8
2.5 To Start ... ... 8-9
2.6 Cutting . ... .. 9
2.7To Stop .. ....9
3. MAINTENANCE .. .. .. . 10
3.1 Blade Removal and Replacement ... ... 10
3.2 Blade Guard Check. .. 10
3.3 Poly V-belt Alignment and Tensioning .. .. ....10
3.4 Troubleshooting .. .. ... .11
3.4.1 Blade Troubleshooting .. 11
3.4.2 Engine Troubleshooting ......... 12-13
3.5 Transporting .. ... .. ...... .14
4. TECHNICAL DATA ... ..... .. .. .15
WARRANTY ...... .. .. ..16
MAINTENANCE RECORD ..... ...17
.
EC DECLARATION .... ..18

2
SAFETY INFORMATON
1.1 Safety Precautions
Before using this equipment, study the entire owner s manual to become familiar
with its operation. Do not allow untrained or unauthorized personnel, especially
children, to operate this equipment. Use only factory authorized parts for service.
This manual contains DANGER, WARNING, CAUTION callouts
which must be followed to reduce the possibility of personal injury,
damage to the equipment, or improper service.
This is the safety alert symbol. It is used to alert you to potential
personal injury hazards. Obey all safety messages that follow this
symbol to avoid possible injury or death.
DANGER indicates a hazardous situation which, if not avoided, will
result in death or serious injury.
WARNING indicates a hazardous situation which, if not avoided,
could result in death or serious injury.
CAUTION indicates a hazardous situation which, if not avoided,
could result in minor or moderate injury.
!
!
DANGER
!
WARNING
!
CAUTION

3
SAFETY INFORMATON
1.2 Operating Safety
Failure to follow instructions in this manual may lead to serious injury or even death! This
equipment is to be operated by trained and qualified personnel only! This equipment is for
industrial use only.
The following safety guidelines should always be used when operating the concrete saw:
DO NOT operates or services this equipment before reading the entire manual. Always read,
understand, and follow procedures in operator’s Manual before attempting to operate
equipment.
ALWAYS be sure to operator is familiar with proper safety precautions and operating
techniques before using the saw. This equipment should not be operated by persons under 18
years of age.
NEVER operate this equipment without proper protective clothing, shatterproof glasses,
steel-toed boots and other protective devices required by the job.
NEVER operate this equipment when not feeling well due to fatigue, illness or under the
influence of drugs or alcohol.
NEVER use accessories or attachments, which are not recommended by MASALTA for this
equipment. Damage to the equipment and/or injury to user may result.
The manufacturer does not assume responsibility for any accident due to equipment
modifications.
Whenever necessary, replace nameplate, operation and safety decals when they become
difficult to read.
ALWAYS check the machine for loosened threads or bolts before starting.
NEVER touch the hot exhaust manifold, muffler or cylinder. Allow these parts to cool before
servicing engine or saw.
High Temperatures – Allow the engine to cool before adding fuel or performing service and
maintenance functions. Contact with hot components can cause serious bums.
NEVER operate the saw in any enclosed or narrow area where free flow of the air is restricted.
There is a risk of carbon monoxide poisoning. It could cause serious damage to the saw or
engine and may cause injury to people.
ALWAYS use extreme caution when working with flammable liquids. When refueling, stop the
engine and allow it to cool. Do not smoke around or near the machine.
NEVER operate the saw in an explosive atmosphere or near combustible materials. Fire
and/or explosions may result from errant sparks from the equipment.
Stop the engine when leaving the saw unattended. Block the unit when leaving or when using
on a slope.
Maintain this equipment in a safe operating condition at all times. Never use fuel as a cleaning
agent.
ALWAYS store equipment properly when it is not being used. Equipment should be stored in a
clean, dry location out of the reach of children.

4
SAFETY INFORMATON
1.3 Blade Safety
Use appropriate steel centered diamond blades manufactured for use on concrete saws.
ALWAYS inspect diamond blades before each use. The blade should exhibit no cracks, dings,
or flaws in the steel centered core and/or rim. Center (arbor) hole must be undamaged and
true. Examine blade flanges for damage, excessive wear and cleanliness before mounting
blade. Blade should fit snugly on the shaft and against the inside/outside blade flanges.
Ensure that the blade is marked with an operating speed greater than the blade shaft speed of
the saw.
Only cut the material that is specified by the diamond blade. Read the specifications of the
diamond blade to ensure the proper tool has been matched to the material being cut.
ALWAYS keep blade guards in place. Exposure of the diamond blade must not exceed 180
degrees.
Ensure that the diamond blade does not come into contact with ground or surface during
transportation. DO NOT drop the diamond blade on ground or surface.
The engine governor is designed to permit maximum engine speed in a no-load condition.
Speeds that exceed this limit may cause the diamond blade to exceed the maximum safe
allowable speed.
Ensure that the blade is mounted for proper operating direction.
1.4 Transportation Safety
Use the lifting bail and appropriate lifting equipment to ensure the safe movement of the saw.
DO NOT use the handle bars and/or front pointer as lifting points.
NEVER tow the saw behind a vehicle.
Ensure that both pointer bars are positioned appropriately to minimize their exposure during
transportation.
Safeguard against extreme saw attitudes relative to level. Engines tipped to extreme angles
may cause oil to gravitate into the cylinder head making the engine difficult to start.
NEVER transport the saw with the blade mounted.
1.5 Service Safety
NEVER lubricate components or attempt service on a running machine.
ALWAYS allow the machine a proper amount of time to cool before servicing.
Keep the machinery in running condition.
Fix damage to the machine immediately and always replace broken parts.
Dispose of hazardous waste properly. Examples of potentially hazardous waste are used
motor oil, fuel and fuel filters.
DO NOT use food or plastic containers to dispose of hazardous waste.

5
SAFETY INFORMATON
1.6 Safety Labels
MASALTA machines use international pictorial labels where needed. These labels are described
below:
Label Meaning
DANGER!
Engines emit carbon monoxide; operate only
in well-ventilated area. Read the Operation
Manual for machine information. No sparks,
flames, or burning objects near the machine.
Shut off the engine before refueling. Use
only clean, filtered unleaded gasoline.
WARNING!
Read and understand the supplied
Operation Manual before operating the
machine. Failure to do so increase the risk of
injury to yourself or others.
WARNING!
Always wear hearing and eye protection
when operating the machine.
CAUTION!
Lifting point.

6
SAFETY INFORMATION
Label Meaning
WARNING!
Hot surface!
WARNING!
WARNING!
Be care of your hand and foot when cutting.
WARNING!
A nameplate listing the model number and
serial number is attached to each unit. Please
record the information found on this plate so it
will be available if the nameplate lost or
damaged. When requesting service
information, the serial number should be
specified of the unit.
7
OPERATION
2. OPERATION
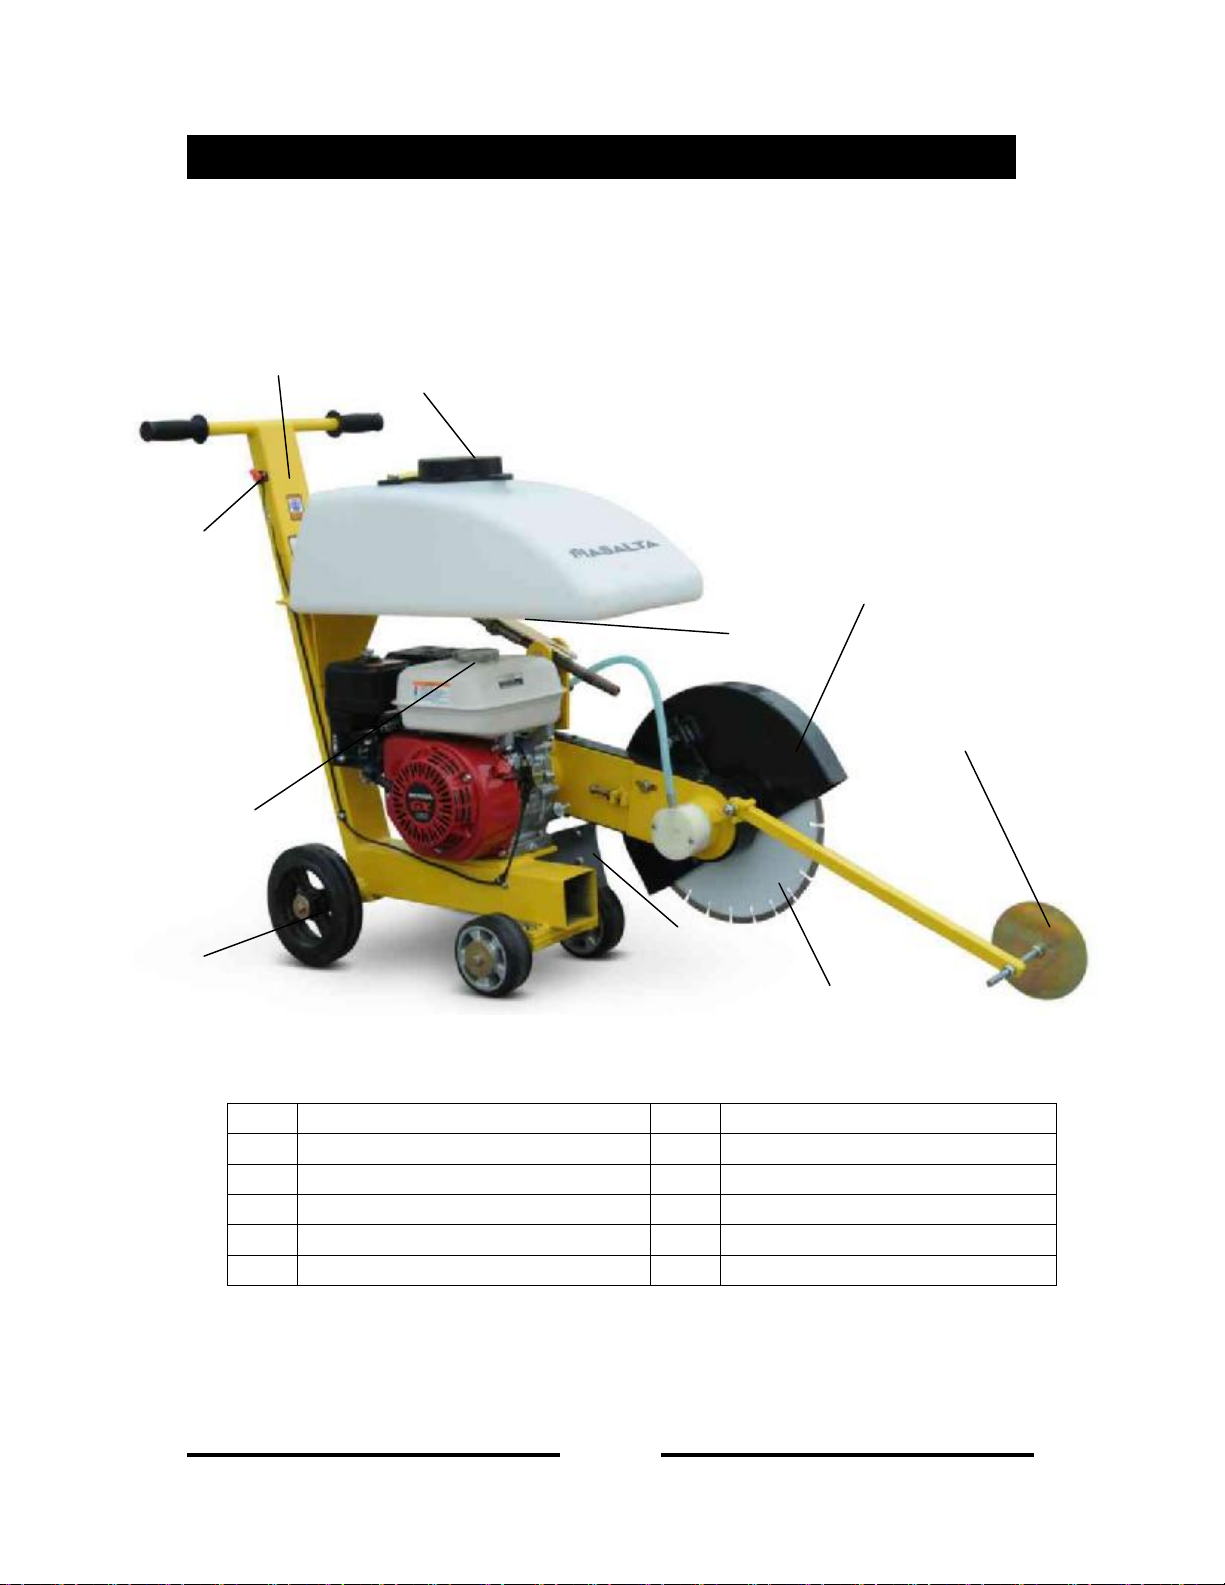
2.1 Controls & Components
Ref. Description Ref. Description
1 Refueling 6 Trolley wheel
2 Handle for Blade high Adjustment 7 Splash Guard
3 Throttle Control 8 Blade Guard
4 Water Tank Filling 9 Diamond Blade
5 Handle for Operating 10 Pointer Wheel
1
5 4
5
6
8
9
7
10
3

8
OPERATION
2.2 Application
Floor saw has been specifically designed as the ideal machine for the professional contractor
who is engaged in concrete and asphalt flat cutting. It is the most common type of diamond blade
cutting. it is possible to cut both concrete (green or cured, with or without rebar) or asphalt with a
floor saw. Our saw utilized for jobs requiring precision cutting including floors, pavements,
walkways, ramps and other flat sawing applications. This type of cutting is described as “flat”
because the pavement is cut somewhere close to a horizontal plane.
2.3 Operating Principle
The following instructions were compiled to provide you information on how to obtain long and
trouble free use of the unit. Periodic maintenance of this unit is essential. Read the manual in
its entirety and follow the instructions carefully. Failure to do so may injure yourself or a
bystander.
2.4 Assembling the Blade
1. Water hose coupler – Disconnect the water hose coupler.
2. Inner Flange (Collar) – This flange is fixed upon the blade shaft. The inside surface of the
flange must be free of debris and permit a tight closure on the surface of the blade.
3. Diamond Blade – Ensure that the proper diamond blade has been selected for the job.
Pay close attention to the directional arrows on the blade. The blade’s operating
directional arrows must point in a “ down – cutting “ direction to perform correctly. When
placing the blade onto the blade shaft, ensure the arbor hole of the blade matches the
diameter of the shaft.
4. Outside Blade Flange (Collar) – Ensure that the outside blade flange is placed flush
against the diamond blade. The inside surface of the flange must be free of debris and
permit a tight closure on the surface of the blade core.
5. Blade Hex Nut – Unscrew the blade shaft nut, DO NOT overtighten the nut when finalizing
the assembly.
6. Blade Guard – Pull the cover on, tighten the screw beside the blade guard cover
2.5 To Start
1. Turn the throttle control level to the middle position.
2. Set the engine ON/OFF switch to the “ON” position.
3. If it is cold start, turn the choke lever to close position.
4. Grip the recoil starter handle and pull it until you feel slight resistance. Then pull sharply
and quickly. Return the recoil starter handle to the starter case before releasing.
5. Grip the recoil starter handle and pull it a little to feel a slight resistance. Then pull it
powerfully from there. To release the handle do not release it at the position where it has
been pulled to, but release it after returning closely to the starter case.

9
OPERATION
6. If the engine has started, while listening to explosion sounds, return the choke lever slowly
to full-open position. Be sure to perform a warm-up run for the period 3 to 5 minutes at low
speed, while paying careful attention to gasoline leakage or abnormal sound.
7. If it is difficult to start the engine by repeatedly pulling the starter rope, pull off the spark
plug and check the sparking performance. If the plug is wet due to excessive fuel intake or
soiled, replace the coil or clean sufficiently to its internals. With the ignition plug removed,
pull the recoil starter handle 2-3 times to discharge excessive blended gas.
2.6 Cutting
1. Before the saw is placed into operation, run the engine for several minutes. Check for fuel
leaks, and noises that would associate with a loose blade guard covers.
2. Rotate the throttle lever to “rabbit” position.
3. To begin sawing, lower the rotating blade allowing it to cut to the present depth.
4. When blade has reached full cutting depth, slowly walk behind the saw at a rate that will
allow the engine to operate without losing optimum RPM.
5. When the end of the cut has been reached, raise the blade out of the cut by pulling back
on the handlebars (using a downward pressure) until the raise/lower rod drops into its slot
with the blade in the raised position.
6. If cutting is complete, shut the saw down using the following “ To Stop Procedures”.
2.7 To Stop
Stop the engine under normal conditions:
1. Place the engine throttle lever in the slow position, and listen for the engine speed to
decrease. Allow engine to run for 2 or 3 minutes for proper cool down.
2. Turn the engine ON/OFF switch to the “OFF” position.
3. Place the fuel valve lever to the “tortoise” position.

10
MAINTENANCE
3. MAINTENANCE
3.1 Blade Removal and Replacement
1. Disconnect the water hose coupler.
2. Ensure the Engine ON/OFF switch on the engine are turned to the “OFF“ position.
3. Place the PMF14 Saw on a stable level working surface.
4. Ensure the blade is raised and the raise/lower rod is locked into position.
5. Raise the blade by rotating the handlebars
6. Loose the screw, lifting up the blade guard cover to gain access to the diamond blade.
7. Use the provided blade nut and blade shaft locking wrenches to replace the diamond
blade.
8. While holding the blade shaft with the locking Wrench, remove the blade hex nut
(counter-clockwise direction) and outer blade flange.
9. Remove the old blade and install a new blade in the same rotational direction as marked
on the blade.
10. Reinstall the outer blade flange and hex nut. Tighten the nut firmly (clockwise direction).
DO NOT OVER TIGHTEN.
3.2 Blade Guard Check
1. Ensure the capacity of the blade guard matches the diameter of your diamond blade.
2. Check that the guard is bolted firmly upon the saw frame.
3.3 V-belt Alignment and Tension
1. Remove the bolts that secure the V-belt cover to the saw frame.
2. Check uniform parallelism of V-belt and pulley (sheaves). Use a straight-edge or
machinist’s square against both pulleys and adjust both pulleys until equally aligned.
3. DO NOT over or under tighten the V-belt. Severe damage can occur to the saw and engine
crank shaft if the belt is over-tensioned. A decrease of power to the blade and poor
performance will result if the belt is under-tensioned (loose on pulleys).

11
MAINTENANCE
4.
3.4 Troubleshooting
3.4.1 Blade Troubleshooting
SYMPTOM POSSIBLE PROBLEM SOLUTION
Blade too hard for the
material being cut?
Consult Dealer for correct blade. Try
cutting very soft material (sandstone, silica
brick, cinder block) to "Redress" the blade.
Engine torque diminished
because of loose V-belt? Tighten and/or replace V-Belt.
Insufficient Engine power? Check throttle setting. Check Engine
horsepower.
Improper dircection of
rotation?
Check that the blade is properly
oriented and rotational arrow points in a
"D
o
wn
-
Cutting"
direction.
Blade slows
or stops
cutting, still
remains on
blade
Blade is slipping on the blade
shaft?
Check that the blade & flange pin are
properly installed on the blade shaft.
Blade being used on
misaligned saw?
Check blade shaft bearings and
alignment integrity.
Blade is excessively hard for
the material being cut?
Check specification of the blade with the
material being cut. Consult Dealer for
information.
Blade being used at improper
RPM?
Ensure blade surface feet per minute
speed (SFPM) is approximately 6,000.
Blade improperly mounted on
arbor shoulders and flanges?
Ensure blade is properly affixed on the
blade shaft.
Blade does
not cut
straight
and/or true.
Excessive force applied to
blade while cutting?
DO NOT force the blade in the cut. Apply
a slow and steady pace when sawing.
Blades too hard for the
material being cut?
Consult Dealer for correct blade. Try
cutting very soft material (sandstone, silica
brick, cinder block) to "Redress" the blade.
Blade improperly mounted on
arbor shoulders and flanges?
Ensure blade is properly affixed on the
blade shaft.
Blade not receiving enough
cooling air?
Ensure proper flow & volume of water is
provided for wet cutting blades. Ensure
sufficient cooling air is circulated about a
dry cutting blade.
Arbor hole out of round? Ensure blade is properly affixed on the blade
shaft.
Incorrect blade chosen for
material being cut?
Check specification of the blade with the
material being cut. Consult Dealer or for
information.
Blade
discoloring,
crackling
and/or
wearing
excessively.
Excessive force applied to
blade while
cutting?
DO NOT force the blade in the cut. Apply
a slow and steady pace when sawing.

12
MAINTENANCE
3.4.2 Engine Troubleshooting
SYMPTOM POSSIBLE CAUSE SOLUTION
Spark plug bridging? Check gap, insulation or replace
spark plug.
Carbon deposit on spark
plug? Clean or replace spark plug.
Short circuit due to deficient
spark plug insulation?
Check spark plug insulation, replace
if worn.
Difficult to start,
"fuel is
available, but no
SPARK at spark
plug".
Improper spark plug gap? Set to proper gap.
ON/OFF switch is shorted? Check switch wiring, replace switch.
Ignition coil defective? Replace ignition coil.
Improper spark gap, points
dirty? Set correct spark gap and clean points.
Condenser insulation worn or
short circuiting? Replace condenser.
Difficult to start,
"fuel is
available, and
SPARK is
present at the
spark plug".
Spark plug wire broken or
short circuiting? Replace defective spark plug wiring.
Wrong fuel type? Flush fuel system, and replace
with correct type of fuel.
Water or dust in fuel system? Flush fuel system.
Air cleaner dirty? Clean or replace air cleaner.
Difficult to start,
"fuel is vailable,
spark is present
and ompression
is normal".
Choke Open? Close Choke.
Suction/exhaust valve stuck or
protruded? Re-seat valves.
Piston ring and/or cylinder
worn? Replace piston rings and or piston.
Cylinder head and/or spark
plug not tightened properly?
Torque cylinder head bolts and
spark plug.
Difficult to start,
"fuel is
available, spark
is present and
compression is
low".
Head gasket and/or spark
plug gasket damaged? Replace head and spark plug gaskets.

13
MAINTENANCE
SYMPTOM POSSIBLE CAUSE SOLUTION
Fuel not available in fuel
tank? Fill with correct type of fuel.
Fuel filter clogged? Replace fuel filter.
Fuel tank cap breather hole
clogged? Clean or replace fuel tank cap.
No fuel present
at the
carburetor.
Air in fuel line? Bleed fuel line.
Air cleaner not clean? Clean or replace air cleaner.
Check float adjustment.
Improper level in carburetor?
Rebuild carburetor.
Defective spark plug? Clean or replace spark plug.
"Weak in power"
compression is
proper and does
not misfire.
Improper spark plug gap? Set to proper gap.
Water in fuel system? Flush fuel system and replace with
correct type fuel.
Ignition coil defective? Replace ignition coil.
"Weak in power"
compression is
proper but
misfires. Dirty spark plug? Clean or replace spark plug.
Wrong fuel type? Flush fuel system, and replace with
correct type of fuel.
Spark plug heat value
improper? Replace with correct type of spark plug.
Engine
overheats.
Cooling fins dirty? Clean cooling fins.
Governor adjusted
correctly? Adjust governor.
Governor spring defective or
missing? Replace governor spring.
Rotational
speed
fluctuates.
Fuel flow restricted? Check entire fuel system for leaks or
clogs.
Recoil mechanism clogged
with dust and dirt?
Clean recoil assembly with soap and
water.
Recoil starter
malfunction.
Spiral spring loose? Replace spiral spring.

14
MAINTENANCE
3.5 Transporting
1. Shutdown engine for transportation.
2. The blade must be removed from the saw during all transport and lifting.
3. For transportation, tighten fuel tank cap securely to prevent fuel from spilling.
4. Use the parking brake during transportation
5. Use lifting point when lifting machine
6. Make sure lifting device has enough capacity to hold machine
15
TECHNICAL DATA
4. TECHNICAL DATA
Model MFS14-1 MFS14-3 MFS14-4
Engine type Kipor170 Robin EX17 Lombardini LD225
Power kw(hp) 3.1(4.2) 4.2(5.7) 4.0(5.5)
Weight kg(lb) 83(183) 70(154) 70(154)
Max cutting depth cm(in) 18.5(7.2)
Blade size cm(in) 30-35(12-14)
Depth adjustment Handle rotation
Driving Manual push
Water tank capacity (L) 28
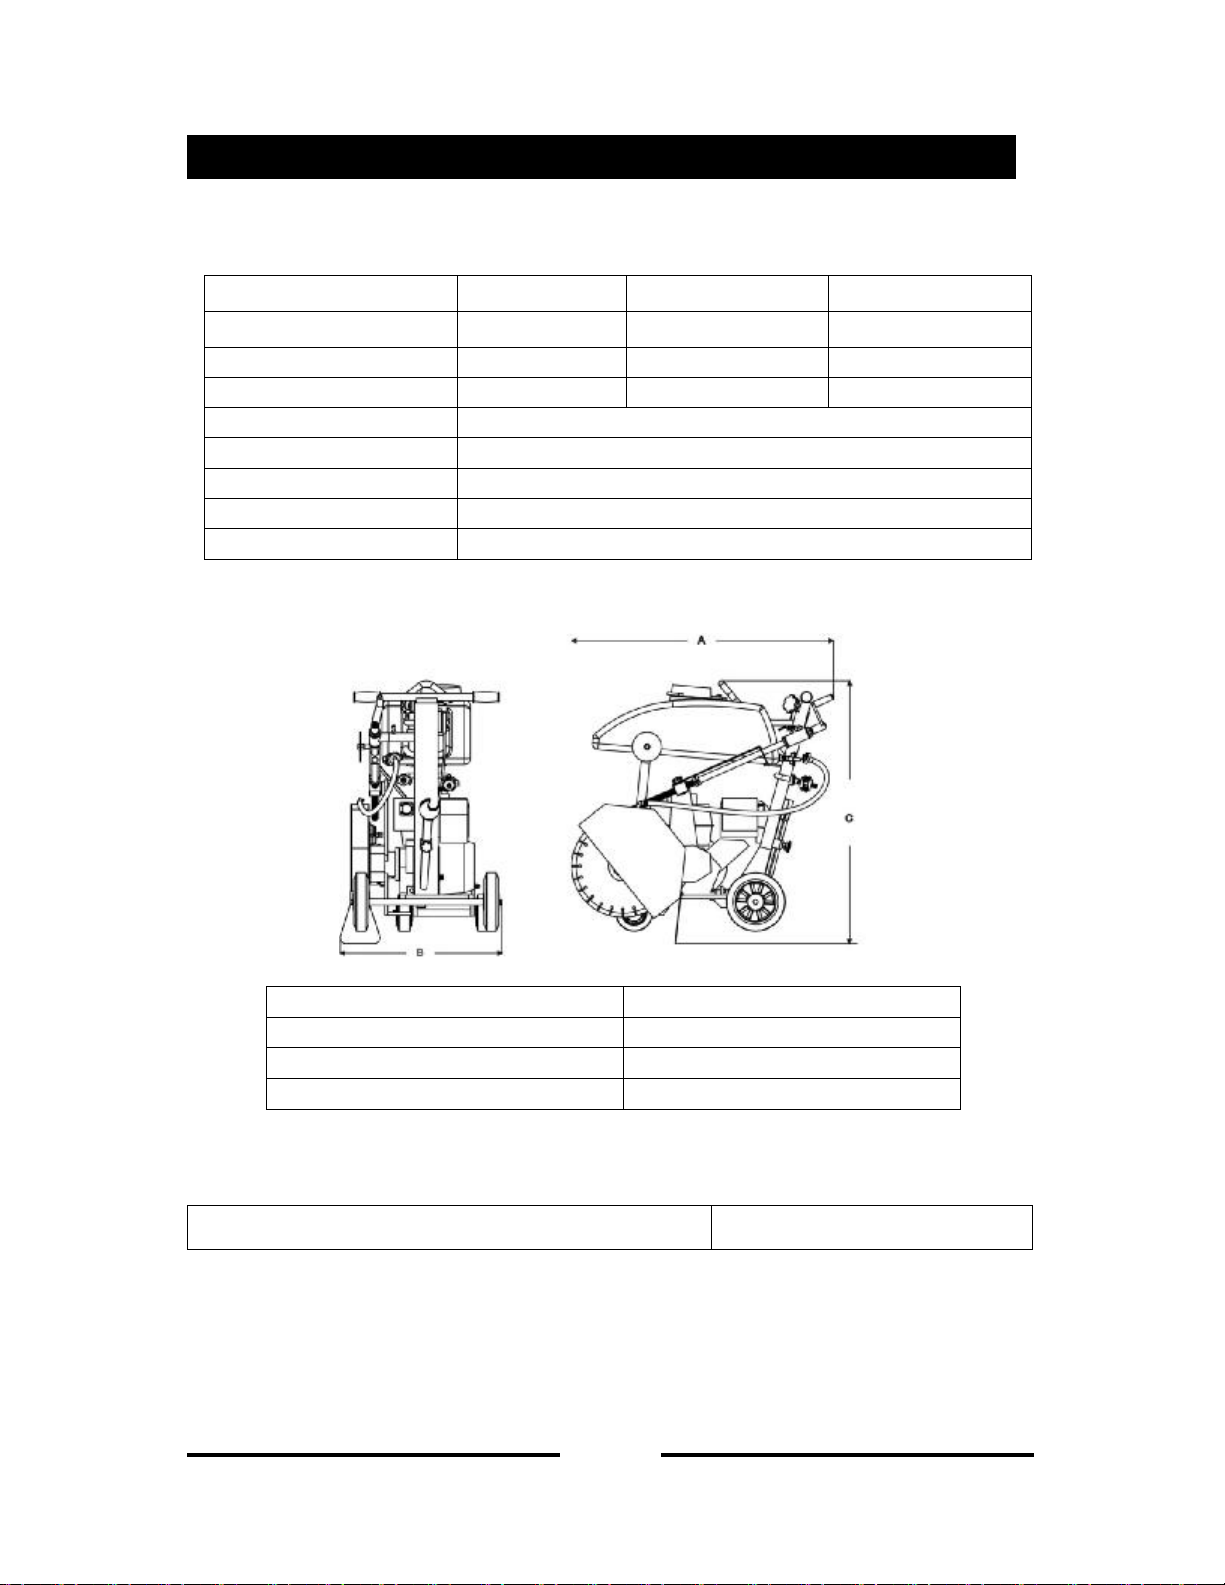
Dimension:
Sound Specification (According to 2000/14/EC)
Guaranteed sound power level 108 dB(A)
Hand-Arm vibration Specification (According to ISO 5394, EN 1033 and EN500-4): 5.0m/s2
Ref. Dimension (MM)
A 1050
B 910
C 480

16
WARRANTY
MASALTA products are covered by warranty for a period of twelve (12) months from the date
of purchase against defects in material or workmanship provided that:
l The product concerned has been operated and maintained in accordance with the
operating instructions.
l Has not been damaged by accident, misuse or abuse.
l Has not been tampered with or repaired by any unauthorized person.
The owner is responsible for the cost of transportation to and from the authorized repairer and
the unit is at the owners risk while in transit to and from the repairer.
Impact damage is not covered under warranty. Clutches are not covered under any
warranty.
Engines are officially guaranteed by Honda, Robin, Kipor manufacturer. Please refer to
the annex for engine warranty.

17
MAINTENANCE RECORD
PREVENTATIVE MAINTENANCE AND ROUTINE SERVICE PLAN
MASTERPAC green concrete saw has been assembled with care and will provide years of
service. Preventative maintenance and routine service are essential to the long life of your
saw. After reading through this manual thoroughly, you will find that you can do some of the
regular maintenance yourself. However, when in need of parts or major service, be sure to
see your dealer. For your convenience we have provided this space to record relevant data
about your saw.
Invoice Number: Type of Machine:
Date Purchased: Dealer Name:
Serial Number: Dealer Phone:
REPLACEMENT PARTS USED MAINTENANCE LOG
PART NO. DESCRIPTION
QTY COST DATE DATE OPERATION

18
EC DECLARATION OF CONFORMITY
CE-KONFORMIT TSERKL UNG
DECLARACIÓN DE CONFORMIDAD DE LA CE
DÉCLARATION DE CONFORMITÉ C.E.
MASALTA ENGINEERING CO., LTD
Weisi Road, Baohe Industrial Estate, HeFei 230051, China
hereby certifies that the construction equipment specified hereunder / bescheinigt, da. das Bauger.t / certifica
que la m quina de construcción / atteste que le matériel :
1. Category / Art / Categoría / Catégorie:
Floor Saw
2. Type / Typ / Tipo / Type:
MFS 14
has been produced in accordance with the following standards:/in übereinstimmung mit folgenden Richtlinien
hergestellt worden ist:/ha sido fabricado en conformidad con las siguientes normas: / a été produit
conformément aux dispositions des directives européennes ci-après :
2000/14/EC outdoor
2006/42/EC
2004/108/EC/EN55012:2007
EN13862/2001
15.02.10 Hermann Josef Lensing
--------------------------------------------------- Research and Development Manager
Date / Datum / Fecha / Date

Table of contents
Other Masalta Saw manuals

Popular Saw manuals by other brands

Craftsman
Craftsman 10 IN. TABLE SAW 315.22811 owner's manual

Wen
Wen BA4664 instruction manual

Barranca Diamond
Barranca Diamond BD10 Owner's Manual and Operating Instructions

HURRY UP
HURRY UP HUCRS-200 instruction manual

Wellsaw
Wellsaw 1016 operating & maintenance manual

DeWalt
DeWalt DCS727-XE Original instructions


