MASCOT MOL-HA-MSM01-W User manual

USER MANUAL
MODEL: MOL-HA-MSM01-W


EN-1
USER MANUAL
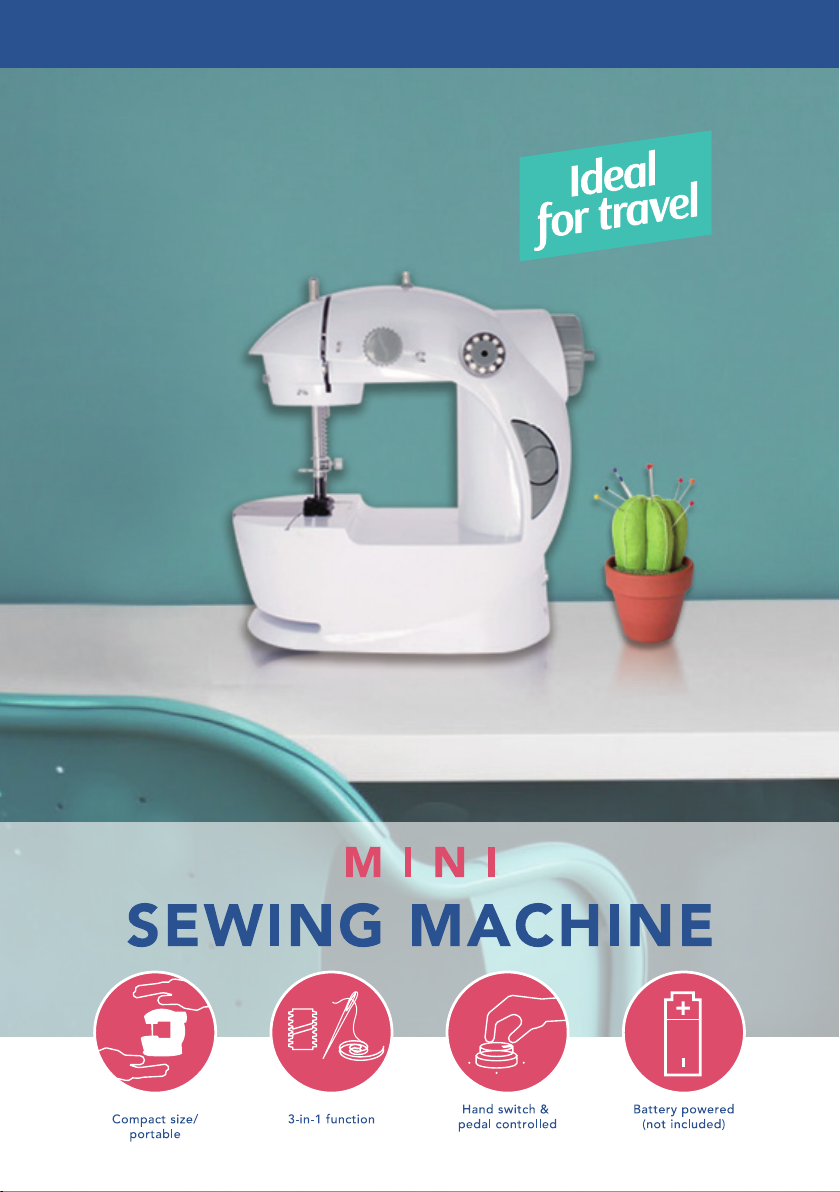
MINI SEWING MACHINE (MOL-HA-MSM01-W)
English
TABLE OF CONTENTS:
1) Package contents
2) Safety instructions
3) Installing and using the device
4) Features and specications
1) PACKAGE CONTENTS
1) Mini sewing machine
2) Foot pedal
3) USB power cable
4) Accessories
5) User manual
2) SAFETY INSTRUCTIONS
The following basic precautions must always be taken before using the “Mini sewing
machine” hereinafter referred to as ‘device’:
General information
• Read the instructions for use carefully and keep them safe. If you give this device to other
people, please also pass on this manual.
• Only use this device in accordance with the instructions in this user manual.
• The device is not a toy. Keep it out of the reach of children and pets.
• This device is intended for domestic and private use and should only be used for its
intended purpose. The device is not intended for commercial use. All other uses are
deemed to be improper and may result in damage to property or even personal injury.
General safety information and instructions
• Read the instructions for use carefully and keep them safe. If you give this device to other
people, please also pass on this manual.
• Only use this device in accordance with instructions in this user manual.
• This device can be used by children aged 8 and over and people with restricted physical,
sensory or mental capacity or a lack of experience and expertise, provided they are under
supervision or have been given instructions about safely using the device and are aware of
the potential hazards. Children must not play with the device. Cleaning and maintenance
must not be done by children unless they are over the age of 8 and under supervision.
• WARNING! Do not leave packaging material lying around carelessly. This may
become dangerous playing material for children. Risk of suffocation!

EN-2
• Keep the device out of the reach of children below the age of 8 years.
• This device is not a toy and keep children under strict supervision to prevent them from
using the device as a toy.
• Do not allow unsupervised children to clean or maintain this device.
• Only use the device indoors, in dry areas and not in the vicinity of water, other liquids or
humidity.
• Do not use the device if it, or its cable, has fallen into water or any kind of uid.
• Never immerse the device, power cable in water or any kind of uid.
• Do not place the device under any mechanical stress.
• Please handle the device carefully. Jolts, impacts or falls, even from a low height, can
damage the device.
• Prior to use, check the device for visible external damage. Never operate the device if it is
damaged.
• Do not open the casing as this may result in electric shock.
• Do not attempt to disassemble or repair the device or modify it in any manner.
• Place the device on a at and stable surface, in a place where it cannot fall over.
• Do not switch on the device until accessories have been tted properly.
• Always switch off the device before changing accessories.
• Do not leave the device unattended.
• Damaged or bent needles should not be used.
• Keep ngers away from all moving parts. Special care is required around the needle of
the device.
• Do not push or pull fabric while stitching. It may deect the needle, causing it to break.
• Switch the device off when making any adjustments in the needle area, such as threading
needle, changing needle, threading bobbin and such like.
• Never drop or insert any object into any opening.
• Never place anything on the foot controller or block it.
• If the supply cord that is connected to the foot controller is damaged, it must be replaced
by the manufacturer or its service agent or a similar qualied person, in order to avoid
hazards.
• When an AC/DC charger is used to power the device, remove the batteries from the
device.
• Do not subject the device to shocks or let if fall, as it may damage the device.
• Do not sew clothes while wearing them.
• Only use a 5-6Vdc power adapter of with a minimal output of 1.000mA. Do not use
adapters with different voltages, as this could cause serious damage to the device or the
charger.
• Use the included USB cable with a suitable AC/DC Power adapter.
• Repairs must only be carried out by a qualied technician. Never attempt to repair the
device yourself. Improper repairs can pose signicant risks to the user and will invalidate
any warranty claims.
• The guarantee will expire immediately if damage has been caused by non-compliance
with this user manual. The manufacturer accepts no liability for damage caused by non-
compliance with the user manual, negligent use or use which does not comply with the
conditions of this user manual.
• This device is not a toy and should be kept away from children and pets.
• Do not allow unsupervised children to clean or maintain this device.
• This device is intended for domestic or similar use and should never be used for anything

EN-3
other than its intended purpose.
• If you give the device to a third party, also supply the user manual.
• Retain the device’s user manual and packaging.
Batteries and heat
• Ensure the battery compartment is securely closed.
• Only use AA batteries (Alkaline batteries are recommended).
• Only use a set of 4 of the same brand of AA batteries and do not mix.
• Do not mix Alkaline, standard batteries (carbon zinc) or rechargeable batteries (nickel
hydride)
• Do not mix old and new batteries.
• Install the batteries with the correct polarity inside the battery compartment.
• Replace a full set of 4 AA Alkaline batteries at the same time.
• Remove batteries from the appliance when it is not being used for a long period of time,
to prevent the batteries from leaking.
• Do not place the device close to products that become hot.
• Do not open the casing as this may result in electric shock.
• Do not place the device close to products that become hot.
• If the battery leaks, do not allow any battery uid to come into contact with the skin or
eyes. If contact has been made, wash the affected area with copious amounts of water and
seek medical advice.
• Batteries can be life-threatening if swallowed. Therefore, store batteries out of the reach
of young children. If a battery has been swallowed, medical assistance must be sought
immediately.
• Keep batteries out of reach of children.
• Non-rechargeable AA batteries should not be recharged.
• Rechargeable AA batteries can be used with this appliance. The rechargeable batteries
must be removed from the appliance before being charged.
• Only charge rechargeable batteries with the charger that comes with these batteries and
follow the instructions in the manual provided by the manufacturer.
• Rechargeable batteries should only be recharged under adult supervision.
• Do not short circuit the contacts inside the battery compartment or any batteries.
• Do not crush, puncture, dismantle the device, otherwise the batteries might get damaged.
• Do not dispose the device in a re because the batteries could explode.
• Do not expose the device and batteries to excessive heat sources like re.
• Do not dispose the device in your household waste, as it contains batteries. Batteries
can be disposed of by taking them to your local recycling station. Contact your local
government ofces for details.
Use warning
Before starting to sew, always check that the device is properly threaded. If the thread or
bobbin is incorrectly positioned, the device may become damaged. While sewing, keep
your ngers away from moving parts. Pay particular attention to the needle. Do not pull the
fabric when sewing, but guide it gently, otherwise the needle may break and the device
may become damaged. Remove the batteries when the sewing machine is not used for
an extended period of time. This will protect the device and extend the life of the batteries.
To prevent the sewing process from being interrupted, always make sure you have spare
batteries available.

A
N
B
O
C
P
D
Q
E
R
F
S
T
H
U
I
V
J
W K
X
L
G
DC JACK
M
EN-4
3) INSTALLING AND USING THE DEVICE
The device is intended for indoor domestic and private use. The device is not intended for
any other purposes. Follow the instructions in this user manual to make sure the device is
installed and used safely.
Open the packaging carefully before taking out the device. Make sure it is complete and
undamaged. If any components are missing or damaged, contact the vendor and do not
use the product. Retain the packaging or recycle it in accordance with local regulations.
Placing the batteries
1) The device requires 4x AA batteries (not included). Best performance can be achieved
with alkaline batteries. Rechargeable batteries can also be used with the device.
2) Locate the battery compartment at the bottom of the device.
(Battery compartment)
3) Open the battery compartment cover.
4) Make sure the device is switched OFF and install 4x AA batteries in the battery
compatment, ensuring the polarity matches the diagram shown in the battery compartment.
5) Close the battery compartment again.
Description of the device:

C
E
1
2
3
4
5
6
7
EN-5
ON/OFF power switch
Battery compartment (under the device)
Spool pin
Take up lever
Thread spool
Presser foot
Presser foot lifter
Thread gap
Bobbin compartment (cover)
Bobbin holder
Handwheel
Speed button
Foot pedal jack
Instructions for use:
Press the ON/OFF button A to switch the device on or off. The device is ON when the
switch is pressed down and OFF when it is not pressed down. Be sure the device is
properly threaded and that the fabric is positioned for sewing before you turn on the device.
Sewing with the thread spool
1) Pull out the thread spool pin C by raising it upwards.
2) Place the thread spool Eon the thread spool pin C as shown in the image.
3) Pull the thread from the thread spool Eand take it towards the front of the device by
passing it through the rst thread guide 1.
4) Bring the thread across to the second thread guide 2over the tension adjustment screw
Nbetween the two washers behind the screw N. The thread must be held taut.
5) Pull the thread from the tension adjustment screw Nto the front of the device by
bringing it across the thread guide 3.
6) Pull the thread through the thread guide 4on the take up leaver D, inserting towards
the front of the device, from right to left.
Tension adjustment screw
Needle clamp screw
Needle clamp
Adjusting screw
Needle
Bobbin
Bobbin winding spindle
Bobbin pin
Bobbin holder
Light
ON/OFF light switch
External power supply socket
A N
B O
C P
D Q
E R
F S
G T
H U
I V
J W
K X
L DC JACK
M

EN-6
7) Pull the thread down to the thread guide 5 and insert the thread from above downwards.
8) Pull the thread downward through the thread guide 6. If necessary, lower the needle R
to reach this thread guide by turning the handwheel K slightly counter clockwise.
9) Insert the thread through the eye 7of the needle from the front toward the back of the
device. If necessary, raise the needle Rto reach the eye by turning the handwheel K
clockwise.
10) Raise the presser foot Fby lifting the presser foot lifter G on the back of the machine.
11) Pull approximately 25cm of thread through the needle Rand lay it on the deck under
the presser foot F running away from you.
How to insert the bobbin into the base:
• Remove the bobbin compartment cover Iby pushing it in the direction indicated on the
cover.
• Place the bobbin with a thread of your choice in the bobbin holder Jleaving
approximately 25 cm of thread extended out from the bobbin holder Jand extend the
thread into the thread gap H.
• Turn the handwheel K clockwise. The needle will go down, picking up the bobbin thread.
Continue to turn the handwheel Kuntil the needle R returns to the highest raised position.
Stop when the needle R begin to go down again.
• Raise the presser foot F and bring the spool thread around to the front. The spool and
bobbin threads are joined together; pull the two threads towards the rear and lay them
under the presser foot F.
• Replace the bobbin compartment cover I
Note! The two threads must sew correctly. Take some tests before starting to sew.
Improper threading will damage the lockstitch. It is possible that the device is sold with the
thread already inserted. Check the position of the threads before replacing them with yours.
How to use the bobbin:
Follow steps 4 to 11 of the paragraph “Sewing with the thread spool” (above)
1) Pull the bobbin spindle U out of the device.
2) Insert the bobbin spindle Uthrough the center hole of the threaded bobbin
3) Insert the bobbin spindle U (with bobbin) into the bobbin holder V.
4) Make sure the bobbin spindle with the bobbin is tightly secured to the device.
Note! Use only the side bobbin with the thread spool for sewing with both threads.
How to use the device without the foot pedal:
1) Lift the needle Rabove the presser foot by turning the handwheel K clockwise.
2) Raise the presser foot F by lifting up the lever on the back of the device.
3) Place the fabric to be sewn under the presser foot F. The presser foot Fshould be in
a raised position. Make certain the seam direction is towards you, aligned with the presser
foot F, with seam location directly under the needle R.
4) Lower the presser foot Fby releasing the presser foot lever G downwards.
5) Rotate the handwheel Kin a clockwise direction by two 2complete turns to lock the
start seam.
6) Select speed button L on the front of the device. High speed is selected when the
button is extended out, low speed is selected when the button is ush with the device. Use

EN-7
the low speed for intricate work which requires a lot of stopping, starting and fabric turning.
Use the high speed for long uninterrupted seams.
7) Turn the power switch A to the ON position.
8) Gently guide the fabric to keep the seam straight by pressing it lightly down with your
ngertips on both sides as it feeds through the presser foot F.
9) When the seam is nished, turn the power switch A to OFF.
10) Raise the needle Rabove the fabric by turning the hand wheel Kslightly in a
clockwise direction.
11) Raise the presser foot Fby lifting the presser foot lifter G.
12) Pull the fabric toward you, leaving approximately 25cm of thread between the fabric
and the device.
13) Cut the thread close to the fabric, leaving the excess thread loosely lying on the sewing
deck in the direction of the presser foot F and towards you.
14) To do other seams, repeat the same procedure.
How to use the foot pedal:
Follow steps 1 to 4 of the paragraph “how to use the device without the foot pedal” (above)
1) Make certain that the device is switched OFF.
2) Plug the foot pedal jack into the socket on the back of the device M.
3) Turn the device ON by pressing the foot pedal.
4) Press the foot pedal to operate the device. Let up the foot pedal to stop the device from
sewing.
5) When you are nished sewing, remove your foot from the foot pedal.
IMPORTANT! The device must be set to OFF with power switch A, when using the
foot pedal.
How to adjust the mechanical tension:
In normal circumstances, it should not be necessary to adjust the tension. The tension has
been set for maximum performance as default. If the stitches are too loose or too tight, you
can adjust them.
1) To loosen the stitch: Turn the tension screw N counter clockwise.
2) To tighten the stitch: Turn the tension screw N clockwise.
The stitches may need to be enlarged to sew the heaviest fabrics. Sewing heavier fabric
may require loosening the stitch. Ver light fabric may require tightening the stitch.
Note! The bobbin’s tension is not adjustable!
How to replace the needle:
CAUTION! Before proceeding with the needle’s removal, always disconnect the
power supply and/or remove the batteries and make sure the device is switched OFF.
1) Turn the handwheel Kclockwise to raise the needle R to its highest position.
2) Loosen the needle clamp screw O by turning it counter clockwise. You may need to use
a short fat head screwdriver or small pliers.
3) Remove the needle R, pulling down away from the needle clamp P.
4) Place a new needle with the at side facing the needle clamp P.
5) Push the needle up gently as far as it will go and against the needle clamp P.
6) Tighten the needle clamp screw O, while holding the needle R in place.

EN-8
Note! Needles come in various sizes designated by numbers. The smaller the number, the
thinner the needle. Use smaller needles for more delicate fabrics and larger needles for
heavier fabrics.
How to wind the thread on a bobbin:
Choose your favorite color of thread for winding on the bobbin. You can sew with threads
of the same color as the fabric or create contrasts with threads of different shades. To wind
the thread on a bobbin you must:
1) Always remove the bobbin Sfrom the bobbin compartment before you wind a new
bobbin.
2) Place the thread spool Eon the spool pin C.
3) Put the spool pin into the hole of the handwheel K and turn it slightly anti-clockwise.
4) Take an empty bobbin. Pull the thread down from the thread spool Eand thread the
loose end through the small hole on the bobbin from the side.
5) Leaving the loose end on the outside of the bobbin, wind the thread several turns around
the INSIDE of the bobbin.
6) Place the bobbin on the bobbin pin T, making certain that the thread is winding onto
the bobbin in an anti-clockwise direction. (The thread must be wound under the bobbin, not
above).
7) Hold the thread lightly guiding it through your thumb and index nger.
8) When the bobbin is full, switch the device off. Insert the bobbin into the bobbin case
using the instructions for threading the device.
Cleaning and maintenance
Proper and regular cleaning will ensure safe operation and extend the lifespan of the
device. Use a damp cloth to remove dirt from the device.
Warning!
Before cleaning the device, always disconnect the power supply and/or remove the
batteries and make sure the device is switched OFF.
Attention!
• Do not clean the device with strong chemicals - or alkali-based, abrasive or disinfecting
agents - because they could damage the surface of the product.
• Do not immerse the device into water or any other liquids.

EN-9
Sorage and transportation
• When storing the device, it should rst be cleaned in accordance with this user manual.
The device should be stored in its original packaging.
• Always store the device in a dry and well-ventilated room and beyond the reach of
children and pets.
• Protect the device against vibrations and shocks during transport.
4) TECHNICAL SPECIFICATIONS
• Electrical power
Batteries: 4x AA, 1.5Vdc each (not included)
Adapter: 5-6Vdc, 1A (not included)
• Power consumption: 5 Watt
• Dimensions: 19.5 x 11.5 x 20.3 cm (LxWxH)
• Weight: 670 gram
All contents and specications mentioned in this manual are subject to change without prior notice.
Your product has been manufactured using high quality materials and components
which can be recycled and used again. At the end of its service life, this product
cannot be disposed of in normal domestic waste, but must be taken to a special
collection point for recycling electrical and electronic equipment. This is indicated in
the user manual and in the packaging by the waste container marked with a cross
symbol. Used raw materials are suitable for recycling.
By recycling used appliances or raw materials, you are playing an important role in protecting
our environment. You can ask your local council about the location of your nearest collection
point.
INSTRUCTIONS FOR PROTECTING THE ENVIRONMENT
(WEEE, the waste electrical and electronic equipment directive)

NL-1
GEBRUIKERSHANDLEIDING
MINI-NAAIMACHINE (MOL-HA-MSM01-W)
Nederlands
INHOUDSOPGAVE:
1) Inhoud verpakking
2) Veiligheidsinstructies
3) Installatie en gebruik van het apparaat
4) Functies en specicaties
1) INHOUD VERPAKKING
1) Mini-naaimachine
2) Voetpedaal
3) USB-voedingskabel
4) Hulpstukken
5) Gebruikershandleiding
2) VEILIGHEIDSINSTRUCTIES
Tref altijd de volgende voorzorgsmaatregelen voordat u de ‘Mini-naaimachine’ (hierna het
‘apparaat’ te noemen) gebruikt:
Algemene informatie
• Lees deze instructies vóór gebruik goed door en bewaar ze op een veilige plaats. Als u dit
apparaat aan iemand anders geeft, geef deze handleiding daar dan bij.
• Gebruik dit apparaat uitsluitend volgens de instructies in deze gebruikershandleiding.
• Dit apparaat is geen speelgoed. Houd het buiten bereik van kinderen en huisdieren.
• Dit apparaat is bedoeld voor huishoudelijk of soortgelijk gebruik en mag nooit worden
gebruikt voor iets anders dan het beoogde doel. Het apparaat is niet bedoeld voor
commercieel gebruik. Alle andere toepassingen worden onjuist geacht en kunnen leiden tot
schade aan eigendommen of zelfs persoonlijk letsel.
Algemene veiligheidsvoorschriften en -instructies
• Lees deze instructies vóór gebruik goed door en bewaar ze op een veilige plaats. Als u dit
apparaat aan iemand anders geeft, geef deze handleiding daar dan bij.
• Gebruik dit apparaat uitsluitend volgens de instructies in deze gebruikershandleiding.
• Dit apparaat kan worden gebruikt door kinderen van 8 jaar en ouder, personen met
beperkte fysieke, zintuiglijke of mentale vermogens of personen met gebrek aan ervaring
en kennis, mits ze onder toezicht staan of instructies hebben gekregen over het veilige
gebruik van het apparaat en zich bewust zijn van de mogelijke gevaren. Laat kinderen
nooit met het apparaat spelen. Reiniging en onderhoud dienen niet te worden uitgevoerd
• WAARSCHUWING! Laat verpakkingsmateriaal niet onbeheerd rondslingeren.
Het kan gevaar opleveren wanneer kinderen ermee spelen. Kans op verstikking!

NL-2
door kinderen, tenzij ze ouder zijn dan 8 en onder toezicht staan van een volwassene.
• Houd het apparaat buiten het bereik van kinderen jonger dan 8 jaar.
• Dit apparaat is geen speelgoed. Houd kinderen altijd in de gaten om te voorkomen dat ze
met het apparaat spelen.
• Laat kinderen dit apparaat niet zonder toezicht schoonmaken of onderhouden.
• Gebruik het apparaat uitsluitend binnenshuis, in droge gebieden en niet in de buurt van
water, andere vloeistoffen of vocht.
• Gebruik het apparaat of de kabel ervan niet als het in water of een andere vloeistof is
gevallen.
• Dompel het apparaat of de stroomkabel ervan nooit onder in water of een andere
vloeistof.
• Zorg ervoor dat het apparaat niet wordt blootgesteld aan enige mechanische belasting.
• Ga voorzichtig met het apparaat om. Het apparaat kan beschadigd raken door een schok,
stoot of val, zelfs van een geringe hoogte.
• Controleer het apparaat vóór gebruik op zichtbare beschadigingen aan de buitenkant.
Gebruik het apparaat niet als het beschadigd is.
• Open de behuizing niet. Als u dit wel doet, loopt u kans op een elektrische schok.
• Probeer het apparaat niet te demonteren, te repareren of anderszins aan te passen.
• Plaats het apparaat op een stabiele en vlakke ondergrond, op een plek waar het niet kan
vallen.
• Zet het apparaat pas aan als alle hulpstukken correct zijn bevestigd.
• Zet het apparaat altijd uit voordat u hulpstukken verwisselt.
• Laat het apparaat nooit onbeheerd achter.
• Beschadigde of verbogen naalden mogen niet worden gebruikt.
• Houd uw vingers uit de buurt van alle bewegende delen. Wees vooral voorzichtig in de
buurt van de naald van het apparaat.
• Duw en trek niet aan de stof tijdens het naaien. Hierdoor kan de naald verbuigen en zelfs
breken.
• Schakel het apparaat uit wanneer u aanpassingen aanbrengt in de buurt van de naald,
zoals het inrijgen of vervangen van de naald, het inrijgen van de spoel en dergelijke.
• Zorg ervoor dat er nooit voorwerpen in de openingen terecht komen.
• Plaats nooit iets op het voetpedaal en blokkeer het ook niet.
• Als het stroomsnoer dat is aangesloten op het voetpedaal beschadigd is, moet het
worden vervangen door de fabrikant, een servicemedewerker daarvan of een vergelijkbaar
gekwaliceerde persoon, om gevaarlijke situaties te voorkomen.
• Wanneer een AC/DC-oplader wordt gebruikt om het apparaat van stroom te voorzien,
moet u de batterijen uit het apparaat verwijderen.
• Stel het apparaat niet bloot aan schokken en laat het niet vallen, omdat het apparaat
hierdoor beschadigd kan raken.
• Naai uw kleding niet terwijl u deze nog draagt.
• Gebruik alleen een stroomadapter van 5-6V DC met een minimale uitvoer van 1000mA.
Gebruik geen adapters met andere voltages, omdat dit ernstige schade aan het apparaat
of de oplader kan veroorzaken.
• Gebruik de meegeleverde USB-kabel met een geschikte AC/DC-voedingsadapter.
• Reparaties mogen alleen worden uitgevoerd door een gekwaliceerde monteur. Probeer
nooit zelf het apparaat te repareren. Ondeskundige reparaties kunnen aanzienlijke risico's
opleveren voor de gebruiker en zullen elke aanspraak op garantie doen vervallen.
• De garantie komt direct te vervallen in geval van schade als gevolg van het niet in acht
nemen van deze gebruikershandleiding. De fabrikant accepteert geen aansprakelijkheid

NL-3
voor schade als gevolg van het niet in acht nemen van de gebruikershandleiding,
onzorgvuldig gebruik of gebruik dat niet overeenstemt met de voorwaarden in deze
gebruikershandleiding.
• Dit apparaat is geen speelgoed en moet uit de buurt worden gehouden van kinderen en
huisdieren.
• Laat kinderen dit apparaat niet zonder toezicht schoonmaken of onderhouden.
• Dit apparaat is bedoeld voor huishoudelijk of soortgelijk gebruik en mag nooit worden
gebruikt voor iets anders dan het beoogde doel.
• Als u het apparaat aan iemand anders geeft, geef daar dan ook de gebruikershandleiding
bij.
• Bewaar de gebruikershandleiding en verpakking van het apparaat.
Batterijen en warmte
• Zorg ervoor dat het batterijvakje goed is gesloten.
• Gebruik alleen AA-batterijen (alkalinebatterijen worden aanbevolen).
• Gebruik uitsluitend 4 AA-alkalinebatterijen van hetzelfde merk.
• Combineer alkalinebatterijen nooit met standaard (koolstofzink) of oplaadbare batterijen
(nikkel-cadmium).
• Combineer nooit oude met nieuwe batterijen.
• Plaats de batterijen in het batterijvakje. Let daarbij op de juiste polariteit.
• Vervang altijd de volledige set van 4 AA-alkalinebatterijen.
• Verwijder de batterijen uit het apparaat wanneer het gedurende een langere tijd niet wordt
gebruikt. Zo voorkomt u dat de batterijen gaan lekken.
• Plaats het apparaat niet in de buurt van producten die heet worden.
• Open de behuizing niet. Als u dit wel doet, loopt u kans op een elektrische schok.
• Plaats het apparaat niet in de buurt van producten die heet worden.
• Wanneer een batterij lekt, moet u voorkomen dat batterijvloeistof op de huid of in de ogen
terecht komt. Wanneer batterijvloeistof in contact is gekomen met de huid of ogen, moet
het betreffende gebied worden afgespoeld met grote hoeveelheden water en moet u een
arts raadplegen.
• Batterijen kunnen levensgevaarlijk zijn als ze worden ingeslikt. Bewaar batterijen daarom
altijd buiten bereik van jonge kinderen. Als een batterij is ingeslikt, moet onmiddellijk
medische hulp worden ingeroepen.
• Houd batterijen buiten bereik van kinderen.
• Niet-oplaadbare AA-batterijen mogen niet worden opgeladen.
• Bij dit apparaat kunnen oplaadbare AA-batterijen worden gebruikt. De oplaadbare
batterijen moeten uit het apparaat worden verwijderd om te worden opgeladen.
• Laad oplaadbare batterijen uitsluitend op met de oplader die bij deze batterijen is
meegeleverd en volg de instructies in de handleiding die door de fabrikant is verstrekt.
• Oplaadbare batterijen mogen uitsluitend worden opgeladen in het bijzijn van een
volwassene.
• Zorg ervoor dat er nooit kortsluiting optreedt tussen de contactpunten in het batterijvakje
of tussen batterijen.
• Zorg ervoor dat het apparaat niet wordt beschadigd of gedemonteerd; hierdoor kunnen de
batterijen beschadigd raken.
• Gooi het apparaat nooit in een vuur omdat de batterijen kunnen ontploffen.
• Stel het apparaat en de batterijen niet bloot aan extreme warmtebronnen zoals open vuur.

NL-4
• Gooi het apparaat niet weg met het huisvuil, omdat het batterijen bevat. Breng batterijen
naar uw lokale inzamelpunt voor chemisch afval. Neem contact op met uw gemeente voor
nadere informatie.
Waarschuwingen betreffende het gebruik
Voordat u begint met naaien, moet u altijd controleren of de draden van het apparaat
goed zijn ingeregen. Als de draad of de draadklos verkeerd is geplaatst, kan het apparaat
beschadigd raken. Houd uw vingers tijdens het naaien uit de buurt van bewegende
delen. Let vooral op de naald. Trek niet aan de stof tijdens het naaien, maar geleid deze
voorzichtig, anders kan de naald breken en kan het apparaat beschadigd raken. Verwijder
de batterijen wanneer de naaimachine langere tijd niet wordt gebruikt. Zo beschermt u
het apparaat en verlengt u de levensduur van de batterijen. Om te voorkomen dat het
naaiproces wordt onderbroken, moet u altijd reservebatterijen bij de hand houden.
3) INSTALLATIE EN GEBRUIK VAN HET APPARAAT
Het apparaat is uitsluitend bedoeld voor huishoudelijk en particulier gebruik binnenshuis.
Het apparaat is niet bedoeld voor andere doeleinden. Volg de instructies in deze
handleiding om ervoor te zorgen dat het apparaat op een veilige manier wordt geïnstalleerd
en gebruikt.
Open de verpakking voorzichtig en haal het apparaat eruit. Controleer of het apparaat
volledig en onbeschadigd is. Mochten er onderdelen beschadigd zijn of ontbreken, neem
dan contact op met de verkoper en gebruik het product niet. Bewaar de verpakking of
recycle deze zoals voorgeschreven door lokale regelgeving.
Plaatsen van de batterijen
1) Voor het apparaat zijn 4 AA-batterijen vereist (niet inbegrepen). De beste prestaties
worden bereikt met alkalinebatterijen. Bij dit apparaat kunnen ook oplaadbare batterijen
worden gebruikt.
2) Zoek het batterijvakje onderop het apparaat.
(Batterijvakje)
3) Open het deksel van het batterijvakje.
4) Zorg ervoor dat het apparaat UIT staat en plaats 4 AA-batterijen in het batterijvakje.
Zorg ervoor dat de polariteit overeenkomt met het schema dat wordt weergegeven in het
batterijvakje.
5) Sluit het batterijvakje weer.

A
N
B
O
C
P
D
Q
E
R
F
S
T
H
U
I
V
J
W K
X
L
G
DC JACK
M
NL-5
AAN-/UIT-schakelaar
Batterijvakje (onder het apparaat)
Spoelas
Draadhefboom
Draadspoel
Naaivoet
Naaivoetlichter
Draadopening
Draadkloshuis (deksel)
Draadkloshouder
Handwiel
Snelheidsknop
Stekker voetpedaal
Instructies voor gebruik:
Druk op de AAN-/UIT-toets A om het apparaat aan of uit te zetten. Het apparaat staat AAN
wanneer de schakelaar naar beneden is gedrukt en UIT wanneer deze niet naar beneden
is gedrukt. Zorg ervoor dat het apparaat goed van draad is voorzien en dat de te naaien
stof is geplaatst voordat u het apparaat inschakelt.
Stelschroef spanning
Schroef naaldklem
Naaldklem
Stelschroef
Naald
Draadklos
Spindel draadkloswinder
Draadklosas
Draadkloshouder
Lampje
AAN-/UIT-schakelaar verlichting
Aansluiting externe voeding
A N
B O
C P
D Q
E R
F S
G T
H U
I V
J W
K X
L DC JACK
M
Beschrijving van het apparaat:

C
E
1
2
3
4
5
6
7
NL-6
1) Trek de draadspoelas C naar buiten door deze omhoog te trekken.
2) Plaats de draadspoel Eop de draadspoelas C zoals getoond in de afbeelding.
3) Trek aan de draad van de draadspoel Een geleid deze naar de voorkant van het
apparaat door deze door de eerste draadgeleider 1 te leiden.
4) Voer de draad naar de tweede draadgeleider 2via de stelschroef voor de spanning N
tussen de twee pakkingen achter de schroef N. De draad moet strak worden gehouden.
5) Trek de draad vanaf de stelschroef voor de spanning Nnaar de voorkant van het
apparaat door deze over de draadgeleider 3 te leiden.
6) Trek de draad door de draadgeleider 4op de draadhefboom D, in de richting van de
voorkant van het apparaat, van rechts naar links.
7) Trek de draad naar beneden naar de draadgeleider 5en voer de draad van boven naar
beneden.
8) Trek de draad omlaag door de draadgeleider 6. Laat indien nodig de naald Rzakken
om deze draadgeleider te bereiken door het handwiel K iets linksom te draaien.
9) Steek de draad door het oog 7van de naald vanaf de voorkant naar de achterkant van
het apparaat. Breng indien nodig de naald Romhoog om het oog te bereiken door het
handwiel K rechtsom te draaien.
10) Breng de naaivoet Fomhoog door de naaivoetlichter Gaan de achterkant van de
machine naar boven te zetten.
11) Trek ongeveer 25cm draad door de naald Ren leg dit stuk op de steekplaat onder de
naaivoet F van u af lopend.
De draadklos in de voet plaatsen:
• Verwijder het deksel van het draadkloshuis Idoor het in de op het deksel aangegeven
richting te duwen.
• Plaats de draadklos met het door u gekozen draad in de draadkloshouder Jen
laat ongeveer 25cm draad uitsteken uit de draadkloshouder Jen leid de draad in de
draadopening H.
Naaien met de draadspoel

NL-7
• Draai het handwiel K rechtsom. De naald gaat omlaag en pakt de draad van de
draadklos op. Blijf aan het handwiel Kdraaien totdat de naald Rterugkeert naar de
hoogste stand. Stop wanneer de naald R weer begint omlaag te gaan.
• Breng de naaivoet F omhoog en leid de draad van de spoel naar de voorkant. De draden
van de spoel en draadklos worden samengevoegd; trek de twee draden naar achteren en
leg ze onder de naaivoet F.
• Plaats het deksel van het draadkloshuis I weer terug.
Let op! De twee draden moeten correct worden toegevoerd. Voer een paar tests uit
voordat u begint te naaien. Bij een onjuiste draadtoevoer zal het stiksel beschadigd raken.
Het is mogelijk dat het apparaat wordt verkocht met de draad al geplaatst. Controleer de
positie van de draden voordat u ze vervangt door die van u.
Gebruik van de draadklos:
Volg stap 4 t/m 11 van de paragraaf ‘Naaien met de draadspoel’ (hierboven)
1) Trek de spindel van de draadklos U uit het apparaat.
2) Steek de spindel van de draadklos Udoor het middelste gat van de van draad
voorziene draadklos.
3) Plaats de spindel van de draadklos U (met draadklos) in de draadkloshouder V.
4) Zorg ervoor dat de draadklosspindel met de draadklos stevig op het apparaat is
bevestigd.
Let op! Gebruik de draadklos aan de zijkant alleen voor het naaien met beide draden.
Gebruik van het apparaat zonder voetpedaal:
1) Til de naald Rboven de naaivoet door het handwiel K rechtsom te draaien.
2) Zet de naaivoet Fomhoog door de hendel aan de achterkant van het apparaat naar
boven te bewegen.
3) Plaats de te naaien stof onder de naaivoet F. De naaivoet F moet omhoog staan. Zorg
ervoor dat de richting van de naad naar u toe is gericht, uitgelijnd met de naaivoet F, met
de naad direct onder de naald R.
4) Laat de naaivoet Fzakken door de naaivoetlichter G naar beneden te bewegen.
5) Draai het handwiel Ktwee 2 volledige slagen rechtsom om de startnaad af te hechten.
6) Selecteer de snelheidsknop L aan de voorkant van het apparaat. De hoge snelheid is
geselecteerd wanneer de knop naar buiten is getrokken, de lage snelheid is geselecteerd
wanneer de knop op één lijn ligt met het apparaat. Gebruik de lage snelheid voor
ingewikkelde werkzaamheden waarvoor veel stoppen, starten en draaien van stof vereist
is. Gebruik de hoge snelheid voor lange ononderbroken naden.
7) Zet de aan-/uitschakelaar A op AAN.
8) Om de naad recht te houden, geleidt u de stof voorzichtig door deze aan beide zijden
licht met uw vingertoppen aan te drukken wanneer deze door de naaivoet Fwordt
gevoerd.
9) Wanneer de naad is voltooid, zet u de aan-/uitschakelaar A op UIT.
10) Til de naald Rboven de stof door het handwiel K iets rechtsom te draaien.
11) Til de naaivoet Fop door de naaivoetlichter G naar boven te bewegen.
12) Trek de stof naar u toe en laat ongeveer 25cm draad tussen de stof en het apparaat
zitten.
13) Snijd de draad dicht bij de stof af en laat het overtollige stuk draad losjes op de
steekplaat liggen in de richting van de naaivoet F en naar u toe.

NL-8
14) Herhaal dezelfde procedure om andere naden/steken/zomen uit te voeren.
Gebruik van het voetpedaal:
Volg stap 1 t/m 4 van de paragraaf ‘Gebruik van het apparaat zonder voetpedaal’ (hierboven)
1) Controleer of het apparaat UIT staat.
2) Steek de stekker van het voetpedaal in de aansluiting aan de achterkant van het
apparaat M.
3) Zet het apparaat AAN door op het voetpedaal te drukken.
4) Druk op het voetpedaal om het apparaat te bedienen. Laat het voetpedaal opkomen om
te voorkomen dat het apparaat naait.
5) Wanneer u klaar bent met naaien, haal dan uw voet van het voetpedaal.
BELANGRIJK! Het apparaat moet worden UITGESCHAKELD met de aan-/
uitschakelaar A, wanneer u het pedaal gebruikt.
De mechanische spanning instellen:
Onder normale omstandigheden is het niet nodig om de spanning in te stellen. De
spanning is standaard ingesteld op maximale prestaties. Wanneer de steken te los of te
strak zitten, kunt u ze aanpassen.
1) De steek losser maken: Draai de stelschroef voor de spanning N linksom.
2) De steek strakker maken: Draai de stelschroef voor de spanning N rechtsom.
Voor het naaien van zwaardere stoffen moeten de steken mogelijk worden vergroot. Voor
het naaien van zwaardere stoffen moet de steek mogelijk losser worden gemaakt. Voor het
naaien van zeer lichte stof moet de steek mogelijk strakker worden gemaakt.
Let op! De spanning van de draadklos kan niet worden ingesteld!
Vervangen van de naald:
LET OP! Voordat u de naald verwijdert, moet u altijd eerst de stekker uit
het stopcontact trekken en/of de batterijen verwijderen en ervoor zorgen dat het
apparaat UIT staat.
1) Draai het handwiel Krechtsom om de naald R in de hoogste stand te zetten.
2) Draai de schroef van de naaldklem O los door deze linksom te draaien. Daarvoor heeft
u mogelijk een korte dikke schroevendraaier of een kleine tang nodig.
3) Verwijder de naald Rdoor deze naar beneden te trekken uit de naaldklem P.
4) Plaats een nieuwe naald met de platte kant naar de naaldklem P gericht.
5) Duw de naald voorzichtig zo ver mogelijk omhoog, tegen de naaldklem P.
6) Draai de schroef van de naaldklem Ovast terwijl u de naald R op zijn plaats houdt.
Let op! Naalden zijn verkrijgbaar in diverse maten, die worden aangeduid met nummers.
Hoe lager het nummer, hoe dunner de naald. Gebruik kleinere naalden voor tere stoffen en
grotere naalden voor zwaardere stoffen.
Draad op een draadklos winden:
Kies uw favoriete kleur draad om op de draadklos te winden. U kunt naaien met draad van
dezelfde kleur als de stof of contrasten creëren met draden van andere kleuren. Om de
draad op een draadklos te winden, moet u:
1) Altijd de draadklos Suit het draadkloshuis verwijderen voordat u draad op een nieuwe

NL-9
draadklos windt.
2) Plaats de draadspoel Eop de spoelas C.
3) Plaats de spoelas in het gat van het handwiel K en draai deze iets linksom.
4) Neem een lege draadspoel. Trek de draad vanaf de draadspoel Enaar beneden en
steek het losse uiteinde vanaf de zijkant door het kleine gat op de draadklos.
5) Laat het losse uiteinde aan de buitenkant van de draadklos en wind de draad een aantal
slagen om de BINNENKANT van de draadklos.
6) Plaats de draadklos op de draadklosas Ten zorg er daarbij voor dat de draad linksom
op de draadklos wordt gewonden. (De draad moet onder de draadklos worden gewonden,
niet erboven).
7) Geleid de draad zachtjes door uw duim en wijsvinger.
8) Wanneer de draadklos vol is, schakelt u het apparaat uit. Plaats de draadklos in de
draadkloshouder met behulp van de instructies voor het inrijgen van het apparaat.
Reiniging en onderhoud
Wanneer u het apparaat regelmatig goed reinigt, zorgt u ervoor dat het veilig kan worden
gebruikt en verlengt u ook de levensduur van het apparaat. Gebruik een vochtige doek om
vuil van het apparaat te verwijderen.
Waarschuwing!
Voordat u het apparaat gaat schoonmaken, moet u altijd eerst de stekker uit het
stopcontact trekken en/of de batterijen verwijderen en ervoor zorgen dat het apparaat UIT
staat.
Let op!
• Reinig het apparaat niet met sterke chemicaliën, of alkalische, schurende of
desinfecterende middelen, omdat deze het oppervlak van het apparaat kunnen
beschadigen.
• Dompel het apparaat niet onder in water of andere vloeistoffen.
Opslag en transport
• Voordat u het apparaat opbergt, moet u het eerst reinigen zoals beschreven in deze
gebruikershandleiding. Bewaar het apparaat in de oorspronkelijke verpakking.
• Berg het apparaat altijd op in een droge, goed geventileerde ruimte, buiten bereik van
kinderen en huisdieren.
• Bescherm het apparaat tijdens transport tegen trillingen en schokken.
Table of contents
Languages: