Master PBS 120 User manual

Bedienungsanleitung
Operating instructions
Istruzioni d‘uso
Notice d‘utilisation
Instrucciones de servicio
Instruções de serviço
Gebruiksaanwijzing
Betjeningsvejledning
Bruksanvisning
Käyttöohje
Bruksanvisning
Οδηγίες χειρισμού
Kullanım kılavuzu
Instrukcja obsługi
Kezelési útmutató
Návod k obsluze
Návod na obsluhu
Instrucţiuni de folosire
Navodila za uporabo
Ръководство за експлоатация
Kasutusjuhend
Naudojimosi instrukcija
Ekspluatācijas instrukcija
Руководство по эксплуатации
PBS 120

D ......................... 6... 12
GB ......................... 13... 19
I ......................... 20... 26
F ......................... 27... 33
E ......................... 34... 40
P ......................... 41 ... 47
NL ......................... 48... 54
DK ......................... 55... 61
N ......................... 62... 68
FIN ......................... 69... 75
S ......................... 76 ... 82
GR ......................... 83... 89
TR ......................... 90... 96
PL ......................... 97... 103
H ......................... 104... 110
CZ ......................... 111 ... 117
SK ......................... 118 ... 1 2 4
RO ......................... 125... 131
SLO ......................... 132... 138
BG ......................... 139... 145
EST ......................... 146... 152
LT ......................... 153... 159
LV ......................... 160... 166
RUS ......................... 167 ... 173


II
I
7
13
15
III
8
9
10
21
9
10
21
6
5
4
3
2
1
11
12
8
910 10 9
17
20 19 18
16
15
14

VIII
IV V
VI VII
22 16
25
23
24
7 6 26 11 13
5
910
27

6
Gefahrloses Arbeiten mit diesem
Gerät ist nur möglich, wenn der
Benutzer diese Bedienungsanleitung
und die Sicherheitshinweise
vollständig liest, versteht und die
darin enthaltenen Anweisungen
strikt befolgt.
Gerät nicht dem Regen aussetzen,
nicht abspritzen und nicht dampf-
strahlen.
Vor jeder Benutzung Gerät, Kabel
und Stecker überprüfen. Schäden
nur von einem Fachmann beseitigen
lassen.
Schutzbrille tragen.
Gehörschutz tragen.
Schutzhandschuhe beim Sägeband-
wechsel tragen.
Nicht mit der Hand oder anderen
Gegenständen in den Schnittbereich
des laufenden Gerätes greifen.
Kabel immer nach hinten vom Gerät
wegführen.
Vor allen Arbeiten am Gerät, in Arbeitspausen
sowie bei Nichtgebrauch den Motor-Haupt-
schalter ausschalten.
Bei der Montage des Sägebandes auf die
Schnittrichtung achten.
Vergewissern, dass alle Vorrichtungen, die das
Sägeband abdecken, einwandfrei funktionie-
ren.
Das Werkstück stets fest in den Schraubstock
einspannen. Nicht zu kleine Werkstücke sägen,
die nicht sicher eingespannt werden können.
Große Werkstücke abstützen, um ein Weg-
kippen aus dem Schraubstock zu verhindern.
Hierzu keine Personen gebrauchen. Instabiles
Abstützen kann zum Klemmen bzw. Reißen des
Sägebandes führen.
Unregelmäßig geformte Werkstücke so ein-
spannen, dass sie nicht verrutschen können.
Das Sägeband könnte verklemmen, bzw.
reißen.
Das Werkstück nur spannen/lösen, wenn das
Sägeband hochgeschwenkt ist und stillsteht.
Nicht einschalten, wenn das Sägeband das
Werkstück berührt. Säge nur mit laufendem
Sägeband auf das Werkstück ansetzen.
Schalten Sie das Gerät sofort aus, wenn das
Sägeband blockiert oder reißt.
Nach dem Schnitt das Gerät immer mit laufen-
dem Sägeband aus dem Werkstück schwen-
ken.
Anschlag so einstellen, dass das abgesägte
Werkstück nicht daran verklemmen kann. Das
Sägeband könnte verklemmen, bzw. reißen.
Schnittbereich stets frei von Bearbeitungsabfäl-
len halten.
Nie mit der Hand oder anderen Gegenstän-
den in den Schnittbereich greifen, während
das Gerät eingeschaltet ist.
Nur original Würth-Zubehör und Ersatzteile
verwenden.
Zu Ihrer Sicherheit
D

7
Geräteelemente
Vor der Verwendung des Gerätes muss sich der Benut-
zer mit allen Betriebsmerkmalen und Sicherheitshinwei-
sen vertraut machen.
Übersicht (Abb. I - VI)
1
Maschinengestell
2
Schraubstockspindel mit Klemmhebel
3
Schraubstock
4
Sägeband
5
Handrad zum Verstellen der Sägebandspannung
6
Schalter
7
Haltegriff
8
Schwenkbares Gehäuse
9
Klemmhebel für Sägebandführung
10
Einstellbare Sägebandführung
11
Drehregler für Motor-Drehzahlsteuerung
12
Motor
13
Motor-Hauptschalter
14
Schwenklagerung
15
Arretierstift
16
Klemmhebel für Gehrungsschnitt
17
Einstellbarer Anschlag
18
Klemmschraube für Anschlag
19
Führungsstab
20
Kontermutter
21
Hutmuttern
22
Endanschlag
23
Stiftschraube
2 4
Endanschlag
25
Drehknauf
26
Entriegelungsknopf
2 7
Befestigungsschrauben für Schutzabdeckung
Gerätekennwerte
Typ PBS 120
Art. 0701 320 X
Nenn-Spannung 230 V AC
Nenn-Frequenz 50/60 Hz
Stromaufnahme max. 5,0 A
Nennaufnahmeleistung 1.200 W
Drehzahl 8.000 - 16.000 min
-1
Schutzklasse / I
Gewicht ca. 18 kg
Abmessungen (B x L x H) max. 850x830x600 mm
Abmessungen Sägeband 1.440x13x0,65 mm
Bestimmungsgemäßer Gebrauch
Dieses Gerät wurde nach den neuesten Technologien
entworfen und gebaut und erfüllt alle typischen Anfor-
derungen zum Sägen von Metallen in Industrie und
Handwerk.
Es sägt:
Standardstähle (St37, St50, …)•
Spezialstähle (C 40, 18NiCrMo5 …)•
Aluminium und Aluminiumlegierungen•
Messing•
Bronze•
Stahlrohre (St 35, ST 52 …)•
Es ist nicht geeignet zum Sägen von:
Holz und ähnlich weichen Materialien•
Das Gerät wurde für den Trockenschnitt
entworfen und gebaut.
Die Verwendung von Kühlschmiermit-
teln kann das Gerät unbrauchbar ma-
chen.
Transport (Abb. II)
Zum Transport des Gerätes darf im
Schraubstock kein Werkstück einge-
spannt und muss der Arretierstift 15
komplett eingerastet sein!
Hierzu das schwenkbare Gehäuse
8
ganz nach unten
schwenken und den Arretierstift
15
in die dort dafür
vorgesehene Bohrung einschieben.
Arbeitsplatz
Das Gerät auf eine ausreichend plane Werkbank– stellen, damit es im Betreib nicht kippt.
Idealerweise eine Schraubstockhöhe von ca. 90– bis 95 cm über dem Boden wählen.
Beim Festschrauben des Gerätes auf einer Werk-– bank die dafür vorgesehenen Befestigungsbohrun-
gen am Maschinengestell
1
verwenden.
Beim Festspannen mit einer Schraubzwinge die– Auflagefläche in der Mitte des Maschinengestelles
1
verwenden.
Unbedingt für ausreichende Sichtverhältnisse beim– Arbeiten mit dem Gerät sorgen.

8
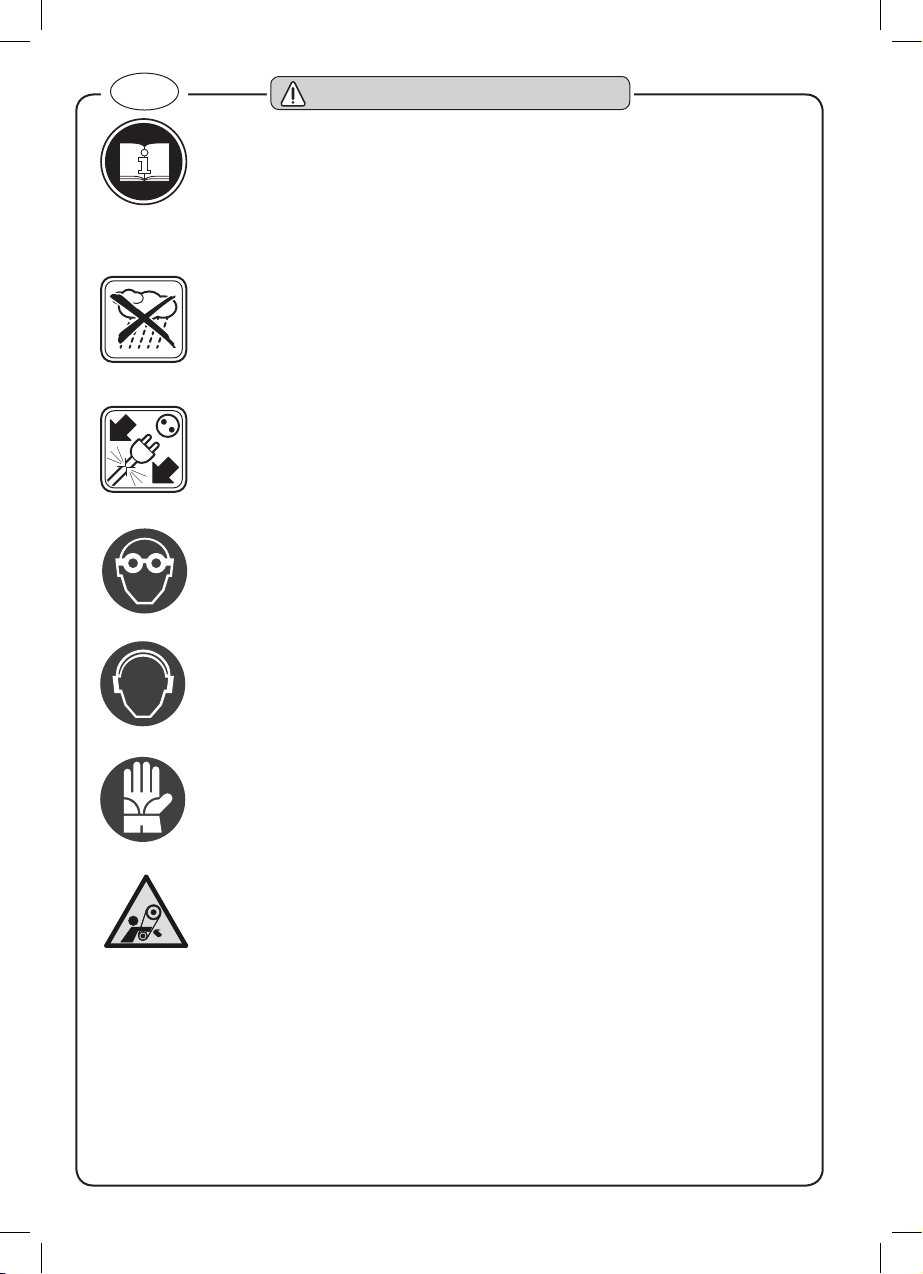
Elektrischer Anschluss
Dem Netzsystem muss ein Magnetschutzschalter vor-
geschaltet sein, der alle Leiter vor Kurzschluss und
Überlast schützt. Dieser Schutzschalter ist entsprechend
den elektrischen Eigenschaften der Maschine auszu-
wählen.
Der elektronische Drehzahlregler
11
ist mit einer Reset-
Funktion ausgestattet, welche das automatische Wie-
dereinschalten des Gerätes nach einem Spannungs-
ausfall verhindert.
Überlastschutz
Der Motor des Gerätes ist mit einem Hitzeschutzun-
terbrecher versehen, der die Stromzufuhr unterbricht,
sobald die Temperatur zu hoch wird.
Wenn dieser ausgelöst hat - einige Minuten abwarten,
bis er sich von selbst wieder zurückgesetzt hat.
Einstellungen
Bei allen Einstellarbeiten den Motor-
Hauptschalter 13 ausschalten (Stellung
<0>), um ein unbeabsichtigtes Einschal-
ten zu vermeiden!
Bandsägenspannung (Abb. I)
Das Gerät ist mit einem Überspann-
Schutzsystem ausgestattet (Kupplung).
Zum Spannen des Sägebandes das Handrad
5
solan-
ge im Uhrzeigersinn drehen, bis die Kupplung ausge-
löst hat.
Anschlag (Abb. I)
Zum Absägen identischer Werkstücklängen den ein-
stellbaren Anschlag
17
verwenden.
Führungsstab–
19
in die dafür vorgesehene Boh-
rung im Maschinengestell 1 einschrauben und mit
der Kontermutter
20
sichern.
Werkstück mit der zu sägenden Schnittlänge in– den Schraubstock
3
fest einspannen.
Klemmschraube–
18
leicht lösen und den Anschlag
17
an das abzusägende Werkstück führen.
Klemmschraube–
18
festdrehen, um den Anschlag
17
zu fixieren.
Führungsrollen für Sägeband (Abb. III)
Das Sägeband wird über jeweils zwei Kugellagerpaa-
re vor und hinter dem Sägeschnitt seitlich geführt. Diese
sind auf exzentrischen Achsen angebracht. Durch Ver-
drehen der Hutmuttern
21
kann der Abstand zwischen
Sägeband und Kugellagerpaar eingestellt werden.
Kugellagerpaare so einstellen, dass sie sich beim– Betrieb des Gerätes mitdrehen, aber das Säge-
band nicht klemmen.
Sägebandführung (Abb. III)
Die beiden Sägebandführungen
10
sollten so einge-
stellt werden, dass sich die Führungsrollen möglichst
nahe am Werkstück befinden. Hierdurch wird eine
möglichst hohe Schnittqualität erreicht und das Säge-
band ist außerhalb des Schnittbereiches weitestgehend
abgedeckt, um das Restrisiko eines Kontaktes zu ver-
ringern
Klemmhebel–
9
lösen und die Sägebandführungen
10
entsprechend des zu bearbeitenden Werkstü-
ckes einstellen.
Klemmhebel–
9
wieder festklemmen.
Schnittwinkel (Abb. IV)
Mit dem Gerät lassen sich Schnitte mit einem verstellba-
ren Winkel zwischen 0° und 60° durchführen.
Klemmhebel–
16
lösen und das schwenkbare Ge-
häuse
8
anhand der Skala auf dem Maschinenge-
stell
1
verdrehen.
Klemmhebel–
16
wieder festklemmen.
Das Gerät verfügt über drei feste Winkel-An-
schläge:
0°
Über den Endanschlag
24
erfolgt die Positionierung.
45°
Gehäuse–
8
auf 0° einstellen.
Drehknauf–
25
auf 45° drehen.
Gehäuse–
8
bis zum Anschlag drehen.
60°
Über den Endanschlag
22
erfolgt die Positionierung.
Schnittgeschwindigkeiten
Das Gerät ist mit einem elektronischen Steuersystem
(CESC, Constant Electronic Speed Control) ausge-
stattet, mit dem sich die Schnittgeschwindigkeit stän-
dig graduell verstellen lässt, um sie an Art und Größe
des Werkstücks anzupassen (siehe Schnitttabelle
Abb. VIII
).
Die Einstellung erfolgt über den Drehregler
11
am Mo-
torgehäuse.

9
Schnittbereiche
Die nachstehende Tabelle gibt an, welche Schnittbe-
reiche bei 0°, 45° und 60° unter den normalen, in
dieser Anleitung beschriebenen Betriebsbedingungen
erreicht werden können.
Werkstück Winkel Schnittbereich
[mm]
0°
102
100 x 100
90 x 120
45°
80
80 x 80
82 x 80
60°
50
43 x 43
43 x 50
Werkstück einspannen
Das Werkstück direkt zwischen die Spannbacken des
Schraubstockes
3
legen, ohne dass andere Objekte
dazwischen eingefügt werden.
Die zu sägenden Werkstücke niemals
mit der Hand festhalten!
Beim Sägen von Flachmaterial oder Sonderpro-
filen unbedingt die Einspannbeispiele Abb. VII
beachten.
Ist die Wandstärke eines Profils sehr dünn, muss eine
Schablone derselben Form ins Profilinnere eingebracht
werden, damit es nicht zwischen den Spannbacken des
Schraubstocks gequetscht wird.
Inbetriebnahme
Vor Inbetriebnahme des Gerätes verge-
wissern, dass alle Schutzvorrichtungen
intakt und korrekt positioniert sind.
Sägeband einlaufen
Sägeband richtig einlaufen lassen.
Ansonsten wird die Schnittgenauigkeit
des Sägebandes unwiderruflich beein-
trächtigt.
Für die ersten zwei oder drei Schnitte ein Werkstück
aus Vollmaterial mit einem Durchmesser von ca. 40 -
50 mm verwenden.
Die Schnitte anfangs nur unter leichtem
Druck durchführen und dann den An-
pressdruck langsam steigern.
Gerät einschalten (Abb. V)
Motor-Hauptschalter–
13
in Stellung
<1>
bringen
(Gerät ist betriebsbereit).
Haltegriff–
7
mit einer Hand festhalten und Gehäu-
se anheben, damit das Sägeband keinen Kontakt
zum Werkstück hat.
Entriegelungsknopf–
26
drücken, um das Sicher-
heitssystem auszuschalten, das ein unbeabsichtig-
tes Einschalten verhindert.
Schalter–
6
betätigen, um das Gerät einzuschalten.
Nie mit der Hand oder anderen Gegen-
ständen in den Schnittbereich greifen.
Gehäuse langsam absenken, bis das Sägeband– das Werkstück berührt.
Langsam den Schnittdruck erhöhen und den Schnitt– zu Ende führen.
Für den Werkstückwechsel stets das
Gerät ausschalten (Schalter 6 loslas-
sen).
Niemals versuchen den Schalter 6 zu
blockieren oder in seiner Funktion zu
manipulieren.

10
Hinweise:
Das Gerät kann sich nach längerem Betrieb (aufgrund
Überhitzung) selbständig abschalten, um Motorschä-
den zu verhindern.
Schalter–
6
dann loslassen und warten bis der Un-
terbrecher selbständig zurückgesetzt wird.
Die elektronische Geschwindigkeitsregelung des Gerä-
tes ist mit einer Motorschutzfunktion ausgestattet. Sie
verhindert, dass der Motor mehr Strom aufnimmt, als
durch den maximalen programmierten Stromaufnah-
mewert festgelegt ist.
Sollte der Strombegrenzer während der Arbeit auslö-
sen:
Schnittdruck verringern–
Sägeband wechseln
Unbedingt Schutzhandschuhe tragen,
um Verletzungen durch die Zähne des
Sägebandes zu vermeiden.
Sägeband ausbauen (Abb. VI)
Motor-Hauptschalter–
13
ausschalten (Stellung
<0>
).
Klemmhebel–
9
lösen und die Sägebandführungen
10
möglichst eng zusammenschieben.
Klemmhebel–
9
wieder festklemmen.
Die vier Befestigungsschrauben–
27
der Schutzab-
deckung lösen und entfernen.
Die Schutzabdeckung entfernen.–
Handrad–
5
gegen den Uhrzeigersinn drehen, bis
das Sägeband entspannt ist.
Sägeband vorsichtig zuerst aus den Sägebandfüh-– rungen
10
ziehen.
Sägeband vorsichtig von den gummierten Rollen– abnehmen.
Sägeband einbauen (Abb. VI)
Das Gerät wurde für einen Betrieb im
Uhrzeigersinn ausgelegt.
Beim Einbau des Sägebandes unbedingt
auf die korrekte Ausrichtung der Zähne
achten.
Sägeband vorsichtig zwischen die Sägebandfüh-– rungen
10
einlegen.
Sägeband vorsichtig über die gummierten Rollen– legen.
Handrad–
5
solange im Uhrzeigersinn drehen, bis
die Kupplung ausgelöst hat.
Schutzabdeckung mit den vier Befestigungsschrau-– ben
27
montieren.
Sägeband kurz einlaufen lassen.–
Zubehör
Zum Schneiden großer massiver Querschnitte oder
dünnwandiger Profile bzw. Winkelstücke sind Säge-
blätter mit unterschiedlichen Zahnteilungen erhältlich.
Material: M42 (Federstahl + HSS-Stahl)
Abmessungen siehe <Gerätekennwerte>.
Wartung und Reinigung
Vor allen Arbeiten am Gerät Motor-Hauptschalter
ausschalten.
Halten Sie das Gerät und die Lüftungsschlitze des
Gerätes stets sauber, um gut und sicher arbeiten
zu können.
Bei extremen Einsatzbedingungen kann
sich bei der Bearbeitung von Metallen
leitfähiger Staub in Inneren des Gerätes
absetzen. Die Schutzisolierung des Ge-
rätes kann dadurch beeinträchtigt wer-
den. In solchen Fällen empfiehlt es sich
die Lüftungsschlitze häufig auszubla-
sen.
Sollte das Gerät trotz sorgfältiger Herstell- und Prüfver-
fahren einmal ausfallen, so ist die Reparatur von einem
Würth-master-Service ausführen zu lassen. In Deutsch-
land erreichen Sie den Würth-master-Service kostenlos
unter Tel.
0800-WMASTER (0800-9 62 78 37)
. In
Österreich unter Tel.
0800-20 30 13
.
Bei allen Rückfragen und Ersatzteilbestellungen unbe-
dingt die Artikelnummer (siehe Typenschild) des Gerä-
tes angeben.
Die aktuelle Ersatzteilliste dieses Gerätes kann im In-
ternet unter "http://www.wuerth.com/partsmanager"
aufgerufen oder von der nächstgelegenen Würth-Nie-
derlassung angefordert werden.
Ersatzteile
Es dürfen nur original Ersatzteile verwendet werden.
Der Gebrauch von anderen Teilen kann Schäden am
Gerät verursachen.

11
Fehler Ursache Abhilfe
Motor startet nicht Motor, Netzkabel oder Stecker
defekt. Das Gerät durch eine authorisierte Elektrofach-
kraft überprüfen bzw. reparieren lassen.
Schutz im Schaltkasten ausgelöst. Schutz prüfen und wieder einschalten.
Spannungsausfall im Netzsystem. Spannung im Netzsystem prüfen.
Hitzeschutzunterbrecher des Motors
hat ausgelöst. Schalter 6 loslassen und warten, bis sich der
Unterbrecher von alleine wieder zurücksetzt
(einige Minuten).
Auslösung des Hitze-
schutzunterbrechers Überhitzung des Motors. Prüfen, ob die Lüftungsschlitze des Motors
verschmutzt sind, ggf. reinigen.
Überlastung des Motors durch zu
hohen Schnittdruck. Schnittdruck verringern.
Motorschaden Das Gerät durch eine authorisierte Elektrofach-
kraft überprüfen bzw. reparieren lassen.
Ungenauer Schnitt-
winkel bei 0°und
60°
Die Anschläge 22 und 24 sind nicht
richtig eingestellt (siehe Abb. IV). Anschläge neu einstellen. Befestigungsschrau-
ben lösen und die Anschläge neu ausrichten.
Ungenauer Schnitt-
winkel bei 45° Die Stiftschraube 23 ist nicht richtig
eingestellt (siehe Abb. IV). Kontermutter lösen und Stiftschraube 23 neu
einstellen. Kontermutter wieder festziehen.
Ungenauigkeit in der
Rechtwinkligkeit des
Schnitts
Zu hoher Schnittdruck. Schnittdruck verringern.
Die Zahnteilung des Sägebandes ist
für das Werkstück ungeeignet. Schnittparameter in der Schnitttabelle
(Abb. VIII) überprüfen und anpassen.
Die Schnittgeschwindigkeit ist für das
Werkstück ungeeignet. Schnittparameter in der Schnitttabelle
(Abb. VIII) überprüfen und anpassen.
Sägebandführungen falsch einge-
stellt. Einstellungen prüfen und ggf. anpassen.
Werkstück nicht plan eingespannt. Einspannung prüfen und ggf. anpassen.
Das Schnittbild ist
grob oder wellig Das Sägeband ist abgenutzt oder hat
nicht die richtige Zahnteilung für die
Dicke des Werkstücks.
Schnittparameter in der Schnitttabelle
(Abb. VIII) überprüfen und anpassen.
Zu hoher Schnittdruck. Schnittdruck verringern.
Das Sägeband rutscht
leicht aus seiner
Führung.
Exzentrische Sägebandführungen
falsch eingestellt. Einstellungen prüfen und ggf. anpassen.
Zu starker Verschleiß der Rollengum-
mierung. Rollen vom Fachpersonal prüfen lassen und ggf.
austauschen.
Durchrutschen des Sägebandes an
den Rollen, verursacht durch Schneid-
öl und –fett.
Auf keinen Falls irgendwelche Schmier- oder
Kühlmittel für das Sägen verwenden. Rollen
vom Fachpersonal prüfen lassen und ggf.
austauschen.
Hinweise zur Fehlersuche

12
Änderungen vorbehalten
Entsorgung
Elektrowerkzeuge, Zubehör und Verpackungen sollen
einer umweltgerechten Wiederverwertung zugeführt
werden.
Nur für EU Länder:
Elektrowerkzeuge nicht in den Haus-
müll werfen.
Gemäß der Europäischen Richtlinie
2002/96/EG über Elektro- und Elek-
tronik-Altgeräte und ihrer Umsetzung
in nationales Recht müssen nicht mehr gebrauchsfähige
Elektrowerkzeuge getrennt gesammelt und einer um-
weltgerechten Wiederverwertung zugeführt werden.
Gewährleistung
Für dieses WÜRTH-Gerät bieten wir eine Gewährleis-
tung gemäß den gesetzlichen / länderspezifischen Be-
stimmungen ab Kaufdatum (Nachweis durch Rechnung
oder Lieferschein).
Entstandene Schäden werden durch Ersatzlieferung
oder Reparatur beseitigt. Schäden, die auf unsachge-
mäße Behandlung zurückzuführen sind, sind von der
Gewährleistung ausgeschlossen.
Beanstandungen können nur anerkannt werden, wenn
das Gerät unzerlegt einer WÜRTH-Niederlassung,
Ihrem WÜRTH-Außendienstmitarbeiter oder einer
WÜRTH-autorisierten Kundendienststelle für Elektroge-
räte übergeben wird.
Elektromagnetische Verträglichkeit (EMV)
Das Gerät entspricht den derzeit geltenden EMV-
Normen.
Die Tests wurden nach den Normen EN 61000-6-1,
EN 61000-6-3, EN 55014-1 und EN 55014-2 durch-
geführt.
Geräusch- / Vibrationsinformation
Messwerte ermittelt entsprechend UNI EN ISO
3746-1997.
Der A-bewertete Geräuschpegel des Gerätes beträgt
typischerweise:
Schallleistungspegel
Ohne Last bei 80 m/min Band-
geschwindigkeit
L
pm
= 71,2 dB(A)
L
wa
= 87,0 dB(A)
Unter Last bei 80 m/min Band-
geschwindigkeit (Sägen von
Stahl Ø 80mm)
L
pm
= 86,3 dB(A)
L
wa
= 102,1 dB(A)
Schalldruckpegel
Ohne Last bei 80 m/min Band-
geschwindigkeit L
eq
= 68,8 dB(A)
Unter Last bei 80 m/min Band-
geschwindigkeit (Sägen von
Stahl Ø 80mm) L
eq
= 83,1 dB(A)
Die Hand-Arm-Vibration ist typischerweise nied-•riger als 2,5 m/s
2
Konformitätserklärung
Wir erklären in alleiniger Verantwortung, dass dieses
Produkt mit den folgenden Normen oder normativen
Dokumenten übereinstimmt:
EN 55014-1, EN 55014-2, EN 61000-6-1, EN
61000-6-3 gemäß den Bestimmungen 2004/108/EG
und 2006/42/EG.
07
Adolf Würth GmbH & Co. KG

13
Safe working with the metal saw is
only possible if the operator has
read these operating instructions
and fully understands and adheres
to the safety instructions in this docu-
ment.
Protect the metal saw from the ele-
ments. Do not hose it down or clean
it with a steam or water jet.
Before starting the saw, check the
device, cable and plug for defects.
All repairs must be carried out by
specialist technicians.
Wear protective goggles.
Wear hearing protection.
When changing the saw band, wear
protective glove.
Do not reach into the cutting range
of the running machine.
Always lead the cable away from the front of
the machine.
Before carrying out any work on the machine
or when taking a break, switch off the main mo-
tor switch.
When mounting the saw band, observe the cut-
ting direction.
Ensure that all guards covering the saw band
are in proper working order.
Clamp the workpiece firmly in the vice. Do not
attempt to cut very small workpieces, as they
cannot be properly secured in the vice
.
Support large workpieces to ensure that they
cannot slip from the vice. It is forbidden to hold
the workpiece by hand when cutting it. Improper
securing of the workpiece might cause the saw
band to jam or tear
.
Pay particular attention when clamping irregu-
larly shaped workpieces. Prevent the saw band
from jamming or tearing.
Clamp/release the workpiece when the saw
band is standing still and moved away from
the workpiece.
Do not switch on the machine, if the saw band
touches the clamped workpiece. Always first
start the saw and then place the saw band on
the workpiece.
Immediately switch off the machine, if the saw
band is blocked or torn.
After cutting, swivel the running saw band
away from the workpiece before switching off
the machine.
Adjust the stop so that the cut-off workpiece
cannot become jammed, as the saw band
could otherwise be damaged.
Keep the cutting area free from machining
chips and residue.
Do not reach into the cutting range of the run-
ning saw.
Use only original Würth accessories and
spare parts.
For your safety
GB

14
Device components
Before using the metal saw, the operator must familiar-
ise himself with all device features and the applicable
safety instructions.
Machine overview (Fig. I – VI)
1
Machine frame
2
Vice screw with clamping lever
3
Vice
4
Saw band
5
Hand wheel for the adjustment of the saw band
tension
6
Switch
7
Handle
8
Swivelling housing
9
Clamping lever for saw band guide
10
Adjustable saw band guide
11
Rotary controller for motor speed
12
Motor
13
Main motor switch
14
Swivel bearing
15
Locking pin
16
Clamping lever for mitre cutting
17
Adjustable stop
18
Clamping screw for stop
19
Guide rod
20
Lock nut
21
Cap nuts
22
Stop
23
Stud
2 4
Stop
25
Adjusting knob
26
Release knob
2 7
Securing bolts for guard
Metal saw data
Type PBS 120
Prod. no. 0701 320 X
Rated voltage 230 V AC
Rated frequency 50/60 Hz
Max. current consumption 5,0 A
Rated input power 1,200 W
Speed 8,000 - 16,000 rpm
Protection class / I
Weight approx. 18 kg
Dimensions (W x L x H) max. 850x830x600 mm
Dimensions of saw blade 1,440x13x0.65 mm
Proper use
This machine has been designed and produced ac-
cording to the latest technology and meets the typical
requirements for the cutting of metal in an industrial or
workshop environment.
It can be used to cut the following materials:
Standard steel grades (St37, St50, …)•
Special steel grades (C 40, 18NiCrMo5 …)•
Aluminium and aluminium alloys•
Brass•
Bronze•
Steel pipes (St 35, ST 52 …)•
The saw is not suitable for the cutting of:
Timber and similar soft materials•
The saw is designed for dry cutting
only.
The use of cooling lubricant might irrep-
arably damage the saw.
Transport (fig. II)
To transport the machine, ensure that no
workpiece is clamped in it and that the
locking pin 15 is properly engaged!
Swivel the housing
8
to its lower stop and insert the
locking pin
15
into the respective borehole.
Workplace
Place the metal saw onto a level workbench and– secure it against tipping.
IIdeally, the vice should be about 90 to 95 cm– above the floor.
Secure the machine to the workbench by inserting– screws through the provided boreholes in the ma-
chine frame
1
.
When securing the saw with a C-clamp, place the– clamp onto the provided area at the centre of the
machine frame
1
.
Ensurethatyourviewisnotobstructedduringworking.–

15
Electrical connection
The machine must be connected to the mains power
supply through a magnetic contactor that protects the
saw from short circuits and overloads. This protective
switch must be suitable for the rated power and current
values of the machine.
The electronic speed controller
11
is equipped with a
reset function that prevents automatic restart of the ma-
chine after a power failure.
Overload protection
The motor of the machine is equipped with a thermal
cut-out so that it is automatically switched off, if the tem-
perature reaches a certain threshold.
The cut-out is automatically reset after a few minutes
when the temperature has dropped.
Settings
Before adjusting any machine settings,
switch off the main motor switch 13 (po-
tion <0>) to prevent inadvertent switch-
ing on!
Saw band tension (fig. I)
The saw is equipped with a excessive
tension protection (coupling).
To tension the saw band, turn the hand wheel
5
clock-
wise until the coupling is released.
Stop (fig. I)
To cut workpieces of identical length, set the adjustable
stop
17
.
Screw the guide rod–
19
into the provided borehole
in the machine frame 1 and secure it with the lock
nut
20
.
Clamp the workpiece with the length to be cut off– into the vice
3
.
Release the vice–
18
and move the stop
17
to the
part to be cut off .
Tighten the clamping screw–
18
to secure the
stop
17
.
Guide rollers for saw band (fig. III)
The saw band is guided across two pairs of ball bear-
ings located in front of and behind the cutting area.
The ball bearings are mounted on eccentric axles. The
distance between the saw band and the ball bearing
pair can be adjusted by turning the cap nuts
21
.
Adjust the ball bearing pairs in such a way that– they rotate when the machine is running, but do not
stop the saw band.
Saw band position (fig. III)
Adjust the two saw band guides
10
in such a way that
the guide rollers are as close as possible to the work-
piece. This allows for the best possible cut quality. In
addition, the saw band is covered outside the cutting
area, minimizing the risk of injury.
Release the clamping lever–
9
and adjust the saw
band guides
10
to suit the workpiece.
Tighten the clamping lever–
9
.
Cutting angle (fig. IV)
The metal saw can produce cuts at adjustable angles
between 0° and 60°.
Release the clamping lever–
16
and turn the hous-
ing
8
to the required position (see scale on the ma-
chine frame
1
).
Tighten the clamping lever–
16
.
The saw is equipped with three fixed angle
stops:
0°
The angle is adjusted by means of the stop
24
.
45°
Set housing–
8
to an angle of 0°.
Turn adjusting knob–
25
to 45°.
Turn the housing–
8
to the stop.
60°
Adjust the position by means of the stop
22
.
Cutting speed
The machine is equipped with a CESC (Constant Elec-
tronic Speed Control) that allows for gradual speed ad-
justment at any time, so that the speed of the machine
can be adjusted to suit the workpiece (see cutting table
fig. VIII
).
To adjust the speed, turn the rotary controller
11
on the
motor housing.

16
Cutting ranges
The table below indicates the cutting ranges for 0°,
45° and 60° that can be achieved under the operat-
ing conditions described in this manual.
Workpiece Angle Cutting range
[mm]
0°
102
100 x 100
90 x 120
45°
80
80 x 80
82 x 80
60°
50
43 x 43
43 x 50
Clamping workpiece
Place the workpiece between the jaws of the vice
3
. Do
not insert other objects.
Never hold the workpiece to be cut by
hand!
To cut flat or special sections, refer to the exam-
ples for correct clamping in figure VII.
If the wall thickness of a profile is very thin, insert a
piece of similar shape inside the profile so that the sec-
tion is not damaged when clamped between the jaws.
Start-up
Before starting the machine, check all
safety devices to ensure that they are
properly mounted and in working or-
der.
Running in saw band
Allow the saw band to run in properly,
as the cutting accuracy of the band is
otherwise permanently impaired.
For the first two or three cuts, use a solid workpiece with
a diameter of approx. 40 to 50 mm.
For the first cuts, apply minimum pres-
sure and then gradually increase the
force.
Switching off metal saw (fig. V)
Set the main switch–
13
to position
<1>
(machine
ready for operation).
Hold the machine by the handle–
7
and lift off the
housing so that the saw band is not in contact with
the workpiece.
Press the release button–
26
to disable the safety
system that prevents inadvertent switching on.
Actuate the switch–
6
to switch on the machine.
Never reach into the cutting area!
Slowly lower the housing until the saw band touch-– es the workpiece.
Gradually increase the cutting pressure and com-– plete the cut.
To change the workpiece, switch off the
saw (release switch 6).
Never attempt to block the switch 6 in
the ON position or to otherwise ma-
nipulate it.

17
Notes:
During prolonged operation, the saw might be auto-
matically switched off to protect the motor against dam-
age from overheating.
Release the switch–
6
and wait until the cut-out is
automatically reset.
The electronic speed control of the machine features a
motor protection function. It prevents the motor against
damage from overcurrent.
If the overcurrent protection is triggered:
Reduce cutting pressure.–
Changing saw band
The teeth of the saw band are sharp. Al-
ways wear protective gloves to prevent
injury.
Removing saw band (fig. VI)
Switch off main motor switch–
13
(position
<0>
).
Release the clamping lever–
9
and slide the saw
band guides
10
as closely together as possible.
Tighten the clamping lever–
9
.
Loosen and remove the four securing bolts–
27
of
the guard.
Remove the guard.–
Turn the hand wheel–
5
anticlockwise to release the
saw band.
Carefully remove the saw band from the saw band– guides
10
.
Then carefully pull the saw band from the rubber-– coated rollers.
Installing saw band (fig. VI)
The machine is designed for operation in
clockwise direction.
When installing a saw band, ensure that
theteetharefacinginthecorrectdirection.
Carefully insert the saw band between the saw– band guides
10
.
Carefully place the saw band on the rubber-coat-– ed rollers.
Turn the hand wheel–
5
clockwise until the coupling
is released.
Secure the guard with the–
4
securing bolts
27
.
Allow the saw band to run in properly.–
Accessories
For large solid parts or thin-walled profiles and angles,
we offer saw bands with various tooth pitches.
Material: M42 (spring steel + HSS steel)
For dimensions, see <Metal saw data>.
Cleaning and maintenance
Before carrying out any work on the metal saw,
switch off the main motor switch.
For safe working, always keep the machine
clean and ensure that the ventilation slots are un-
blocked.
Under extreme conditions, conductive
dust might enter the machine housing
when metal is cut. This might interfere
with the insulation of the saw. When cut-
ting metal under extreme conditions,
regularly blow out the ventilation slots.
The metal saw has been produced according to best
practice and extensively tested at the factory. In the un-
likely event of a failure, have it examined and repaired
by a Würthmaster-Service Workshop. In Germany, call
0800-WMASTER (0800-9 62 78 37
) to contact the
Würthmaster Service. In Austria, call
0800-20 30 13
.
In all your queries and spare part orders, always quote
the product number (see type plate) of your machine.
The current spare parts list of the machine can be
viewed online at http://www.wuerth.com/partsman-
ager. Alternatively, contact your local Würth agency
for a hardcopy.
Spare parts
Only use original spare parts. The use of parts from
suppliers other than WÜRTH might cause damage to
the equipment.

18
Fault/malfunction Cause Remedy
Motor fails to start Motor, power cable or plug defec-
tive. Have the saw examined and repaired by an
authorised electrician.
Cut-out in switch cabinet triggered. Check cut-out and reset.
Power failure. Check voltage of mains supply.
Thermal cut-out of motor triggered. Release the switch 6 and wait until the cut-out
is automatically reset (this may take several
minutes).
Triggering of thermal
cut-out Motor overheated Check whether the ventilation slots of the motor
are blocked and clean them, if necessary.
Overload of motor due to excessive
cutting pressure. Reduce cutting pressure.
Motor damaged Have the saw examined and repaired by an
authorised electrician.
Inaccurate cutting
angle at 0°and 60° Check the position of stops 22 and
24 and adjust, if necessary (see
fig. IV).
Readjust stops. Release securing bolts and
realign stops.
Inaccurate cutting
angle at 45° Stud 23 incorrectly set (see fig. IV). Loosen lock nut and readjust stud 23. Retighten
lock nut.
Inaccurate cut at right
angles Excessive cutting pressure. Reduce cutting pressure.
Tooth pitch of saw band unsuitable
for workpiece. Check cutting parameters and adjust with refer-
ence to the cutting table (fig. VIII).
Cutting speed unsuitable for work-
piece. Check cutting parameters and adjust with refer-
ence to the cutting table (fig. VIII).
Incorrect saw band guide settings. Check settings and adjust them, if necessary.
Workpiece not tightly clamped. Check workpiece clamping and adjust it, if
necessary.
Rough or irregular
cutting edge Saw band worn or tooth pitch unsuit-
able for workpiece thickness. Check cutting parameters and adjust it with
reference to the cutting table (fig. VIII).
Excessive cutting pressure. Reduce cutting pressure.
The saw band slides
easily from its guides. Eccentric saw band guides set incor-
rectly. Check settings and adjust them, if necessary.
Rubber coating of rollers worn. Have rollers examined by specialist technician
and have them replaced, if necessary.
Saw blade slips at the roller, due to
cutting oil or grease. Never use cooling lubricant or other coolants
for cutting. Have rollers examined by specialist
technician and have them replaced, if neces-
sary.
Troubleshooting

19
Subject to changes without prior notice
Disposal
Dispose of the electrical tools, accessories and packag-
ing material in an environmentally friendly manner for
recycling, where this is possible.
For EU member states only:
Do not dispose of electronic tools
through the domestic waste collec-
tion.
According to the European Directive
2002/96/EC on waste electrical
and electronic equipment (WEEE), electric tools must
be collected separately for recycling.
Warranty
This WÜRTH metal saw is covered by warranty accord-
ing to the applicable national regulations. The warran-
ty period begins on the date of purchase (please retain
invoice or delivery note as proof of purchase).
Faults covered by warranty shall be eliminated by re-
placement or repair. Damage caused by improper op-
eration of the gun is not covered by warranty.
Claimsunderwarrantyshallonlybeconsidered,iftheriv-
et gun is returned fully assembled to a WÜRTH agency,
your WÜRTH sales representative or a customer service
workshopforelectricalequipmentauthorisedbyWÜRTH.
Electromagnetic compatibility (EMC
The metal saw conforms to the current EMC stand-
ards.
It has been tested according to EN 61000-6-1,
EN 61000-6-3, EN 55014-1 and EN 55014-2.
Noise/vibration
The measured values conform to UNI EN ISO
3746-1997.
Typical measured noise levels (A):
Noise level
Without load, band speed
80 m/min
L
pm
= 71.2 dB(A)
L
wa
= 87.0 dB(A)
With load, band speed
80 m/min
(cutting steel Ø 80mm)
L
pm
= 86.3 dB(A)
L
wa
= 102.1 dB(A)
Noise level
Without load, band speed
80 m/min L
eq
= 68.8 dB(A)
With load, band speed
80 m/min
(cutting steel Ø 80mm) L
eq
= 83.1 dB(A)
The hand-arm vibration is typically lower than•2.5 m/s²
Declaration of Conformity
We herewith declare that this product conforms to the
following standards and directives:
EN 55014-1, EN 55014-2, EN 61000-6-1, EN
61000-6-3, 2004/108/EC and 2006/42/EC.
07
Adolf Würth GmbH & Co. KG

20
È possibile lavorare senza pericolo
con quest'apparecchio, solo dopo
aver letto completamente e compre-
so queste istruzioni d'uso e le avver-
tenze per la sicurezza, nonché os-
servandoattentamenteleindicazioni
in esse contenute.
Non impiegare l'apparecchio sotto
la pioggia, non sottoporlo all'effetto
di schizzi o getti di vapore.
Prima di ogni utilizzo controllare
apparecchio, cavo e spina. Far
riparare i danni da un tecnico
specializzato.
Indossare occhiali di protezione.
Indossare protezioni per l'udito.
Indossare guanti di protezione du-
rante il cambio della lama.
Non intervenire mai con le mani o
con altri oggetti nella zona di taglio
mentre l'apparecchio è acceso.
Far sempre passare il cavo dietro, tenendolo
sulla parte posteriore dell'apparecchio.
Prima di qualsiasi lavoro con l'apparecchio,
nelle pause di lavoro, nonché in caso di non
utilizzo, spegnere l'interruttore generale del
motore.
Nel montaggio della lama si deve fare atten-
zione alla direzione di taglio.
Assicurarsi che tutti i dispositivi che coprono la
lama funzionino perfettamente.
Serrare il pezzo da tagliare saldamente nella
morsa a vite. Non segare pezzi troppo piccoli
che non possono essere fermamente bloccati
nella morsa.
Puntellare pezzi grandi per evitare che si ro-
vescino fuori dalla morsa. Per sostenere questi
pezzi non utilizzare delle persone. Un puntel-
lamento instabile può far sì che la lama s'incep-
pi e/o si strappi.
Serrare pezzi di forma irregolare nella morsa,
in modo tale che questi non possano scivolare
e spostarsi. La lama potrebbe incepparsi e/o
strapparsi.
Serrare o allentare il pezzo nella morsa solo
quando la lama è in alto e ferma.
Non attivare la macchina, quando la lama toc-
ca il pezzo da tagliare. Applicare la segatrice
sul pezzo da tagliare per iniziare il lavoro, solo
con lama già in movimento.
Spegnere immediatamente l'apparecchio, se
la lama si blocca o si strappa.
Dopo il taglio spostare l'apparecchio dal pez-
zo sempre con lama in movimento.
Regolare il finecorsa, in modo tale che il pez-
zo segato non possa rimanervi inceppato. La
lama potrebbe incepparsi e/o strapparsi.
Mantenere la zona di taglio costantemente
sgombra da residui di lavorazione.
Non intervenire mai con le mani o con altri og-
getti nella zona di taglio, mentre l'apparecchio
è acceso.
Utilizzare solo accessori e pezzi di ricambio
originali Würth.
Per la Vostra sicurezza
I
Table of contents
Languages: