MasterForce 240-5269 User manual

Wet/Dry Vacuum
Pump Accessory
240-5269
OPERATOR’S MANUAL
CAUTION: To Reduce The Risk Of Injury, User Must Read
And Understand Operator's Manual. Save These Instructions
For Future Reference.

Page 1
SECTION PAGE
Safety Instructions & Warnings ......................................................................................................2
Introduction.....................................................................................................................................5
Unpacking & Checking Carton Contents........................................................................................6
Getting to Know Your Pump...........................................................................................................7
Assembly........................................................................................................................................8
Operation........................................................................................................................................9
Using Your Pump Accessory........................................................................................................10
Maintenance.................................................................................................................................11
Troubleshooting............................................................................................................................11
Repair Parts..................................................................................................................................12
Warranty.......................................................................................................................................14
FOR YOUR SAFETY: CAREFULLY READ AND UNDERSTAND ALL
INSTRUCTIONS.
TABLE OF CONTENTS

Page 2
SAFETY INSTRUCTIONS & WARNINGS
The purpose of safety symbols is to attract our attention to possible dangers. The safety symbols,
and the explanations with them, deserve your careful attention and understanding. The symbol
warnings do not by themselves eliminate any danger. The instructions and warnings they give are
no substitutes for proper accident prevention measures.
WARNING: Be sure to read and understand all safety insructions in this manual,
including all safety alert symbols such as “DANGER”, “WARNING” and “CAUTION”, before
using this pump. Failure to follow all instructions listed below may result in electric shock,
re and/or serious personal injury.
SYMBOL MEANING
DANGER: Failure to obey this warning WILL result in death or serious injury to
yourself or to others. Always follow the safety precautions to reduce the risk of re, electric
shock and personal injury.
WARNING: Failure to obey this safety warning CAN result in death or serious injury
to yourself or to others. Always follow the safety precautions to reduce the risk of fire,
electric shock and personal injury.
CAUTION: Failure to obey this safety warning MAY result in personal injury to
yourself or others or property damage. Always follow the safety precautions to reduce the
risk of re, electric shock and personal injury.

Page 3
SAFETY INSTRUCTIONS & WARNINGS
IMPORTANT SAFETY INSTRUCTIONS
Safety is a combination of using common
sense, staying alert, and knowing how your
Pump Accessory works.
SAFETY SIGNAL WORDS
DANGER: Indicates an imminently
hazardous situation which, if not avoided, will
result in serious injury or death.
WARNING: Indicates a potentially
hazardous situation which, if not avoided, could
result in death or serious injury.
CAUTION: Indicates a potentially
hazardous situation which, if not avoided, may
result in minor or moderate injury.
When using your Pump, always follow basic
safety precautions including the following:
WARNING: TO REDUCE THE RISK
OF FIRE, ELECTRIC SHOCK OR INJURY:
• Read and understand this operator’s manual
and all labels on the Pump Accessory before
operating. Use only as described in this
manual.
• Do not operate this Pump Accessory without
being installed on a Wet/Dry Vac or without
the strainer installed.
• Do not install pump, motor, or any electrical
components below water level. This pump is
not submersible.
• Do not leave pump running while
unattended.
• Do not use this Pump Accessory near, or for
pumping ammable or combustible liquids,
gases, or explosive dusts, such as gasoline
or other fuels, lighter uid, cleaners, oil-
based paints, natural gas, hydrogen, coal
dust, magnesium dust, grain dust, or gun
powder.
• Keep cord away from heated surfaces.
• Do not expose to rain. For indoors use only.
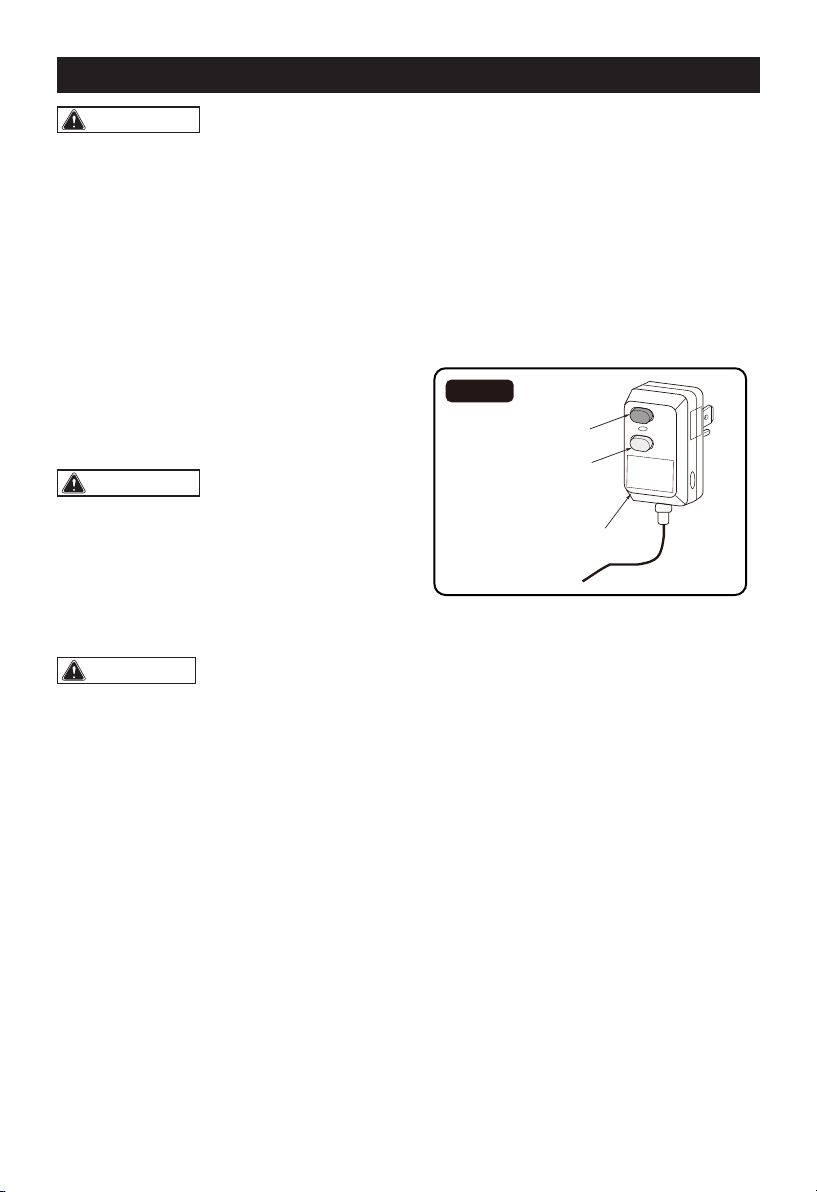
• Do not unplug by pulling on cord. To unplug,
grasp the GFCI (Ground Fault Circuit
Interrupter) plug, not the cord.
• Do not use with damaged cord, plug or other
parts.
• Do not use Pump Accessory as a sprayer.
• If your Pump Accessory is not working
as it should, has missing parts, has
been dropped, damaged, left out doors,
or dropped into water, return it to an
Independent Service Center.
• Do not run pump dry. Damage may occur to
pump.
• Do not pull or carry by cord, use cord as
handle, close a door on cord, or pull cord
around sharp edges or corners.
• Do not run Wet/Dry Vac over cord.
• Do not handle plug, the Wet/Dry Vac, or the
Pump Accessory with wet hands.
• To reduce the risk of health hazards from
vapors or dusts, do not vacuum or pump
toxic materials.
• Do not use or store near hazardous
materials.
• Do not plug the Pump Accessory into the
same electrical circuit that is being used by
the Wet/Dry Vac.
• For wet applications only. Do not attempt to
pump dry debris, or debris of any kind.
• Do not leave Pump Accessory unattended
when plugged in. Unplug from outlet when
not in use and before servicing. Turn off
Pump Accessory before unplugging.
• To reduce the risk of injury from accidental
starting, unplug power cord before changing
or cleaning strainer.
• Do not put any object into ventilation
openings. Do not operate pump with any
ventilation openings blocked; keep free of
dust, lint, hair or anything that may reduce
air ow.
• Keep hair, loose clothing, ngers, and all
parts of body away from openings and
moving parts.
• To reduce the risk of eye injury, wear safety
eyewear. The operation of any utility Vac or
blower can result in foreign objects being
blown into the eyes, which can result in
severe eye damage.
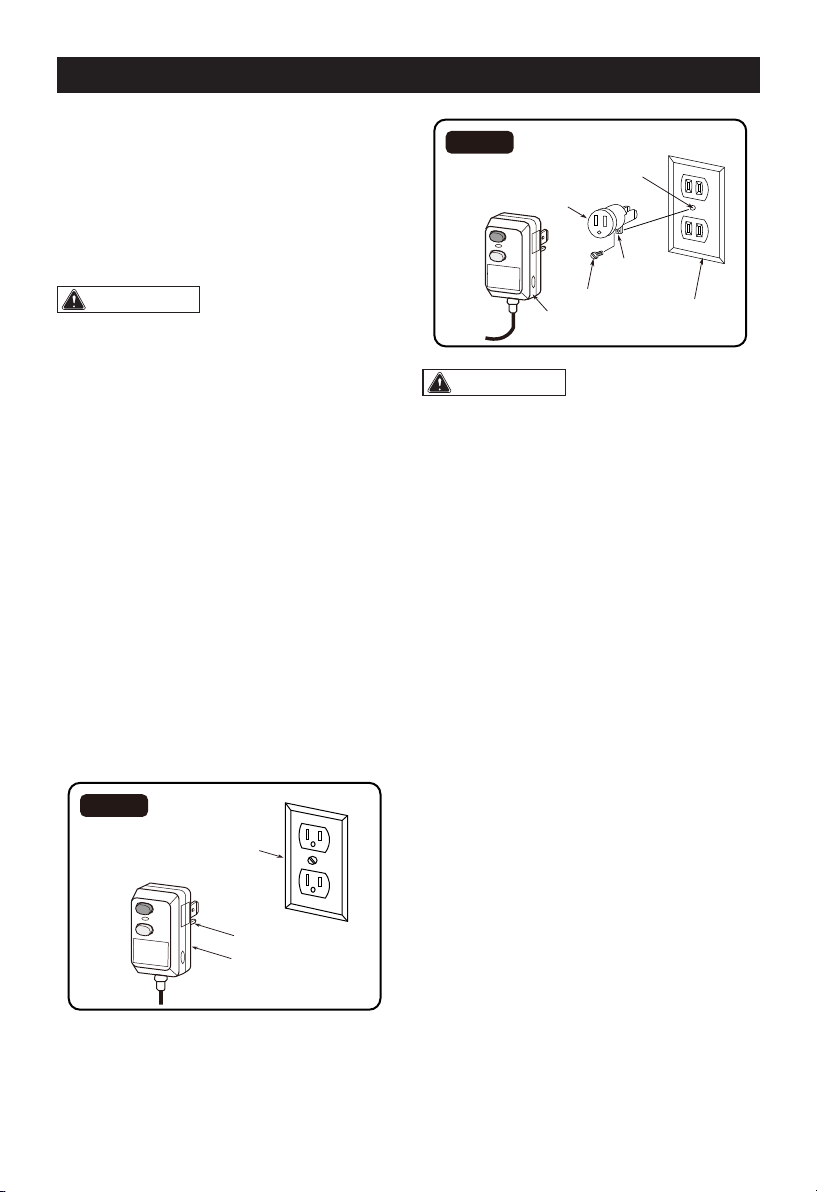
• This pump is supplied with a grounding
conductor and grounding-type attachment
plug. To reduce the risk of electric shock, be
certain that it is connected only to a properly
grounded, grounding type receptacle.
• Test GFCI before each use.
• Do not allow Pump Accessory to be used
as a toy. Close attention is necessary when
used by or near children.

Page 4
SAFETY INSTRUCTIONS & WARNINGS
CAUTION:
• To reduce the risk of hearing damage, wear
ear protectors when using for extended
hours or using in a noisy area.
• For dusty operations, wear dust mask. Use
this Pump Accessory only as described in
this manual. Observe the following warnings
that appear on the motor housing of your
Pump Accessory and GFCI housing.
WARNING: FOR YOUR OWN SAFETY,
READ AND UNDERSTAND OPERATOR’S
MANUAL. DO NOT RUN UNATTENDED. DO
NOT PICK UP HOT ASHES, COALS, TOXIC,
FLAMMABLE, OR OTHER HAZARDOUS
MATERIALS. DO NOT USE AROUND
EXPLOSIVE LIQUIDS OR VAPORS.
WARNING: To reduce the risk of
electrocution, complete the following steps:
1) Plug in receptacle.
2) Press reset button. Indicator should be ON.
3) Press test button. Indicator should be OFF.
4) Press reset button for use. Do not use if test
fails.
WARNING: To reduce the risk of
electrocution, do not use extension cord to
connect GFCI to power receptacle.
WARNING: To reduce the risk of
electric shock, connect only to a properly
grounded, grounding-type receptacle.

Page 5
INTRODUCTION
Grounding Instructions
This appliance must be grounded. If it should
malfunction or breakdown, grounding provides
a path of least resistance for electric current to
reduce the risk of electric shock. The plug must
be inserted into an appropriate outlet that is
properly installed and grounded in accordance
with all local codes and ordinances.
WARNING: Risk of electric shock-
This pump is supplied with a grounding
conductor and grounding- type attachment
plug. To reduce the risk of electric shock, be
certain that it is connected only to a properly
grounded, grounding-type receptacle.
This pump is for use on a nominal 120-volt
circuit, and has a grounded plug as illustrated in
the sketch. (fig. 1) A temporary adapter with a
grounding lug may be used to connect this plug
to a 2-pole receptacle if a properly grounded
outlet is not available. The temporary adapter
should only be used until a properly grounded
outlet can be installed. The green-colored rigid
ear, lug, or the like, extending from the adapter,
must be connected to a permanent ground such
as a properly grounded outlet box cover. (g. 2)
Whenever the adapter is used, it must be held
in place by a metal screw. Please consult a
qualied electrician if there are questions on how
to connect to a ground with a 2-prong outlet. The
pump should not be plugged into this outlet if it is
not grounded.
Fig. 1
RESET
TEST
Properly Grounded Outlet
Grounding Prong
GFCI Plug
Fig. 2
RESET
TEST
Make sure this is a
metal screw connected
to a known ground
Green
Grounding Lug
2-Prong Outlet
(grounded at screw
connection)
GFCI Plug
Metal Screw
Adapter
WARNING: Check with a qualified
electrician or service person if you are in
doubt as to whether the outlet is properly
grounded. Do not modify the plug provided
with the appliance - if it will not t the outlet,
have a proper outlet installed by a qualied
electrician.
This Pump Accessory is intended for indoor,
household use only. When connected to a
compatible Wet/Dry Vacuum, it may be used
for light pumping of wet media. Familiarize
yourself with the following product and features
and read the entire owner’s manual for specic
usage of your new Pump Accessory.

Page 6
Pump Accessory
Strainer
Drain Cap
Operators Manual
.
Shut-Off Valve
Adapters
Screw
UNPACKING & CHECKING CARTON CONTENTS
Tools Required
• Screwdriver
Remove all contents from the box. Remove the power head and take out any contents inside
the collection tank. Check each item against the carton contents list.

Page 7
GETTING TO KNOW YOUR PUMP
Shut-off
Valve
Adapter
Strainer
Familiarize yourself with the control and features of your
Pump Accessory before operating.
Pump Accessory
Pump Outlet
Drain Cap
GFCI Plug
Pump Inlet
Cord
ON/OFF Switch

Page 8
ASSEMBLY
Pump Accessory Assembly
Your Pump Accessory will work on most Wet/
Dry Vacuums that have a drain at the bottom
of the drum. When attaching the pump to the
drain of your vacuum, you will use most of the
parts included in this kit.
1. Mount adapter onto the drain of your Wet/
Dry Vac and rmly tighten by hand. Locate
screw notch and install the supplied #16 x
2.6-inch long screw. (g. 3)
Fig. 3
Small
Adapter
Diameter of Drain on
Wet/Dry Vac is 1-1/2
Inch: Use Small Adapter
Diameter of Drain on
Wet/Dry Vac is 2 Inch:
Use Large Adapter
Large
Adapter
Screw Notch
Screw
Small Adapter
NOTE: The drain adapter can now be a
permanent fixture on your vacuum. Use the
included drain cap when the pump is not in use.
2. Push the strainer into the large inlet of
the pump assembly. With the strainer
installed, slide the Pump Accessory into the
adapter previously installed on the vacuum,
positioning the pump in an upright fashion.
Tighten the coupler by hand until secure.
(g. 4)
Fig. 4
Strainer Large
Inlet
Pump Accessory
Coupler
NOTE: The connection is designed to prohibit
rotation of the pump after installation, so proper
alignment must be achieved before the coupler
has been tightened.
3. After the pump assembly is securely
attached to the drain, the shut-off valve
should be installed to the outlet of the
pump and turned to the closed position.
Without this shut-off valve installed, liquid
will leak through the pump outlet. Connect
a standard size garden hose (not included),
up to 50 feet in length, to the outlet end of
the shut-off valve. Longer lengths will cause
reduced performance of the pump. (g. 5)
Fig. 5
Pump Accessory
in Upright
Position
Coupler
Shut-off Valve
Garden Hose
(Not Included)

Page 9
WARNING: To reduce the risk of
fire or explosion, do not operate this vac
in areas with flammable gases, vapors, or
explosive dust in the air. Flammable gases
or vapors include but are not limited to:
lighter uid, solvent type cleaners, oil-based
paints, gasoline, alcohol, or aerosol sprays.
Explosive dusts include but are not limited
to: coal, magnesium, aluminum, grain, or
gun powder. Do not vacuum explosive dust,
flammable or combustible liquids, or hot
ashes. Do not use this vac as a sprayer.
To reduce the risk of health hazards from
vapors or dusts, do not vacuum toxic
materials. Store Pump Accessory indoors.
Do not submerse pump or power cord.
WARNING: The operation of any
utility vac can result in foreign objects being
blown into the eyes, which can result in
severe eye damage. Always wear safety
eyewear complying with ANSI Z87.1 (or in
Canada, CSA Z94.3) before starting operation.
Safety eyewear is available at many local retail
stores.
CAUTION: To reduce risk of hearing
damage, wear ear protection when using
the pump accessory for extended hours or
when using it in a noisy area.
To reduce the risk of electric shock, this
Pump Accessory has a built-in GFCI (Ground
Fault Circuit Interrupter) plug with a ground
connection. The plug must be used on a
properly grounded outlet. If the plug does not t
into the outlet, contact a qualied electrician to
install the proper outlet. Do not modify the plug
in any way.
After you plug the power cord into the outlet,
you should always test the GFCI. Press the
red “RESET” button to reset your Pump
Accessory. This has to be done each time the
pump accessory is plugged into an outlet. If the
red “RESET” indicator does NOT pop up, your
unit is not functioning properly and you should
contact an Independent Service Center to have
your Pump Accessory serviced. Once you have
plugged the power cord into the outlet and the
tested GFCI, you are ready to run your pump.
(g. 6)
Fig. 6
TEST
Button
RESET
Button
GFCI (Ground Fault
Circuit Interrupter)
RESET
TEST
NOTE: The Pump Accessory should not be
operated on the same circuit as the Wet/Dry
Vac.
OPERATION

Page 10
Turn on the unit by pushing the switch from
position “O” to position “l”. The symbols used
on the switch actuator are international “On &
Off” symbols. “O” is the symbol for “OFF” and “l”
is the symbol for “ON”. (g. 7)
Fig. 7 ON/OFF
Switch
O = OFF I = ON
Your Pump Accessory will work best when being
used to pump large amounts of liquid. If the liquid
does not ll the drum so that it covers the drain on
the inside of your Wet/Dry Vac, the pump may not
function properly. Due to the function of Wet/Dry
Vacs and the Pump Accessory, the pump will not
operate properly if your vac is running.
1. Make sure that your pump is connected to
the drain of your vac (See Assembly), and
that the GFCI is functioning properly. If you
require a hose, connect it to the outlet of
the pump.
2. Close the shut-off valve and vacuum up the
intended liquid until your Wet/Dry Vac stops
picking up the liquid or until all liquid is
cleaned up. (g. 8)
Fig. 8 Closed
Position
3. Turn your vac off, allowing it to stop
completely. Position hose to the desired
location to empty drum contents. Open the
shut-off valve located between the outlet of
the Pump Accessory and the garden hose.
(g. 9)
Fig. 9
Open
Position
4. Turn your pump on allowing it to pump
out as much of the liquid in the drum as
possible. When you notice that the pump
is no longer moving any water through the
hose and the speed of the motor increases,
turn the pump off.
5. To verify drum is mostly empty, unplug the
pump and vac, remove vacuum powerhead
and inspect the drum contents. If liquid is
still in drum, see “Troubleshooting” section
on page 12.
NOTE: Do not run pump dry or damage may
occur to internal components of the pump and
void warranty.
6. Unplug the pump, unplug and remove the
powerhead of your Wet/Dry Vac and clear
any debris that may have collected on or
near the strainer of the pump. Reinstall the
power head and repeat steps 2 through 5
as required.
WARNING: To reduce the risk of re
or electric shock, do not run vac unattended.
USING YOUR PUMP ACCESSORY

Page 11
TROUBLESHOOTING
MAINTENANCE
Cleaning Strainer
WARNING: To reduce the risk of
injury from accidental starting, unplug power
cord before cleaning strainer.
Your pump requires no additional lubrication or
maintenance beyond keeping it clean and free
of debris.
Cleaning
Before storing the pump, it should be cleaned.
To clean the Pump Accessory, rinse out your
vac drum so that it is free of any debris. Fill
the drum 3/4 of the way full with clean water
and allow the pump to pump the water out.
For vacuums under 12-gallons, perform this
procedure twice. Remove the remaining water
from the drum; remove the Pump Accessory
from the drain and install the supplied drain cap
to the permanently installed drain adapter.
To keep your pump looking its best, clean the
outside with a cloth dampened with warm water
and mild soap. Remove any excess water or
debris with a dry cloth.
Cord Storage
Wrap the cord and use the attached hook &
loop strap to retain the cord.
Storing the Pump Accessory
When not in use, store your Pump Accessory
in a cool, dry location with the cord wrapped
using the supplied hook & loop cord wrap.
The original Wet/Dry Vac drain cap should then
be installed on the drain adapter that has been
permanently attached to the drain of your Wet/
Dry Vac.
WARNING: Extreme temperatures
can cause the motor seal to fail, allowing
water into the motor.
WARNING: To assure product SAFETY
and RELIABILITY, repairs and adjustment
should be performed by Independent Service
Centers, always use approved replacement
parts.
Remedy Corrective Action
No Flow/Restricted Flow
1) Check strainer for clog.
2) Make sure water is in vac tank.
3) Check shut-off valve.
4) Check for kink in hose.
5) Make sure hose outlet does not exceed 50 feet.
Unit Does Not Turn On
1) Check GFCI-see page 8.
2) Make sure Pump Accessory is plugged in.
3) Make sure switch is on.
4) Check house circuit breaker/fuse.
Leaking
1) Check t on adapter.
2) Check coupler t and “O” ring.
3) Check shut-off valve t and “O” ring.
4) Check garden hose t and make sure hose washer is in place.
Odor (Electrical)
1) Unplug Pump Accessory.
2) Check for blockage.
3) If Pump Accessory continues to have an electrical
odor, return to Service Center.

Page 12
REPAIR PARTS
240-4836 Wet/Dry Vac Pump Accessory
Always order by part number, not by key number. Always mention the model number when
ordering parts. The model number is found on the serial plate located on the pump.
WARNING: To reduce the risk of injury from electrical shock, unplug power cord
before servicing the Wet/Dry Vac Pump Accessory.
1 2 3 4
5 6 7
Key Description Part # Qty
1 Adapter 1(small) PA01DM.10.15 1
2 Adapter 2(large) PA01DM.10.14 1
3Strainer PA01DM.10.08 1
4Shut-Off Valve FV9144.80.00 1
5 Screw BOA2SP.26.16 1
6 Drain Cap VM01SR.10.08 1
7 Operator's Manual 1

Page 13
NOTES

Page 14
SAVE YOUR RECEIPTS
THIS WARRANTY IS VOID WITHOUT THEM
WARRANTY
This MASTERFORCETM brand pump accessory carries our 90-Day Money Back Guarantee.
If you are not completely satised with your MASTERFORCETM brand pump accessory for
any reason within ninety (90) days from the date of purchase, return the pump accessory
with your original receipt to any MENARDS® retail store, and we will provide you a refund - no
questions asked.
Wet/Dry Vacuum Pump Accessory
2-YEAR LIMITED WARRANTY
This MASTERFORCETM brand pump accessory carries our famous No Hassle 2-Year
Limited Warranty to the original purchaser. If, during normal use, this MASTERFORCETM
pump accessory breaks or fails due to a defect in material or workmanship within two
(2) years from the date of original purchase, simply bring the pump accessory with the
original sales receipt back to your nearest MENARDS®retail store. At its discretion,
MASTERFORCETM agrees to have the pump accessory or any defective part(s) repaired
or replaced with the same or similar MASTERFORCETM product or part free of charge,
within the stated warranty period, when returned by the original purchaser with original
sales receipt. Not withstanding the foregoing, this limited warranty does not cover any
damage that has resulted from abuse or misuse of the Merchandise. This warranty: (1)
excludes expendable parts including but not limited to adapters, valves, and strainers;
(2) shall be void if this pump accessory is used for commercial and/or rental purposes;
and (3) does not cover any losses, injuries to persons/property or costs. This warranty
does give you specic legal rights and you may have other rights, which vary from state
to state. Be careful, pump accessories are dangerous if improperly used or maintained.
Seller’s employees are not qualied to advise you on the use of this merchandise. Any
oral representation(s) made will not be binding on seller or its employees. The rights
under this limited warranty are to the original purchaser of the merchandise and may not
be transferred to any subsequent owner. This limited warranty is in lieu of all warranties,
expressed or implied including warranties or merchantability and tness for a particular
purpose. Seller shall not be liable for any special, incidental, or consequential damages.
The sole exclusive remedy against the seller will be for the replacement of any defects as
provided herein, as long as the seller is willing or able to replace this product or is willing
to refund the purchase price as provided above. For insurance purposes seller is not
allowed to demonstrate any of these pump accessories for you.
For questions / comments, technical assistance or repair parts -
Please call toll free at: 1-866-384-8432. (M-F 8:30am-5:00pm EST)
90-DAY MONEY BACK GUARANTEE

© 2011 Menard, Inc., Eau Claire, WI 54703 11/2017
Table of contents
Other MasterForce Vacuum Cleaner manuals