5. Cuando el interior del alimento alcanza la temperatura seleccionada, el aparato emitirá un pitido y
la pantalla mostrará «End». Presione el botón TEMP ACE por 2 segundos y la pantalla mostrará la
temperatura interna de los alimentos.
6a. Cocción finalizada - sonda de temperatura:
Retire la carne del aparato, inserte la sonda y colóquela en un plato por un mínimo de 5 minutos
para que repose. La carne deberá dejarse reposar para que termine de cocinarse. Si alcanza la
temperatura de reposo de la tabla de la página anterior, su cocción habrá finalizado.
6b. Cómo cocinar más alimentos sin la sonda de temperatura:
Si usa la misma opción para cocinar más alimentos, pero no necesita usar la sonda, solo tiene que
presionar START/STOP para reiniciar el aparato. Luego, presione la flecha TIME para ajustar un
nuevo tiempo de cocción. Cambie la temperatura de la función si fuera necesario.
Para iniciar, presione START/STOP. Si usa una función diferente para cocinar más alimentos,
seleccione la función antes de ajustar el tiempo y temperatura de cocción.
NOTA: Puede comprobar la temperatura interna de los alimentos en cualquier momento, incluso si
no programa una función de cocción. Solo tiene que presionar el botón TEMP por 2 segundos.
6c. Cocción de alimentos en lotes con la sonda de temperatura:
Si está cocinando carne en lotes, retire la sonda de la carne cocida y colóquela en el centro de la
porción de carne sin cocinar de mayor tamaño. Presione el botón TEMP, ajuste la temperatura
interna deseada y presione START/STOP. «Add Food» aparecerá en pantalla. Deje que el aparato
funcione por unos 3 minutos hasta que se abra la tapa y luego, eche el siguiente lote de carne. A
continuación, siga el paso 5.
TIPOS DE COCCIÓN
Compruebe que el aparato está enchufado antes de encenderlo y luego presione el botón de
encendido.
GRILL
1. Coloque la olla de cocción en la carcasa principal con la muesca de la olla en la protuberancia
posterior correspondiente. A continuación, en el grill con las asas mirando hacia arriba en el
recipiente. Compruebe que la protección contra salpicaduras está en su lugar y cierre la tapa.
ESES
15 16
precisa y mantener su cocina libre de humos. Deberá seleccionar el ajuste de temperatura del grill a
la hora de utilizar la función de grill. La gama de temperaturas recomendada para varios tipos de
ingredientes se encuentran a continuación.
NOTA: Cuando se cocinan carnes a temperatura más elevada, el aparato podría emitir más humo
de lo normal.
CÓMO USAR LA SONDA DE TEMPERATURA
1. Enchufe la sonda de temperatura en la toma ubicada en el lateral derecho del panel de control y
luego, seleccione la opción y temperatura de cocción deseadas. Antes de configurar la alerta de la
sonda, deberá enchufarla.
Compruebe que el cable de la sonda no tiene nudos (no aplicable con la función de deshidratación).
NOTA: No es necesario configurar un tiempo de cocción, ya que el aparato apaga el elemento
calefactor automáticamente y le avisa cuando la sonda detecta que su comida ha alcanzado la
temperatura interna que usted ajustó.
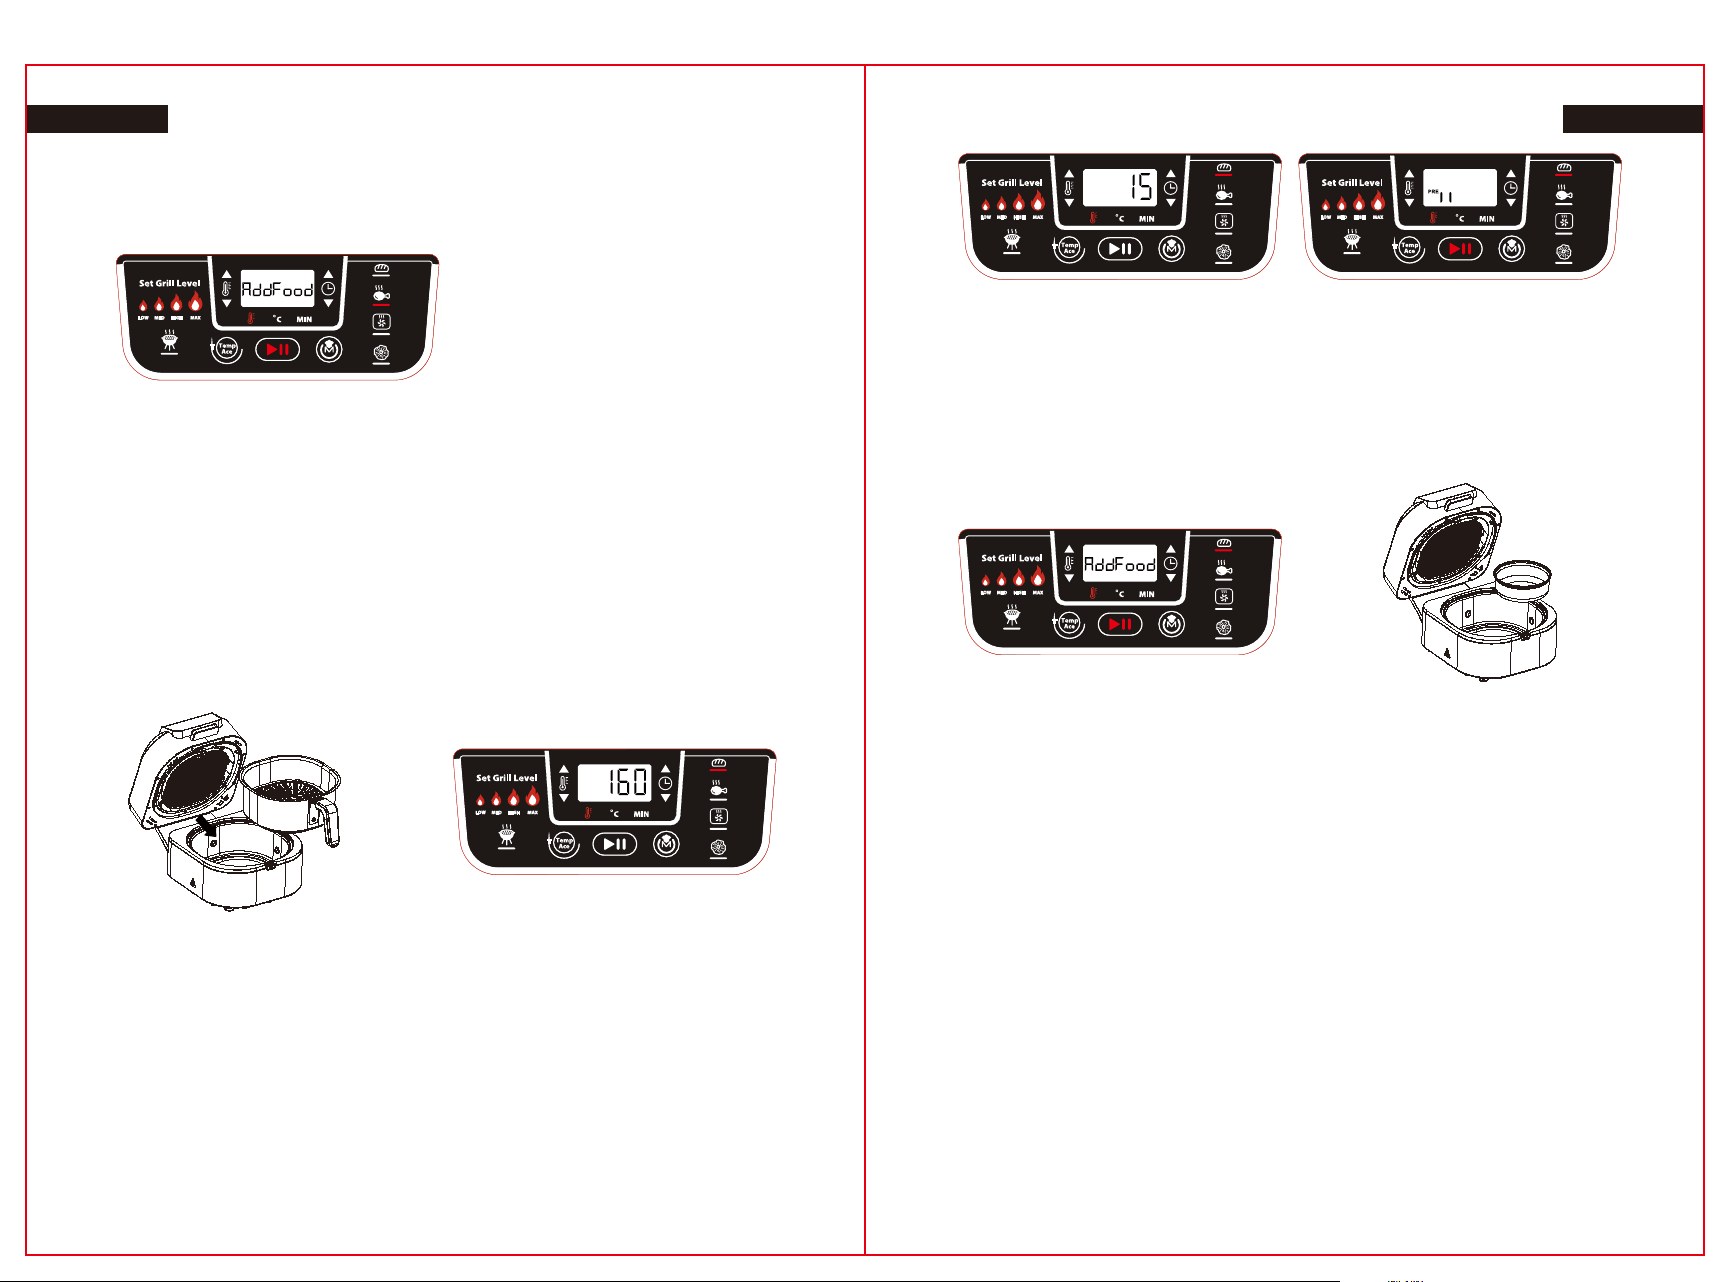
2. Presione el botón TEMP ACE y la pantalla muestra 80° C por defecto. Use las flechas de ascenso
y descenso para seleccionar la temperatura de cocción deseada (de 35° C a 85° C ).
NOTA: Para ajustar la función de temperatura, presione el botón TEMP de nuevo para salir. El
aparato volverá a la configuración de temperatura de la función.
NOTA: El grill sin humo cocina con facilidad y las configuraciones de temperatura interna recomen-
dadas dependen de cómo cocina este aparato, y podrían parecer inferiores a las temperaturas
recomendadas para otros aparatos. La temperatura interna de los alimentos empieza a aumentar
cuando están en reposo. Los alimentos siguen cocinándose cuando se dejan reposar al menos 5
minutos después de retirarlos del calor.
3. Coloque el accesorio adecuado en el aparato según la función de cocción seleccionada y cierre la
tapa. Para iniciar el precalentamiento, presione START/STOP. Cuando el aparato está precalentán-
dose, inserte la sonda en el centro de la parte más gruesa del trozo de carne más grande, cerca del
hueso, pero sin tocarlo. NO inserte la sonda verticalmente o en ángulo porque no ofrecerá una
lectura precisa.
4. Cuando el aparato se ha precalentado y «Add Food» parpadea en pantalla, abra la tapa y coloque
los alimentos dentro; luego, cierre la tapa sobre el cable de la sonda. El monitor mostrará ahora la
lectura de la sonda de temperatura mientras se cocinan los alimentos.
PRIMER USO
1. Retire del aparato todo el material de embalaje, las etiquetas promocionales y cintas.
2. Saque de la caja todos los accesorios y lea con atención este manual. Preste particular atención a
los procedimientos operativos, advertencias y precauciones básicas para evitar lesiones o daños a
la propiedad.
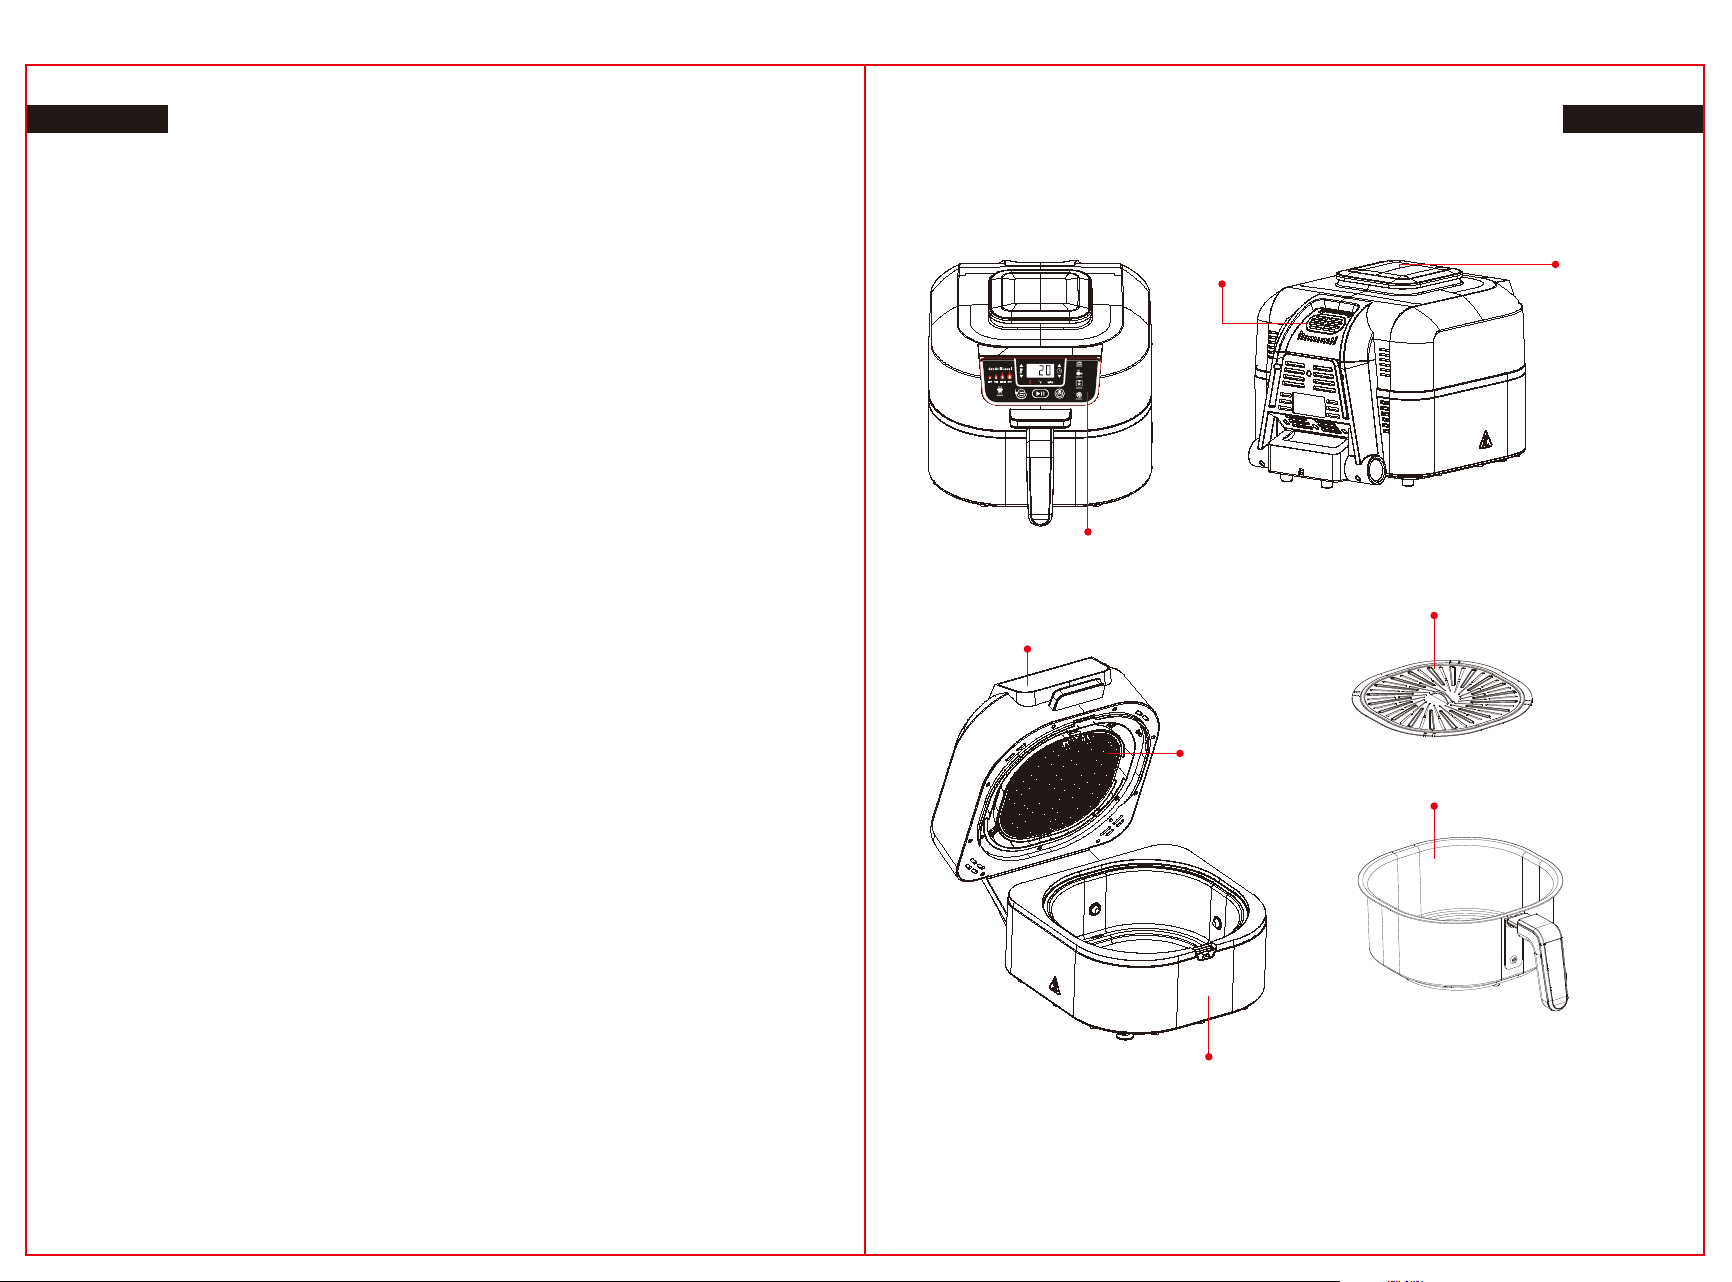
3. Lave la parrilla, protección contra salpicaduras, olla interna y la sonda de temperatura en agua
caliente jabonosa y luego séquelas. La parrilla, protección contra salpicaduras y la olla interna son
todas aptas para lavar en lavavajillas. NUNCA lave en el lavavajillas el panel principal ni la sonda de
temperatura.
CÓMO USAR EL GRILL SIN HUMOS
PROTECCIÓN CONTRA SALPICADURAS
La protección contra salpicaduras, ubicada en la parte inferior de la tapa, mantiene el elemento
calefactor limpio y minimiza el humo.
La protección contra salpicaduras se extrae para su limpieza pero es aconsejable mantenerla en su
lugar durante la cocción.
CÓMO RETIRAR LA PROTECCIÓN CONTRA SALPICADURAS
Limpie y retire la protección contra salpicaduras después de cada uso. Espere a que la protección
contra salpicaduras se enfríe por completo y luego sáquela abriendo y tirando del clip hacia arriba
con el dedo pulgar mientras tira de una de las pestañas exteriores hacia usted con la otra mano.
Esto desbloqueará la protección contra salpicaduras para que pueda sacarla de su ranura a lo largo
de la parte posterior de la tapa.
CÓMO INSTALAR LA PROTECCIÓN CONTRA SALPICADURAS
Desplace con cuidado la protección contra salpicaduras hacia la parte posterior de la tapa para
engancharla. Enganche la pestaña posterior a la rejilla con la abertura de la tapa en la parte inferior.
Luego, desplace lentamente la protección contra salpicaduras hacia arriba hasta que se enganche
en el clip en la parte frontal de la tapa.
CONTROLES DEL GRILL
Nuestra tecnología le ayuda a controlar la temperatura del grill para conseguir una cocción más
2. Presione el botón GRILL. El nivel de temperatura por defecto en el lateral derecho del panel de
control se iluminará, y la temperatura del aire correspondiente aparecerá en pantalla. Para cambiar el
ajuste de temperatura, presione el botón Grill, o las flechas TEMP de ascenso y descenso.
3. Presione las flechas TIME en ascenso y descenso para ajustar el tiempo de cocción, de aproxima-
damente 1 minuto a 30 minutos, o siga las instrucciones de la página 8 para ajustar la temperatura de
la sonda utilizando el botón TEMP ACE.
4. Presione START/STOP para iniciar el precalentamiento. «PRE» aparecerá en pantalla y se iniciará
la barra de progreso. Esto puede llevar aproximadamente 4 minutos.
5. La pantalla mostrará «Add Food» cuando finalice el precalentamiento.
6. Abra la tapa y coloque los ingredientes en el grill. Al cerrar la tapa, la cocción se iniciará y el
temporizador empezará la cuenta atrás.
NOTA: Si desea usar la sonda de temperatura solo para comprobar la temperatura de los alimentos,
presione el botón TEMP ACE por 2 segundos y la temperatura interna de los alimentos aparecerá en
pantalla por 5 segundos. Si la pantalla empieza a parpadear, quiere decir que no ha mantenido el
botón presionado el tiempo suficiente. Consulte la página de Resolución de problemas.
7. El aparato emitirá una señal acústica cuando finalice el tiempo de cocción y «END» aparecerá en
pantalla. Presione la flecha TIME ascendente y START/STOP si necesita agregar más tiempo de
cocción a los alimentos. Cuando usa el detector, el cambio de tiempo varía. Consulte la página 9,
sección 6b cuando use la sonda.
8. Mantenga la tapa abierta después de sacar los alimentos para que el aparato se enfríe con mayor
rapidez. Al finalizar la cocción, la tapa de acero inoxidable de la parte externa del aparato estará
caliente.
NOTA: Cuando cocine en lotes, consulte las instrucciones de la parte inferior de la página 7.
7. Recomendamos encarecidamente sacudir los ingredientes regularmente para obtener un mejor
resultado. Cuando se levanta la tapa, el aparato se pausa. Para sacar el recipiente, use pinzas con
punta de silicona o manoplas de horno. Cuando termine, vuelva a colocar el cesto y cierre la tapa. Al
cerrar la tapa, la cocción se reanuda automáticamente.
8. El aparato emitirá una señal acústica cuando finalice el tiempo de cocción y «END» aparecerá en
pantalla. Retire los ingredientes y cierre la tapa. Presione la flecha TIME ascendente y START/STOP
si necesita agregar más tiempo de cocción a los alimentos.
ASADO
1. Coloque la olla en la carcasa con su muesca alineada con la protuberancia de la carcasa principal
y cierre la tapa.
2. Presione el botón ROAST. La pantalla mostrará el ajuste de temperatura por defecto. Use las
flechas TEMP en ascenso y descenso para ajustar la temperatura.
NOTA: Convierta recetas típicas con una caída de temperatura de 10 ° C. Compruebe los alimentos
con frecuencia para evitar que se cocinen en exceso.
3. Presione las flechas TIME en ascenso y descenso para ajustar el tiempo de cocción, de aproxima-
damente 1 minuto a 90 minutos, o siga las instrucciones de la página 8 para ajustar la temperatura de
la sonda utilizando el botón TEMP.
4. Para iniciar el precalentamiento, presione START/STOP. «PRE» aparecerá en pantalla y se iniciará
la barra de progreso. El precalentamiento llevará unos 4 minutos.
NOTA: Aunque el precalentamiento es altamente recomendable para obtener un mejor desempeño,
puede omitirlo presionando el botón ROAST. «Add Food» parpadeará en pantalla. Coloque los
CRUJIENTE POR AIRE
1. Coloque la olla de cocción en la carcasa principal con la muesca de la olla en línea con la
protuberancia posterior de la carcasa. Coloque el cesto de fritura en la olla y cierre la tapa.
2. Presione el botón AIR CRISP en la ventana. La pantalla mostrará el ajuste de temperatura por
defecto. Use las flechas TEMP en ascenso y descenso para ajustar la temperatura.
3. Presione las flechas TIME en ascenso y descenso para ajustar el tiempo de cocción, de aproxi-
madamente 1 minuto a 90 minutos, o siga las instrucciones de la página 8 para ajustar la temperatu-
ra de la sonda utilizando el botón TEMP ACE.
4. Para iniciar el precalentamiento, presione START/STOP. «PRE» aparecerá en pantalla y se
iniciará la barra de progreso. El precalentamiento llevará hasta 3 minutos.
NOTA: Aunque el precalentamiento es altamente recomendable para obtener un mejor desempeño,
puede omitirlo presionando el botón AIR CRISP. «Add Food» parpadeará en pantalla. Coloque los
ingredientes en el cesto de fritura y abra la tapa. Al cerrar la tapa, la cocción se iniciará y el
temporizador empezará la cuenta atrás.
5. La pantalla mostrará «Add Food» cuando finalice el precalentamiento.
6. Abra la tapa y coloque los ingredientes en el cesto de fritura. Al cerrar la tapa, la cocción se inicia
y el temporizador empezará la cuenta atrás.
NOTA: Si desea usar la sonda de temperatura solo para comprobar la temperatura de los alimentos,
presione el botón TEMP por 2 segundos y la temperatura interna de los alimentos aparecerá en
pantalla por 5 segundos. Si la pantalla empieza a parpadear, quiere decir que no ha mantenido el
botón presionado el tiempo suficiente. Consulte la página de Resolución de problemas.
ingredientes en el cesto de fritura y abra la tapa. Al cerrar la tapa, la cocción se iniciará y el temporiza-
dor empezará la cuenta atrás.
5. La pantalla mostrará «Add Food» cuando finalice el precalentamiento.
6. Abra la tapa y eche los ingredientes en la olla. Al cerrar la tapa, la cocción se iniciará y el tempori-
zador empezará la cuenta atrás.
NOTA: Si desea usar la sonda de temperatura solo para comprobar la temperatura de los alimentos,
presione el botón TEMP ACE por 2 segundos y la temperatura interna de los alimentos aparecerá en
pantalla por 5 segundos. Si la pantalla empieza a parpadear, quiere decir que no ha mantenido el
botón presionado el tiempo suficiente. Consulte la página de Resolución de problemas.
7. El aparato emitirá una señal acústica cuando finalice el tiempo de cocción y «END» aparecerá en
pantalla. Retire los ingredientes y cierre la tapa. Presione la flecha TIME ascendente y START/STOP
si necesita agregar más tiempo de cocción a los alimentos.
HORNEAR
1. Coloque la olla de cocción en la carcasa principal con la muesca de la olla en línea con la marca y
luego cierre la tapa.
2. Presione el botón BAKE. La pantalla mostrará el ajuste de temperatura por defecto. Use las flechas
TEMP en ascenso y descenso para ajustar la temperatura.
NOTA: Convierta recetas típicas con una caída de temperatura de 10 ° C. Compruebe los alimentos
con frecuencia para evitar que se cocinen en exceso.
3. Presione las flechas TIME en ascenso y descenso para ajustar el tiempo de cocción, de aproxima-
damente 1 minuto a 90 minutos, o siga las instrucciones de la página 8 para ajustar la temperatura de
la sonda utilizando el botón TEMP ACE.
4. Para iniciar el precalentamiento, presione START/STOP. «PRE» aparecerá en pantalla y se
iniciará la barra de progreso. El precalentamiento llevará hasta 3 minutos.
NOTA: Aunque el precalentamiento es altamente recomendable para obtener un mejor desempeño,
puede omitirlo presionando el botón BAKE. «Add Food» parpadeará en pantalla. Coloque los
ingredientes en el cesto de fritura y abra la tapa. Al cerrar la tapa, la cocción se iniciará y el
temporizador empezará la cuenta atrás.
5. La pantalla mostrará «Add Food» cuando finalice el precalentamiento.
6. Abra la tapa y eche los ingredientes a la olla, o coloque directamente la bandeja de asado en el
fondo de la olla y cierre la tapa para iniciar la cocción. Al cerrar la tapa, la cocción se iniciará y el
temporizador empezará la cuenta atrás.
NOTA: Si desea usar la sonda de temperatura solo para comprobar la temperatura de los alimentos,
presione el botón TEMP ACE por 2 segundos y la temperatura interna de los alimentos aparecerá en
pantalla por 5 segundos. Si la pantalla empieza a parpadear, quiere decir que no ha mantenido el
botón presionado el tiempo suficiente. Consulte la página de Resolución de problemas.
7. El aparato emitirá una señal acústica cuando finalice el tiempo de cocción y «END» aparecerá en
pantalla. Presione la flecha TIME ascendente y START/STOP si necesita agregar más tiempo de
cocción a los alimentos.
DESHIDRATAR
NOTA: El botón TEMP ACE y la sonda de temperatura no se pueden usar con esta función.
1. Coloque la olla interna en la carcasa principal con la marca de la olla en línea con la marca de la
carcasa principal, y a continuación, coloque en el fondo de la olla una sola capa de ingredientes.
Coloque el cesto de fritura en la olla y ponga una capa de ingredientes en el fondo del cesto. Cierre
la tapa.
2. Presione DESHIDRATAR La pantalla mostrará el ajuste de temperatura por defecto. Use las
flechas TEMP en ascenso y descenso para ajustar la temperatura deseada.
3. Con las flechas TIME puede ajustar el tiempo de deshidratación en intervalos de 1 minuto hasta 9
horas.
4. Para iniciar, presione START/STOP. En el modo de deshidratación, el aparato no precalienta.
NOTA: Debe abrir la tapa durante el proceso de deshidratación para verificar los ingredientes. Al
abrir la tapa, el temporizador se detiene y volverá a iniciarse automáticamente al cerrarla.
5. El aparato emitirá una señal acústica cuando finalice el tiempo de deshidratación, y «END»
aparecerá en pantalla. Retire los ingredientes y cierre la tapa.
RESOLUCIÓN DE PROBLEMAS | PREGUNTAS MÁS
FRECUENTES
• «Agregar ingredientes» aparece en pantalla.
El aparato ha finalizado el precalentamiento del grill ya puede agregar los ingredientes.
• «Cerrar la tapa» aparece en pantalla.
La tapa está abierta y la función seleccionada no se inicia hasta que la tapa no esté cerrada.
• «Agregar olla» aparece en pantalla.
La olla no está colocada en el aparato.
• «Enchufar» aparece en pantalla.
La sonda de temperatura en la parte derecha del panel de la pantalla no está conectada a la toma.
Conecte la sonda de temperatura antes de continuar.
• «E» aparece en pantalla.
El aparato no funciona correctamente. Póngase en contacto con el servicio de atención al cliente
en la dirección de correo electrónico que encontrará en el certificado de garantía. Si prefiere llamar
por teléfono, tenga el producto a mano.
• Después de presionar el botón START/STOP, aparecen luces parpadeantes.
Es la barra de progreso que le indica donde se encuentra el proceso de precalentamiento.
• ¿La barra de progreso del precalentamiento no empieza desde el principio?
Si el aparato está ya caliente debido a un uso previo, no tardará a calentarse el máximo de tiempo.
• Cancelación o anulación del precalentamiento.
Para obtener un óptimo resultado, se recomienda encarecidamente precalentar el aparato, pero
después de presionar el botón START/STOP podrá saltarse el precalentamiento seleccionando de
nuevo la función. Pero cuando use la función de grill, no podrá desactivar el precalentamiento.
• ¿Agrego los ingredientes antes o después del precalentamiento?
Deje que el aparato se precaliente antes de agregar los ingredientes para obtener un mejor
resultado de cocción.
• Mi aparato produce humo, ¿es normal?
Seleccione siempre la temperatura recomendada a la hora de utilizar la función de grill. Los ajustes
soportados están disponibles tanto en la Guía de inicio rápido como en la Guía de inspiración. No
olvide colocar la protección contra salpicaduras.
• ¿Puedo pausar el aparato para verificar los ingredientes?
El aparato se pausa automáticamente cuando se abre la tapa durante el proceso de cocción.
• ¿Puedo colocar la olla de cocción sobre mi encimera? ¿Es seguro?
Durante la cocción, la olla se caliente. Tome cuidado al manipularla y colóquela solo sobre
superficies resistentes al calor.
• Los ingredientes se han quemado.
No agregue alimentos hasta que haya completado el periodo de precalentamiento requerido.
Verifique los ingredientes durante el proceso de cocción para obtener el mejor resultado y retírelos
cuando alcancen el nivel de dorado deseado.
Para que no se cocinen en exceso, retire los ingredientes en cuanto haya finalizado el tiempo de
cocción.
• ¿Por qué no se han cocinado los ingredientes con el proceso de crujiente por aire?
Los ingredientes deben estar colocados en una capa uniforme en el fondo del cesto de frituras sin
amontonarse para obtener un dorado uniforme. Sacuda los ingredientes durante la cocción para
obtener un resultado crujiente consistente.
• Cuando los ingredientes se cocinan por aire, ¿se desplazan de lugar?
A veces, el ventilador desplaza los ingredientes más ligeros. Fije los alimentos sueltos (como la
rebanada superior de un sándwich) con palillos para evitarlo.
• ¿Puedo cocinar por aire los ingredientes frescos rebozados?
Sí, pero debe usar la técnica correcta para rebozarlos. Primero, los ingredientes deben pasarse por
harina, luego por mantequilla y por último por pan rallado. Presione el pan rallado en los alimentos
para que no se suelten. La fuerza del ventilador puede hacer volar el empanado suelto.
• ¿Por qué ya no se ilumina el panel de pantalla?
El aparato está apagado. Para volver a iluminarlo, presione el botón de encendido.
• ¿Cómo desactivar la sonda de temperatura durante la cocción?
Para desactivar la sonda de temperatura, presione START/STOP para reiniciar.
• ¿Puedo usar la sonda para comprobar la temperatura de los ingredientes cuando el aparato
no está cocinando en modo TEMP?
Sí, solo tiene que insertar la sonda en los alimentos y luego presionar el botón TEMP ACE por 2
segundos; la temperatura interna de los alimentos aparecerá en pantalla por 5 segundos. Si no
mantiene presionado el botón por 2 segundos, el aparato cambiará a modo TEMP ACE, ya que
este modo se acciona al presionar el botón con mayor rapidez. Si lo hace, «165F» aparecerá 5
veces en pantalla. Después, presione de nuevo el botón TEMP ACE y luego la flecha de descenso
TEMP hasta que la pantalla del panel de control muestre «OFF». El aparato volverá a la función de
cocción programada y el temporizador seguirá contando.
• ¿Mis ingredientes pueden quedar cocinados en exceso o semicrudos aunque haya usado la
sonda de temperatura?
Para obtener la lectura más precisa, es importante insertar la sonda de temperatura a lo largo en la
parte más gruesa del alimento. Consulte el apartado del uso de la sonda de temperatura para
obtener más detalles.
INSTRUCCIONES DE LIMPIEZA
Debe limpiar el aparato después de cada uso. Deje que el aparato se enfríe antes de limpiarlo.
• Desenchufe el aparato de la toma de corriente antes de limpiarlo. Mantenga la tapa abierta
después de sacar los alimentos para que el aparato se enfríe con mayor rapidez.
• Además la sonda de temperatura, la protección contra salpicaduras y demás accesorios incluidos
se pueden lavar en el lavavajillas. NO lave la sonda de temperatura en el lavavajillas.
• Al lavar los accesorios a mano, use el cepillo de limpieza. Después de lavar los accesorios a
mano, séquelos con un paño o al aire.
NOTA: NO use soluciones de limpieza líquidas sobre la toma de la sonda o cerca de la misma. Para
evitar daños a la toma, puede usar aire comprimido o un palito de algodón.
• Si quedan residuos de alimentos o grasa pegados en el grill, la protección contra salpicaduras, o
cualquier otro componente extraíble, colóquelos a remojo en el fregadero o en un recipiente lleno de
agua caliente jabonosa durante unas horas o toda la noche. Use el cepillo de limpieza después de
sacar los componentes del remojo para limpiarlos bien.
• Con el tiempo, las pestañas frontales y el armazón de la protección contra salpicaduras pueden
acumular grasa. Dejar a remojo la protección contra salpicaduras por la noche puede ayudar a
ablandar el aceite adherido. Use el cepillo de limpieza después del remojo para eliminar la grasa de
las pestañas frontales y del armazón de acero inoxidable.
• Ponga a remojo la sonda de temperatura de acero y el agarre de silicona en agua caliente
jabonosa para limpiarla. NO deje caer el cable o el enchufe en agua ni en otros líquidos.
NOTA: NO use herramientas abrasivas o dispositivos de limpieza. NUNCA sumerja el aparato
principal en agua ni en otros líquidos.