Matsu MS3WN User manual

MS3WN/MF3WN

This manual contains sections of Safety
Instructions,Operating Instructions,
Installation Instructions and Troubleshooting
Ti
p
s etc. Carefull
y
readin
g
it before usin
g
the
dishwasher will help you to use and maintain
the dishwasher properly.
To review the section on Troubleshooting Tips
will help you to solve some common problems
by yourself and not need to ask for the help of
professional technicians.
Control Panel . . . . . . . . . . . . . . . . . . . . . . . . 2
Dishwasher Features . . . . . . . . . . . . . . . . . 2
Wash Cycle Table . . . . . . . . . . . . . . . . . . . . 3
Water Softener . . . . . . . . . . . . . . . . . . . . . . 4
Deter
g
ent . . . . . . . . . . . . . . . . . . . . . . . . . . . 5
Rinse Aid . . . . . . . . . . . . . . . . . . . . . . . . . 5, 6
Loading the Dishwasher Rack . . . . . . . . 6,7
Turning On the Appliance . . . . . . . . . . . . . . 7
Filtering System . . . . . . . . . . . . . . . . . . . . . 8
Caring for the Dishwasher . . . . . . . . . . 9. 8,
About Electricity connection . . . . . . . . . . 9
Before calling for service. . . . . . . . . . 10,11
. . . . . . . . . . . . . . . . . . 1
The manufacturer, following a policy of constant
development and up-dating of the product, may
make modifications without giving prior notice.

This appliance must be grounded. In the event
of a malfunction or breakdown, grounding will
reduce the risk of electric shock by providing a
path of least resistance of electric current. This
appliance is equipped with a cord having an
equipment-grounding conductor and a grounding
plug. The plug must be plugged into an appropriate
outlet that is installed and grounded in accordance
with all local codes and ordinances.
1
Kee
p
children awa
y
from deter
g
ent and rinse aid, kee
p
child away from the open door of the dishwasher,
there could still be some detergent left inside.
ren
Do not abuse, sit on, or stand on the door or dish
rack of the dishwasher.
Do not touch the heating element during or
immediately after use.
Do not wash plastic items unless they are marked
dishwasher safe or the equivalent. For plastic
items not
so
marked,
check
the
manufacturer's
recommendations.
Use only detergent and rinse additives designed
for an automatic dishwasher. Never use soap,
laundry detergent, or hand washing detergent
in your dishwasher. Keep these products out of
the reach of children.
During installation, the power supply must not
be excessively or dangerously bent or flattened.
The door should not be left in the open position
since this could present a tripping hazards.
Do not tamper with controls.
Do not
p
lace an
y
heav
y
ob
j
ects of stand on the door
when it is open. The appliance could tip forward.
When loading items to be washed:
1) Locate sharp items so that they are not likely to
damage the door seal;
2) Load sharp knives with the handles up to reduce
the risk of cut-type injuries.
3 Warning:Knives and other utensils with sharp points
must be loaded in the basket with their points down
or placed in a horizontal position.
)
When using your dishwasher, you should prevent
plastic item from contacting with heating element.
If the supply cord is damaged, it must be replaced
by the manufacturer or its service agent or a
similarly qualified person in order to avoid a
hazard.
Please dispose of packing materials properly.
Use the dishwasher only for its intended function.
Remove the door to the washing compartment when
removin
g
an old dishwasher from service or discardin
g
it.
The appliance is not intended for use by young
children or infirm persons without supervision.
Dishwasher detergents are strongly alkaline,they
can be extremely dangerous if swallowed.Avoid
contact with skin and eyes and keep children away
from the dishwasher when the door is open.
Young children should be supervised to ensure that
they do not play with the appliance.
Check that the detergent receptable is empty after
completion of the wash cycle.
Other means for disconnection from the supply must
be incorprated in the fixed wiring with at least 3mm
contact separation in all poles.
The appliance is to be connected to the water mains
using new hose sets and that old hose-sets should
not be reused.
The maximum permissible inlet water pressure is 1Mpa.
The minimum permissible inlet water pressure is 0.04Mpa.

To get the best performance from your dishwasher,read all operating instructions before using it for the
f i r s t t i m e .
5
6
7
""
""
Rapid Button: Only used with cycle .
Plus Button: Only used with cycle
Door Handle: Pull it to open the door.
Washing Program Selector: Turn the knob clockwise
to select wash cycles.
8
1
2
3
4
2
Upper Basket
Spray Arms
Lower Basket
Water Softener
Detergent Dispenser
Silverware BasketMain Filter
Cup Shelf
5
6
7
8
Rinse Aid Dispenser
Coarse Filter
Drain pipe connector
Inlet pipe connector
9
10
12
11
3
2
14
11 12
1
2
3
4
5
6
7
8
9
10
14 5 6 2 3
8
7

This button
(
see " Control
p
anel "
)
is used with the normal c
y
cle in the case where
p
ots and
p
ans with dr
y
caked-on food must be
washed.
This is not recommended for delicate items in so far as the high temperature could make their surfaces opaque or lighten
decorative colors after repeated washing.
This button (see " Control panel " )when pressed with wash cycle 4("light")makes it possible to eliminate the drying phase.
Your dishwasher has an overfill protection device which could automatically shut off the inlet valve and starts the drain pump
if the water level in the unit is detected to be above the normal level. If this occurs, turn off the main water supply before calling for
servicing. If there is water in the base pan because of an overfill or small leak, the water should be removed before restarting the
dishwasher.
3
For normally soiled loads,
such as , plates,glasses
and lightly soiled pans.
standard daily cycle.
pots
Pre-wash
-wash
Wash (52 ℃)
Rinse (70 ℃)
Drying
Pre
For the heaviest soiled loads,
such as pots,pans,casserole
dishes and dishes that have
been sitting with dried food
on them for a while.
For lightly soiled loads,such
as plates,glasses,bowls and
lightly soiled pans.
For dishes that need to be
rinsed and dried only.
For lightly soiled loads,
such as glasses, crystal and
fine china.
To rinse dishes that you
plan to wash later that day.
15 g
15 g
A shorter wash for lightly
soiled loads that do not
need drying.
Intensive
Rapid
Soak
4/20 g
20 g
Pre-wash
-wash( 2℃
Wash (60 ℃)
Rinse
Rinse (70 ℃)
Drying
Pre 5 )
Wash (52 ℃)
Rinse (70 ℃)
Drying
Rinse (70 ℃)
Drying
Wash (52 ℃)
Rinse (62 ℃)
Drying
Wash (52 ℃)
Rinse
Pre-wash
Normal Wash
(IEC-EN 50242)
4/20 g

4
Always use salt intended for use with dishwashers.
The salt container is located beneath the lower rack and should be filled as follows:
Unscrew the ca
p
from the salt container.
There is a rin
g
on the container with an arrow on it
(
see Fi
g
ure to the side
)
, if
necessary, rotate the ring in the anticlockwise direction from the "-" Setting
toward the "+" sign, based on the hardness of the water being used.It is
recommended that adjustments should be made in accordance with the following
schema:
1
2
1.
2.
The salt container must be refilled when the salt warning light comes on. Though the salt container is filled
enough, the indicator light may not black out before the salt fully dissolve.
If there are spills of the salt, a soak program could be run to wipe them out.
Contact your local water board for information on the hardness of your water supply.
The hardness of the water varies from place to place. If hard water is used in the dishwasher, deposits will form on the dishes
and utensils.
The appliances is equipped with a special softener that uses a salt specifically designed to eliminate lime and minerals from the
water.
There are two ways to reduce the hardness: one way is using water softener, the other is using
detergent.
water
Remove the lower basket and then unscrew and remove the cap from the salt
container.
If you are filling the container for the first time ,fill 2/3 of its volume with water
(around 500ml).
Place the end of the funnel(supplied) into the hole and introduce about 1.2kg of
salt .It is normal for a small amount of water to come out of the salt container
1
2
4
3
5

5
Dishwasher detergent is corrosive! Take care to keep it out
of reach of children.
Use onl
y
deter
g
ent s
p
ecificall
y
made for use in dishwashers.
Kee
p
y
our deter
g
ent fresh and dr
y
. Don't
p
ut
p
owder deter
g
ent
into the dispenser until You're ready to wash dishes.
The rinse aid is released during the final rinse to prevent water
from forming droplets on your dishes that can leave spots and
streaks. It also improves drying by allowing water to "sheet" off
the dishes.
Your dishwashers are designed to use liquid rinse aids. The
rinse aid dispenser is located inside the door next to the
detergent dispenser. To fill the dispenser, open the cap and
pour the rinse aid into the dispenser until the level indicator
turns completely black. The dispenser holds about 100 ml of
liquid rinse aid.
Be careful not to overfill the dispenser, because this could
cause oversudsing. Wipe away any spills with a damp cloth.
Don't forget to replace the cap before you close the dishwasher
door.
If you have soft water, you may not need rinse aid for it may
cause a white film to develop on your dishes.
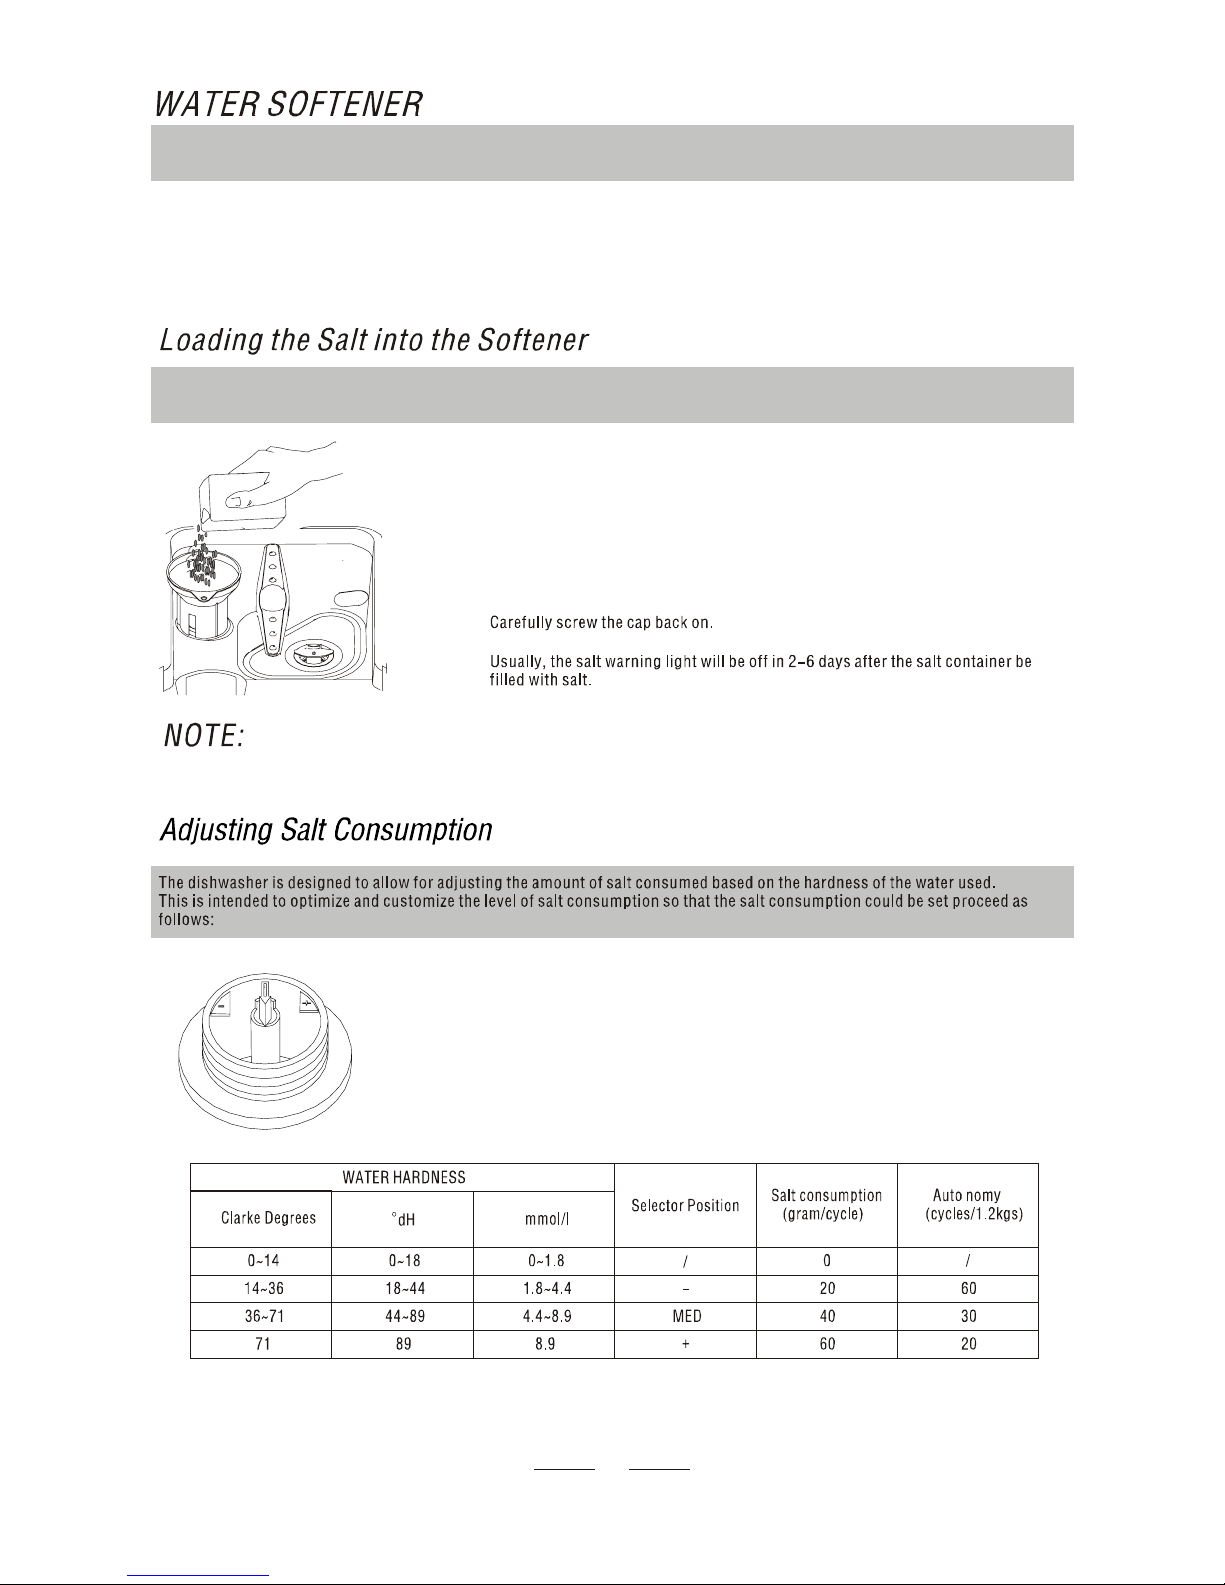
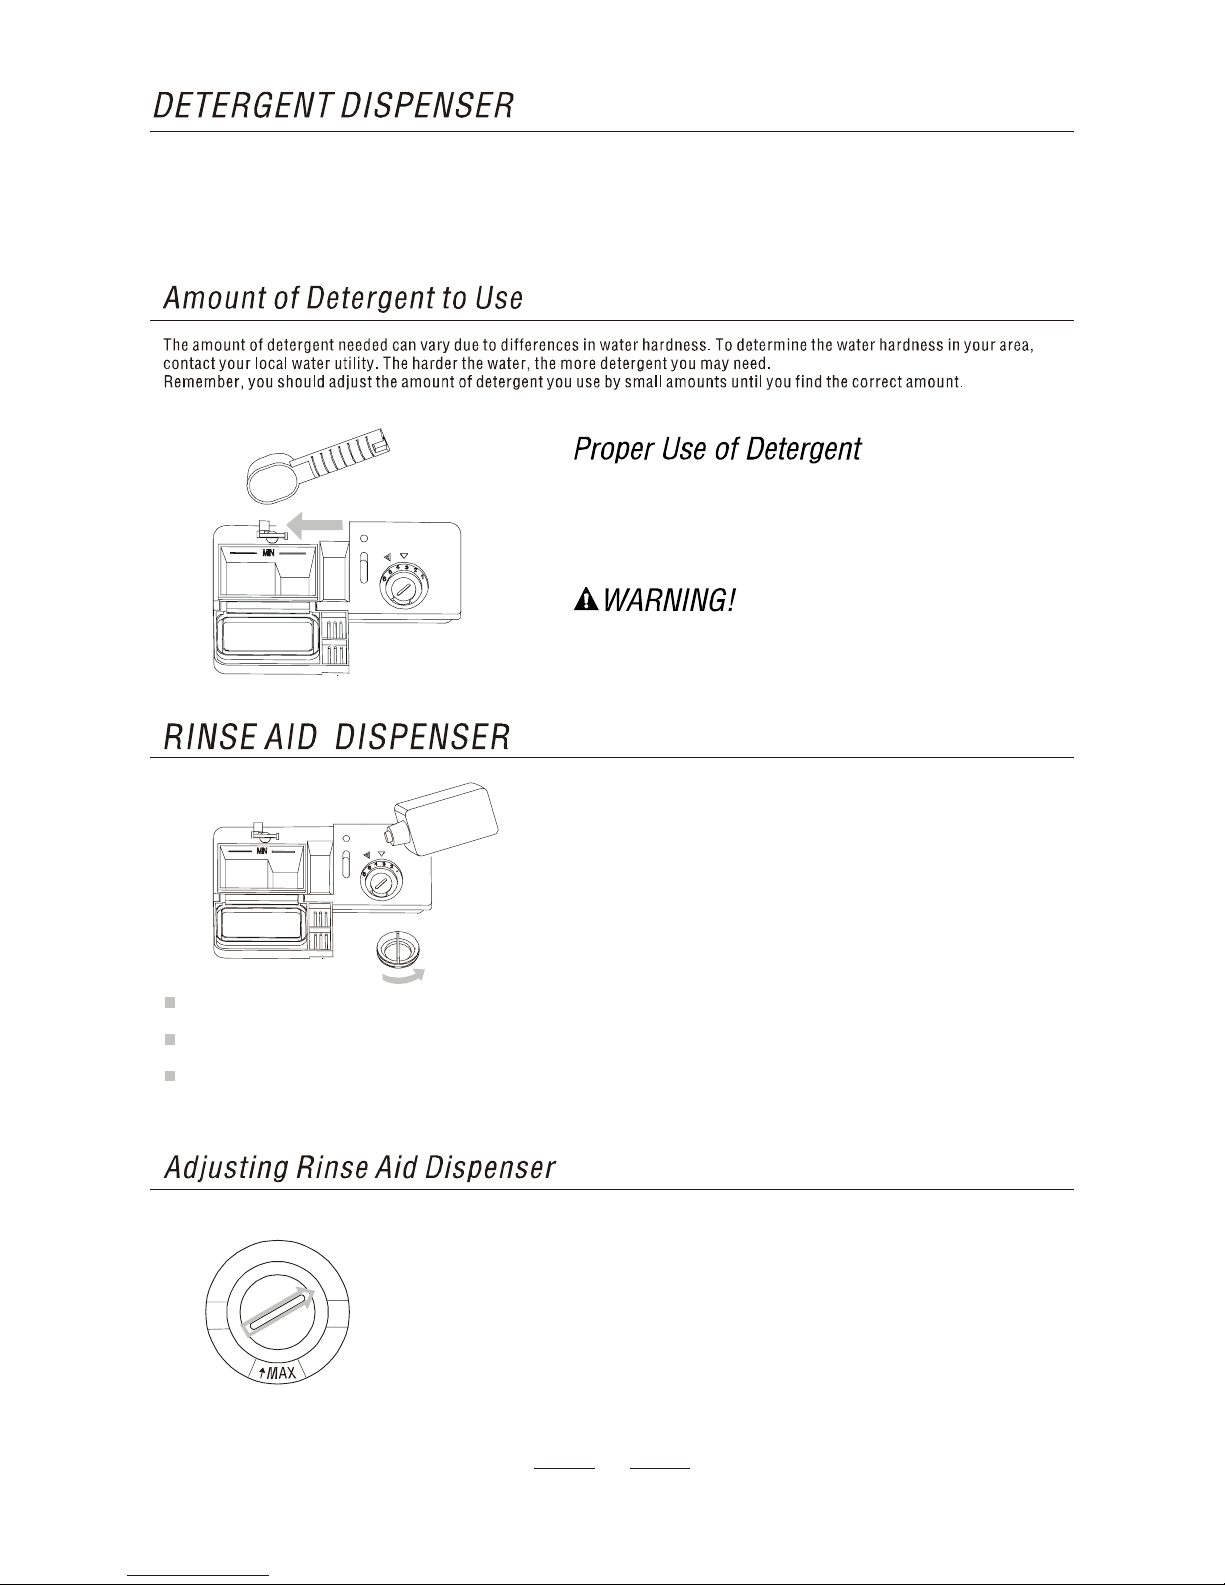
YOU MAY NOT NEED TO ADD TOO MUCH DETERGENT BECAUSE YOUR DISHWASHER HAS A SPECIALLY-DESIGNED WATER
SOFTENER.
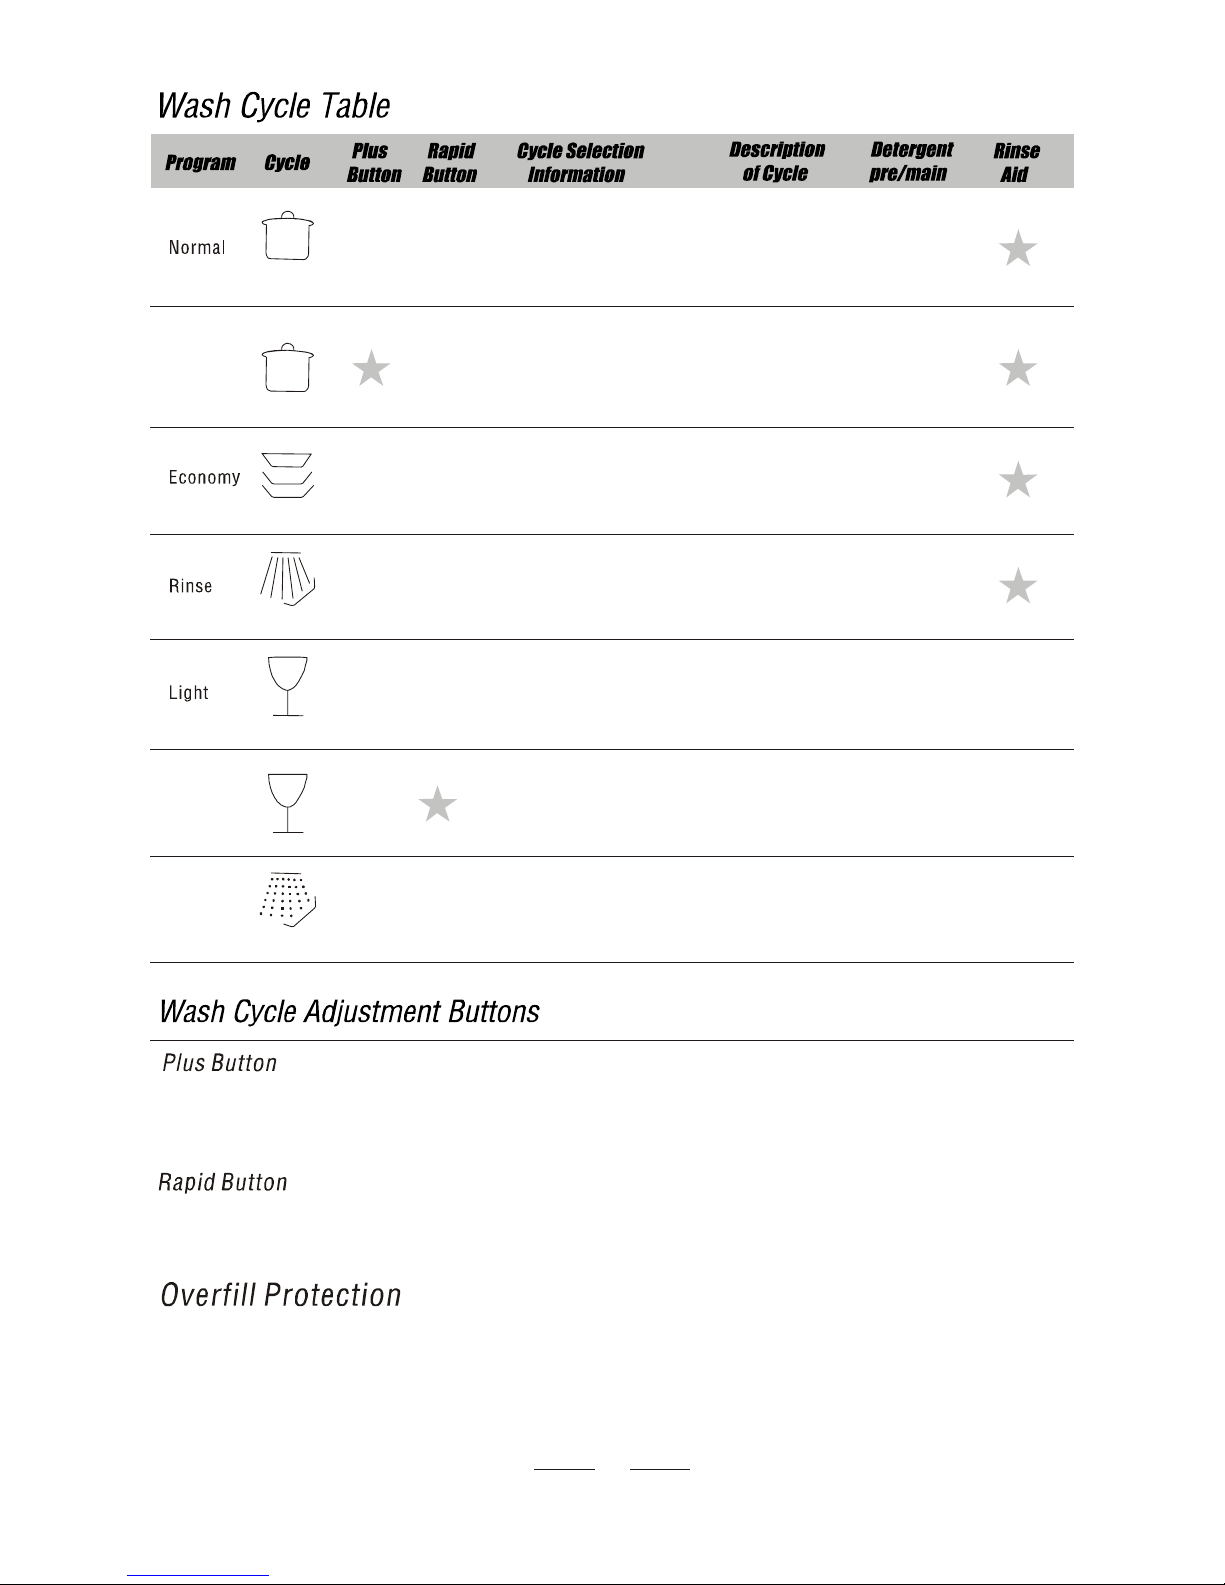
The dispenser must be refilled before the start of each wash cycle following the instructions provided in the" Wash Cycle
Table".Your dishwashers than conventional dishwashers. Generally, only one tablespoon of
detergent is needed for a normal wash load. Also, more heavily soiled items need more detergent. Always add the detergent just
before starting dishwasher, otherwise it could get damp and will not dissolve properly.
use less detergent and rinse aid
To open the dispenser, turn the cap to the "open" (left)
arrow and lift it out.
Pour the rinse aid into the dispenser, being careful not to
overfill.
Replace the cap by inserting it aligned with "open" arrow
and turning it to the closed (right) arrow.
A measured amount of rinse aid is released during the final rinse. As with detergent, the amount
of rinse aid needed for your dishes depends on the hardness of the water in your area. Too much
rinse aid can result in lather of foaming and cause cloudiness or steaks on your dishes. If the
water in your area is very soft, you may not need rinse aid. If you do,you can dilute the rinse aid
with an equal amount of water.
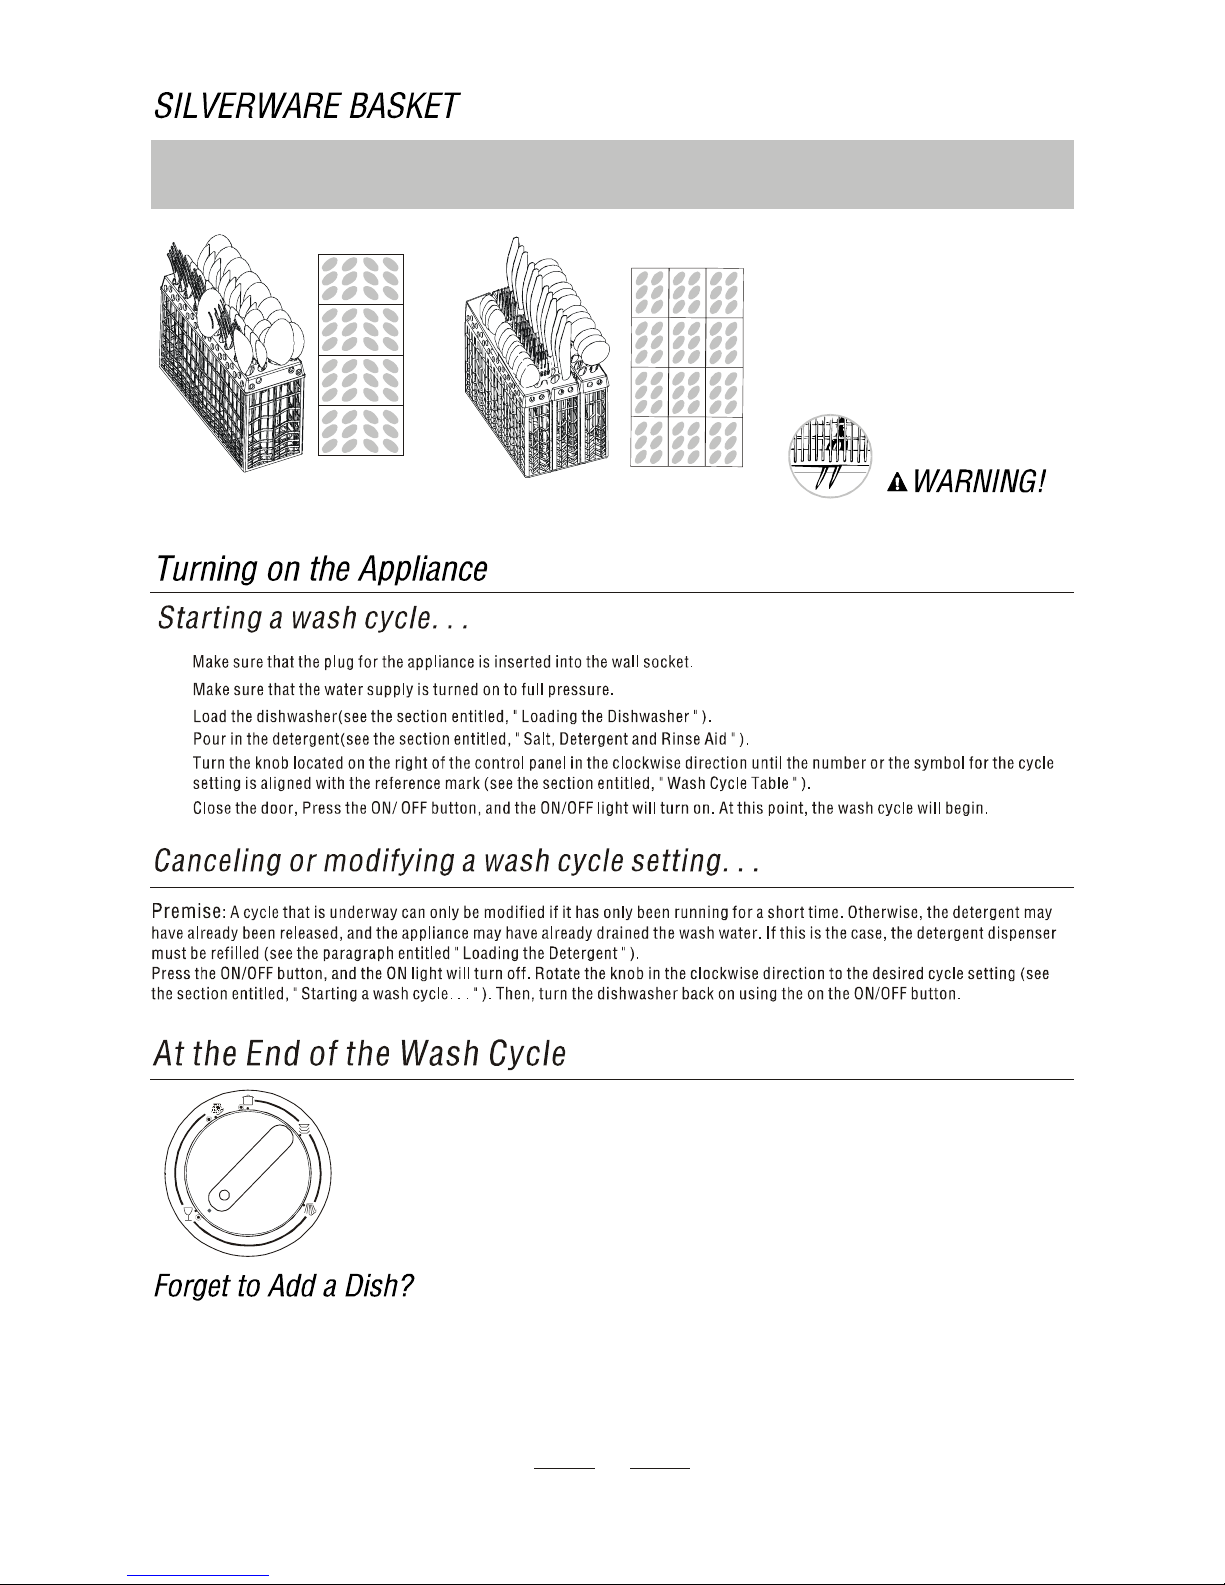
The rinse aid dispenser has six settings. Always start with the dispenser set on " 1 ". If spots and
poor drying are problems, increase the amount of rinse aid dispensed by removing the dispenser
lid and rotating the dial to "2". If the dishes still are not drying properly or are spotted, adjust the
dial to the next higher number until your dishes are spot-free. We suggest you set to "4" .
6
5
4
3
2
1

6
As the rinse aid diminishes, the size of the black dot on the rinse
aid level indicator changes, as illustrated below.
Full
3 / 4 full
1 / 2 full
1 / 4 full - Should refill to eliminate spotting
Empty
The u
pp
er rack is desi
g
ned to hold more delicate and li
g
hter dishware such as
g
lasses, coffee and tea cu
p
and saucers, as well
as plates, small bowls and shallow pans(as long as they are not too dirty).
Position the dishes and cookware so that they do not get moved by the spray of water.
The upper rack can be adjusted for height by putting wheels of different height into the rails.
We recommend that you place large items which are most difficult to clean into the lower rack: pots, pans, lids,
serving dishes and bowls, as shown in the figure to the right.
It is preferable to place serving dishes and lids on the side of the racks in order to avoid blocking the rotation of the
top spray arm.
Pots, serving bowls, etc, must always be placed top down.
Deep pots should be slanted to allow water to flow out.
The
bottom
rack
feature
fold
down
tine
rows
so
that
larger
or
more
pots
and
pans
can
be
loaded.
12
3
4
6
5
9
10
7
8
9
11
1
Cups
2
Small serving bowl
3
Large serving bowl
4
Saucers
5
6
7
Dish
Dessert dishes
2
3
5
7
6
1
4
Model: MS3WN Model: MF3WN
11
Oval platter
10
Soup plates
Dessert dishes
9
Dinner plates
11
Silverware basket
Model: MS3WN Model: MF3WN

7
Silverware should be placed in the silverware basket with handles at the bottom: If the rack has side baskets, the spoon should
be loaded individually into the appropriate slots, Especially long utensils should be placed in the horizontal position at the
front of the upper rack.
Do not let any item extend through bottom.
Teaspoons
4
Soup spoons
2
Forks
1
Serving fork
8
Serving spoon
6
Knife
5
3
Dessert spoons
7
Gravy ladle
2
3
4
5
6
1
1
1
1
1
1
4
7
8
1
1
1
6
2
2
2
2
2
2
2
2
5
5
5
5
5
5
5
5
3
3
3
6
4
4
4
4
4
4
4
3
3
3
3
3
When the knob stops turning and is aligned with a STOP mark(see figure), the cycle has finished .
Turn off the appliance using the ON/OFF button, shut off the water supply and open the door of
the dishwasher. Wait a few minutes before unloading the dish washer to avoid handling the
dishes and utensils while they are still hot and more susceptible to breakage. They will also dry
better.
A forgotten dish can be added any time before the detergent cup opens.
Pull the door handle.
Do not open the door until the water spray action stops.
Steam may rise out of the dishwasher.
Add forgotten dishes.
Close the door and push the latch to the far right.
4
3
2
1
4
4
3
8
2
6
7
4
4
4
5
4
4
4
4
1
1
1
1
1
1
1
1
1
4
4
4
1
1
1
5
5
5
5
5
5
5
5
5
5
5
2
2
2
2
2
2
2
2
2
2
2
3
3
3
3
3
3
3
3
3
3
3
6
Model: MS3WN Model: MF3WN

8
Coarse filter
Lar
g
er items, such as
p
ieces of bone or
g
lass, that could clo
g
the drain are tra
pp
ed in the
coarse filter. To remove an item cau
g
ht in this filter,
g
entl
y
s
q
ueeze the tabs on to
p
of this
filter and lift it out.
For your convenience, we have placed the drain pump and filtering system within easy reach inside the tub. There are three
components of the filtering system: the main filter, the coarse filter, and the fine filter.
2
Fine filter
This filter holds soil and food residue in the sump area and prevents it from being
redeposited on the dishes during a cycle.
Main filter
Food and soil particles trapped by this filter are pulverized by a special jet on the lower spray
arm and washed down the drain.
1
3
Never run the dishwasher without the filters in place.
Filter assembly
For best
p
erformance and results, the filter assembl
y
must be cleaned.
The filter efficientl
y
removes food
p
articles from the wash water, allowin
g
it to be
recirculated durin
g
the c
y
cle. For this reason, it is a
g
ood idea to remove the lar
g
er
food
p
articles tra
pp
ed in the filter after each wash c
y
cle b
y
rinsin
g
the semicircular
filter and cup under running water. To remove the filter assembly, pull on the cup
handle in the upward direction. The entire filter assembly should be cleaned
once a week.
To clean the coarse filter and the fine filter, use a cleanin
g
brush. Then, reassemble
the filter parts as shown in the figures left and reinsert the entire assembly in the
dishwasher, positioning in its seat and pressing downward.
The dishwasher must never be used without the filters. Improper replacement of the
filter ma
y
reduce the
p
erformance level of the a
pp
liance and dama
g
e dishes and utensils.
ATTENTION: Do not put the fine filter upside down
.

9
Never use a s
p
ra
y
cleaner to clean the door
p
anel for it could dama
g
e the door lock and electrical com
p
onents. It is not allowed
to use the abrasive agent or some paper towel becauseof the risk of scratching or leaving spots on the stainless steel surface.
To clean the ed
g
e around the door,
y
ou should use onl
y
a soft warm, dam
p
ra
g
. To
p
revent
p
enetration of water into the door lock and electrical com
p
onents, do not use a s
p
ra
y
cleaner
of any kind.
Also, never use abrasive cleaners or scouring pads on the outer surfaces because they will
scratch the finish. Some papers towels can also scratch or leave marks on the surface.
After every wash, turn off the water supply to the
appliance and leave the door slightly ajar so that
moisture and odors are not trapped inside.
Before cleaning or performing maintenance, always
remove the plug from the socket. Do not run risks.
To clean the exterior and rubber
p
arts of the dishwasher,
do not use solvents or abrasive cleaning products.
Rather, use only a cloth and warm soapy water.
To remove spots or stains from the surface of the
interior, use a cloth dampened with water and a little
white vinegar, or a cleaning product made specifically
for dishwashers.
When
y
ou
g
o on holida
y
, it is recommened that
y
ou run a
wash cycle with the dishwasher empty and then remove
the
p
lu
g
from the socket, turn off the water su
pp
l
y
and
leave the door of the a
pp
liance sli
g
htl
y
a
j
ar. This will hel
p
the seals last longer and prevent odors from forming
within the appliance.
If the a
pp
liance must be moved, tr
y
to kee
p
it in the vertical
position.If absolutely necessary, it can be positioned on
its back.
One of the factors that cause odors to form in the
dishwasher is food that remains tra
pp
ed in the seals.
Periodic cleanin
g
with a dam
p
s
p
on
g
e will
p
revent this
from occurring.
Please see the ratin
g
lable to know the ratin
g
volta
g
e and connect the dishwasher to a
pp
ro
p
riate
p
ower su
pp
l
y
,Use re
q
uired fuse
13 amp. Fused electrical supply is required-copper wire only. Time delay fuse or circuit breaker recommended and provide
separate circuit serving only this appliance. Outlet should be placed in adjacent cabinet.
After making sure that the voltage and the frequency values for the current in the home
correspond to those on the rating plate and that the electrical system is sized for the
maximum voltage on the rating plate, insert the plug into an electrical socket which is
earthed properly. If the electrical socket to which the appliance must be connected is not
appropriate for the , replace the socket,rather than using a adaptors or the like as
they could cause overheating and burns.
plug

10
Fuse blown, or the
circuit breaker acted
Replace fuse or reset circuit breaker. Remove any other
appliances sharing the same circuit with the dishwasher
Sound from soft food shredding action and detergent cup
opening.
Utensils are not secure
in the baskets or something
small has dropped into
the basket
To ensure everything is secured in the dishwasher.
Motor hums Dishwasher has not been used regularly. If you do not use it
often, remember to set it to fill and pump out every week,
which will help keep the seal moist.
Improper detergent
Add 1 gallon of cold water to the tub. Close and latch the
dishwasher, then drain out the water by slowly turning the
Dial until a drain period is reached. Repeat if necessary.
Spilled rinse agent Always wipe up rinse agent
spills immediately.
Detergent with
colorant was used
Make sure that the detergent is the one without colorant.
Rinse agent dispenser
is empty
Make sure that the rinse agent dispense is filled.
Improper program
Improper rack loading Make sure that the action of the detergent dispenser and
spray arms are not blocked by large dishware.
Extremely hard water
Low inlet
temperature
Overloading the
dishwasher
Improper loading
Old or damp powder
detergent
Empty rinse agent
dispenser
Incorrect dosage of
detergent
To remove spots from glassware:
Take out all metal utensils out of the dishwasher.
Do not add detergent.
Choose the longest cycle.
Start the dishwasher and allow it to run for about
18 to 22 minutes, then it will be in the main wash.
Open the door to pour 2 cups of white vinegar
into the bottom of the dishwasher.
Close the door and let the dishwasher complete
the cycle. If the vinegar does not work: Repeat
as above, except use 1/4 cup (60 ml)of citric acid
crystals instead of vinegar.
Some audible sounds are
normal
'
Make sure the dishwasher is turned on and the door is
closed securely.
Check that the water supply is connected properly and
the water is turned on.
Make sure the power cord is properly plugged into the
wall socket.
Power supply is not
turned on
Water pressure is low
'
Overflow The system is designed to detect an overflow. When it
does, it shuts off the circulation pump and turns on the
drain pump.
Select stronger program
Use only the special dishwasher detergent to avoid suds.
If this occurs, open the dishwasher and let suds evaporate.

11
Combination of soft
water and too much
detergent
Use less detergent if you have soft water and select a
shortest cycle to wash the glassware and to get them clean.
Tea or coffee stains using a solution of 1/2 cup of bleach and 3 cups warm water
to remove the stains by hand.
You have to wait for 20 minutes after a cycle to let the heating
elements cool down before cleaning interior; otherwise, burns
will happen.
Iron deposits in water
can cause an overall film
You have to call a water softener company for a special filter.
Hard water minerals To clean the interior, use a damp sponge with dishwasher
detergent and wear rubber gloves. Never use any other cleaner
than dishwasher detergent for the risk of foaming or suds.
Dial is not in the
position
OFF Turn the Dial to OFF position and slide the door latch to the
left.
Dishes block detergent
cups
Re-loading the dishes properly.
Normal phenomenon There is some steam coming through the vent by the door
latch during drying and water draining.
Aluminum utensils have
rubbed against dishes
Use a mild abrasive cleaner to eliminate those marks.
'
This is normal A small amount of clean water around the outlet on
the tub bottom at the back of the tub keeps the water
seal lubricated.
Be careful not to overfill the rinse aid dispenser.
Spilled rinse aid could cause oversudsing and lead
to overflowing. Wipe away any spills with a damp cloth.
Overfill dispenser or rinse
aid spills
Minimum and maximum permissible inlet water pressure : 0.04-1.00 MPa.
Specifications: RATED VOLTAGE: 230V / 50Hz
(Model:MS3WN) RATED POWER: 1930W
B RATED ENERGY EFFICIENCY
B RATED WASH PERFORMANCE
B RATED DRYING PERFORMANCE
8 PLACE SETTINGS
7 WASHING PROGRAMMES
MECHANICAL CONTROL
AUTOMATIC RINSE AGENT AND
DETERGENT DISPENSER
STAINLESS STEEL INTERIOR
ADJUSTABLE FEET
SALT / RINSE AID REFILL INDICATORS
This symbol on the product or in the instructions means that your electrical and electronic
equipment should Be disposed at the end of its life separately from your household waste. There
are separate collection systems for recycling in the EU.For more information, please contact the
local authority or your retailer where you purchased the product.
Make sure the dishwasher is level using the feet adjustment.
Dishwasher isn t level
'
Specifications: RATED VOLTAGE: 230V / 50Hz
RATED POWER: 1930W
A
(Model:MF3WN)
RATED ENERGY EFFICIENCY
B RATED WASH PERFORMANCE
B RATED DRYING PERFORMANCE
12 PLACE SETTINGS
7 WASHING PROGRAMMES
MECHANICAL CONTROL
AUTOMATIC RINSE AGENT AND
DETERGENT DISPENSER
STAINLESS STEEL INTERIOR
ADJUSTABLE FEET
SALT / RINSE AID REFILL INDICATORS
This manual suits for next models
1
Table of contents
Popular Dishwasher manuals by other brands

Bosch
Bosch SMV 55 operating instructions

montpellier
montpellier MDI800 Installation and operating instructions

Summit Professional
Summit Professional DW2433SS2ADA use and care manual

Dacor
Dacor RDW24 installation instructions

Samsung
Samsung DW80J3020UW user manual

Insignia
Insignia NS-DWR3SS1 installation guide