Maurer 51199 User manual

Termometro digitale wireless con stazione meteo
Wireless digital thermometer with weather station
Termometro digital inalambrico con estacion meteorologica
cod. 51199
Manuale istruzioni
Instruction manual
Manual de instrucciones
ITALIANO
ENGLISH
ESPAÑOL
Distribuzione
PADOVA-ITALY

2
ITALIANO
SPECIFICHE:
Caratteristiche principali
1. Icone per previsione meteo
- Le previsioni del tempo indicano l'andamento del tempo per le prossime 24 ore.
- Quattro visualizzazioni delle previsioni del tempo come segue:
- La previsione può essere accurata nelle normali condizioni di ventilazione, alcuni errori si verificano al
chiuso o in ambiente con aria condizionata.
2. Temperatura interna: intervallo da 0 a 50 ° C.
3. Umidità interna: intervallo di rilevamento dal 20% al 95%.
4. Temperatura esterna: gamma da -20 a 60 ° C.
5. Umidità esterna: intervallo di rilevamento dal 20% al 95%.
6. Il giorno della settimana può essere visualizzato nelle seguenti lingue: inglese, italiano, francese,
olandese, spagnolo, danese, tedesco.
7. Visualizzazione del livello di comfort
Sole Leggermente nuvoloso Nuvoloso Pioggia

3
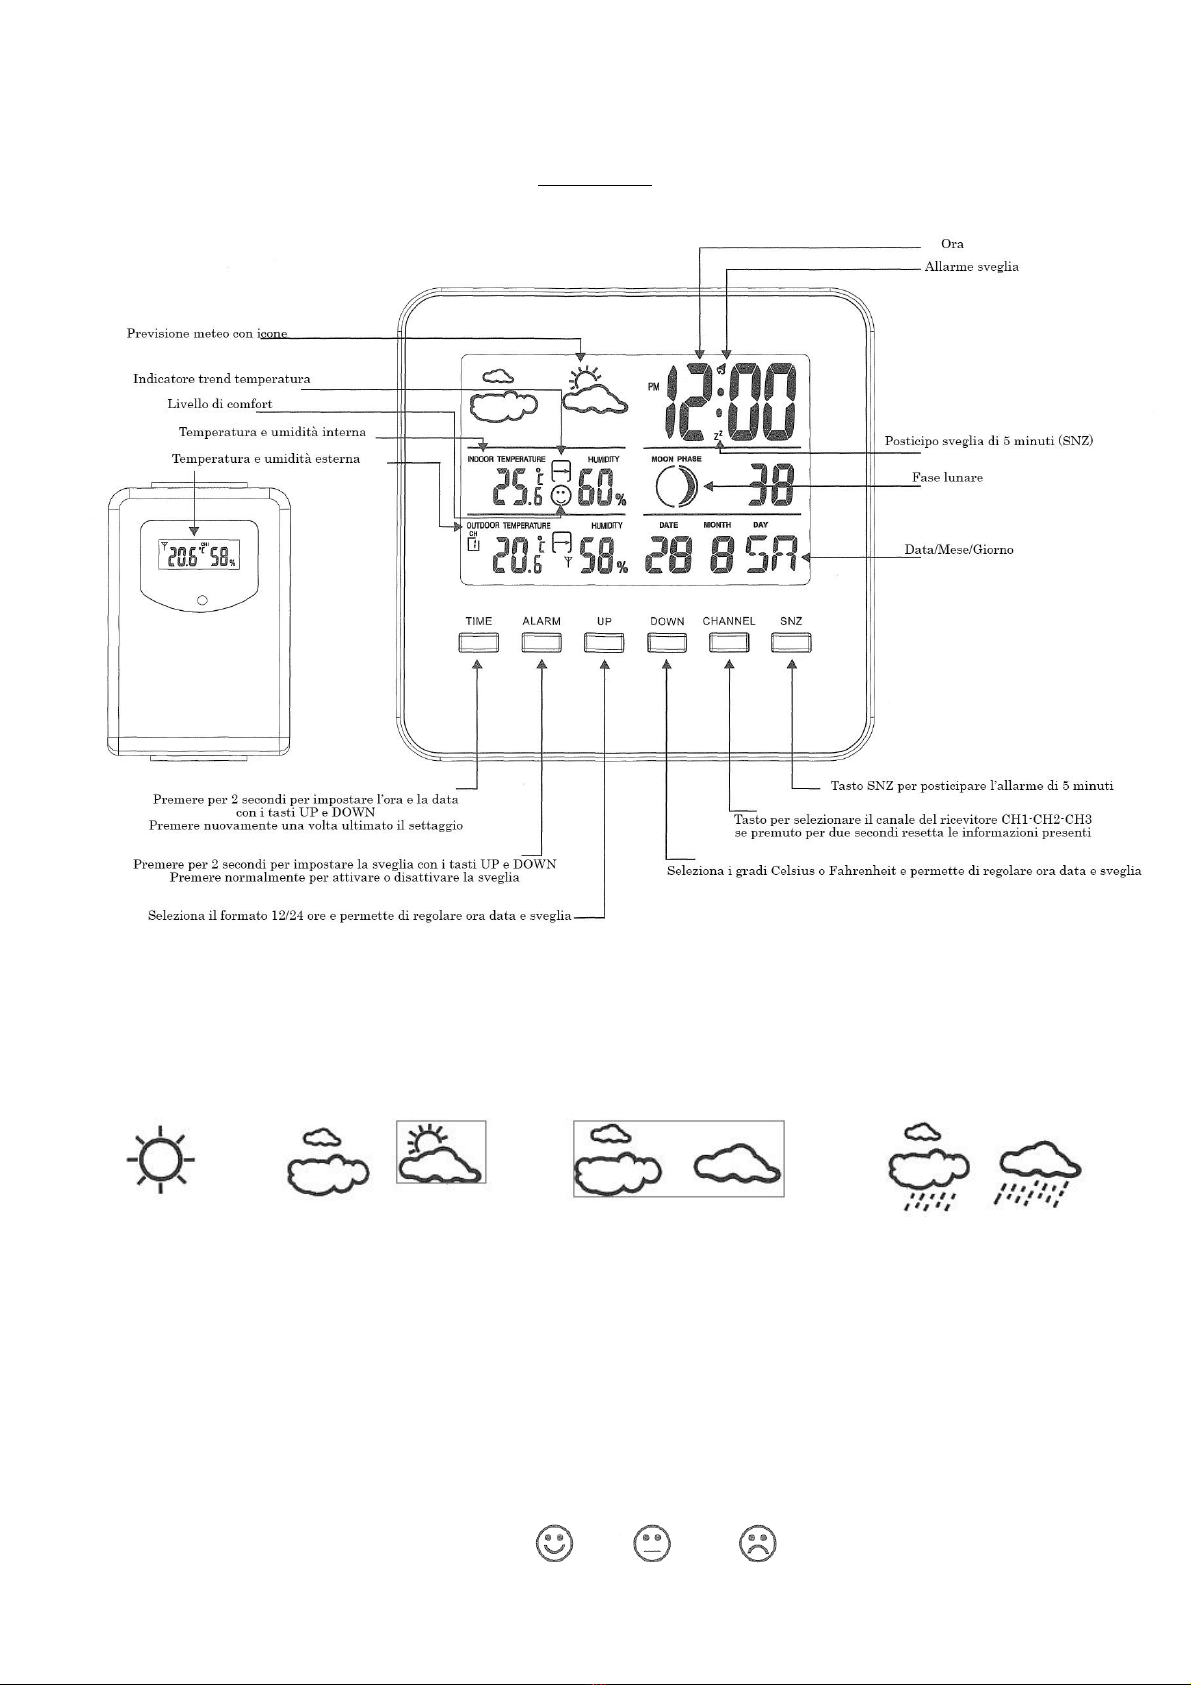
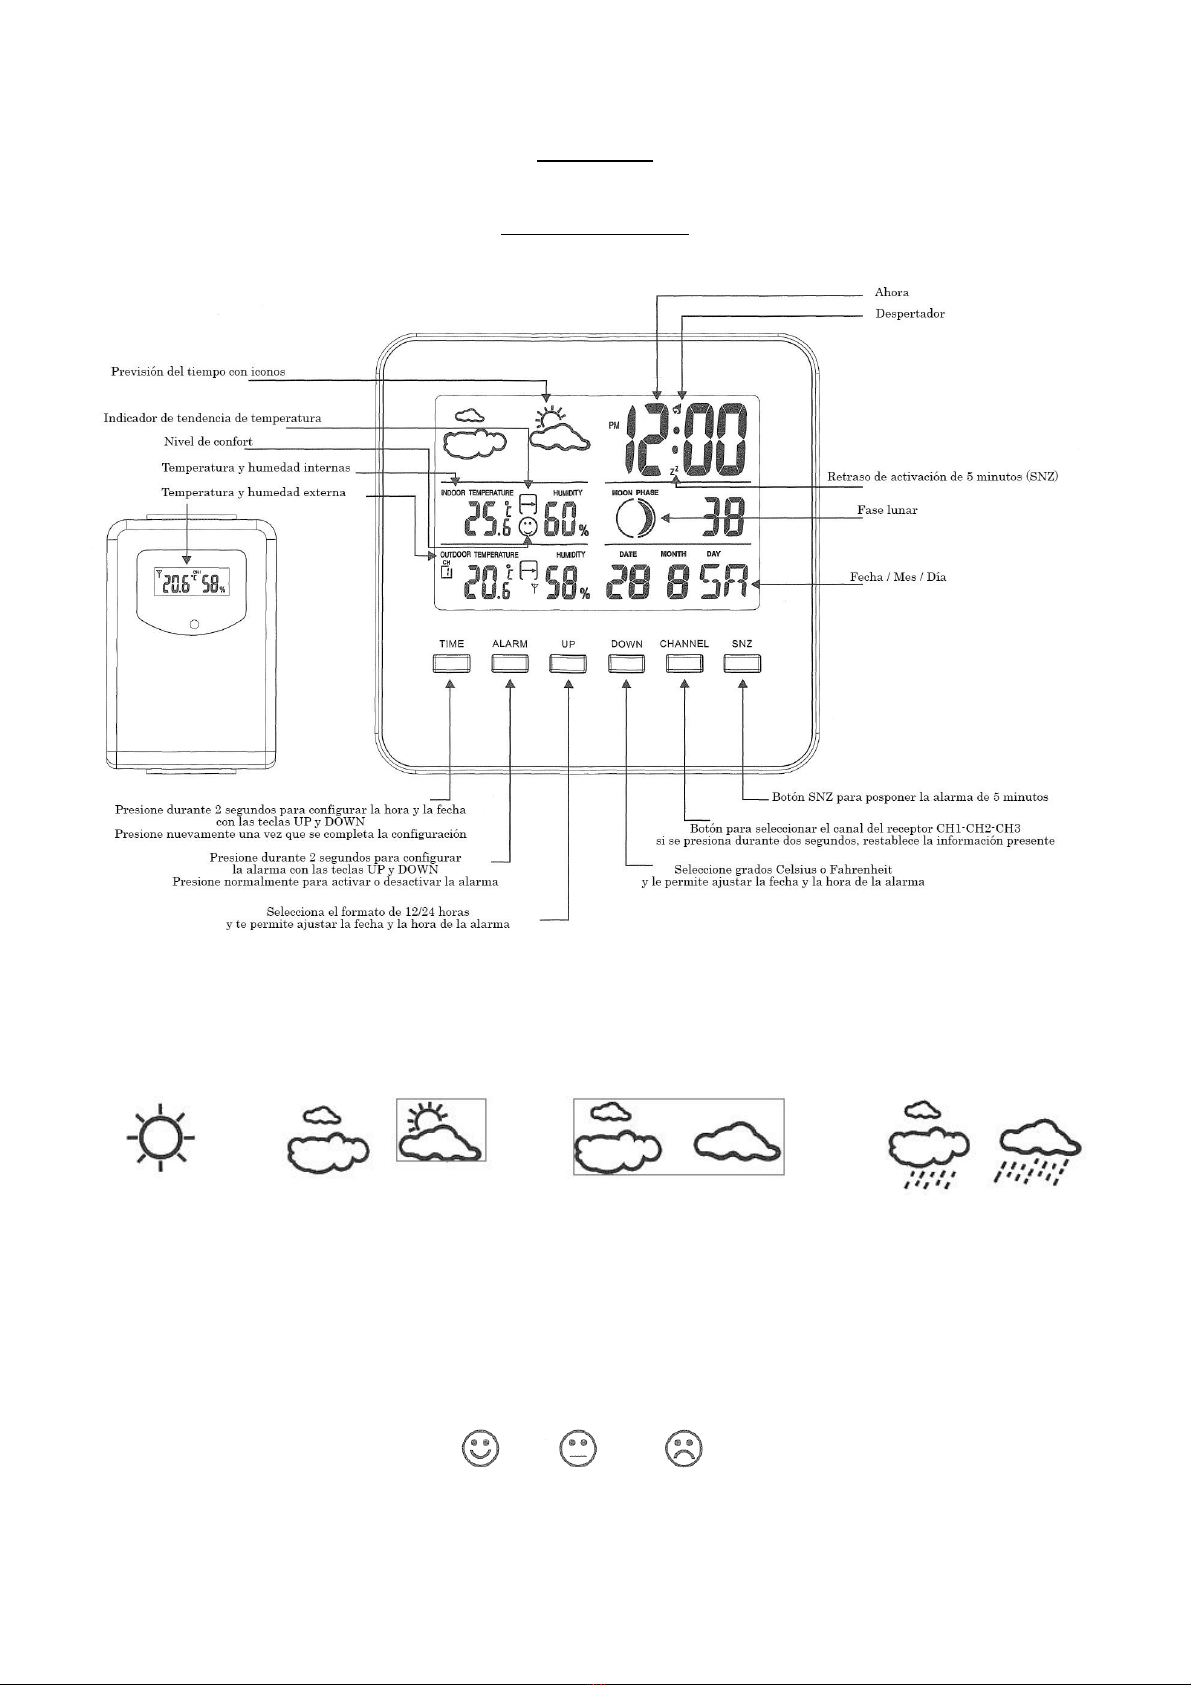
8. Allarme e posticipo allarme.
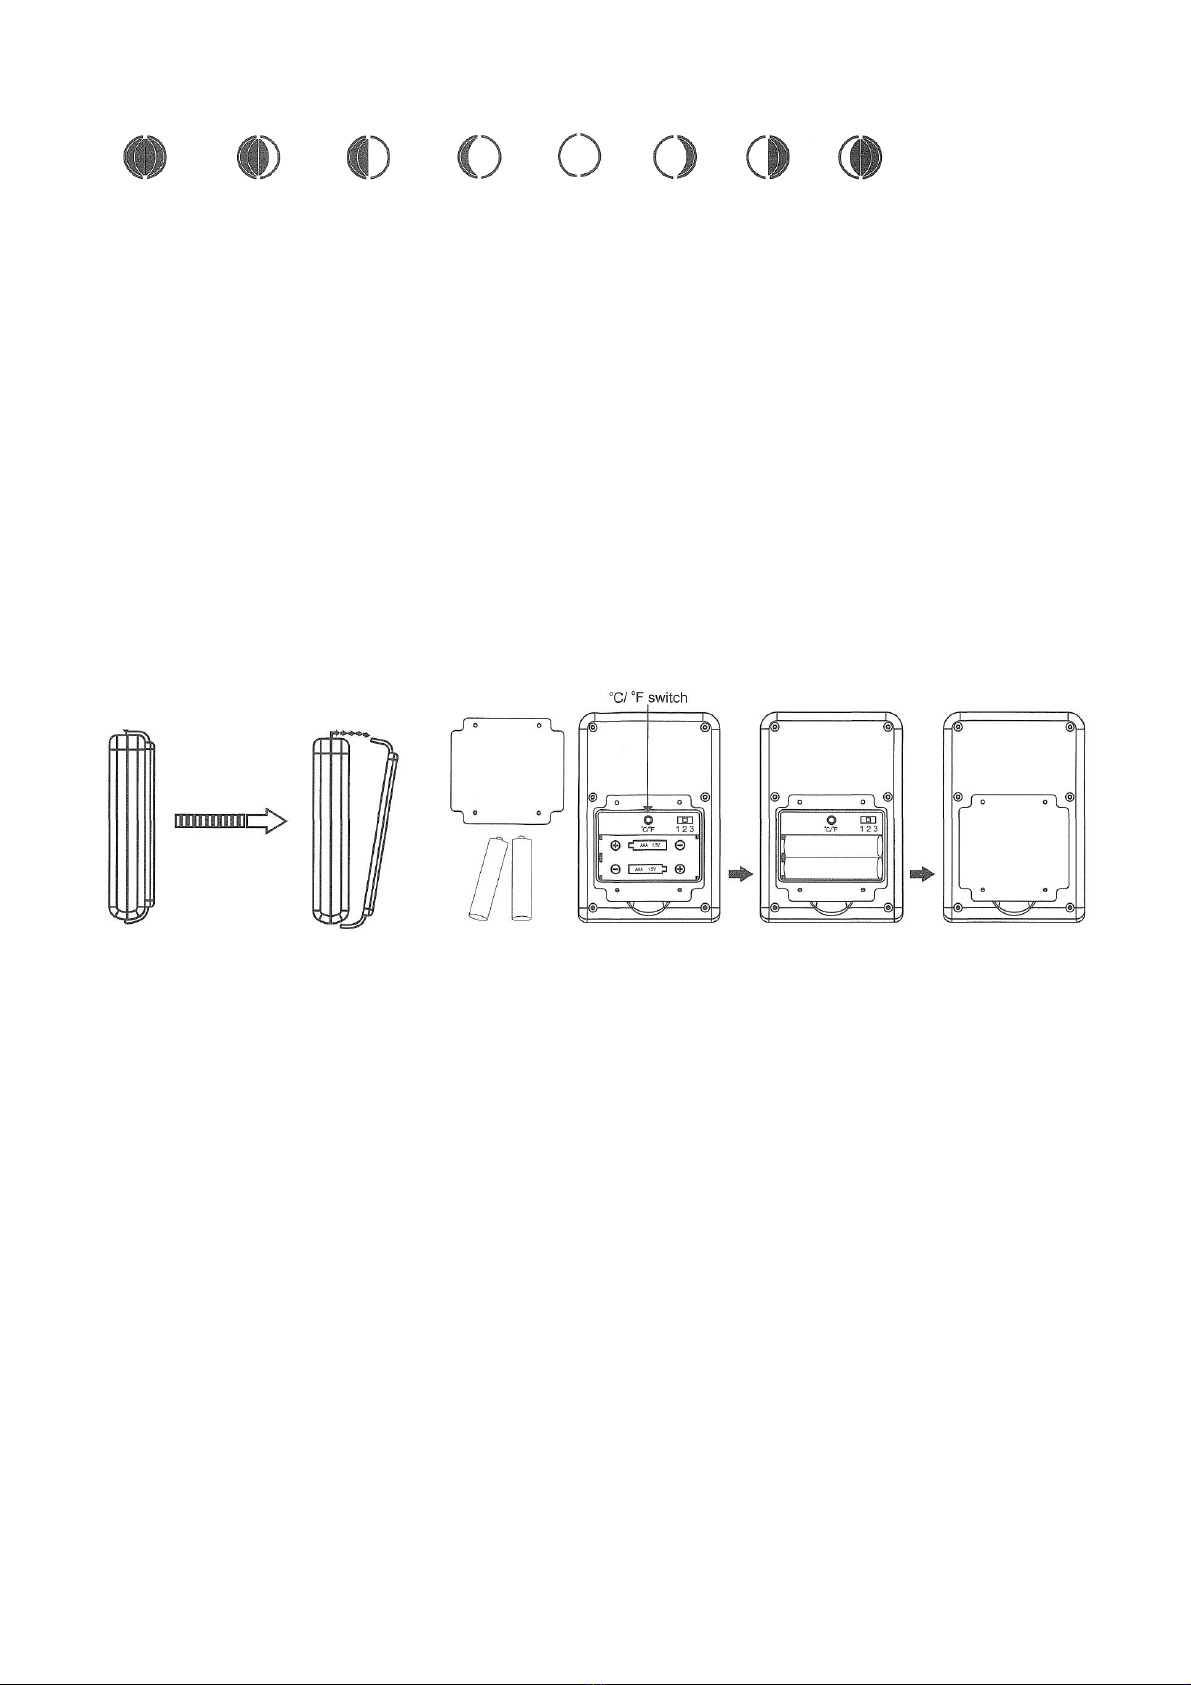
9. Fase lunare:
(1) La fase lunare cambia a seconda dell'impostazione del tempo.
(2) Il ricevitore principale mostra 8 diverse fasi lunari:
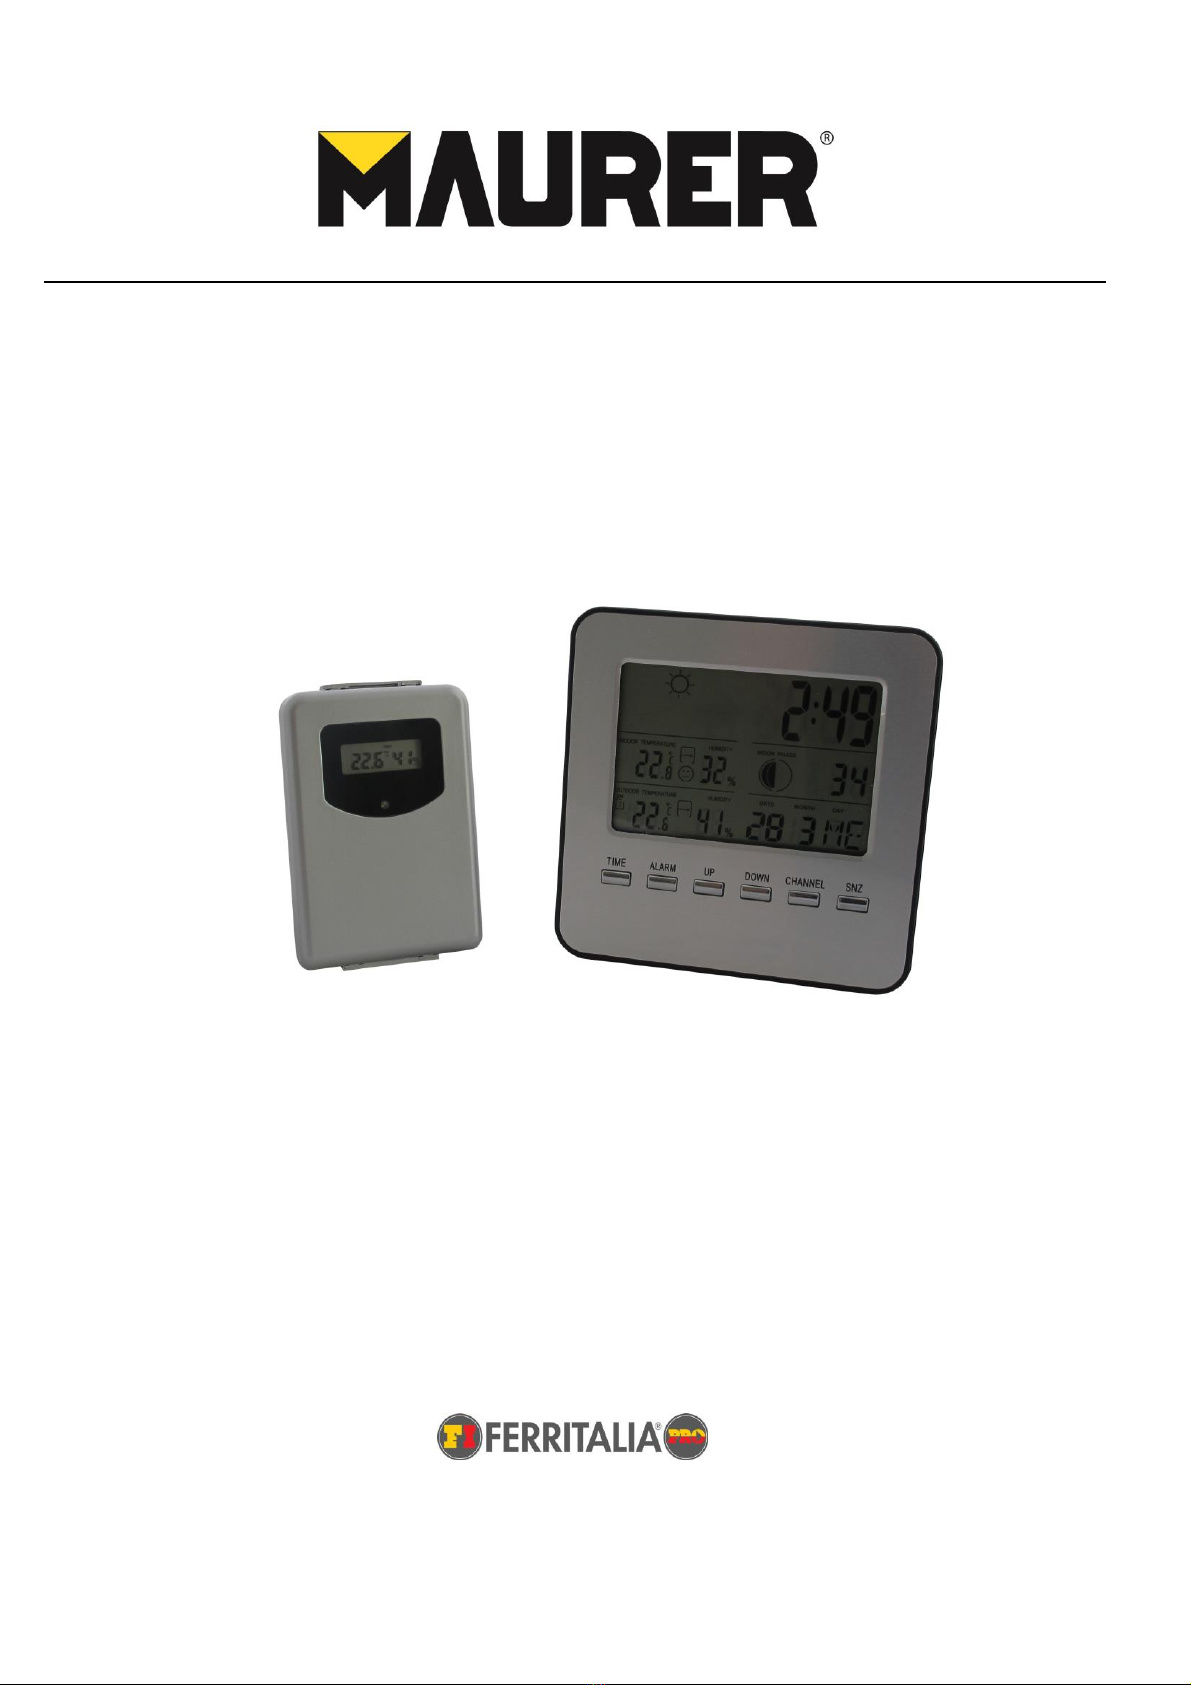
II- Istruzioni per l'uso:
Installazione delle batterie e sincronizzazione del ricevitore principale con il sensore:
1. Rimuovere il coperchio dell'alloggiamento della batteria sul retro del ricevitore principale e inserire 2
batterie AAA. Chiudere il coperchio.
2. Rimuovere la staffa di montaggio dal retro del sensore come illustrato in FIG. 2. Quindi utilizzare un
cacciavite per rimuovere il coperchio della custodia e inserire 2 batterie AAA. Prima di chiudere il
coperchio della custodia, assicurarsi che l'interruttore CH sia impostato su CH 1. Selezionare anche
se vuoi Celsius / Fahrenheit premendo il tasto "°C/°F". Quando si chiude il coperchio dell'alloggiamento
della batteria, assicurarsi che la guarnizione in gomma sia posizionata correttamente per garantire che
le batterie siano protette dalle intemperie.
3. Quando le batterie sono in posizione, le unità rileveranno automaticamente la temperatura e
l'umidità correnti dopo 3 secondi. Se la temperatura esterna non viene visualizzata, premere "CHANNEL"
fino a quando il numero "1" appare sotto l'icona "OUTDOOR CH".
Nota che le condizioni attuali si aggiorneranno ogni 60 secondi.
4. Se si desidera ripristinare le informazioni sulla temperatura corrente, premere e tenere premuto il
pulsante "CHANNEL" per 2 secondi.
Fig.2
Nota: se il display LCD è debole, sostituire la batteria.
Si consiglia di non superare i 25 metri di distanza (in campo aperto) tra il ricevitore e il sensore.
Modalità comune:
1. Premere "TIME" per 2 secondi per l'impostazione dell'ora.
2. Premere "ALARM" per attivare o disattivare la sveglia dopo aver impostato l'ora.
3. Premere "ALARM" per 2 secondi per l'impostazione dell'allarme.
4. Premere "UP" per l'interruttore di formato 12HR / 24HR.
5. Premere "DOWN" per l'interruttore Celsius / Fahrenheit.
6. Premere "CHANNEL" per cambiare canale: CH1 ~ CH2 ~ Ch3.
7. Premere "CHANNEL" per 2 secondi, cancellare tutte le informazioni presenti sui canali.
8. Premere "SNZ" per posticipare l'allarme per 5 minuti quando l'allarme è attivato.
Impostazione dell'ora:
1. Premere "TIME" per 2 secondi, i numeri lampeggiano.
2. Impostare l'ora premendo i pulsanti "SU" o "GIÙ". Quando viene visualizzata l'ora corretta, premere
"TIME". Ripeti per ORA, MINUTO, ANNO, MESE, DATA, LINGUA, si prega di notare che i simboli
lampeggianti sotto "GIORNO" si riferiscono alla lingua EN
Eclisse 1/4 nuova 1/2 nuova 3/4 nuova Piena 3/4 vecchia 1/2 vecchia 1/4 vecchia

4
(INGLESE), IT (ITALIANO), FR (FRANCESE), NE (OLANDESE), ES (SPAGNOLO), DA (DANESE) e GE (TEDESCO).
3. Premere "TIME" per confermare.
Impostazione dell'allarme:
1. Per impostare l'ora della sveglia, premere "ALARM" per 2 secondi (i numeri lampeggeranno). Per
attivare la sveglia, premere il pulsante "ALARM" (il simbolo della sveglia apparirà tra le cifre dell'ora e del
minuto).
2. Impostare l'ora della sveglia premendo i pulsanti "UP" o "DOWN" . Sequenza di impostazione: ora ~
minuto- uscita Quando si ha l'ora desiderata premere "ALARM" per uscire.
3. Per attivare l'allarme, premere una volta il tasto "ALARM" per attivare l'allarme (il simbolo della
campana apparirà accanto all'orario) e premere di nuovo "ALARM" per disattivarlo (il simbolo della
campana scompare).
4. Quando l'allarme si attiva, emetterà un segnale acustico in modo incrementale più velocemente
man mano che lo lasci. È possibile premere il tasto "SNZ" che posticipa l'allarme per 5 minuti o puoi
disattivare l'allarme premendo una volta il tasto "ALARM". L'allarme rimarrà attivato (vedere il simbolo
della campana) a meno che non si prema di nuovo il pulsante "ALARM" per disattivare l'allarme (il
simbolo della campana scompare).
Informazione sullo smaltimento delle apparecchiature elettriche ed elettroniche obsolete.
Questo simbolo sui prodotti e/o sulla documentazione di accompagnamento significa che i
prodotti elettrici ed elettronici usati non devono essere mescolati con i rifiuti domestici generici.
Per un corretto trattamento, recupero e riciclaggio, portare questi prodotti ai punti di raccolta
designati, dove verranno accettati gratuitamente. Uno smaltimento corretto di questo
prodotto contribuirà a far risparmiare preziose risorse e evitare potenziali effetti negativi sulla
salute umana e sull’ambiente, che potrebbero derivare, altrimenti, da uno smaltimento errato. Per
ulteriori dettagli contattare la propria autorità locale o il punto di raccolta più vicino.

5
ENGLISH
SPECIFICATION:
I Main Features
1. Weather forecast:
- Weather forecast indicates the weather trend for next 24 hours.
- Four weather forecast displays:
- Forecast can be accurate under the normal ventilated conditions, some error exists when indoor or in
air-conditioned environment.
2. Indoor temperature: Range of 0 octo 50°C.
3. Indoor humidity: Range of detection 20% to 95%.
4. Outdoor temperature: Range of -20 acto 60°C.
5. Outdoor humidity: Range of detection 20% to 95%.
6. Week Day can be displayed in ?languages: English, Italian, French, Dutch, Spanish, Danish, German.
7. Comfort level display:
8. Alarm and Snooze.
9. Moon Phase:
(1 )Moon phase changes by time setting.
(2)The main receiver displays 8 different moon phases:
Sunny Slightly cloudy Cloudy Rainy

6
II Operating instructions:
Installing batteries and syncing main receiver with sensor:
1. Remove battery housing cover on the back of the main receiver and insert 2 x AAA batteries.
Replace housing cover.
2. Remove mounting bracket from the back of the sensor as illustrated in FIG. 2. Then use a screw driver
to remove battery housing cover and insert 2 x AAA batteries. Before replacing housing cover, ensure
CH switch is set to CH 1. Also select whether you would like Celsius/Fahrenheit by pressing the "°C/°F"
button. When replacing battery housing cover, ensure that the rubber seal is correctly in position to
ensure batteries are protected from the weather.
3. When batteries are in place, the units will automatically detect the current temperature and humidity
after 3 seconds. If outdoor temperature is not displayed, press "CHANNEL" until the number "1" appears
below the "OUTDOOR CH" icon.
Note the current conditions will update every 60 seconds.
4. If you want to reset current temperature information press and hold the "CHANNEL" button for 2
seconds.
Fig.2
Note: If faint LCD display please replace the battery.
It is advisable not to exceed 25 meters distance (in open field) between the receiver and the sensor.
Common mode:
1. Press "TIME" for 2 seconds for time setting.
2. Press "ALARM" to turn on or off alarm after you set the time.
3. Press "ALARM" for 2 seconds for alarm setting.
4. Press "UP" for 12HR/24HR format switch.
5. Press "DOWN" for Celsius/Fahrenheit switch.
6. Press "CHANNEL" to change channel: CH1 ~ CH2 ~ Ch3.
7. Press "CHANNEL" for 2 seconds, clear all the channels' present information.
8. Press "SNZ" to snooze the alarm for 5 minutes when alarm is activated.
Setting the time:
1. Press "TIME" for 2 seconds, the numbers will flash.
2. Set hour by pressing the "UP" or "DOWN" buttons. When correct hour appears, press "TIME". Repeat for
HOUR,
MINUTE, YEAR, MONTH, DATE, LANGUAGE, Please note the flashing symbols under "DAY" refer to the
language EN
(ENGLISH), IT(ITALIAN), FR(FRENCH),NE(DUTCH),ES(SPANISH), DA(DANISH) and GE(GERMAN).
3. Press "TIME" to confirm.
Eclipse 1/4 new 1/2 new 3/4 new full 3/4 old 1/2 old 1/4 old

7
Setting the alarm:
1. To set alarm time, press "ALARM" for 2 seconds (the numbers will flash). To turn on alarm, press the
"ALARM" button (an
alarm bell symbol will appear in between hour and minute digits).
2. Set alarm time by pressing "UP" or DOWN" buttons. Setting sequence: hour~ minute- exit. When you
have the
desired time press "ALARM" to exit.
3. To activate the alarm, press the "ALARM" button once to activate the alarm (bell symbol will appear
next to the time) and
press "ALARM" again to deactivate it (bell symbol will disappear).
4. When the alarm goes off, it will beep incrementally faster the longer you leave it. You may press the
"SNZ" button to
snooze the alarm for 5 minutes or you may turn off the alarm by pressing the "ALARM" button once. The
alarm will stay
activated (see bell symbol) unless you press the "ALARM" button again to turn off the alarm (bell symbol
disappears).
Information on disposal for users of waste electrical & electronic equipment.
This symbol on the products and/or accompanying documents means that used electrical and
electronic products should not be mixed with general household waste. For proper treatment,
recovery and recycling, please take these products to designated collection points, where
they will be accepted on a free of charge basis. Disposing of these products correctly will help
to save valuable resources and prevent any potential negative effects on human health and
the environment which could otherwise arise from inappropriate waste handling. Please contact your
local authority for further details of your nearest designated collection point.

8
OPERATION:
ESPAÑOL
ESPECIFICACIONES:
I - Características principales
1. Previsión del tiempo:
- Previsión del tiempo para la tendencia del clima durante las próximas 24 horas.
- Cuatro pantallas de pronóstico del tiempo:
Soleado Ligeramente nublado Nublado Lluvioso
- El pronóstico puede ser bajo condiciones ventiladas normales, existe algún error cuando está bajo
techo o con aire acondicionado medio ambiente.
2. Temperatura interior: Rango de 0 octo 50 ° C.
3. Humedad interior: rango de detección del 20% al 95%.
4. Temperaturas exteriores: rango de -20 a 60 ° C.
5. Humedad exterior: rango de detección del 20% al 95%.
6. Week Day se puede mostrar en Idiomas: inglés, italiano, francés, holandés, español, danés, alemán.
7. Visualización del nivel de confort:

9
8. Alarma y
9. Fase lunar:
- La fase lunar cambia por el ajuste del tiempo.
- El receptor principal muestra 8 fases lunares diferentes:
.
II. Instrucciones de operación:
Instalar las baterías y sincronizar el receptor principal con el sensor:
1. Retire la cubierta de la carcasa de la batería en la parte posterior del receptor principal e inserte 2
pilas AAA. Reemplace la tapa de la carcasa
2. Retire el soporte de montaje de la parte posterior del sensor como se ilustra en la FIG. 2. Luego use un
destornillador para quitar la batería tapa de la carcasa e inserte 2 pilas AAA. Antes de reemplazar la
cubierta de la carcasa, asegúrese de que el interruptor CH esté en CH 1. También seleccione
si desea Celsius / Fahrenheit presionando el botón "oCtF". Cuando reemplace la cubierta de la carcasa
de la batería, asegúrese. El sello de goma está en posición para garantizar que las baterías estén
protegidas del clima.
3. Cuando las baterías estén en su lugar, las unidades detectarán automáticamente la temperatura y
humedad actual después de 3 segundos. si la temperatura exterior no se visualiza, presione "CHANNEL"
hasta que aparezca el número "1" debajo del ícono "OUTDOOR CH".
Tenga en cuenta que las condiciones actuales se actualizarán cada 60 segundos.
4. Si desea restablecer la información de temperatura actual, presione el botón "CHANNEL" durante 2
segundos.
Fig.2
Notas: Si la pantalla LCD es débil, reemplace la batería.
Se recomienda no exceder los 25 metros de distancia (en campo abierto) entre el receptor y el sensor.
Modo común:
1. Presione "TIME" durante 2 segundos para configurar la hora.
2. Presione "ALARM" para encender o apagar después de configurar la hora.
3. Presione "ALARM" durante 2 segundos para configurar la alarma.
4. Presione "UP" para el interruptor de formato 12HR / 24HR.
5. Presione "DOWN" para el interruptor Celsius / Fahrenheit.
6. Presione "CHANNEL" para cambiar el canal: CH1 ~ CH2 ~ Ch3.
7. Presione "CHANNEL" durante 2 segundos, borre la información actual de todos los canales.
8. Presione "SNZ" para posponer la alarma durante 5 minutos cuando la alarma esté activada.
Configurando el tiempo:
1. Presione "TIME" durante 2 segundos, los números parpadearán.
2. Configure la hora presionando los botones "UP" o "DOWN". Cuando aparezca la hora correcta,
Eclipse 1/4 nuevo 1/2 nuevo 3/4 nuevo llena 3/4 vieja 1/2 vieja 1/4 vieja

10
presione "HORA". Repita por HORA,
MINUTO, AÑO, MES, FECHA, IDIOMA, Tenga en cuenta que los símbolos que parpadean debajo de
"DÍA" se refieren al idioma EN
(INGLÉS), IT (ITALIANO), FR (FRANCÉS), NE (DUTCH), ES (SPANISH), DA (DANISH) y GE (GERMAN).
3. Presione "TIME" para confirmar.
Configurar la alarma:
1. Para configurar la hora de la alarma, presione "ALARMA" durante 2 segundos (los números
parpadearán). Para activar la alarma, presione el botón "ALARMA" (una
el símbolo de alarma aparecerá entre los dígitos de las horas y los minutos).
2. Configure la hora de la alarma presionando los botones "ARRIBA" o "ABAJO" Secuencia de
configuración: hora ~ minuto - salir Cuando tenga la
tiempo deseado presione "ALARMA" para salir.
3. Para activar la alarma, presione el botón "ALARM" una vez para activar la alarma
presione "ALARM" nuevamente para desactivarlo (el símbolo de campana desaparecerá).
4. Cuando la alarma suena, sonará incrementalmente más rápido cuanto más la deje. Puede
presionar el botón "SNZ" para
posponga la alarma durante 5 minutos o puede apagar la alarma presionando el botón "ALARMA" una
vez. La alarma se mantendrá
activado (ver símbolo de campana) a menos que presione el botón "ALARMA" nuevamente para
apagar la alarma (el símbolo de campana desaparece).
Información a disposición del usuario sobre residuos eléctricos y electrónicos.
Este símbolo sobre el producto y/o documentos que lo acompañan significa que los
productos eléctricos y electrónicos usados no deben mezclarse con los residuos domésticos
generales. Por favor, lleve estos productos a los puntos de recogida designados donde se
admitirán sin coste alguno para su correcto tratamiento, recuperación y reciclado.
La eliminación correcta de estos productos ayudará a ahorrar recursos valiosos y a prevenir
cualquier efecto potencial negativo sobre la salud o el medio ambiente, que podría surgir de la
manipulación inadecuada de los residuos. Por favor, contacte con las autoridades locales para mayor
información sobre su punto de recogida más cercano.
FERRITALIA Società Cooperativa. - Via Longhin, 71 - 35129 Padova –ITALY
www.ferritalia.it
Table of contents
Languages:
Popular Weather Station manuals by other brands

La Crosse Technology
La Crosse Technology WS-7394U instruction manual

Auriol
Auriol AHFL 433 B2 user manual

La Crosse Technology
La Crosse Technology WS-9049 instruction manual

Somogyi
Somogyi HC 11 instruction manual

P3 International
P3 International E 9300 operating instructions

Clas Ohlson
Clas Ohlson ws590h user manual