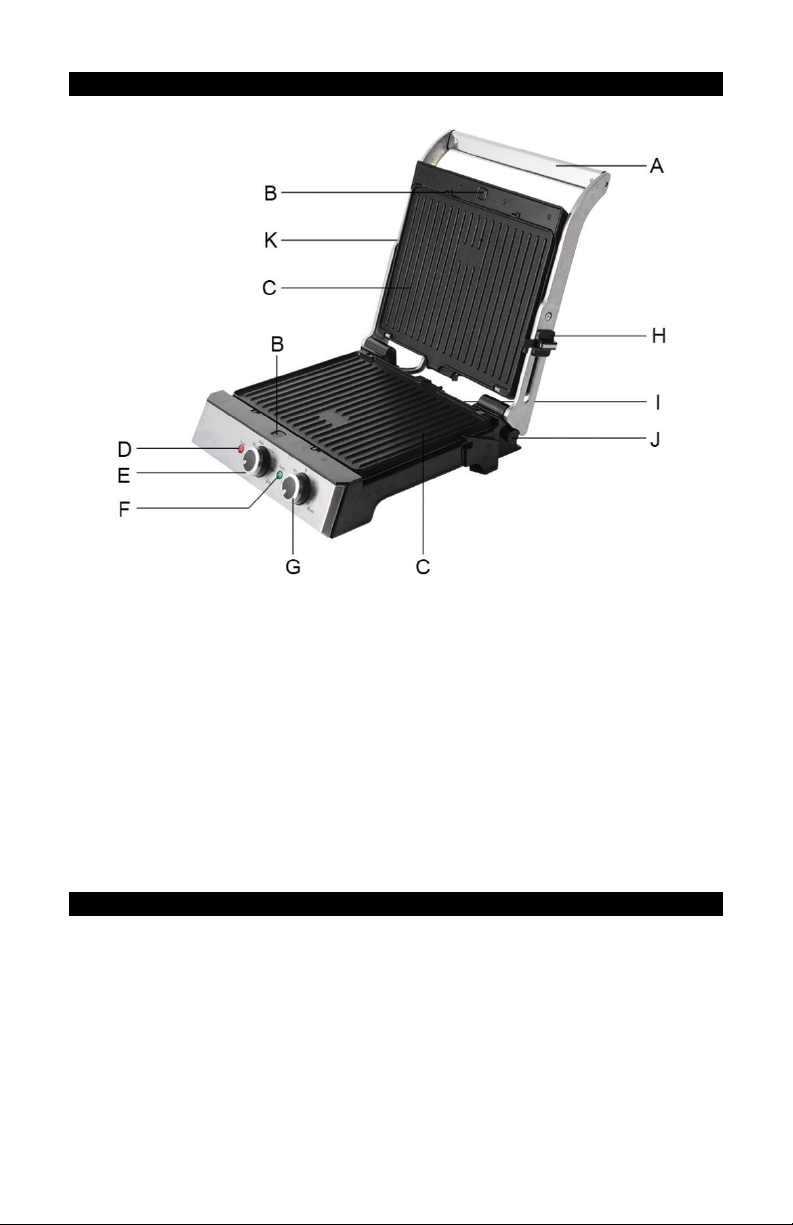
IMPORTANT SAFEGUARDS
The Elite Brand takes consumer safety very seriously. Products are designed and
manufactured with our valued consumers' safety in mind. Additionally, we ask that you
exercise a level of caution when using any electrical appliance by following all
instructions and important safeguards.
READ ALL INSTRUCTIONS BEFORE USE AND SAVE FOR FUTURE REFERENCE
1. Use only for household.
2. Do not touch hot surfaces. Use handle or knobs.
3. To protect against risk of electric shock, do not immerse the cord, plug or cooking
unit in water or any other liquid.
4. Close supervision is necessary when any appliance is used by or near children.
5. Unplug from outlet when not in use and before cleaning. Allow to cool before
putting on or taking off parts, and before cleaning appliance.
6. Do not operate any appliance with a damaged has malfunctioned or has been
damaged in any manner. In order to avoid the risk of an electric shock, never try to
repair the Grill Toaster yourself. Take it to an authorized service station for
examination and repair. An incorrect reassembly could present a risk of electric
shock when the Grill Toaster is used.
7. The use of accessory attachments not recommended by the manufacturer may
result in fire, electrical shock, or risk of injury to persons.
8. Do not use outdoors or for commercial purposes.
9. Do not let power cord hang over the edge of the table or counter, or touch hot
surfaces.
10. Do not put the unit on its side during operation.
11. Remove all the covering and marketing materials from the unit before the first use.
12. Make sure the mains voltage corresponds to the values stated on the product’s
rating plate.
13. The unit reaches high temperatures during operation and remains hot for some
time after being turned off. Do not touch the hot surfaces.
14. The unit may only be installed on a stable surface resistant to high temperature,
away from other heat sources, such as heating bodies, ovens, etc. Do not expose the
unit to direct sunlight or moisture.
15. Do not place on or near a hot gas or electric burner or heated oven.
16. Unplug the unit when finished using.
17. Do not use appliance for other than intended use.
18. Do not intend to operate by means of an external timer or separate remote-control
system.
19. Never operate the appliance with wet hands.
20. Do not immerse the power cord, plug, or appliance in water or any other liquid.
21. Use manufacturer-recommended accessories only.
22. Extreme caution must be exercised when moving an appliance containing hot oil or
other hot liquids.
23. Never carry the unit during operation or while hot. Do not carry the unit by the
power cord.
24. Never pull the cord to disconnect the plug from the socket; hold the plug instead.
25. The appliance is not intended for and should not be accessible to children or people
with reduced capabilities.
26. Keep the appliance and its cord out of reach of children less than 8 years.
27. The temperature of accessible surfaces may be high when the appliance is operating.
Questions? We're here to help! Visit: www.maxi-matic.com for support on this product.