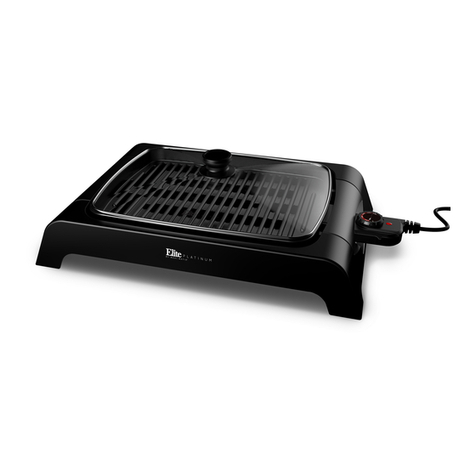
Maxi-matic EliteGourment EGL-3450 User manual

ELECTRIC SMOKELESS
INDOOR GRILL
INSTRUCTION MANUAL
Before operating your new appliance, please read all instructions carefully and keep for
future reference.
MODEL: EGL-3450
Questions? Elite's customer service team is ready to help.
Call us toll-free at 800-365-6133 ext. 120/107/105.
For more Elite products, visit us at www.maxi-matic.com.
Recipes are included in this manual.


TABLE OF CONTENTS
IMPORTANT SAFEGUARDS
SHORT CORD PURPOSE
POLARIZED PLUG
PARTS IDENTIFICATION
BEFORE FIRST USE
HOW TO USE
CLEANING AND MAINTENANCE
COOKING REFERENCE CHART
RECIPES
WARRANTY POLICY
RETURN INSTRUCTIONS
IMPORTANTES MEDIDAS DE SEGURIDAD
EL USO DE UN CORDÓN CORTO
ENCHÚFE POLARIZADO
DESCRIPCION DE PARTES
ANTES DEL PRIMER USO
COMO USAR
MANTENIMIENTO Y LIMPIEZA
PÓLIZA DE GARANTÍA
INSTRUCCIONES DE DEVOLUCIÓN
2
3
3
4
5
5
6
7
8
11
12
13
14
14
15
16
16
18
19
20

2 Questions? We’re here to help!
Visit: www.maxi-matic.com for support on this product.
IMPORTANT SAFEGUARDS
The Elite Brand takes consumer safety very seriously. Products are designed and
manufactured with our valued consumers’ safety in mind. Additionally, we ask that
you exercise a level of caution when using any electrical appliance by following all
instructions and important safeguards.
READ ALL INSTRUCTIONS BEFORE USE AND SAVE FOR FUTURE
REFERENCE
WARNING: When using electrical appliances, basic safety precautions should
always be followed as below:
1. Do not touch hot surfaces. Use
handles or knobs.
2. To protect against electrical shock, do
not immerse cord, plug or thermostat
control switch itself in water or any
other liquids.
3. Wash all removable accessories
before using for the rst time.
4. Close supervision is necessary when
appliance is used by or near children.
It is not recommended for children to
operate this appliance.
5. Unplug from outlet when not in use
and before cleaning. Allow the
appliance to cool before putting
on or taking off parts and before
cleaning.
6. Do not operate any appliance with
a damaged cord or plug or after the
appliance malfunctions or has been
damaged in any manner. Return the
appliance to the nearest authorized
service facility for examination, repair
or adjustment.
7. The use of accessory attachments
not recommended by the appliance
manufacturer may cause injuries.
8. Do not use outdoors.
9. Do not operate the grill without the
drip pan in place.
10. Do not let cord hang over edge of
table or counter or touch hot
surfaces.
11. Do not place on or near a hot gas or
electric stove, or in a heated oven.
12. Always attach the Thermostat Control
Switch to the appliance rst, and then
plug cord into the wall outlet. To
disconnect, turn all controls to the
OFF position, then remove the plug
from the wall outlet.
13. Do not use the appliance for other
than its intended use.
14. Oversized foods or metal utensils
must not be inserted in the appliance
as they may cause a re or risk of
electrical shock.
15. A re may occur if the appliance is
covered or touching ammable
material including curtains, draperies,
walls and the like when in operation.
16. Do not clean with metal scouring
pads. Pieces can break off the pad
and touch electrical parts, involving a
risk of electrical shock.
17. Do not store any materials other than
manufacturers recommended
accessories on this unit when not in
use.
18. Do not place any of the following
materials on the unit: Paper,
cardboard, plastic and the like.
19. Some countertop and table surfaces,
such as Corian®, wood and/or
laminates, are not designed to
withstand prolonged heat generated
by certain appliances. It is
recommended by countertop
manufacturers that a hot pad or
trivet be placed under your appliance
to prevent possible damage to the
surface.

3Questions? We’re here to help!
Visit: www.maxi-matic.com for support on this product.
SAVE THESE INSTRUCTIONS.
THIS PRODUCT IS FOR
HOUSEHOLD USE ONLY.
SHORT CORD PURPOSE
POLARIZED PLUG
If the plug still does not t, contact a
qualied electrician. Never use the plug
with an extension cord unless the plug
can be fully inserted into the extension
cord. Do not alter the plug of the
product or any extension cord being
used with this product. Do not attempt
to defeat the safety purpose of the
polarized plug.
If this appliance is equipped with a
polarized plug (one blade is wider than
the other), please follow the below
instructions:
To reduce the risk of electrical shock,
this plug is intended to t into a
polarized outlet only one way. If you
are unable to t the plug into the
electrical outlet, try reversing the plug.
If an extension cord is used: (1) the
marked electrical rating of the extension
cord should be at least as great as the
electrical rating of the product; (2) the
extension cord should be arranged so
that it will not drape over the counter
top or tabletop where it can
unintentionally be pulled on or tripped
over by children or pets.
Note: A short power cord is provided
to reduce the risk of personal injury
resulting from becoming entangled in or
tripping over a long cord.
Longer power-supply cords or
extension cords are available and
may be used if care is exercised in
their use.

4 Questions? We’re here to help!
Visit: www.maxi-matic.com for support on this product.
PARTS IDENTIFICATION
A. Cool-Touch Grill Handles
B. Non-Stick Grilling Surface
C. Thermostat Control Switch
D. Power Cord
E. Cool-Touch Grill Base
* Includes a Removable Drip Pan (Not pictured)
TO ASSEMBLE:
CAUTION: DO NOT ASSEMBLE WHILE THE UNIT IS PLUGGED IN OR STILL HOT!
1. First, place the Drip Pan inside of the Cool-Touch Grill Base.
2. Insert the Thermostat Control Switch onto the Non-Stick Grilling Surface. (See
“OPERATING INSTRUCTIONS” for directions)
3. Place the Non-Stick Grilling Surface onto the Cool-Touch Grill Base.
FEATURES:
Your new Electric Smokeless Indoor Grill has many unique features. Please read all
instructions before operating your grill so each of the features will function to its
fullest and give you wonderful years of satisfactory cooking.
• 12” Non-stick Grilling Surface: Easily removed from the unit for easy cleaning.
• Grill a Variety of Meals: Cook steaks, hamburgers, sh, chicken, and
vegetables faster and easier.
• Cool-Touch Grill Handles & Grill Base: Makes handling the unit safer and
easier.
• Removable Drip Pan: That is removable, dishwasher safe, features a non-stick
coating and makes cleaning easy and convenient.
• Thermostat Control Switch: Adjustable temperature control to meet all your
grilling needs.

5Questions? We’re here to help!
Visit: www.maxi-matic.com for support on this product.
BEFORE FIRST USE
• Clean all parts (except the Thermostat Control Switch)
before using for the rst time. (Refer to “CLEANING
INSTRUCTIONS” section)
• Grill is fully immersible with the Thermostat Control
Switch removed.
• NEVER use abrasive cleaners or scouring pads on the
non-stick surface as they might damage the coating.
NOTE:
The initial 15 minutes
of use may result
in minimal smell
and smoke. This is
normal and harmless
and comes from the
protective substance
applied to the heating
elements during
manufacturing.
CAUTION:
Unplug from the
outlet when not in
use. Let all parts cool
completely before
cleaning.
-
HOW TO USE
PREPARE THE GRILL FOR COOKING:
• Prepare the grill by adding enough water to the Drip Pan
so it covers the entire bottom surface to reduce smoking
during cooking and make clean up easier.
CONNECTING THERMOSTAT CONTROL SWITCH:
• Make sure the Thermostat Control Switch is set to OFF, and
that it is NOT plugged into an electrical outlet. Also, ensure
that the unit and its parts are not hot.
• Insert the extended rod piece on the Thermostat Control
Switch into the receptacle on the side of the Non-Stick
Grilling Surface until you feel it lock into place.
• Plug the cord into 120V AC electrical outlet.
SETTING THE TEMPERATURE:
• Set to desired temperature.
• When setting the temperature, the indicator light on the
Thermostat Control Switch will light up indicating that the
power is now ON. When the desired temperature setting
has been reached, the light will shut off—this does not
mean the grill is OFF.
COOKING:
• Coat the Non-Stick Grilling Surface with cooking spray or
oil.
• Let the grill preheat for approximately 5 minutes or until
it reaches your desired temperature (when the indicator
light shuts off).
• Place desired food onto the grill to cook.
• When grilling is complete, set the Thermostat Control
Switch to the OFF position and unplug it from the
electrical outlet.
-
Always use the electric
grill on a dry, level,
heat-resistant surface
and where it won’t
easily fall or tip over.
Do not use the grill
without the Drip Pan
in place as it may
damage countertops,
tables, work surfaces,
etc.
Ensure that the Non-
Stick Grilling Surface is
securely positioned on
the Cool-Touch Grill
Base before using.
-
-
5

6 Questions? We’re here to help!
Visit: www.maxi-matic.com for support on this product.
HOW TO USE (cont.)
TIPS:
• Always preheat the grill for approximately 5 minutes for better results.
• Remove excess fat from meats to reduce smoking while grilling.
• Use cooking spray when cooking sh, lean meats or vegetables.
• When using wooden/bamboo skewers for kebobs, soak them in warm water
for at least 30 minutes. This will prevent them from burning during grilling.
• To protect the non-stick coating on the Non-Stick Grilling Surface, only use
utensils that are made of nylon, plastic, or wood. Avoid metal utensils.
• Use separate plates for raw meats, sh, and chicken to prevent the transfer of
harmful bacteria.
• Using tender cuts of meat is recommended. Marinate meats before grilling.
• Add enough water to cover the bottom surface of the drip pan to help reduce
smoking and make clean up easier.
WARNINGS:
• Use caution when cooking with hot oil, grease or juices may splatter.
• Do not touch any hot surfaces, use handles and knobs.
• Do not attempt to cut food while it is on the non-stick grilling surface during
the cooking process.
• Do not use metal utensils to handle food while it is cooking. This will damage
the non-stick coating of the grilling surface.
• Do not attempt to move the electric grill while it is in use and plugged into the
electrical outlet.
CLEANING AND MAINTENANCE
1. Make sure the power cord is unplugged and that all parts have cooled
completely before disassembling the unit for cleaning.
2. Use a wooden or plastic spatula to scrape off any food residue.
3. Use paper towels to remove any excess grease.
4. Wash the grill in dishwasher or in warm sudsy water.
5. Use a non-abrasive soapy sponge or cloth to clean the Grilling Surface.
6. Remove the Drip Pan, wipe it with paper towel rst and then wash it by hand
with warm soapy water. Ensure that it dries completely before reinserting the
tray back under the grill.
7. Use a wet soapy sponge or cloth to clean the Cool-Touch Grill Base.
8. ENSURE THAT ALL PARTS HAVE DRIED THOROUGHLY BEFORE REASSEMBLING
THE GRILL FOR USE OR FOR STORAGE.
WARNINGS:
• Never immerse the thermostat control switch in water or any other liquid as
this may lead to personal injury.
• Do not use abrasive cleaning material, scouring pads or steel wool to clean any
part of the electric grill.
• Do not plug into electrical outlet if any part of the unit is wet.
• Do not clean while the unit is plugged into an electrical outlet.

7Questions? We’re here to help!
Visit: www.maxi-matic.com for support on this product.
COOKING REFERENCE CHART
Cooking time may vary due to differences in sizing and thickness of food and may
also need adjustment based on how well you prefer your food to be cooked. Please
use the table below for suggested internal temperatures for meats, sh, and poultry.
Cook accordingly. (Source: www.fda.gov)
NOTE: The use of a food thermometer when grilling is recommended.
MINIMUM INTERNAL TEMPERATURE & REST TIME:
Cook all food to these minimum internal temperatures as measured with a food
thermometer before removing food from the heat source. For reasons of personal
preference, consumers may choose to cook food to higher temperatures.
FOOD INTERNAL TEMPERATURE (°F)
Chicken Breasts 165°
Steaks 145° (allow to rest for at least 3 minutes)
Fish Fillets 145° (or until opaque/milky white)
Hamburgers 160°
Shrimp 145° (or until opaque/milky white)
Pork 145° (allow to rest for at least 3 minutes)
GRILLING TIME CHART:
FOOD TEMPERATURE (°F) GRILLING TIME (min.)
Steaks, ¾-inch thick (medium rare) 400 10-14
Steaks, ¾-inch thick (medium) 400 14-18
Hamburger 400 14-16
Chicken breast, boneless/skinless
(pound to even thickness) 400 12-18
Fish illet or steak, 1-inch thick 400 8-12
Shrimp 400 4-6
Beef kabobs (medium) 400 8-10
Vegetable kabobs 400 8-12
Lamb chops, ¾-inch thick (medium) 400 14-18
Pork chops, ¾-inch thick, (boneless) 400 12-15
Pork chops, ¾-inch thick, (with bone) 400 14-16
Sausage, precooked 325-350 8-10
Sausage, uncooked 400 12-15
Veal, ¾-inch thick (medium), boneless 400 8-10

8 Questions? We’re here to help!
Visit: www.maxi-matic.com for support on this product.
RECIPES - Steak
GARLIC DIJON GRILLED STEAKS
1. Cut a 12” square of heavy-duty foil; spray with non-stick cooking spray.
2. Cut ½ inch from top of each garlic bulb and remove outer layers.
3. In small bowl, combine olive oil with mustard and mix well. Set aside.
4. Place garlic bulbs in microwave and heat on High for 1-½ minutes or until tender. Let
cool for 1 minute.
5. Squeeze garlic bulb to release garlic cloves onto sprayed foil. Top with mustard mixture.
Wrap securely in foil using double-fold seals.
6. When ready to grill, pour the contents of the garlic foil packet onto the steaks and then
set the steaks on the grill. Cook for 10 minutes or until steaks are of desired doneness.
1 tbsp. olive oil
4 (5oz.) boneless beef sirloin steaks
2 whole garlic bulbs
1 tbsp. dijon mustard
GRILLED STEAKS WITH CHEDDAR-ONION BUTTER
1. In small bowl, combine all cheddar-onion butter ingredients; mix well. Set aside.
2. Coat the steaks with the butter mixture when ready to grill. Place steaks into the grill.
Cook for 10 minutes or to desired doneness.
3. Reserve left over butter mixture to serve with steaks.
Cheddar-Onion Butter:
¼ cup butter, softened
¼ cup sliced green onions
½ tsp. dry mustard
2 oz. (½ cup) nely shredded cheddar cheese
Steaks:
4 beef sirloin or T-bone steaks (1 inch thick)
¼ tsp. salt
¼ tsp. coarse ground black pepper
PEPPER STEAK WITH CABERNET
1. Season your steaks with peppercorn and salt then place onto the grill and cook for 10
minutes or until you have attained your desired doneness.
2. Over medium heat, in a saucepan, combine olive oil and 1 Tbsp. of butter, shallots and
cabernet. Stir and cook until the mixture thickens slightly to a glaze.
3. Add cream and reduce mixture. Mix well, keep warm, and season with salt. Remove
steaks from grill and serve with sauce.
NOTE: Use care when adding the wine to the saucepan, as a ame could arise from the
burning of the alcohol.
1 cup cabernet wine
1 cup cream
1 ½ cups beef broth
2 tbsp. butter
6 sirloin steaks
4 tbsp. cracked peppercorn
½ tsp. salt
1 tbsp. olive oil
3 shallots, sliced

9Questions? We’re here to help!
Visit: www.maxi-matic.com for support on this product.
SAVORY GRILLED FISH
1. Combine the rst four ingredients in a small bowl; mix well. Set aside 4 tbsp. of the
mixture for later use.
2. Brush remaining mixture onto both sides of sh steaks.
3. Let stand for 10 minutes to marinate.
4. Place sh steaks onto grill. Grill for 5-10 minutes or until sh akes easily.
5. To serve, transfer sh steaks onto plate and top each with the remaining mayonnaise
mixture.
SOUTHERN GRILLED SHRIMP
1. Peel and de-vein shrimp.
2. Place remaining ingredients in blender or food processor and puree until smooth.
3. Pour contents of blender over shrimp in a non-metal container and marinate at least one
hour, or as long as eight hours.
4. Place each individual shrimp onto the grill and grill for 3-5 minutes or until desired
doneness. If desired, baste with remaining sauce.
1 lb. large shrimp
½ medium onion
4 cloves garlic
RECIPES - Seafood
HERB-MARINATED GRILLED HALIBUT
1. In a small bowl, combine herbs, lemon juice, oil and garlic; mix well. Place halibut steaks
on a plate, sprinkle with salt and pepper.
2. Spoon herb mixture over sh and spread evenly. Let stand at room temperature for 15
minutes to marinate. When ready to grill, place sh onto the grill.
3. Cook 5-10 minutes or until sh akes easily with fork. If desired, sprinkle sh with
additional chopped fresh herbs before serving.
2 tbsp. nely chopped herbs
2 tbsp. fresh lemon juice
½ tsp. olive oil
¼ tsp. coarse ground black pepper
2 garlic cloves, minced
4 (4oz.) halibut steaks
¼ tsp. salt
1/3 cup fat-free mayonnaise
1 ½ tbsp. of nely chopped fresh basil
1 tbsp. lemon juice
3 tsp. lime juice
¼ c hot sauce
1 tsp. of chopped ginger
2 tbsp. bottled sun-dried tomato
1 ½ lb. swordsh, halibut, shark,
tuna, or salmon steaks
GRILLED FISH WITH MUSHROOMS
1. Place llets onto grill. Sprinkle with lemon juice, salt, and lemon pepper.
2. Grill for 5-10 minutes or until sh akes easily. Meanwhile, combine remaining
ingredients in a saucepan and sauté over low heat for 5 to 7 minutes.
3. Serve by adding mushroom mixture over the sh and garnish with parsley springs and
lemon wedges.
4 sh llets (any)
3 tbsp. butter
1 ½ cups chopped mushroom
1 tbsp. lemon juice
1 tsp. of salt
½ tsp. of lemon pepper
2 tbsp. chopped parsley
Parsley springs and lemon

10 Questions? We’re here to help!
Visit: www.maxi-matic.com for support on this product.
RECIPES - Miscellaneous
BAHAMA-RAMA GRILLED CHICKEN BREASTS
1. Season the chicken with salt and pepper and marinate in lime juice for about 2 hours.
Place chicken breasts onto grill and grill for 5-10 minutes or until attaining your desired
doneness.
2. In a separate saucepan, heat oil and bacon over medium heat. When bacon is browned,
add the onion, green pepper, and celery, and sauté: cover the saucepan and reduce the
heat to low.
3. Simmer for about 10 minutes or until everything is tender. Add the tomatoes, chicken
stock, Worcestershire sauce, and thyme. Continue to simmer, uncovered, for about 10
minutes.
4. Season with salt and pepper to taste. Serve sauce over chicken and with steamed rice.
½ cup red onion, chopped
½ cup celery, chopped
1 cup chicken stock
2 cups diced canned tomatoes (with juice)
½ tsp. dried thyme
1 tbsp. Worcestershire sauce
4 chicken breasts
Salt and freshly ground pepper
Juice from 2 fresh limes
2 tbsp. olive oil
¼ cup bacon, nely diced
½ cup thinly sliced strips of green bell pepper
SPICY GRILLED LAMB CHOPS
1. Combine chili powder, cumin, thyme, sugar, salt, allspice, and black pepper into small
bowl.
2. Sprinkle the mixture over the chops and rub it evenly all over the meat.
3. Chill the chops, covered, overnight.
4. Place chops onto grill. Grill for 10-12 minutes or until desired doneness.
5. Serve chops with pepper jelly.
3 tbsp. chili powder
1 tbsp. ground cumin
2 tsp dried thyme – crumbled
2 tsp. sugar
2 cups hot pepper jelly
1 ½ tsp salt
¾ tsp. ground allspice
1 tsp freshly ground black pepper
4 lamb chops each about 1 ½” thick
OLD FASHIONED BURGERS
1. Combine ground beef, salt & pepper, red wine, ginger, egg, and cornstarch into a large
bowl and mix well.
2. Flatten meat into 4 individual patties. Brush each patty with vegetable oil on both sides.
3. Place patties onto grill. Grill for 10-12 minutes or to desired doneness.
1 tsp. vegetable oil
1 tsp. fresh ginger root, minced
1/4 minced onions
2 tbsp. cornstarch
1 lb. ground beef
1 tsp. red wine
1 egg, beaten
1/2 tsp. of salt & pepper combined

11Questions? We’re here to help!
Visit: www.maxi-matic.com for support on this product.
LIMITED WARRANTY* ONE (1) YEAR
WARRANTY IS ONLY VALID WITH A DATED PROOF OF PURCHASE
PLEASE DO NOT RETURN TO STORE OF PURCHASE.
If you have any problems with this unit, contact Customer Service for support.
1. Your small kitchen appliance is warranted to the original purchaser to be free from any
manufacturing defects under normal use and conditions for one (1) year, cord excluded.
This Warranty applies only to the original purchaser of this product.
2. Retail stores/merchants selling this product do not have the right to alter, modify, or in any
way revise the terms and conditions of the warranty.
3. If you use your appliance for household use and according to instructions, it should give
you years of satisfactory service.
4. At its sole discretion, Maxi-Matic USA will either repair or replace the product found to be
defective during the warranty period.
5. The repaired or replacement product will be in warranty for the remaining balance of the
one-year warranty period and an additional one-month period.
6. Consumer’s remorse is not an acceptable reason to return a product to our Service Center.
7. This limited warranty covers appliances purchased and used within the 50 U.S. states plus
the District of Columbia and does NOT cover normal wear of parts or:
- Damages caused by unreasonable use, neglect, normal wear and tear, commercial
use, improper assembly or installation of product.
- Damages caused in shipping.
- Damages caused by replacement or resetting of house fuses or circuit breakers.
- Defects other than manufacturing defects.
- Breakage caused by misuse, abuse, accident, alteration, lack of proper care
and maintenance, or incorrect current or voltage.
- Lost or missing parts of the product. Parts will need to be purchased separately.
- Damages of parts that are not electrical; i.e. cracked or broken plastic/glass,
scratched/dented inner pots.
- Damage from service or repair by unauthorized personnel.
- Extended warranties purchased via a separate company or reseller.
- Acts of nature such as re, oods, hurricanes, tornadoes, etc.
8. This warranty does not apply to re-manufactured merchandise.
Maxi-Matic, USA shall not be liable for any incidental or consequential damages caused by the
breach of any express or implied warranty. Apart from the extent prohibited by applicable law,
any implied warranty of merchantability or tness for a particular purpose is limited in time to
the duration of the warranty.
*One Year Limited Warranty valid only in the 50 U.S. states plus the District of Columbia,
excluding Puerto Rico and the Virgin Islands.
This warranty is effective only if the product is purchased and operated in the USA; product us-
age which is in violation of the written instructions provided with the unit will void this warranty.
For international warranty, please contact the local distributor.
This warranty gives you special legal rights and you may also have other rights to which you are
entitled which may vary by state, province, and/or jurisdiction.
**Any instruction or policy included in this manual may be subject to change at any time.
MAXI-MATIC, USA
18401 E. Arenth Ave. City of Industry, CA 91748
Customer Support Hours of Operation MON-FRI 8:30 AM - 5:00 PM PST
(800) 365-6133 Ext: 120/107/105; (626) 912-9877 Ext: 120/107/105
Visit: www.maxi-matic.com for Live Chat Support and Contact Us Form

12 Questions? We’re here to help!
Visit: www.maxi-matic.com for support on this product.
RETURN INSTRUCTIONS
RETURNS:
A. Any return of defective merchandise to the manufacturer must be
processed accordingly by rst contacting customer service (info@
maxi-matic.com) to obtain an RA # (Return Authorization Number). We
will not accept any returns of merchandise without an applicable RA #.
B. IMPORTANT RETURN INSTRUCTIONS. Your Warranty depends on your
following these instructions if you are returning the unit to Maxi-Matic,
USA:
1. Carefully pack the item in its original carton or other suitable
box with sufcient cushioning to avoid damage in shipping.
2. Before packing your unit for return, be sure to enclose:
a) Your name, full address with zip code, daytime telephone
number, and RA#,
b) A dated sales receipt or PROOF OF PURCHASE,
c) The model number of the unit and the problem you
are having (Enclose in an envelope and tape directly to
the unit before the box is sealed,) and
d) Any parts or accessories related to the problem.
3. Maxi-Matic, USA recommends that you ship the package via UPS
ground service for tracking purposes. We cannot assume
responsibility for lost or damaged products returned to us
during incoming shipment. For your protection, always carefully
package the product for shipment and insure it with the carrier.
C.O.D shipments cannot be accepted.
4. All return shipping charges must be prepaid by you.
5. Once your return has been received by our warehouse, Maxi-Matic,
USA will repair or replace the product if it is defective in material or
workmanship, subject to the conditions in paragraph B.
6. Maxi-Matic will pay the shipping charges to ship the repaired or
replacement product back to you.

13Questions? We’re here to help!
Visit: www.maxi-matic.com for support on this product.
IMPORTANTES MEDIDAS DE SEGURIDAD
ADVERTENCIA: Cuando se utilizan aparatos eléctricos, se deben seguir precauciones
de seguridad básicas, entre ellas:
1. Lea todas las instrucciones
cuidadosamente, antes de usar el
aparato
2. No toque las supercies calientes,
use el mango o las agarraderas.
3. Remueva todo material de empaque,
antes de usar el aparato
4. Lave todas las partes o accesorios
removibles, antes de usar por vez
primera.
5. Para protegerse de una descarga
eléctrica, no sumerja el cordón,
enchufe eléctrico o aparato en agua
o ningún otro líquido.
6. Cercana supervisión es necesaria,
cuando el aparato sea usado por o
cerca de niños.
7. Desconecte el aparato, cuando no
esté en uso y antes de limpiarlo.
Permita que enfríe completamente
antes de remover las partes o
accesorios.
8. Nunca use ningún aparato con el
enchufe dañado. Si el cordón de
alimentación es dañado este debe
ser reemplazado por el fabricante,
personal capacitado o su agente de
servicio, para evitar riesgos.
9. El uso de accesorios no
recomendados por el fabricante,
pueden causar daños personales o
daños al aparato.
10. No lo use a la intemperie o en
lugares húmedos.
11. No deje que el cordón eléctrico
cuelgue de la orilla de la mesa o
mostrador, alguien podría enredarse
con el cordón y causar un tropezón.
12. No ponga el aparato sobre o cerca
de supercies calientes como estufas
y hornos.
13. Siempre deberá conectar el cordón
eléctrico al aparato primero y
después al toma corriente, si aplica.
14. Siempre deberá de apagar el aparato
antes de desconectar del toma
corriente.
15. Nunca introduzca utensilios de
metal en el aparato, podría causar
fuego, descarga eléctrica o daños
personales
16. Fuego podría ocurrir si el aparato es
cubierto o toca material inamable
cuando esté en uso: como si toca
cortinas, alfombras y paredes.
17. No ponga dentro o sobre el
aparato los siguientes materiales,
papel, cartón, plásticos, algún otro
material inamable o artículos
similares que no sean comestibles
18. Algunos supercies de mesas y
mostradores hechos o recubiertos
de laminados de CORIAN, MADERA
FINA O FORMICA no están diseñados
para soportar calores prolongados
generados por ciertos aparatos
eléctricos de cocina. SE
RECOMIENDA COLOCAR MANOPLAS
DE COCINA O MANTELES
RESISTENTES AL CALOR BAJO SU
APARATO.
GUARDE ESTAS INSTRUCCIONES
ESTE PRODUCTO ES PARA USO
DOMĚSTICO UNICAMENTE

14 Questions? We’re here to help!
Visit: www.maxi-matic.com for support on this product.
EL USO DE UN CORDÓN CORTO
1. Para reducir el riesgo de daños personales, como un tropezón o enredarse con
el cordón eléctrico, un cordón eléctrico corto es suministrado con la unidad.
2. Una extensión eléctrica más larga podrá ser utilizada, siempre y cuando tome
extremas precauciones durante su uso.
3. Si una extensión eléctrica más larga va a ser utilizada, tenga muy en cuenta las
siguientes recomendaciones:
• Las especicaciones eléctricas especialmente el (amperaje) del cordón
eléctrico a utilizar deberá de ser igual o de más amperaje que el especicado
en el aparato a utilizar.
• La extensión eléctrica deberá de ser colocada de una manera que no
cuelgue de la mesa, donde una mascota, los niños o cualquier otra persona
lo pueda jalar o tropezar sobre ella, accidentalmente.
ENCHÚFE POLARIZADO
Si este aparato es suministrado con un cordón eléctrico de enchufe polarizado (un
lado del enchufe es más ancho que el otro) favor de seguir las siguientes
recomendaciones.
Para reducir el riesgo de una descarga eléctrica, este enchufe está diseñado para
entrar en el receptáculo eléctrico de una sola manera. Si el enchufe eléctrico no
entra completamente, de un giro al mismo y trate de nuevo; si no entra de ninguna
manera, póngase en contacto con un electricista para solucionar el problema.
NO TRATE DE MODIFICAR EL ENCHÚFE DE NINGUNA MANERA.

15Questions? We’re here to help!
Visit: www.maxi-matic.com for support on this product.
PARTS IDENTIFICATION
A. Agarraderas de Tacto Frío
B. Parilla Antiadherente
C. Control de Temperatura
D. Cordón Eléctrico
E. Base de Tacto Frío
*Incluye una charola removible para
residuos.
1. Inserte la Charola Removible para residuos dentro de la Base de Tacto Frio.
2. Inserte el Control de Temperatura a la Parilla Antiadherente. (Lea la sección de
“INSTRUCCIONES” para mas instrucción)
3. Ponga la Parilla Antiadherente sobre la Base de Tacto Frio.
4. Asegurese de que el Control de Temperatura este rmemente conectado a la
Parilla Antiadherente y que esta este bien colocada sobre la Base de Tacto Frio.
• Parilla Antiadherente: Fácilmente se remueve de la base para una fácil
limpieza.
• Cocine una gran variedad de carnes y vegetales: Carnes asadas,
hamburguesas, pescados, pollos, vegetales y mucho más.
• Base y agarraderas de tacto frío: Hace el manejo de la parrilla más fácil y
seguro.
• Charola Removible para Residuos: Ayuda a atrapar grasa y residuos que caen
durante el proceso de cocción.
• Control del Temperatura: Deja que el usuario ajuste la temperatura de
cocción para todas sus necesidades culinarias.
PRECAUCION: ¡NO ENSAMBLE EL APARATO CUANDO ESTE CALIENTE O CUANDO ESTE ENCHUFADO
AL TOMA CORRIENTE!

16 Questions? We’re here to help!
Visit: www.maxi-matic.com for support on this product.
ANTES DEL PRIMER USO
• Limpie la Parilla Antiadherente del asador de residuos de
empaque o polvo, con un trapo enjabonado antes de usar
el aparato.
• Limpie la Base de Tacto Frio y la Charola para Residuos con
un trapo enjabonado.
• Seque todas las partes completamente antes
re-ensamblar el aparato para usar o almacenar.
• Reérase a la sección “LIMPIEZA Y MANTENIMIENTO” para
más instrucciones.
COMO USAR
Siempre use la parilla eléctrica sobre una supercie plana, estable y
resistente a altas temperaturas. No coloque la parilla donde fácilmente se
puede caer. No use la parilla sin la Charola Removible para residuos, esto
podría causar daño a sus mesas, mostradores, etc.
COMO CONECTAR EL CONTROL DE TEMPERATURA:
1. Asegúrese de que el Control de Temperatura este
apagado (posición off) y que este desconectado del toma
corriente.
2. Asegúrese de que ninguna parte del aparato este caliente o
mojada.
3. Inserte la punta metálica del Control de Temperatura en el
receptáculo de la Parilla Antiadherente y asegúrese de que
estén rmemente unidos.
4. Inserte el Cordón Eléctrico un toma de corriente de 120 Vca.
PRECAUCIÓN:
Nunca sumerja la parilla
antiadherente ni el
cotnrol de temperatura
en agua o otros tipos de
liquidos.
Cuando use la unidad
por primera vez, usted
va a notar algo de
humo y olor a
quemado. Esto es
causado por la unidad
que está quemando
los residuos
protectores de barniz
aplicados en nuestra
fábrica. Esto es normal
y no causará daño
alguno y
desaparecera.
-
-
SELECCIONANDO LA TEMPERATURA:
• Cuando seleccione la temperatura la luz indicadora del
Control de Temperatura encenderá indicando que está
calentando la parilla. Cuando la temperatura
seleccionada ha sido alcanzada, la luz indicadora se
apagará. Tome nota, que esto no quiere decir que la
unidad este apagada.
COCINANDO:
• Ponga una capa de aceite para cocinar sobre la Parilla
Antiadherente.
• Deje que la unidad se precaliente por unos 5 minutos o
hasta que la temperatura seleccionada haya sido
alcanzada (cuando la luz indicadora del Control de
Temperatura se haya apagado).
• Ponga los alimentos deseados a cocinar sobre la parilla.
• Cuando ha terminado de cocinar, apague el Control de
Temperatura
PRECAUCIÓN:
Asegure de que el
Control de
Temperatura no esté
prendido o conectado
al toma corriente y que
todas las partes se hayan
enfriado completa-
mente antes de limpiar
el aparato.

17Questions? We’re here to help!
Visit: www.maxi-matic.com for support on this product.
COMO USAR (cont.)
CONSEJOS:
• Siempre use utensilios de cocina de madera o plástico
resistentes al calor para no dañar la parilla antiadherente.
• Siempre precaliente su parrilla asadora por unos 5
minutos.
• Ponga una capa de aceite de cocinar cuando cocine
pescados, carnes o vegetales.
• Cuando use varillas de madera para cocinar brochetas, es
muy recomendado sumergirlos en agua por
aproximadamente 30 minutos, esto va a prevenir que las
varillas se quemen durante el proceso de asar.
• No revuelva diferentes tipos de carnes en un solo plato,
trate de separarlas para prevenir la transferencia de
bacteria dañina.
NOTA:
La tabla de tiempos
sugeridos en este
manual son
aproximados y se
incluyen para usted
como referencia
únicamente.
PRECAUCIÓN:
• Tenga mucho cuidado cuando cocine usando aceite
caliente, grasas y jugos podrán salpicarle y causarle
quemaduras graves.
• No toque ninguna supercie caliente.
• No trate de picar alimentos en la parilla antiadherente
cuando esté funcionando.
• No use utensilios de metal sobre la parilla antiadherente;
esto podría dañar la supercie antiadherente de la unidad.
• Use la tabla de tiempos para cocinar como referencia
únicamente.
• El tiempo de cocinar podría variar tomando en cuenta el
tamaño, grosor y su preferencia por los alimentos.
LA TABLA DE TIEMPOS:
CARNES Y VEGETALES TIEMPO (minutos)
Pechuga de pollo (1.27 cm de grueso) 10-15
Filete de res (1.27 a 2.54cm de grueso) 10-15
Filete de pescado (1.27cm de grueso) 10
Hamburguesa 7-10
Camarones 5-7
Vegetales 3-5
17

18 Questions? We’re here to help!
Visit: www.maxi-matic.com for support on this product.
MANTENIMIENTO Y LIMPIEZA
1. Asegúrese de que el aparato este desconectado del toma
corriente y que todas las partes se hayan enfriado
completamente.
2. Use espátulas de plástico o madera para remover residuos
de comida de la parilla.
3. Use toallas de papel para limpiar el exceso de aceite o
grasa de la Parilla Antiadherente antes de limpiar.
4. Use una esponja o trapo enjabonado para limpiar la Parilla
Antiadherente.
5. Use una esponja o trapo enjabonado para limpiar la Base
de Tacto Frío.
6. Remueva la charola de residuos, limpie con una toalla de
papel primero y lave con agua y jabón.
7. SEQUE TODAS LAS PARTES DE ESTE APARATO
COMPLETAMENTE ANTES DE RE-ENSAMBLAR PARA
OPERAR O ANTES DE ALMACENAR. NUNCA ENCHUFE EL
APARATO AL TOMA CORRIENTE O OPERE EL APARATO CON
LAS PARTES MOJADAS; ESTO ES PARA PREVENIR DAÑOS
PERSONALES.
NOTA:
Nunca sumerja la
Parilla
Antiadherente o el
Control de
Temperatura en agua
o ningún otro líquido.
El hacerlo puede
provocar una
descarga eléctrica y
causar daños
personales graves.
Nunca use
limpiadores corrosivos
o estropajos de
alambre, podrían
dañar las partes de
este aparato.
-
Table of contents
Languages:
Other Maxi-matic Grill manuals
Popular Grill manuals by other brands

vidaXL
vidaXL 44281 Operating and safety instructions

The Flying Culinary Circus
The Flying Culinary Circus FCC BBQ FCC-EG-211000 manual

Fogo & Chama
Fogo & Chama FIRECRACKER instruction manual

Brinkmann
Brinkmann ProSeries 4415 owner's manual

Mayer Barbecue
Mayer Barbecue 1000016257 Assembly instructions

Ninja
Ninja SIZZLE GR101 Series owner's guide