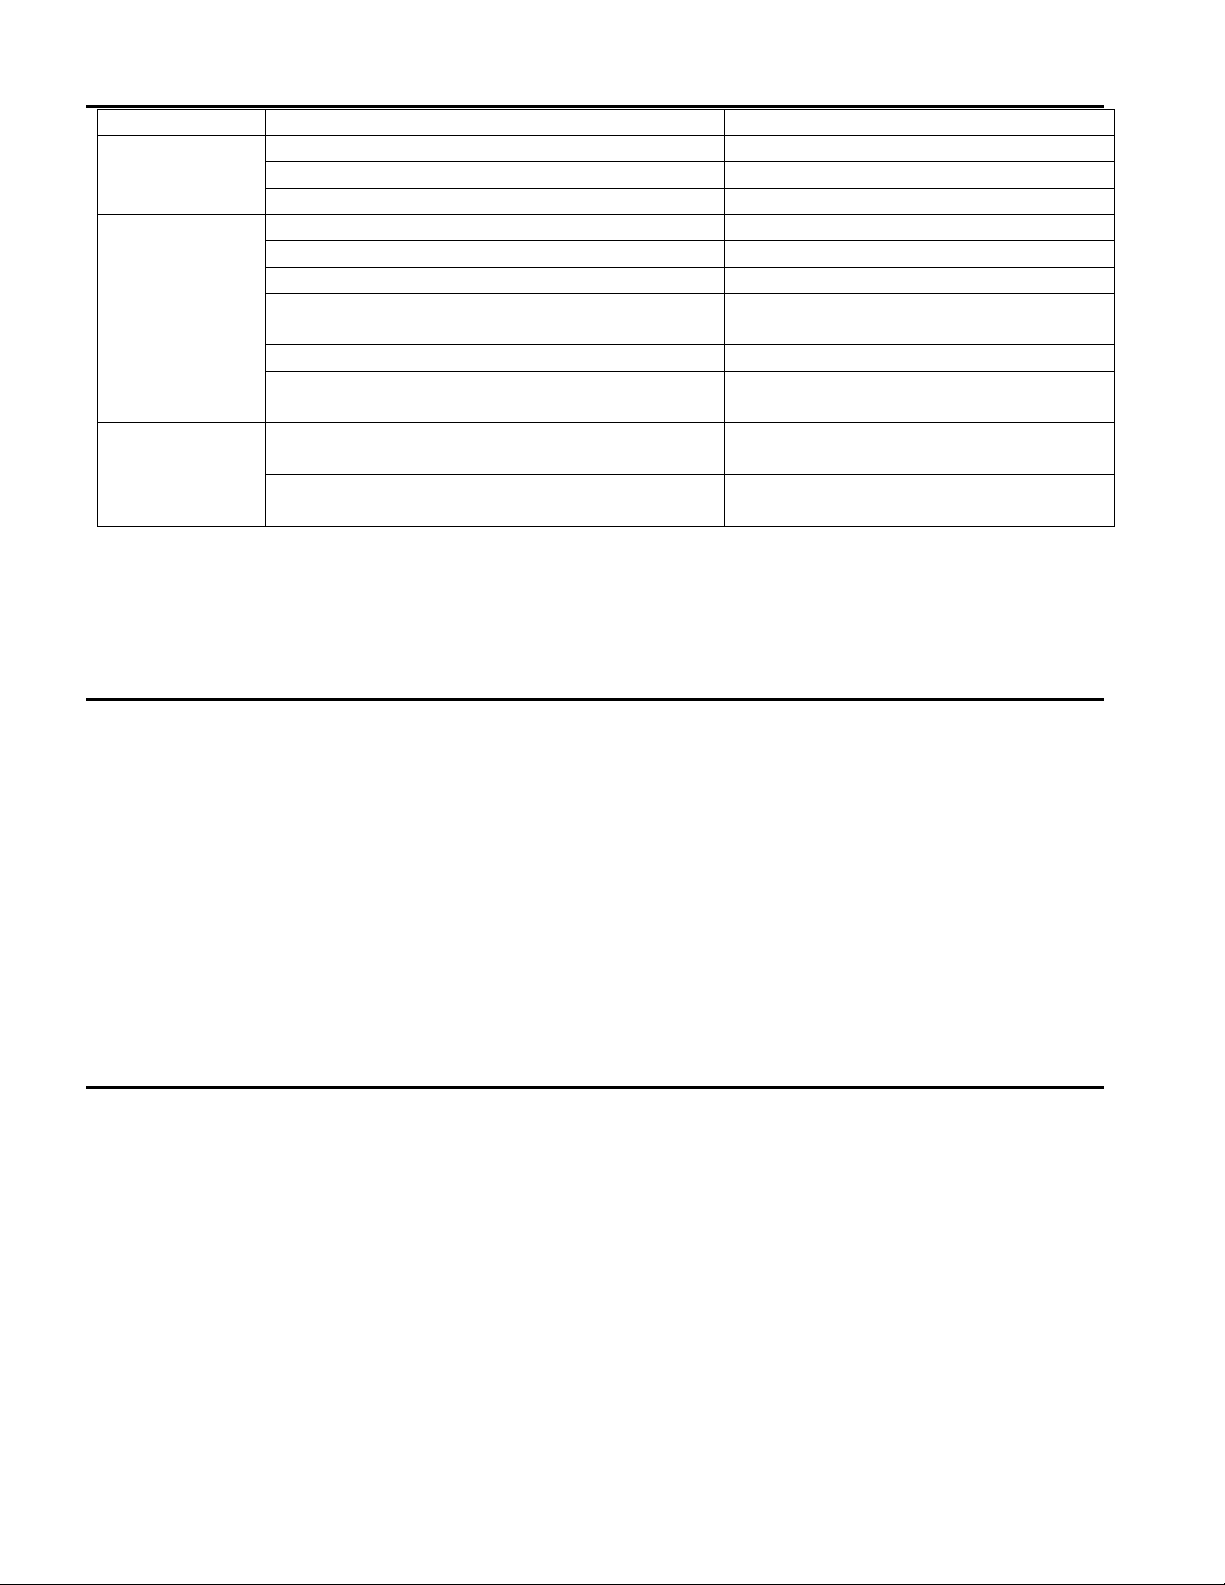
Maxx Cold MXDC-4 Operating and maintenance manual

2018-02-07
PRINTED in USA
MOBILE ICE CREAM FREEZERS
and DIPPING CABINETS
MODELS: MXDC4_MXDC8_MXDC12_MXF31F_MXF52F_MXF71F
INSTALLATION, MAINTENANCE & OPERATING MANUAL
Thank you for choosing our equipment for your operational requirements. Follow these instructions carefully.
If properly used and maintained, you can expect to enjoy years of reliable, efficient and top quality use.
Note: Product line is subject to ongoing, continuous upgrades and improvements. The specifications
defining
each model are subject to change without notice.
Keep this manual for training and as a reference guide when service or maintenance is required.
Keep a copy of your Bill of Sale.
This will establish your appliance's warranty period and the date this coverage started.
For AUTHORIZED PARTS or TECHNICAL SERVICE, please contact:
Maxximum Food Service • 3355 EnterpriseAvenue, Suite 160, Weston, FL 33331 USA
Phone: (954) 202-7419 • Website: MaxximumFoodService.com

1
TABLE OF CONTENTS
TECHNICAL SERVICE CONTACT INFORMAITON COVER
SAFETY PRECAUTIONS 2
PROPER DISPOSAL of the FREEZER
REPLACEMENT PARTS
HOW TO CONNECT ELECTRICITY 3
TRANSPORTATION and INSTALLATION
DIAGRAM of FREEZER 4
TEMPERATURE DISPLAY
THE FUNCTION of the CONTROL PANEL 5
DEFROST FUNCTION (If Ice Builds Up on Interior Walls)
NORMAL OCCURENCES
FOOD STORAGE
TECHNICAL DATA
TROUBLESHOOTING 6
GENERAL MAINTENANCE and CLEANING
CLEANING the CONDENSER
DIPPING CABINET CANOPY PARTS DIAGRAM 7
CANOPY INSTALLATION (12 steps) 8 - 11
ICE CREAM HANDLING INSTRUCTIONS for DIPPING CABINET 11
WARRANTY INFORMATION 12
TECHNICAL SPECIFICATIONS 13 - 16

2
SAFETY PRECAUTIONS
When using electrical appliances, basic safety precautions should be followed, including the following:
•Equipment must be properly installed and located in accordance with the Installation Instructions.
•Do not allow children to climb, stand, crawl inside or hang on to the equipment.
•Do not touch the cold surfaces in the freezer compartment when hands are damp or wet. Skin may stick to these
extremely cold surfaces.
•Do not store or use gasoline or other flammable vapors and liquids in the vicinity of this or any other appliance.
Do not store explosive substances such as aerosol cans with a flammable propellant in this appliance.
•Keep fingers out of the “pinch point” areas; clearances between the doors and between the doors and cabinet are
necessarily small; be careful closing doors when children are in the area.
•Unplug the equipment before cleaning and making repairs.
NOTE: We strongly recommend that any servicing be performed by a qualified technician.
WARNING
•The manufacturer has a policy of continuous improvement on our products and reserve the right to
change materials and specifications without notice. To confirm the specific parameters, please refer to the
name plate ratings.
•The freezer requires periodic maintenance and cleaning. Failure to provide this care voids the
appliances warranty.
•Do not expect optimal performance if the ambient temperature exceeds 84°F (29°C) &/or the relative
humidity is higher than 60%.
PROPER DISPOSAL OF THE FREEZER
If you are getting rid of your old freezer / refrigerator, please follow these instructions, at minimum:
BEFORE YOU THROWAWAY YOUR OLD REFRIGERATOR OR FREEZER:
•Take off the doors.
•Leave the shelves in place so that children may not easily climb inside.
APPLIANCE DISPOSAL
When recycling appliance please make sure that the refrigerants are handled according to local and national codes,
requirements and regulations.
REFRIGERANT DISPOSAL
Make sure the refrigerant is removed for proper disposal by a qualified service technician. If you intentionally release
any refrigerants you can be subject to fines and imprisonment under provisions of the environmental regulations.
REPLACEMENT PARTS
•Component parts shall be replaced with like components. Always use the manufacturer authorized / provided parts
for the best results.
•Servicing shall be done by authorized service personnel, to minimize the risk of further damage due to incorrect
parts or improper service.
•If the supply cord is damaged, it must be replaced by a special cord or assembly available from the manufacturer
or its approved / authorized service agent.

3
WARNING
HOW TO CONNECT ELECTRICITY
DO NOT, UNDER ANY CIRCUMSTANCES, CUT OR REMOVE THE GROUND PRONG FROM THE
POWER CORD. FOR PERSONAL SAFETY, THIS APPLIANCE MUST BE PROPERLY GROUNDED.
•The power cord from this appliance is equipped with a grounding plug which minimizes the possibility of electric
shock hazard.
•Have the wall outlet and circuit checked by a qualified electrician to make sure the outlet is properly grounded.
•It is your personal responsibility and obligation to have your outlet replaced with the properly grounded wall
outlet.
•The refrigerator should always be plugged into its own individual dedicated electrical circuit, which has a voltage
rating that matches the rating plate. This provides the best performance and also prevents overloading building
wiring circuits which could cause a fire hazard from overheated wires or tripping a circuit breaker / blowing a
protective fuse.
•Never unplug the equipment by pulling on the power cord. Always grip plug firmly and pull straight out from the
outlet.
•Repair or replace immediately all power cords that have become frayed or otherwise damaged.
•Do not use a cord that shows cracks or abrasion damage along its length or at either end.
•When removing the equipment away from the wall, be careful not to roll over or damage the power cord. If
power cord is damaged it should be replaced with original equipment manufacturer parts. To avoid hazard this
should be done by a qualified service technician.
•Do not plug the power cord into an extension cord. This can create a fire hazard or short circuit.
WARNING
Compressor warranties are void if compressor burns out due to low voltage.
Power supply cord ground should not be removed!
Do not use electrical appliances inside the compartments of this equipment.
TRANSPORTATION and INSTALLATION
1. When you transport the freezer, the angle between the compartment body and the
ground should be no more than 45°, and you should never place the freezer up-side down.
2. Do not use any of the external part as loading points, for example, the condenser on
the back, the door or the hinge.
3. When the freezer is installed or used, all the package (including board and foam
plastic) should be properly disposed of. Please recycle, when possible.
4. Keep the freezer stable and level to avoid vibration and noise.
5. The freezer should be installed in a place with good ventilation, a space of at least 4" (10cm) should be allowed
between the surrounding walls and the cabinet wall for proper air circulation.
6. It should be placed far from any heat source and not under direct sunshine to avoid less efficient performance due
to the high ambient temperature.
7. Install the freezer in a dry place to prevent the compartment body from rusting, which may (1) affect the electric
insulation (2) create a food safety contamination risk and (3) reduce the appliance's expected useful life.
CAUTIONS:
1. The freezer must be properly grounded to avoid a shock hazard.
2. In case of any damage to the electric wires and/or plug, please contact an authorized electrician to repair the
connection.
3. If the voltage is unstable, please provide a suitable automatic voltage regulator and/or surge protection.
4. Allow the freezer to reach its operating temperature before it is loaded with product.
5. You should adjust the temperature control according to the required temperature and quantity/tiers of the stored

4
food (ice cream tubs, etc.) and the environmental temperature/required conditions for the stored product to
maintain its quality.
6. Before putting product into the freezer please adjust the temperature control to its lowest set point and let it run
until the temperature of inner cabinet decreases to 0°F (-18°C.) Once the unit reaches 0°F (-18°C), set the unit to
your devised set point and load product. NOTE: For high elevation installations, it may be necessary to “warm-
up” the cabinet to higher set points.
7. Unplug the appliance by pulling the cord cap (plug) NOT the electrical cord.
8. Never put hot food in the freezer. Only place product in the freezer after it is has reached its ideal storage
temperature. Some foods will need to be placed in a refrigerator or another freezer to cool down past room
temperature prior to placing in the freezer.
9. Do not overfill the unit. Keep the top item at least 4" (10cm) below the brim on the cover. There should be
reasonable space between the food items for better temperature regulation.
10. If a power outage occurs, you should wait at least 5 minutes before the freezer is turned on again to avoid damage
to the compressor.
11. Never store any flammable, explosive and corrosive liquid or gas in the freezer. Keep it away from this appliance.
12. Beer, beverage, fresh flowers, medicine and injections cannot be put into the freezer for storage or cooling.
Handling them in the freezer voids the warranty
13. If the stored items are not place in properly sealed, protective packaging, then ice crystals may form or the
product quality can be affected.
NOTE! Before loading product we recommend you run the unit empty for two to three days. This allows you to be
sure electrical wiring and installation are correct and no shipping damage has occurred.
LOSS of FOOD PRODUCT IS NOT COVERED BY THE WARRANTY!
DIAGRAM of FREEZER:
TEMPERATURE DISPLAY:
The thermometer shows the warmest frozen food temperature. It is adjusted and designed so that only temperature
below 32°F (0°C) is accurately displayed.
1. Upper Sliding Lid
2. Lock and key
3. Lower Sliding Lid
4. Cabinet Body
5. Compressor Cover
(Louvered for Air Flow)
6. Power indicator
7. Thermostat
8. Power Cord and Plug
9. Thermometer
10. Caster

5
THE FUNCTION of the CONTROL PANEL:
The figure on the temperature control 1~7 reflect the relative temperature setting from high to low.
The specific temperature is not shown or indicated by this knob.
Turn the knob clockwise: the cabinet temperature will go DOWN.
Turn the knob counter-clockwise, the cabinet temperature will go UP.
The green light is a power indicator.
When the green light is ON, the power is connected.
After the temperature setting is adjusted and the appliance is turned on, it will take
time, possibly several hours for the unit to reach the new temperature setting.
DEFROST / IF ICE BUILDS UP ON INTERIOR WALLS:
1. Defrost the unit when the frost thickness on the wall of the cabinet reaches 1/4" (6mm) to optimize the freezing
capacity.
2. Turn the temperature control to the lowest point for 5-6 hours before defrosting.
3. Cut off the power and take out the food.
4. Use of warm water or a plastic scraper may accelerate the defrosting time of the cabinet wall.
5. After defrosting, clean the wall with dry cloth. Turn the power on.Allow time for the cabinet to reach its set-point
temperature. And then load the cabinet with food.
NORMAL OCCURENCES:
1. There may be a sound of flowing water when the refrigerant is running.
2. When the ambient humidity is too high, there will be condensation on the surface of the freezer and the lid.
3. When the machine is running, the condenser and compressor will be hot.
NOTE: Do not expect optimal performance if the ambient temperature exceeds 84°F (29°C) or the local
environment exceeds 60% relative humidity.
FOOD STORAGE:
The appliance is suitable for storing packaged ice cream and similar ready-frozen dessert items.
Product must not be filled higher than the stacking mark on the inside of the freezer. (4" from the sliding lid)
TECHNICAL DATA:
MODELELECTRICAL
POWER CAPACITY
CuFt (L) AMPS
NET
WEIGHT
Lbs (kg)
OVERALL DIMENSION
Inches (mm)
MXDC-4
115/120V/60Hz/1-ph
6.0 (170)
2.5
165 (74)
31.5 x 27.2 x 50.4 (800 x 691 x1280)
MXDC-8
115/120V/60Hz/1-ph
11.5 (326)
4
235 (107)
51.7 x 27.2 x 50.4 (1313 x 691 x 1280)
MXDC-12
115/120V/60Hz/1-ph
16.5 (467)
6.5
287 (130)
70 x 27.2 x 50.4 (1778 x 691 x 1280)
MXF31F
115/120V/60Hz/1-ph
6.0 (170)
2.5
117 (53)
31.5 x 27.2 x 33 (800 x 691 x838)
MXF52F
115/120V/60Hz/1-ph
11.5 (326)
4
162 (73)
51.7 x 27.2 x 33 (1313 x 691 x 838)
MXF71F
115/120V/60Hz/1-ph
16.5 (467)
6.5
197 (89)
70.0 x 27.2 x 33 (1778 x 691 x 838)
LOAD LINE

6
TROUBLESHOOTING:
ISSUE
REASON
SOLUTION
Unfreezing
Temperature control is on the highest point
Adjust the temperature
Plug and outlet not connected well
Securely connect the plug to the outlet
Blown fuse or tripped breaker
Change the fuse / Reset the breaker
Compressor
Continues to
Run
Temperature control is on the lowest point
Adjust temperature control
Too much product stored in the cabinet
Reduce the quantity
Thick frost
Defrost
Lid is open for extended periods of time.
Lid is open too frequently.
Reduce the length of time
or the frequency of the lid being open.
Too close to the wall
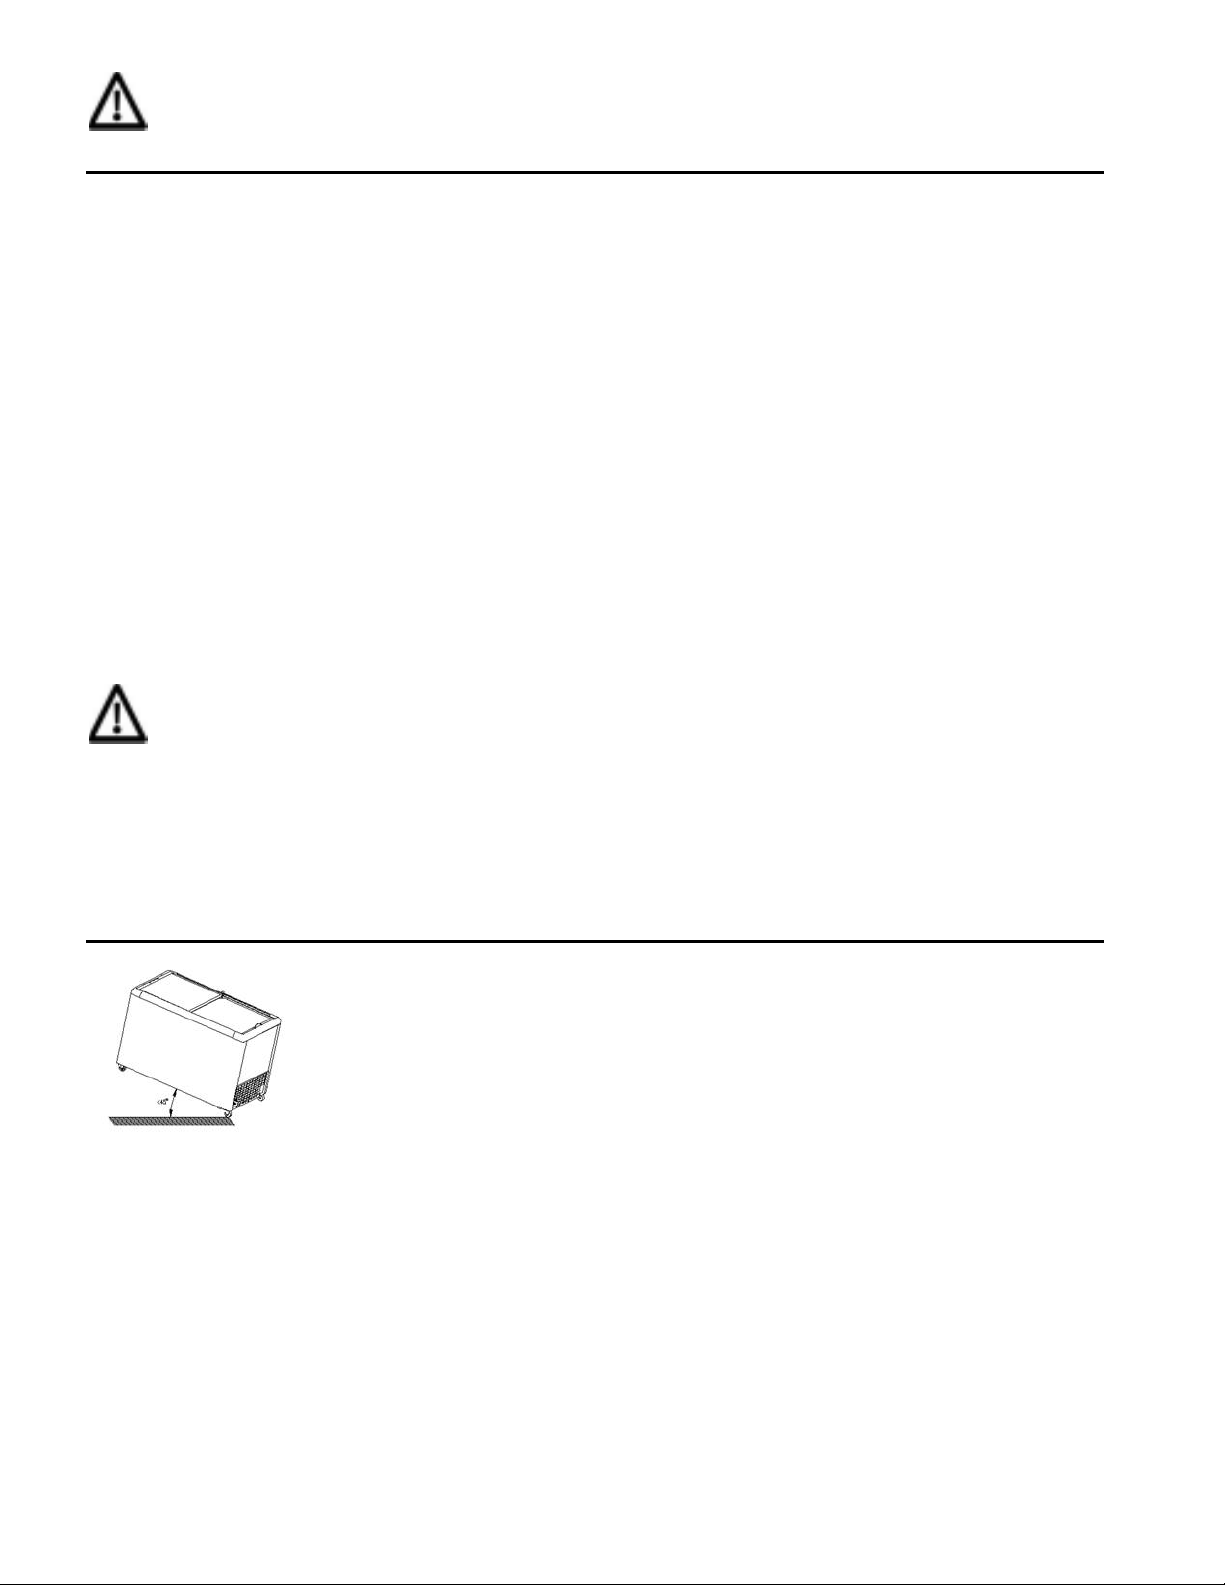
Reposition unit 4" from the wall
Close to a hot source or in the sun
Change the unit's location
or remove the heat source
Big noise
Ground is not flat so unit doesn't sit level and
is making a vibrating noise
Change the unit's location to a flat
surface
Refrigerant lines are connected
or too close together
Separate the refrigerant lines
NOTE:If the unit continues to have issues and you cannot solve the troubles according to the above-mentioned
troubleshooting information or guidelines, please contact an authorized service agent. Do not handle it yourself unless
you are a trained and licensed refrigeration technician.
GENERAL MAINTENANCE and CLEANING:
1. To save energy, keep the door closed as much as possible. Do not open the door frequently or leave it open for
extended periods of time. This will conserve energy and preserve the quality of the food in the cabinet.
2. Never place heavy or hot stuff on the top of the freezer to avoid damage to the appliance.
3. Turn OFF the power before cleaning.
4. To clean the freezer, please use soft cloth with mild detergent and hot water.
5. Use warm water to clean the magnetic gasket in order to maintain its elasticity. Apply a food approved plastic
conditioner to prolong its service life. If the gasket is damaged, replace it immediately.
6. The freezer should not be left unused for a long time. To stop using the freezer and to store it, safely disconnect the
main power first, then clean the inside and leave the door open for 2~3 days with an open box of baking soda in
the cabinet. Make sure the inside of the cabinet is dry before storing.
7. To return the freezer to use, clean the inside cabinet with a sanitizing solution. Wipe thoroughly with a damp cloth.
Allow the unit to air dry, leaving the door open for 2~3 days.
CLEANING THE CONDENSER (Related Warranty Information)
•Condensers will accumulate dirt and require cleaning every 30 days.
•Dirty condensers result in compressor failure, product loss, and lost sales, which are not covered by warranty.
•If you keep the Condenser clean you will minimize your service expense and lower your electrical costs.
•The Condenser requires scheduled cleaning every thirty days or as needed.
•Air is pulled through the Condenser continuously, along with dust, lint, grease, etc.
•A dirty Condenser can result in voiding the unit's warranty coverage, as well as, compressor failure, product loss
and loss of product sales.
•Proper cleaning involves removing dust from the Condenser. By using a soft brush, or vacuuming the Condenser
with a shop vac, or using CO2, nitrogen, or pressurized air.
•If you cannot remove the dirt adequately, please call our technical service number and we will refer you to local
companies.
•On most of the units the condenser is accessible in the rear of the unit. You may need to remove the cabinet grill to
expose the refrigeration system and piping network.
•The Condenser looks like a group of vertical fins. You need to be able to see through the condenser for the unit to
function at maximum capacity. Do not place filter material in front of condensing coil. This material blocks air-
flow to the coil similar to having a dirty coil.

7
THE CLEANING OF THE CONDENSER IS NOT COVERED BY THE WARRANTY!
HOW TO CLEAN THE CONDENSER:
1. Disconnect the electrical power to the unit.
2. Remove the louvered grill.
3. Vacuum or brush the dirt, lint, or debris from the finned condenser coil.
4. If you have a significant dirt build up you can blow out the condenser with compressed air.
NOTE: TO AVOID EYE INJURY, EYE PROTECTION IS RECOMMENDED.
5. When finished be sure to replace the louvered grill. The grill protects the condenser.
6. Reconnect the electrical power to the unit.
If you have any questions, please call our Technical Service Department, 1-877-368-2797.
If displayed product is accessible to customers, health codes generally require covering the interface /
access area with a sneeze guard. This transparent canopy complies with the regulations describing this
type of covering for frozen dessert items, in most conditions.
DIPPING CABINET CANOPY PARTS DIAGRAM:

8
CANOPY INSTALLATION:
1. POWER OFF THE FREEZER. REMOVE FOOD INSIDE.
2. CHECK and PREPARE PARTS and TOOLS
•Open the carton box, take out foam package and dispose appropriately. Recycle when possible.
•Check parts and quantities as listed in Parts Diagram above.
•Tool Preparation: Utility Knife, Philips Screw Driver, Flat Head Screw Driver, Electric Drill with 3.2 Bit.
•Store all empty packages in the carton in case they need to be reused.
NOTE: Unplug the freezer and relocate any food inside to another cold storage appliance before
installation of canopy.
3. INSTALLATION GUIDELINES
•Remove lid guide tab from frame front.
•Score the front frame lid guide tab several times.
•Cut through the front frame lid guide tab and pull from frame.
•Smooth cut area on frame with small file.
4. ASSEMBLE the FIXED STRIPS
•Slide one side of the rectangular connector all the way into the left end of the front fixed strip lot.
•Slide the other side of the rectangular connector all the way into the side slot of the left fixed strip.
•Securely screw bolt M5X5 into the corresponding holes in the two strips.
•Repeat steps 1 - 3 for the right side of the front fixed strip and the right fixed strip.

9
5. INSTALL THE FIXED STRIPS
Place the sub-assembly on the top frame of the freezer and close to the inside
edge.
Drill the hole and secure the LEFT side of the FRONT Fixed
Strip with Screw 4.2X13.
Drill the hole and secure the LEFT and RIGHT Fixed Strips with
Screw 3.5X14.
6. APPLY GLASS CEMENT
•Apply glass cement on the ten (10) slots of all three (3) fixed strips.
NOTE: Keep unused glass cement in a safe place and out of the reach of children.
7. INSTALL the GLASS SIDE PANELS
•As shown in the figure, you will need the glass clamp, rectangular support, flat head bolt M6x16, glass
cement, right and left fixed bracket, seal.
•Assemble the parts as shown in the figure.

10
8. INSTALL FRONT GLASS
•Insert the FRONT glass into the corresponding slot of the front fixed strip.
•Keep the Front Glass in an UPRIGHT position.
9. INSTALL LEFT and RIGHT GLASS
•Insert the LEFT side glass into the slot of the LEFT side fixed strip.
•Fix the LEFT fixed bracket to the LEFT fixed strip with screw 4.2x13
•Repeat steps 1 - 2 for Installation of the RIGHT side glass.
10. INSTALL TOP and STAINLESS STEEL UPPER PLATES
•As Shown in the Figure, place the stainless steel upper plates on the side glass.
•Next, put the TOP glass on the stainless steel plates.
•Next, fix the TOP glass and stainless steel upper plates to rectangular support using flat head bolt M6x16.

11
11. INSTALL UPPER MID GLASS
•As Shown in the Figure, Loosen the bolt from the glass clamp.
•Place the upper mid glass between the jaws of the clip.
•Tighten the bold and cap nut.
12. PREPARE the DIPPING CABINET
•The dipping cabinet with the glass canopy attached should sit without being moved for 24 hours to let the
glass cement cure.
•After the 24 hours, the equipment can be moved and used normally. Please clean the unit prior to use.
ICE CREAM HANDLING INSTRUCTIONS for DIPPING CABINET
Novelty Products:
•These items come pre-packaged. Simply place them in the storage baskets and segregate them by product type.
•Do not overfill the baskets or this product can soften or even melt.
•If you want to offer more variety, dividers and divided baskets can be used. It is recommended that novelties
be held between 5° and 10°F (-15° and -12°C). The product will remain firm but should be ideal for human
consumption.
Scoopable Frozen Dessert Offerings like Sherbet, Frozen Yogurt and Ice Cream:
•Product should be scooped with commercial duty scoops, spades or dishers such as
the Zeroll(R) product line. These professional dishers and scoops make defined product
balls without removing over-run or otherwise harming texture.
•If the items are made at the serving location, they should be produced in flanged
plastic or stainless steel containers. The containers can then be dropped easily into a
solid template designed for accessible dishing and serving.
•If the items are produced remotely, the shipping container is usually made of thin
cardboard or plastic can be inserted into the cabinet with an accessible template
opening for each offering. The solid skirt around the containers helps keep the cabinet
clean and attractive.
Health codes, inspectors & regulations require using a dipper well to store the scoops
throughout the day.
A semi-continuous flow of potable tap water is needed to keep the scoops clean removing butter-fat & trace product
smear that may stick to the scoop, restrict bacteria growth & stop flavor migration into another selection.
A flow rate ≤ ⅓ gpm is suggested with a water flow restrictor & a shut off valve to stop the flow in off-peak periods.

12
LIMITED WARRANTY
For Warranty details, please refer to:
www.MaxximumFoodService.com or 1-877-368-2797 or S[email protected]
A warranty card should have been included with your appliance.
However, if the warranty card is missing with your product, please send the following information to:
Warranty & Reference Data Sheet: (make a return copy standard post card
size)
Maxximum Food Service
WA RRANTY CARD
C/O Technical Services
3355 Enterprise Avenue,
Suite 160 Fort Lauderdale,
FL 33331
Brand & Model Number _ Serial Number
Date of Installation Name of Installer
or □"Plug and Play" Hook-up
Clearance in front of, to the side, and behind the louvered cooling panels for utility compartment?
Temperature of the freezer compartment
Type of Container in Freezer: Novelties 3 gallon tubs 6 gallon tubs
3 gallon rectangular cartons 6 gallon rectangular cartons
Other
Type of Product in Freezer: Ice Cream Gelato Frozen Custard
Frozen Yogurt Sorbet Italian Ice
Popsicles Sherbert Other
Are products stacked to store backups in freezer? _____ yes _____ no
Are Tub Holders Used? _____ yes _____ no Are Tub Holder Skirts Used? _____ yes _____ no
Is there a Sneeze Guard? _____ yes _____ no Are Baskets Used? _____ yes _____ no
Product Vertical Clearance to the freezer compartment lid?
Is there a dipper well for this unit? _____ yes _____ no If yes, water flow _____ gpm.
RoomAmbient Temperature
(PLEASE INITIAL) The installation Manual has been read and understood.
Date

NOTES

NOTES

Maxximum Food Service • 3355 Enterprise Avenue, Suite 160, Weston,FL 33331 USA
Phone: (954) 202-7419 • Website: MaxximumFoodService.com
This manual suits for next models
6
Table of contents
Other Maxx Cold Freezer manuals

Maxx Cold
Maxx Cold MXCR50BHC User manual

Maxx Cold
Maxx Cold MXSF29U W/1 DOOR Owner's manual

Maxx Cold
Maxx Cold MXSH3.4S User manual

Maxx Cold
Maxx Cold MCRT-23FD Operating instructions

Maxx Cold
Maxx Cold MXCR50B User manual

Maxx Cold
Maxx Cold MXX-23F User manual

Maxx Cold
Maxx Cold Select Series User manual

Maxx Cold
Maxx Cold MXX-23R User manual

Maxx Cold
Maxx Cold Select MXSF29U Owner's manual