MBO ALPHA 300 DAB User manual

ALPHA 300 DAB
BEDIENUNGSANLEITUNG
INSTRUCTION MANUAL
MODE D‘EMPLOI
© by 4MBO International Electronic AG, Germany
Digitaler Anrufbeantworter
MBO

1
TABLE OF CONTENTS
TABLE OF CONTENTS
Table of contents . . . . . . . . . . . . . . . . . . . . . . . . . . . . . . . . . . . . . . . . . . . . . . 1-2
INTRODUCTION
Dear customer . . . . . . . . . . . . . . . . . . . . . . . . . . . . . . . . . . . . . . . . . . . . . . . . 3
Warning . . . . . . . . . . . . . . . . . . . . . . . . . . . . . . . . . . . . . . . . . . . . . . . . . . . . . . 3
Scope of supply . . . . . . . . . . . . . . . . . . . . . . . . . . . . . . . . . . . . . . . . . . . . . . . 4
Safety notes . . . . . . . . . . . . . . . . . . . . . . . . . . . . . . . . . . . . . . . . . . . . . . . . . . . 4
THE UNIT
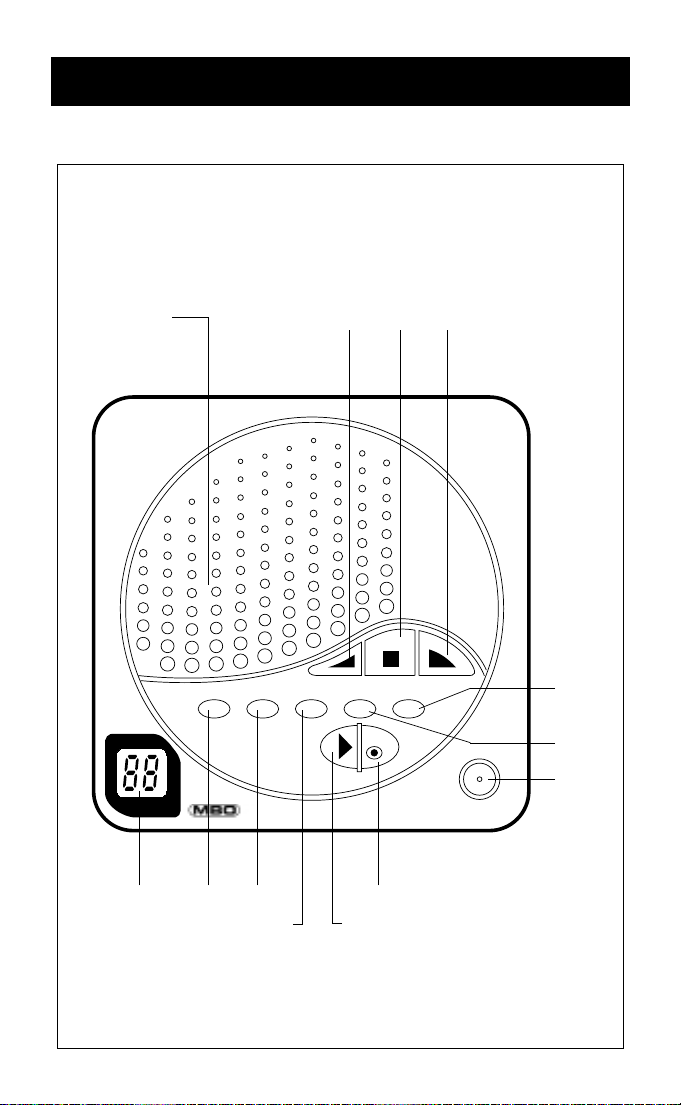
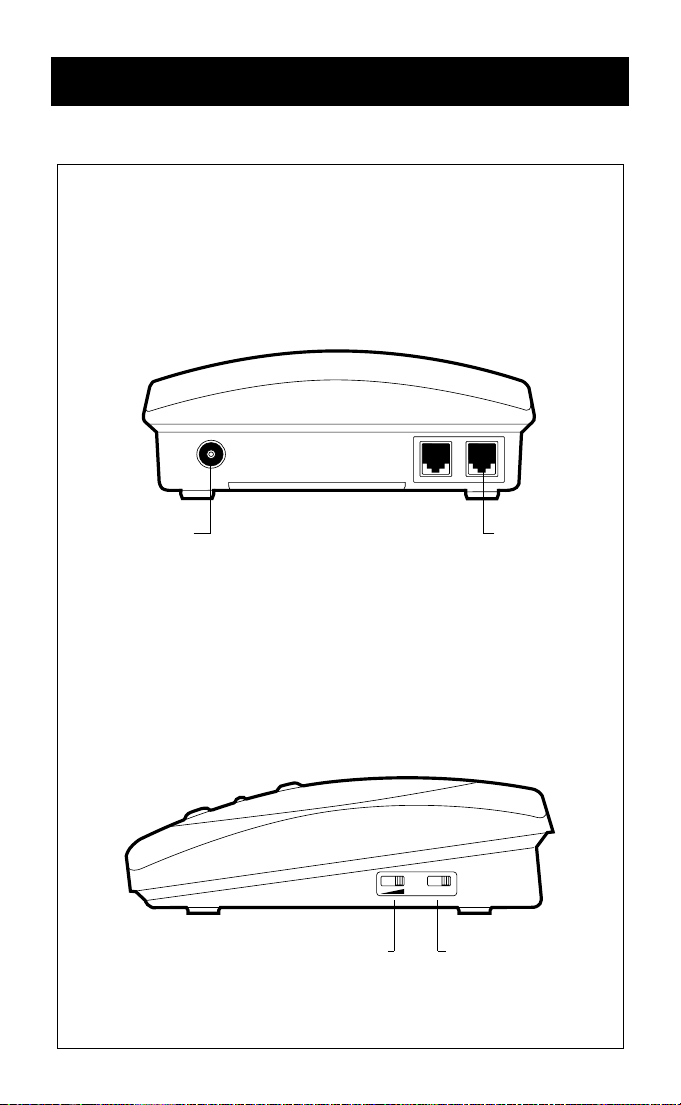
Description of the unit . . . . . . . . . . . . . . . . . . . . . . . . . . . . . . . . . . . . . . . . . 5-6
INSTALLATION
Battery installation . . . . . . . . . . . . . . . . . . . . . . . . . . . . . . . . . . . . . . . . . . . . . 7
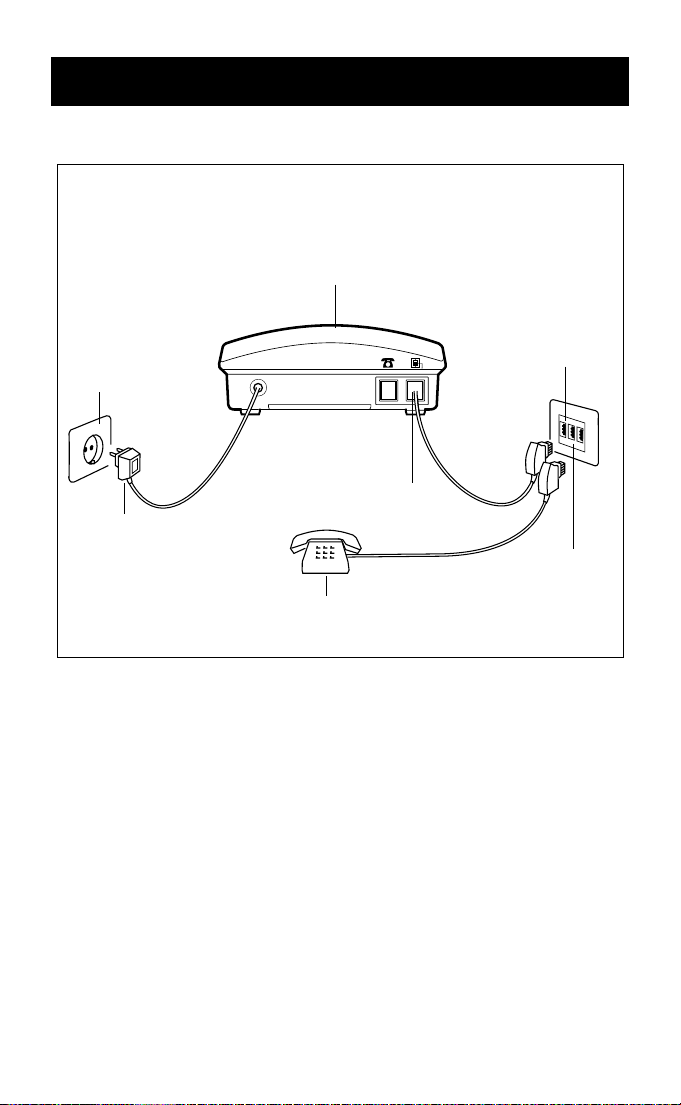
Installing the unit . . . . . . . . . . . . . . . . . . . . . . . . . . . . . . . . . . . . . . . . . . . . . . 8
Connect the line cord . . . . . . . . . . . . . . . . . . . . . . . . . . . . . . . . . . . . . . . . . . 8
Connect the telephone . . . . . . . . . . . . . . . . . . . . . . . . . . . . . . . . . . . . . . . . 8
Connect the power cord . . . . . . . . . . . . . . . . . . . . . . . . . . . . . . . . . . . . . . . 8
BEFORE STARTING
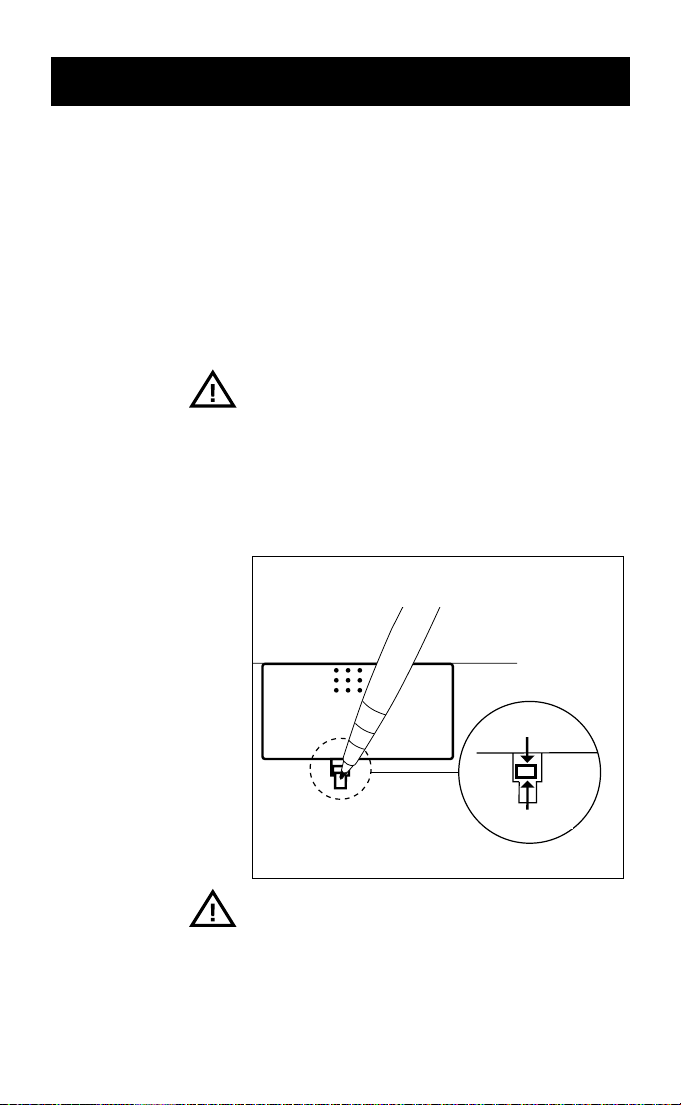
Setup ring select . . . . . . . . . . . . . . . . . . . . . . . . . . . . . . . . . . . . . . . . . . . . . . . 9
Date/time/stamp setting . . . . . . . . . . . . . . . . . . . . . . . . . . . . . . . . . . . . . . . 9
Play the current time . . . . . . . . . . . . . . . . . . . . . . . . . . . . . . . . . . . . . . . . . . . 10
Recording your announcement . . . . . . . . . . . . . . . . . . . . . . . . . . . . . . . . .10-11
Reviewing your announcement . . . . . . . . . . . . . . . . . . . . . . . . . . . . . . . . . 11
OPERATION
Recording a memo . . . . . . . . . . . . . . . . . . . . . . . . . . . . . . . . . . . . . . . . . . . . 12
Two way recording . . . . . . . . . . . . . . . . . . . . . . . . . . . . . . . . . . . . . . . . . . . . 12
Answer mode . . . . . . . . . . . . . . . . . . . . . . . . . . . . . . . . . . . . . . . . . . . . . . . . . 13
Turning the system on/off . . . . . . . . . . . . . . . . . . . . . . . . . . . . . . . . . . . . . . 13
Answer calls . . . . . . . . . . . . . . . . . . . . . . . . . . . . . . . . . . . . . . . . . . . . . . . . . . . 14
Bypassing the announcement . . . . . . . . . . . . . . . . . . . . . . . . . . . . . . . . . . 14
Screening your calls . . . . . . . . . . . . . . . . . . . . . . . . . . . . . . . . . . . . . . . . . . . . 14
Listening to your messages . . . . . . . . . . . . . . . . . . . . . . . . . . . . . . . . . . . . . 15
Erase or save message . . . . . . . . . . . . . . . . . . . . . . . . . . . . . . . . . . . . . . . . . 16
Call Break Through (CBT) . . . . . . . . . . . . . . . . . . . . . . . . . . . . . . . . . . . . . 16-17

2
REMOTE CONTROL
Your remote access code . . . . . . . . . . . . . . . . . . . . . . . . . . . . . . . . . . . . . 18
Change your remote acess code . . . . . . . . . . . . . . . . . . . . . . . . . . . . . . 18-19
Room monitor . . . . . . . . . . . . . . . . . . . . . . . . . . . . . . . . . . . . . . . . . . . . . . . 19
Changing your announcement . . . . . . . . . . . . . . . . . . . . . . . . . . . . . . . . 19-20
Playing your message . . . . . . . . . . . . . . . . . . . . . . . . . . . . . . . . . . . . . . . . . 20-21
Recording a memo . . . . . . . . . . . . . . . . . . . . . . . . . . . . . . . . . . . . . . . . . . . 21
Turning on the system . . . . . . . . . . . . . . . . . . . . . . . . . . . . . . . . . . . . . . . . 21
Turning off the system . . . . . . . . . . . . . . . . . . . . . . . . . . . . . . . . . . . . . . . . 22
REFERENCE
When memory is full . . . . . . . . . . . . . . . . . . . . . . . . . . . . . . . . . . . . . . . . . 22
Malfunction . . . . . . . . . . . . . . . . . . . . . . . . . . . . . . . . . . . . . . . . . . . . . . . . . . 22-23
Replacing the battery . . . . . . . . . . . . . . . . . . . . . . . . . . . . . . . . . . . . . . . . . 23
Table 1: Message window . . . . . . . . . . . . . . . . . . . . . . . . . . . . . . . . . . . . 24
Table 2: Remote control command . . . . . . . . . . . . . . . . . . . . . . . . . . . . . 25
TABLE OF CONTENTS

3
DEAR CUSTOMER,
we congratulate to your new answerphone and
we are glad that you have decided for the
ALPHA 300 DAB from 4MBO. The product you
have bought is state of the art, of highest quality
and has many advanced features.
WARNING
Please read the operation manual in order to
familiarise yourself with all the possibilities of
your answerphone. Follow the instructions in
order to ensure reliable operation and a long
service life of the appliance.
For messages lost as a result of a technical
defect the company of 4MBO cannot accept any
liability.
The operating instructions are there to provide
information. Their contents are not the subject
of a contract. All of the data stated are merely
nominal values.
Subject to technical modifications.
Closing date: 10/2001
INTRODUCTION

INTRODUCTION
4
Please check your appliance to ensure that it is
complete. The following parts should be present:
• 1 answerphone with telephone connecting cord
• 1 plug-on power supply unit (IN: 220-240 V
alternating current 50 Hz OUT: AC 9 V 300 mA)
• 1 instruction manual
In order to ensure trouble-free operation and a
long service life of the appliance the following
safety notes are to be exactly observed:
• Use only the plug-in power supply unit included
in the scope of supply and alkaline 9 V block
batteries.
• Do not expose the appliance to vibrations and
shocks, moisture and direct sunlight.
• Do not expose the appliance to any extreme
temperature fluctuations.
• Do not set up the appliance in the immediate
vicinity of electromagnetic interference fields.
Examples: lifts, radios and TV sets, photocopiers
,
heating and air conditioning units.
• Do not connect the appliance to the same elec-
tric terminal connections to which appliance
with an irregular current flow are connected
(air- conditioning units, photocopiers etc.).
• Do not press the keys too hard. Even with only
light key pressure the appliance works correctly.
• Clean the answerphone always only with a
slightly dampened cloth. Do not use any sol-
vents.
• Do not spill any liquids over the appliance.
SCOPE OF SUPPLY
SAFETY NOTES

5
THE UNIT
LÖSCHEN ANS1 ANS2 MEMO UHR
ANS
ALPHA 300 DAB
. .
DESCRIPTION
OF THE UNIT
Fig. 1 View from above
LED Display Delete Answer 1 Answer (on/off)
Answer 2 Play
Loudspeaker Repeat Stop Forward
Clock
Memo
Micro-
phone

6
2 4 ET
DESCRIPTION
OF THE UNIT
Fig. 3 Right side
Fig. 2 Rear side
THE UNIT
Power cord TEL LINE
Volume control Ring select switch

7
INSTALLATION
Open the battery door on the base of the unit
and install one 9 V battery. The battery is used
to save your messages in the event of a power
failure. Your announcements and messages will
be retained in memory for at least 50 hours
during a power failure. If the battery used for
backup power is missing, low on power, or
incorrectly installed, the MESSAGE WINDOW
displays ”Lo”.
Notes:
To avoid losing your announcements or mes-
sages stored in memory, you should leave the
unit connected to the AC power while changing
the battery. Disconnect the telephone line cord
before changing the battery.
Batteries are hazardous waste. Do not dispose
them together with the household garbage.
BATTERY
INSTALLATION
öffnen
sperren
Fig. 4 Battery door
open
close

8
INSTALLATION
Plug one end of the line cord into the LINE jack
at the rear of the unit and the other end into the
modular wall jack (N).
Plug your telephone set cord into the wall jack
(F).
Plug the power transformer into an electrical
outlet that is not controlled by a wall switch. The
message window will count from 0to 60. It will
then flash A1 /CL /0to indicate that you need to
set the date, time and record an announce-
ment.
CONNECT THE
TELEPHONE
CONNECT THE
LINE CORD
CONNECT THE
POWER CORD
INSTALLING
THE UNIT
Fig. 5
Electrical outlet
Wall jack
NFN
Power transformer
Telephone
Rear of the unit
LINE
Wall jack
F

9
SETUP
RING SELECT
DATE/TIME/STAMP
SETTING
Use the switch on the right side of the unit to
select the number of times you want the phone
to ring before the system answers.
1. Set it to 2 if you want the system to answer
all calls on the second ring
2. Set it to 4 if you want the system to answer
calls on the fourth ring
3. Set it to ET (Economical Toll saver) if you want
the system to answer on the second ring
when the system has new messages and on
the fourth ring when the system has no new
message.
Note:
We suggest that you use ET. If you call long
distance or from a pay phone to check your
messages, the system will answer after 2 rings if
a new message has been received since the last
time you checked. If the system does not answer
after 2 rings you have no new messages so you
can hang up to avoid paying for the call.
When ”CL” flashes on the message window the
system clock need to be set as follows:
1. Press and hold down the (UHR) key for about
2 seconds and release to play voice weekday.
2. Press the or the key to select the right
weekday.
3. Press the (UHR) key to select the correct week-
day.
4. Repeat step 2-3 to setup hour.
5. Repeat step 2-3 to setup minute.
After the minute has been setup the exact Day
Time Stamp (DTP) will be played.
Adjust the volume control if necessary. The
setup procedure will be abandoned if the key
input is more than 8 seconds.
BEFORE STARTING

10
BEFORE STARTING
Whenever you want to hear the current week-
day and time, press (UHR) once.
NOTE:
1 for Sunday, 2 for Monday, 3 for Tuesday, 4 for
Wednesday, 5 for Thursday, 6 for Friday, 7 for
Saturday.
Before using your new answering phone, you
should record the announcement that callers
will hear when the system answers a call. The
system has two announcements ANS1 and
ANS2 for ”ANSWER & RECORD” mode and
”ANSWER ONLY” mode respectively.
To record ANS1:
1. Prepare your announcement
Example:
”Hello, we can’t come to the phone right
now. Please leave your name, phone number
and a short message after the beep.
Thank you.”
2. Press and hold (ANS1) key for about two
seconds and then release it to record ANS1
after hearing the beep. The message window
will count from ”0”.
3. Speak towards the microphone in a normal
tone of voice, from about 25 cm away.
4. Press ( ) key when you have finished.
5. The unit will automatically play back your an-
nouncement.
To record ANS2:
ANS2 is an answer-only message when you do
not want to record an incoming message. The
procedure of recording ANS2 is similar to re-
cording ANS1.
PLAY THE
CURRENT TIME
RECORDING YOUR
ANNOUNCEMENT

11
1. Prepare your announcement:
Example:
”Hello, I can’t come to the phone right now.
Please call back later. Thank you.”
2. Press and hold (ANS2) key for about two
seconds and release to record ANS2 after
hearing the beep. The message window will
count from ”0”.
3.
Repeats ANS1 steps 3-5.
To review your announcements press (ANS1) or
(ANS2) once.
The old announcement is deleted when a new
announcement is recorded successfully.
REVIEWING YOUR
ANNOUNCEMENT
BEFORE STARTING
CHANGING YOUR
ANNOUNCEMENT

12
TWO WAY
RECORDING
RECORDING
A MEMO
OPERATION
Memo is a message left for a family member. It
is stored by the system as an incoming message.
1. Press and hold the (MEMO) key for about 2
seconds until the message window displays
”oo”.
2. Record the memo after hearing a long beep.
The maximum memo recording time is 30 sec.
3. Press the ( ) key when you have finished.
4. To listen to the memo press the (Memo) key
once.
5. To erase or save a memo follow the instruc-
tions ”ERASE OR SAVE MESSAGE” (page 16).
If you have an important telephone conversation
but you do not want to write it down, you can
record it as follows:
1. Press and hold the (MEMO) key for about 4
seconds at any time during the phone conver-
sation.
2. The message window will display ”2r”. The
conversation will be recorded.
3. To stop recording press the ( ) key.
The two way recording is stored by the system
as an incoming message.
Please note:
The system does not sound a warning beep to
let the other party know that the call is being
recorded. To ensure that you are in compliance
with the regulations that concern recording a
telephone call, you should start the recording
process and then inform the caller that you are
recording the call.

13
The system has two operation modes: ”ANSWER
& RECORD” mode and ”ANSWER ONLY” mode.
ANSWER & RECORD:
The system will answer and record incoming
calls. ANS1 will be played to inform caller to
leave message.
The procedure to setup the ”ANSWER & RE-
CORD” mode is as follows:
1. The system is set to ”ANSWER & RECORD”
mode once the power is switched on.
2. While in ”ANSWER ONLY” mode, press the
(ANS) key for about 2 seconds. A beep tone
will be heard and ANS1 will be played.
3. The message window will display the total
number of messages.
ANSWER ONLY:
The system will only play ANS2 to inform the
caller you cannot come to the phone. No
message will be recorded. When the memory is
full, the system will change to “ANSWER ONLY”
automatically.
The procedure to setup “ANSWER ONLY” mode
is as follows:
1. While in ”ANSWER & RECORD” mode, press
the (ANS) key for about 2 seconds.
2. The Message Window will display ”Ao”.
After you have completed the setup, the mes-
sages stored in the memory (0if no message has
been received).
Press the (ANS) key once to switch the system
on. The answer button will light up to inform
you that the answer system is on. If you do not
want your system to answer calls, press the
(ANS) key once to turn off the system.
OPERATION
ANSWER MODE
TURNING THE
SYSTEM ON/OFF

14
OPERATION
When the system answers a call in ”ANSWER &
RECORD” mode, the caller hears the announce-
ment ANS1 followed by a beep.
While the system is answering a call, the mes-
sage window displays ”--”. The answer key will
flash if a new message exists.
For ”ANSWER ONLY” mode, the system will only
play ANS2 and no message will be recorded.
To conserve memory, messages are limited to a
maximum of 60 seconds each. The system will
beep once and hang up if:
1. the caller is still speaking after 60 seconds
2. the caller is silent for more than 8 seconds
3. the system memory runs out
4. a continuous signal or busy tone is detected
People who call frequently can press ”*” (from a
touch tone telephone) when the announcement
begins. The system will skip the rest of the an-
nouncement, beep, and begin recording.
To screen your calls, set the system to answer
calls and adjust the volume control so you can
hear the announcement and callers message on
the system´s speaker. If you decide to take a call,
lift the handset of any telephone on the same
line. The system will stop recording and reset to
answer calls.
Note:
If the announcement does not stop immediately,
press the ( ) key or the telephone hook switch.
ANSWER CALLS
BYPASSING THE
ANNOUNCEMENT
SCREENING
YOUR CALLS

15
You can use the speaker volume control to
adjust the volume. It does not effect the level of
the announcement heard by the caller.
1.
Playback all messages:
Press the (PY ) key to hear all messages
sequentially.
2.
Playback new messages only:
Press and hold the (PLA) key for about 2
seconds, new messages will be played se-
quentially.
While the system plays each message, it will
show the order on the message window and
announces it on speaker. At the end of each
message, the system announces the day and
time the message was received. After the last
message has been played, the system announces
”END OF MESSAGES” and the available free
memory capacity.
The following functions are available during
playback to make it easier on you to listen to the
messages:
- Pause message:
Press the ( ) key to pause message play. If
the message pause exceeds 8 seconds, the
message play will be aborted. To continue
message playback from the pause state, press
the ( ) key to stop pausing the message
play.
- Skip message:
To skip to the next message, press the ( )
key.
- Repeat message:
To listen to the previous message, press the
( ) key while Date/Time/Stamp (DTS) is play-
ing.
- Stop message:
Press the ( ) key to abort the message play.
OPERATION
LISTENING TO
YOUR MESSAGES

16
OPERATION
Deleting all old messages:
Press and hold the (LÖSCHEN) key until ES (ERASE
ALL)
is displayed. All messages will be deleted.
Please note:
All memo recordings will also be deleted.
Deleting Single messages:
Press the (
LÖSCHEN
) key to erase the current
playing message.
Saving messages:
The system saves your messages automatically.
It can record approximately 19 minutes of
messages (including the time for your announce-
ments) or a maximum of 60 messages.
When the memory is full or 60 messages have
been recorded, the LCD will display ”Fu”. You
must delete some or all of the messages before
any new message can be recorded. If you
deleted all messages accidentally, press and hold
the (
LÖSCHEN
) key for about 2 seconds before
recording any new message. The erased mes-
sages will be saved after you have heard a long
beep.
If you do not want to be disturbed, your system
will answer the phone for you. However, if there
is a particular call you would like to receive,
inform the caller of the Caller Breakthrough
function.
When the caller enters the CBT code from a
touch tone telephone, the system beeps loudly
to alert you to the priority call .
To use Call Breakthrough (CBT) a caller should:
1. Dial your telephone number.
.
2. When the announcement begins to play,
ERASE OR SAVE
MESSAGE
CALL
BREAKTHROUGH
(CBT)

17
enter ”*” to skip the ANS play, and then
enter the CBT code, a two-beep alarm tone
will be heard if the code is correct.
3. The CBT function if it exceeds 45 seconds. it
will then enter ICM recording in “ANSWER &
RECORDS” mode, or ends on-line operation
in “
ANSWER ONLY” mode or in “SYSTEM
STANDBY” mode.
4. The corresponding touch tone commands are
as follows:
End CBT function — press ”*
8
”.
Repeat CBT — press CBT code +”*”.
The CBT code is initially preset to ”267”. You
can change the code to any 3 digits from 000 to
999. The procedure of CBT code setup/display is
as follows:
1. Press the ( ) key for about 2 seconds and
release to display CBT code.
The code display/setup will be high digit first,
then middle digit, and the low digit.
2.
Press the ( ) key or the ( ) key to
increase or decrease the digit.
3. Press the (ANS) key to select the correct digit.
4.
Repeat step 2 and 3 to change following digit
setup.
5. If a keypress exceed 8 seconds, the setup/dis-
play procedure will be aborted.
6. Press the ( ) key to quit the CBT code set-
up/display.
OPERATION

18
REMOTE CONTROL
You can use many features of the system when
you are away from home. To protect your
privacy, most features can only be used after you
have entered a Remote Access Code from a
touch tone telephone. The code is initially preset
to ”159”. You can use the preset code or
choose any 3 digit from 000 to 999.
The procedure for remote access code setup/
display is as follows:
1. Press the ( ) key for about 2 sec and then
release it to display the remote access code.
The code display/setup will be a high digit
first, then a middle digit, and then a low digit.
2. Press the ( ) key or the ( ) key to in-
crease or decrease the digit.
3. Press the (ANS) key to select the correct digit.
4. If a keypress exceeds 8 seconds, the setup/dis-
play procedure will be aborted.
Please Note:
If the AC power fails and there is no battery
installed or the battery is low on power, the
remote access code will return to the factory
setting.
If you have left home, you can change the
remote access code as follows:
1. Dial your telephone number from a touch
tone telephone.
2. When the system answers, enter ”*” to skip
the ANS play, a beep tone will be heard.
3. Press the security code + ”*” to enter the
remote control mode.
4. Enter ”*6” and then the new security code.
5. If a valid code number is entered, the system
YOUR REMOTE
ACCESS CODE
CHANGE YOUR
REMOTE ACCESS
CODE

19
changes the remote access code.
If you have left home, you can monitor the
room state on the telephone line by using the
following steps:
1. Dial your telephone number from a touch tone
telephone.
2. When the system answers, enter ”*” to skip
the ANS play, a beep tone will be heard
3. Press the security code + ”*” to enter the
“REMOTE CONTROL” mode.
4. Enter ”3” to start the room monitor.
5. The duration of room monitor start is set to
30 seconds or you may press ”8” to quit.
To change your announcement:
1. Dial your telephone number from a touch
tone telephone.
2. When the system answers, enter ”*” to skip
the ANS play, a beep tone will be heard.
3. Press the security code plus ”*” to enter the
“REMOTE CONTROL” mode.
4. Press ”*1” to change ANS1 or press ”*2”
to change ANS2. The system beeps and
begins recording.
5. Speak into the telephone in a normal tone of
voice.
6. When you have finished, press ”8” to stop or
press ”#” to quit the remote control func-
tion.
REMOTE CONTROL
CHANGING YOUR
ANNOUNCEMENT
ROOM MONITOR
Table of contents
Other MBO Answering Machine manuals