MBO 921 User manual

© by 4MBO International Electronic AG, Germany
MBO DVD-PLAYER 921
BEDIENUNGSANLEITUNG
INSTRUCTION MANUAL
MODE D’EMPLOI
GEBRUIKSAANWIJZING
ISTRUZIONI PER L’USO
MANUAL DE INSTRUCCIONES
MANUAL DE INSTRUÇÕES
DVD-CD-Abspielgerät

1
CONTENTS
CONTENTS . . . . . . . . . . . . . . . . . . . . . . . . . . . . . . . . . . . . . . . . . . . . . . . . . . . . . . . . . . . . . . . . . . . . . . . . . . . . . . . . . . . . . . . . . . . . . . . . . . . . . . . . . . . . . . . . . . . . . . . . . . . . . . . . . 1-2
INTRODUCTION
Dear Customer . . . . . . . . . . . . . . . . . . . . . . . . . . . . . . . . . . . . . . . . . . . . . . . . . . . . . . . . . . . . . . . . . . . . . . . . . . . . . . . . . . . . . . . . . . . . . . . . . . . . . . . . . . . . . . . . . . . . . . . . 3
Attention ........................................................... . . . . . . . . . . . . . . . . . . . . . . . . . . . . . . . . . . . . . . . . . . . . . . . . . . . . . . . . . . . . . . . . . . . 3
Caution . . . . . . . . . . . . . . . . . . . . . . . . . . . . . . . . . . . . . . . . . . . . . . . . . . . . . . . . . . . . . . . . . . . . . . . . . . . . . . . . . . . . . . . . . . . . . . . . . . . . . . . . . . . . . . . . . . . . . . . . . . . . . . . . 3
Features ............................................................ . . . . . . . . . . . . . . . . . . . . . . . . . . . . . . . . . . . . . . . . . . . . . . . . . . . . . . . . . . . . . . . . . . . . 3
Disc Formats Supported by this Player ............................................. . . . . . . . . . . . . . . . . . . . . . . . . . . . . . . . . . . . . . . . . . . . . . . . . . . 4
IMPORTANT SAFETY INSTRUCTION
Caution . . . . . . . . . . . . . . . . . . . . . . . . . . . . . . . . . . . . . . . . . . . . . . . . . . . . . . . . . . . . . . . . . . . . . . . . . . . . . . . . . . . . . . . . . . . . . . . . . . . . . . . . . . . . . . . . . . . . . . . . . . . . . . . . 4
Note . . . . . . . . . . . . . . . . . . . . . . . . . . . . . . . . . . . . . . . . . . . . . . . . . . . . . . . . . . . . . . . . . . . . . . . . . . . . . . . . . . . . . . . . . . . . . . . . . . . . . . . . . . . . . . . . . . . . . . . . . . . . . . . . . 4
Region Codes .......................................................... . . . . . . . . . . . . . . . . . . . . . . . . . . . . . . . . . . . . . . . . . . . . . . . . . . . . . . . . . . . . . . .4
Safety Instruction ....................................................... . . . . . . . . . . . . . . . . . . . . . . . . . . . . . . . . . . . . . . . . . . . . . . . . . . . . . . . . . . . . . . 4 - 5
Important Safety Precautions . . . . . . . . . . . . . . . . . . . . . . . . . . . . . . . . . . . . . . . . . . . . . . . . . . . . . . . . . . . . . . . . . . . . . . . . . . . . . . . . . . . . . . . . . . . . . . . . . . . . . . . . . 5
Power Cord Protection . . . . . . . . . . . . . . . . . . . . . . . . . . . . . . . . . . . . . . . . . . . . . . . . . . . . . . . . . . . . . . . . . . . . . . . . . . . . . . . . . . . . . . . . . . . . . . . . . . . . . . . . . . . . . . . 5
Placement ........................................................... . . . . . . . . . . . . . . . . . . . . . . . . . . . . . . . . . . . . . . . . . . . . . . . . . . . . . . . . . . . . . . . . . . 5
Nonuse Periods ......................................................... . . . . . . . . . . . . . . . . . . . . . . . . . . . . . . . . . . . . . . . . . . . . . . . . . . . . . . . . . . . . . . .5
No Fingers or other Objects Inside ............................................... . . . . . . . . . . . . . . . . . . . . . . . . . . . . . . . . . . . . . . . . . . . . . . . . . . . . 5
Keep away from Water/Magnet .................................................. . . . . . . . . . . . . . . . . . . . . . . . . . . . . . . . . . . . . . . . . . . . . . . . . . . . 5
Stacking ............................................................ . . . . . . . . . . . . . . . . . . . . . . . . . . . . . . . . . . . . . . . . . . . . . . . . . . . . . . . . . . . . . . . . . . . 5
Condensation .......................................................... . . . . . . . . . . . . . . . . . . . . . . . . . . . . . . . . . . . . . . . . . . . . . . . . . . . . . . . . . . . . . . .5
If there is Noise Interference on the TV while a Broadcast is being reveived .......................... . . . . . . . . . . . . . . . . . . . . . . . . . . . . 5
DESCRIPTION OF THE DEVICE
Front of the Device . . . . . . . . . . . . . . . . . . . . . . . . . . . . . . . . . . . . . . . . . . . . . . . . . . . . . . . . . . . . . . . . . . . . . . . . . . . . . . . . . . . . . . . . . . . . . . . . . . . . . . . . . . . . . . . . . . . 6
Display . . . . . . . . . . . . . . . . . . . . . . . . . . . . . . . . . . . . . . . . . . . . . . . . . . . . . . . . . . . . . . . . . . . . . . . . . . . . . . . . . . . . . . . . . . . . . . . . . . . . . . . . . . . . . . . . . . . . . . . . . . . . . . . . . 6
Rear of the Device ....................................................... . . . . . . . . . . . . . . . . . . . . . . . . . . . . . . . . . . . . . . . . . . . . . . . . . . . . . . . . . . . . . 6
REMOTE CONTROL
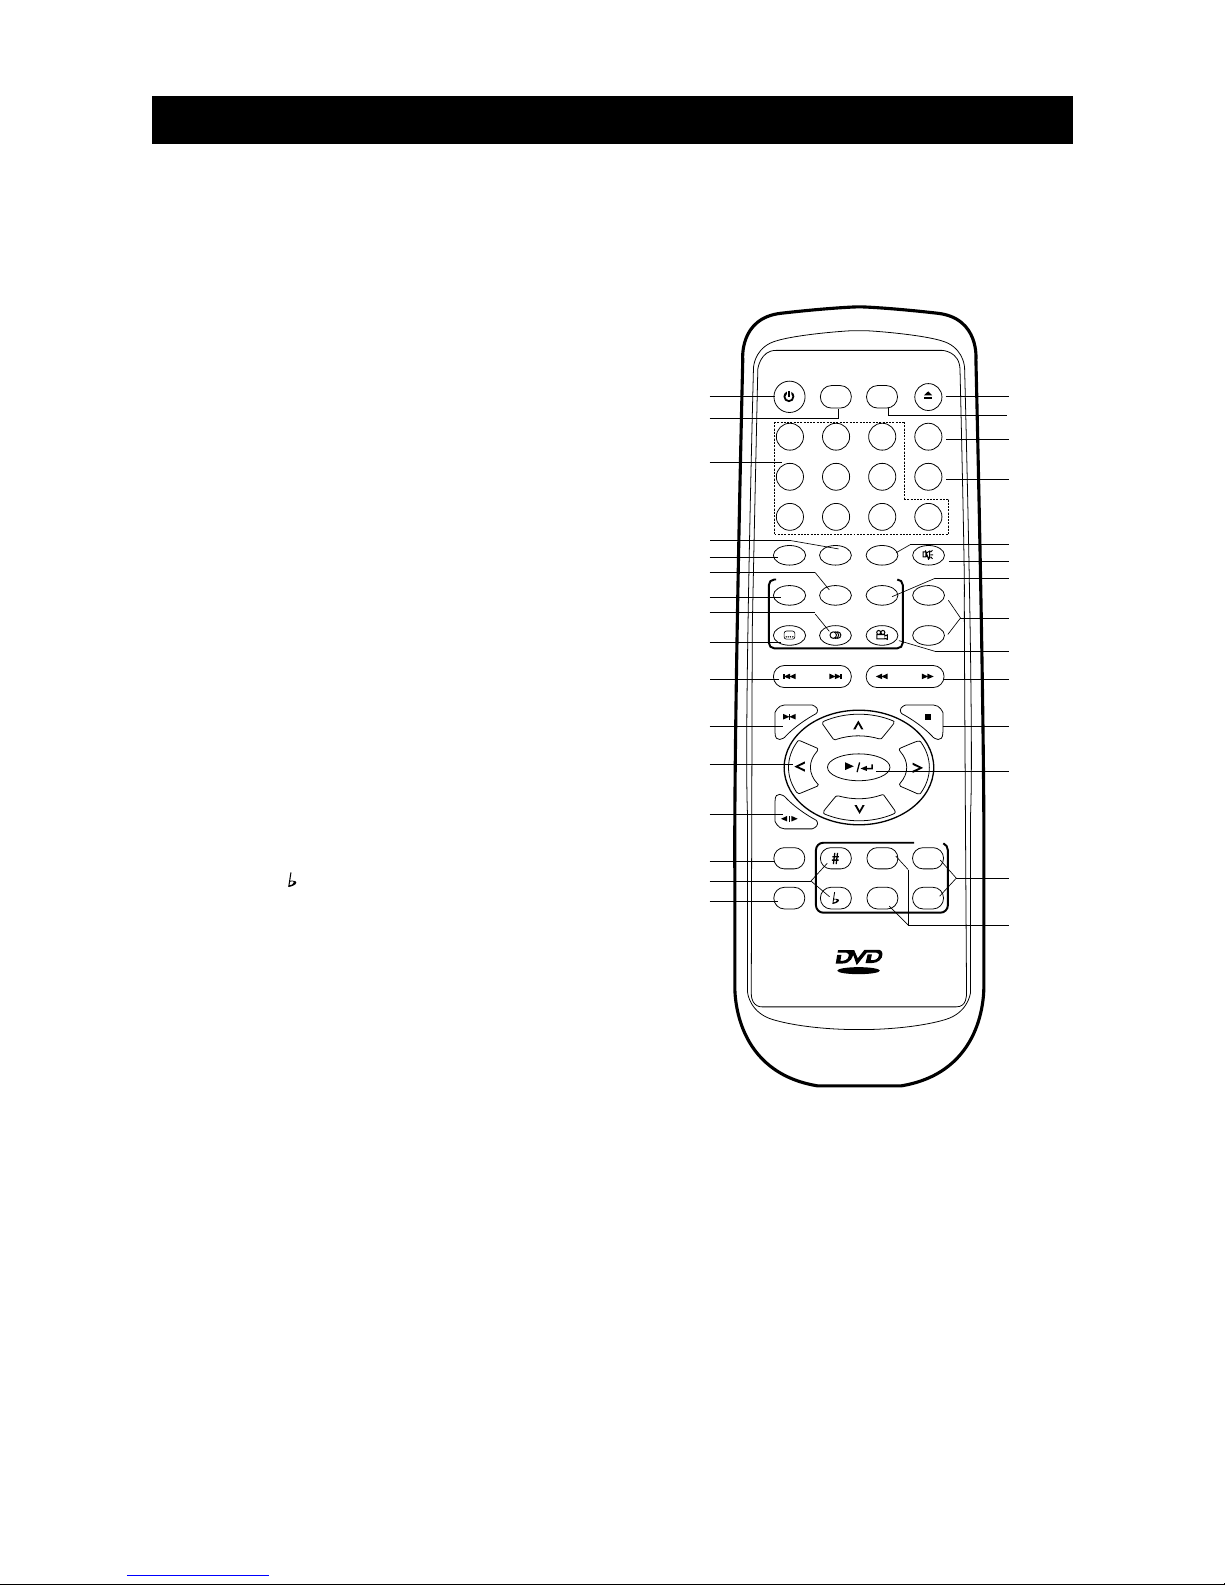
Description of Key Functions .................................................. . . . . . . . . . . . . . . . . . . . . . . . . . . . . . . . . . . . . . . . . . . . . . . . . . . . . . . . . 7
Preparing the Remote Control . . . . . . . . . . . . . . . . . . . . . . . . . . . . . . . . . . . . . . . . . . . . . . . . . . . . . . . . . . . . . . . . . . . . . . . . . . . . . . . . . . . . . . . . . . . . . . . . . . . . . . . 8-9
CONNECTIONS
Connecting to a TV ....................................................... . . . . . . . . . . . . . . . . . . . . . . . . . . . . . . . . . . . . . . . . . . . . . . . . . . . . . . . . . . . . 9-11
Connecting to Amplifier with Dolby Digital/DTS Decoder ..................................... . . . . . . . . . . . . . . . . . . . . . . . . . . . . . . . . . . . . . . 11-12
REPRODUCTION
Selecting the Type of Disc for the Type of TV Connected .................................... . . . . . . . . . . . . . . . . . . . . . . . . . . . . . . . . . . . . . . 12
Connecting to the Multi-System TV ................................................ . . . . . . . . . . . . . . . . . . . . . . . . . . . . . . . . . . . . . . . . . . . . . . . . . . 12
Connecting to the NTSC TV .................................................... . . . . . . . . . . . . . . . . . . . . . . . . . . . . . . . . . . . . . . . . . . . . . . . . . . . . . . 12
Connecting to the PAL TV .................................................... . . . . . . . . . . . . . . . . . . . . . . . . . . . . . . . . . . . . . . . . . . . . . . . . . . . . . . . . 13
DVD PLayback . . . . . . . . . . . . . . . . . . . . . . . . . . . . . . . . . . . . . . . . . . . . . . . . . . . . . . . . . . . . . . . . . . . . . . . . . . . . . . . . . . . . . . . . . . . . . . . . . . . . . . . . . . . . . . . . . . . . . . . . .13
Basic Play . . . . . . . . . . . . . . . . . . . . . . . . . . . . . . . . . . . . . . . . . . . . . . . . . . . . . . . . . . . . . . . . . . . . . . . . . . . . . . . . . . . . . . . . . . . . . . . . . . . . . . . . . . . . . . . . . . . . . . . . . . . . . . 13
Stopping Play ......................................................... . . . . . . . . . . . . . . . . . . . . . . . . . . . . . . . . . . . . . . . . . . . . . . . . . . . . . . . . . . . . . . . . . 13
After Operation ........................................................ . . . . . . . . . . . . . . . . . . . . . . . . . . . . . . . . . . . . . . . . . . . . . . . . . . . . . . . . . . . . . . . 13-14
Rapid Advance (Rapid Reverse) ................................................. . . . . . . . . . . . . . . . . . . . . . . . . . . . . . . . . . . . . . . . . . . . . . . . . . . . . . 14
Skipping Ahead or Back to Chapters ............................................... . . . . . . . . . . . . . . . . . . . . . . . . . . . . . . . . . . . . . . . . . . . . . . . . . 14
Still Picture (Pause) ..................................................... . . . . . . . . . . . . . . . . . . . . . . . . . . . . . . . . . . . . . . . . . . . . . . . . . . . . . . . . . . . . . . . 14
Frame Advance (Step) . . . . . . . . . . . . . . . . . . . . . . . . . . . . . . . . . . . . . . . . . . . . . . . . . . . . . . . . . . . . . . . . . . . . . . . . . . . . . . . . . . . . . . . . . . . . . . . . . . . . . . . . . . . . . . . . 14
Slow-Motion Play . . . . . . . . . . . . . . . . . . . . . . . . . . . . . . . . . . . . . . . . . . . . . . . . . . . . . . . . . . . . . . . . . . . . . . . . . . . . . . . . . . . . . . . . . . . . . . . . . . . . . . . . . . . . . . . . . . . . . 14
DIRECT SELECTION OF SCENES
Selecting Scenes by Title Number ............................................... . . . . . . . . . . . . . . . . . . . . . . . . . . . . . . . . . . . . . . . . . . . . . . . . . . . . 14
Selecting Scenes by Chapter Number ............................................... . . . . . . . . . . . . . . . . . . . . . . . . . . . . . . . . . . . . . . . . . . . . . . . . 15
Selecting Scenes by Time .................................................... . . . . . . . . . . . . . . . . . . . . . . . . . . . . . . . . . . . . . . . . . . . . . . . . . . . . . . . . . . 15
REPEAT PLAY
Repeat Viewing ......................................................... . . . . . . . . . . . . . . . . . . . . . . . . . . . . . . . . . . . . . . . . . . . . . . . . . . . . . . . . . . . . . . 15
Repeating Sections between two Specific Points (A-B Repeat) .................................. . . . . . . . . . . . . . . . . . . . . . . . . . . . . . . . . . . . 16
Displaying the Information of the Scene to be Viewed ...................................... . . . . . . . . . . . . . . . . . . . . . . . . . . . . . . . . . . . . . . . 16
CONVENIENT FUNCTIONS
Displaying the Scene with a Larger and Closer View ....................................... . . . . . . . . . . . . . . . . . . . . . . . . . . . . . . . . . . . . . . . . 16
Changing Audio Soundtrack Language ............................................... . . . . . . . . . . . . . . . . . . . . . . . . . . . . . . . . . . . . . . . . . . . . . . 16
Clearing/Displaying of Subtitles ................................................ . . . . . . . . . . . . . . . . . . . . . . . . . . . . . . . . . . . . . . . . . . . . . . . . . . . . . . 16
Changing Subtitle Language ................................................... . . . . . . . . . . . . . . . . . . . . . . . . . . . . . . . . . . . . . . . . . . . . . . . . . . . . . . 16-17
Viewing from another Angle ................................................... . . . . . . . . . . . . . . . . . . . . . . . . . . . . . . . . . . . . . . . . . . . . . . . . . . . . . . 17
Using a DVD Menu ........................................................ . . . . . . . . . . . . . . . . . . . . . . . . . . . . . . . . . . . . . . . . . . . . . . . . . . . . . . . . . . . 17
Using the Menu Function . . . . . . . . . . . . . . . . . . . . . . . . . . . . . . . . . . . . . . . . . . . . . . . . . . . . . . . . . . . . . . . . . . . . . . . . . . . . . . . . . . . . . . . . . . . . . . . . . . . . . . . . . . . . 17
Switching to another TV System ................................................. . . . . . . . . . . . . . . . . . . . . . . . . . . . . . . . . . . . . . . . . . . . . . . . . . . . . 18

2
CONTENTS
Turning Off the Volume of the DVD Player ............................................ . . . . . . . . . . . . . . . . . . . . . . . . . . . . . . . . . . . . . . . . . . . . . 18
VIDEO CD PLAYBACK
Preparations . . . . . . . . . . . . . . . . . . . . . . . . . . . . . . . . . . . . . . . . . . . . . . . . . . . . . . . . . . . . . . . . . . . . . . . . . . . . . . . . . . . . . . . . . . . . . . . . . . . . . . . . . . . . . . . . . . . . . . . . . . . 18
Basic Play . . . . . . . . . . . . . . . . . . . . . . . . . . . . . . . . . . . . . . . . . . . . . . . . . . . . . . . . . . . . . . . . . . . . . . . . . . . . . . . . . . . . . . . . . . . . . . . . . . . . . . . . . . . . . . . . . . . . . . . . . . . . . . 18
Menu Play ........................................................... . . . . . . . . . . . . . . . . . . . . . . . . . . . . . . . . . . . . . . . . . . . . . . . . . . . . . . . . . . . . . . . . . . 18
Playback control ........................................................ . . . . . . . . . . . . . . . . . . . . . . . . . . . . . . . . . . . . . . . . . . . . . . . . . . . . . . . . . . . . . . .19
After Operation ........................................................ . . . . . . . . . . . . . . . . . . . . . . . . . . . . . . . . . . . . . . . . . . . . . . . . . . . . . . . . . . . . . . . 19
Stopping Play ......................................................... . . . . . . . . . . . . . . . . . . . . . . . . . . . . . . . . . . . . . . . . . . . . . . . . . . . . . . . . . . . . . . . . . 19
Rapid Advance (Rapid Reverse) ................................................. . . . . . . . . . . . . . . . . . . . . . . . . . . . . . . . . . . . . . . . . . . . . . . . . . . . . . 19
Skipping Ahead or Back to Tracks ................................................ . . . . . . . . . . . . . . . . . . . . . . . . . . . . . . . . . . . . . . . . . . . . . . . . . . . . 19
Still Picture (Pause) ..................................................... . . . . . . . . . . . . . . . . . . . . . . . . . . . . . . . . . . . . . . . . . . . . . . . . . . . . . . . . . . . . . . . 20
Frame Advance (Step) . . . . . . . . . . . . . . . . . . . . . . . . . . . . . . . . . . . . . . . . . . . . . . . . . . . . . . . . . . . . . . . . . . . . . . . . . . . . . . . . . . . . . . . . . . . . . . . . . . . . . . . . . . . . . . . . 20
Slow-Motion Play . . . . . . . . . . . . . . . . . . . . . . . . . . . . . . . . . . . . . . . . . . . . . . . . . . . . . . . . . . . . . . . . . . . . . . . . . . . . . . . . . . . . . . . . . . . . . . . . . . . . . . . . . . . . . . . . . . . . . 20
Informaton (Video CDs) . . . . . . . . . . . . . . . . . . . . . . . . . . . . . . . . . . . . . . . . . . . . . . . . . . . . . . . . . . . . . . . . . . . . . . . . . . . . . . . . . . . . . . . . . . . . . . . . . . . . . . . . . . . . . . 20
REPEAT PLAY
Repeat Viewing (Listening) . . . . . . . . . . . . . . . . . . . . . . . . . . . . . . . . . . . . . . . . . . . . . . . . . . . . . . . . . . . . . . . . . . . . . . . . . . . . . . . . . . . . . . . . . . . . . . . . . . . . . . . . . . . 20
Repeating Sections between two Specific Points (A-B Repeat) .................................. . . . . . . . . . . . . . . . . . . . . . . . . . . . . . . . . . . . 21
AUDIO CD PLAYBACK
Preparations .......................................................... . . . . . . . . . . . . . . . . . . . . . . . . . . . . . . . . . . . . . . . . . . . . . . . . . . . . . . . . . . . . . . . . . . 21
Basic Play . . . . . . . . . . . . . . . . . . . . . . . . . . . . . . . . . . . . . . . . . . . . . . . . . . . . . . . . . . . . . . . . . . . . . . . . . . . . . . . . . . . . . . . . . . . . . . . . . . . . . . . . . . . . . . . . . . . . . . . . . . . . . . 21
Information (Audio CDs) .................................................... . . . . . . . . . . . . . . . . . . . . . . . . . . . . . . . . . . . . . . . . . . . . . . . . . . . . . . . . . . 21
Stopping Play ......................................................... . . . . . . . . . . . . . . . . . . . . . . . . . . . . . . . . . . . . . . . . . . . . . . . . . . . . . . . . . . . . . . . . . 21
Rapid Advance (Rapid Reverse) ................................................. . . . . . . . . . . . . . . . . . . . . . . . . . . . . . . . . . . . . . . . . . . . . . . . . . . . . . 21
Skipping Ahead or Back to Tracks ................................................ . . . . . . . . . . . . . . . . . . . . . . . . . . . . . . . . . . . . . . . . . . . . . . . . . . . 21
Still Picture (Pause) ..................................................... . . . . . . . . . . . . . . . . . . . . . . . . . . . . . . . . . . . . . . . . . . . . . . . . . . . . . . . . . . . . . . . 22
Programming Audio CDs . . . . . . . . . . . . . . . . . . . . . . . . . . . . . . . . . . . . . . . . . . . . . . . . . . . . . . . . . . . . . . . . . . . . . . . . . . . . . . . . . . . . . . . . . . . . . . . . . . . . . . . . . . . . . 22
To clear the ordering Setting . . . . . . . . . . . . . . . . . . . . . . . . . . . . . . . . . . . . . . . . . . . . . . . . . . . . . . . . . . . . . . . . . . . . . . . . . . . . . . . . . . . . . . . . . . . . . . . . . . . . . . . . . 22
INITIAL SETTINGS
Changing the Password ..................................................... . . . . . . . . . . . . . . . . . . . . . . . . . . . . . . . . . . . . . . . . . . . . . . . . . . . . . . . . . 22
Rating Level Setting (DVD) ................................................... . . . . . . . . . . . . . . . . . . . . . . . . . . . . . . . . . . . . . . . . . . . . . . . . . . . . . . . . . 22-23
Disc Menu Language Setting ................................................... . . . . . . . . . . . . . . . . . . . . . . . . . . . . . . . . . . . . . . . . . . . . . . . . . . . . . . 23
Audio Soundtrack Language Selection (DVD) ........................................... . . . . . . . . . . . . . . . . . . . . . . . . . . . . . . . . . . . . . . . . . . . . 23
Subtitle Language Selection (DVD) ............................................... . . . . . . . . . . . . . . . . . . . . . . . . . . . . . . . . . . . . . . . . . . . . . . . . . . . . 23-24
TV Display Setting . . . . . . . . . . . . . . . . . . . . . . . . . . . . . . . . . . . . . . . . . . . . . . . . . . . . . . . . . . . . . . . . . . . . . . . . . . . . . . . . . . . . . . . . . . . . . . . . . . . . . . . . . . . . . . . . . . . . . 24-25
TV System Setting ........................................................ . . . . . . . . . . . . . . . . . . . . . . . . . . . . . . . . . . . . . . . . . . . . . . . . . . . . . . . . . . . . . 25
Video Output Setting . . . . . . . . . . . . . . . . . . . . . . . . . . . . . . . . . . . . . . . . . . . . . . . . . . . . . . . . . . . . . . . . . . . . . . . . . . . . . . . . . . . . . . . . . . . . . . . . . . . . . . . . . . . . . . . . . 25
Audio Output Setting ...................................................... . . . . . . . . . . . . . . . . . . . . . . . . . . . . . . . . . . . . . . . . . . . . . . . . . . . . . . . . . . . 25
On Screen Display (OSD) Language Setting ............................................ . . . . . . . . . . . . . . . . . . . . . . . . . . . . . . . . . . . . . . . . . . . . . 26
Screen Saver Setting ...................................................... . . . . . . . . . . . . . . . . . . . . . . . . . . . . . . . . . . . . . . . . . . . . . . . . . . . . . . . . . . . . 26
Viewing from another Angle ................................................... . . . . . . . . . . . . . . . . . . . . . . . . . . . . . . . . . . . . . . . . . . . . . . . . . . . . . . 26
GENERAL
Troubleshooting ........................................................ . . . . . . . . . . . . . . . . . . . . . . . . . . . . . . . . . . . . . . . . . . . . . . . . . . . . . . . . . . . . . . . 27-28
Handling Precautions ...................................................... . . . . . . . . . . . . . . . . . . . . . . . . . . . . . . . . . . . . . . . . . . . . . . . . . . . . . . . . . . . 28
If the Surface is soiled . . . . . . . . . . . . . . . . . . . . . . . . . . . . . . . . . . . . . . . . . . . . . . . . . . . . . . . . . . . . . . . . . . . . . . . . . . . . . . . . . . . . . . . . . . . . . . . . . . . . . . . . . . . . . . . . 28
Moisture on the Disc . . . . . . . . . . . . . . . . . . . . . . . . . . . . . . . . . . . . . . . . . . . . . . . . . . . . . . . . . . . . . . . . . . . . . . . . . . . . . . . . . . . . . . . . . . . . . . . . . . . . . . . . . . . . . . . . . 29
Improper Disc Storage . . . . . . . . . . . . . . . . . . . . . . . . . . . . . . . . . . . . . . . . . . . . . . . . . . . . . . . . . . . . . . . . . . . . . . . . . . . . . . . . . . . . . . . . . . . . . . . . . . . . . . . . . . . . . . . . 29
Disc which cannot be Played with this Player .......................................... . . . . . . . . . . . . . . . . . . . . . . . . . . . . . . . . . . . . . . . . . . . . . 29
Maintenance .......................................................... . . . . . . . . . . . . . . . . . . . . . . . . . . . . . . . . . . . . . . . . . . . . . . . . . . . . . . . . . . . . . . . .29
DEFINITION OF TERMS
Angle ............................................................. . . . . . . . . . . . . . . . . . . . . . . . . . . . . . . . . . . . . . . . . . . . . . . . . . . . . . . . . . . . . . . . . . . . . 29
Chapter Number ......................................................... . . . . . . . . . . . . . . . . . . . . . . . . . . . . . . . . . . . . . . . . . . . . . . . . . . . . . . . . . . . . . 29
DVD . . . . . . . . . . . . . . . . . . . . . . . . . . . . . . . . . . . . . . . . . . . . . . . . . . . . . . . . . . . . . . . . . . . . . . . . . . . . . . . . . . . . . . . . . . . . . . . . . . . . . . . . . . . . . . . . . . . . . . . . . . . . . . . . . 29
Playback control ........................................................ . . . . . . . . . . . . . . . . . . . . . . . . . . . . . . . . . . . . . . . . . . . . . . . . . . . . . . . . . . . . . . .29
Subtitles ........................................................... . . . . . . . . . . . . . . . . . . . . . . . . . . . . . . . . . . . . . . . . . . . . . . . . . . . . . . . . . . . . . . . . . . . . 29
Time Digit . . . . . . . . . . . . . . . . . . . . . . . . . . . . . . . . . . . . . . . . . . . . . . . . . . . . . . . . . . . . . . . . . . . . . . . . . . . . . . . . . . . . . . . . . . . . . . . . . . . . . . . . . . . . . . . . . . . . . . . . . . . . . 29
Title Number .......................................................... . . . . . . . . . . . . . . . . . . . . . . . . . . . . . . . . . . . . . . . . . . . . . . . . . . . . . . . . . . . . . . . . 29
Track Number .......................................................... . . . . . . . . . . . . . . . . . . . . . . . . . . . . . . . . . . . . . . . . . . . . . . . . . . . . . . . . . . . . . . .29
Video CD ............................................................ . . . . . . . . . . . . . . . . . . . . . . . . . . . . . . . . . . . . . . . . . . . . . . . . . . . . . . . . . . . . . . . . . . 29
SPECIFICATIONS ......................................................... . . . . . . . . . . . . . . . . . . . . . . . . . . . . . . . . . . . . . . . . . . . . . . . . . . . . . . . . . . . . . . . . . . . 30

3
INTRODUCTION
FEATURES
we congratulate to your new DVD-Player and we are glad you have decided for the player
from 4MBO. The product you have bought is state of the art, of highest quality and has many
advanced features.
Please read the operation manual in order to familiarise yourself with all the possibilities of your
DVD-Player. Follow the instructions in order to ensure reliable operation and a long service life of
the appliance.
Duplication, transmission, copying, storing on electronic media and translations into foreign
languages in any form whatsoever, using any media whatsoever and the distribution of the
document or parts thereof is forbidden without the express written permission of 4MBO
International Electronic AG.
The operating instructions are there to provide information. Their contents are not the subject of
a contract. All of the data stated are merely nominal values.
Subject to technical modifications.
Closing date: 02/2002
The lightening flash with arrowhead symbol, within an equilateral triangle, is intended to alert
the user to the presence of uninsulated « dangerous voltage » within the product’s enclosure
that may be of sufficient magnitude to constitute a risk of electric shock to persons.
The exclamation point within an equilateral triangle is intended to alert user to the presence of
important operation and maintenance (servicing) instructions in the literature accompanying the
appliance.
DVD: a completely new dimension in video entertainment
• Subtitles may be displayed in one of a maximum of 32 languages*
• The audio soundtrack can be heard in up to “n” languages*
• The multi-angle function allows you to choose the viewing angle of scenes which were shot
from a number of different angles.
(Limited to DVD discs recorded with multiple camera angles.)
* The number of the languages recorded is dependent on the DVD disc used.
Support MP3 & DTS playback
High quality digital audio
•
With the linear PCM sound of a 48 kHz/16 bit through 96 kHz/24 bit, audio quality exceeding
that of audio CD becomes possible.
Many convenient features
• Direct access of favorite scenes (title/chapter/time/track search)
• Parental lock settings to prevent play of disc unsuitable for some audiences [DVD only]
Compatible with PAL DVD disc (video CD) and NTSC DVD disc (video CD)
• This DVD player can play disc in either PAL or NTSC system. However, the DVD player must be
connected to a multi-system TV to play both PAL DVD disc (video CD) and NTSC DVD disc
(video CD). The use of a multi-system TV is recommended.
Compatible with video CD and audio CD as well as DVD
DEAR CUSTOMER
ATTENTION
CAUTION
CAUTION: TO REDUCE THE RISK OF ELECTRIC
SHOCK, DO NOT REMOVE REAR COVER
NO USER SERVICEABLE PARTS INSIDE.
REFER SERVICING TO QUALIFIED
SERVICE PERSONNEL
CAUTION
RISK OF ELECTRIC
SHOCK, DO NOT OPEN

4
INTRODUCTION / IMPORTANTSAFETY INSTRUCTION
The unit can play back discs bearing any of the following marks:
1. DVD 5. Audio CD
2. Video CD 6. CD-R
3. SVCD 7. CD-RW
4. DVCD 8. MP3-CD
This unit employs a laser. Due to possible eye injury, only qualified service personnel should re-
move the cover or attempt to service this device. Use of controls or adjustments or performance
of procedures other than those specified herein may result in hazardous radiation exposure.
VISIBLE AND INVISIBLE LASER RADIATION WHEN OPEN.
AVOID EXPOSURE TO BEAM.
This equipment has been tested and found to comply with the limits for a Class B digital device
pursuant to part 15 of the FCC Rules. These limits are designed to provide reasonable protection
against harmful interference in a residential installation. This equipment generates, uses and can
radiate radio frequency energy and, if not installed and used in accordance with the instructions,
may cause harmful interference to radio communications. However, there is no guarantee that
interference will not occur in a particular installation. If this equipment does cause harmful inter-
ference to radio or television reception, which can be determined by turning the equipment off
and on, the user is encouraged to try to correct the interference by one or more of the following
measures:
• Reorient or relocate the receiving antenna.
• Increase the separation between the equipment and receiver.
• Connect the equipment into an outlet on a circuit different from that to which the receiver is
connected.
• Consult the dealer or an experienced radio/TV technician for Help.
Since it is usual for DVD movies to be released at different times in different regions of the world,
all players have region codes and disc can have an optional region code. If you load a disc of a
different region code to your player, you will see the region code notice on the screen. The disc
will not play, and should be unloaded.
There are 6 regions (also called “locales”).
Each DVD player and disc will be played in one region ONLY.
1: Canada, U.S., U.S. Territories
2: Japan, Europe, South Africa, Middle East (including Egypt)
3: Southeast Asia, East Asia (including Hong Kong)
4: Australia, New Zealand, Pacific Islands, Central America, Mexico, South America, Caribbean
5: Former Soviet Union, Indian Subcontinent, Africa (also North Korea, Mongolia)
6: China
1. Read these instructions.
2. Keep these instructions.
3. Head all warnings.
4. Follow all instructions.
5. Do not use this apparatus near water. Water must not be allowed to drip or spray onto the
player. Do not place items containing liquid on the player.
6. Clean only with a damp cloth.
7. Do not block any of the ventilation openings. Install in accordance with the manufacturer’s
instructions.
8. Do not install near any heat sources such as radiators, heat registers, stoves, or other appa-
ratus including amplifiers) that produce heat.
9. Protect the power cord from being walked on or pinched particularly at plug, convenience
receptacles, and the point where they exit from the apparatus.
DISC FORMATS
SUPPORTED BY THIS PLAYER
CLASS I
LASER PRODUCT
CAUTION
REGION CODES
Manufactured under licence of Dolby
Laboratories.
"Dolby”, "AC-3” and the double-D symbol are
trademarks belonging to Dolby Laboratories.
Confidential, unpublished document.
©1992-1997 Dolby Laboratories.
All rights reserved.
WARNING LOCATION:
INSIDE ON LASER COVERSHIELD.
NOTE
1
2
3
4
5
6
SAFETY INSTRUCTION

5
IMPORTANT SAFETY INSTRUCTION
IMPORTANT
SAFETY
PRECAUTIONS
POWER CORD
PROTECTION
PLACEMENT
NONUSE PERIODS
NO FINGERS OR OTHER
OBJECTS INSIDE
KEEP AWAY FROM
WATER/MAGNET
10. Only use attachments/accessories specified by the manufacturer.
11. Unplug this apparatus during lighting storms or when unused for long periods of time.
12. Never make or change connections with the power switched on.
13. Refer all servicing to qualified service personnel. Servicing is required when the apparatus
has been damaged in any way; such as when the power-supply cord or plug is damaged,
liquid has been spilled or objects have fallen into the apparatus, the apparatus has been
exposed to rain or moisture, does not operate normally, or has been dropped.
Please read and observe all warnings and instructions carefully given in this instruction manual
before operating the DVD Player. This set has been designed and manufactured to assure perso-
nal safety. Improper use can result in electric shock or fire hazard!
To avoid any malfunctions of the unit, and to protect against electric shock, fire or personal
injury, please observe the following:
• Hold the plug firmly when connecting or disconnecting the AC power cord.
• Keep the AC power cord away from heating appliances.
• Never put any heavy object on the AC power cord.
• Do not attempt to repair or reconstruct the AC power cord in any way.
Avoid placing the unit in areas of:
• direct sunlight or heating radiators, or closed automobiles
• high temperature (over 35° C) or high humidity (over 90%)
• much dust as the internal parts may be seriously damaged
• When the unit is not being used, turn it off.
• When left unused for a long period of time, the unit should be unplugged from the house-
hold AC outlet.
• Touching internal parts of this unit is dangerous, and may cause serious damage to the unit.
Do not attempt to disassemble the unit.
• Do not put any foreign object on the disc tray.
• Keep the unit away from flower vases, tubs, sinks, etc. If liquids are spilled into the unit,
serious damage could occur.
• Never bring a magnet or magnetized object near the unit.
• Place the unit in a horizontal position, and do not place anything heavy on it.
Moisture may form on the lens in the following conditions:
• immediately after a heater has been turned on
• in a steamy or very humid room
• when the unit is suddenly moved from a cold environment to a warm one
If moisture forms inside this unit, it may not operate properly. In this case, turn on the power and
wait about one hour for the moisture to evaporate.
Depending on the reception condition of the TV, interference may appear on the TV monitor
while you watch a TV broadcast and the unit is left on. This is not a malfunction of the unit or
the TV. To watch TV broadcast, turn off the unit. DVD’s and Video CD’s contain recordings in
both PAL and NTSC format. Use the menu to select the CD/DVD that suits the television you have
connected.
CONDENSATION
IF THERE IS NOISE
INTERFERENCE ON THE TV
WHILE A BROADCAST IS
BEING RECEIVED
STACKING

6
DESCRIPTION OF THE DEVICE
STOP
PAUSE / STEPPLAYEJECT
PHONES LEVEL
DVD / VCD / CD PLAYER
PHONESPOWER
PREV. NEXT
Mp3
DOLBY
DIGITAL
DIGITAL OUT
VIDEO
+–
WARNING
DO NOT OPEN
RISK OF ELECTRIC SHOCK
AUDIO OUT VIDEO OUT
Front RearCoaxialOptical
Center Woofer
B/U
G/Y
R/V
Video S-Video
SCART OUT
AC IN
LL
R
FRONT OF THE DEVICE
REAR OF THE DEVICE
VIDEO
CD
ALL
MP3
VCD
DIGITAL
TOTAL
PROG
88 88
88888
DISPLAY
1 2 3 4 5 6 7 8 9 10 11 12
1
POWER-Switch
2 Power Indicator-LED
3 Headphone jack
7
Eject (open/close)
8 Play
9 Pause/Step
10 Stop
11 Previous (capter)
12 Next (capter)
4 Headphone Volume
5 Display
6 Disc Tray
1 2 3 4 5 6 7 8
1
Optical audio output (digital)
2 Coaxial audio output (digital)
3 Analog audio output
5.1 Channel (optional)
4
RBG/YUV-Channel
(video output)
5 Composite video output
6 Super VHS video output
7 Scart out, combined
audio-/video output für
european TV-sets
8
Power plug
9
1 2 3 4 5 6 7 8
14 13 12 11 10
16
15
1
Indicates DVD is inserted
2 Indicates CD is inserted
3 Indicates Disk is playing
4 Indicates repeatfunction active
5 Shows the Titlenumber
6 Shows the Capternumber
7
Indicates a program is active
8 Indicates Dolby Digital is active
9 Indicates DTS is active
10 Indicates Karaoke-mode
11 Counter
12 Indicates Pause-mode
13
Displays that Disk has different angles
14 Indicates VCD is inserted
15 Indicates MP3-CD is inserted
16 Indicates CD in use
2

7
REMOTE CONTROL
17
18
19
20
21
22
23
24
25
26
27
28
29
30
PLAY/SEL.
+
–
–
VIDEO
POWER TV SYS.
1
4
7
2
5
8
3
6
90
SETUP EJECT
PROGRAM
CLEAR
MUTE
GOTOREPEAT
PBC
MENU
1/ALL
AB
TITLE
SUBTITLE
AUDIO
ANGLE
VOLUME
F.FW DF.BW D
STOP
KEY
ECHO
ZOOM
SURROUND
INFO.
SLOW
VOCAL
PAUSE/STEP
NEXT
PEEV.
+
REMOTE CONTROL UNIT CONTROLS
1
2
3
4
5
6
7
8
9
10
11
12
13
14
15
16
NOTE
This remote control is a new improved
model. Maybe you will find different
figures of the remote control (e.g. on
the package).
Description of key functions
1. ON / OFF (Standby)
2. TV SYS (choose your type of TV: PAL/NTSC
and Multi-System TV)
3. NUMERIC buttons
4. REPEAT (1/ALL) button (Repeat title, disc, track
or repeat off).
5. A-B button (Repeat scene A - beginning -
until B - end - or repeat off)
6. MENU
7. PBC (playback control)
8. AUDIO (change language)
9. SUBTITLE (change subtitles)
10. PREV capter
NEXT capter
11. PAUSE/STEP
12. CURSOR
13. SLOW
14. INFO
15. KEY #/
16. ZOOM
17. EJECT (open/close disk tray)
18. SETUP
19. PROGRAM
20. CLEAR
21. GOTO
22. MUTE
23. TITLE
24. VOLUME
25. ANGLE (if supported by the DVD)
26. FFWD (search forward)
FBWD (search backward)
27. STOP
28. PLAY/SEL.
29. SURROUND
30. ECHO +/-

8
REMOTE CONTROL
PREPARING THE REMOTE
CONTROL
Battery Installation
Open the battery compartment and insert two AAA-size batteries with the (+) and (-) marks
correctly aligned, as shown.
Batteries used up are special waste - please dispose properly! Do not use rechargeable (NiCd)
batteries.
Battery life
• The batteries normally last for one year or longer. Battery life may vary depending on the
conditions of use.
• If the remote control unit fails to work even when it is operated near the player, replace the
batteries.
• Use batteries of size R3/AAA/1,5V.
NOTE:
• Do not use rechargeable (NiCd) batteries.
• Do not attempt to recharge the batteries.
• Never short-circuit or apply heat to the batteries.
• Do not drop, step on or otherwise impact the remote control unit.
• Do not mix old and new batteries or different types of batteries.
• When not using the remote control for a long time, remove batteries. Otherwise the electro-
lyte may leak which may damage the remote control.
• If electrolyte should come in contact with parts of your body, wash it off thoroughly with
water.
Operating range of the remote control unit
• The remote control must point at the IR-receiver on the DVD-player.
• The operating range of the infrared signal is up to 7m. The angle is supposed to be smaller
that 30° (illustration page 9).
• The operating range may also vary according to the brightness of the room.
NOTE:
• Do not point bright lights to the remote control sensor.
• Do not put any objects between player and conrol unit.
• Do not use the DVD-player remote control unit simultanously with other remote controls.
IMPORTANT:
Batteries are hazardous
waste. Do not dispose
them together with the
household garbage.
!

9
REMOTE CONTROL / CONNECTIONS
STOP
PAUSE / STEPPLAYEJECT
PHONES LEVEL
DVD / VCD / CD PLAYER
PHONESPOWER
PREV. NEXT
Mp3
DOLBY
DIGITAL
DIGITALOUT
VIDEO
+–
PLAY/SEL.
+
–
–
VIDEO
POWER TV SYS.
1
4
7
2
5
8
3
6
90
SETUP EJECT
PROGRAM
CLEAR
MUTE
GOTOREPEAT
PBC
MENU
1/ALL
AB
TITLE
SUBTITLE
AUDIO
ANGLE
VOLUME
F.F W DF.B W D
STOP
KEY
ECHO
ZOOM
SURROUND
INFO.
SLOW
VOCAL
PAUSE/STEP
NEXT
PEEV.
+
sensor for remote control IR-signal
CONNECTING TO A TV
• Ensure that all equipment to be connected are switched off or disconnect the AC power cords.
• Before connecting other equipment study the instructions.
• Watch the colour coding of the connecting cables.
A. Connecting to a Stereo TV
1TV (not supplied)
2DVD-Player
3Audio-/videocable (not supplied)
4S-videocable (not supplied)
5to audio input (red, white)
6to video input (yellow)
7to S-video-input
8Scartcable (supplied)
9Power cord (supplied)
10 to AC outlet (110-240 V, 50/60 Hz)
S-video output
The S- (seperate) video output connector seperates the colour (C) and luminance (Y) signals befo-
re transmitting them to the TV in order to achieve a sharper picture. Audio signals are not trans-
mitted. If your TV is equipped with an S-video input, use a S-video cable (not supplied) to connect
the S-video output of the player with the S-video in jack of your TV. This will optimise your image
reproduction.
IMPORTANT!
Never make or change connections
with the power switched an.

10
CONNECTIONS
WARNING
DO NOT OPEN
RISK OF ELECTRIC SHOCK
AUDIO OUT VIDEO OUT
Front RearCoaxialOptical
Center Woofer
B/U
G/Y
R/V
Video S-Video
SCART OUT
AC IN
LL
R
IN
OUT
ILL. A
556 7
1
3
2
4
10
9
8
B. Connecting to a Mono TV
1TV (not supplied)
2DVD-player
3Audio-/videocable (not supplied)
4Scartcable (supplied)
ILL. B
WARNING
DO NOT OPEN
RISK OF ELECTRIC SHOCK
AUDIO OUT VIDEO OUT
Front RearCoaxialOptical
Center Woofer
B/U
G/Y
R/V
Video S-Video
SCART OUT
AC IN
LL
R
IN
OUT
1
3
2
4

11
CONNECTIONS
AUDIO OUT VIDEO OUT
Front RearCoaxialOptical
Center Woofer
B/U
G/Y
R/V
Video S-Video
SCART OUT
LL
R
IN
OUT
1
3
2
8
7
CONNECTING TO AMPLIFIER
WITH DOLBY DIGITAL/DTS
DECODER
D. Connecting to a Dolby Digital decoder or an analog Amplifier
When the DVD is recorded in Dolby Digital/DTS, the Dolby Digital/DTS Bitstreams are transmitted
from the player´s OPTICAL and COAXIAL digital audio output connector. When the DVD-player
is connected to a Dolby Digital decoder, you can enjoy theaterquality audio right in your home.
(An optional audio cable is required when an optical Dolby Digital decoder is used.)
1TV (not supplied)
2DVD-player
3Audio-/videocable (not supplied)
4Scartcable (supplied)
5S-videocable (not supplied)
6Coax-digitalcable (not supplied) or
7Optical digitalcable (LWL), not supplied or
8Audiocable for analog output (not supplied), no decoder neccessary
9Decoder or amplifier with Dolby Digital/DTS decoder (not supplied)
4
6
NOTE:
Remove the dust protection cap
from the optical digital output.
Mostly the plugs of the optical
digital cable have also dust
protections. Always
reattach the caps
when no using
the connector.
5
9
C. Connecting to Audio Equipment
1Audio equipment (not supplied)
2TV (not supplied)
3DVD-player
4Audio-/videocable (not supplied)
5Scartcable (supplied)
WARNING
DO NOT OPEN
RISK OF ELECTRIC SHOCK
AUDIO OUT VIDEO OUT
Front RearCoaxialOptical
Center Woofer
B/U
G/Y
R/V
Video S-Video
SCART OUT
AC IN
LL
R
IN
OUT
ILL. C
1
3
2
4
5

Both the DVD discs and video CDs have the material recorded in the PAL and NTSC systems. Refer
to the table below to select the correct disc type for the type of connected TV.
DISC TV Monitor
PAL Played in the PAL system.
NTSC Played in the NTSC system.
DISC TV Monitor
PAL No clear images are shown
on the screen.
NTSC Played in the NTSC system.
12
CONNECTIONS / REPRODUCTION
Concerning the digital audio output
Depending on the disc format, either Dolby Digital sound or Linear PCM sound will be outputted
from the unit´s digital audio output connector (PCM/Dolby Digital) as shown in the table below.
DiSC Sound Recording Format Digital Audio Output From Connector
DVD Dolby Digital Dolby Digital Bitstream
Linear PCM Linear PCM (96 kHz Samplingrate only)
Audio-CD Linear PCM Linear PCM (44,1 kHz Samplingrate only)
Video-CD MPEG Linear PCM (44,1 kHz Samplingrate only)
Note:
• For DVDs, sound having 96 kHz sampling cav be outputted from the unit´s digital output
connector.
Information:
• Dolby Digital is a digital sound compression technique developed by the Dolby Laboratories
Licensing Corporation. Supporting 5.1-channel surround sound, as well as stereo (2-channel)
sound, this technique enables a large quantity of sound data to be efficienly recorded on a disc.
• Linear PCM is a signal recording format used in audio CDs. While audio CDs are recorded in
44.1 kHz/16bit, DVD are recorded in 48 kHz/16 bit up to 96 kHz/24 bit.
• If you have a Dolby Pro Logic Surround decoder, you will obtain the full benefit of Pro Logic
from the same DVD movies that provide full 5.1-channel Dolby Digital soundtracks, as well as
from titles with the Dolby Surround mark.
Caution for the digital output connector:
• Do not connect an amplifier (with an optical digital input connector) which does not contain
the Dolby Digital decoder.
• Otherwise attemting to play DVD may cause such a high level of noise that it may be harmful
to your ears and damage your speakers.
• Video CDs and audio CDs can be played as they would normally be played.
SELECTING THE TYPE OF
DISC FOR THE TYPE OF TV
CONNECTED
CONNECTING TO
THE MULTI-SYSTEM TV
CONNECTING
TO THE NTSC TV

13
Preparations
• Press on the power button of the TV set, and select “VIDEO” as the TV input.
• Press on the power button of the stereo system if the player has been connected to a stereo
system.
1. Press on the POWER button.
2. Press EJECT to open the disc tray.
3. Place a disc onto the tray. Hold the disc without touching either of its surfaces, position it with
the printed title side facing up, align it with the guides, and place it in its proper position.
4. Press EJECT.
• The disc tray is automatically closed and play commences if the disc does not have any
menus recorded on it.
• If the disc has one or more titles recorded on it, a menu screen will appear on the TV
monitor after a few moments.
NOTE:
Steps 5 and 6 are available only when a menu is recorded on the disc.
5. Press , or , or the number button(s) to select the preferred title.
NOTE:
For selection of a title, a double-digital number must be input, i.e. 01 for chapter 1, 02 for
chapter 2, etc.
6. Press PLAY/SEL. Play of the selected item now commences.
7. Press STOP. The reproduction is suspended.
Press STOP.
INFORMATION:
• When the player is stopped the position where STOP was pressed is saved.
•
Pressing PLAY/SEL again continues playing at this position.
Opening the disc tray or pressing STOP again deletes the saved position. However, this
function is only available for CD’s/DVD’s that show the current playing time during play.
Stopping play and returning to the menu screen (when a menu screen is available on the
disc).
Press MENU. Play is suspended, and the “SETUP MENU“ screen is displayed.
If it is not being used the player can be switched to standby by pressing the POWER button on
the remote control. Pressing the POWER switch on the device itself switches it off.
NOTE:
• The disc continues to rotate while the menu is displayed even after the player has finished
playing a particular item. When no further selections are to be played, be sure to press the
STOP button to clear the menu display.
• If the disc is placed in upside down (and it is a single sided disc), the DVD display will indi-
cate “NO DISC”.
REPRODUCTION
DVD PLAYBACK
BASIC PLAY
STOPPING PLAY
CONNECTING
TO THE PAL TV
DISC TV Monitor
PAL Played in the PAL system.
NTSC No clear images are shown
on the screen.
AFTER OPERATION

14
REPRODUCTION / DIRECT SELECTION OF SCENES
INFORMATION:
• When “ ” appears while a button is being operated, it means that the corresponding
operation is prohibited by the disc.
By the remote control:
Press F.BWD or F.FWD down during play.
• The speed of advance (FF x2, FF x4, FF x8, FF x16, FF x32) or reverse (FR x2, FR x4, FR x8,
FR x16, FR x32) changes for every press of the F.FWD or F.BWD button.
• Normal play is resumed when the PLAY/SEL button is pressed.
Skipping ahead
Press NEXT on the remote control or on the main unit during play.
• A chapter is skipped each time the button is pressed.
Skipping back
Press PREV on the remote control or on the main unit during play.
• When the button is pressed once midway through a chapter, play returns to the start of that
chapter. When it is pressed again, a chapter is skipped each time the button is pressed.
Press PAUSE/ STEP once during play.
• The screen suspends.
To return to normal play
Press PLAY/SEL.
Press PAUSE/ STEP during play.
• The disc is advanced by one frame each time the button is pressed.
To return to normal play
Press PLAY/SEL.
Press SLOW during play.
• The speed of advance (SF x1/2, SF x1/4, SF x1/8, SF x1/16, SF x1/32) changes for every press
of the SLOW button.
To return to normal play
Press PLAY/SEL.
INFORMATION:
• Slow-motion play backwards impossible.
1. Press GOTO during play.
2. Press , to move the cursor to the title number .
3. Press the number button(s) to select the preferred title.
4. Press PLAY/SEL.
Play now commences from chapter 1 of the selected title.
Selecting a double-digit number
Example: 10
Press „1“ and then „0“.
INFORMATION:
• When “ ” appears while a button is being operated, it means that the corresponding
operation is prohibited by the disc.
• Selecting Scenes by Title Number possible during play only.
RAPID ADVANCE
(RAPID REVERSE)
SKIPPING AHEAD OR
BACK TO CHAPTERS
STILL PICTURE (PAUSE)
FRAME ADVANCE (STEP)
SLOW-MOTION PLAY
SELECTING SCENES
BY TITLE NUMBER

1. Press GOTO during play.
2. Press , to move the cursor to the chapter number .
3. Press the number button(s) to select the preferred chapter.
4. Press PLAY/SEL.
Play now commences from the selected chapter.
Selecting a double-digit number
Example: 10
Press „1“ and then „0“.
INFORMATION:
• When “ ” appears while a button is being operated, it means that the corresponding
operation is prohibited by the disc.
• Selecting Scenes by Chapter Number possible during play only.
Example:
Viewing after 15 minutes have elapsed from the title start.
1. Press GOTO twice during play.
2. Press the number button(s) to specify the starting position.
Example :
To specify “15 min. 00 sec.”, press „0“, „1“, „5“, „0“, „0“.
• h (0) : min (00) : sec (00)
3. Press PLAY/SEL.
Play now commences from the specified position.
NOTE:
• These operations work only with discs for which the elapsed playing time appears on the
unit’s display during playback.
• For some discs, play may not start from the specified position even when the steps above have
been performed correctly.
INFORMATION:
• When “ ” appears while a button is being operated, it means that the corresponding
operation is prohibited by the disc.
Press 1/ALL during play.
Each time this button is pressed, the TV monitor changes and the disc will repeat a chapter or
title.
• Repeat of chapter being played
• Repeat of title being played
• Repeat of disc being played
• Cancel repeat mode
To return to normal play
Press 1/ALL REPEAT several times until “REP CANCEL” is displayed.
NOTE:
• Repeat play works only with discs for which the elapsed playing time appears on the unit’s
display during playback.
• Repeat play may not work correctly with some DVDs.
15
REPEAT VIEWING
DIRECT SELECTION OF SCENES / REPEAT PLAY
SELECTING SCENES BY TIME
SELECTING SCENES BY
CHAPTER NUMBER

16
REPEAT PLAY / CONVENIENT FUNCTIONS
1. Press A-B during play at the point where repeat play is to commence (A).
2. Press A-B again at the point where repeat play is to be concluded (B).
Repeat play of the selection between points A and B starts.
To return to normal play
Press A-B again.
(“REP CANCEL” appears on the TV monitor.)
NOTE:
• A-B repeat play works only within a chapter.
Displaying the information of the scene to be viewed
1. Press INFO during play, viewing the actual mark f. e. DVD, the subtitle , the language
, the time digit f. e. 0:07:58, the title , the chapter .
2. Press INFO a number of times, the title , the chapter , the time digit f. e. 0:07:59,
the selected TV Type , the language , the subtitle , the angle , the Audio Output
will show in sequence on the screen.
Stop displaying the information of the scene to be viewed
Press INFO a number of times until the information disappears.
This zoom in function enables you to take a closer look at the scene you are viewing that is
especially a considerate function when you are seeing a science fiction or adventure film.
1. Press ZOOM during play.
2. Press ZOOM once to see the scene in 2 times of size; press twice to see the scene in 4 times
of size.
To return to normal play
Press ZOOM a number of times until “X1” show on the screen.
The position of the scene can be moved during zooming by pressing the , or and but-
tons.
It is possible to change the audio language from the one selected at the initial settings to a dif-
ferent language, if available. (This operation works only with discs on which multiple audio sound-
track languages are recorded.)
1. Press AUDIO during play.
2. Press AUDIO a number of times until the preferred language is selected.
INFORMATION:
• When the preferred language is not selected even after pressing the button several times, it
means that language is not available on the disc.
• When the power is turned on or the disc is removed, the language heard is the one selected
at the initial settings. If this language is not recorded on the disc, only the available language
on the disc will be heard.
If a disc has subtitles recorded on it, they can either be cleared or displayed on the TV monitor.
(This operation works only with discs on which the subtitle language is recorded.)
Press SUBTITLE during play to display the desired subtitle or clear it.
When this button is pressed once, the first subtitle recorded on the disc will display. The rest of
the subtitles recorded will display in sequence for every press of the SUBTITLE button.
• Usually a circulation will happen while switching to another language, that is you can cancel
the subtitle by pressing this button a number of times until “OFF” appears on the screen.
It is possible to change the subtitle language from the one selected at the initial settings to a
different language, if available.
(This operation works only with discs on which multiple subtitle languages are recorded.)
1. Press SUBTITLE during play.
DISPLAYING THE
INFORMATION OF THE
SCENE TO BE VIEWED
REPEATING SECTIONS
BETWEEN TWO SPECIFIC
POINTS (A-B REPEAT)
DISPLAYING THE SCENE
WITH A LARGER AND
CLOSER VIEW
CHANGING AUDIO
SOUNDTRACK LANGUAGE
CLEARING/DISPLAYING
OF SUBTITLES
CHANGING SUBTITLE
LANGUAGE

17
When no subtitles are recorded “ ” will be displayed instead of the language number.
2. Press SUBTITLE a number of times until the preferred language is selected.
The display will disappear after 5 seconds.
NOTE:
• In some cases, the subtitle language is not changed immediately
to the selected one.
INFORMATION:
• When the preferred language is not selected even after pressing the button several times, it
means that the language is not available on the disc.
• When the power is turned on or the disc is removed, subtitles appear in the language selec-
ted at the initial settings. If this language is not recorded on the disc, they appear in the disc’s
priority language.
Some DVD discs may contain scenes which have been shot simultaneously from a number of dif-
ferent angles. For these discs, the same scenes can be viewed from each of these different angles
using the ANGLE button. (The recorded angles differ depending on the disc used.)
1. Press ANGLE during play.
2. Press ANGLE a number of times until the preferred viewing angle is selected.
Press the ANGLE button a number of times to change the viewing angle.
NOTE:
• This function will only work on discs where different angles have been recorded.
• The viewing angles are shown on the unit’s display and you can select one from them for
viewing .
Some DVD discs have unique menu structures called DVD menus. For example, DVDs program-
med with complex contents provide guide menus, and those recorded with various languages
provide menus for audio and subtitle language. Although the DVD menu’s contents and operati-
on differ from disc to disc, the following explains basic operation when this feature is used.
1. Press MENU during play (eventually press TITLE).
The DVD menu available on the disc is now displayed.
2. Press , , , to select the preferred item.
3. Press PLAY/SEL.
The selected item is now executed.
When the menu continues onto another screen
Repeat steps 2 and 3.
To return to the previous menu screen
Press MENU (eventually press TITLE).
The functions described below are not available for all CD’s/DVD’s.
1. Press PBC.
2. Press PLAY/SEL.
3. Press MENU.
A DVD chapter menu is displaying now.
4. Press , , , or number button(s) to select the preferred item.
5. Press PLAY/SEL.
The selected item is now executed.
USING THE MENU FUNCTION
CONVENIENT FUNCTIONS
VIEWING FROM ANOTHER
ANGLE
USING A DVD MENU

18
Both the DVD discs and video CDs have the material recorded in
the PAL and NTSC systems. This unit provides PAL, NTSC and
Multi TV systems for your selection. (Refer to page 18 for the examples)
1. Press TV SYS during play.
2. Press TV SYS button a number of times to switch to the desired TV system.
• We strongly recommend you to select AUTO system in order to autoplay the corresponding
disc materials and prevent the unnecessary exchanging process.
NOTE:
• Press the TV SYS button once to switch to NTSC system. Press twice to switch to PAL system.
Press 3 times to switch to AUTO system.
This unit provides a MUTE function for you to temporarily turn it off.
1. Press MUTE during play.
2. Press MUTE button a number of times to turn on/off the volume.
• When “MUTE” is shown on the screen, the volume of the DVD player was turned off. To turn
on the volume, press the button a number of times until “MUTE OFF” appears on the screen.
• Press on the POWER button of the TV set, and select “Video” as the TV input.
• Press on the POWER button of the stereo system if the player has been connected to a
stereo system.
1. Press on the POWER button.
2. Press EJECT to open the disc tray.
3. Place a disc onto the tray.
Hold the disc without touching either of its surfaces, position it with the printed title side
facing up, align it with the guides, and place it in its proper position.
4. Press PLAY/SEL.
For video CDs without playback control:
Play is commenced.
For video CDs provided with playback control:
A menu appears after a few moments.
• This function works only with video CDs with playback control (version 2.0).
• The details differ depending on the disc concerned.
Also refer to the instructions accompanying the disc.
1. Press on the POWER button.
2. Press EJECT to open the disc tray.
3. Place a disc onto the tray.
Hold the disc without touching either of its surfaces, position it with the printed title side
facing up, align it with the guides, and place it in its proper position.
4. Press PLAY/SEL.
After steps 1 to 4 above the menus are displayed on the TV monitor:
5. Press the number button(s) to select the preferred item.
A doubledigital number must be input while selecting items. For example, 01, 02, 03, etc..
6. Press PLAY/SEL.
The player now starts to play the selected item.
NOTE:
, , , are not effective for selecting items for video CDs.
CONVENIENT FUNCTIONS / VIDEO CD PLAYBACK
SWITCHING TO ANOTHER
TV SYSTEM
TURNING OFF THE VOLUME
OF THE DVD PLAYER
PREPARATIONS
BASIC PLAY
MENU PLAY

19
VIDEO CD PLAYBACK
STOPPING PLAY
SKIPPING AHEAD OR
BACK TO TRACKS
RAPID ADVANCE
(RAPID REVERSE)
PLAYBACK CONTROL
If a video CD has “PLAYBACK CONTROL” written on its disc or jacket, it means that particular
scenes or information can be selected for viewing interactively with the TV monitor using the
menu screen.
When the menu continues onto another screen
After step 4, press NEXT.
To return to the previous menu screen press PREV.
Stopping play and returning to the menu screen
Press STOP.
• Play is suspended, and the menu screen is displayed.
When the unit is not in use, remove the disc and press POWER to turn off the unit.
NOTE:
• The disc continues to rotate while the menu is displayed even after the player has finished
playing a particular item. When no further selections are to be played, be sure to press the
STOP button to clear the menu display.
• If the disc is placed in upside down (and it is a single sided disc), the DVD display will indi-
cate “NO DISC”.
INFORMATION:
• When “ ” appears while a button is being operated, it means that the corresponding
operation is prohibited by the disc.
Press STOP.
By remote control:
Press F.BWD or F.FWD down during play.
• The speed of advance (FF x2, FF x4, FF x8, FF x16, FF x32) or reverse (FR x2, FR x4, FR x8,
FR x16, FR x32) changes for every press of the F.FWD or F.BWD button.
Press PLAY/SEL to continue the normal play.
INFORMATION:
• When PREV/NEXT is pressed during menu play, a menu screen may sometimes be recalled.
Skipping ahead
Press NEXT during play.
A track is skipped each time the button is pressed.
Skipping back
Press PREV during play.
When the button is pressed once midway through a track, play returns to the start of that track.
When it is pressed again, a track is skipped each time the button is pressed.
INFORMATION:
• When PREV/NEXT is pressed during menu play of video CDs, a menu screen may sometimes
be recalled.
AFTER OPERATION
Table of contents