McALLISTER Airacomet Instruction Manual

McALLISTER MODELS & DESIGN
”Airacomet” Catapult Glider
Catapult launched gliders are great fun!
This simple profile scale glider can be hand thrown to fly in your backyard or go to a larger space
and use the included catapult to launch this jet high and fast! Careful adjustments are the way to
get the best out of a catapult glider. That will teach you trimming skills, which is a vital part of the
fun and enjoyment of flying model aircraft.
Follow the separate instructions for how to assemble the included catapult.
If you have any questions, please contact us at
Building Instructions
BEFORE YOU BEGIN
This model glider can be built using superglue, a waterproof wood glue like Titebond II, or balsa cement.
Some parts will require sanding to fit. A useful tool is a two-sided nail file, or you can glue medium and
fine sandpaper to each side of a straight stick.
A sharp craft knife can be used to remove the laser cut parts from the sheets. Adult supervision is highly
recommended when using sharp tools and superglue.
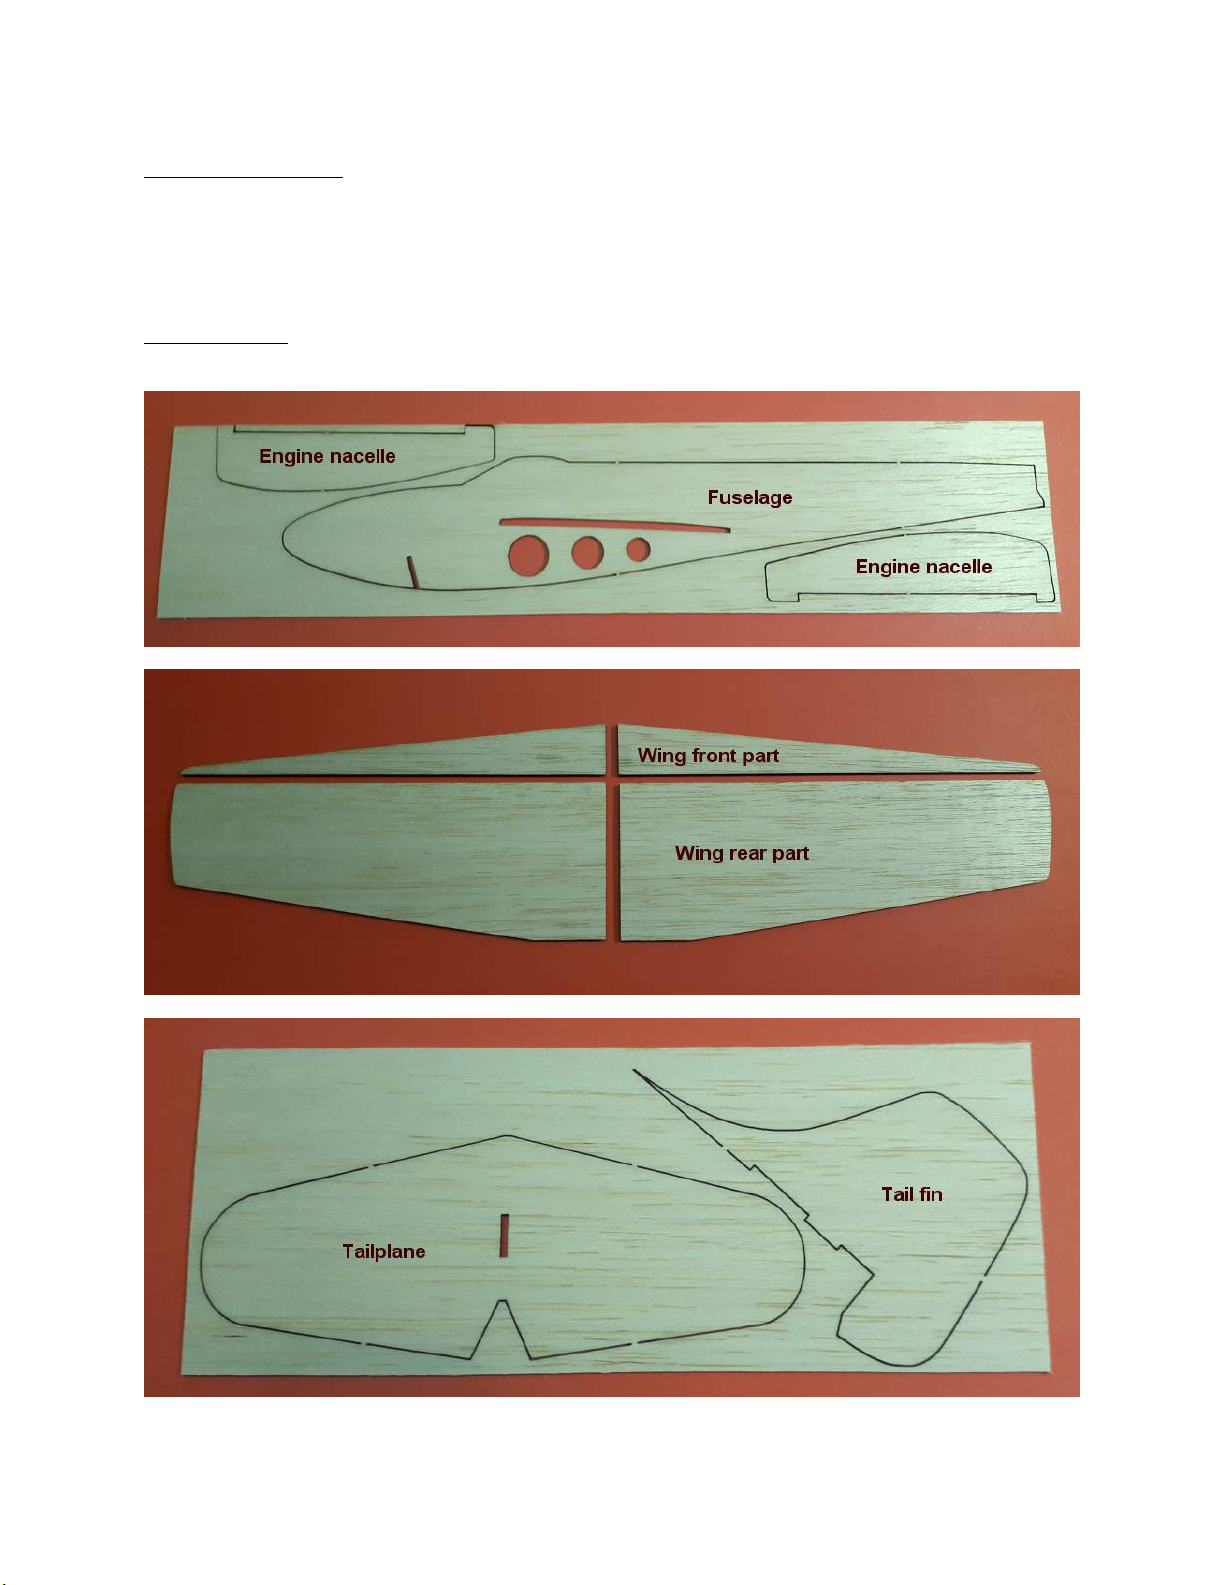
PREPARATION
Remove the parts from the laser cut sheets. Sand the small tabs off so that the edges are smooth.

CONSTRUCTION
Glue the two wing leading edge fillets to the flat area on the front of each wing half.
Next, sand the wings to an aerofoil shape.
Take your sanding stick and sand the top front edge of the wing in a curve down to the bottom edge. Start
this about 1/2" (12mm) back from the front edge (yellow line). Then round the bottom corner of the front
edge. Do this along the whole length of one wing panel.
Next sand the top rear edge from a line which runs from 1” (25mm) from the trailing edge at the wing root,
to 3/8" (9mm) from the trailing edge at the wing tip (white line). Sand this area fairly flat until the trailing
edge is a little less than 1/16” (1.5mm) thick. Then sand the angle at the white line to make a smooth
surface.

Below is a typical wing tip shape viewed from the end. Aim for this sort of shape.
Repeat the process for the other wing. Make sure that you are making both a RIGHT wing and a LEFT
wing panel.
Join the two wing panels. First the center of each wing needs to be angled. Prop the wing tip up 7/8”
(22mm) with the center of the wing just over the edge of a board. Use the sanding stick held vertical to
make an angle for the joint. Do this on both wings.
Next put one wing flat on your board. Prop the other wing tip up 1-3/4” (45mm). Once you are satisfied
with the alignment, apply glue and leave to dry. A handy tip is to stick a strip of packaging tape to your
board and make the glue joint over that.
Slide the wing into the slot in the fuselage. Check that the wing join is directly down the center line of the
fuselage.

Look from the front of the fuselage; the wings should be positioned so that they are at the same angle on
each side of the fuselage.
To check this, you can set the fuselage and wing inverted on a flat surface. Use a right angle to set the
fuselage vertical. Put a scrap of 1/8” (3mm) balsa under each wing tip. When satisfied with the alignment,
run thin superglue along each side of the joint to glue the wing in place. Glue on the top surface when the
glue is set.

Take the two engine nacelles and sand toward the rear edges so that they taper to about 1/16” (1.5mm)
thick. Be sure to make both a left hand and a right hand nacelle. Round off all of the outside edges.
Slide each engine nacelle up to the bottom of the wing against the fuselage to check the fit. Glue each in
place.

Slot the tail fin into the tailplane. The tab will help with the alignment.
Set the fin at the edge of a board and use a right angle to get the fin at 90 degrees to the tailplane. Glue
in place with superglue.

Position the tailplane and fin on the rear of the fuselage. The top edge of the tailplane will align with the
top edge of the fuselage and the rear of the fin will fit to the rear edge of the fuselage.
When you are satisfied with the fit, glue the assembly onto the fuselage. Make sure that the fin is vertical
and exactly in line with the fuselage center line.

Glue the plywood catapult peg into the slot in the fuselage.
FINISHING
Using fine sandpaper, smooth all of the surfaces. You can fly the model as it is without further finishing
but avoid wet conditions. One thin coat of Zinsser Shellac will harden the balsa wood and provide a
degree of water resistance. Sand very lightly after coating. The finished glider shown here was first
sealed with Shellac and then given a light coat of Krylon silver spray paint.
The paper cockpit details should be carefully cut out with small scissors or a sharp new blade. Look at the
photos for location and make a small pencil mark to help with alignment if needed. Stay away from the
curved edge a little. The edges can be coloured black with a Sharpie later.

Spray the back of one of the paper pieces with Elmers Spray Adhesive or use a glue stick. (Liquid glues
may make the ink run). Glue one side in place and press it down firmly. Repeat for the other side making
sure that they align with each other.
The aircraft markings are applied in the same manner. The larger insignia goes on the left wing, both top
and bottom. The smaller insignia go on each side of the rear fuselage. Lightly brush a thin coat of Shellac
over the paper decals to protect them.
I this photo you can also see a trim tab as mentioned in the flight trimming instructions.

Test Flights
The glider will need some nose weight to balance properly in flight. A good starting point is to Scotch tape
a penny to the nose.
The initial balance point is 1-3/8” (35mm) back from the leading edge of the wing where it meets the
fuselage. Choose a calm day outside for your test flights.
Throw the glider with the wings level and the nose slightly down. Try to throw it just fast enough for it to
glide away from you steadily. If the model dives downwards, move the dime a little further back. If the
model climbs and then dives (stalling), move the coin further forward. If needed, add more weight using
modelling clay. Aim for a slow glide with a nice smooth flight.

For throw launching you can try tilting the model to the right (if you are right handed) and give it a hard
throw pointing upward at about 20 degrees. Keep adjusting your throw and nose weight until you get
some nice glides.
Catapult Flights
Warning: Never point a catapult model at, or near, anyone when launching. The glider will be
going fast from the launch so be very careful!
Catapult launched gliders are tricky to fly but great fun, too. For the first catapult launches use just one of
the 1/8” rubber loops. Hold the catapult in your left hand (do the same if left handed). Hook the rubber
loop onto the glider. Pull the glider back, tilt it about 40 degrees to the right and point upwards about 30
degrees. Holding the catapult still, let go of the glider.
The jet will arch up and to the right, hopefully the wings will level and it will glide down. Watch which way
it turns. After several tries add a very small amount of modelling clay to the left wing tip. This is to try to
make the glider go into a gentle left turn as it slows down after the launch.
Another trimming tool you can try is to cut a small rectangle (1/2” x 1/4") of thin card. Crease it slightly in
the middle and glue it to the bottom of the rudder on the left side. This is a rudder trim tab and is used to
help make the glider go into a left turn at the top of a stronger catapult launch. You can add a tab to the
rear edge of the left wing too. Use that tab to level the wings if the rudder tab causes too much left turn.
It’s all experimentation as every model built can be a little dfferent from another.
To get the best out of any catapult glider we can recommend searching “catapult launch gliders” on
YouTube. Have fun!
Table of contents
Popular Toy manuals by other brands


LEGO
LEGO 30193 manual

Fisher-Price
Fisher-Price 71985 instruction sheet

PARKZONE
PARKZONE Stinson Reliant SR-10 instruction manual

Eduard
Eduard MiG-25PD/PDS Foxbat exterior quick start guide

Knights of Dice
Knights of Dice HARMONIC THEATRE Assembly instructions

Zipp Manufacturing
Zipp Manufacturing Bullitt Thunderboat Building instructions