Mec Empower Broadband Calix GigaCenter User manual

GigaCenter
Quick Start Guide

1
GigaCenter Quick Reference
1. Logging into the GigaCenter………………………………………………………………………. 1
2. Change the name and password of the wireless network………………………….. 4
3. Connect to the wireless network………………………………………………………………. 5
4. Change the “admin” user password………………………………………………………….. 7
5. Block a website from being accessed………………………………………………………… 10
6. Restrict access to the Internet by time-of-day…………………………………………… 12
7. Change the firewall security settings………………………………………………………… 13
8. Add Port Forwarding rules………………………………………………………………………… 15
9. Turn on “Remote Access”…………………………………………………………………………. 16
10. Extending Wireless Coverage……………………………………………………………………. 18

2
1. Logging in to the Calix GigaCenter
a. Connect an Ethernet cable between your computer and the Ethernet “1” port on
your Gigacenter.
b. From your browser, access the GigaCenter at http://192.168.1.1
c. The following window should appear. If you receive a security warning, click on
“Advanced” and choose to access the GigaCenter.
d. Login using the user [admin] and the password listed on the Default Settings label
on your GigaCenter, then click the “Login” button.

3
e. The GigaCenter dashboard should now appear as follows:

4
2. Change the name and password of the wireless network
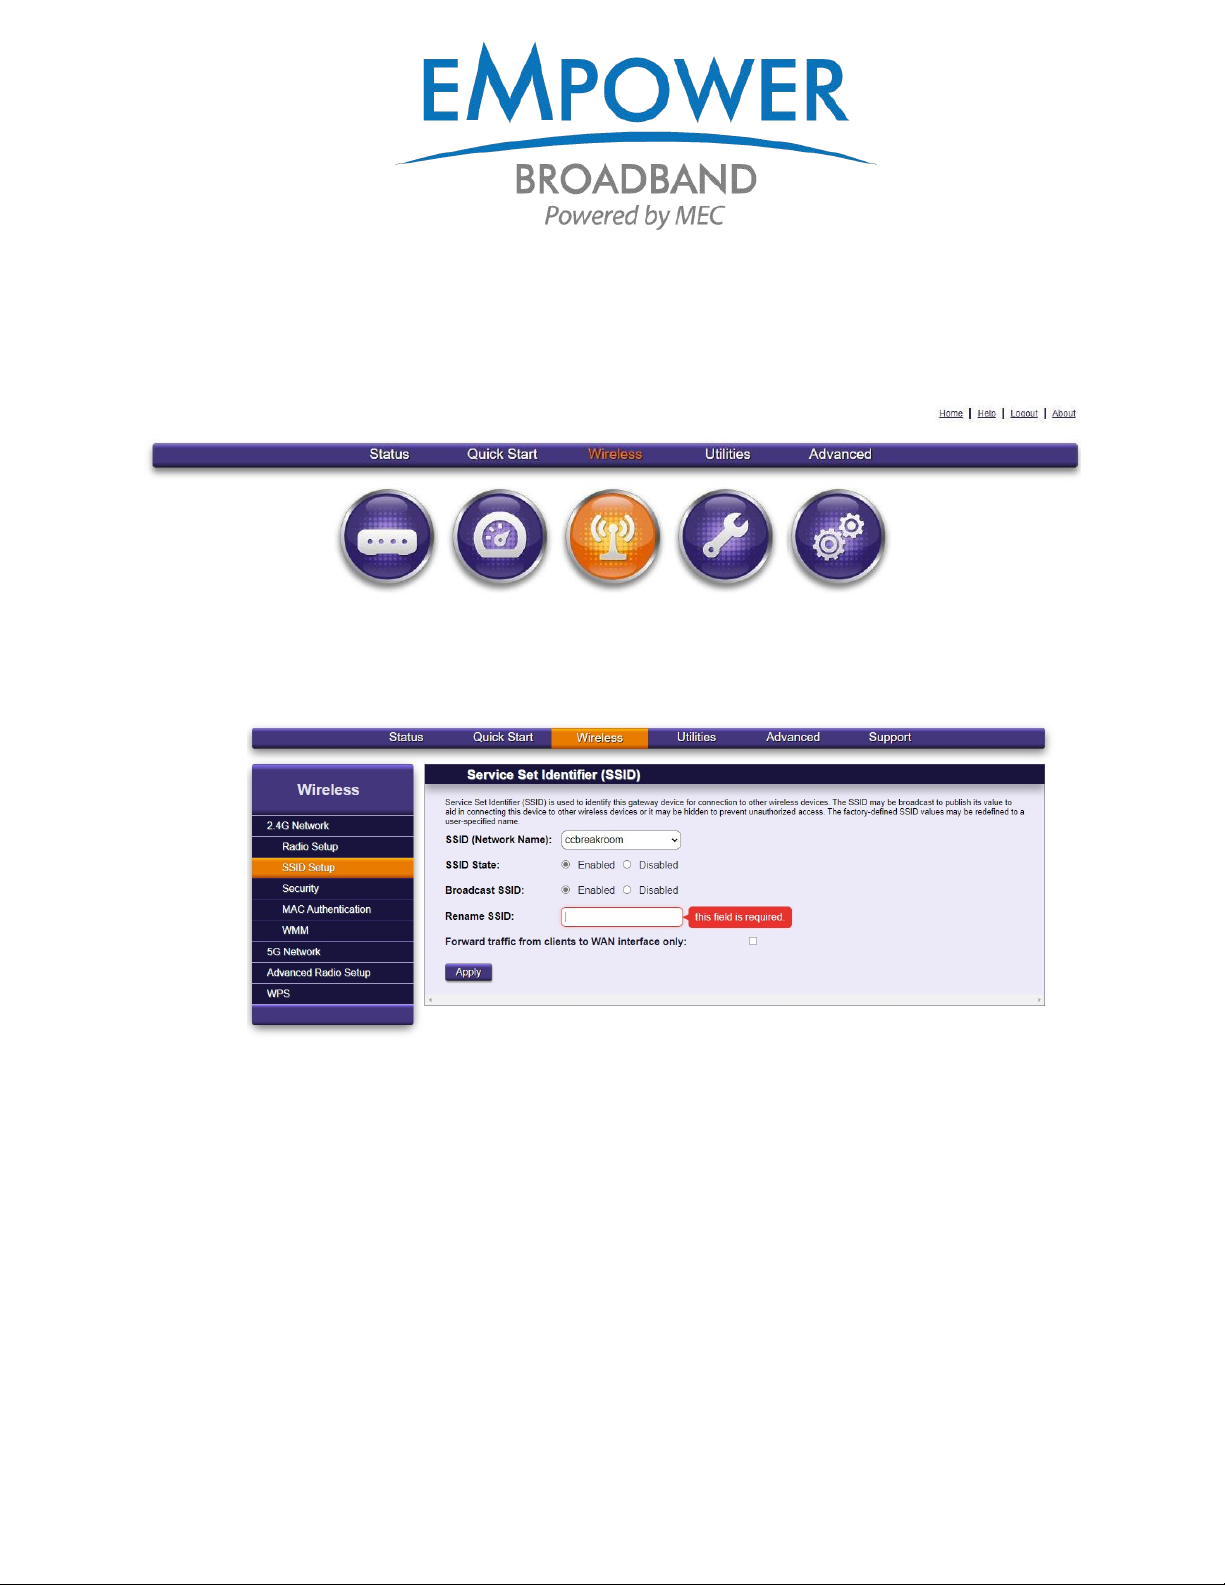
a. From the GigaConnect dashboard, click on the “Wireless” icon:
b. From the “Wireless” column on the left under “2.4G Network,” click “SSID Setup.”
c. Change the default “SSID (Network Name)” by typing the name you desire into the
“Rename SSID” field, then click the “Apply” button.
d. To change the wireless password, from the “Wireless” column on the left under “2.4G
Network,” click “Security.”
e. Click the circle adjacent to “Use Custom Security Key,” type in the desired new security
key, and click “Apply.”
f. Repeat steps “b” through “e” under the “5G Network” heading in the left column.

5
3. Connect to the wireless network
a. Click on the wireless icon on the right side of the task bar at the bottom of
your screen.
b. Click on the name of your wireless network.

6
c. Ensure that “Connect automatically” is checked, then click “Connect”
d. Press the “WPS” button on the side of the Calix GigaCenter. The connection may take
as much as two minutes.
If you are unable to connect to the Gigacenter by pressing the “WPS” button, manually key in your
password on the device you are trying to join to the network.
The steps listed above apply to a Windows OS. If you are trying to add a mobile phone or use a
different OS on your computer (such as Apple or Linux) consult your vendor documentation on how to
join that device to a wireless network.

7
4. Change the “admin” user password
a. Click the “Advanced” icon from the dashboard, or the “Advanced” button on
the blue line near the top of the screen.
Or
b. Click “Security” in the left column of your screen.
c. Click the “Show” checkbox, then type the new password [“newpass” in this example].
d. Click the Apply button at the bottom of the screen.

8
e. Click the “Ok” button in the “Residential Gateway” box.
f. Login with user “admin” and the new password for “Password.”

9

10
5. Block a website from being accessed
a. Click the “Advanced” icon from the dashboard, or the “Advanced” button on
the blue line near the top of the screen.
Or
b. Click “Website Blocking” in the left column.

11
c. Type in a website name, e.g. “badstuff.com” and click the “Apply button.

12
6. Restrict access to the Internet by time-of-day
a. Click the “Advanced” icon from the dashboard, or the “Advanced”
button on the blue line near the top of the screen.
Or
b. From the “Create Schedule” screen, “Device” pull-down menu, choose
the name of the computer you desire to restrict. Choose the days of the
week to allow access, choose the “Time of day range, and click the
“Add” button.

13
7. Change the firewall security settings
a. Click the “Advanced” icon from the dashboard, or the “Advanced” button on
the blue line near the top of the screen.
Or
b. In the left column, click “Security, then click “Firewall.”

14
c. Choose the desired “Security Level,” then click “Apply.”

15
8. Add Port Forwarding rules
a. Click the “Advanced” icon from the dashboard, or the “Advanced” button on
the blue line near the top of the screen.
Or
b. In the left column, click “Security, then click “Port Forwarding.”
c. Click “Add,” key in the port forwarding rule parameters, then click “Apply.”
d. Add additional port forwarding rules as desired.

16
9. Turn on “Remote Access”
a. Click the “Advanced” icon from the dashboard, or the “Advanced” button on
the blue line near the top of the screen.
or
b. In the left column, click “Security, then click “Remote Management.”
c. Click “Enabled” for “Remote GUI State.”
d. Determine your “WAN IP Address” by, e.g. accessing a site such as
http://www.dslreports.com/whatismyip, type in that address in the “WAN IP
Address” field, type in the port you will use for remote access, then click
“Apply.”

17
e. The WAN IP address is valid for up to three days (72 hours) when the
GigaCenter is powered off, but will need to be re-determined and reentered if
the previous WAN IP address has expired. The GigaCenter otherwise keeps the
same IP address.

18
10. Extending wireless coverage using the Calix 804Mesh Dual Wi-Fi device
a. Connect the power supply and plug in the Calix 804Mesh Dual Wi-Fi device in the part
of the building you desire to extend wi-fi service. Once the power light and two of the
Wi-Fi Backhaul lights are solid green (see sections “i” and “ii” below), press the “WPS”
button on the back of the 804Mesh Dual Wi-Fi device until the four “WiFi Backhaul”
lights are flashing green.
i. The optimum distance for the Calix 804E away from the Calix 844E or 844G will
be indicated by two green lights only in the “WiFi Backhaul” lights. More lights
than two indicate that the Calix 804Mesh Dual Wi-Fi device is too close to the
Caliz 844E or 844G. Less than two lights in the WiFi Backhaul lights indicate
that the Calix 804Mesh Dual Wi-Fi device is too far away from the Calix 844E
or 844G.
ii. Optimum distance from the Calix 844E or 844G to the Calix 804Mesh Dual Wi-
Fi device is affected by the number and type of walls and other physical
obstacles between the two devices.
b. After pressing the “WPS” button on the back of the 804Mesh Dual Wi-Fi device, go to
the operating ONT and ensure the green light adjacent to the “WPS” button is solid
green. Press the “WPS” button on the ONT until the light flashes green.
c. Wait until the WPS light is solid green.
d. Go to the Calix 804 Mesh Dual Wi-Fi device. Examine the “WiFi Backhaul” lights to
ensure that the conditions explained is sections a.i and a.ii above are met. Adjust the
location of the Calix 804Mesh Dual Wi-Fi if the “WiFi Backhaul” lights indicate that you
are too close or too far from the Calix 844E or 844G.

Scan the QR code at left to access the installation instructions
for this product. All product documentation is available online
from the Calix Resource Center (support.calix.com).
GigaCenter
Quick Start Guide
This document provides general installation practices for the GigaCenter model
844G/854G.
This document also provides guidance for site preparation, installation, and basic
troubleshooting.
Package Contents
GigaCenter - Model 844G or 854G
Power Adapter (Optional - may ship separately or with UPS*)
Wall mount bracket
Tabletop mounting stand
GigaCenter Quick Start Guide (this document)
Product identification labels with login credentials (x2)
www.calix.com P/N 220-00857, Rev 11
Table of contents