MeCan MBP01-CCD User manual

1
Bio-Pyramid with CCD Camera
MBP01-CCD - User’s Manual
○ Standard Accessories
・
Accessories
・
CCD
-
SET
USB camera
WAT-03U2
Zoom lens
M13VM550
Software
USB Cable
・Bio-Pyramid hood for CCD camera
MBP01-M75
・Focusing Items
・
Sharp cut filter
camera, lens,
USB cable are delivered
pre-assembled
for safety measure.
Hex Wrench
MF-SC56A
Installation
❶
Lens Attachment Sleeve
❷ Observation window cover
❸ Handles
Open window cover to observe through
observation window. Window cover and
observation window cannot be detached.
Parts name
Focusing Sheet
Focusing Target

2
Table of Contents
Software Installation(launch & Image Capture Soft) ・・・・
Lens & Filter attachment ・・・・・・・・・・・・・・・・・・・・・・・・・・・・
Lens Adjustment(Focus, Zoom, Shooting range) ・・・・・・
Software operation(Capture, Folder Selection, Save) ・・
Pinpoint setting(Black/White, Gain) ・・・・・・・・・・・・・・
Camera Control(White Balance, Exposure, Gain)・・・・・・・・
Camera Control(Brightness, Contrast, Color, Saturation) ・・
Camera Control(sharpness・gamma・default) ・・・・・・・・・・
Data Save / Management・・・・・・・・・・・・・・・・・・・・・・・・・・・・・
PC environment for software ・・・・・・・・・・・・・・・・・・・・・・・・
Specification ・・・・・・・・・・・・・・・・・・・・・・・・・・・・・・・・・・・
3
4
5
6
7
8
9
10
10
11
12

3
Required system Recommended system
CPU 800MHz or better IntelⓇ Core iTM series or later
Memory 512MB or better 2 GB or better
USB 2.0 port
2.
0
port, Monitor resolution
1920 x 1080 or better
Operating Procedure
For gel documentation procedure, please skip to
P6
“
Software
Operation
”
Software Installation
1. Copy Image Capture Software to PC
Please check PC’s operating environment before installation.
CD-ROM will not be required for operation once soft is copied. (no license limit)
❶ Insert CD-ROM to PC
and select “Open folder
to view files”
❷ Select WCV_3.00
and click
❸ Select Watec
Camera Viewer.exe
and click
❹ Copy software to
Designated place
and done !
Copy
* Insert CD
-
ROM to PC before connecting USB cable to PC
2. Launch Software Installation
Install launch software only when copying the capture soft to PC would not open launcher
When your PC is not equipped with launching software (very rare),
first install vcredisc_x86 (included in the CD) and launch capture soft.
❶ Select vcredist_x86 ❷ Check I agree
to the license terms
and conditions
box, and click install.
❸ Setup start to
progress
❹ Complete when
“Setup Successful”
is displayed

4
Lens & Filter Attachment
3. Attaching camera and lens to Bio-Pyramid
Have Camera set, Hex wrench, Bio Pyramid hood and Filter ready.
❶ Turn the Bio-Pyramid hood upside down
and install filter from inside the hood.
Install only MF-SC56A SC filter
when used together with
LED transilluminator
When using MFC65-52 - IR Cut filter
(optional item) together, first install
MFC65-52 and then install MF-SC56A over
MFC65-52
IR Cut Filter
MFC65-52 (Option)
Use together with
UV Transilluminator
camera, lens,
USB cable are delivered
pre-assembled
for safety measure.
Do not fasten too tight
May damage the lens
❷ Install lens and tighten the screw on the
side of hood with hex wrench.
Important!
❸ Set CCD camera parallel to lens logo
❹ Insert lens to Hood Top. Make sure lens logo comes to front and center position.
❺ Adjust camera position as to it is set parallel to front side.
(movable up to 300° with lens attached)
❻ Using Hex wrench, tighten screw (green arrows) and fixate.

5
4. Aperture, Zoom, and Focus Adjustment
Adjusting lens for appropriate focusing/shooting coverage while checking image on display
Connect USB camera to PC (with USB cable) and launch image capture software.
The setting explained here start with minimum zoom (= widest shooting coverage) which make it
easy for focusing. Please readjust zoom later as it requires for your own specific purpose.
① Aperture Adjustment
● Loosen the “Lock-screw” (orange circle –
second from the top) of aperture adjustment ring.
● Turn the aperture adjustment ring (orange arrow)
all the way to counter-clockwise for brighter image.
● Tighten the “Lock-screw”
② Zoom Adjustment
● Loosen the “Lock-screw” (green circle –
third from the top) of zoom adjustment ring.
● Turn the zoom adjustment ring (green arrow)
all the way to counter-clockwise.
③ Focusing Adjustment
● Loosen the “Lock-screw” (yellow circle – at the top) of focus adjustment ring.
● Turn the zoom adjustment ring (yellow arrow) all the way to counter-clockwise.
● Turn the zoom adjustment ring (yellow arrow) gradually to clockwise to focus.
④ Tighten Zoom and Focus Lock-screw once setting is finished
Please readjust the focus
when zoom level is changed

6
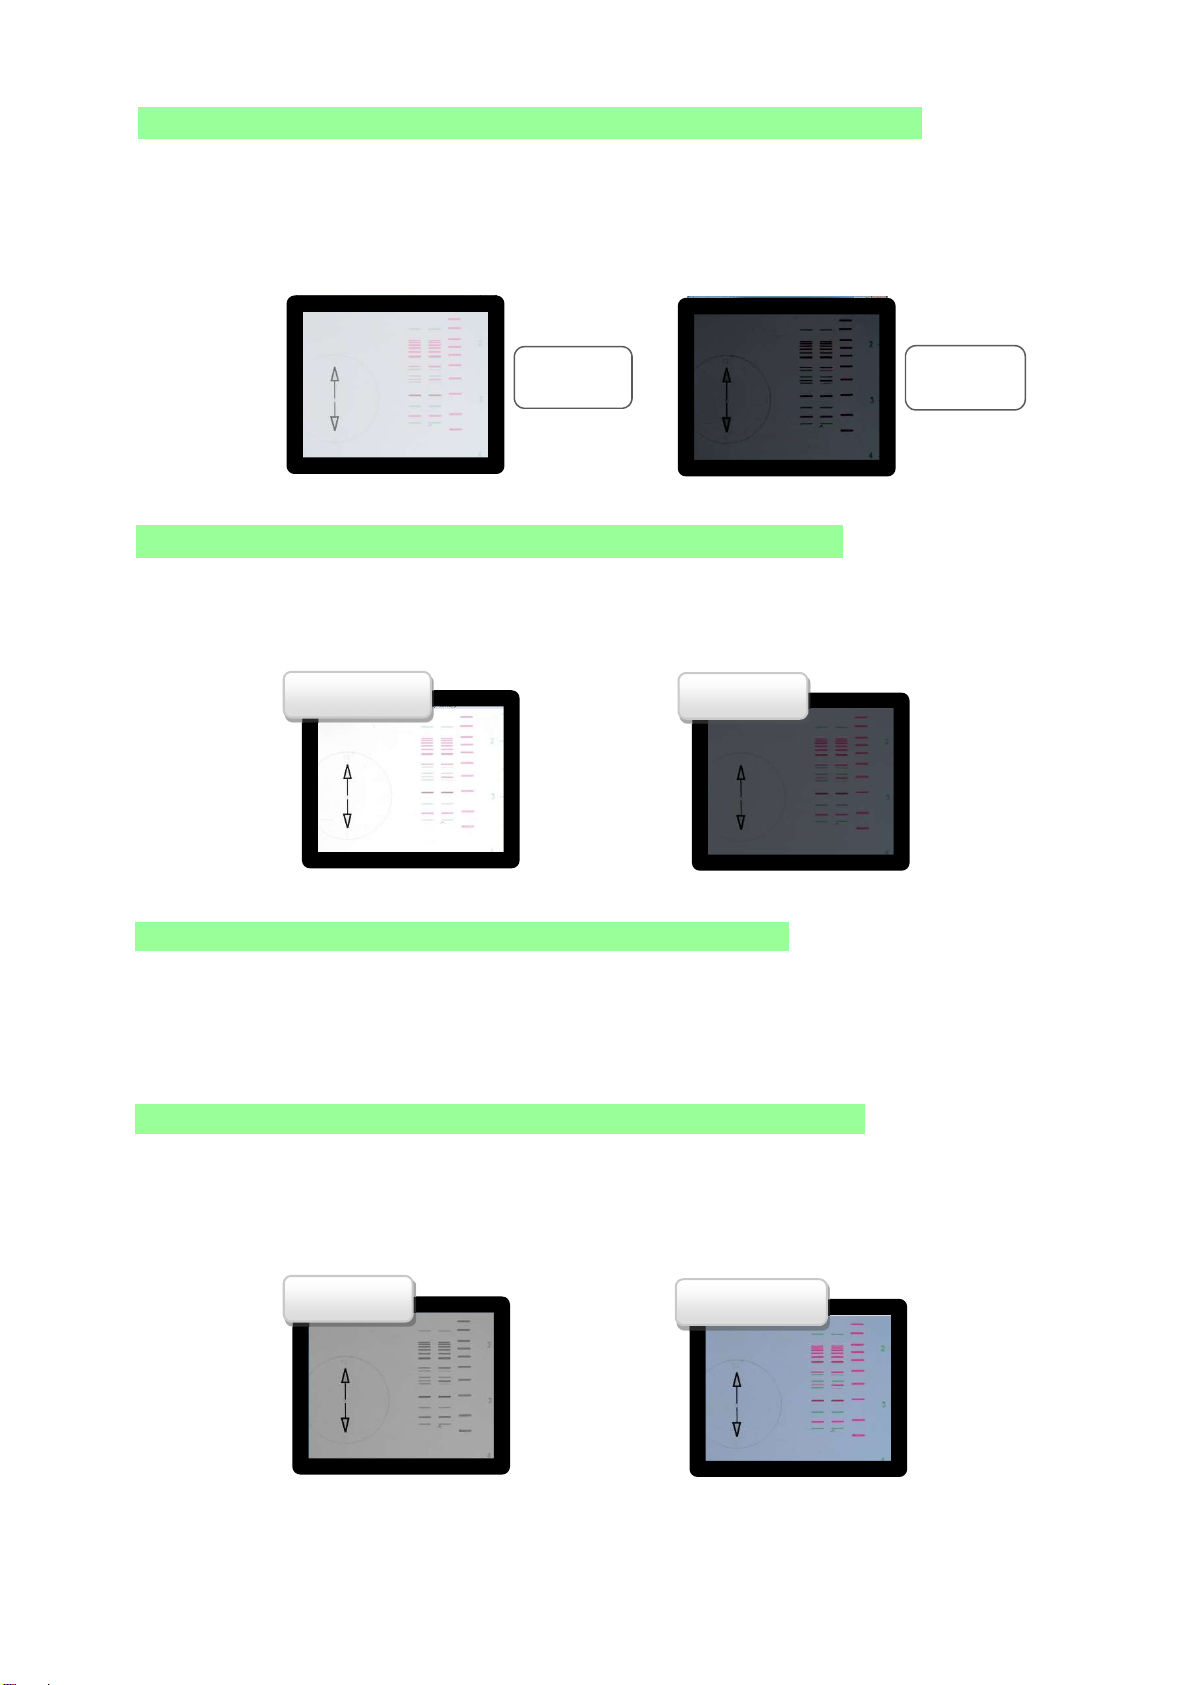
❹ Save Captured Image.
Click “SAVE” and Icon will
be changed to “SAVED”
❺ Not Saving Image.
Click “PREVIEW” will bring
it back to preview display
without saving image.
Image will be deleted when
save button is not clicked
Make sure before
returning to PREVIEW! Horizontal from the top
1. Error message will be
displayed
if software is launched without
connecting camera to PC first.
2. Data name will be assigned
automatically by the time when
image is captured. To assign
designated name, please do so
manually after saving.
3. Adjust the camera position
when captured image is tilted.
Image will be displayed parallel
to screen when camera is set
and positioned horizontally
The “Slip Mount” feature of zoom
lens enable to rotate visual field
300° while camera is attached
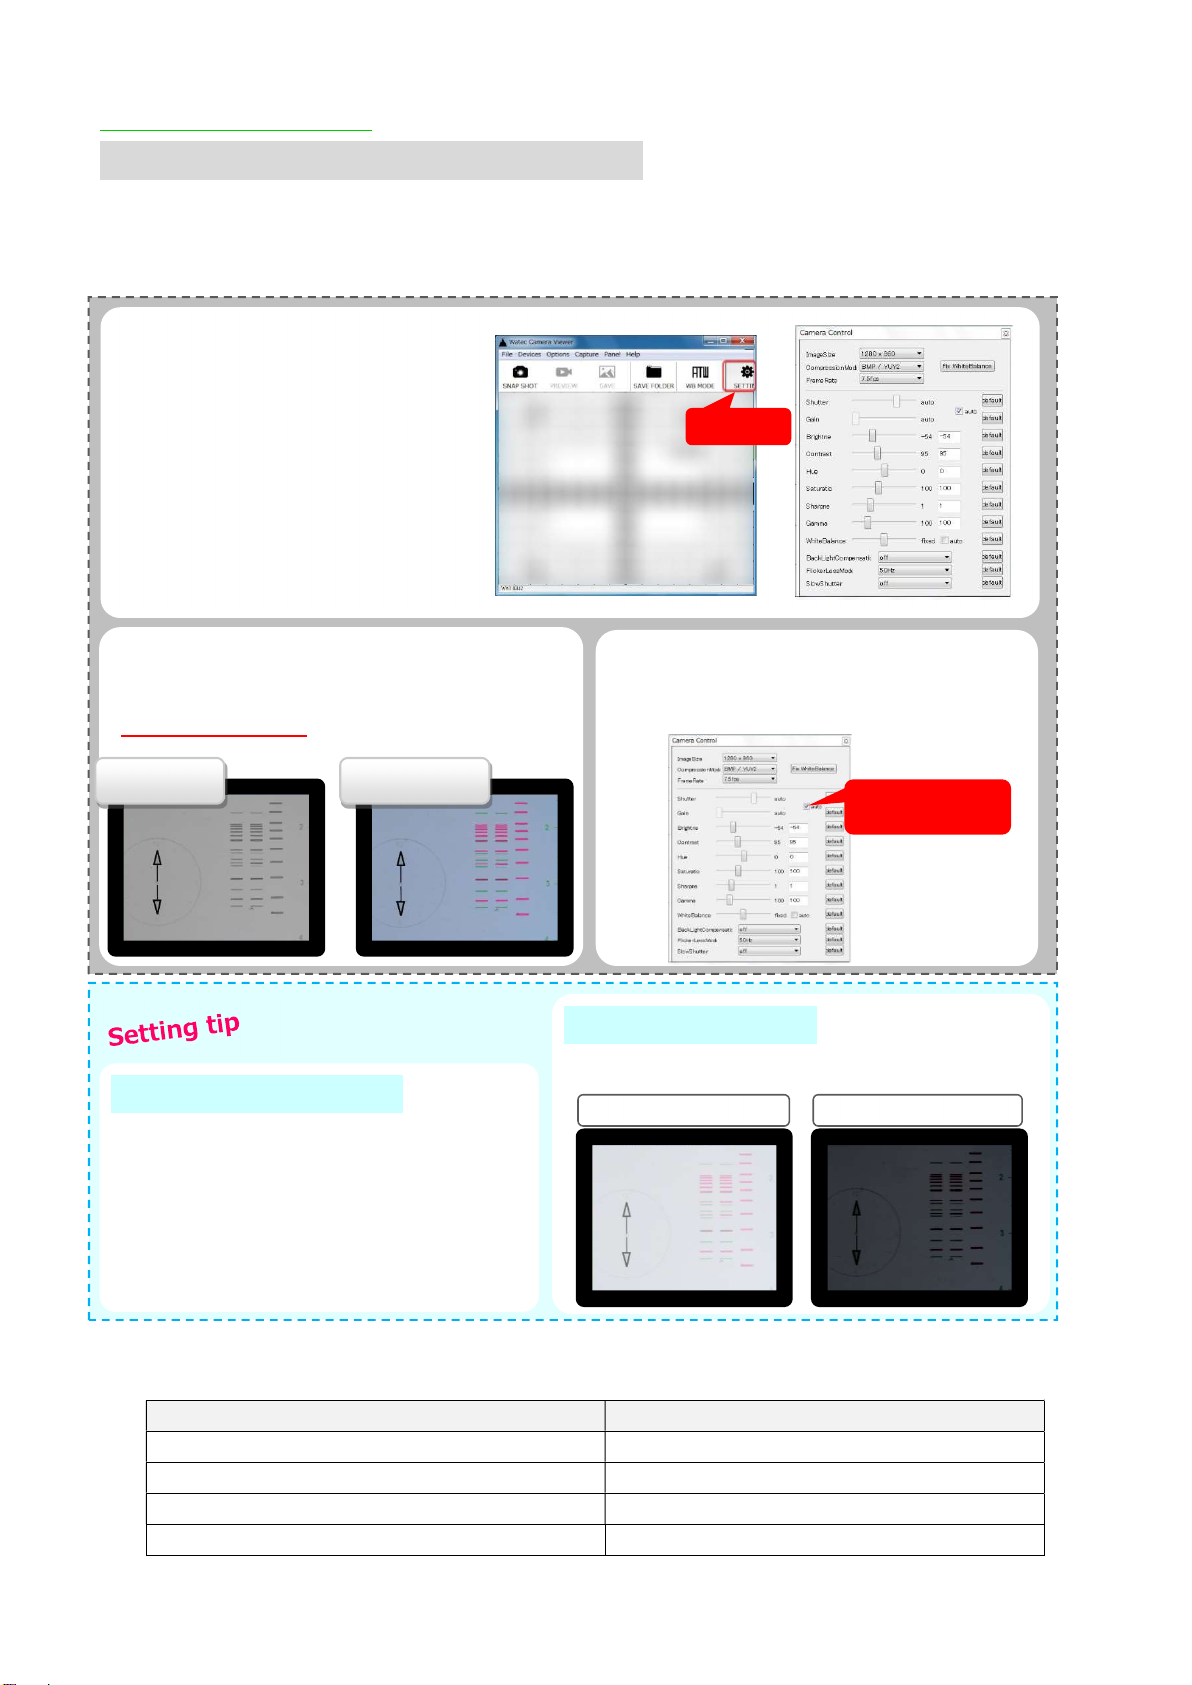
Image Capture Soft - Basic Operation
5. How to capture image and save
This process is operated from PC
Please see
P7
for pinpoint shooting conditions setting
❶ Launch Capture soft
Connect camera and PC first
and click the icon below.
❷ Select Folder to Save
Click “SAVE FOLDER.”
Select the folder to which
image will be saved,
and press OK.
❸ Capture Image.
Click “SNAP SHOT” and
preview will be displayed.
Capture an image and
it will be turned into
a Captured Image
select this icon
Click
SETTING
to open camera
control box. Uncheck auto
shutter/gain check box.
Set gain: 0 & shutter: 1/15.
Change shutter if it is too dark
Click
Uncheck

7
Item Condition
Reagent SYBR Green
Used marker / amount Dyna Marker 100dp DNA/10.0μℓ
Gel concentration / electrophoresis / dye /Bleach
1% / 25 min / 10min / 10min
Light Source 505nm LED light source
Problem:Band is too dark
Solution:Increase Brightness (P10-④)
Problem:Rough image quality
Solution:Reboot the software.
Camera’s auto saving feature sometimes
renders rough images especially right after
capturing very bright images.
: Decrease Gain when image is too rough.
: Increase Shutter speed when it is too dark.
smaller value = darker
larger
value = brighter
Pinpoint Setting
6
. Pinpoint setting with Camera Control
D
etailed image setting with
Camera Control
for when it
’
s difficult to visualize band with
default. Steps explained here should solve most problem (depending on the condition of the gel)
and you can leave rest of setting as a default. * Camera should be connected to PC for setting.
Launch Camera Control
● Click “SETTING”
● Camera Control window
will be opened.
Click
Value: 0
Value: 255
Black/White Image Setting
Set “Saturation” to
grayscale (value: 0) (P10-⑦)
Exposure/Gain Adjustment
Set “Shutter” to “1/15 sec”
and Gain to
“0”
(
P9
-
③)
Uncheck
box
** The Gel used for this particular pinpoint setting

8
before
after
7. Characteristics of Various Settings
When it is difficult to capture clear image with pinpoint setting, make fine adjustment
from Camera Control window. Here explains each item in camera control window in detail.
②
White Balance
-
Default value
・・・
Auto (Range 2800 - 6500)
● Default setting is “ATW” (auto)
● First, remove Sharp-Cut Filter
● Prepare Focusing Sheet and capture it with camera.
● Click WB MODE icon
● After 5 second, the icon switch to PWB
●
White balance is now fixed
Switched
If focusing sheet is used while settings,
image noise may will be appeared when
switching to capture mode. (this is caused
by auto saving feature of the camera)
Reboot software when it happens.
Same size as Mini
-
Gel. Please
use it for field of view,
zoom, focusing adjustment
It is fluorescent material and
May become ultra-bright
③
Exposure / Gain
Default value ・・ Auto (1/8000–2sec)
●Clear AUTO Check Box
●Decrease Gain when image is too rough.
●Increase Shutter
speed when it is
too dark.
Clear check
box
Camera Control window
Click
①Launch Camera Control
●Click “SETTING”
●Camera Control window
will be opened.

9
Larger
= brighter
Smaller
= darker
Brightness Value
Value: 255
Value: 0
Value: 0
Value: 255
④
Brightness
-
Default Value
・・
0 (adjusting range
-
128
–
127)
●
Brightness adjustment. Higher value for brighter and lower value for darker image.
● Adjust when band looks too dark.
⑤
Contrast
-
Default Value
・・
85 (adjusting range 0
–
255)
●
Contrast adjustment.
● Higher value for lighter, and lower value for darker color.
⑥
Hue
-
Default Value
・・
0 (adjusting range
-
40
–
40)
●
Hue adjustment.
● Setting is not required when white balance (P8-②) has been already set.
⑦
Saturation
-
Default Value
・・
94 (adjusting range 0
–
255)
●
Lowering the value turns it into Grayscale.
● Image would look rough when value is increased far up.
● Set value to “0” for black and white capture.

10
Value: 1
Value: 4
⑧
Sharpness
-
Default Value
・・
1 (adjusting range 1
–
4)
●
Image sharpness adjustment.
● Please use with default value.
● Increasing value provide more sharpness but comes also with more image roughness
⑨
Gamma
-
Default Value
・・
100 (adjusting range 48
–
300)
●
Image gradation correction.
● Please use with default value.
⑩
Image Size and Compression
●
Size
Image will be saved with larger size with larger data size setting
>> 1280 x 960 / 1280 x 720 / 640 × 480 / 320 × 240
● Compression
“bmp” and “JPG” file can be selected
>> bmp is not a compressed image and it has large data size (high resolution image)
>> JPEG is compressed image and it will reduce data size considerably.
⑪
Save Settings
●
The setting at end of operation will be saved automatically.
● The setting saved with previous operation will automatically run from the second time
Data Storage and Management
8
. Storage and management of captured image
●
Captured image will be saved to designated place.
● Once image is captured, data name will be assigned automatically.
Data name will be given according to the time it is captured.
● When required, provide different name or save it in different folder
manually after image is save.

11
Item Adjustable Range
Brightness -128 - 127
Contrast 0 - 255
Hue -40 - 40
Saturation 0 - 255
Sharpness 1 - 4
Gamma 48 - 300
White Balance 2800 - 6500
Backlight Compensation OFF / ON
Gain 0 - 24
Flicker Correction OFF / ON
Exposure 2sec - 1/8000 sec
Slow Shutter Compensation OFF / ON
Size 1280 x 960
1280 x 720
640 x 480
320 x 240
Compression bmp / JPEG
Frame Rate 30FPS / 60FPS
Flicker Less 50Hz / 60Hz
PC and Software
9. About this manual
●
Operation system which this Instructions is based on is windows 7/32bit.
1
0
. Compatible OS
NOT compatible with Windows XP, Apple product
Windows Vista 32bit / 64bit
Windows 7 32bit / 64bit
Windows 8 32bit / 64bit
Windows 10 32bit / 64bit
NOT compatible with Windows XP, Apple product
Adjustable items

12
MBP01
-
CCD
-
Specification
Maximum Shooting Area 265 x 205mm (interior dimension at the bottom)
Shooting Distance – distance to the lens Approximately 290 mm
Filter size φ52mm size camera filter
Observation window transmission rate
(range: 220-450nm) Max 0.09% Average 0.02 %
* measured value, not guaranteed value
Size W 287 x D 227 mm(= exterior dimension)
H 304 mm (to the lens adapter top)
Material Hood: ABS / Bottom: Foam rubber
Observation window: Acrylic
Power Cons / Power-supply 0.75W (150mA) / DC+5V (USB bus power)
Cam Operation/Storage temp -5℃ to +45℃ / -5℃ to +50℃
Cam Operation/Storage Humidity below 90%Rh (must not to be condensed)
Image Sensor / Pixel 1/3 inch CMOS sensor / 1305 (H) x 977(V)
Camera / Lens Mount 1.3MP CMOS Sensor / CS mount
Output HD (30fps), VGA (60fps)
USB / Cable length USB video class & USB bus power compatible
less than 3 meter long recommended
Table of contents