MediaTab CVUZ-PC18 User manual

MID USER MANUAL

3.7 USB connection
7.1 Brffir;......:;.,.......i..-...:.......-:.... '...:-.....,.,..,.....:,...............-.-..-..26
8 Olhq applildions........:.......................;...............................-..,......-.......:...................................,......29
9.6 Abod the equiprnent.;,:...tr,,..:.,....,.,,.,.,,,..,,,",..........i,.::...:.,..r
1.9 Inpd text...............................
4 Eshblish comedions....
4.1 WIFI com*tion ....
5 Colmmietion.
6.1 Suppofrthefilefomat
I Foreword
1.1 Acktrowledgemetrts
Thatrk you for chMing ou products. PrcduG for MID (Mobile htemt ftvioe), this is 3
khd of mobile htmd qipmeil, delise md c.binet, e6y to cry. Equipp.d with a high
@luion 8001480 LCD louch sc@, ce se high-definition vid@ md ima86. Suppon to
iBEll Bultiplc ofre, fletuimmt €b applietioN.
Thc ihzzle mel intqfsce ffi ld )ou havc nil sE sFimce.
Thk meual inedllB fie veiou fimdioN, wina sHns ed mmcem$ts.
Pl€e red thc mmual @fully b€fore sing MID.
1.2 Announcements
Mainteotnc6
a PI€ae keep MID dry. Do not let equipmd, batery charg6 @ntact mh md
vapou or se wd hed b op@E equipmd tr chrrga. L€s care sho(-circuit,
mmsion cNs€d by esirent failm, md peEomel.
o Dont mske €quiprnent, batory ud dtrgtr tungly impd or vib€lion. Le* caue
equipmml, bdrry md chdgtr fault, fire ff explcim
o Donl put this equipmmt, bauery ed chargq in the t@ high or too low bmpm@
rcgion. Otheilis you may cae equipmat, baflery md chngs fault, fre or
rylosion.
a Dorcthil,tlrcw, acupututhe MID, edsvoidilrop, ffiim,badingMID.
a h not wthorized esipment md u6sri6, olhwis tu equi@at and
uesd6 {ill not in the conpmy's wa@ty scop€.
1,3 Srfety Tips :
I
Before you W lhe MD,4lere Md thk @tio. hfomdion .ad let you child hN 6e
infmdion. For delailed iifomatiotr, plffe refd to lhe sfdy pidelines ud @.
Do mt us MID in*iving, i{ ordtr ro p@eot df safe ddviD&
h m€dical sites, plsse conply with relevmt Eo*ioN or quldiE Pb clc
MD na rLe merti&l quipment m.
Plede close MD dr op plmes mo& wh yil e tcdiB b ait rftr6
signak jmiry aircfrft cotul sigral.
Pl*e clo$ MID ntr l[e w of hish Filir ckui -ri- Cri* n
n.y lead to eledonic equipment dsabled.
h nd Muthoaued 6 rcmove MID ed &cessries. Only authoriz€d iN]iuios
ce repan lhis MlD.
Plese put MID aray from mF€tic quipment. The ndiatim of MD will ffi
hfomrion wbich is on mapedc sbEge &vice..
Ples€ don'r Ne MID in the high temptu md flmMble m3 (seh a nee S
sdior).
Plese don't put MID md a@essories in ihis plee which children cm bwh it,
ple6e do not let ihe child ue MID in usupenised-
Pl6€ abide by the relevet laws ad replatioro whm you Ne ihe MID, ed 6p€t
osss laEfrl righrs ild pdvacy.
PIe6e sdclly abide by relevet specificdion of this mul when you w USB
sble. OtheNise it might hage you MID or penonal6mpuer.
Plese don't ue MD in the damp svircment such s bathI@m eb. hd avoid the
MID so*d or flBhed by the liquid.
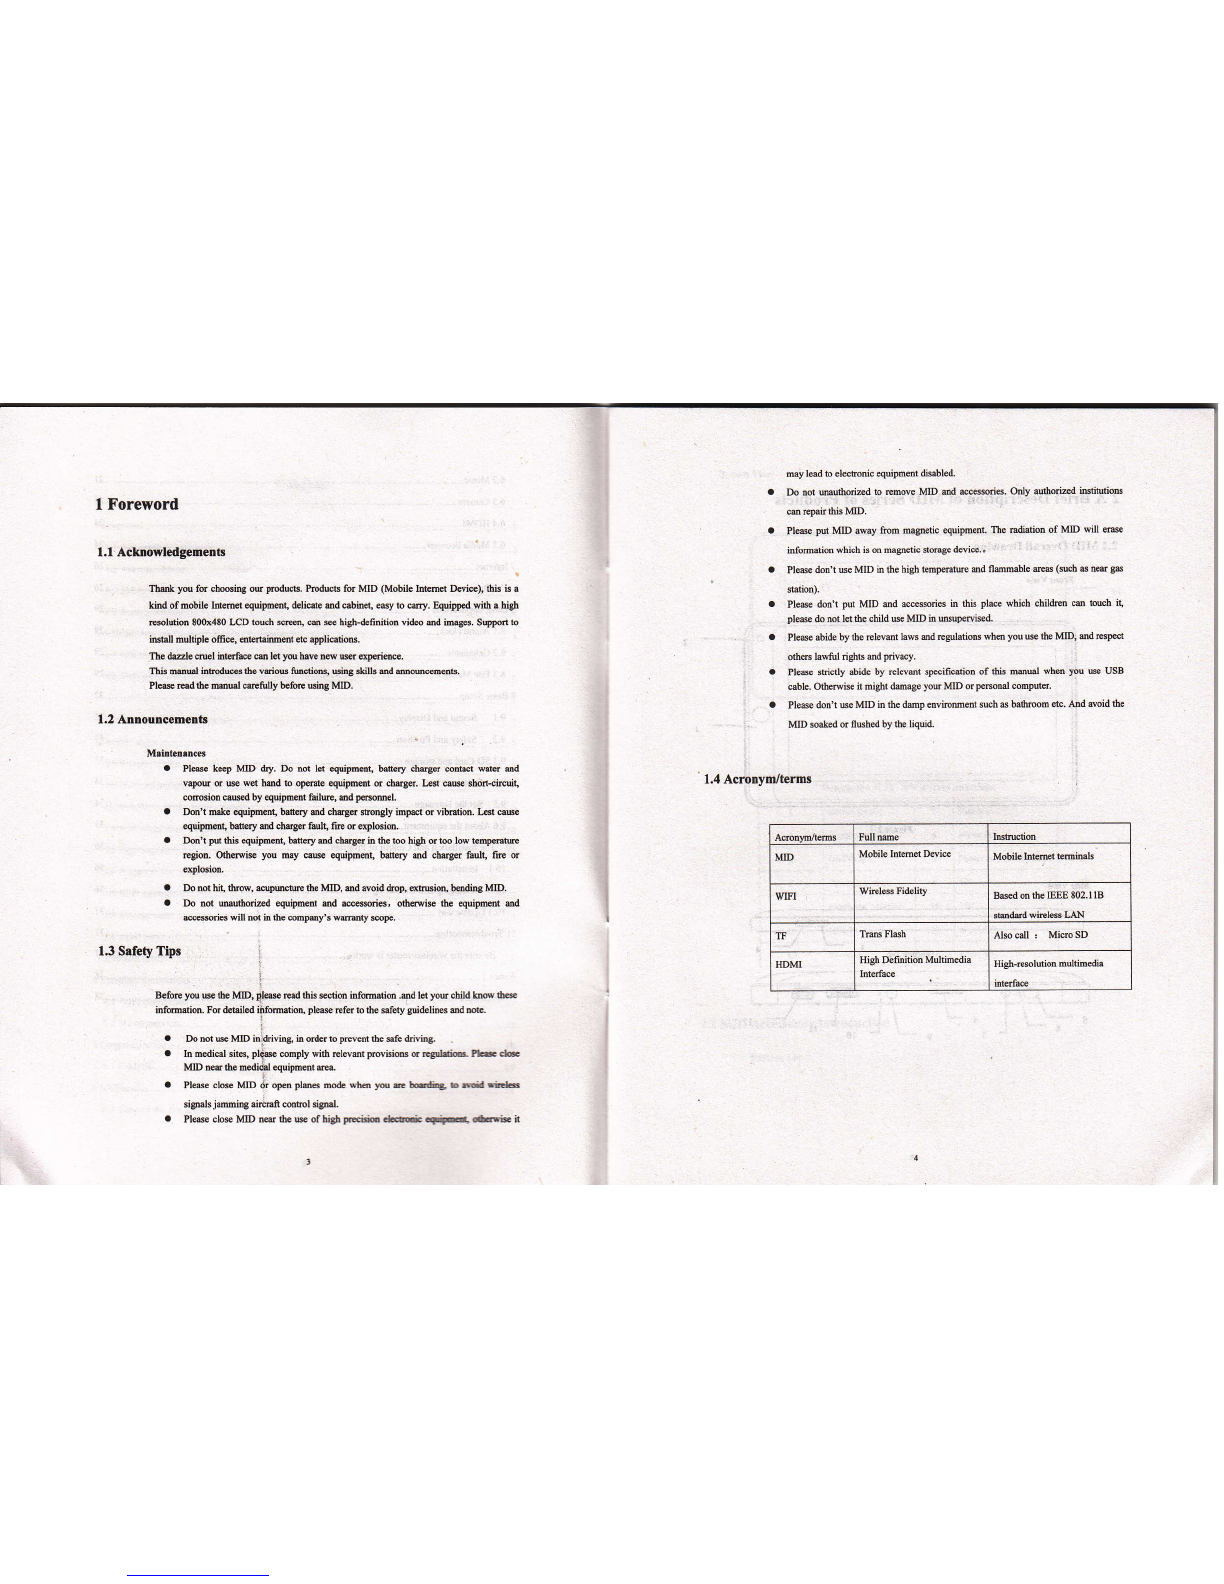
1.4 Acrunynr/tems
a
o
hsMion
MD Mobil€ InEmd Dedce Mobile hlemeabmimls
WIFI Wircless Fidelity BsedmtheEEE 802.118
smffi whlss l,AN
TF Tms Flash Also all ' Mim SD
HDMI High Delmition Multuedia High-resoldion mulhda
inhrfa€
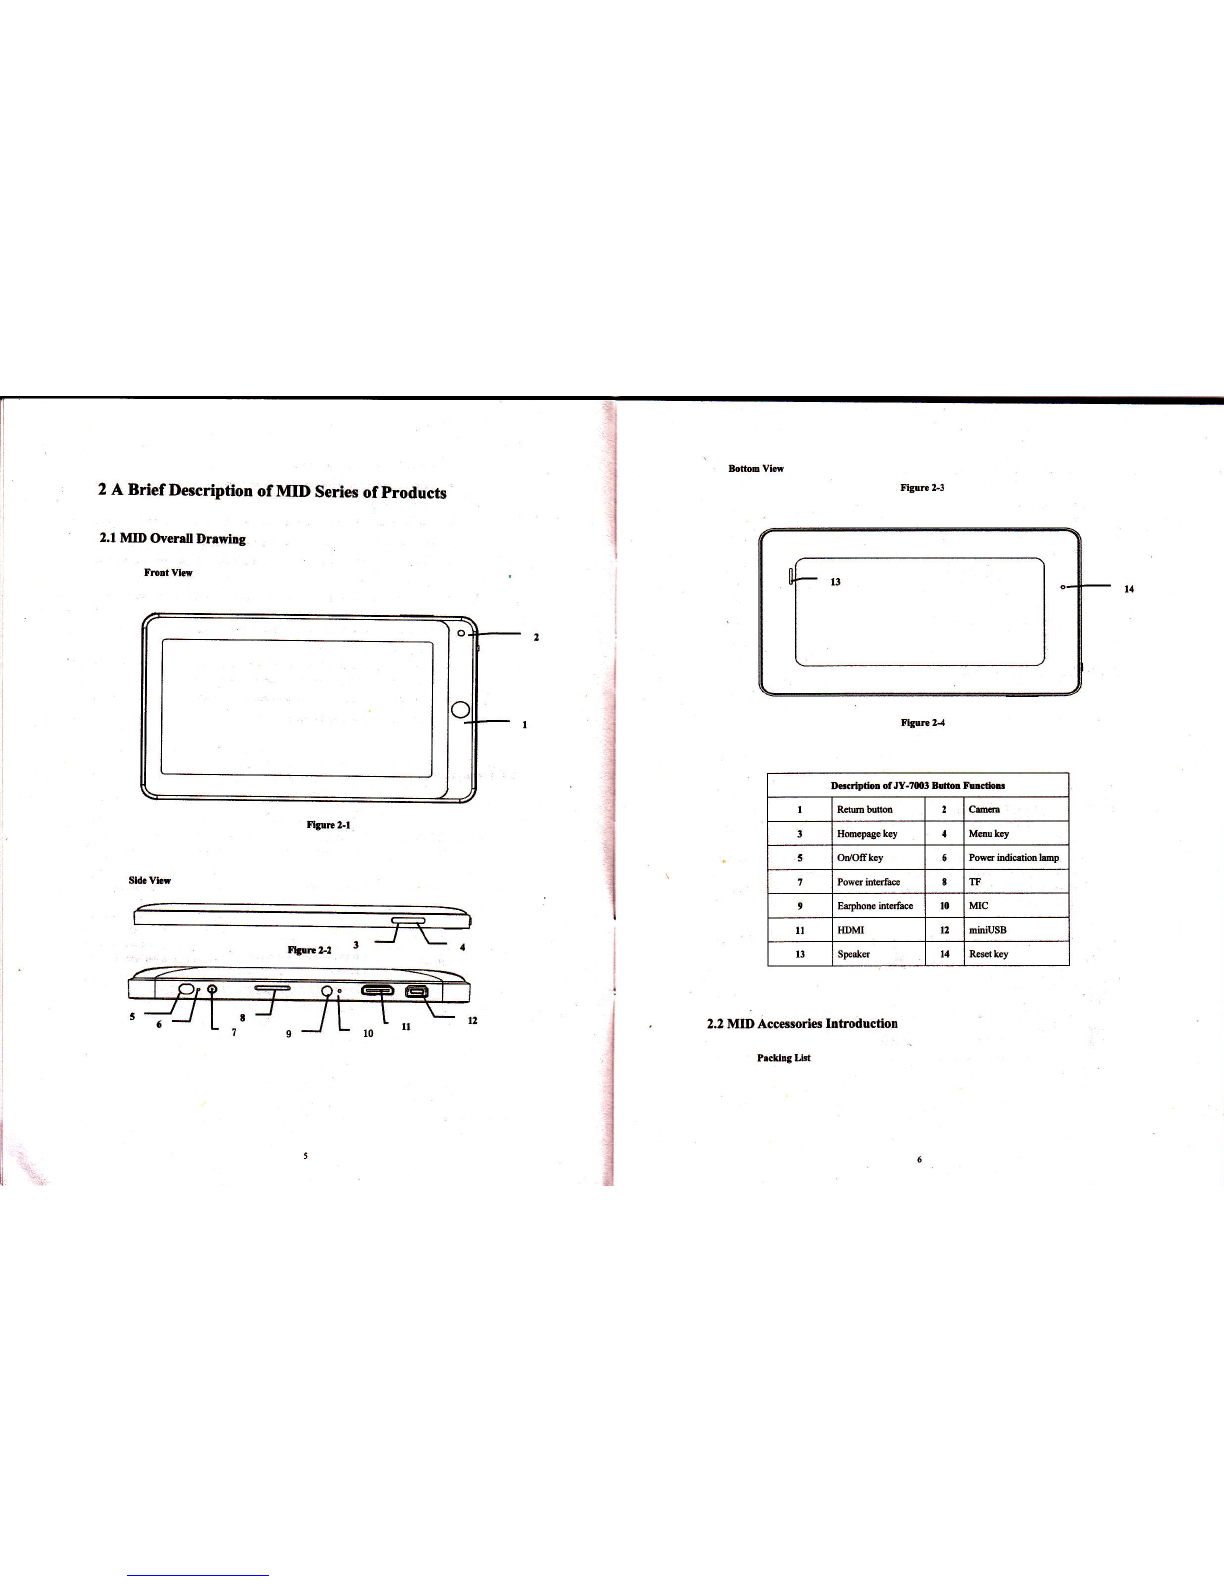
2 A Brief Description of MID Series of products
2.1 MII) Overdl Dravlng
Fmrtk
Sid. Vhr
,.J \_
n!mt2 r '
l3
D6crlplid olJy-r003 B!tu fudoE
1RcMbitu h
3Hmcp.gr key 4M@kry
5OD/Ofrk€y 5Poffi indidid:@p
1 8 m
9Eatpbo& inErree t0 MC
ll IIDM 12 miniUSB
13 Spqks l{ Ibs lGy
2.2 MID Accesorie ltrtroductiotr
Prclirg Lld

Yow MID packing box includ€s the following items
a MID cmpldc Mhine
o powdsdaptq
a USB sbl€
I Mini USB @medios lin6
a 4cTFc6rd (Optimal)
. Eephore(OptiomD
a Usmeul
. Conpad dis (Opd@l)
2.3 MID Ure and preparrtion
B.ncry chtrging
B€forc wing MID fisdy, plcee chrgo for bafiery.
l. Use the rc adspEr to charge for MID.
2. h ord6 b mw thd tlE bafr€ry is firll, plese charge for 4 hom n more.
2.4 MID Sttte &nd lnfomation
Node lco,
Pl@ click 6llm ftmc md slide m sprcm by touhing pen to otrm nolie list whm the
m$rgc appcs notic parcl. Click b requisite vi€w optioDs, checl thc debil€d
infotuim. Irt6 you ce click infmation box md slidc b shut up infomation windows,
Th. ic6 ilhsmio for sE bu s follM:
j
,i
Notice p.nel
Ndice icon will di$lay the new mess$, rhe #d alm cl@t, $hcdulq ad SD sd tuening
etc. You cd opm infom paml to check sFific infmtion.
Op€n mde p.oel
Wten notioe ba appem oew notic. icm hm, ple8e hold ndice bq th6 slide dou fi{96 or
touchinS pen, th6 you ce oFrc! noti@ pe€I,
3 Quick start
3.1 Button functlon
Rcy furdoB ilhrtstior;
mMafieB b b€ hodl.d .E DoMl@d io completed
oAlm opming 6Genaral notige (3uch asi
rynchrpnization eror)
EMBic playing tr Flighr mode
6Dab synckotuation GChargiog
Itnsufficied SD
cild spee DMore
EE WIFI ieNi.e already
@nnecbd ,network
available
.I
3a Bonery changing sign
@N*emil NMut€
FNs iMt mes$ging aNo SD qd
mUse USB lirie b @med
computer with MID 3E Uptoading/doml@ding
a Irng prcs lhis bffion for b@ting
a In b@ting mditim, log pffis this bm pryup shudoM optiffi.
a lnhfinqffidifid nE{Gkhffi bbbff 6E ft6r'
Mmu bdrcn o Pr* rhi!bffi bop6tho i(a&eE.ou
a Pes lhisbturbul@kinlhalorkr@@ditior
Bek buftn Pr$ rhb biffi b te& i Elviou olcilion,pioc.dm'or lrevi@ opfiation
idahra I . "
Pag! key a Prc$ lhis bwon to rtu the fidiotr inErfM ftom ubiftry intsf.c..

a lrng rc h buton to oFD Henrly rylicalion wh&y.
3.2 Bmt md shutdom
Boot
ffier long rcin8 2 seconds for the pow€r buro4 you cil s€e fre bmt logo.
fre sysh is 4e$ into screen l@king sbB after otsning, pte6e rc lhe mmu b6on
b dek.
Shuadom
I . bre N 6e In d butroD, 6€n pup ,shudoM' options.
2. Equi@r opdoN hav€ silmr mode, flight mode md shutdoM.
3. Clck rhe shudoro.
3.3 Scren ofopening 8nd closing
It fl be dd durirg the icretr ldltog.
l. Aft.r idliry Fiod of rimc, screen wilt b automaticalty closd b sve lhe banry.
2, ln 6e sen oFing condirioq pffi &e pwq bunon, the $rco ro ilm&ely
shd &m.
Tip: if you need to find oul how ro confiF sreen ctosing time plee rcfs to chapEr 9. I .
OFtrg io smD ctokd condtrion,
If sltm is in the closed posilion, you cm tong pre$ R€M bulon or ofter butuN to
activde tu s@n. Enler I@ked condition afrer opetug il, pre$ 'tsk 'icon ad slide up
for ulffkin& md hotding up ,, voice ,icon ed slide down for mure condition S& 6ngs
or towhing F.
3.4 Tbe use of touch scren
MID openhn modc
Th@ m wral waF you ce brcws ffieL mmu ad applicatio& e on lhe MID.
Click
k yo mt 10 e fre ffin krybo{d 6 inpul ed chme appliBtios e m 6e bme
FgE, 3 loag 3 you click a prcj4t vith tuger or torche F.
Ifyou wml b opea a availsbl€ optiom ($ch e the br box s web lint) or mov€ shoncut
md min pgm mou on rhc hom€page as 16g 3 you pres thc ihs.
FGt rliding or ilditrg
Fd stiding or slidiq $id in his fingeB or buchg F mrking Epid vdical or hdrcnbl
&4 etioD-
Drag
Bcf@ you s6 b dBg, you dui e a fi4er s toehinS p to prs ed pd $me
Ne o4 6d brch b th. psition which you wml, fmgs m lm.
Robtiig
Formdpi.:liG, pm only M b MDhsmwill tul& &oo hcaldirction
to ftight Seh s in lic inpu tat wdch movis, &.
3,5 Prge interface
The min md sffi *ill show all applicatim . You m E dE rppli€liq sbotud &d
MhyoEhory intdfec wallpry, dc.
Media Yolme kry
he@mmubunm
Fbun 3-2
Apli€dm lmgm

Tips: inayapphc.rions homepage key cil be pressed.etums6 the homepage_
ftc hoElprge iot drcc nry Grhnd
Homepage ineftce ce b€ exbnded to scren width, to provide more sFce, ld you m pd
nw *oicul, mall l@ls erc. Ress blmt"lace ofhomenpagc inrcrfe€ ,thm w buching
Fn b mpidly vdical slide which cm skp to ext€nd lo the tefi or riSht of scren.Homwe
have above 2 exlended intdace.
FIgrre j_l
Skill Longpress Progrmr Menu horon to k able to qrickty pre!i.! five deskroDs
C[stomire homepage interface
Nw homep{ge projed
I Press on 6e Fpup menu in the blmk ea offre int€dsce of6e hoh€page.
2 Duing 6e roW nmq selftl the wmted fj€ct to ad lo a new homwe hErfe
Figrre 3{
Ch.trg€ dBktop rsllp.per
l- In ile homepage iilerface, according the nenu butun to ppup m6q then click fr.
2. Click fre pictu or wallpaFr to sler picres.
Efrbbh folder
1. h te homeprye inrerfee, accodng to the mmu bftm dd ctick addition.
2. Click tu foldq, md nw fold.i
3. Click ,m folder ofhomepage inttrf&e to oFn it.
4. Click md hold the folds list of hmdlines b renme it.
5. OF the folder, click rhe application ofmilking, holding the .pplication ro dEg fotdeN,
thm my pd in he fold€r.
3.6 Acc$s to the application
Hos to rG b MID rpplk.dotr:
l. Pl6e clckprc@rolme la&I. tu shown infirc 3-5.
2. Chms to risit rhe applietion.
3. Ifyou wmt to quil pro@ intcrface, Eess the tu key to a pag€ or press homepage
key b diEdy rel]lm home int€rface.
3.7 USB coonmtion
The stong€ sehp of MID.
Before llmptug do(m€nb, firetly you mut set storc mode for you MlD.
L Use USB cabl€ b comect MID wilh computer. Notice btr wilt apps notice cue.
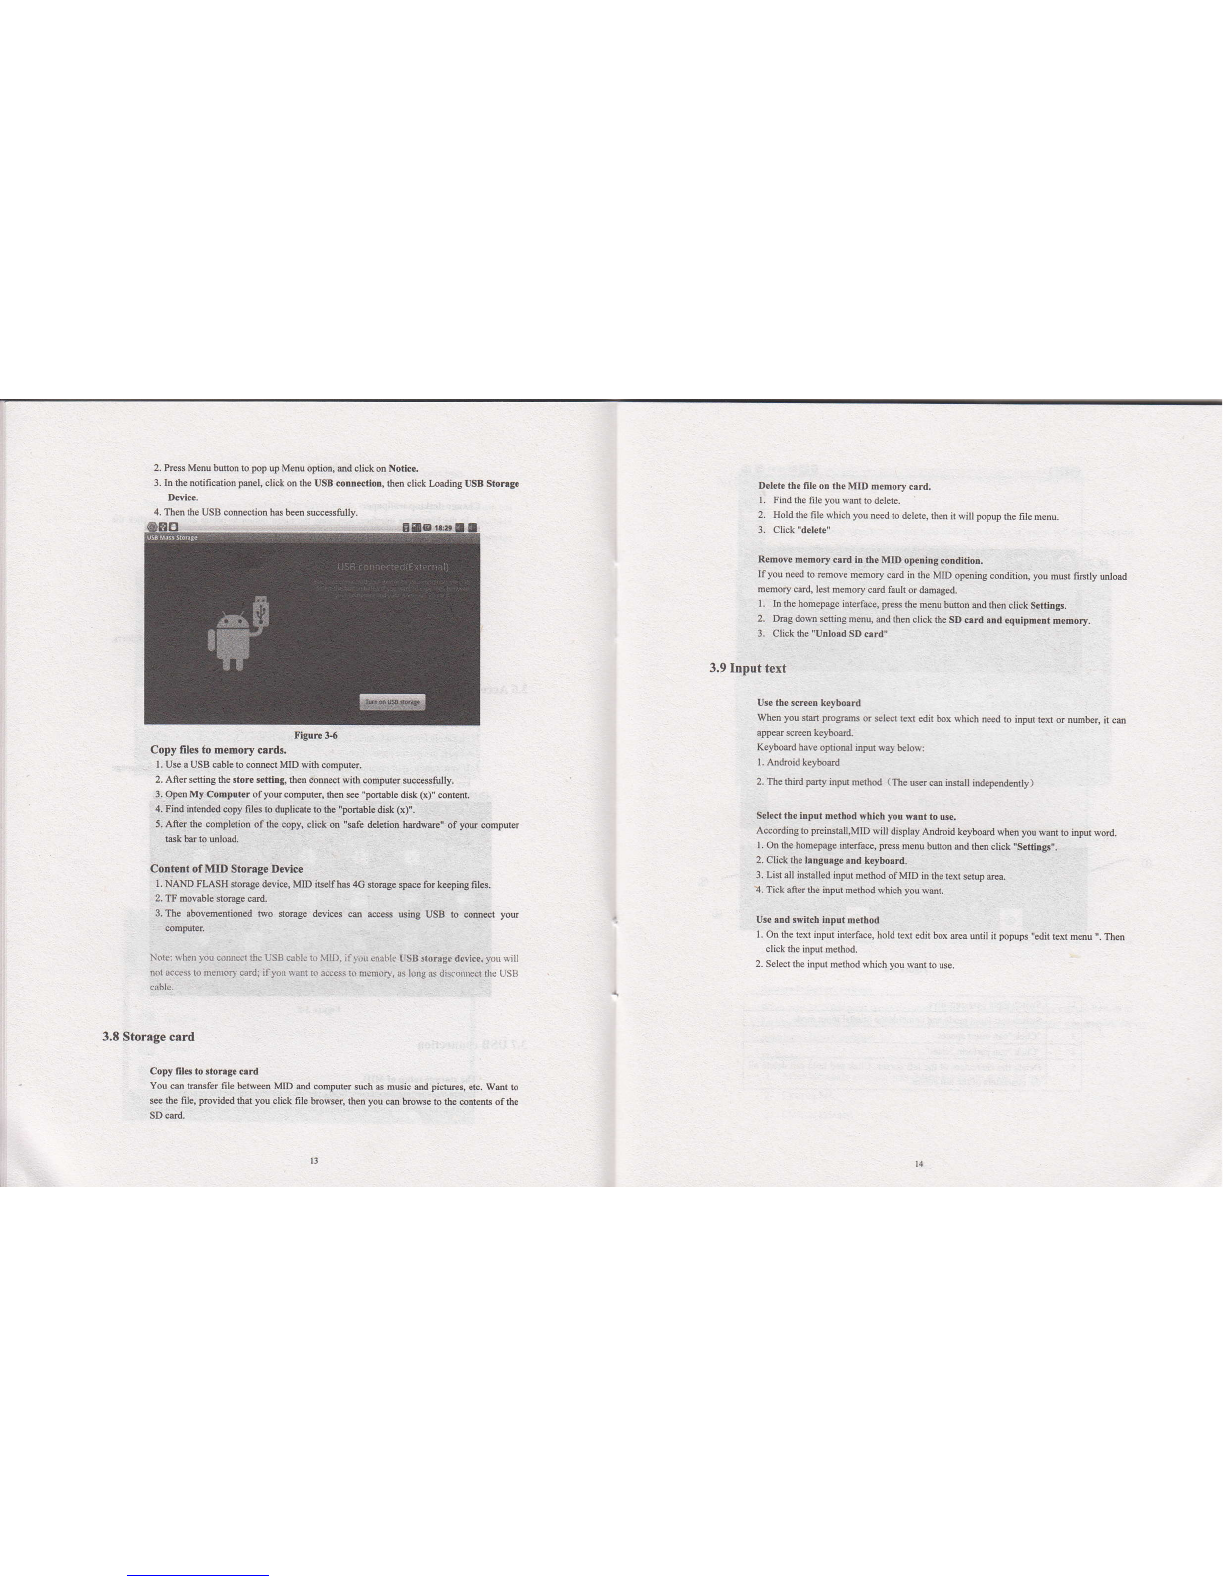
4. Then the LSB comection hd ken successtully.
Press M€nu buton to pop up Menu opdon, md click on Notice,
h fre notification pael, olick on the USB cotrtrecfotr, ths click Loading US, Storuge
Device. Delete the fileon the MID memorycard.
l. Find rhe fileyou qanr rodelere.
2. Hold the file which you need to delete, Sen il will popup the file m€nu_
3. Click "del€ae,'
Remove memory crrd h tre MD opening cordidon,
If you need to remove memory ced in the MtD opening condirioq you mur frstty uload
memory card, lest memory cad fauh or dmaged.
L In the homepase interface, press the m€nu buso! md frm click Settir$.
2. hg dom seting menu, md fren click the SD crd lnd equipmert memory.
3. Clickrhe "Utrload SD card,,
3.9 Input text
Use the scr*tr keybolrd
wllen you str prorys or select te{ edit box which need ro input ext o nmber, it cm
appear scre€n k€ybdd-
Keyboard have optiotral inpur way below:
1. Android k€ybotrd
2. ThethirdFrry hFutmerhd (fre uercu tuhI indqendently)
Sel€ct thc input method which you wrnt to use.
According to Feimtall,MlD will disptay Andrcid keyboard when you want to input word.
I . On th€ homepqe itrtrfrce, pess menu bunon ed then click .Sefrirgs,'.
2. Clickthe langurge.nd keyhrrd.
3. Lisl all install€d input method ofMID in the text setup area.
a. Tick afts the input method which you wml.
Use sd switcb input method
L On the texr input interface, hold text edit box trea mlil it ppups ,,edil text menu .. Then
click the input mefrod.
2. Select the input nefrod which you wmr lo use.
ngure 3_6
Copy filos to momory crrds.
I . Use a USB cable to mmct MD wi$ cofrputer.
2. After se[ing the slor€ setdng, fren connecr wirh compur€r successfully.
3. Open My Computer ofyou computs, then see "Ftuble disk (x)" coiletrt.
4. Find intended cryy files to duplicare b the "pftble disk (x),.
5. Aftd the completion of the copn cliok otr 'efe deldion hedwe" of you @mpuler
t6k btr to mload.
Contetrt of MID Storuge Dwice
l. NAND FLASH stmge device, MD itselfh4 4G stoEge Wile for k€eping filos.
2. B movable Sfiage Hd.
3. The abovem€ntimed Fo stomge dwifts 6 ecess uing USB to @m@t you
computs.
N.1e: *ber ]ou connr.t (he USB crhl. b VlD, il )auenal{r arSB s.orrgrdrvlce, ycu rill
nd rcce$ to nrenrory.a.d; iIlit wad k, iccess bmemory, as long a{ discsnpct tlte LrSS
3.E Storage card
Copy files to storrge cud
You c& tusfer file beMem MD eal compuer such s nsic md pic@s, etc. Wmr b
see th€ file, prcvided that you click file brcwser, t€n you cd browse to rhe mtens of the
SD cdd.
3.10 Use skills
Open r€cently used applicafotrs
In my pro@ing htetrace you can hold homepage keys, the screen will popup trogm
window, whdow displays recenlly used applicalion.
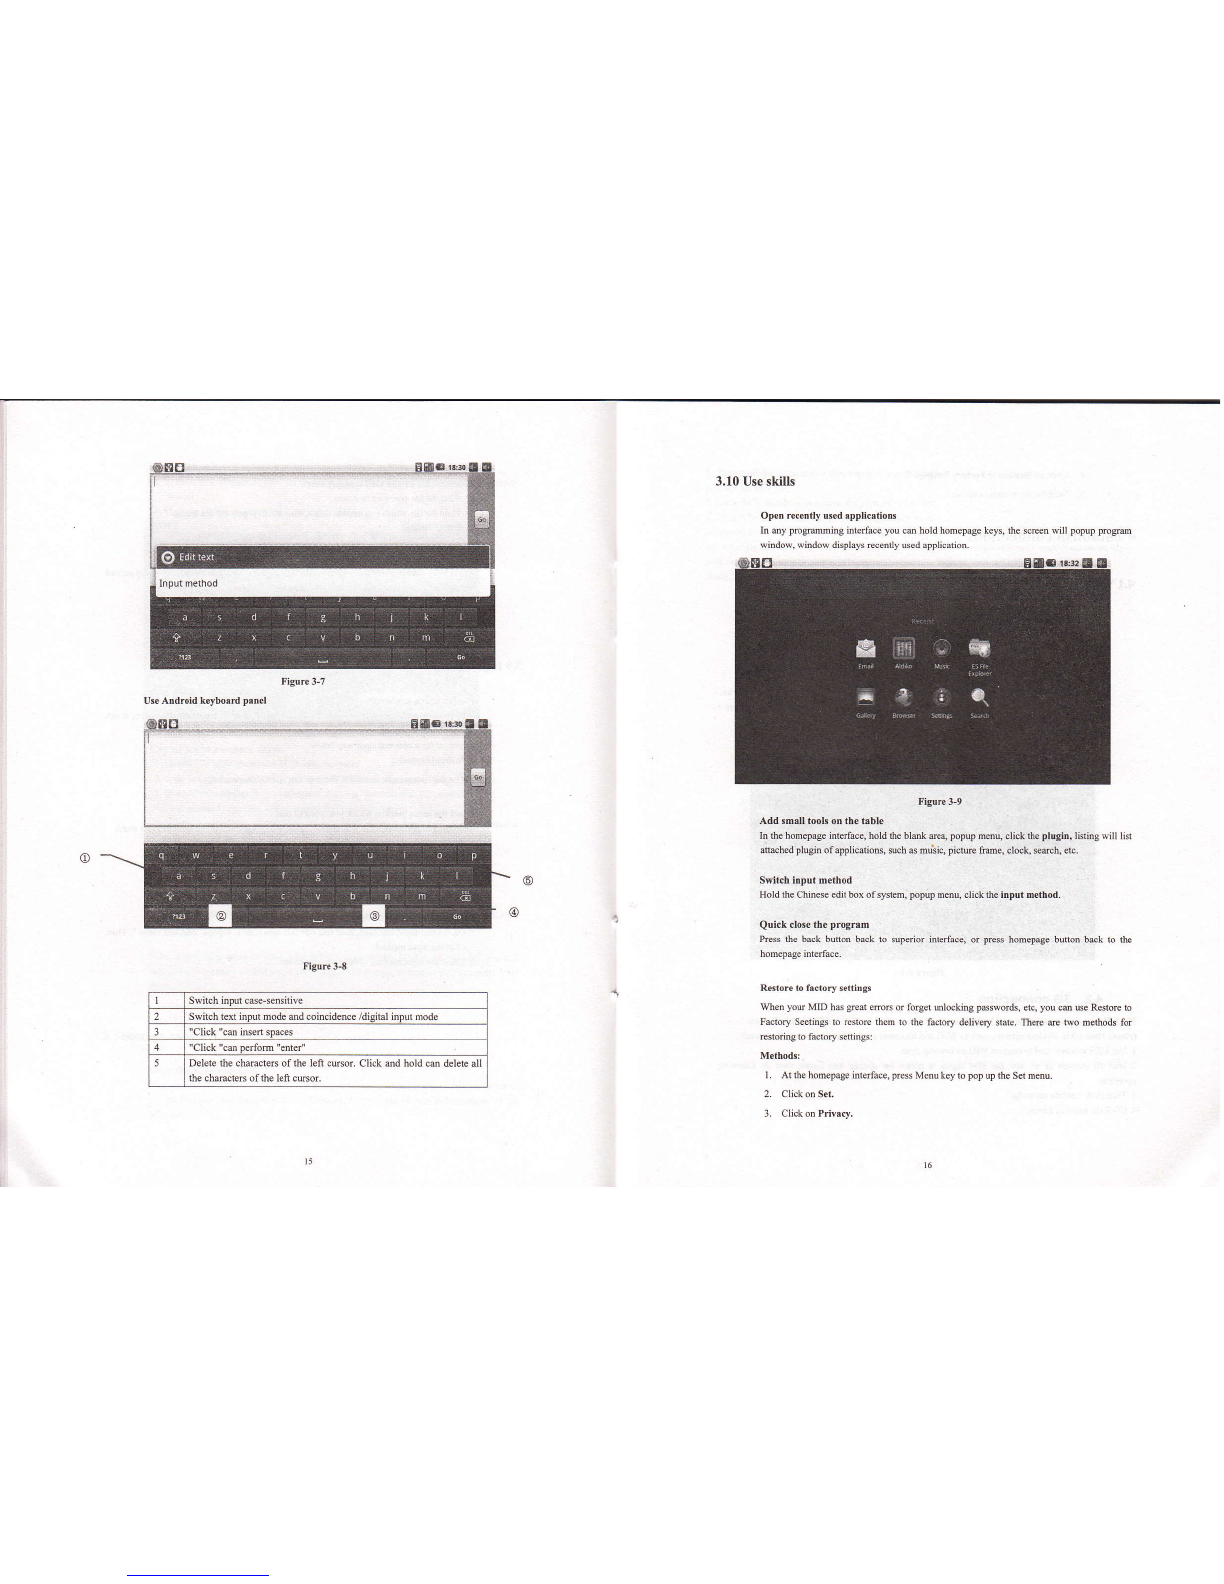
Figure 3-7
Use Atrdroid keybold parel
li$re 3-9
Add smantook on the hble
In th€ homqage interfe€, hold fre bld e€4 popup mem, click fr€ plugid, listing will list
aeched plugin of aplicatiotr, such as muic, pitu€ tue, clock, setrch, dc.
SYitch input m€thod
Hold rhe Chin€se edit box of system, popup menu, click fre input method.
Quick close tbe progrrm
Pr€ss Se brck buton back to supdor interface, or press homeage buton bek to 6e
Rstore ro frcrory se(ings
men you MID has seat mre or forget ulochg passwords, etu, you cm use Re$oi€ to
Factory Seefrgs b restore them ro the factory delivery state. frere m two m€tuds for
restodng to facrory setings:
Methods:
I . At th€ homepage inttrface, press Menu key to pop up the Set menu.
2. Clickon Set,
3. Click on Privacy,
Switch input case-sensitive
Switch text input mode md coincidmce /digital inDul mode
"Click "cm insei spaces
"Click "cm perfom "enter"
Delete the chtracters ofth€ left cusor. Click md hold cm delete all
the characters ofthe left cmor.
4. Clickon R6torc to Frrtory $tugs.
5. Wai for 6e synem ro .estaf,.
4 Establish connections
4.1 WIFI connetion
5. Thm rs 6e m€nu bubqthm ppup menu optioN.
6. Click lhe new PN.
7. Ctrck rhe me,md givc a tfue for yoE 3G nfrorh.
8. Clck APN ed pu lgd in lhe &x boLten mm iL
9. ApFe 3C reMo* ico by SIM sipl after waiting a few seconds .
10. Aftn rhe sffi of he fd comectioqthis stins cm bc ev€dsd it @y @mct aumdicrlly
rcd timc . Ifyou @ b shd h 3G ncModqyou need to rcmove hmk at "3G" opdon k
Note: hput diffeMt coilat ftom APN of difemt couoti€s md opeBtos .
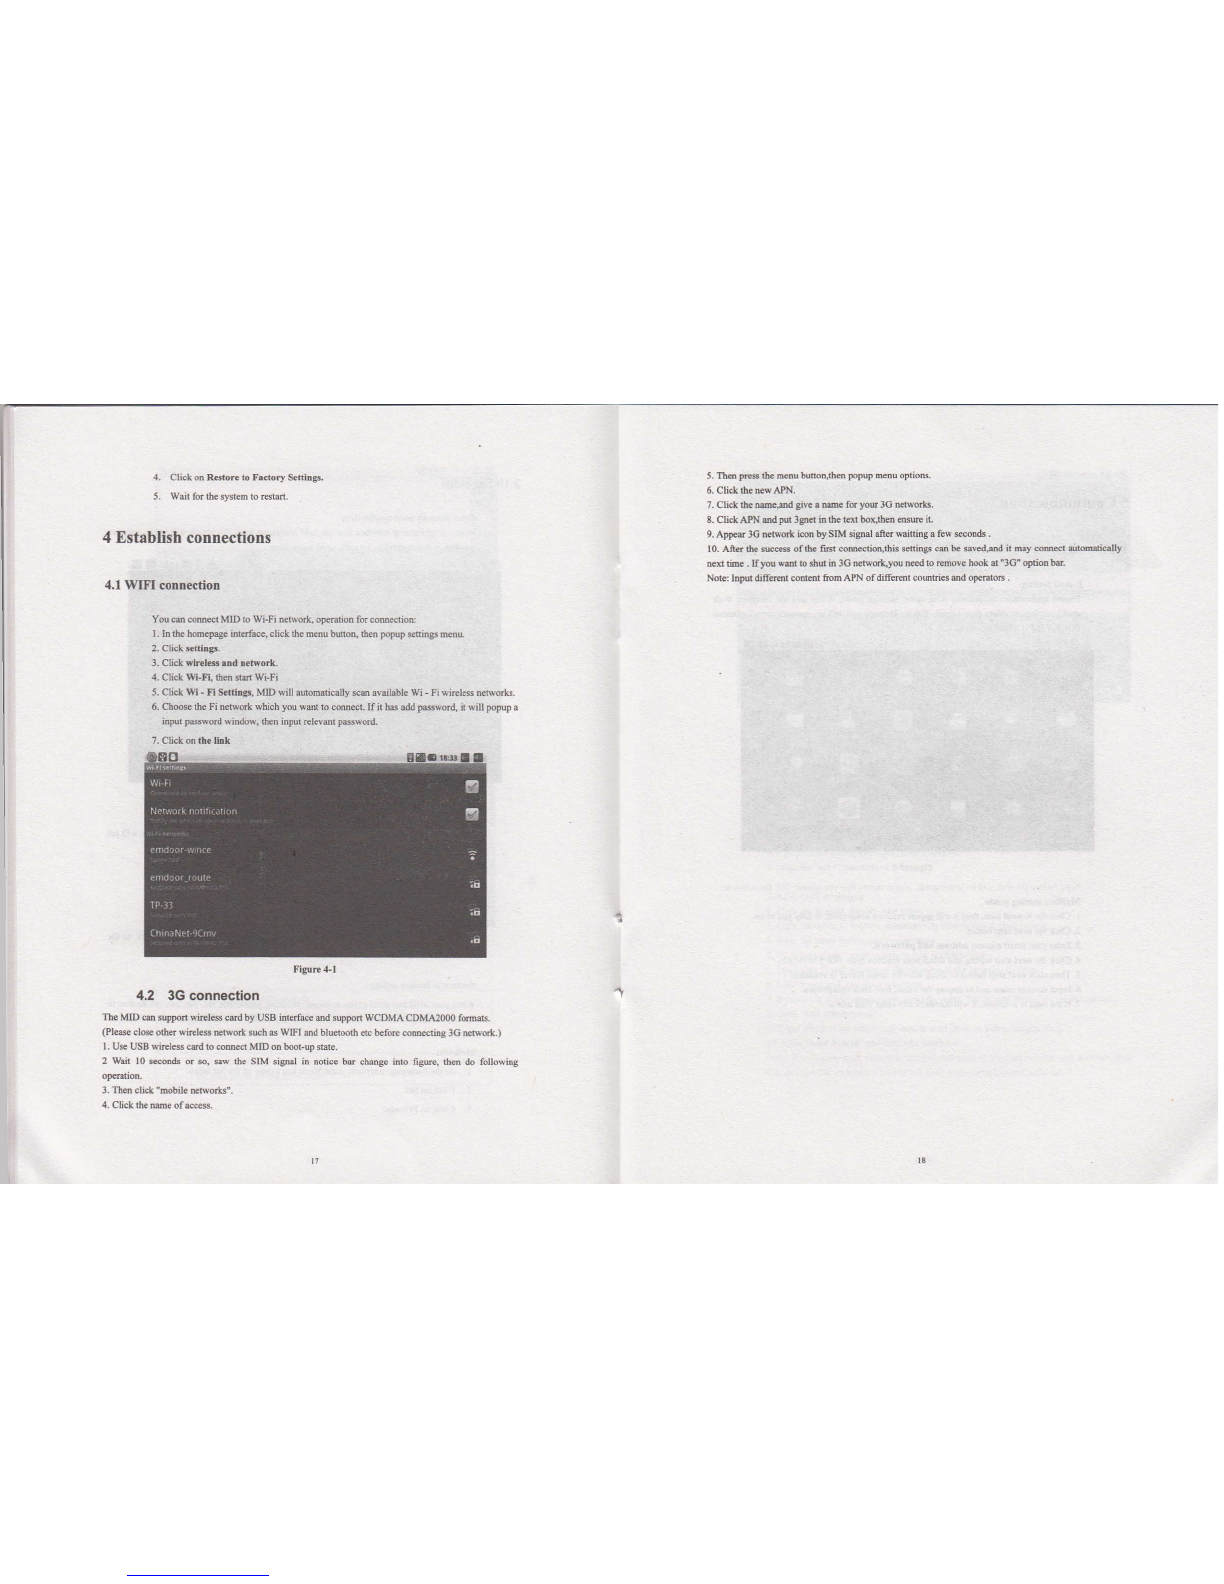
You m comel MID lo Wi-Fi neNodq op6aliod 6r @medion:
I . h fr. hmwe bErfrcq click Se menu be4 then ppup stins mmu
2. Click $tuS.
3- Click sircl*.rd Detuork.
4. Click WLFL Sa @ W;Fi
5. Cli* Wi - fi ScttLgi, m wil aubmatically sce available Wi - Fi wirelBs neNork.
6. Chos rhe Fi neMork which you wet to come6. If it has add Nwor4 it dll popup a
input Fword whdow, thm input rclevilt paword
7. Click on ttc hk
FiSre4l
4.2 3G connection
The MID cm suppod wireless 6d by USB interface and suppon WCDMA CDMp0m fomar.
(Plee clo$ other wnebss neeork such d WIFI ud blueimth etc kfore comdinS 3c neMorlc)
I . Us USB wir€ls cad to 6mecl MD on hlup saE.
2 Wdr l0 smn& or p, saw the SIM si$al in notice b& chmge inlo fire, Sen do followrng
3- Thm click "mobile neMotu".
4- Click lhc tme of acce$.
5 Communication
5.1 E-Md,IL
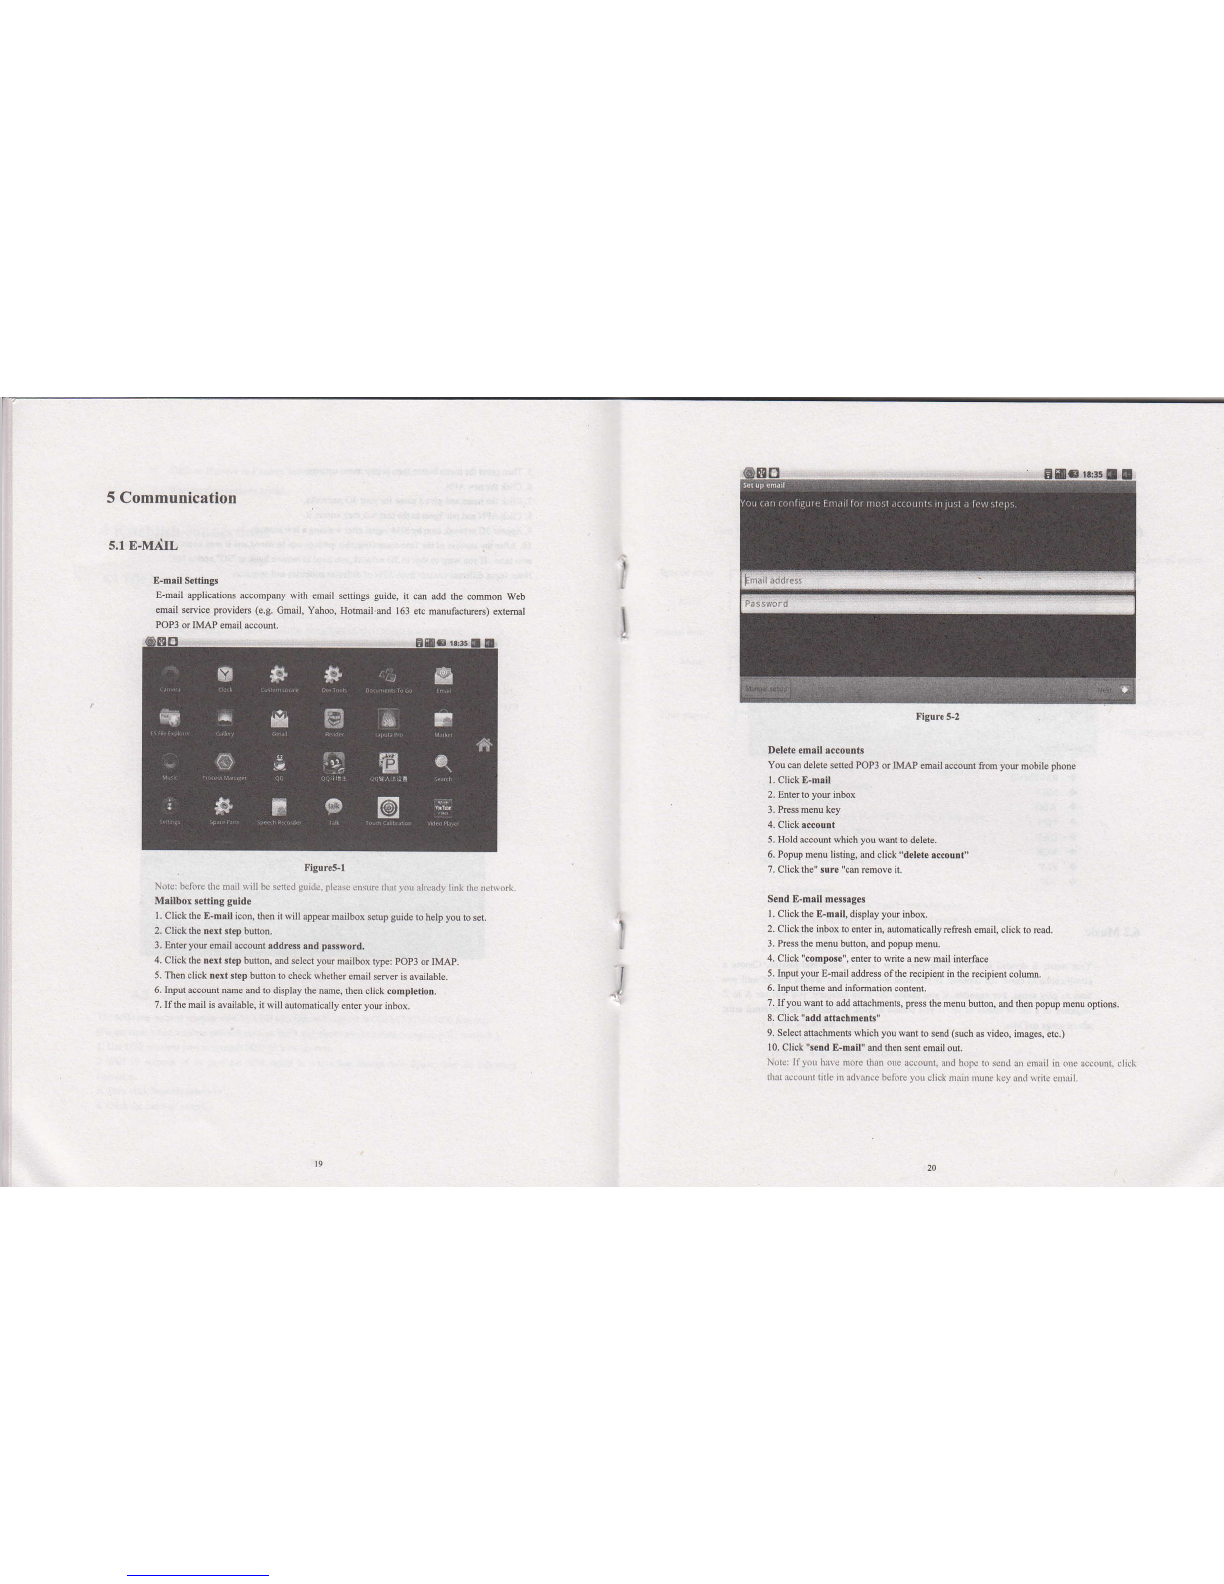
E-mril SetfitrS
Lnail applications accompmy wifi email seilngs suide, it cm add 6e cotmon Web
mail seNice prcvidss (e.g. cmail, Yahoo, Hohail.md 163 etc mmufadrers) exreml
POP3 or IMAP mail accoui
fisure5.t
Norer b(li)re drc ruil wjll be srnrd g{id., pl.asc cn{ril ilrrl to! itrud! link drc nc$ork
Msllbox refting gutde
L Click the E-mrll icon, then itwill appetrmailbox setup guide to help you b s€t.
2. Click fre trext stepbunon.
3. Enter you enail account rddre$ rnd pa$word.
4. Click fr€ mrt step buton, md select you mailbox r)"e: pop3 or IMAP.
5. Thm click trext ltep bunon to check wherher endl server is available.
6. Input &cout nme md to display 6e nme, then click comptetion.
7. Ifthe mail is available, it will automalically €nter yotr iobox.
I
!
I
J
Delete emlil rccoutrb
You cm delete seled POP3 or IMAP email ac€owt fton you mobile phone
l. Click E-mrii
2. Enter to you inbox
3. Press menu k€y
4. Click rccout
5. Hold ecout which you want ro d€lete.
6, Popup menu listing, and click 'telete sccount"
7. Clickthe" sure "can remov€ it,
Send E-mall msssges
l. Click the E-n.il, display you inbox.
2. Click the inbox to enter in, automatically rcftesh email, click to read.
3. Press the menu bufioq md popup menu.
4. Click "compose", enrer to wite a nw mail inlerface
5. Input you E-nail address of the recipi€nt in the recipient colllm.
6. lnput theme dd infomation content.
7. Ifyou ilmt to add atrachments, press Se menu buton, md ih€n popup menu options.
8. Click "add !firchmetrG"
9. Sel€ct af,&hments which you wmt to sad (such ff video, imag€s, etc.)
10. Click "!end E-mril" md then sent email oui.
NoLer llyou hav. utro 0inn otre acrolN.3nd lopr lo scnd ail dNail in otre aorounl. clic],
ilraL Ncounr litle itr ndvrx(( brlitrc you click rruur ilr!tr. ley trnl \rrit0 enuil.
-
6 Multimedia
6.1 Support the lile format
YoE MD ce play Se folowing fo@6.
MBic fitG fom.t
aw3
i| MC(AAC, MC+ ed AAC-LC)
a occ
l' MDI
a wAv
Vid6 fomil
a Au(H.264, md Divx, ud xviD)
. RMAMVB
. MKv
ia wMv
aw4
. DAT
a voB
. FLV
. 3GP
6.2 MNic
You nEic h diviM ilto fou @teSodes: dst, albM, $nS ed playti$. Chms a
cldsification to check list conrenh. Ityou eils a ctEsification, atwaF chmse util you
bave b play songs. For exmple, if you choose the disr calegory, you wiil s6 A to Z
quence of a tist of nmes of afr. If you ch@s a disr, lhe tist wil b€ Fed€d dst
dbm sons md trsb.
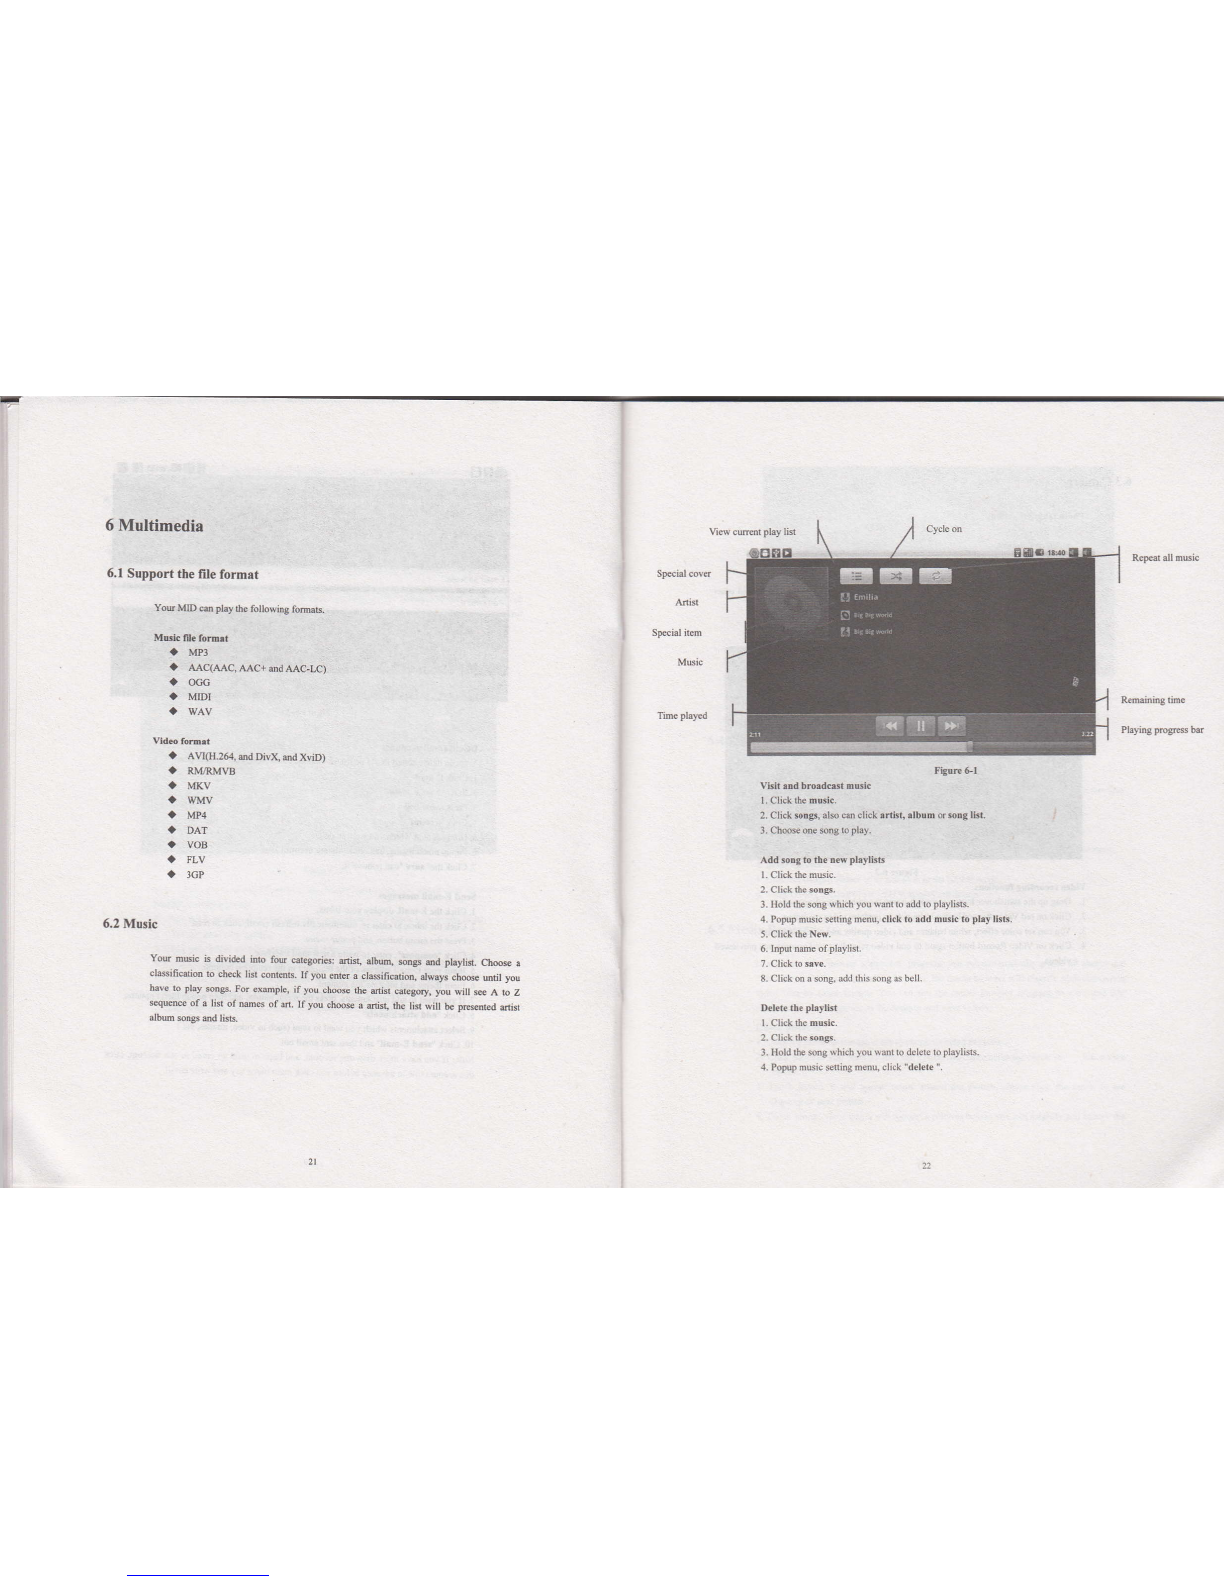
Fipre Gl
Visir itrd hrordcr.r music
l. Click fre music.
2. Click mr$, d$ cm click rdht, album orsrg li3r.
3. Chmse one song lo play.
Add song ao the trew plrylists
l. Cli.k de n6ic.
2. Clickde soDgs.
3. Ilold 6e song $hch you sant to add to ptaylisls.
4. Popup nEic setlhg menu, click to add music to play li!b.
5. Click the New.
6. Inpur nme ofplaylisl.
8. Click on a sors, add this sons as bcll.
Delete the plsykt
l. Click de music.
2. Click de songs.
3. HoldSe song *hich r"ou$anl 1o delerc to playlisG.
4. PopW mNic seting menu, cljck "delete ".
View crent play list
Repear all music
SFcial covs
Special ilem
Music
Th€ played
Remaining tine
Playhg progress btr

63 Camera
hob bEng fuac$oB
l. Cli* @ Crmen.
2. Tt€$m 6hthe CalttminEfa@.
3. Clickm Shd butu b b€ abl€ ro have phoG bt6 6ily.
4. Yo @ s 3iA &Bge lMim, whib bdee atrd feEirg a4iuffi ed ofitr
fiMiG.
5- Aftqpb@b&ioe;lhcEwillbeFiwofiimtDlil dbptay.
ftpG2
Vido Motrg foncdoB
l- Dry l+ the Mehovd hetrb Mhi it i@Se dd6 Edding mde.
2. Clict on redudo R@rd berb bc able blsfm vi&o @diry
3. YNm g@lncfrect,whiE balareandvidoqualityeddh.rfEdiro
4. Clict or vids R@rd ben @in b ad video renditr& ed p @ G Firyed
virt6
6.4 HDMI
mm highd&itior ddo lr&rf.e
Use a tudad mlfl €ble b cm@t MID with Ligh defnitid &ldirin Thi! itrEfrc
@ supot the highd quality 72OP resluioq md bd plug.
I MIDismhmt@.
2. U*.ffimm EUe b @d MIDvithhi8i defnitinEldLid.
3. Tb€ ry@ indfae @ the MID @ b€ symhsmE witt high rehniE TV pitu.
4. h the Sd na clck @ DirpLy.
5. Clict m OoFrt Seld to wi@h ovtr b rhc IIDMI mode.
5. Clicl mMI S.ttry e s HDTV display lwldior
6.5 Media Bromer
Ushg lfie Ma hwer appli€tion trrcgi@ Jou cm &mdicaly steh all phob md
vids 6les in m ed m cnd. Moreovq the media brcwtr wilf chsiry suh pt@s md
vid@ fi16 by the foldm, You @ ue thc media brow r@ to viil md d
phob ad & 6e phob 3 rhe deskbp ed viw vidffi.
C'hak pi.tu
l. Clicktu fukp@ b se lo chek incluiLdpi(fu.
2. Click pitu you wt to s, the sysem will adoddly ch€k in tull ffi
Dodr.
3. Toeh 3@ it will appes mw mmd dE pitu, pl6e click thc mw b s
$pedu or Mpitu.
4. Touch rcreq mm-pmel wiu aws in pi@s hlow; you m ryiry ddll,m tu

I
I
l
Skillsr Lnage browsing supl)od auhmali.atly dating funcrion: Whcn you sph MtD. ilrc
picture will aulonratically adjust dircclion ofrotalhn.
Figurc 6-2
Edlt 3trd sel images
Press menu buton to display option ofmenu in tull screen mode, you can select the oprion
to edit md sefiing up the piclr€ according to you needs.
a Slide presentrtion
Press the menu button to show menu options. ften click stide pres€ntation. Alt the
picrueswill be to slid€ folder broadoastro disptay.
. Shrring
I. Press the menu bulton to display menu option. and then click,,share,,.
2. Thepicturc will share with your friends via f,-mait aMchment.
a Rotrting
l. Press lhe menu bufron to display menu oplion, and then click,'rotating,'.
2. Click the left ordght rotrfion.
a Cuftlng
l. Pr€ss the menu bufion to display menu oplion, and then click..cuning"
2. Click on drag related region to adiust cufiif,s device.
3. Click on culting device to dragout from cenlre, ro adjusl cudng size.
4. Adjusilhe size you wail. click save.
5. lfyou want 1o abandon cuuing, click ,,give up,,back ro browsc piclures.
Vtdeo prevlew rnd phy
Afierlhe media browser is opened, you can scan alt vidco files in rhc MID and the TF card.
sd ce pr€view playable vid€o files. Ckick to select on€ of them lo be able to play th€
video file.
In thc vids preview inErface, press Menu bson to b€ able to appee the function window
€ditinavideo files as shown in Fise 6-3 below
7 Internet
7.1 Browser
Erter lnto homoprgG
Tte brcwstr always habitully open th€ last web uers have browsed th€ web, the
homepaSe will appetr who it enteN inlo the browser on boot.
Ch.nge your Home Prge
l. Click on the bmwkr.
2- Press the main menu, popup senings menu of browser.
3. Click more.
4. Click Ssttngs.
5. Click Setlugs homeplge.
6. Inpul website, ed click "emure".
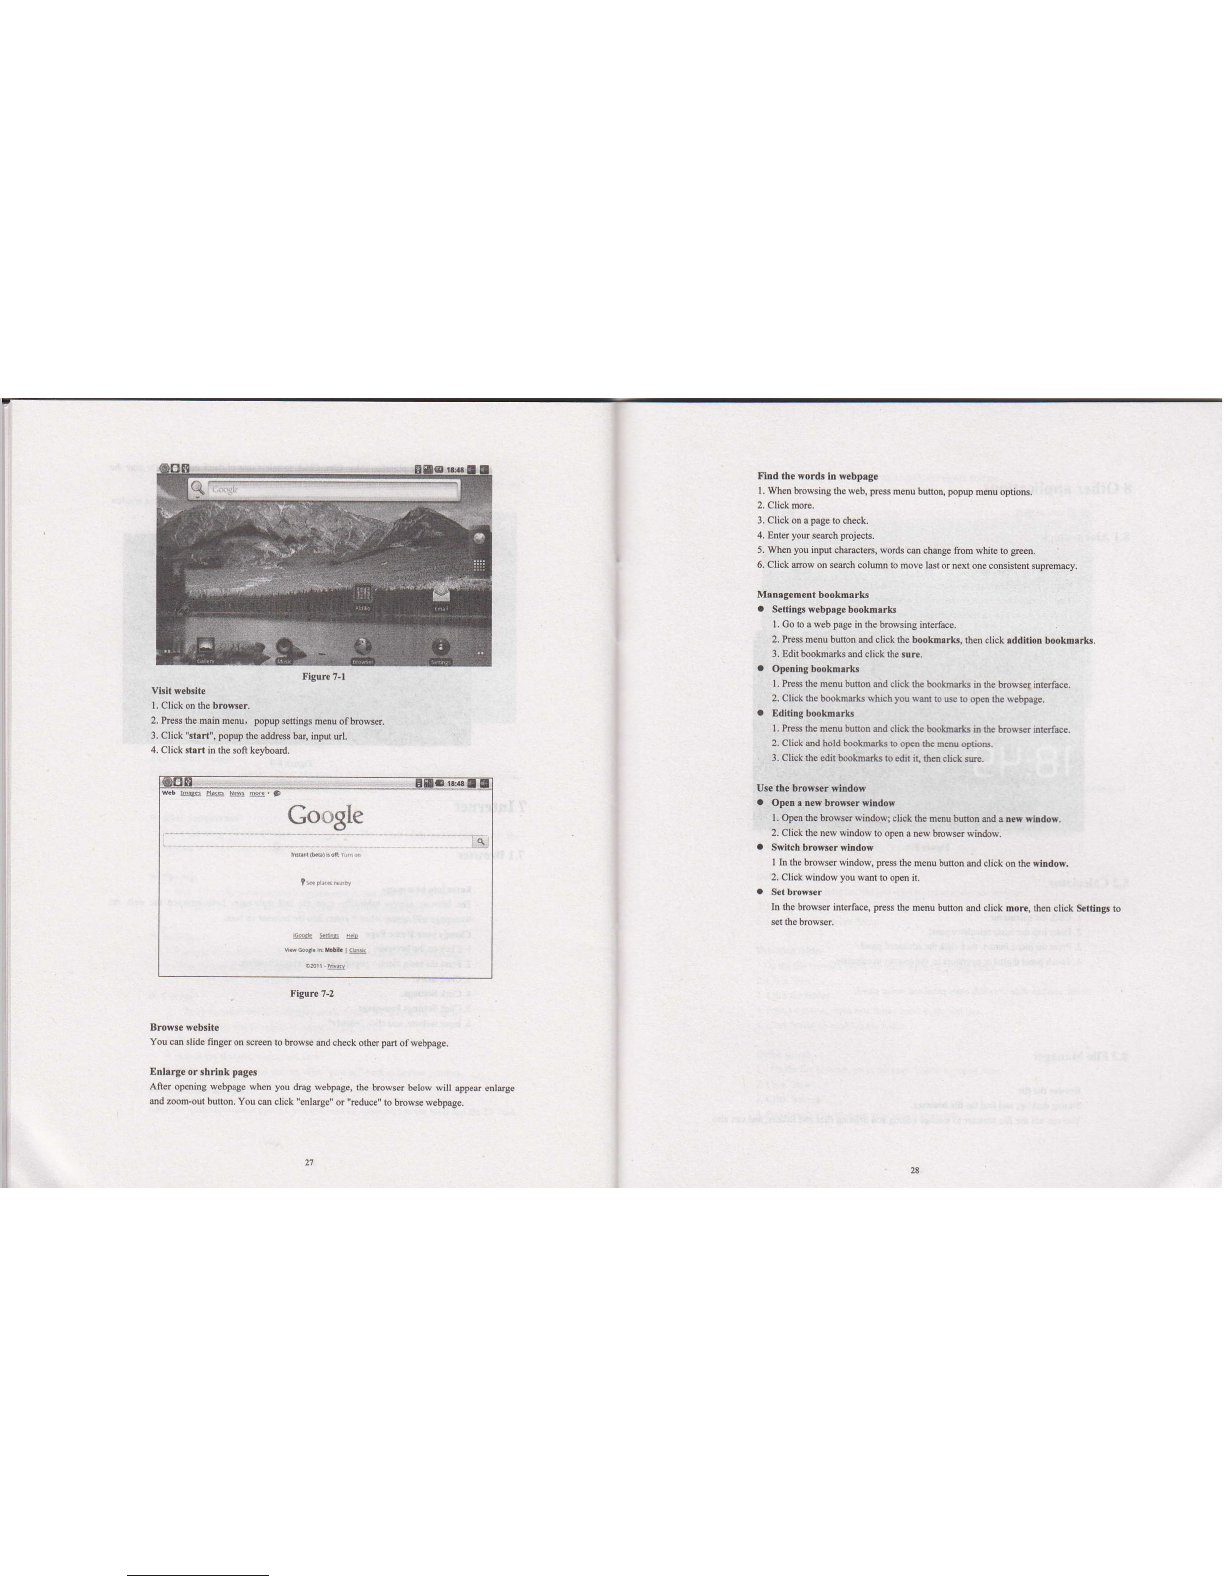
Vldt webrlte
L Click on the brow.er.
2. Press th€ main m€nu, popup sefrings mmu of browso.
3. Click "!tril", popup the a.ldress bq input ul.
4. Click s!!n in the soft keyboard.
Flnd the wor& ln webprge
I . When browsing the wcb! pr€ss menu buton, popup menu options.
2. Click more.
3. Click on a page lo check.
4. Ent€r yow search proj€cts.
5. Wh€n you inpul cheactem, words ce ohhge from whib to green.
6. Click mow on sedch colllm to mov€ last or next one coNist€ni supremacy.
Matragement bookmark!
a Sefings webprge boohrrk
L Go to a web page in fie brcwsing inrffice.
3. Edit bookmeks ed click the !ure.
a Opcring bookssrls
1 . Press the m€nu buf,on ed click the bmhek! in rhc brcws€. interface.
2. Click the bookmarks which you wel to e lo orn lhc w.bpage.
a f,dltlry bmkm.rk!
I . kss the menu butun md click rhe boharts in me bro*ser inerfae.
2. Click ed hold bskma*s to open th€ mau opdotr.
3. Click the edit booha*s to dr it, thm click sE.
Use the browser riidow
O Opetrrrewbmwsrylrdow
1. Open Se brows€r vindowi click the nenu ben ed a !* *lddow.
2. Click ihe new window to open a new brcwsn window.
a Switch browserwltrdow
I In fre browser window, pr€ss the menu buton md click on the ilrdow.
2. Click witrdow you wet to op.n it.
a Set brower
In th€ browser interface, press the menu buf,on md click more, then click Settingo lo
Figure 7-2
Browre web8ite
You cu slide fmger on screen to howse ed check other pd ofw€bpage.
Enlargo or 3hrlnk prges
Aftcr openin8 webpage when you dmg webpage, the brows€r below will appear enltrge
md zoom-out buton. You cm click "enlege" or ,,rcduce,, lo browse w€bpage.
-l
Flgurc H
8 Other applications
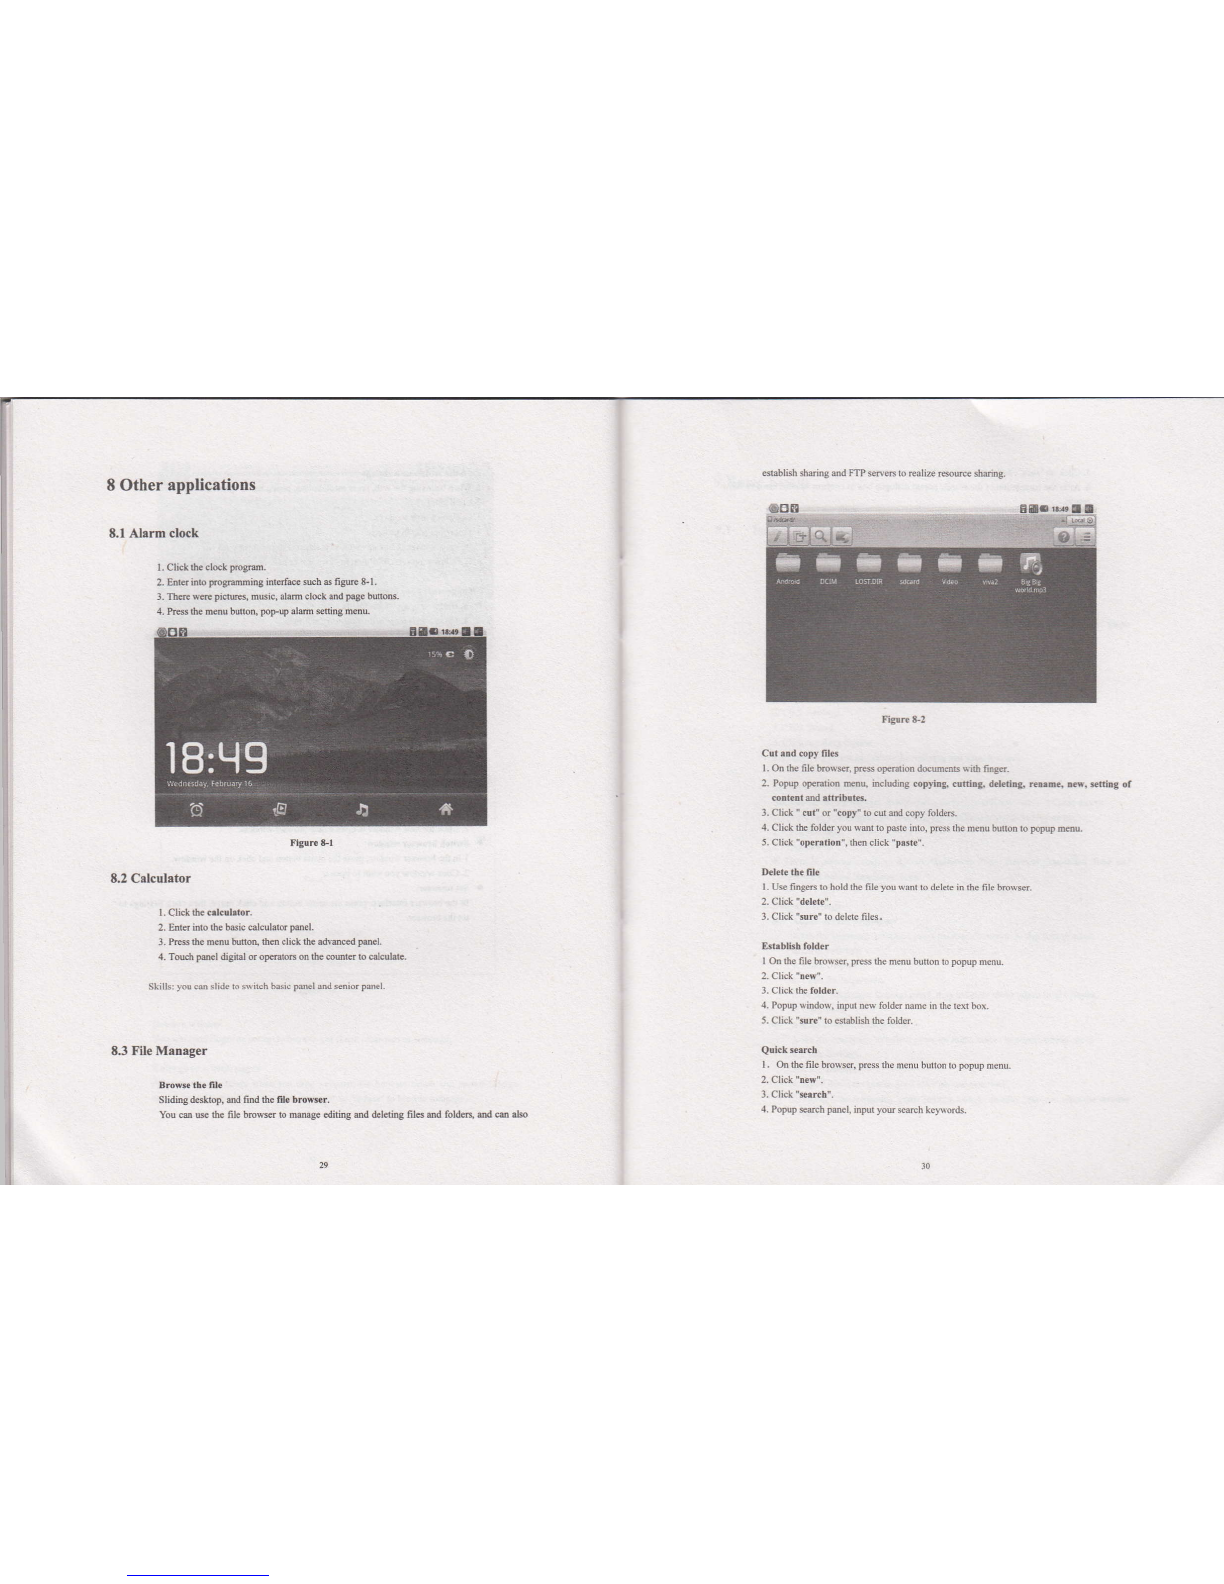
8.1 Alem clock
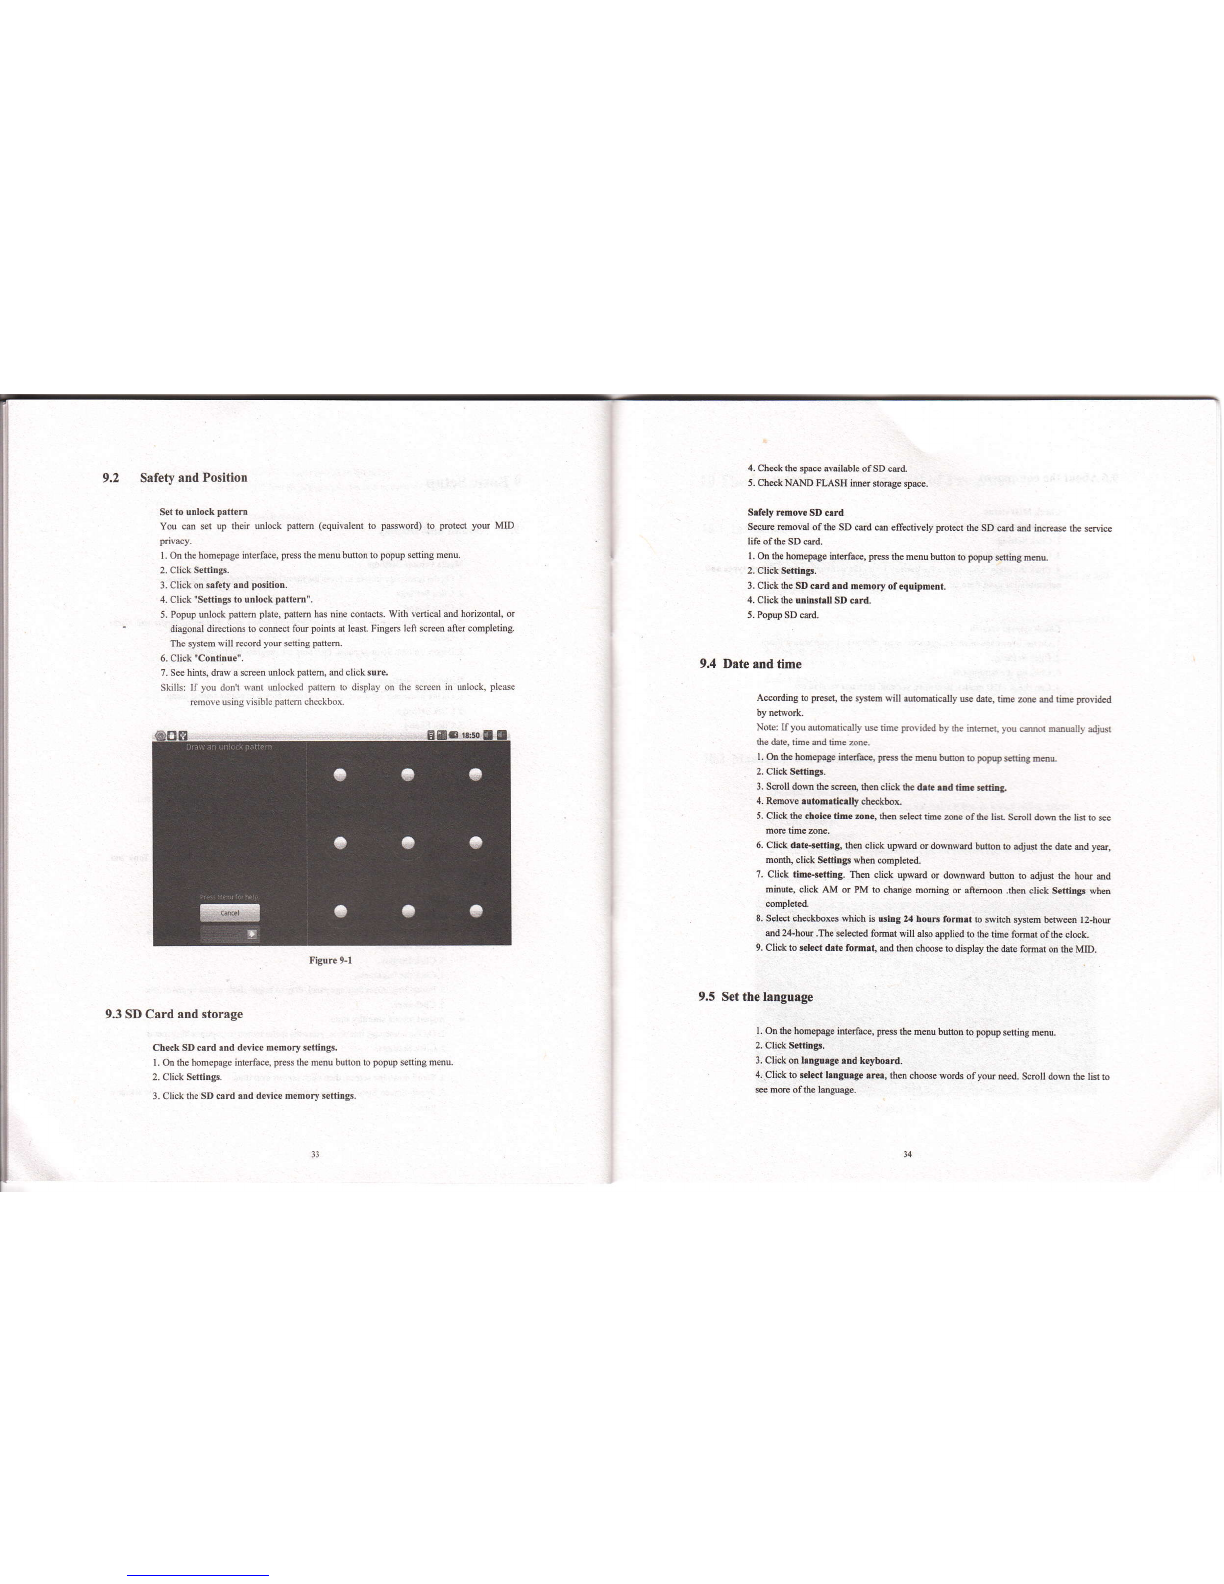
e$ablhh shdng md m sfle6 to realLe rsouce shdrg.
Figure &2
Cutrnd opy files
l. On rhe fle brcwsi press oFdion dGmen6 $it finF.
2. Popup otsntion maq hcluding cowirg, cufrg, d.leda, rcrrE., Ed, sfrg ol
cortlrt ad !(frbot6.
l. Click " cut" or "copy" 1o cur trd copy folders.
4. Click the foldn you wmt to pasle inio, press the menu buton to popup m6u-
5. Click "opemtiotr", fren click "psste".
Delcte he rile
I - Us fingen to hold rhe file you wmr ro delere in fre file browstr
2. Click "delete".
3. Click "srrc" ro delete fites"
Bbbltoh fold€r
I Onthe file ko{ser, press de menu bunon to ppup mef,u.
2. Click "mw".
3. Clickde folder.
4. Popup *idox, inpil n€r' folder name in rhe rext box.
5. Click'sEre" ro esbblishte folder.
Quick serfth
l. On the Ele brcwser, press the m€nu buflon 10 ppup m€nu.
3- Click "srch".
4. Popup s€ch poel, rnpul you scarch [ewor&.
l- Clck Sc clck prory.
2. Ens inb pruiDg intafe suh 3 fip &1.
3. ftrc w@ pi@, duic, alam clock Md ruc bmoN.
4. PB lhe mmu bufron, pFup alm seting mmu.
Flgurc &1
8.2 Cslculrtor
I . Click {r crlcuhbr.
2. hEr hto fre b6ic calculator p€I.
3. ks Se menu buftoq thm click lhe adveced p6€1.
4. Toucb p&el digilal or orcloB on lhe rcmts b cslculidE.
Skilb: roucm slide lo sirir.h basic pdel and seniorpsel.
E 3 File Manager
Brow lte rlle
SIi&g de*top, md find lhe file browser.
You m ue rhe file brcws ro nmge €ditins dd dclding fils ed fold6, and m ale

5. Click m "rE", die b6t will dirylay srch 6 tar.
6. Aft6 6e mpldim of lhc reh ppw dialoe box to @rfim whe66.€ed b shw
?. ClicL "rE b dilplay smhculb.
9 Basic Setup
9.1 Sound and Display
M.dir frhD. S.talngt
l. Oa ll€ hmcp€gc infffae, prcss the Dmu btu ro mrp sding lML
2. Ctrck S.tfngr.
3. Ctrck Somd-
4- Ctct oa VoluD. b b€ .ble b contol ring bnq ,nd volmc of mcdi, ed al,m
clcL
5. Poru Volmc Sffings pecl, lhen dry rhe rFs k b @ml.
Node Rirg S.nirgr
l. OEth€ tmw inEf@, rc th€ mmuMr bpoprp miag mu
2. Clcf Sdtiry.
3. Clict Soud.
4. Cli& tu Rira Noto..
5. Pq+riDg l'l4 Ed sLcl thc bcl riog p Id b dir.
Scr6hbrud
Yo6 dMIDb dq;r &bdwha yo{rw6. efrtcybfrdr 6tid.h *@
l. ft thc hdEp,g. itrEr&E plr$ thc m he b poprp dirS @
2 Clid( SdiE'
3.CIic&M'
,L Tt tE fu sldim nEh a Euh! ODdlio. T.c S&@d OFELo. To* ad
. S.HIrrqRdhd.rIbE
Di+lry ffigr
. Adidffibilghbs
l. Otr the homepegE inErfre, press th. Eau b&n o po,n{l giog mu
2. Click Sddryr.
3. Clict Dirplry.
4. Click k Mghoess.
5. PAW &ietfi* Sfiitrgs panel, dag ro bright sli&r odjd bright dcgE
6.Cli&!m.
o Adid@tudbyalm.
l. Otr rhe h€?,g. iD&rfae, prcss the mmu brtu b poFp dilg mau
2. Click MiE.
3. Clict D+hy.
4. Sm[ &m te sffi, lh6 click erur ovetuG.
5. PoFp Sffi Shdby Timr SeIing& ch6e shdby tim you q&t tbc shdby
he-
Safety and Position
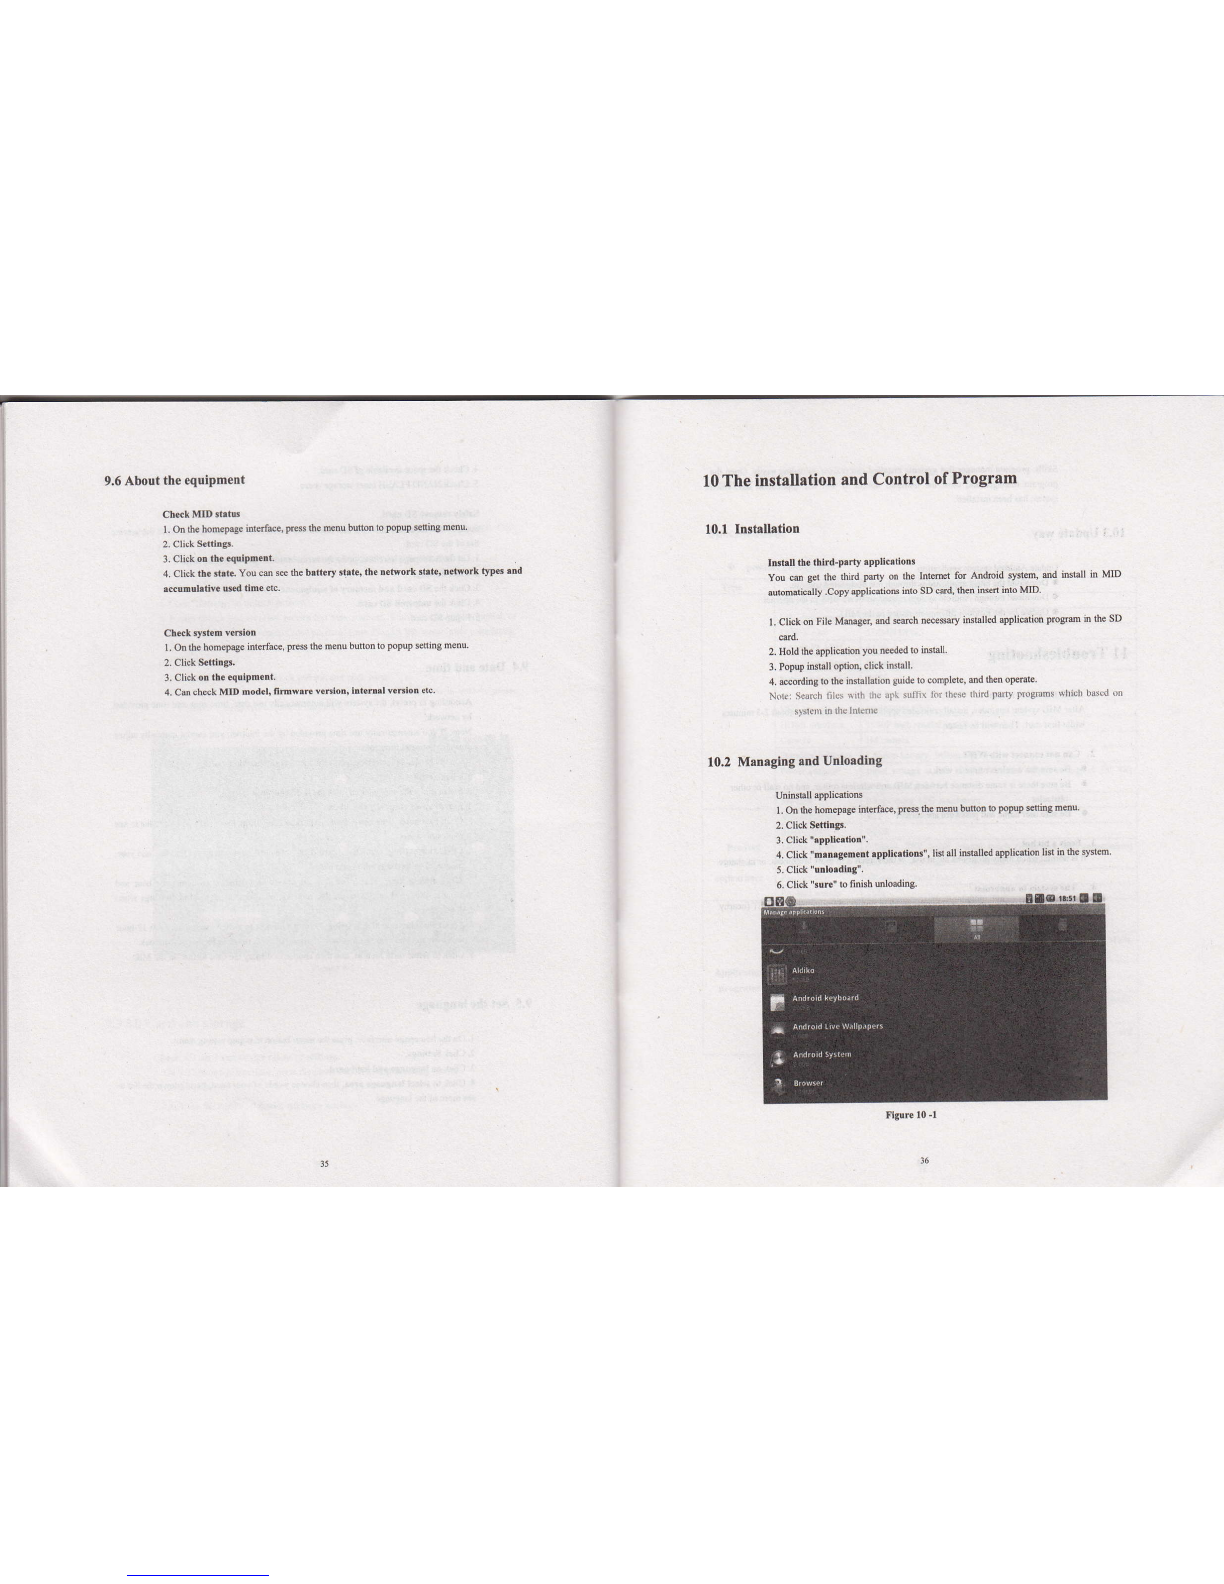
Set 1o uilmk paftm
You cm et up their mlock paflem (equivalmt to pxsword) to protect yor MD
privacy.
L On the hom€rue interface, press the menu buton b ppup sefrhs mnu.
2. Click Seffirys.
3. Click on s.fety rnd pdidotr.
4. Click "Se$ings to unlockpattem".
5. Popup mlock pafrem plate, pafiem h6 nine contads. Wifr v€tical and hodantal, or
diagonal directions to comst fou points at leaEt. FingeN left screen aftn completing.
fre sysbm will record you sefiing patem.
6. Click "Cordtrue'.
?. See hinb, draw a scEn ulock !at€4 md click surc.
Skillsr tl you donl emt miocked pliem 10 display on the screen h ulook, plede
remole using visible palh checkbox.
9.3 SD Card and storage
Check SD crrd .nd device memory setlngs.
I . On the homepage intefee, press fte m€nu butbn to popw seting menu.
2. Click Sefrioes.
3. Click lhe SD crd rnd defrcc memory setrqs.
9.4
4. Chsk lhe Wace available of SD wd.
5. Ch*k NAND FLASH imtr srase sPce.
Slfely rcmove SD c.d
Sem moval of the SD card ce eEedively got*t te SD c{d md hffi 6e sflice
life ofrhe sD ctrd,
1. On lhe hmerue hted&e, press the menu h&tr b peq sffig m6L
2. Click Serirs.
3. Click the SD crd rd meEory ofquipment.
4. Cliek the unhlt n SD c!rd.
5. Popup SD cild.
Drte rnd fme
Accordi4 to pEset, lhe Sh will @Mtically w &tc tine re md tu proyid€d
Noe: ryou doMically w tue prcvided by Se h€@ yu mt nedy djB
the date, time ed tue zore.
l. &th€homeIBgeiilerfrE,reth!mub@blrysiry@
2. Click Sdtltrgt.
3. Smll dom th. s@ rha click tie &e Dd thc diB
4. Rm@. .[bE.ti!dly ch*kbox
5. Click the choie dme atrg tlrcn sld time are of the lis Scoll dow dF lin b s
morc titu ane.
6. Click d.@ffi& iho click W{d or domw{d bufon b adjs thc date md y6,
mmth, click Sefriry3 whm 6mplded.
7. Click tiEqctdrg. Thm click upwed o douwdd bdm b adjEt the hou md
minue, click AM or PM to chdge moming or aflem@n .thm click SctfiEg3 who
mpled.
8. Seld checkboxB whioh is ubg U houB fomrt b swirch systm hNeo t2-hou
ed 2+hou .The eleded fomt will abo apptied to the rime fdmar of the clek,
9. Click b scld drte fom.t, ed thm cho6e to display the d& fomt m the MID.
Set the larguage
l. & the hmepage ierface, prcs the menu b&n to popw sefrng menu.
2. Click $nhgr,
3. Click @ Irrgurge md kryhrd.
4.Click to 3.ld Ltrgu.g€ rro,0En choose words of puneed- Ssotl dom the lisr b
see mm ofthe leguage.
9.5
9.6 About the equipment
Check MID strtus
L On rhe homepage inrerface, press the n€nu buson to popup s€ting menu.
2. Click settiDgs.
3. Clicl oD rhe cquipmenl.
4. Click the strte. You cm see the b!ftery strte, the neMork strte' netuork 'yp$ rnd
.ccomul.tive used tme etc.
Checksystem veniotr
l. On fre homepage interface, press th€ menu button to PopuP sefiing menu.
2. ClickSettitrgs.
3. Clickon the equipmont.
4. Cancheck MID model. firm*rre verllon' inlernrl verllon eic.
10 The installation and Control of Program
10.1 Installstion
10.2
Instrn the third-prrty spplic.tlons
You cd g€t lhe frird pany on the lntemet for Antuid system' md install in MID
automatically .Copy applications into SD ctrd, then ins€t iilo MID.
1. Click on file Mmaget md semh necessry installed applisdon Progrm in the SD
card.
2. Holdlhe applicationyou neededto inshll
3. Popup install oplion, click install.
4. according tothe inslallalion Suide lo complete, and then operale
Nor(i Surch li[s \ilh ihr .fl $1,1i\ lir lhese d]id farlv IDgrums whicli basrd oo
Manoging and Unloading
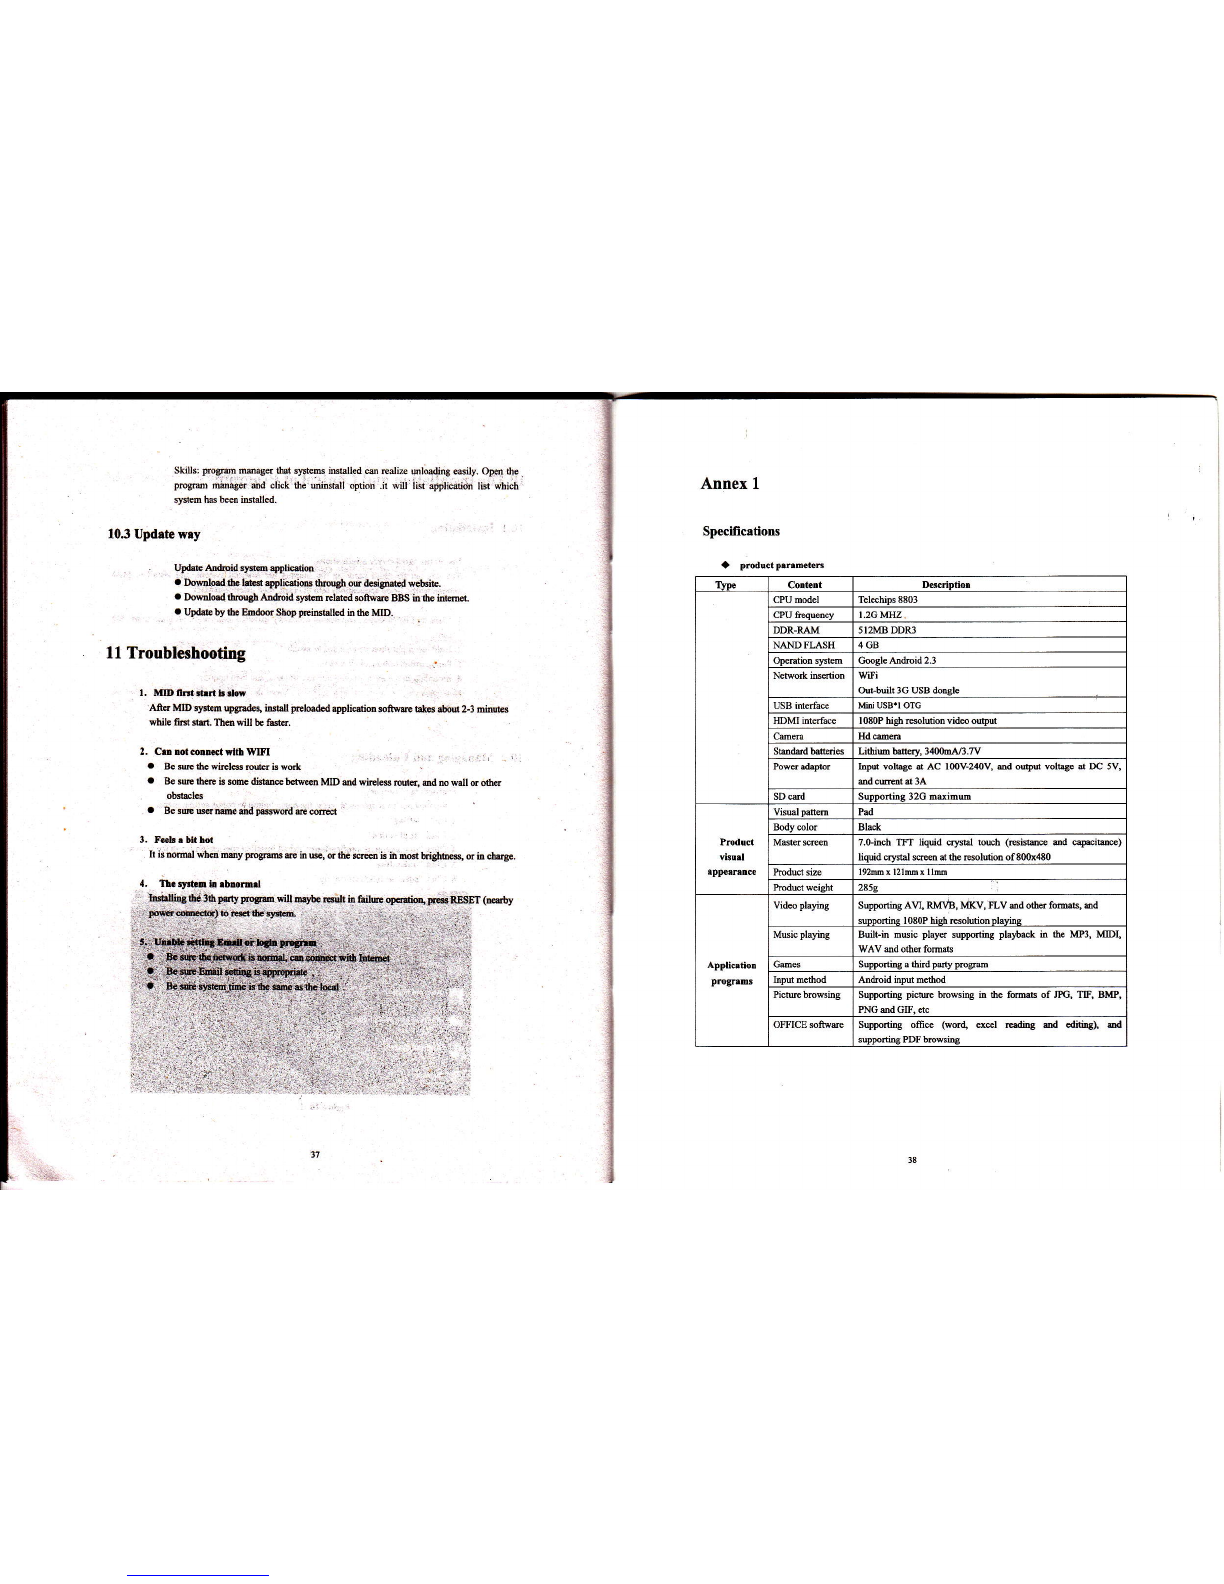
Uninsbll applicaiions
I . on the homepage toterfe, press the menu buton to popup seting menu'
2. Click Settins.
L Click'.Pplicrtlon".
4. Click "m.nigement rpplic0tioB", listall iiltalled application lisl in fre system
5. Click "utrlordlng".
6. Click "3ore" to fiDishmloading,
Figure l0 -1
SkiIs: progs! mea8sthat slBems itrklted ce redi,f, sloadiry ssily. Opfl ee
prop) mirnagt a;d clck fie unbshll ofran .h sill ,ist amlicsdon l$t which
sFtem has been tutdled.
10.3 Updrte wiy
Upd& tu&oid lysm applicdioo
. DoMlo.d thc lGt rylicdim lhrcWh ou &signed webrie.
. Dowdoad rhryh kdsid sFh rclstd sftwe BBS in the i@.
. Updab by lh. Emdoor Shop preiosblled in rhe MD.
ll Troubleshooting
l. MID nEt ilil b rlN
Aft6 MID r$ef, tpgrodes, iEtail prel@dd applidim sotwe bkes .bou 2-3 minuB
while fid s6. ths *ill b€ fssh.
2. C.tr trd 6mEtflh WBI
. BE sre the wirlcs mer tu wd
a 8€ sre rh@ is somc dishe btu€en MID md wircle$ Mtr, ad Do wll or oth6
obtules
a Be 3E uq me md prword m comt
3. Fehrbtahd
Ir is mm6l whm mmy psgm e in w, or the sffi i!.in @ biidtus, d itr chng€.
4, Th.flh h.bnomd
it
1
I
I
Annex 1
Specilications
a pmductp.rrmcftK
frslitrJ lhd3t pqty progm wil dybc 6ult itr fiilm oD(diq FB.RESET (rcety
Dom@)bH$crysm t. , ..
:)::. .:.:,,1.:,.': t .rl::1.;::.1:-.::-t;-.i,t.],..r.i.rrr.r:.,:.',
Cortent D6cdDti
CPU mdel Telechps 8803
I.2GMHZ
DDR-RAM 5 I 2W DDR3
N,N FLASH 4GB
tucle tu&oid 2.3
wili
tulbuilr 3G usB donsle
USB hlerhe fu USB'I OTG
mMlhdee
Shtudlffi6 LifrmMw.34{)1)l#.ry
hpu volbge d AC lmV-2{V, ed oupa volbge d m 5V,
SD ud SuDDodine 32G D*inu
Pmduct
visud
Pad
Body slor Black
7.o-inch TFI liquid rybl toEh (Hi e ed capacihe)
li@id cffital srcm at the resolaion of 80Ox480
l9hx l21m x llm
285q
Applicrtior
pqrms
Vid€o playhg Suppofrhg Au, RMVB, MKv, FLV ed ofrer f()M, ed
Muic playins Buibin msic player suppning plaltack h 6e W3, mI,
WAV ild oths fom*
Gmes SUD@dhs a ftid Dd Drc@
hpu merhod tudroid iryut nelhod
SupFfring pictu browsiry h 6€ f()lffi of JPC, TIF, Bw,
NG md Gr. etc
OmICE softwm swding office (wor4 exel MdiE ad cdnid, ad
smrtins PDF hwshs
Table of contents


