MediCapture MVR Lite User manual
MVR Lite
High Denition
Medical Video Recorder
User Guide
Applies to Firmware 191018 and higher.
MVR Lite-UG01-EN-200324-OB

MVR Lite-UG01-EN-200324-OB
<2>
MVR Lite User Guide - English
Precautions for Use
Symbols in the manual Symbols on the product
Warning
Indicates a potentially hazardous situation
or improper use that could result in
serious personal injuries or death.
NOTE
Background color: Yellow
Triangular band: Black
Symbol: Black
Before attempting to set up the
product, carefully read through the
User Guide.
This symbol indicates the
manufacturer,
and appears next to the
manufacturer’s name and address.
Caution
Indicates a potentially hazardous situation
or improper use which, if not avoided,
may result in minor or moderate injury
and/or appreciable material, nancial and
environmental damage.
This symbol indicates the
equipotential pole which brings the
various parts of a system to the
same potential.
This symbol indicates the manufacturer,
and appears next to the manufacturer’s
name and address.
Protective Earth
This symbol indicates the equipotential
pole which brings the various parts of a
system to the same potential.
I : AC power ON
O : AC power OFF

MVR Lite-UG01-EN-200324-OB
<3>
MVR Lite User Guide - English
WARNING
To avoid risk of electric shock, this equipment must only be connected to a supply mains with protective earth.
Do not modify this equipment without authorization of the manufacturer.
To avoid risk of electric shock, replace the fuse only by qualied service personnel, and only with the type specied in
the user guide.
To reduce the risk of re or shock hazard, do not expose this equipment to rain or moisture, this device is designed for
indoor use only.
Do not connect / disconnect physical video connections when power is on. This device may get hot during operation,
especially at the bottom and rear. When changing physical video connections, wait until device has cooled down before
reconnecting device.
External equipment, intended for connection to signal input / output or other connectors, shall comply with UL/EN
60601-1 for medical electrical equipment. Anyone who connects equipment to the signal input part or signal output part
is conguring a medical system, and is therefore, responsible that the system complies with the requirements of medical
system standard IEC 60601-1-1.
Equipment not complying with UL/EN/IEC 60601-1 shall be kept outside the patient environment, as dened on the
systems standard.
CAUTION
To reduce the risk of re or shock hazard and annoying interference, use the recommended accessories only.
Do not use the images for diagnosis or evaluation purposes. The compression reduces the information of the picture
and is therefore not appropriate for diagnosis.
The MVR Lite is a Class I active medical device (Medical Devices Directive 93/42/EEC). It is important to observe
your obligations as the operator of this medical device to ensure its safe operation with no risk of danger to patients,
users or third parties. If no other local law is applicable, it is recommended that a safety and document test be
performed at least once every 2 years according to EN 62353. It is important to ensure that persons performing the
safety check have the necessary qualications.
After a strong electrical disturbance, like lightning or a strong electrostatic discharge, the output signal may shake,
change in color, or turn black. If you see these symptoms, restart the device by turning off the power, waiting a few
seconds, and then turning on the power.
USA FCC CLASS A:
This equipment has been tested and found to comply with the limits for a Class A digital device, pursuant to Part 15 of
the FCC Rules.
CANADA ONLY / CANADA SEULEMENT
Caution: This digital apparatus does not exceed the Class A limits for radio noise emissions from digital apparatus set
out in the Radio Interference Regulations of the Canadian Department of Communications.
Attention: L’interférence radioélectrique générée par cet appareil numerique de type A ne dépasse pas les limites
éconcées dans le Règlement sur les perturbations radioélectriques, section appareil numérique, du Ministère des
Communications.
Disposal Method: Use your local regulations for proper disposal.

MVR Lite-UG01-EN-200324-OB
<4>
MVR Lite User Guide - English
Précautions d’utilisation
MISE EN GARDE
Pour éviter les risques de choc électrique, cet équipement ne doit être connecté qu’à une prise électrique avec borne de terre.
Ne pas modier cet équipment sans autorisation expresse du fabricant.
Pour éviter les risques de choc électrique, le fusible ne peut être remplacé que par un personnel qualié et seulement avec le
modèle spécié dans le manuel utilisateur.
An de réduire les risques d’incendie ou d’électrocution, n’exposez pas cet équipement à la pluie ou à l’humidité. Cet équipment est
exclusivement destiné à un usage intérieur.
ATTENTION
An de réduire les risques d’incendie ou de choc électrique et les interférences nuisibles, utilisez uniquement les accessoires
recommandés.
Ne pas utiliser les images à des ns d’évaluation ou de diagnostic. La compression réduit l’information de l’image qui n’est en
conséquence pas appropriée aux diagnostic.
Le MVR Lite Recorder est un produit actif de classe I (Directive Medical Devices 93/42/EEC). L’exploitant doit utiliser cet
équipement conformément aux recommandations du manuel utilisateur an d’assurer un fonctionnement sans risque ni danger
pour le patient, l’utilisateur ou tout autre partie. Si aucun règlement d’usage n’est disponible, il est recommandé de mettre en place
et procéder à un test de sécurité conformément à la norme EN 62353 tous les 2 ans . Il est important que les personnes réalisant
ces tests de sécurité aient les qualications nécessaires.
Après une perturbation électrique forte, comme la foudre ou une forte décharge électrostatique, le signal vidéo de sortie peut
vaciller, changer de couleur ou devenir noir. Si ces symptômes apparaissent, redémarrer l’équipement en l’éteignant puis en le
redémarrant après avoir attendu quelques secondes.
Mise au rebut : Pour la mise au rebut du produit, respecter les règlements et leslois appropriés valides dans
votre pays.
Symboles utilisés dans le manuel Symboles utilisés sur le produit
Mise en garde
Symbole avertissant l’utilisateur de situation
potentiellement dangereuse ou d’utilisation inappropriée
pouvant causer des blessures graves ou la mort
NOTE
Couleur de fond: Jaune
Bande triangulaire: Noire
Icone: Noir
Lire les instructions avec attention avant
d’installer le produit.
Cette icône représente le fabricant
et apparaît avec le nom et l’adresse
de celui-ci.
Attention
Symbole avertissant l’utilisateur de situation
potentiellement dangereuse ou d’utilisation inappropriée
pouvant causer des blessures mineures ou modérées
et/ou des dépréciations matérielles, nancières et des
dommages environnementaux.
Borne équipotentielle, garantit
l’équipotentialité pour l’ensemble
du système
Cette icône représente le fabricant et apparaît avec le
nom et l’adresse de celui-ci. Prise de terre
Borne équipotentielle, garantit l’équipotentialité pour
l’ensemble du système.
I: Marche
(Connexion à l’alimentation se cteur)
O: Arrêt
(Pas de connexion à l’alimentation secteur)

MVR Lite-UG01-EN-200324-OB
<5>
MVR Lite User Guide - English
Table of Contents
Ordering Information
MediCapture recommends MediCapture® Brand USB ash drives.
Please visit medicapture.com for information on how to purchase ash drives.
Technical Support
For technical support and other questions, please visit medicapture.com or
call 888-922-7887 (toll free from within the USA) or 503-445-6935 (from outside the USA).
MediCapture®Inc. EC REP: Obelis, SA
2250 Hickory Road, Suite 200 Bd. General Wahis 53
Plymouth Meeting, PA 19462 USA 1030 Brussels, Belgium
Ordering Information........................................................... 5
Technical Support ....................................................... 5
Important Safety Instructions.............................................. 6
Data Protection................................................................... 7
Start.................................................................................... 7
Intended Use: ............................................................. 7
General Functional Description: ................................ 7
To Get Started: ........................................................... 8
Front Panel......................................................................... 9
Front Panel......................................................................... 9
Back Panel ......................................................................... 9
Monitor User Interface...................................................... 10
USB keyboard with integrated trackpad ........................... 10
Remote Control .................................................................11
Remote control with a Remote Device (tablet)
by using the MVR Remote App .........................................11
Connecting the MVR Lite.................................................. 12
Inserting a USB Flash Drive ............................................. 12
Creating Patient Data ....................................................... 13
Workow after MVR Lite was switched on:............... 13
Using Patient Button to End Recording Study.................. 13
Manual Patient Data Input................................................ 14
Search Recent Patient on Storage................................... 14
Capturing Images ............................................................. 14
Recording Videos ............................................................. 15
Pausing a Video Recording.............................................. 15
Changing Input Signals in Live View = Multi Input........... 16
Recording to a USB Flash Drive....................................... 16
Storage Options = Multi-Storage ...................................... 16
Recording to a USB Hard Drive........................................ 17
Hard Drive Formats .................................................. 17
How to Determine the Format of a USB Hard Drive ........ 17
Transferring Images from a USB Drive to
Your Computer.......................................................... 17
Recording to Network Storage*........................................ 18
Reviewing Studies on MVR Lite ....................................... 18
Archive.............................................................................. 18
Deleting Data.................................................................... 19
Reviewing Videos on MVR Lite ........................................ 20
Reviewing Still images on MVR Lite................................. 20
Creating and Printing Reports .......................................... 21
Report Header Image....................................................... 21
Viewing Still Images on Your Computer ........................... 21
Viewing Videos on Your Computer ................................... 21
Other Features ................................................................. 21
Capturing Images While Recording Videos.............. 21
Creating Tags in Video Files..................................... 21
Information Page / System Settings ................................. 22
Device Info: Device ID / LAN MAC address /
QR code ........................................................................... 22
MediCapture Automatic Video
Repair Function ........................................................ 22
Footswitches and Camera Triggers.......................... 22
Settings (for Administrators) ............................................. 23
Structure of Settings: ................................................ 23
Locking / Protecting Advanced Settings ........................... 24
User Accounts for Security Protection.............................. 24
Special Video Input Settings............................................. 26
Picture-in-Picture Recording (PIP) ........................... 26
Recording Options ........................................................... 26
Video Time Limit ....................................................... 26
Pause Function......................................................... 26
Upgrades / Activation keys ............................................... 27
4K Recording Upgrade ............................................. 27
Network Upgrade...................................................... 27
Appendix A: MVR Lite Specications ............................... 28
Appendix A: MVR Lite Specications, continued.............. 29
Appendix B: MediCapture Limited Warranty..................... 30

MVR Lite-UG01-EN-200324-OB
<6>
MVR Lite User Guide - English
Important Safety Instructions
1. Read all of these instructions.
2. Keep these instructions.
3. Heed all warnings in these instructions.
4. Follow all of these instructions.
5. Do not misuse this apparatus.
6. Clean only with dry cloth.
IMPORTANT!
Make sure that no humidity enters the device. Do not use any cleaning agents, scouring agents or
solvents on this device.
7. Do not block any of the ventilation openings. Install in accordance with the manufacturer’s instructions.
8. Do not install near any heat source such as radiators, heat registers, stoves or other apparatus that
produces heat.
9. Do not tamper with the polarized or grounding-type plug. A polarized plug has two types of blades with
one being wider than the other. A grounding-type plug has two blades and a third grounding prong. The
wide blade or third prong is provided for your safety. When the provided plug does not t into your outlet,
consult an electrician for replacement of the obsolete outlet.
10. Protect the power cord from being walked on or pinched especially near plugs, outlets, and the point
where the cord exits from the apparatus.
11. Only use attachments/accessories specied by the manufacturer.
Use only hospital grade or equivalent power cord providing reliable grounding.
12. Use only with a cart, stand, tripod, bracket or table specied by the manufacturer, or sold with the
apparatus. When a cart is used, use caution when moving the cart/apparatus combination to prevent
the cart from tipping over and to avoid injury.
Place device in the position for easy disconnection of power cord.
13. Unplug this apparatus during lightning storms or when unused for long periods of time.
14. Disconnection Method: Switch off AC power by the rocker switch on the rear panel.
15. Do not place vessels containing water or other liquids (such as vases, etc.) on top of the apparatus.
Do not splash water on top of the apparatus.
16. Refer all servicing to qualied service personnel. Servicing is required when the apparatus has been
damaged in any way, such as when a power supply cord or plug has been damaged, liquid has
been spilled on the apparatus, objects have fallen into the apparatus, and the apparatus has been
exposed to rain or moisture, or does not operate normally, or has been dropped.
17. Service Equipment by qualied personnel only, where qualied personnel refers to the person with
proper education or training assigned by the hospital, medical institution or authorized distributor.
18. Manufacturer will provide circuit diagrams, component part lists, descriptions calibration instructions
to assist to service personnel in parts repair or replacement.

MVR Lite-UG01-EN-200324-OB
<7>
MVR Lite User Guide - English
Start
Intended Use:
The MVR Lite is intended to be networked to a variety of surgical imaging systems. The MVR Lite has the capability to view,
archive, review, and process images collected from these surgical imaging systems so that they can be reviewed in their originally
recorded state.
The intended patient population are not specied for this device. The intended user occupations are doctors or nurses, ages
between 20 - 59, education level college or university level or above.
Contra Indications and side effects:
Contraindications directly related to the product are presently unknown. On the basis of the patient‘s general condition the doctor
in charge must decide whether the planned use is possible or not. For further notes and instructions please refer to the latest
medical literature.
General Functional Description:
MVR Lite is a medical grade, High Denition Video Recorder. MVR Lite does not feature any applied parts that come in contact with
the patient. It is an assistive tool with no medical application to patients when using the device.
MVR Lite can be operated by using an external touchscreen monitor, the front panel buttons, the supplied IR remote control, a USB
keyboard, a USB mouse or a track pad.
For more details about external touchscreen monitors types, please visit www.medicapture.com
After installing all physical video connections (see section Back Panel), the user can store images and videos - provided by the
imaging system - in real time onto a USB storage media or on a network storage. Images get stored in JPG format or PNG format;
videos are stored in high quality MP4 format. Both collected formats can be viewed and stored from the USB storage to any common
PC system or server for long-term storage.
Additional (optional) function:
• 4K Activation: MVR Lite can record a 4K HDMI signal in 2160p30. (Without activation the signal will be
downscaled to 1080p30).
• Networking Activation. MVR Lite can record directly to a network storage, can be operated by the MVR
Remote App (on a portable Android device) and you can print reports on connected network printers.
• Note: A USB-LAN Adapter is required to connect to wired LAN.
In the Review function a user can playback and edit the recorded data within the active patient study.
After closing the study, the user has access to the Archive to review and edit several stored studies of different patients.
MVR Lite features multi-input recording. It automatically detects the input resolution of both possible video inputs. For this reason, the
MVR Lite must be switched on before the signal sources are activated. If two signals are detected, an additional icon appears on the
monitor. The user can toggle between these signal sources during the active patient study. For more details, see section Changing
Input Signals in Live View.
Please note: MVR Lite features powerful functionality in minimized mechanical dimensions.
Passive cooling results in an inaudible, fan-less design. The device will be very warm to the touch,
which is normal. MVR Lite operates across the full temperature range from -20°C to 40°C.
MediCapture recommends an installation in a location where air can provide proper cooling. It is not
recommended to stack MVR Lite with converters or other warm devices .
Data Protection
Sensitive personal data is processed when using the devices of MediCapture. The user of a device of MediCapture is obligated, if
the device is sent to MediCapture (i) for maintenance purposes (ii) under warranty (iii) after its use as a demo/test device or (iv) for
any other reason, to reset the device to its delivery state and to delete all personal data on the device.
The formatting function of the device must be used for this purpose (see chapter Deleting Data in this User Guide).
If MediCapture notices that personal data is stored on the device, or if there is only reasonable suspicion that this is the case,
the device will be returned at the expense of the user and the user will be instructed to re-send the device in the condition
described hereinabove.
If a software update is installed on the device, data will only be transmitted to the device and not vice versa.

MVR Lite-UG01-EN-200324-OB
<8>
MVR Lite User Guide - English
To Get Started:
1. Connect a camera with an HDMI output connector to the matching MVR Lite HDMI input connector. It is recommended to keep
any cable connections as short as possible to avoid electromagnetic interferences caused by cables.
2. Insert the supplied MediCapture USB ash drive in the front panel. (Connect USB ash drive and all external pointing
devices rst, e.g., mouse, keyboard, touch screen, etc. before switching on the device from the back panel.)
3. Turn on the unit from the back panel power switch.
Turn on your camera system(s) after MVR Lite has nished its boot sequence.
4. Prior to recording images and video for the rst time, it is recommended to check the initial settings found in the
INFORMATION Page .
As long as no patient study was started, this INFORMATION page gives you access to MVR Lite Settings .
The following settings are recommended to be checked prior to the rst use of MVR Lite:
5. Once your settings have been customized, use your imaging equipment as you normally do. Tap on the Start eld to
create a new patient folder and to type in patient information. Choose Capture Photo or Record Video by pushing the
corresponding button. Press again to stop recording.
6. When you wish to end the study, press the END OF STUDY icon [or F3 on your keyboard]. Afterwards, you can either
nish the study or review and edit.
If you wish to continue with the last active study, please tap on the upper return icon [or ESC on your keyboard] to
go back.
7. When you nish the study, it is safe to remove the USB ash drive from the MVR Lite. Insert the stick into the USB
connector of a computer. Drop and drag your recordings from the stick to your computer for viewing, archiving, etc.
Note: Do not remove the ash drive from MVR Lite while recording!
a) User Interface Language
➤Settings ➤System ➤Language
Note: You can select the touch keyboard layout
(language) every time the touch keyboards appears.
Simply tap on the “globe” icon to change the layout.
b) Time Zone, Date and Time
➤Settings ➤System ➤Date and Time
c) Patient Information denition
➤Settings ➤System ➤Patient Info
d) Set Network settings* For Network storage, the
MVR Remote App and network printing, please use
Auto-IP setup or Manual IP setup.
➤Settings ➤Advanced ➤Connections ➤Network
e) Network Storage properties.* Set properties of your
shared folder on the network storage target.
➤Settings ➤Advanced ➤Connections ➤Network
Storage
f) Storage target selection. For Multi-Storage you can
select two* options. This setting is very important as it
also denes your Review options in the Archive and
search options for existing Patient Information.
➤Settings ➤System ➤Storage
g) Video quality and codec format H.264 or HEVC
➤Settings ➤Video/Audio ➤Recording Quality
h) Photo format JPG or PNG
➤Settings ➤Video/Audio ➤Photo Settings
i) User Accounts. You can dene User Accounts with
specic passwords to protect the device and data
from misuse.
➤Settings ➤Advanced ➤User Accounts
j) Printer Selection and Number of Print Copies
(Network printers only available when Network is
activated!) Please ask your IT-Administrator to connect
MVR Lite to LAN network rst.
➤Settings ➤System ➤Printer
k) Audio-Recording ON/OFF and microphone selection
➤Settings ➤Video/Audio ➤Audio Input
* Note. Only available when Network is activated by
activation key.

MVR Lite-UG01-EN-200324-OB
<9>
MVR Lite User Guide - English
Front Panel
The unit is for exclusive interconnection with IEC60601 certied equipment in the patient
environment and IEC60XXX certied equipment outside of the patient environment.
A certied power supply cord set must be used with this equipment. The relevant national installation and/or
equipment regulations shall be considered. The power supply cord shall be not less robust than an ordinary
tough rubber-sheathed exible cord according to IEC 60245 (designation 53) or ordinary polyvinyl chloride
sheathed exible cord according to IEC 60227 (designation 53).
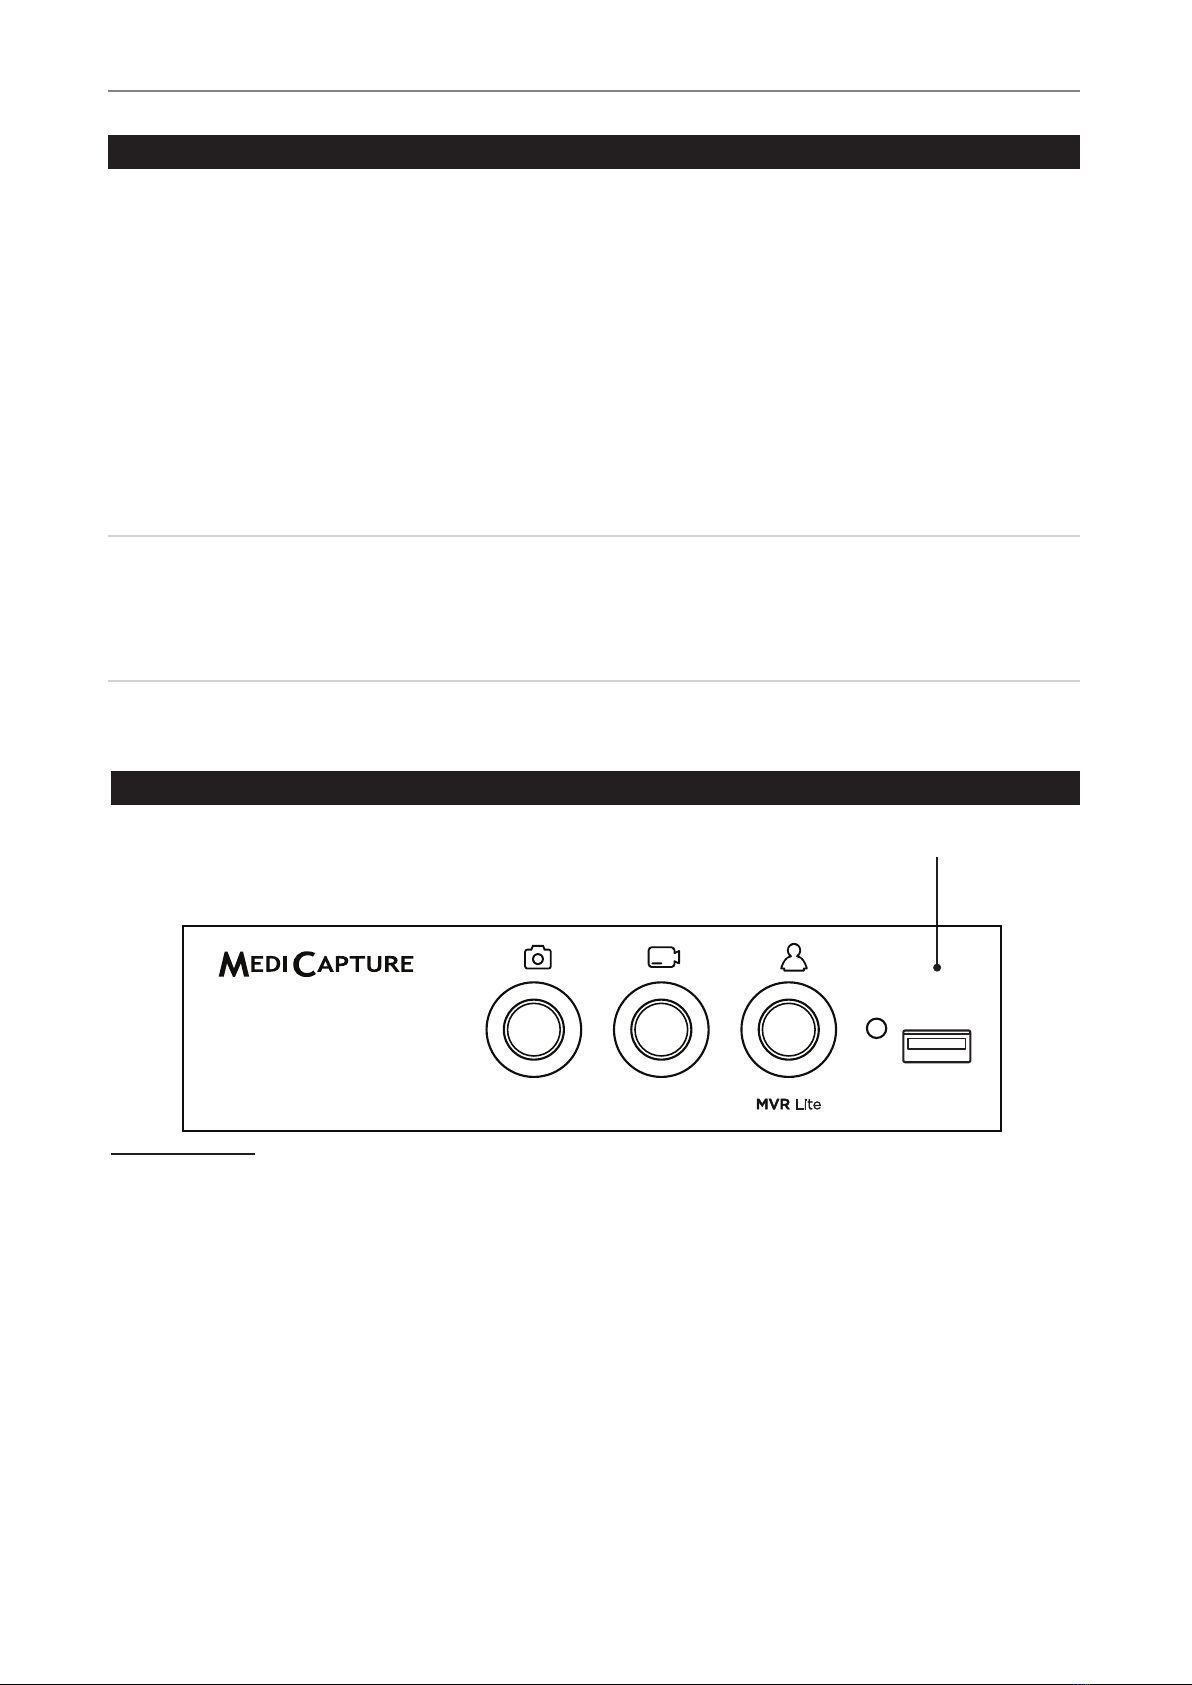
Front Panel
Capture Photo button
Captures the image on the
monitor to storage(s).
New Patient button
Press before each patient study. Opens
a new folder / new study to store the
patient’s images and videos. End of study.
Closes the active recording study.
USB Drive Connector
Connect a USB drive here.
Images and videos are
captured to the drive.
Record Video button
Records video clips of
what is displayed on
monitor. Press once to start
recording and again to stop.
IR Receiver
Light Rings
Flash green when ready for recording or when a new study can be created.
Green LED light ring indicates which function is available at the moment.
Back Panel
Footswitch /
Remote cable
Headset /
Microphone
USB connectors (2)
for optional accessories
PC connector
(USB type-C)
Service interface
Equipotential
Pole
HDMI Output
Output is for
connection to
a monitor or a
touchscreen monitor.
HDMI Input 1
for a HD camera /
MVC Pro with HDMI output
(4K camera optional)
HDMI Input 2
for an HD camera with
HDMI connector
(DVI with adapter)
Power connector
Use supplied power cable to
connect 100V-240V outlet.
l=On
(connection to power
supply, mains)
O=Off
(no connection
to power supply,
mains)
Power Switch

MVR Lite-UG01-EN-200324-OB
<10>
MVR Lite User Guide - English
Monitor User Interface
Please note:
The position of the icons in live view can be arranged to your preferred location. Simply swipe the icons to the
left or the right for position change.
If you do not wish to see the icons on your monitor, you can easily swipe them out of the visible monitor area.
Swipe the icons with one nger, when using a touchscreen monitor.
Capture Photo
Record Video Start/Stop
Control Icon and
Review last study
Change Input Signal
USB storage active.
Remaining time/storage space
Network storage active.
Remaining time/storage space
Information page
MVR Lite displays easy-to-use icons. Icons can be tapped directly on a connected touchscreen.
MVR Lite live view screen. End of study
USB Keyboard with Integrated Trackpad
A USB keyboard with integrated trackpad can serve as an alternative to a touchscreen monitor. The integrated trackpad works like a
mouse with double-click function.
Please note the short cut key functions to operate the user interface of MVR Lite:
F1 = Take picture
F2 = Start / Stop video recording
- Hold for 3 sec = Pause
F3 =
New study / End of study
i = Information screen
Esc = Back
(in Settings)
1= Input 1 (select)
2= Input 2 (select)
r= Review in
live mode
c= Change input
(toggle input 1 / 2)
Trackpad works
like a mouse to
control the cursor.
Double-click =
Enter / selection
Enter / selecion
Home = Change input
(toggle input 1 / 2)
PgUp or PgDn =
Information screen in
open study
Enter = Select,
Video Pause on/off
Arrow keys to
control the cursor
or to move between
elds in Settings

MVR Lite-UG01-EN-200324-OB
<11>
MVR Lite User Guide - English
Important:
Remove remote’s battery protective tab or insert the battery before using.
Remote Control
Navigation Wheel:
OK Button = Select button.
OK 3 seconds = Video Pause
“Esc” button:
New Patient button:
Press before each
recording session. Opens
a new folder / new study.
END OF STUDY:
Closes the recording study
for next steps.
Capture Photo button:
Records the image on the
monitor to the storage(s).
Record Video button:
Records video clips of what is
being displayed on monitor.
Press once to start recording
and again to stop.
Input selection button:
Toggle between Input 1
and Input 2
Remote control with a Remote Device (tablet) by using the MVR Remote App
Android remote devices (tablets) can be used
for external control of MVR Lite, either via USB
connection as an external touchscreen monitor
(= USB tethering) or wirelessly as a handhold
portable device.
MediCapture recommends to use pre-installed and
tested MediCapture tablets.
Example: TBHI9PRO – Remote Tablet
For further instructions about setup and use
of a tablet as a remote control, please contact
MediCapture for the document User Guide
Supplement, Tablet.
MVR Lite-UG01-EN-200324-OB
<12>
MVR Lite User Guide - English
Connecting the MVR Lite
The MVR Lite connects to one or two video sources (for example, an endoscopic camera, surgical camera, ultrasound, etc.).
1. If you are adding the MVR Lite to imaging equipment that you are already using, begin by
locating the video output of the primary video source.
2. Connect the appropriate cable between the video output on the video source and the
appropriate video input
on the back panel of the MVR Lite.
3. Plug in the power cord.
4. You can also connect standard footswitches or camera triggers to the back panel. A
footswitch or trigger can be used to capture photos. Connect the footswitch or trigger
to the “Remote” connector. By tapping the footswitch or trigger, it will perform the same
function as pushing the Capture Photo button on the front panel.
Please note: To operate two remote cables from your image source (Capture Photo + Record Video)
an adapter is necessary for the MVR Lite remote connector.
Footswitches are available as an option at medicapture.com.
Note that for a camera trigger to be compatible with the MVR Lite, it must be of the simple
“closed-contact” type, not a “programmable” type of trigger.
Inserting a USB Flash Drive
The easiest way to get started is to record to the supplied USB ash drive.1
Insert the ash drive in the front USB port.
MediCapture brand ash drives are recommended.
1 MediCapture brand ash drives come in a variety of models.
USB Drive Connector
Connect a USB drive here Images
and videos are captured to the drive.
MVR Lite-UG01-EN-200324-OB
<13>
MVR Lite User Guide - English
Using Patient Button to End Recording Study
You can use the Patient button on the front to nish a study. [USB keyboard: Key “F3” has the same function as the Patient button.]
Light Ring
Is illuminated green when a recording
study can be closed (END OF STUDY)
Creating Patient Data
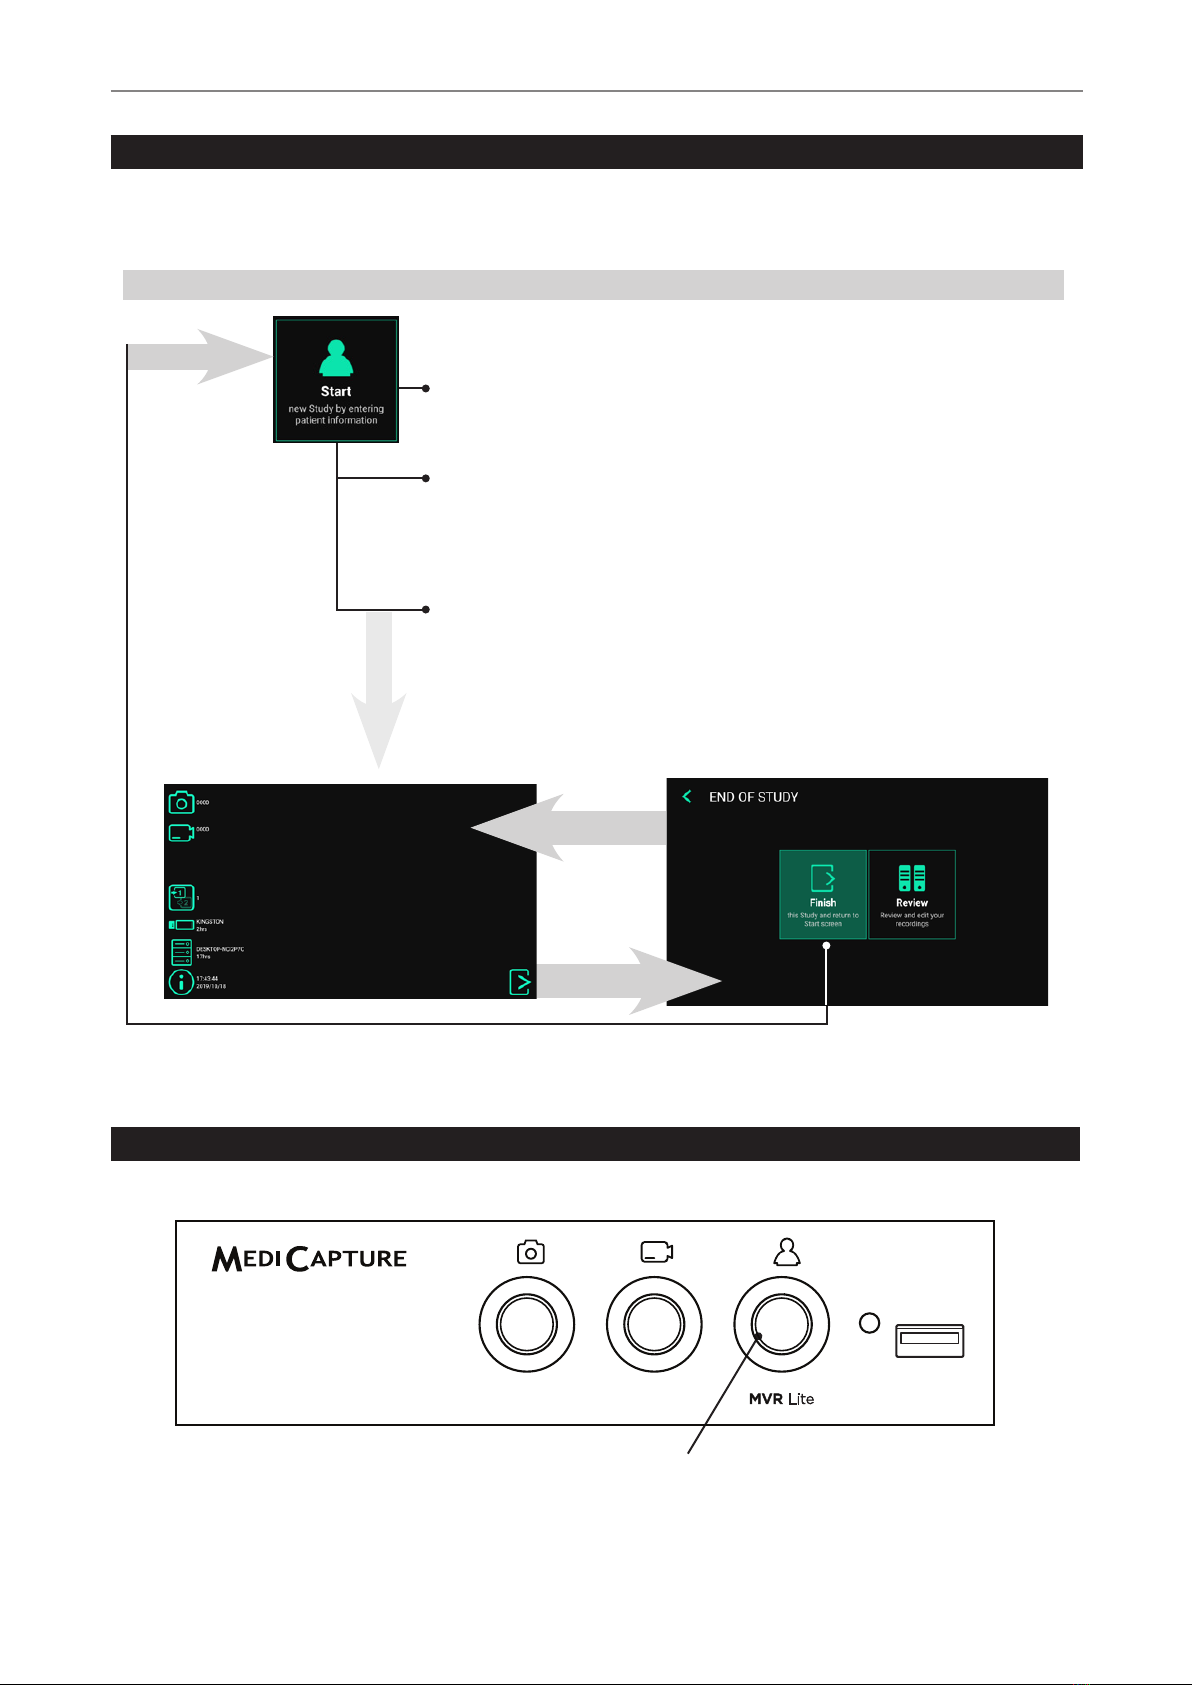
The workow for patient data input depends on the settings for Patient Info. ➤Settings ➤System ➤Patient Info
MVR Lite starts with a dened home screen after switching-on or after a study was nished.
Workow after MVR Lite was switched on:
No Patient Info
MVR Lite creates a folder to store images and
videos recorded in that study.
Manual Patient Info
You can type in patient information to assign
images and videos to a patient. To input patient
information, please use an external touch monitor
or a USB keyboard.
START
End of study
Back to study
(live screen)
Live screen for recording
Tap on Start, press the Patient button on the front [or
use “F3” key on your keyboard] to start a new study.

MVR Lite-UG01-EN-200324-OB
<14>
MVR Lite User Guide - English
Manual Patient Data Input
You can type in patient information
to assign images and videos to a
patient. Patient info settings must be
set to Manual.
➤Settings ➤System ➤Patient Info
Tap on Start
to start your
new study.
Search Recent Patient on Storage
Instead of typing patient data manually, you can also list all recent patients which are located on your MVR Lite storage
media (those which are enabled and connected). Tap on the “search” icon in the screen “ENTER PATIENT DATA” to
retrieve the list.
Select existing patient data and
tap again to copy the patient data to
your new study. You can still change
these data.
Tap on Start to start your new study.
Capturing Images
To capture an image, tap on the Capture Photo icon on the touchscreen.
Front panel: Press the Capture Photo button on the front panel. [USB keyboard: Function key “F1” has the same function.]
Light Ring
Is illuminated green when the device is ready for capturing
images. Goes out briey when capturing images.

MVR Lite-UG01-EN-200324-OB
<15>
MVR Lite User Guide - English
Pausing a Video Recording
To use Pause you have to enable the function in Settings.
➤ Settings ➤Video/Audio ➤Recording Options
The Pause icon will appear in the live screen after Pause is enabled.
To pause a video, tap on the Pause icon on the touchscreen. To continue video recording, tap the Pause icon again.
Alternative operation:
To pause a video while it is recording:
• press the Record Video button on the front panel for 3 seconds.
• You can also use the OK button of the Remote Control.
• [USB keyboard: Holding key “F2” for 3 seconds or “Enter” has the same function.]
The Light Ring ashes in a very fast sequence when the video recording in paused.
To continue the video recording:
• press the Record Video button or OK button of the Remote Control again.
• [USB keyboard: Pressing “F2” or “Enter” has the same function.]
The Pause function is used to create only one video le with content of different sections. It can be used multiple times during
one video recording to eliminate “unwanted” parts. When reviewing a video le that was paused, you can see tags in the
timeline. These tags are helpful to identify the different sections of the video.
Video Start Video Stop
Pause Pause
Part 1 Part 2 Part 3
Video Start Video Stop
More information about tags in chapter: Reviewing Videos on MVR Lite.
Recording Videos
To start recording video, tap on the Record Video icon on the touchscreen. Tap icon again to stop recording.
Front panel: Press the Record Video button on the front panel. Press the button again to stop recording.
[USB keyboard: Function key “F2” has the same function.]
Recording tips:
• You can capture still images while video is being recorded. Simply tap/press the Capture
Photo button while a video recording is in progress. When reviewing a video le, you can
see tags in the timeline. These tags are helpful to identify when a picture was captured
during recording.
• Long recordings are automatically divided into les of 4GB each. This ensures that les are
kept to a manageable size. The process is “seamless.” When making a long recording, you
will not notice when a new le is automatically started. When playing back a long recording
using “continuous play” (a feature in most media players), there will be no gaps in playback.
Light Ring
Is illuminated green when the device is ready for
recording videos. Flashes green while recording.
More information
about tags
in chapter:
Reviewing Videos
on MVR Lite.

MVR Lite-UG01-EN-200324-OB
<16>
MVR Lite User Guide - English
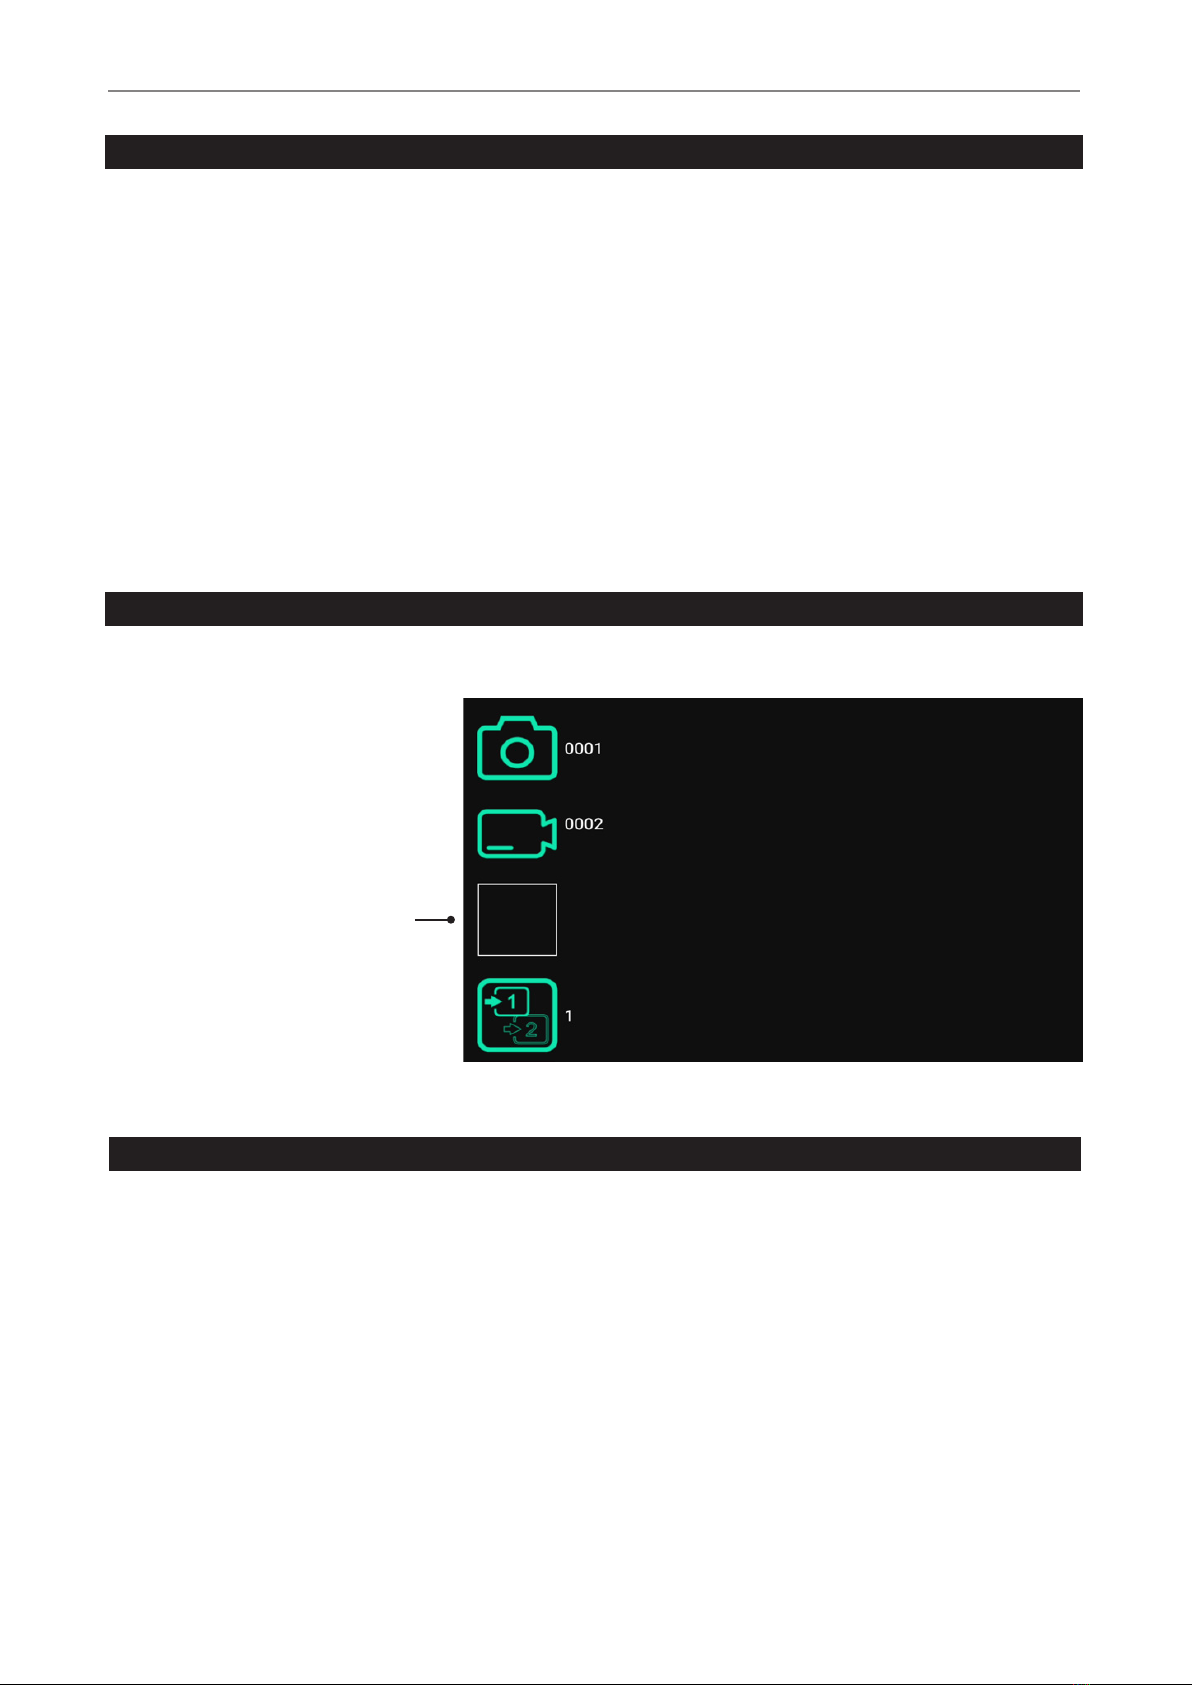
Changing Input Signals in Live View = Multi Input
If two cameras are being connected, MVR Lite detects both input resolutions and displays an additional icon on
the monitor. You have the option to change between Input 1 and Input 2 at any time during one imaging session
(patient study). Any active video recording must be stopped rst.
• By using a touchscreen monitor simply tap on the Input button to toggle between both signals.
• Alternatively, you can use the remote control button for toggling the Input.
• [USB keyboard: Pressing “c”has the same function.]
Storage Options = Multi-Storage
➤Settings ➤Archive ➤Storage
MVR Lite offers the possibility to store your recording studies to multiple storage targets.
Note: Two types/options of storage
can be chosen at the same time.
Options are:
• USB Storage
• Network Storage*
You can also select different
video resolutions for different
storage targets.
Example: Recording to USB in the
highest possible resolution and recording
to a network server* in reduced resolution.
Resolutions 1920x1200 and 1280x1024 will be supported at setting 1080p –
recorded and captured in original resolution and format.
Note: Images are always captured in the original input resolution.
Recording to a USB Flash Drive
Recording to the supplied MediCapture USB ash drive is the easiest way to start using your MVR Lite. When you nish recording,
you can remove the ash drive and easily carry it with you.
Please make sure that USB storage is activated.
➤Settings ➤ Archive ➤Storage
USB Drive Connector
Connect a USB drive here. Images
and videos are captured to the drive.
Note: In case the policy in your IT-environment does not allow the use of USB storage media at all,
IT-Administrators can disable the USB-option for storage and use the network storage* instead.
➤Settings ➤Archive ➤Storage
*Note: Only available when Network is activated by activation key.

MVR Lite-UG01-EN-200324-OB
<17>
MVR Lite User Guide - English
Recording to a USB Hard Drive
Recording to a USB hard drive is very similar to recording to a USB ash drive. The primary benet to using a USB hard drive
is that it can provide much greater storage capacity than a USB ash drive. Before using a USB hard drive with your
MVR Lite, note the following:
• Delete any software that came pre-loaded on the drive (it may be incompatible with the
MVR Lite).
• To protect your videos and images, it is important to back them up by transferring them
from the external hard drive to your computer or network.
• Due to the large capacities of external USB hard drives, it will take the MVR Lite
approximately 20-60 seconds to recognize the device. Please be patient and wait
until the external hard drive has been recognized. The external hard drive has been
recognized when the New Patient backlight becomes illuminated and the USB icon
appears on the connected monitor.
CAUTION:
After inserting the
external hard drive,
DO NOT UNPLUG!
Wait at least
one (1) minute
allowing the system
enough time
to recognize
the external hard drive.
How to Determine the Format of a USB Hard Drive
• Plug the drive to a Windows computer.
• Right-click on the drive icon and select “Properties”.
• In the general tab, the File System (format) will be listed.
Transferring Images from a USB Drive to Your Computer
1. If you record your videos to a USB ash drive or USB hard drive, unplug it from the MVR Lite at the end
of your imaging studies. Insert the drive into a USB connector on your computer.
Note: Do not remove the ash drive from MVR Lite while recording! Your recording le may get corrupted.
2. The computer will manage the USB drive just like any other drive on your computer. Navigate to the drive and open it
so you can see the folders it contains.
3. You can click on the images and videos to review them while they are on the drive, or you can move them to your
computer’s hard drive and review and store them there (recommended). Refer to Windows or Mac OS documentation
for information on how to access drives on your computer and manage les.
Hard Drive Formats
USB hard drives come in different “formats”: FAT32, NTFS or exFAT. The MVR Lite can process all three formats.
In case-of non-recognition of the USB hard drive, it may be helpful to format the drive to FAT32.
Note: The automatic video repair function does not work with the le format exFAT.
MediCapture recommends to use hard drives in format FAT32 or NTFS.
MVR Lite-UG01-EN-200324-OB
<18>
MVR Lite User Guide - English
Recording to Network Storage*
Recording to network storage is the best option for long-term storage. Images and Videos are recorded in real-time and in standard
formats to this external mass-storage.
Please ask your IT-Administrator to setup the settings for network storage.
1. Create a physical LAN connection to your Network server by using the USB-LAN adapter for the rear of MVR Lite.
Plug the adapter into a USB port.
2. For wired LAN connection: Choose IP settings Auto-IP setup or Manual IP setup.
➤Settings ➤Advanced ➤Connections ➤Network
3. Properties for the Network storage server.
➤Settings ➤Advanced ➤Connections ➤Network storage*
4. Storage settings for Network storage (activation and resolution limits).
➤Settings ➤Archive ➤Storage
Reviewing Studies on MVR Lite
You can review your active study from the live recording screen. This is helpful to control your recordings before you nish this study.
Video recordings must be stopped before changing to Review.
• Tab on the Review icon to enter Review.
• [USB keyboard: Pressing “r” has the
same function.]
• Closing the Review screen brings
you back to your live recording screen.
Control Icon and
Review last study
Archive
The Archive offers intuitive features to browse your recorded studies. You can enter the Archive from the Start screen. Both enabled
options for Multi-Storage can be accessed in Archive. All enabled options need to be connected to MVR Lite.
Available features in Archive:
• Review images and playback videos
• Delete les
• Delete empty studies
• Take snapshots from paused videos. Paused videos can be moved frame by frame
• Edit images with annotations and store them as new image
• Magnify or crop images and store them as new image
• Copy complete studies, single images or single videos from Network to USB*
• Select images and print them on a report
• Send reports to a network printer* or store them as PDF le
*Note: Only available when Network is activated by activation key.
*Note: Only available when Network is activated by activation key.

MVR Lite-UG01-EN-200324-OB
<19>
MVR Lite User Guide - English
Select one storage: USB or Network*
Tap on study for selection
To select a study, a video or a still image,
simply tap on the preview icon.
Tap on video for playback Tap on image for editing
*Note: Only available when Network is activated by activation key.
Deleting Data
Data on selected storage media can be deleted individually. Your conrmation of each deleting activity is requested on the screen.
• Deleting single les (pictures/videos): Select the le you want to delete and tap on the delete icon.
• Deleting of a complete study is possible, as soon as it is empty – all les where already deleted.
• Clearing of all data from the device storage. Please use the formatting process to delete all data from directly
connected storages (USB memory or internal memory):
➤Settings ➤Advanced ➤Update & Default
Note: When using the formatting process, all data is deleted and cannot be recovered!
MVR Lite-UG01-EN-200324-OB
<20>
MVR Lite User Guide - English
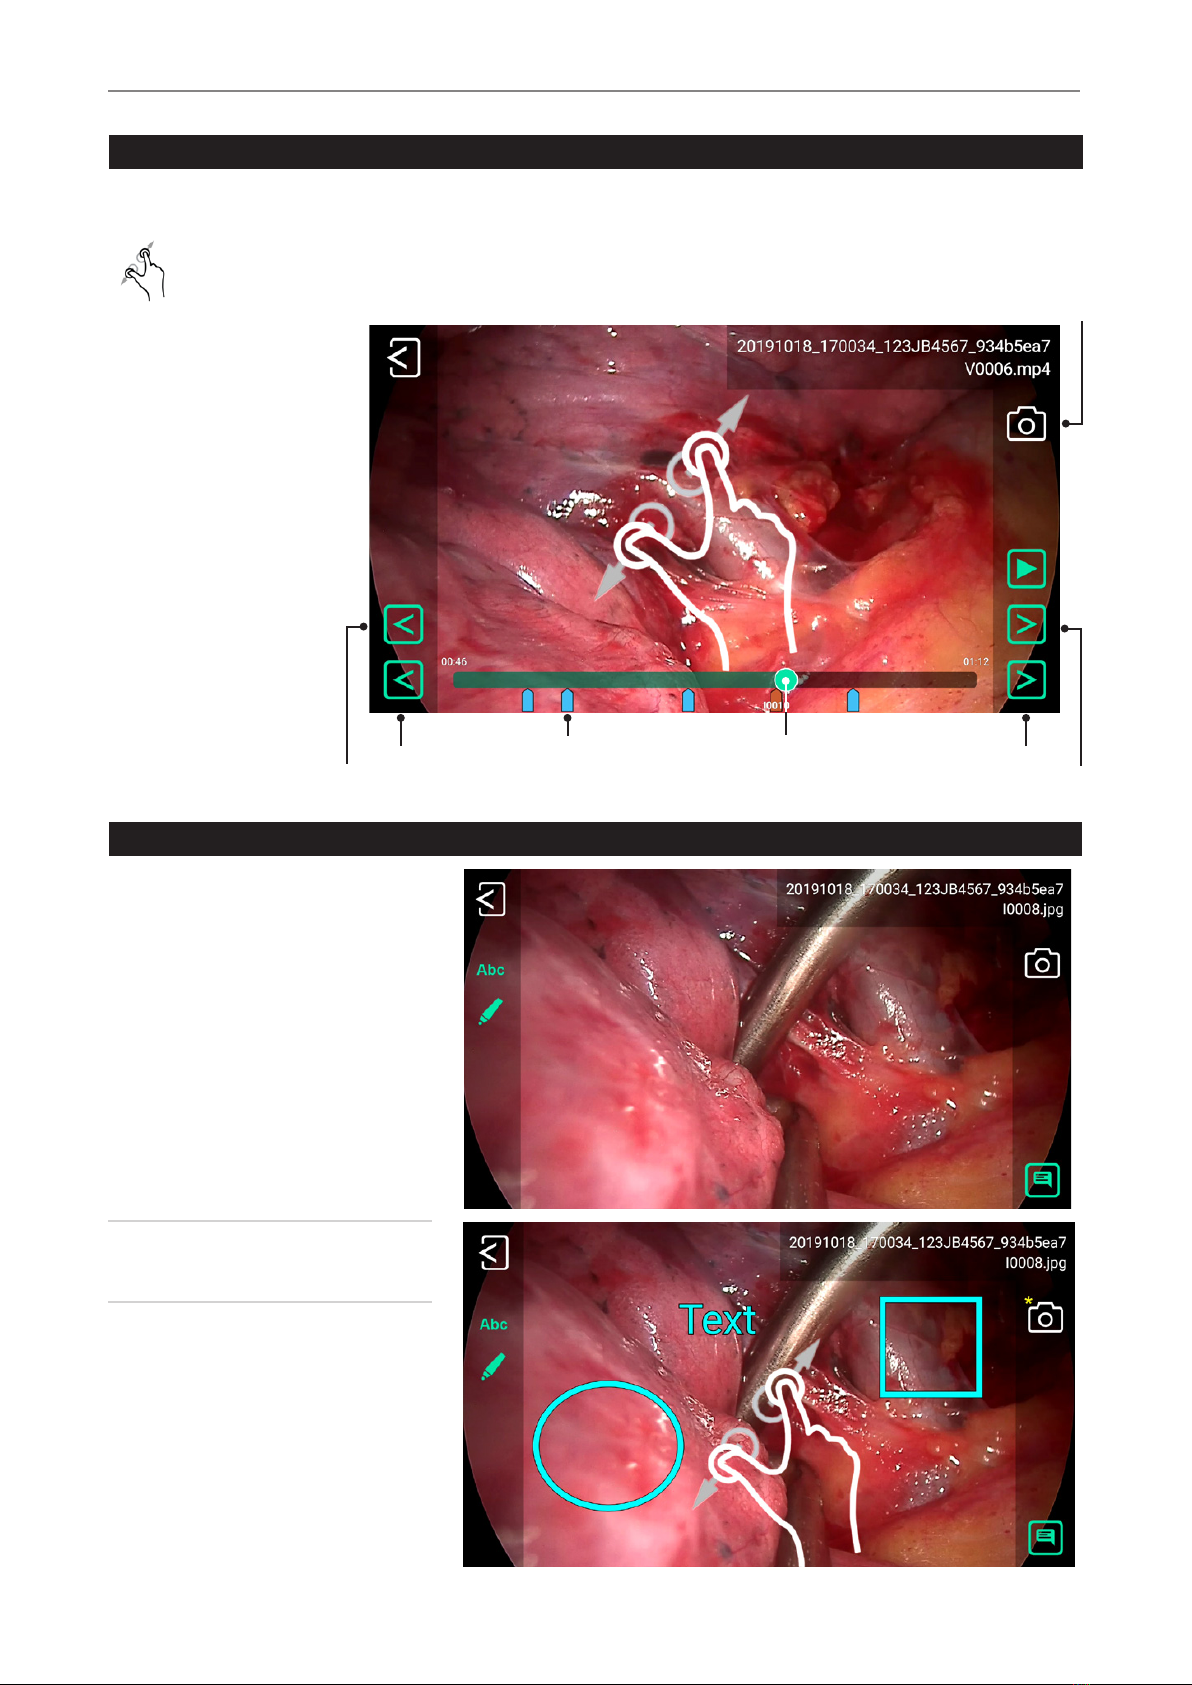
Reviewing Videos on MVR Lite
A selected video starts to play automatically. To pause the video, tap on the Pause icon. You can now use the timeline slider
to change position in the video or tab forward and backward frame by frame.
You can magnify the paused video by using two ngers.
If you want to take a snapshot of the paused video, tap on the Photo icon.
This captured image will be added to the patient study.
You may see tags in the video
timeline. Tags get created
every time:
One frame backward
One tag
backward Tag Position in timeline One tag
forward
One frame forward
Snapshot
• the video is paused during
recording
• an image is captured
during recording
• the video signal
lost synchronization for
less than 10 seconds
(most probably caused by
a damaged video cable)
You can jump between tags
by using the green forward/
backward icons.
Reviewing Still images on MVR Lite
A selected image can be edited in many
ways and stored afterwards as a new image
to the study.
Options are:
• Magnication / cropping
• Adding text notes
• Marking areas with circles, squares
or freehand drawings
• Adding notes to the image le which
will appear in reports
Note: To discover all options for editing,
please watch our demonstration videos at
medicapture.com
Table of contents
Other MediCapture DVR manuals


Popular DVR manuals by other brands


GE Security
GE Security SymSafe user manual

American Dynamics
American Dynamics Intellex Intellex Ultra user guide

Rifatron
Rifatron HV-800 user guide

EverFocus
EverFocus EDR410M Specifications

Contemporary Research
Contemporary Research IP-HDVR Dimensional drawing

Security Labs
Security Labs SLD240 Installation & operation manual