Medicus GlucoDr. auto AGM-4000 User manual

A812DA303
08/2015
AGM-4000
BLOOD
GLUCOSE
MONITORING
SYSTEM
User Manual
Blood Glucose Monitoring System
#7102~7107, #7402, #7403, #7406, 140,
Beolmal-ro, Dongan-gu, Anyang-si,
Gyeonggi-do 431-804 REPUBLIC OF KOREA
www.allmedicus.com
Manufactured by
All Medicus Co., Ltd.
EU Representative
MT Promedt Consulting GmbH
Altenhofstr. 80, D-66386 St. Ingbert, Germany
Tel.: +49 6894 - 58 10 20
This summary is intended only as a
quick reference and is not a substitute
for GlucoDr auto Blood Glucose
Monitoring System User Manual.
Please read the entire this User Manual
before you begin testing.
TEST SUMMARY
Check the User ID.
Insert a test strip.
The meter will
automatically turn on.
Check the code number.
The code number
displayed on the meter
must match the one on
the test strip vial.
Apply the blood drop
to the side edge of
the yellow window of
the test strip.
Wait for the blood
drop to completely ll
the yellow window of
the test strip, then the
meter will begin the
countdown.
The blood glucose
result will be
displayed on the
meter in just
5 seconds.

This User Manual will tell you all you need to know
about the system and how it works.
Please read this carefully before using the meter.
“Thank you for using
Blood Glucose Monitoring System”

Test Principle
The blood sample is drawn into the test strip's reaction chamber through capillary action. Glucose in the
sample reacts with glucose dehydrogenase and mediator in the test strip. This reaction creates electrical
currents. The electrical currents produced are proportional to the glucose concentration in the blood
and converted to the equivalent glucose concentration values calculated based on the algorithm
programmed in GlucoDr auto Meter.
- The GlucoDr auto Meter is designed for use with GlucoDr auto Test Strips
(manufactured by All Medicus Co., Ltd.) only.
- The GlucoDr auto Blood Glucose Monitoring System is calibrated to produce values equivalent to results
on plasma specimens obtained from a laboratory analyzer (YSI 2300 STAT Plus).
- The GlucoDr auto Blood Glucose Monitoring System should not be used for the diagnosis of diabetes.
Precautions for Use
For Self-testing: GlucoDr auto Blood Glucose Monitoring System is for quantitative blood glucose testing
in fresh capillary whole blood drawn from the ngertips, palm, arm, thigh, and calf. The GlucoDr auto Blood
Glucose Monitoring System is for testing outside the body (in vitro diagnostic use). The GlucoDr auto Blood
Glucose Monitoring System is
intended for use by diabetic lay users for self testing to improve management
of their blood glucose level. The GlucoDr auto Blood Glucose Monitoring System should not be used for the
diagnosis of or screening of diabetes mellitus, or for neonatal use.
For professional use: GlucoDr auto Blood Glucose Monitoring System is for quantitative blood glucose
testing in venous, arterial whole blood and fresh capillary whole blood drawn from the ngertips, palm,
arm, thigh, and calf. The GlucoDr auto Blood Glucose Monitoring System is for testing outside the body (in
vitro diagnostic use). The GlucoDr auto Blood Glucose Monitoring System is intended for use by healthcare
professionals to improve management of patient’s blood glucose level. The GlucoDr auto Blood Glucose
Monitoring System should not be used for the diagnosis of or screening of diabetes mellitus, or for
neonatal use.
Intended Use
PRECAUTIONS

Precautions for Test Strip
- Store test strip vials in dry place with temperature ranging between 1~32℃(34~90℉).
- Avoid direct sunlight, heat and excessive humidity.
-
Always close the vial cap immediately after removing a test strip from the vial. If the test strip vial is left
open for a long time, the test strips will become unusable.
- Use the test strip immediately after removing it from the vial.
- Use all the test strips within 4 months after the rst opening.
- Store your test strips only in their original vial and do not transfer them to a new bottle or any other
container.
- Do not handle the test strip with wet hands.
- Do not use the test strip after the expiration date printed on the vial.
- Do not bend, cut, or alter the test strips.
- Do not insert the same test strip into the test port multiple times. It can lead to an improper operation.
Safekeeping
- Store the GlucoDr auto Meter at a temperature between 0~40℃(32~104℉).
- Store the GlucoDr auto Meter at a place where relative humidity is less than 85%.
- Keep the GlucoDr auto Meter in sanitary environment.
- Keep the meter away from direct sunlight.
- Keep the test port away from dirt, blood or water.
- Do not store your meter and test strips in the car, the bathroom, or the refrigerator.
(sensitive to temperature and humidity)
- Keep the meter, test strip vials and lancing materials away from children.
- Clean the outside of the meter using a moist (not wet) cloth or tissue with isopropyl alcohol or mild
detergent with water. Do not immerse the meter in water or other liquid.
-
Rapid change in temperature may cause inaccurate test results in reading. When taking the meter from
cold to warm area or from warm to cold area, let the meter sit for about 30 minutes to adjust to the
room temperature.
- Do not drop the meter.
-
Do not disassemble, repair or remodel without consultation. The sensitive parts could be damaged and
the warranty will then become invalid.
- A hematocrit that is either very high (above 60%) or very low (below 20%) can cause false test results.

·
Getting Started
l 17
l 29
Installing Battery l 34
Display Message Guide l 36
Troubleshooting Guide l 41
Specications l 42
Performance Characteristics l 43
Explanation of Symbols l 44
·
Before Testing
·
Performing the Blood Glucose Test with GlucoDr auto
TM
·
Using the Meter Memory Function
·
Setting the Meter
·
Caring for GlucoDr autoTM Meter
·
Additional Information
Entering the EVENT RECORD MODE l 22
Understanding Your Test Results l 24
Recalling the Previous Test Results l 25
Setting the User ID l 06
Checking the Code Number l 08
Checking Your System with GlucoDr autoTM Control Solution l 09
Preparing the Lancing Device l 14
GlucoDr autoTM Blood Glucose Monitoring System l 01
GlucoDr autoTM Meter l 02
GlucoDr autoTM Meter LCD Display l 04
GlucoDr autoTM Test Strip l 05
Table of Contents

GlucoDr autoTM Blood Glucose Monitoring System
Carrying case
User Manual
GlucoDr autoTM Meter
GlucoDr autoTM Test Strips
Battery
Lancing Device
Lancets
7
Upon request of distributor, actual package may consist of all
or part of items described above.
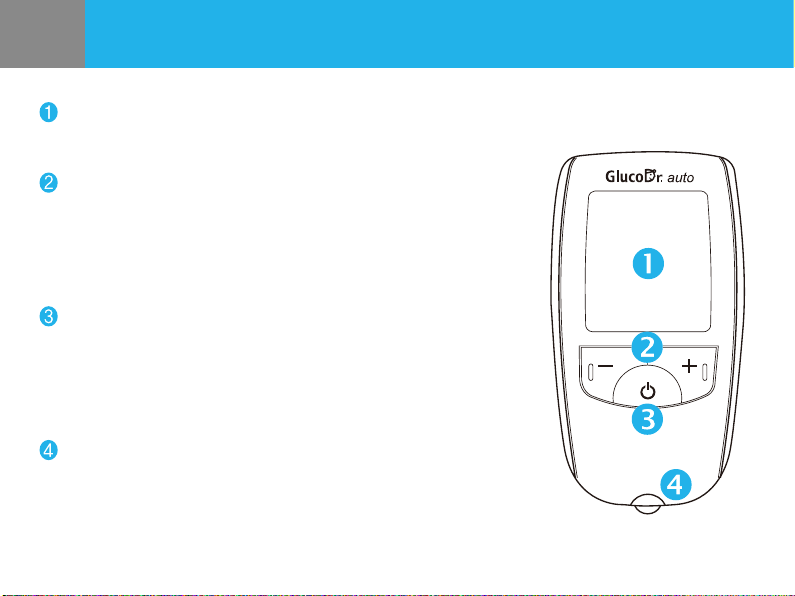
- Test results, icons, symbols and simple messages appear here.
LCD Display
Power Button
- Turn the meter on/o.
- Enter into dierent MODEs while pressing the power button.
(1 second : USER ID MODE, 3 seconds : SET MODE)
- Delete all the stored test results in the MEMORY MODE.
Test Port
- Insert the GlucoDr auto Test Strip for testing. Then the meter
turns on and displays the code number automatically.
GlucoDr autoTM Meter
+/- Button
- Change the User ID number in the USER ID MODE.
- Recall the stored test result in the MEMORY MODE.
- Select an event in the EVENT RECORD MODE.
- Change the date and time in the SET MODE.

Battery Cover
Data Port
- Transfer your test results from the meter
to a computer.
Test Strip Ejector Button
GlucoDr autoTM Meter LCD Display
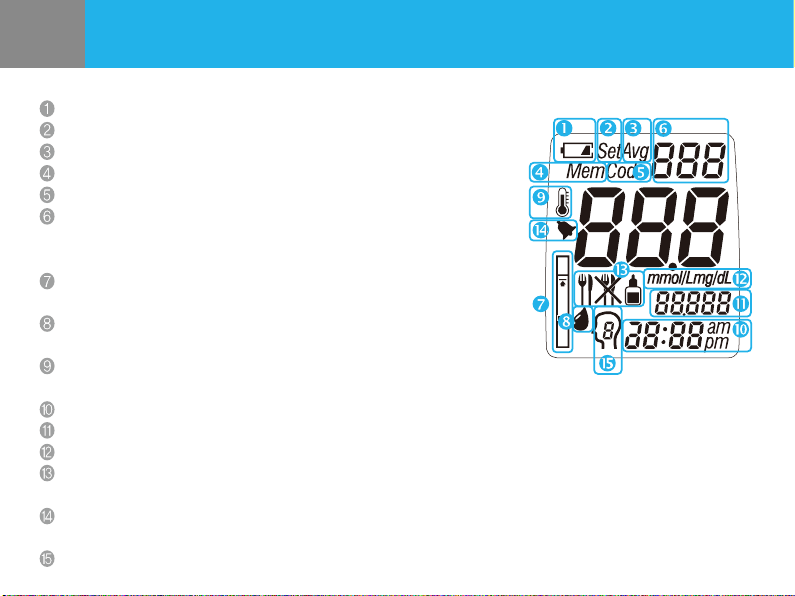
Battery life.
SET MODE.
AVERAGE MODE.
MEMORY MODE.
CODE MODE
MEMORY and CODE NUMBER.
The meter displays the current memory order number in the MEMORY MODE.
The meter displays the current code number in the CODE MODE.
STRIP ICON.
When the STRIP ICON blinks, insert a test strip to the meter.
BLOOD DROP ICON.
When the BLOOD DROP ICON blinks, apply blood sample.
TEMPERATURE ICON.
When the meter is not used at a recommended temperature range, "Er1" and TEMPERATURE ICON appear.
CURRENT TIME and TEST TIME in the MEMORY MODE.
CURRENT DATE and TEST DATE in the MEMORY MODE.
UNIT OF MESUREMENT.
EVENT ICON.
If you choose an event icon which correlates to test results, it helps to manage glucose level more eectively.
ALARM.
You can set up to four dierent alarms. Each alarm rings for 10 seconds.
User ID set on the meter.

GlucoDr autoTM Test Strip
- Hold this part to insert or remove test strip.
Grip
- Make sure the conrmation window lls completely.
Conrmation window (Reaction chamber)
- Insert into test port.
Gold electrodes
- Apply blood sample here; blood is absorbed automatically.
Yellow Side-edge

The GlucoDr auto Meter can manage 5 users’ test results separately.
Select the correct User ID before testing if the meter is used for more than one user.
Make sure to conrm the User ID to insure that the test results are stored to the User ID.
If a single user wishes to use GlucoDr auto Meter only for him/herself, there is no need to
set up the User ID.
Setting the User ID
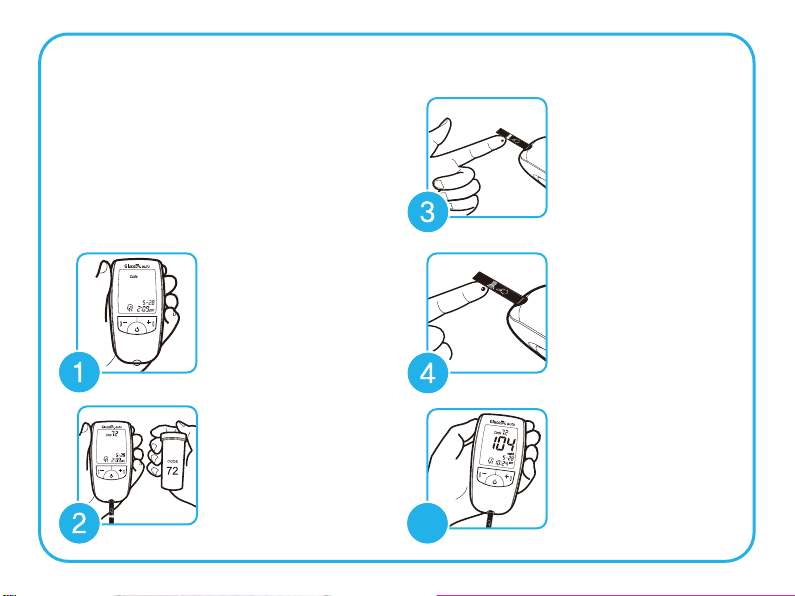
Press the power button to turn on the meter.
The STRIP ICON will blink.
Turn on the Meter
Check the User ID number on your meter.
If the User ID number is correct, start the test.
Check the User ID number.

When the STRIP ICON ashes, press and hold the power button for one second.
The meter will enter the USER ID NUMBER MODE. When the User ID number
ashes, release the power button.
Enter the USER ID NUMBER MODE.
Press +/- button to select User ID number.
If “+” button is pressed, the User ID number will go up, and if "-" button is
pressed, the User ID number will go down.
Select the User ID number.
Once User ID is selected, press the power button once.
Save the User ID.

Code numbers are used to calibrate your meter with the test strips for accurate test
results. Whenever you test, you must check if the code number displayed on the meter
matches the one on the test strip vial.
Checking the Code Number
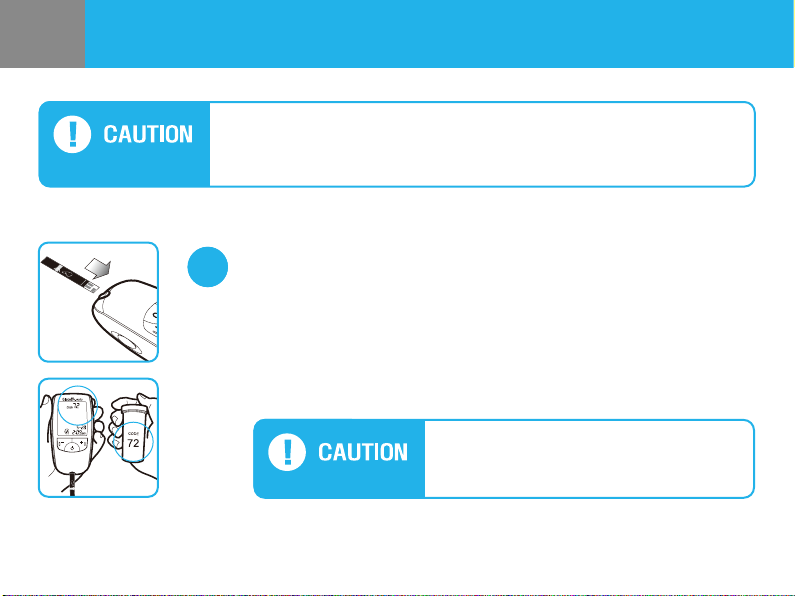
Insert a GlucoDr auto Test Strip into the test port and the GlucoDr auto Meter
will turn on automatically. Then the code number, STRIP ICON and BLOOD
DROP ICON will appear.
Insert a GlucoDr auto Test Strip
Make sure that the code number displayed on the meter matches the one on
the test strip vial. If the code numbers match, you can begin the test.
Check the Code Number
- If the code number on the meter doesn't match the one on the test strip vial,
insert a new test strip and check the code number again.
- If they do not match again, please contact your local distributor.

Control solution test is to check the performance of your meter and test strips.
GlucoDr auto Control Solution contains a measured amount of glucose that reacts with
the GlucoDr auto Test Strips.
The control solution test conrms that your meter and test strips are working correctly.
Compare your control solution test results with the range printed on the test strip vial
label. It is very important that you do this simple test routinely to make sure you get
accurate test results.
Checking Your System with GlucoDr autoTM Control Solution
9
Check your system with the GlucoDr auto Control Solution under the following
situations.
- When you want to check the performance of the meter and test strip.
- When you leave your test strip vial cap open for a long time.
- When you open a new vial of test strips.
- When you think that the test results are not accurate.
- When you drop the meter.
- When you suspect your meter or test strips are not working properly.
- When your blood glucose test results are not consistent.
- Use only the GlucoDr auto Control Solution for the test.
- Check the expiration date printed on the control solution vial.
Do not use if the expiration date is past. Discard the control solution on the
expiration date printed on the vial or three months after rst opening whichever
comes rst. When you rst open a new vial of the control solution, count three
months forward and write the expected discarding date on the label of the
control solution vial for your convenience.
- The control solution, meter, and test strips should be kept at a room temperature
prior to the use.
- Do not drink the control solution.
- Tightly close the cap of control solution vial and store at a room temperature
after the test.
Do not force the test strip into your meter.
This may cause malfunction.
Insert a test strip, with the printed side facing up, into the test port of the
meter. Gently push it all the way in until it goes no further.
The meter will turn on automatically and beep. Then the code number and the
BLOOD DROP ICON will appear. Make sure that the code number displayed on
the meter matches the one on the test strip vial. If the code numbers match,
you can start the test. If the code number on the meter doesn't match the one
on the test strip vial, insert a new test strip and check the code number again.
Insert a Test Strip
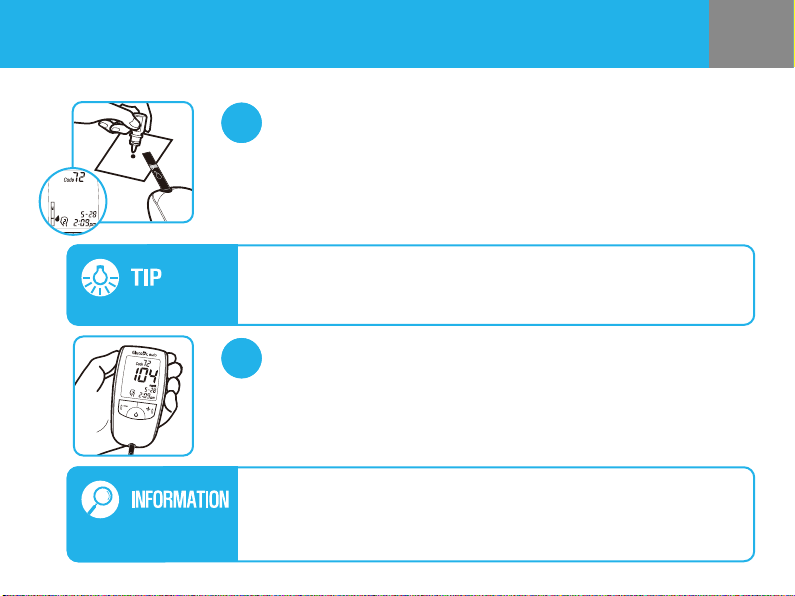
Shake the control solution vial well. Prepare a drop of the control solution
on a clean plate. Slowly let the side edge of the yellow window of the test
strip touch the drop of the control solution following the nger symbol.
Once the conrmation window lls completely, your meter will begin the
countdown.
Apply Control Solution
Your meter will display countdown from“5” to “1”, then the test result will
appear.
Test Result Appears in 5 seconds
To ensure accurate test results
- Gently shake the control solution (vial) to ensure the control solution is
mixed well before each test.
- Squeeze the vial to discard the rst drop before the test.
Do not remove the test strip from your meter before you select the
CONTROL SOLUTION ICON in the EVENT RECORD MODE. If you remove the
test strip before making the selection, you cannot save the test result
marked as the control solution test. See page 22-23 for more details.

Compare the control solution test result to the control solution range printed
on the test strip vial. The test result should fall within this range. Each vial of
test strips may have a dierent control solution range. If the test result you
get is not within this range, the meter and test strips may not be working
properly. Repeat the control solution test. Refer to the GlucoDr auto Test
Strip Instruction for the use.
Compare Control Solution Test Results
The Control Solution range printed on the test strip vial is for the GlucoDr auto
Control Solution only. It is used to check the performance of your meter and test
strips. It is NOT a recommended range for your blood glucose level.
Out-of-range test results may be caused by one or more of the followings:
- Expired or contaminated control solution,
- Expired or damaged test strip,
- Use of control solution or test strip past its discarding date,
- Error in performing the test,
- Failure to shake the control solution vial well,
- Code number printed on the test strip vial does not match the one displayed on
the meter,
- Meter, test strips or control solution are kept too warm or too cold,
- or Meter malfunction
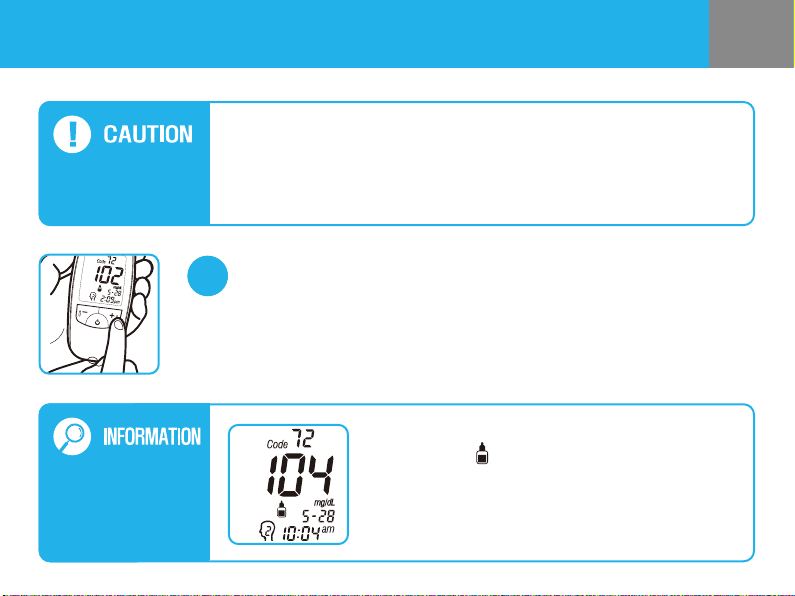
Record all the control solution test results with CONTROL
SOLUTION ICON‘ ’ to distinguish them from those of
actual blood glucose tests in the meter memory. Recorded
control solution test results will not be calculated in your
result averages.
To record the control solution test results, press any of +/- button of the meter
to select CONTROL SOLUTION ICON. Press and release the power button if
selection is completed. The control solution test results will be saved.
Record the Control Solution Test Results in the Meter
If your control solution test results continue to fall outside the range printed on
the test strip vial, the GlucoDr auto Blood Glucose Monitoring System may not
be working properly.
- If this is the case, do not use the system to test your blood glucose levels.
- Contact your local distributor.
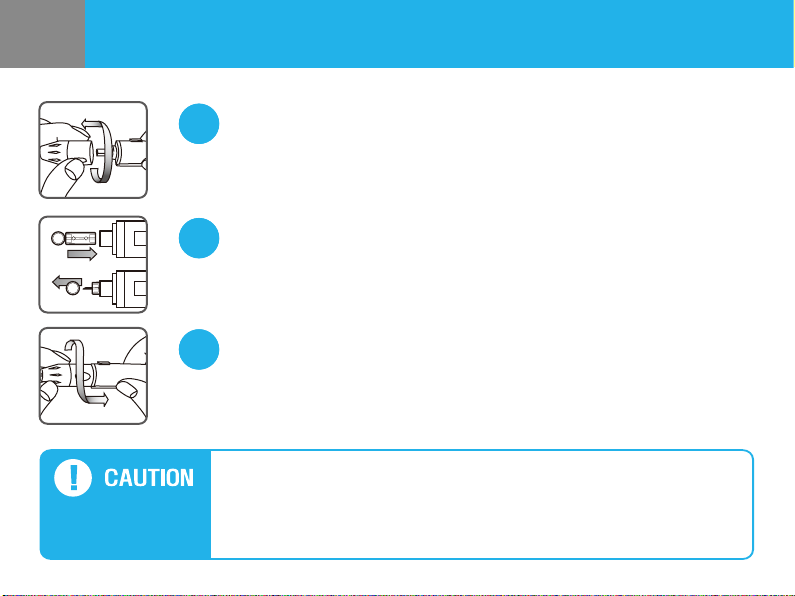
Turn the cap of the lancing device counter-clockwise to remove the cap.
Remove the cap
Insert the lancet rmly into the holder until it comes to a full stop. When the
lancet is placed in the lancing device, twist othe protective disk of the lancet.
Do not discard the protective disk of the lancet; it will be used to dispose the
lancet safely after its use.
Insert a Lancet into the Lancet Holder.
Turn the cap of lancing device clockwise until it ts.
Replace the cap
- Before using the lancing device, wash your hands in warm water with soap.
Make sure to rinse and dry them thoroughly. Perspiration, dirt or water
remaining on your hands may cause incorrect test results.
- Avoid using hand lotion or any other oily products before using the lancing
device.
Preparing the Lancing Device
Table of contents
Other Medicus Blood Glucose Meter manuals


