VivaChek VGM200 User manual

1205091101
Celine
VivaChek GLU & KET User's manual Cover(En)
160x110mm
1205091101
2019-08

i
Blood Glucose and β-Ketone Monitoring System
Dear VivaChek™ System User,
Thank you for choosing the VivaChek™ Blood Glucose and β-Ketone Monitoring
System! VivaChek™ Blood Glucose and β-Ketone Monitoring System is designed
for easy test of blood glucose/β-ketone and helps you keep them under control.
Read this User’s Manual carefully before you use your system. Please keep your
User’s Manual in a safe place, you may want to refer it in the future.
Thank you again for choosing the VivaChek™ System.
Intended Use and Principle
VivaChek™ Blood Glucose and β-Ketone Monitoring System is comprised of the
VivaChek™ Blood Glucose and β-Ketone Meter (VGM200), the VivaChek™ Blood
Glucose Test Strips (VGS01) and the VivaChek™ Blood β-Ketone Test Strips
(VKS01). Glucose measurement is based on electrochemical biosensor
technology using the enzyme Glucose Dehydrogenase to catalyze the formation of
gluconolactone from the oxidation of glucose whereby two electrons are produced.
The electrical current resulting from this enzymatic reaction is proportional to the
concentration of glucose in the sample and is measured by the meter. The meter is
calibrated to display the equivalent of plasma glucose values. Using the same
technology, β-ketone is converted by β-hydroxybutyrate dehydrogenase and the
magnitude of electrical current resulting from this enzymatic reaction is
proportional to the amount of β-hydroxybutyrate present in the sample.
The System is intended to quantitatively measure the glucose and β-ketone
concentration in fresh capillary whole blood samples drawn from the fingertips. It is
intended for self-testing outside the body (in vitro diagnostic use) by people with
diabetes at home as an aid to monitor the effectiveness of diabetes control. It is not
intended for neonatal use or for the diagnosis of or screening for diabetes. This
system is intended to be used by a single person and should not be shared.
The System is not intended for use in healthcare or assisted-use settings such as
hospitals, physician offices, or long-term care facilities because it has not been
cleared by FDA for use in these settings. Use of this system on multiple patients
may lead to transmission of Human Immunodeficiency Virus (HIV), Hepatitis C
Virus (HCV), Hepatitis B Virus (HBV), or other bloodborne pathogens.

ii
TABLE OF CONTENTS
1. Understanding Your Testing Tools…………………………………......
1
Your Meter System Overview…………………………………………......
1
Your Meter Display……………………………………………………...….
2
Important Safety Information………………………………………………
4
Limitations…………………………………………………………………...
5
2. Setting Up Your System…………………………………………...……..
6
Set the Time and Date…………………………………………………......
6
Set the Audio Feature………….……………………………….....……….
8
Set the Test Alarm……………………………………………....…………..
8
Set the Meal Marker..............................................................................
9
Set the Hypoglycemia (Hypo) Alarm.....................................................
9
Set the Ketone Warning…………………………………………....………
10
Pairing Your Meter with the Smart Phone……………………..…………
10
Using Your Meter without the App……………………………..………….
11
3. Taking a Test…………………………………………………………….....
12
Preparing the Test Strip…………………………………………………....
12
Getting a Blood Drop and Testing…………………………………………
12
Discard the Used Test Strip…..…………………………………………...
14
Expected Blood Glucose/β-Ketone Control Goal..................................
14
Taking a GKI Testing.............................................................................
16
Questionable or Inconsistent Results....................................................
18
Testing with Control Solution…………………………….……………......
18
Using the Meter Memory…………………………………………………..
21
4. Maintenance and Troubleshooting……………………………….........
23
Replace the Battery………………..……………………………………….
23
Caring for Your Monitoring System……………...............……………….
24
Cleaning and Disinfection………………………………………………….
24
Troubleshooting Guide……………………………………………………..
26
Symptoms of High/Low Blood Glucose and Ketoacidosis……………...
27
5. Technical Information…………………………………………………….
28
System Specifications……………………………………………………...
28
Warranty……………………………………………………………………..
31

1
CHARPTER 1: UNDERSTANDING YOUR TESTING TOOLS
Your Meter System Overview
The VivaChek™ Blood Glucose and β-Ketone Meter and Test Strips
2
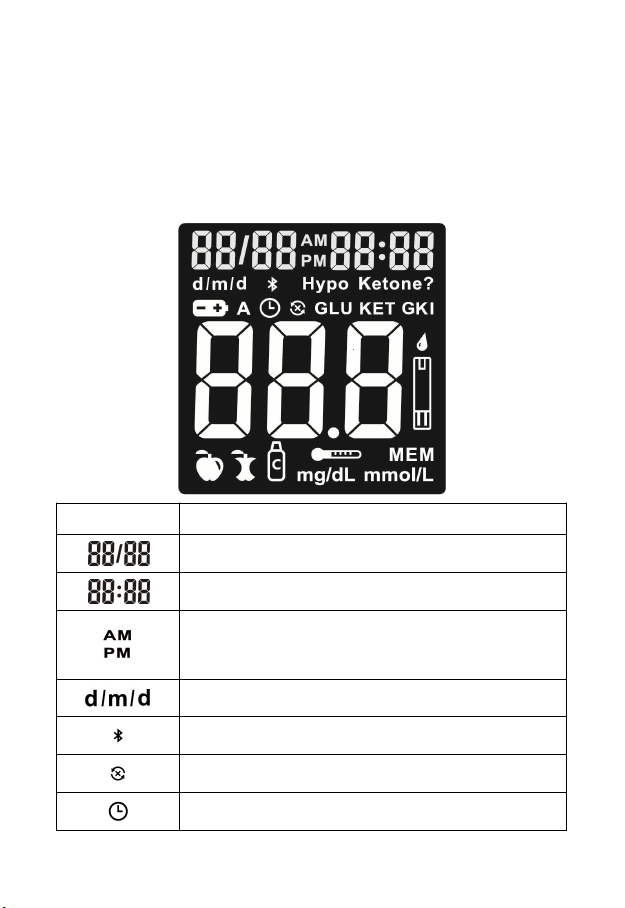
Your Meter Display
The picture below shows all the symbols that appear on your meter display.
Please make sure the display is working properly before testing. When the meter is
off, press and hold power button to see the complete display. All display segments
will appear. If you need more time to check the display, repeat the above operation.
All of the segments should be clear and exactly like the picture below. If not,
contact VivaChek Customer Support at 888-969-6928 (7 days a week. 9 a.m.-5
p.m. Eastern Time) for help. Please contact your healthcare professional if you
need help outside of these hours.
Icon
What it Means
The top left area on the screen indicates the date.
The top right area on the screen indicates the time.
The top middle area on the screen indicates morning or
afternoon time.
Indicates the display form of date and month have been set.
Indicates success Bluetooth communication.
Indicates failure Bluetooth communication.
Indicates the alarms have been set.
Table of contents
Other VivaChek Blood Glucose Meter manuals


