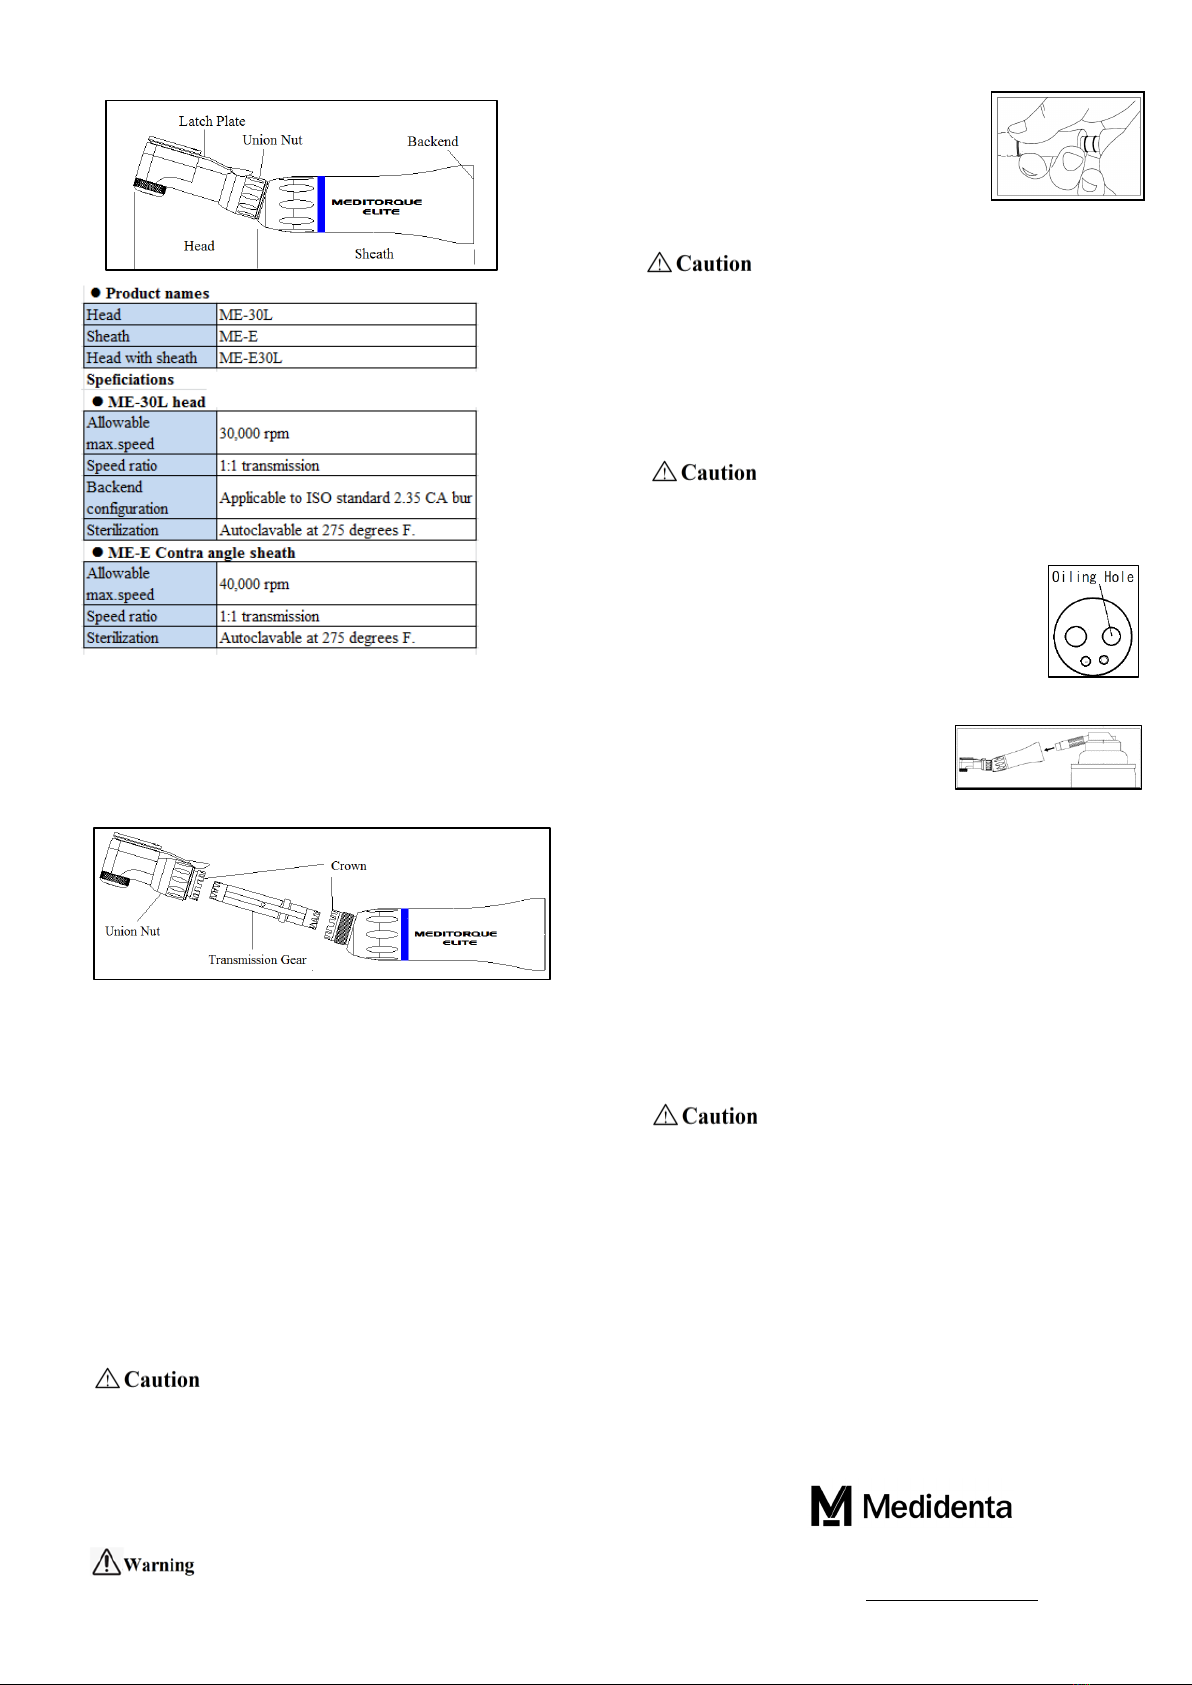
3. ME-E30L E-type Contra angle
3-1. Description of parts and specifications
The head is replaceable. The following heads are available:
ME-20ML…..Miniature latch head, 20k rpm
ME-40L……..Latch head, 40k rpm
E-40LP……...Latch head, pushbutton type, 40K rpm
ME-40FGP… FG head, pushbutton type, 40K rpm
3-2. Removal/installation of head from/into sheath
Removal:
Swing the latch plate out.
Remove the head from sheath, turning the union nut
counterclockwise.
Pull the transmission gear out from the head.
Installation:
Insert the transmission gear into the head. Engage the crown of
the head with that of contra angle sheath, then turn the union
nut.
3-3. Installation/removal of bur onto/from head
Install the head into the sheath. Install it onto the air-motor.
Swing the latch plate out.
Insert a bur into chuck hole all the way until the end of bur
shank touches the back of the chuck. Swing the latch plate back
until it is locked with a snap at center position of the collar of
the contra angle head.
Remove the bur by following these steps in reverse order.
Make sure that the bur is securely installed onto the head onto
Make a trial run before use.
The replacement of the but must be executed after the contra
angle us installed onto the air-motor.
The ISO standard 2.35 CA bur must be used. Do not
use a worn-out bur, as excess pressure will be applied to the
chuck assembly.
When the air-motor and attachments are used, take the
patients’ safety primarily into consideration.
4. Installation/removal of nosecone and contra angle (attachment)
onto/from air-motor.
Installation:
Insert the sleeve of the air-motor into the
backend of the attachment all the way until
it is securely locked with a snap.
Removal:
Hold the air-motor with one hand and the
attachment with the other hand.
Pull the attachment out from the air-motor.
Do not separate the overlapped hands
until the Lock is released.
5. Lubrication
Medidenta recommends I-Spray for lubrication. The air-motor, nose
cone and contra angle handpiece must be lubricated after each use and
each autoclaving.
Neglecting to lubricate or lack of lubricating oil may cause
premature failure. This would be considered a misuse and will void
the warranty.
5-1. Air-motor
Remove the straight nose cone or the contra angle
handpiece from the air-motor.
Inject the handpiece spray for a few seconds into
the oiling hole (drive-air pipe) as indicated to the
right.
5-2. Nose cone and contra angle (attachment)
Inject the handpiece spray for a few
seconds into the backend of the nose
cone or contra angle as indicated
below:
Use the spray nozzle provided with your purchase of
After lubrication make a trial run.
6. Sterilization
Medidenta recommends autoclave sterilization only. For the first
use, the air-motor, nose cone and contra angle must be sterilized.
Before sterilization, clean the surface of the air-motor, nose cone and
contra angle with a damp cloth. Lubricate them. As for the contra
angle, remove the head from the sheath.
Put them individually into a sterilization pouch.
Autoclave them at 275 degrees F. for 20 minutes.
Allow a minimum of 20 minutes for the drying cycle.
Do not use dry heat sterilization or cold sterilization.
Do not use chemicals to clean the handpiece.
Do not immerse the air-motor in ultrasonic bath or boiling
wa ter.
7. Warranty
Manufacturer warranties the motor for 12 months, the contra angle for 3
months and the nose cone for 10 months. Warranty is subject to
observance of the maintenance instructions, cautions, and normal use.
Note:
Medidenta and the manufacturer reserve the right to analyze and
determine the cause of any failure. Warranty is void, if breakage,
accident, or any other issues are caused by the neglect of
maintenance, cautions, warnings or unauthorized repairs.
Manufacturing for:
3575 W. Post Road, Las Vegas, NV 89118
U.S.A.
E-mail: orders@medidenta.com
Toll free #1-800-221-0750


