Medion Pocket PC User manual

Safety and Maintenance 1
Content
Safety and Maintenance ................................................. 2
Safety Instructions ..................................................... 2
Data Security .......................................................... 3
Operating Environment ............................................. 4
Battery Operation .................................................... 6
Maintenance .............................................................. 6
Notes on these Operating Instructions........................... 8
Getting Started ............................................................. 9
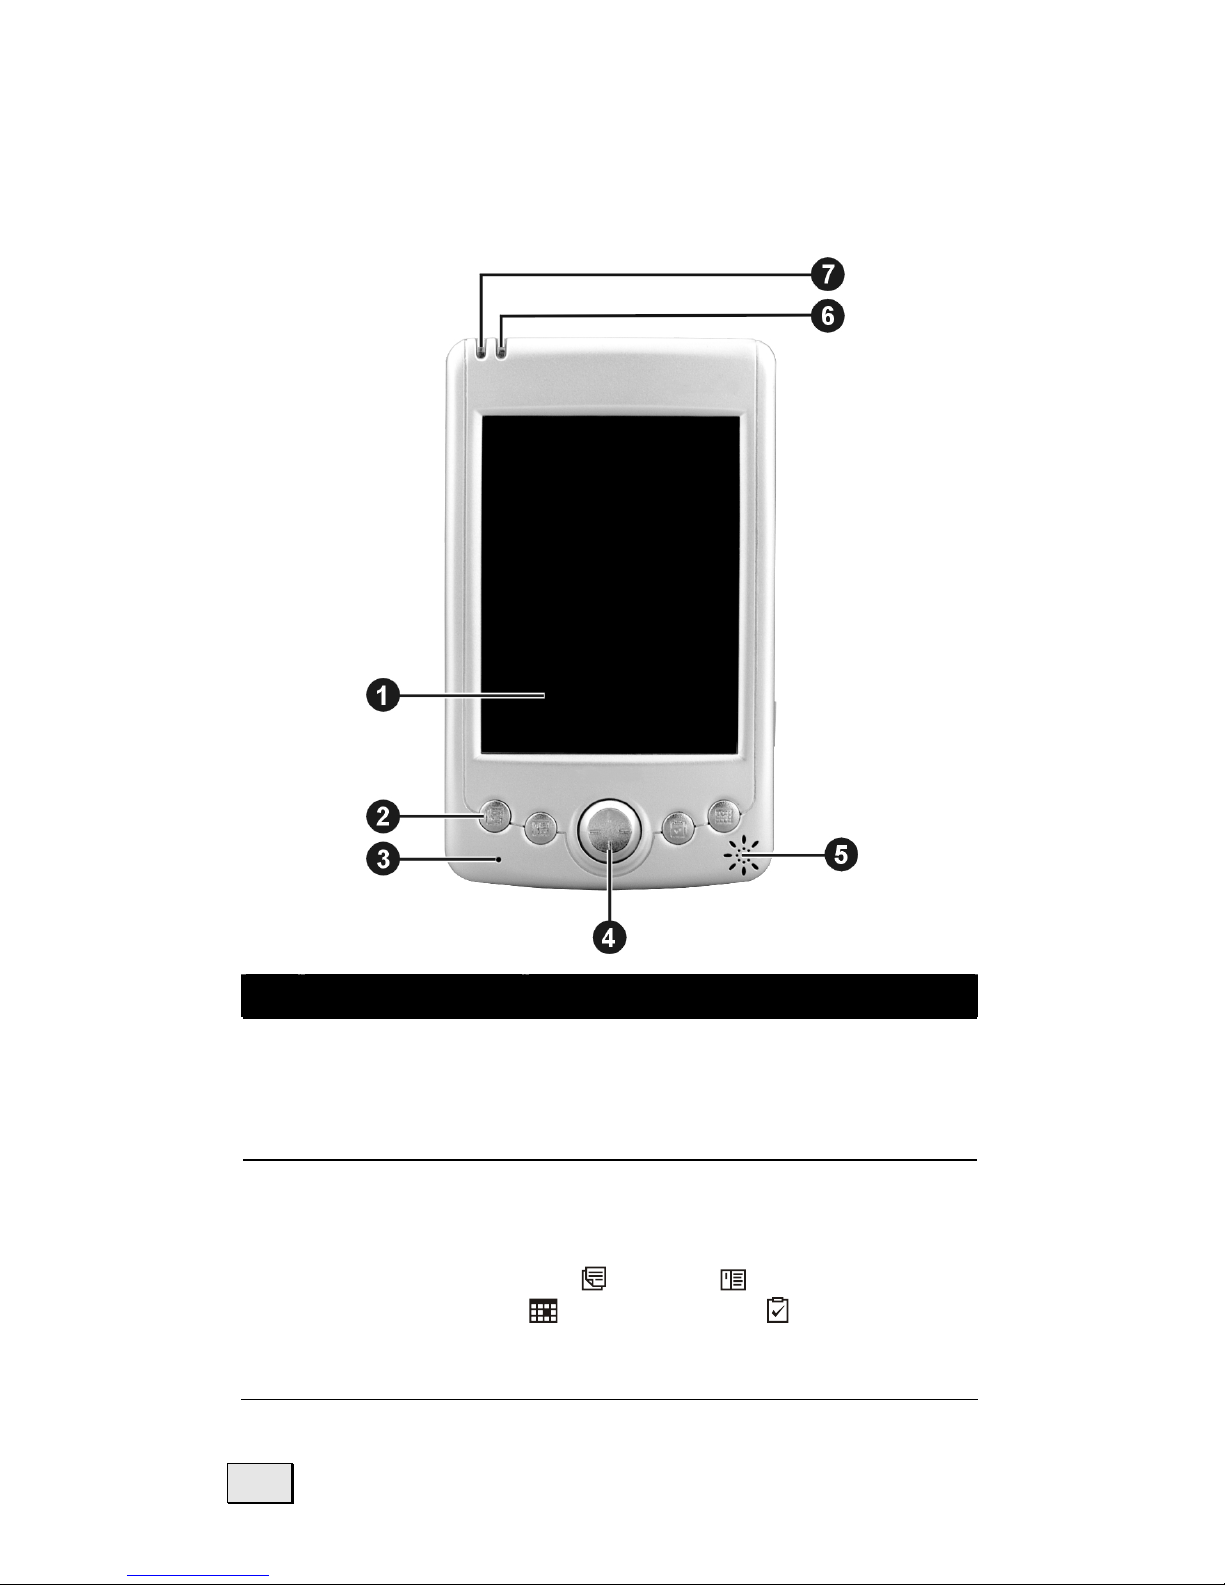
Components............................................................. 10
USB Cradle............................................................ 15
Initial Set-up of the Pocket PC.................................... 16
Step 1: Switching on the power ............................... 16
Step 2: Charging the Pocket PC Battery .................... 18
Step 3: Installing the Software ................................ 19
Step 4: Using the Pocket PC .................................... 23
Working with Memory Cards ...................................... 25
Navigation with optional Memory Card ........................... 27
Navigating with the Pocket PC....................................... 29
Safety Instructions for Navigation............................... 29
Tips for Navigation ................................................. 29
Instructions for Car Installation................................... 29
Instructions for GPS-Receiver .................................. 30
Contents of the Navigation CDs .................................. 30
Software Installation ................................................. 30
Preparing for Navigation ............................................ 31
Mounting the Navigation Set in a Car .......................... 32
Installation of the Holder of the Pocket PC................. 32
Installation of the GPS-Receiver............................... 33
First Initialization of the GPS-Receiver ...................... 34
Connecting Pocket PC and GPS-Receiver .................. 35
Starting Navigation ................................................ 36
Customer Service ........................................................ 37
First-Aid in the Event of Malfunction............................ 37
Additional Support .................................................... 40
Warranty ................................................................. 41
Liability limitations ................................................. 42
Copying this manual............................................... 42

English
2
S
SA
AF
FE
ET
TY
Y
A
AN
ND
D
M
MA
AI
IN
NT
TE
EN
NA
AN
NC
CE
E
SAFETY INSTRUCTIONS
Please read this section carefully and follow all the
instructions given. This will help ensure reliable opera-
tion and extend the service life for your Pocket PC.
Store the packaging and the operating instructions in
a safe place so that if you sell the Pocket PC you can
pass these on to the new owner.
Never allow children to play with electrical
equipment unsupervised. Children may not al-
ways correctly recognize possible danger.
Never open up the housing of the Pocket PC
or the power adapter. These contain no user-
serviceable parts. If the housing is opened there
is a danger to life from electric shock.
Do not place any objects on the Pocket PC and
do not exert any pressure on the display. Other-
wise there is a danger that the screen will break.
To avoid damage, do not touch the screen with
sharp objects. Use only the stylus provided.
There is a risk of injury if the display breaks.
If this should occur, use protective gloves to
pack the broken parts and contact customer
support to arrange for disposal. Then wash your
hands with soap, since there is a possibility that
chemicals may have escaped.

Safety and Maintenance 3
Remove the power adapter from the outlet, switch the
Pocket PC off immediately, or do not actually switch
it on, and contact Customer Service...
... if the power adapter or the attached plug
become scorched or damaged.
... if the housing of the Pocket PC, the Power
Pack or the charging/synchronizing cradle be-
comes damaged or fluids leak into it. Compo-
nents must be checked by Customer Service in
order to avoid damage!
DATA SECURITY
Every time you update your data make backup
copies on an external storage medium. The
supplier does not assume liability for data loss
or damage to data storage units, and no claims
can be accepted for damages resulting from
the loss of data or for consequential damages.
UPGRADING/RETROFITTING AND REPAIR
Upgrading or retrofitting of your Pocket PC must
only be performed by qualified technical staff.
If you do not have the necessary qualifications,
ensure that this is done by a suitably qualified
Service Engineer. Please contact our Service
Center if you encounter technical problems with
your Pocket PC.
In the event repair becomes necessary, please
use only our authorized Service Partners.

English
4
OPERATING ENVIRONMENT
Keep your Pocket PC and all connected devices
away from moisture and avoid dust, heat and
direct sunlight. Failure to follow these instruc-
tions may lead to damage to your Pocket PC.
The Pocket PC and its packaging are recyclable.
AMBIENT TEMPERATURE
The Pocket PC is most reliably operated at an
ambient temperature of between 41°F and 95°F
(5°C and 35°C) and at a relative humidity of be-
tween 20% and 80% (non-condensing).
In the powered down state (power supply: OFF,
see page 16) the Pocket PC can be stored at
between 32°F and 140°F (0°C and 60°C).
The GPS receiver is designed for the envi-
ronmental conditions inside a car. However,
store the Pocket PC in a safe location when you
leave your car to avoid high temperatures.
ELECTROMAGNETIC COMPATIBILITY
When connecting additional or other compo-
nents the “Electromagnetic Compatibility Direc-
tive” (EMC) must be adhered to. Please also
note that only screened cable (maximum 10ft)
should be used with this Pocket PC.
For optimal performance, maintain a distance
of at least 10 ft. from sources of high-
frequency and magnetic interference (televi-
sions, loudspeaker systems, mobile telephones
and so on. This will help avoid malfunctions
and loss of data.

Safety and Maintenance 5
CONNECTION
When connecting your Pocket PC be sure to correctly
observe the following instructions:
POWER SUPPLY
The outlet must be in the vicinity of the Pocket
PC and must be easily accessible.
Only use the mains adapter on grounded sockets
at 100 – 240 V~ AC, 50/60 Hz. If you are unsure
about the power supply to the place of use, ask
the relevant energy supplier.
Use only the power adapter provided with
the reference PSC 05R-050.
For additional safety, we recommend the use of a
surge protector in order to protect your Pocket
PC from damage from spikes or lighting strikes
on the power network.
POWER THROUGH CAR ADAPTER
The car adapter should only be connected to
the lighter socket of a car (car battery = DC
12V , no trucks!). If you are in any doubt
about the power source in your car, contact
your car manufacturer.
CABLING
Arrange cables so that no-one can tread on them
or trip over them.
Do not place any items on the cable.

English
6
BATTERY OPERATION
Your Pocket PC is operated with a removable battery. In
order to prolong the life and efficiency of your battery and
to ensure safe operation, follow the instructions below:
Batteries cannot withstand heat. Avoid the
Pocket PC and the integrated battery becoming
overheated. Failure to comply with this instruc-
tion may lead to damage to and even explosion
of the battery.
Use only the original power pack to charge the
battery (model PSC 05R-050).
Batteries are special category waste. When dis-
posing of the Pocket PC ensure that this is
done correctly. Contact Customer Service for
more details.
MAINTENANCE
ÂWarning: There are no user-serviceable or
cleanable parts inside the Pocket PC housing.
You can prolong the life of the Pocket PC by taking the
following simple steps:
Always remove the power plug and all connecting
cables before cleaning.
Clean the Pocket PC only with a damp, lint-free cloth.
Do not use solvents, caustic or gaseous cleaners.
CARE OF THE DISPLAY
Avoid scratching the display surface as this is ea-
sily damaged.
Ensure that no traces of water remain on the
screen. Water can cause irreversible discoloration.
Use only a soft, lint-free cloth to clean the screen.
Do not expose the screen to either strong sun-
light or ultraviolet radiation.

Safety and Maintenance 7
TRANSPORT
If you wish to transport the Pocket PC follow the in-
structions below:
Following transport of the Pocket PC wait until
the unit has acclimatized before using it.
In the case of wide fluctuations in temperature or
humidity condensation or moisture may form in-
side the Pocket PC and this can cause an electri-
cal short-circuit.
Use a protective cover (such as a display protec-
tion mylar)to protect the Pocket PC from dirt,
moisture, shock and scratching.
When shipping your Pocket PC use only the origi-
nal packaging and advise the carrier accordingly.
Before traveling ensure that you are aware of the
power and communications provision at your
destination. Before traveling obtain any power or
communications adapters (modem, LAN, etc.)
that may be needed.
When passing through the hand luggage control
at airports, it is recommended that you pass the
Pocket PC and all magnetic storage media (ex-
ternal hard drives) through the X-ray system
(the machine on which you place your bags).
Avoid the magnetic detector (the structure
through which you yourself pass) or the mag-
netic wand (the hand device that the security
staff use), since this may corrupt your data.

English
8
NOTES ON THESE OPERATING INSTRUCTIONS
When using the application programs and the operat-
ing system you can use the extensive help functions
that are available at the touch of a button. These help
functions are made available when you use the Micro-
soft Windows®operating system or the respective ap-
plication program
AUDIENCE
These operating instructions are aimed at first-time and
experienced users alike. The bundled product CD con-
tains a comprehensive instruction manual.
QUALITY
In selecting the components we have aimed for a high
level of functionality, simple handling, safety and reli-
ability. A well-balanced hardware and software design
allows us to offer you a technologically advanced
Pocket PC that will give great satisfaction in both work
and leisure use.
SERVICE
Our individual customer care is there to support you
when you have questions or problems. Please get in
touch – we look forward to helping you. This manual
contains a special section on Customer Service start-
ing on page 37.
Thank you for your confidence in our products. We are
pleased to welcome you as a new customer.

Getting Started 9
G
GE
ET
TT
TI
IN
NG
G
S
ST
TA
AR
RT
TE
ED
D
This chapter introduces you to the external compo-
nents of your Pocket PC and guides you through the
process of setting up your Pocket PC for use.
The illustrations on the following pages introduce you
to the various buttons, connectors, ports and features
of your Pocket PC.

English
10
FRONT COMPONENTS
Ref
Component Description
nTouch Screen Displays the output of your Po-
cket PC. Tap the screen with the
stylus to select menu commands
or enter information.
oProgram
Buttons
Each of the four buttons pro-
vides a quick way to run a spe-
cific program. By default, they
are Notes, Contacts,
Calendar and Tasks
buttons. The buttons are cus-
tomizable.

Getting Started 11
Ref
Component Description
pMicrophone Receives sound and voice to
record voice.
Moves up, down, left or right by
pushing the corresponding area
of the pad.
qNavigation
Pad
Selects by pressing.
rSpeaker Sends out music, sounds and
voice.
sNotification
Indicator
Flashes in red to inform you of
scheduled appointments, alarms
and reminders.
tCharge
Indicator
Glows in amber to indicate that
battery charging is in progress
and in green when the battery is
fully charged.

English
12
BACK COMPONENTS
Ref
Component Description
nBattery Supplies power to your Pocket
PC when external power is not
available.
If you remove the battery the
fully loaded back-up battery
can keep the data for app.
10 minutes. Keep the Pocket PC
connected to the USB cradle for
app. 24 hours when you per-
form the initial Set-up in order
to load the back-up battery.
oReset Button Restarts your Pocket PC.
(Soft-Reset)

Getting Started 13
SIDE COMPONENTS
Ref
Component Description
nLanyard Eyelet Lanyard attaches to this opening.
oTurns your Pocket PC on or off
Power Button
Turns the screen backlight off
pRecord Button Records voice notes by pressing
and holding.
qHeadphone
Connector
Connects to a pair of stereo
headphones (2,5 mm/0,98”).
rBattery Lock Locks the battery door.
ÂCAUTION: Always keep the battery
lock in the lock ( ) position unless you
are removing the battery.
Left Ri
g
ht
r

English
14
TOP COMPONENTS
Ref
Component Description
nIR Port Beams files to other mobile de-
vices.
oSD/MMC
Slot
Accepts an optional SD (Secure
Digital) or MMC (MultiMediaCard)
card for removable storage.
pStylus Tap on the touch screen to make
selections and enter information.
Pull the stylus out of its slot to
use and store it in the slot when
not in use.
BOTTOM COMPONENTS
Ref
Component Description
nActiveSync®/
GPS-Connector
Connects to your desktop
compute for synchronizing
data or to GPS-System.
oPower
Connector
Connects to the AC adapter if
you are not using the cradle.

Getting Started 15
USB CRADLE
The USB cradle provides a convenient way to charge
your Pocket PC and synchronize data with a computer.
Cradle assembly:
Ref
Component Description
nPPC Connector Connects to your Pocket PC.
oBattery Charge
Indicator
Glows when the additional
battery is being charged
and turns off when the bat-
tery is fully charged.
pBattery
Connector
Accepts an additional bat-
tery (available as an acces-
sory) for charging.
qUSB Connector Connects to the USB port of
a desktop computer for
data synchronization.
rPower Connector
Connects to the AC adapter.
Cradle Front Cradle Back

English
16
INITIAL SET-UP OF THE POCKET PC
The following guides you step by step through the ini-
tial set up of the Pocket PC:
STEP 1: SWITCHING ON THE POWER
1. Slide the battery lock to the unlock ( ) position
(n) and then open the battery door (o).
2. Insert the projected parts of the battery into the
battery compartment (p) and then fit the battery
into place (q).
3. The backup battery switch
should be set to the ON (right)
position for normal operation.
Pull out the stylus and use it
to slide the battery switch to
the ON (right) position.

Getting Started 17
ÂCAUTION: Always leave the backup
battery switch in the ON position unless
you need to perform a hard reset. A
hard reset will cause the memory of
your Pocket PC to be cleared.
4. Replace the battery door and slide the battery lock
to the lock ( ) position.
5. The red notification indicator on your Pocket PC
will flash for approximately 30 seconds. Then your
Pocket PC will automatically turn on. The brand
logo appears and after 30 seconds the Pocket PC
displays the Windows®welcome screen.
6. To begin the “Welcome” Wizard, tap the screen
with the stylus and follow the onscreen instruc-
tions to complete the wizard. The wizard presents
a brief orientation to Microsoft® Windows® for
Pocket PC, helps you align the touch screen and
prompts you to select your city and time zone.
ÂSettings that you now make can be al-
tered later.

English
18
STEP 2: CHARGING THE POCKET PC BATTERY
1. Slide the Pocket PC carefully into the charg-
ing/synchronization cradle (n).
2. Connect the power adapter cable to the socket
of the charging/synchronization cradle (o).
3. Plug the power adapter supplied into an easily
accessible AC power outlet (p).
The charging indicator lights up orange while
charging and lights up green when the Pocket PC
is fully charged. Do not interrupt the charging
process before the battery has fully charged. This
may take a number of hours.
Note: You can use the Pocket PC while it is charg-
ing, but the power supply should not be discon-
nected during initial set up.
Note: You can also connect the power adapter
directly to the power adapter port of the Pocket PC
(see page 14).
Charging indicator

Getting Started 19
Once the charging display goes out, wait another 5
seconds before removing the power adapter. This time
is needed for calibration of the battery.
The power adapter can be left connected so the
Pocket PC is constantly being recharged while it is
in the charging/synchronization cradle. However,
the power adapter consumes power even when it
is not charging the battery of the Pocket PC.
STEP 3: INSTALLING THE SOFTWARE
Warning: Do not connect the Pocket PC to your
PC yet. Follow the step-by-step instructions in or-
der to perform the installation as safely and as
simply as possible.
Warning: When software is installed, important
files may be overwritten and changed. Create a
suitable backup of your hard drive so you can ac-
cess the original files in the event of problems.
Windows 2000/XP: You need to have adminis-
trative permissions on your Computer in order to
install software. Please log on as administrator.
1. Insert the CD supplied and wait for the program
to start automatically.
Note: If the program does not start automatically,
the Setup program on the CD must be started.
2. The following window appears with a short in-
troduction. Wait for a few seconds or click the
triangle to skip the intro.

English
20
4. Click the Start here button and follow the in-
structions on the screen in order to install the
necessary software.
INSTALLING MICROSOFT®OUTLOOK
For optimum management of your data (e-mails, con-
tacts, dates, etc.) using the Pocket PC, you need the
Microsoft®Outlook program.
The cost of the Pocket PC includes a license for this
program which can be found on the CD. If you already
have Microsoft®2002 installed on your PC, continue
with the next step for installation of Microsoft®Ac-
tiveSync®. Likewise, if you have Outlook 98 or Out-
look 2000, perform this installation:
3. Click Install Outlook 2002 .
On the right of the window a product description
appears with further installation instructions.
5. Now click Install.
6. A dialog box appears that informs you that a
program now has to be installed. Click OK.
Table of contents
Other Medion Handheld manuals