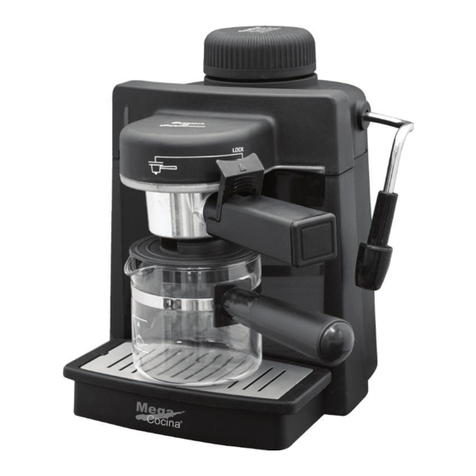
Mega Cocina K-CUP MCHKEKCB User manual

SAVE THESE INSTRUCTIONS
GUARDE ESTAS INSTRUCCIONES
INSTRUCTION MANUAL
MANUAL DE INSTRUCCIONES
MODELS: # MCHKEKCB – BLACK (NEGRO)
#MCHKEKCR – RED (ROJO)
THIS APPLIANCE IS FOR HOUSEHOLD USE ONLY FOR 120V.
To reduce the risk of electrical shock, this appliance has a polarized plug (one blade is wider than the other). This plug
ts polarized outlets only one way. If the plug does not fully insert into the outlet, reverse the plug. If it still fails to t,
contact a qualied electrician. Do NOT attempt to defeat this safety feature.
ESTE APARATO ES PARA USO DOMÉSTICO UNICAMENTE PARA TOMACORRIENTES DE 120V.
Para reducir el riesgo de choques eléctricos, este electrodoméstico tiene un enchufe polarizado (un lado es más ancho
que el otro). Como una precaución de seguridad, este enchufe puede ser conectado a un receptáculo de electricidad
polarizado de una manera solamente. Si el enchufe no cabe completamente en el receptáculo de electricidad, póngalo
al reverso. Si todavía no cabe, llame a un electricista. No intente revocar esta medida de seguridad.


TABLE OF CONTENTS
IMPORTANT SAFEGUARDS ......................................................... 5
SPECIAL CORD INSTRUCTIONS ................................................. 7
PRODUCT SPECIFICATIONS, FEATURES AND
DESCRIPTION OF COFFEE MAKER .........................................8-9
INTRODUCTION........................................................................... 10
OPERATING INSTRUCTIONS ................................................ 10-11
CARE AND CLEANING...........................................................12-13
STORAGE.....................................................................................13
TROUBLESHOOTING.................................................................. 14
SERVICE/WARRANTY................................................................. 15


5
IMPORTANT SAFEGUARDS
SAVE THESE INSTRUCTIONS
When using electrical appliances, basic safety precautions should
always be followed to reduce the risk of re, electric shock, and/or
injury to persons, including the following:
1. READ ALL INSTRUCTIONS BEFORE USING THE APPLIANCE.
2. Do NOT touch hot surfaces.
3. To protect against electric shock, do NOT immerse power cord,
plugs, or appliance in water or other liquids
4. Unplug from electrical outlet when not in use and before
cleaning. Allow to cool before cleaning the appliance.
5. Do NOT operate any appliance with a damaged cord or plug or
if the appliance malfunctions or has been damaged in any way.
6. The use of accessory attachments not recommended by the
manufacturer may cause hazards or injuries.
7. Do NOT use outdoors or for commercial purposes.
8. Do NOT let the power cord hang over edge of table or countertop
or touch hot surfaces.
9. Do NOT place the appliance on or near a hot gas or electric burner
or in a heated oven.
10. WARNING: Turn the power button to “OFF” position before
disconnecting the power cord from the wall outlet.
11. Do NOT use appliance for anything other than its intended
purpose.
12. Use on a hard, at, level surface only.
13. Always be sure the Lid Assembly is closed and in locked position
before turning the coffee maker on.

6
14. This appliance is not intended for use by children or
persons with reduced physical, sensory, or mental capabilities,
or lack of experience and knowledge, unless they have
been given supervision or instruction concerning use of
the appliance by a person responsible for their safety. Children
should be supervised to ensure that they do not play with
the appliance.
15. This appliance is intended to be used in household and
similar applications only, not for commercial applications.
16. BEFORE FIRST USE, brew water to clean the water tank.
17. If the coffee maker has not been used for a long period of time,
clean the water tank prior to use by brewing water only.
CAUTION: There is a sharp Plastic Piercing Tip that punctures
the K-Cup® on the underneath side of the Lid Assembly. There is
also a Stainless Steel Piercing Tip on the bottom of the K-Cup®
Holder. To avoid risk of injury, do NOT put your ngers on the
underneath side of the Lid Assembly or on the inside bottom of
the K-Cup® holder. Also, any breakage or damage to the Piercing
Tips will void the warranty for this appliance.
WARNING: To reduce the risk of re or electric shock, do NOT
remove any service covers. Repairs should be done by authorized
personnel only. Opening the service cover on the bottom of the
appliance will void the warranty.
THIS APPLIANCE IS FOR HOUSEHOLD USE ONLY.

7
SPECIAL CORD INSTRUCTIONS
1. A SHORT POWER SUPPLY CORD IS PROVIDED TO REDUCE
THE HAZARDS RESULTING FROM BECOMING ENTANGLED
IN OR TRIPPING OVER A LONGER CORD.
2. An extension cord may be purchased and used if care is
exercised in its use.
3. If an extension cord is used, the marked electrical rating of the
extension cord must be the same as that of the appliance. The
extension cord must be arranged so that it will not drape over
the counter top or table top where it can be pulled on by children
or tripped over accidentally.

8
PRODUCT SPECIFICATIONS AND
DESCRIPTION OF COFFEE MAKER
Models: MCHKEKCB - BLACK
MCHKEKCR - RED
Voltage: 120v 60HZ
Power: 800W
Water Tank Capacity: Maximum 360ml/12oz
Size: 4.3” Width × 9.8” Height × 7.5” Depth
110mm Width ×251mm Height × 191mm Depth
Net Weight: 2.2 LB (1.0Kg)
Safety Compliance: UL
FEATURES
A. Locking Mechanism
B. Lid Assembly
C. Coffee Outlet
D. Power (On/Off) Button
E. Drip Tray Cover
F. Drip Tray
G. Water Tank (360ml/12oz capacity)
H. K-Cup® Holder
I. Plastic Piercing Tip (FRAGILE—Handle with Care!)
J. Stainless Steel Piercing Tip
K. Power Cord
*Automatic shut-off after brewing

9
C.
A. B.
K.
D.
G.
H.
J.
I.
F.
E.
E.
F.

10
INTRODUCTION
Thank you for purchasing a quality MegaCocina® Single Cup Coffee
Maker. This appliance can provide you with delicious coffee, espresso,
tea, and hot chocolate quickly and conveniently.
OPERATING INSTRUCTIONS
1. TurntheLockingMechanism
to the unlocked position
and lift up the Lid Assembly
to open.
2. Measure the amount of
water you want to use to brew
your coffee. The water
amount should not exceed
the maximum of 360ml/
12oz and should be no less
than 150ml/5oz. Pour water
into Water Tank. (Take note
that water can affect the
taste of your beverage. For
the best-tasting coffee, tea, or
hot chocolate, we recommend
using bottled or ltered water.
We do NOT recommend
using distilled or reverse
osmosis water).
3. Put a K-Cup® into the K-Cup®
Holder.
Step 1
Steps 2-3

11
4. Close the Lid Assembly and
turn the Locking Mechanism
clockwise to the locked
position.
5. Place a cup or mug on the
Drip Tray Cover. Make sure
that the middle of the cup or
mug is under the Coffee
Outlet. The Drip Tray Cover
may be removed to adjust for
the height of the cup or mug.
(see Pic. 1)
6. Plug the Power Cord into an
electrical outlet and press the
Power Button to turn on the
coffee maker. The indicator
light on the Power Button ashes during the heating process
and continues until brewing is nished.
7. The coffee maker shuts off automatically after brewing is nished.
8. To stop brewing at any time, press Power Button. When resuming
brewing, if the indicator light is ashing rapidly, press the Power
Button off again and wait until the coffee maker cools slightly (up
to 2 minutes) before pressing the Power Button
on again to resume brewing.
9. After brewing, turn the Locking Mechanism
counter clockwise to the unlocked position, and
lift up the Lid Assembly to open. Discard the
used K-Cup®.
Step 4-6
Pic.1
Power
Button

12
CARE AND CLEANING
ALWAYS unplug the coffee maker and let it cool down before cleaning.
1. Use a clean, damp cloth to clean all
outside surfaces of the coffee maker.
Do not use harsh abrasives to clean.
2. Use a clean, damp cloth to clean the
K-Cup® Holder, being very careful
not to come into contact with the sharp
stainless steel Piercing Tip as this can
cause bodily injury.
3. Clean the Coffee Outlet by pulling it off. Rinse it periodically (see
Pic. 2 & 3). Pay attention to the sealing ring around the Coffee
Outlet, and do not forget to clean it, also.
4. Lift the stainless steel Drip Tray Cover
off the Drip Tray. Remove the plastic
Drip Tray from the coffee maker by
pulling it until it comes loose. Wash
both the Drip Tray and the Drip Tray
Cover with mild soap and water.
5. Mineral content in water varies from
place to place. Depending on the
mineral content of the water in your area,
calcium deposits or scale may build up
in your coffee maker. Scale is non-toxic,
but it can hinder the performance of your
coffee maker. De-scaling your coffee
maker helps maintain in good condition
the parts of the coffee maker that come in contact with water. To
clean/remove scaling from the inside of the coffee maker:
a. Fill the Water Tank with 360ml/12oz of a cleaning solution
composed of water and household scale remover (4 parts
water to 1 part scale remover). Then close the Lid Assembly,
Pic. 2
Pic. 3

13
place a cup or mug with capacity of at least 360ml/12oz on the
Drip Tray, and press the Power Button to descale the coffee
maker.
b. Once the brewing cycle is over, empty and rinse the cup or
mug. After nishing Step A, pour about 360ml/12oz of water
only into the Water Tank, and then press the Power Button
to start the rinsing process
c. Repeat Step B to remove any remaining unpleasant taste if
necessary.
6. Take care in cleaning the Plastic and Stainless Steel Piercing
Tips so that they do not break. Breakage of the Piercing Tips
will make the warranty null and void.
STORAGE
1. Store the coffee maker out of the reach of children.
2. The storage space should be clean and dry, away from direct
sunlight and any heat source.

14
TROUBLESHOOTING
1. Indicator light on the Power Button ashing rapidly
a. The temperature of the coffee maker may be too high. If the
coffee maker is hot or in use and this occurs, turn the
Power Button off until the coffee maker cools off (up to
2 minutes).
b. High temperature condition mentioned above may also
occur if less than 150ml/5oz of water is in the Water Tank.
Low water level may cause the water to not be
pumped out, and high temperature may result. Pour at least
150ml/5oz of water in the Water Tank and cool the coffee
maker (up to 2 minutes) before pressing the Power Button
again to resume brewing.
c. The indicator light will keep ashing fast until the coffee
maker cools down if the PowerButtonis on. Turn the Power
Button off until the coffee maker cools off (up to 2 minutes).
Then turn it back on to resume brewing.
d. If the coffee maker is cold after pressing the Power Button,
make sure that the Power Cord is plugged into an electrical
outlet. If the coffee maker remains cold after plugging it in,
DO NOT USE the coffee maker as this may indicate a
problem which may require technical assistance.

15
SERVICE/WARRANTY
1. If there are any questions or other issues which may arise when
using this coffee maker, please contact Mega Cocina® at
(305)883-5292, 2255 W. 11th Ave. Hialeah, FL 33010 USA.
2. This coffee maker has a 6-month warranty. Warranty DOES NOT
cover the following:
a. Improper use, such as improper installation or not using the
coffee maker according to the instructions.
b. Appliance has been disassembled.
c. Damage by natural causes.
d. Wear and tear under normal use.
e. Any damage or breakage to the Plastic or Stainless Steel
Piercing Tips.
3. Warranty is valid from the date of purchase with receipt.
Do not return to the store.
Return to
MegaCocina®
2255 W. 11th Ave.
Hialeah, FL 33010 USA.


TABLA DE CONTENIDO
PRECAUCIONES IMPORTANTES............................................... 19
INSTRUCCIONES ESPECIALES
DEL CORDÓN ELÉCTRICO......................................................... 21
ESPECIFICACIONES DEL PRODUCTO
Y DESCRIPCIÓN DE LA CAFETERA.....................................22-23
INTRODUCCIÓN........................................................................... 24
INSTRUCCIONES DE USO.....................................................24-25
LIMPIEZA Y MANTENIMIENTO ................................................... 26
ALMACENAMIENTO.................................................................... 27
SOLUCIÓN DE POSIBLES PROBLEMAS .................................. 28
SERVICIO/ GARANTĺA................................................................. 29


19
PRECAUCIONES IMPORTANTES
Cuando se utiliza cualquier producto eléctrico siempre se deben
seguir medidas de seguridad para evitar el riesgo de incendio,
descarga eléctrica y/o lesiones. Las medidas de seguridad incluyen
las siguientes:
1. LEA TODAS LAS INSTRUCCIONES ANTES DE UTILIZAR SU
ELECTRODOMÉSTICO.
2. NO toque las supercies calientes.
3. Para evitar choques eléctricos, NO sumerja el cable, el enchufe
o el aparato en agua u otro líquido.
4. Desenchufe el aparato cuando no lo esté usando o cuando lo
esté limpiando. Deje que se enfríe antes de limpiar.
5. NO opere ningún electrodoméstico con un cordón o enchufe
dañado, después de que el aparato haya fallado o si se cae al
suelo o se daña de cualquier otra manera.
6. El uso de accesorios no recomendados o vendidos por el
fabricante del aparato puede causar incendios, descargas
eléctricas o lesiones corporales.
7. NO utilice este aparato al aire libre o para propósitos comerciales.
8. NO permita que el cable cuelgue del borde de la mesa o
mostrador o que entre en contacto con supercies calientes.
9. NO coloque este aparato sobre o cerca de hornillas de estufas
de gas o eléctricas, ni dentro de un horno caliente.
10. ADVERTENCIA: Gire el botón de encender/apagar a la posición
“OFF”, antes de desconectar el enchufe del tomacorriente de
la pared.
11. NO utilice este aparato para otro propósito que no sea para el
que ha sido diseñado.

20
12. Siempre coloque la cafetera sobre una supercie dura y nivelada.
13. Asegúrese que el Ensamblaje de la Tapa esté en posición
cerrada antes de prender la cafetera.
14. Esta cafetera no está destinada para ser usada por niños o
personas con capacidades físicas, sensoriales o mentales
limitadas a menos que una persona responsable los supervise.
Los niños deberán estar bajo supervisión para asegurarse de
que no jueguen con el aparato.
15. ESTE APARATO HA SIDO DISEÑADO PARA USO DOMÉSTICO
Y PARA APLICACIONES SIMILARES DE 120V. No es para uso
comercial.
16. ANTES DEL PRIMER USO, cuele agua para limpiar el tanque.
17. Si la cafetera no ha sido usada por un período largo de tiempo,
limpie el tanque de agua antes de usar colando agua solamente.
PRECAUCIÓN: Hay una punta alada de plástico que perfora el
K-Cup® en la parte inferior del Ensamblaje de la Tapa. También
hay una punta alada de acero inoxidable en el Sujetador del
K-Cup®. Para evitar el riesgo de lesiones, NO ponga sus dedos
en la parte inferior del Ensamblaje de la Tapa o en el Sujetador
del K-Cup®. Cualquier rotura o daño a las puntas de plástico y
acero inoxidable anulará la garantía.
ADVERTENCIA: Para reducir el riesgo de incendio o descarga
eléctrica no remueva ninguna cubierta para dar servicio al producto.
Las reparaciones deben ser hechas solamente por el personal
autorizado. Si usted abre la cubierta para dar servicio al producto,
anulará la garantía.
ESTE ELECTRODOMÉSTICO ESTÁ DISEÑADO
SÓLO PARA USO DOMÉSTICO
This manual suits for next models
1
Table of contents
Languages:
Other Mega Cocina Coffee Maker manuals